Cremmaet Lungo Latte - Coffee machine CECOTEC - Free user manual and instructions
Find the device manual for free Cremmaet Lungo Latte CECOTEC in PDF.


User questions about Cremmaet Lungo Latte CECOTEC
0 question about this device. Answer the ones you know or ask your own.
Ask a new question about this device
Download the instructions for your Coffee machine in PDF format for free! Find your manual Cremmaet Lungo Latte - CECOTEC and take your electronic device back in hand. On this page are published all the documents necessary for the use of your device. Cremmaet Lungo Latte by CECOTEC.
USER MANUAL Cremmaet Lungo Latte CECOTEC
-
Parts and components 21
-
Before use 23
-
Operation 24
-
Troubleshooting 31
-
Cleaning and maintenance 32
-
Recycling of electrical and electronic equipment 34
-
Copyright 35
-
Simplified EU Declaration of Conformity 35
SOMMAIRE
EN • The coding in this manual is generic and applies to all code variants of the appliance.
- External drip tray
- Drip tray grid
- Internal drip tray
- Coffee grounds container
- Adjustable coffee spout
- Milk system tube
- Milk tank
- Milk container lid
- Control panel
- Grinding level knob
- Coffee bean hopper lid
- Water tank
- Brewing unit
- Side door
- Cleaning brush
- Power cord
Control panel
| Indicator light | Description | ||
| 1 |  | Power button | |
| 2 |  | Flashing: Low water level/lack of water tank | |
| 3 |  | Flashing: Lack of coffee beans | |
| 4 |  | It lights up stably: The coffee grounds container is full.Flashing: Missing internal drip tray/coffee grounds container | |
| 5 |  | It lights up steadily: Missing / incorrectly installed processing unitFlashing: Side door open / incorrectly installed | |
| 6 |  | It lights up steadily: Needs decalcificationFlashing: Decalcification in progress | |
| 7 |  | System emptying function in progress | |
| 8 |  | It lights up steadily: No milk deposit | |
| 8 |  | Coffee intensity touch icon | |
| 9 |  | Espresso icon | |
| 10 |  | Long Espresso touch icon | |
| 12 |  | Americano icon | |
 | Latte touch icon | ||
 | Cappuccino touch icon | ||
| 13 |  | Hot water touch icon | |
| 15 |  | Frothed Milk/Cleaning touch icon | |
| 16 |  | Double coffee quantity touch icon | |
| 17 |  | Touch icon quick cleaning/system cleaning | |
NOTE:
The graphics in this manual are schematic representations and may not exactly match the product.
2. BEFORE USE
- This appliance comes in a packaging designed to protect it during transport. Take the appliance out of its box and remove all packaging materials. You can keep the original box and other packaging materials in a safe place to prevent damage to the appliance if you need to transport it in the future. If you wish to dispose of the original packaging, make sure all items are recycled properly.
- Check that all parts and components are included and in good condition. If any of them are missing or damaged, please contact Cecotec's Official Technical Support Service immediately.
Box content
- Super-automatic coffee machine
- Instruction manual
- Do not remove the product's serial number in order to keep proper traceability if technical assistance is required.
3. OPERATION
Installation
- Remove protective films, stickers and other packaging materials from the device. (Fig. 2)
- Choose a safe and stable surface with an easily accessible power supply. Leave a minimum distance to the sides of the machine. (Fig. 3)
- Insert the outer drip tray into the machine until it is securely fastened. (Fig. 4).
- Fill the water tank with water (see "Filling the water tank"). (Fig. 5)
- Fill the container with coffee beans (see "Filling the coffee bean container"). (Fig. 6).
- Unwind and extend the power cord. Insert the plug into the socket located at the back of the machine, while the other end of the power cord to the wall socket with the correct voltage. (Fig. 7).
Note: Press the system cleaning touch icon ✦ (see "Manual rinsing") to clean the inside of the coffee machine before the first use.
Filling the water tank (Fig. 8)
When the ⚠ icon flashes, the water tank level is low and needs to be refilled.
- Lift the water tank using the lid as a handle.
- Rinse the water tank with fresh water.
- Fill the tank to the maximum level and put it back in the machine. Ensure it is properly installed.
NOTE: To avoid overflowing the water tank, do not add water directly into the appliance. (Fig. 9).
IMPORTANT: Never fill the water tank with warm water, hot water, carbonated water or other liquids that could damage the water tank and the machine.
Filling the coffee bean container
When Ⓐ flashes, it is necessary to fill the appliance with coffee beans:
- Remove the cover of the coffee bean container. (Fig. 10)
- Fill the bean container with coffee beans.
- Install the tank cover. (Fig. 11)
IMPORTANT: Fill the bean container with coffee beans only. Ground coffee, instant coffee, caramelized coffee or other objects can damage the machine.
Coffee preparation
- Press the power button to switch on the appliance ⏻. Make sure the drip tray is located under the coffee spout and the water tank has water in it. The appliance will perform an automatic rinse in the frother and then in the coffee spout.
- The device will go to the main screen (standby mode).
- Place a cup under the coffee spout and adjust the height of the spout to fit the cup. Depending on the size of the cup (too high or too wide), the drip tray can be removed or the position adjusted. (Fig. 12)
- Press the coffee strength touch icon Ⓐ to choose between mild, normal and strong flavor.
- Choose a coffee by pressing the touch icon Espresso 📄, Long 📋 or Americano 🌐.
- The light under the coffee spout will turn on, and the selected touch icon will illuminate indicating that the coffee maker is preparing the cup of coffee. You can stop the coffee by pressing the touch icon again.
- When the coffee maker returns to the main screen (standby mode).
NOTE: The Espresso touch icon 📋 has a higher coffee strength. The volume of all the above-mentioned types of coffee can be adjusted (see "Adjusting the coffee/hot water volume").
NOTE: Use the Quick Clean ✦ function to clean the inside of the brewer before the first use.
Preparation of two cups of coffee (Fig. 13)
- Press the power button to switch on the appliance Ⓞ. Make sure the drip tray is located under the coffee spout and the water tank has water in it. The appliance will perform an automatic rinse in the frother and then in the coffee spout.
- The device will go to the main screen (standby mode).
- Place two cups under the coffee spout and adjust the height of the spout to fit the cups. Depending on the size of the cups (too high or too wide), the drip tray can be removed or the position adjusted.
- Press the x2 touch icon. The touch icon Espresso 📋 and Largo 📋 will light up. Press the touch icon of your desired coffee.
- Press the coffee strength touch icon ⏻ to choose between mild, normal and strong flavor.
- The coffee type touch icon, the x2 touch icon and the coffee spout light illuminate to indicate that the appliance is preparing the two cups. Two cups of coffee will be dispensed.
- The preparation will stop automatically. If you wish to stop the coffee output during operation, press the touch icon of the coffee type again.
Assembling the automatic milk-frothing system
Install the milk frother on top of the milk tank. (Fig. 14)
NOTE: Clean the automatic milk-frothing system before first use.
Brewing Latte
- Fill the milk tank with milk and close the lid.
NOTE: Always use cold milk (approximately 5° C/ 41° F).
- Install the automatic milk frothing system on the machine as described in "Installing the automatic milk frothing system".
- Make sure that the drip tray located under the coffee spout and the water tank have water in them. The unit will perform an automatic rinse.
- Place a cup under the coffee spout.
- Press the coffee strength touch icon ⏻ to choose between mild, normal and strong flavor.
- Press the Latte touch icon
- The light under the coffee spout will turn on, and the selected touch icon will illuminate indicating that the coffee maker is preparing the cup of coffee. You can stop the coffee by pressing the touch icon again.
- Remove the milk container from the machine and place it in the refrigerator.
After use, refer to the chapter "Daily cleaning of the brewer" to clean the automatic milk frothing system and the milk tank.
WARNING: Steam and hot milk may come out of the nozzle when starting the milk frother.
Brewing Cappuccino
- Fill the milk tank with milk and close the lid.
NOTE: Always use cold milk (approximately 5° C/ 41° F).
- Install the automatic milk frothing system on the machine as described in "Installing the automatic milk frothing system".
- Make sure that the drip tray located under the coffee spout and the water tank have water in them. The unit will perform an automatic rinse.
- Place a cup under the coffee spout.
- Press the coffee strength touch icon ⏻ to choose between mild, normal and strong flavor.
- Press the Cappuccino touch icon
-
The light under the coffee spout will turn on, and the selected touch icon will illuminate indicating that the coffee maker is preparing the cup of coffee. You can stop the coffee by pressing the touch icon again.
-
Remove the milk container from the machine and place it in the refrigerator.
After use, refer to the chapter "Daily cleaning of the brewer" to clean the automatic milk frothing system and the milk tank.
WARNING: Steam and hot milk may come out of the nozzle when starting the milk frother.
Hot water preparation
- Place a cup under the coffee outlet.
- Press the hot water touch icon 📋. Both the Hot Water icon and the coffee spout light illuminate indicating that the appliance is heating water.
- The preparation will stop automatically. If you want to stop the hot water output during operation, press the Hot water touch icon 📋 again.
Preparing frothed milk
- Fill the milk tank with milk and close the lid.
NOTE: Always use cold milk (approximately 5° C/ 41° F).
- Install the automatic milk frothing system on the machine as described in "Installing the automatic milk frothing system".
- Make sure that the drip tray located under the coffee spout and the water tank have water in them. The unit will perform an automatic rinse.
- Place a cup under the coffee spout.
- Press the Frothed Milk/Cleaning touch icon once. The selected touch icon will illuminate indicating that the coffee maker is preparing frothed milk.
- The preparation will stop automatically.
- Remove the milk container from the machine and place it in the refrigerator.
- After use, refer to the chapter "Daily cleaning of the coffee maker" to clean the automatic milk frothing system and the milk container.
WARNING: When starting milk frothing, steam and hot milk may come out of the nozzle.
Daily cleaning of the coffee maker
Timely cleaning and maintenance of the coffee maker is essential to prolong its useful life.
Cleaning the drip tray and coffee grounds container (Fig. 15)
-
Empty and clean the drip tray every day.
-
Remove the external drip tray from the brewer. Empty the remaining water in the drip tray and rinse it with clean water. Dry it afterwards.
- Open the internal drip tray and the coffee grounds container. Empty the ground coffee grounds container and rinse it with clean water. Dry it afterwards.
- Replace the ground coffee grounds container in the internal drip tray.
- Fix the external drip tray in its original position.
NOTE: When 10 coffees have been made, the coffee grounds container full indicator will light up, indicating that the coffee grounds container needs to be emptied.
After removing the ground coffee grounds container for a few seconds, the icon will light up and the coffee count will start again, when 10 coffees are counted again, the alert will reappear.
Cleaning the brewing unit (Fig. 16)
- Press lightly on the side cover's bottom part to remove it.
- Remove the side door of the machine.
- Press the release button on the processing unit and pull it out. Rinse it under the faucet.
- Place the brewing unit in its position again.
- Place the side door on the machine.
NOTE: When the ⚠️ alert ’ lights up steadily, it indicates that the brewer is not installed correctly. When the alert icon ⚠️ flashes, it indicates that the service door is not installed correctly.
Cleaning the water tank
- Lift the water tank out of the machine and rinse it with clean water.
- Fill it with drinking water up to the maximum level. Replace it in the machine.
Cleaning the automatic milk-frothing system
Note: It is important to perform this step after an idle period of 30 minutes maximum after the preparation of your milk recipe to ensure that the automatic milk frother function is working properly.
- Remove the milk container from the machine. (Fig. 17)
- Empty the milk tank and wash it with fresh water.
- Remove the cap, then remove the milk tube from the milk tank. (Fig. 18)
- Disassemble the milk frother and clean it with clean water. You can use a cleaning brush to clean the plastic part to ensure that no milk residue remains. (Fig. 19)
- After cleaning and drying, mount the parts in the milk container. (Fig. 20)
- Make sure that the assembly is correct.
- Fill the milk container with fresh water. Disconnect the appliance. (Fig. 21)
-
Double-tap the Milk Frothed Milk touch icon 📋. Water from the milk tank will pass through the entire system.
-
Press the Milk Foamed touch icon 📋 again to stop cleaning.
NOTE:

icon flashes, it indicates that the milk tank is missing or incorrectly installed. The n continues to operate without a milk tank.
Cleaning of internal milk connection
It is important to perform this step within 10 minutes of preparing milk beverages to ensure that the automatic milk system is working properly.
- Press and hold the milk tank cleaning touch icon 📋.
- Water will run through the milk trough but not through the milk tank. The process will stop automatically.
Turning off the machine
Switch off the coffee machine by pressing the power button ⏻.
Automatic shut-off
The appliance is equipped with an automatic shut-off system. Depending on the mode you have selected, the unit will have different automatic switch-off times (see "Mode selection").
Menus and beverage customisation
- Adjustment of coffee/hot water volume
- The machine can memorize the desired volume of espresso, long, americano, latte, cappuccino and hot water.
- When brewing your coffee or dispensing hot water, press and hold the touch icon you wish to modify. The appliance will continue to brew the cup of coffee or hot water.
-
When the desired volume of coffee or hot water is reached, release the touch icon. Two beeps indicate that the coffee volume has been memorized.
-
Grind adjustment (Fig. 22)
-
You can adjust the grinder to choose different coffee roast levels by turning the bean container adjustment knob. The dots on the adjustment knob indicate the fineness of the grind.
- When the grinder is grinding the coffee beans, you can turn the adjustment knob to change the fineness.
WARNING: Never adjust the grinder adjustment knob when the grinder is not in operation. It could damage the grinder.
3. Mode selection
The machine has three different settings: factory setting, ECO mode and fast mode. In ECO mode, the coffee maker helps to save more energy while in fast mode, the coffee maker uses all its energy to provide greater performance.
| Quick mode | Factory settings | ECO mode | |
| Coffee outlet light | Yes | Yes | No |
| Pre-infusion | No | Yes | Yes |
| Automatic shut-off time | 30 min | 20 min | 10 min |
| Volume memory | Yes | Yes | Yes |
NOTE: The pre-infusion function moistens the ground beans in the brewer with a small amount of water prior to full extraction. This moistens the coffee grounds and improves the balance of flavors, especially in more intense espressos or origin coffees with more delicate profiles.
- When the coffee machine is in standby mode, press and hold the power button 📋 for 5 seconds.
- The touch icons will show the following indications according to the different settings:
| Long Espresso touch icon | Americano icon | Hot water touch icon | |
| Quick mode | Light ON | Flashing | Flashing |
| Factory settings | Flashing | Light ON | Flashing |
| ECO mode | Flashing | Flashing | Light ON |
-
Press the Long Espresso touch icon 📋 to activate the quick mode, the Americano touch icon 📋 to activate the factory setting and the Hot Water touch icon 📋 to activate the ECO mode. Two beeps indicate that the mode is being selected.
-
If you wish to keep the setting unchanged, press 📋 again or wait 5 seconds for the machine to return to standby mode.
4. TROUBLESHOOTING
| PROBLEM | CAUSE | SOLUTION |
| The appliance does not work. | The appliance is not connected to the mains. | - Plug it in and press the power button.- Check the cord and plug. |
| No response on several attempts to press the panel function buttons. | The device is subject to electromagnetic interference.Dirt on the panel. | - Unplug the appliance. Restart after a few minutes.- Wipe the panel with the damp cloth. |
| The coffee is not hot enough. | The cups have not been preheated. | - Rinse the appliance at least 3 times before brewing coffee. |
| Coffee does not come out of the coffee spout. | The system emptying function may have been used before. | - Press the Hot Water touch icon until water comes out of the outlet. |
| The first cup of coffee is of poor quality. | The grinder's first grind does not pour enough coffee into the brewing unit. | - Discard the coffee. Subsequent coffees will be of good quality. |
| Coffee has no cream. | Coffee beans are not fresh. | - Change or use the appropriate brand of coffee beans. |
| The touch icons have no sensitivity. | Touch icons are not pressed from the front of the device. | - Press the lower part of the touch icon from the front of the appliance. |
| The appliance takes too long to warm up. | Too much scale has accumulated. | - Descale the appliance. |
| The icon for lack of water / incorrectly positioned tank flashes. | Water tank incorrectly positioned.The water level in the tank is very low.The area near the water tank sensor is wet. | - Fill the water tank.- Clean the water around the water tank sensor. |
| The internal drip tray fills with a lot of water when making coffee. | The ground coffee is too fine and prevents the water from flowing out of the coffee spout. | - Adjust the coffee grind to a coarser level during grinder operation. |
| Coffee comes out too slowly. | The ground coffee is too fine and prevents the water from flowing out of the coffee spout. | - Adjust the coffee grind to a coarser level during grinder operation. |
| The bean out indicator blinks but coffee beans are still present. | The internal ground coffee outlet is blocked. | - Follow the steps described in “Cleaning the ground coffee outlet”. |
| The descaling indicator continues to flash even after the descaling process. | The decalcification process has not been completed. | - Be patient and wait for the process to finish. The machine will turn off automatically. Do not turn off the machine manually. |
| The milk isn’t frothed | The milk tube connector has not been cleaned for a long time. | - Follow the steps described in “Daily cleaning of the coffee maker” to clean the steamer. |
5. CLEANING AND MAINTENANCE
Descaling
When the Descaling indicator lights up permanently, it indicates that the coffee maker needs to be descaled. The coffee maker will be kept in the best conditions if this function is performed at least once a month or more regularly depending on the hardness of the water used.
- Add the cleaning product in the water tank.
- Fill the water tank with water up to the MAX level.
IMPORTANT: Do not use vinegar or other cleaning products that are not intended for descaling the coffee maker, as this could damage the appliance.
- Plug the device in.
- Place a large empty container under the coffee spout.
- In the main screen (standby mode), press and hold the system cleaning touch icon for 5 seconds. Two beeps will sound, the descaling icon 両 will light up and the system cleaning touch icon will flash.
- Press the system cleaning touch icon ✦ again to confirm the descaling process. To return to the main screen (standby mode) press the On/Off button Ⓗ.
- The descaling touch icon will flash and the system cleaning touch icon will light up to indicate that the unit is in the process of descaling.
WARNING: Use caution with hot water.
- When all the water has been drained from the water tank, the system cleaning touch icon ✦, the descaling touch icon 📋 and the no water touch icon △ will flash. Fill the tank with tap water up to the MAX level. When the water tank is full, the water shortage touch icon △ will turn off. The device will continue the decalcification process.
- Once the descaling process has been completed, the descaling touch icon will go out and the unit will automatically switch off.
System-emptying function
It is recommended that the system drain function be performed before storing the coffee maker.
- In the main screen (standby mode), press and hold the On/Off and American button for 5 seconds.
- The □ icon will then flash.
- Remove the water tank from the appliance. The coffee spout will dispense a small amount of water.
- Once the system emptying function has been completed, the coffee maker will automatically turn off.
IMPORTANT: After performing the system drain function, when using the machine again, press the hot water or cleaning touch icon until water flows out of the frother and the coffee spout.
Manual rinsing
You can perform a manual rinse cycle to clean the coffee spout after each use, or after the appliance has not been used for a long period of time.
- In the main screen (standby mode), press the system cleaning touch icon ✦ once.
- The system cleaning touch icon ✦ will flash. The coffee spout will dispense a small amount of water.
WARNING: Hot water will flow out of the coffee spout into the external drip tray.
- After rinsing, the machine will return to standby mode.
Cleaning of the coffee maker
- Unplug the cord from the power supply.
- Empty all water from the inner and outer drip pans.
- Use a damp cloth or a non-abrasive cleaning agent to clean water stains from the appliance.
IMPORTANT: Never use abrasive products, vinegar or descaling agents not included in the box to clean the appliance.
Cleaning the ground-coffee outlet
Ground coffee may adhere to the wall of the coffee outlet of the appliance after prolonged use. It is recommended to clean the outlet following these steps to ensure that the ground coffee can reach the coffee maker.
- Push the recessed area of the service door. (Fig. 23)
- Remove the service door. (Fig. 24)
- Press the release button on the brewer. (Fig. 25)
- Remove the coffee machine. (Fig. 26)
- Rinse the coffee maker under running water. Allow it to dry completely before reassembling it in the machine. (Fig. 27)
- Use the cleaning brush to clean the dust outlet and remove coffee grounds or dust residue from the machine. (Fig. 28)
- Use a cloth to thoroughly clean the inside of the machine. Allow to dry completely before closing the side door. (Fig. 29)
7. RECYCLING OF ELECTRICAL AND ELECTRONIC EQUIPMENT

This symbol indicates that, according to the applicable regulations, the product and/or battery must be disposed of separately from household waste. When this product reaches the end of its shelf life, you should dispose of the batteries/accumulators and take them to a collection point designated by the local authorities.
For detailed information on how to properly dispose of electrical and electronic equipment and/or the corresponding batteries, consumers should contact their local authorities.
Compliance with the above guidelines will help protecting the environment.
8. COPYRIGHT
The intellectual property rights over the texts in this manual belong to CECOTEC INNOVACIONES, S.L. All rights reserved. The content of this publication may not, either in part or in its entirety, be reproduced, stored in a retrieval system, transmitted or distributed by any means (electronic, mechanical, photocopying, recording or similar) without prior authorisation from CECOTEC INNOVACIONES, S.L.
9. SIMPLIFIED EU DECLARATION OF CONFORMITY
CE Cecotec Innovaciones hereby declares that this product complies with the essential requirements and other relevant provisions of the regulations applicable in the European Union. This product has been designed, manufactured and tested in compliance with the required safety and quality standards. The full text of the EU Declaration of Conformity can be found on the following website: https://cecotec.es/es/information/declaration-of-conformity
1. PIÈCES ET COMPOSANTS
Image 1
4. PROBLEEMOPLOSSING
| PROBLEEM | OORZAAK | OPLOSSING |
https://cecotec.es/es/information/declaration-of-conformity

Fig./Img./Abb./Afb./Rys.1

Fig./Img./Abb./Afb./Rys. 2

Fig./Img./Abb./Afb./Rys. 3
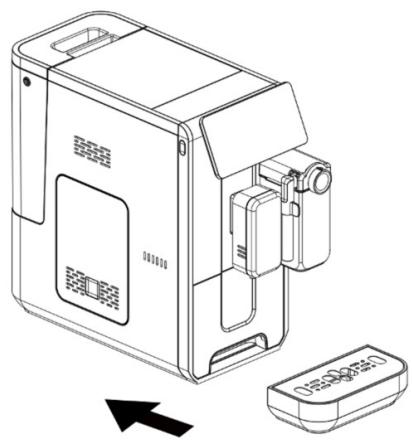
Fig./Img./Abb./Afb./Rys. 4

Fig./Img./Abb./Afb./Rys. 5
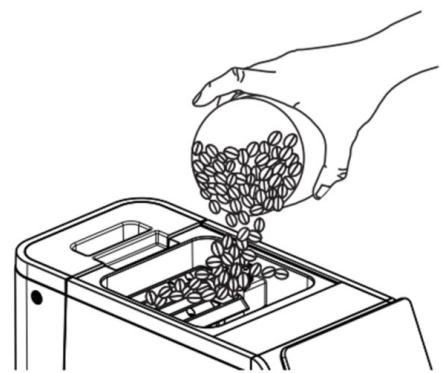
Fig./Img./Abb./Afb./Rys. 6
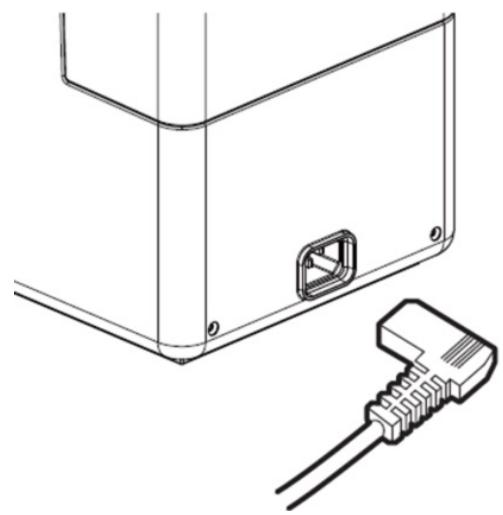
Fig./Img./Abb./Afb./Rys. 7
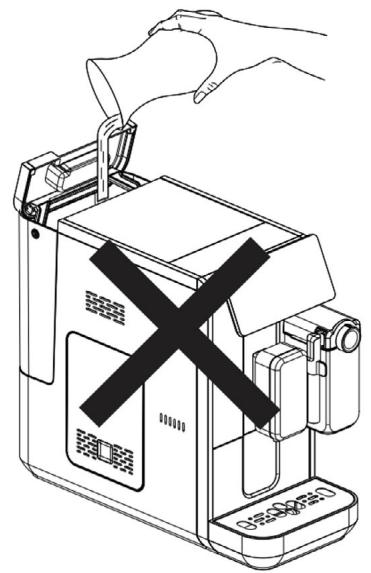
Fig./Img./Abb./Afb./Rys. 9
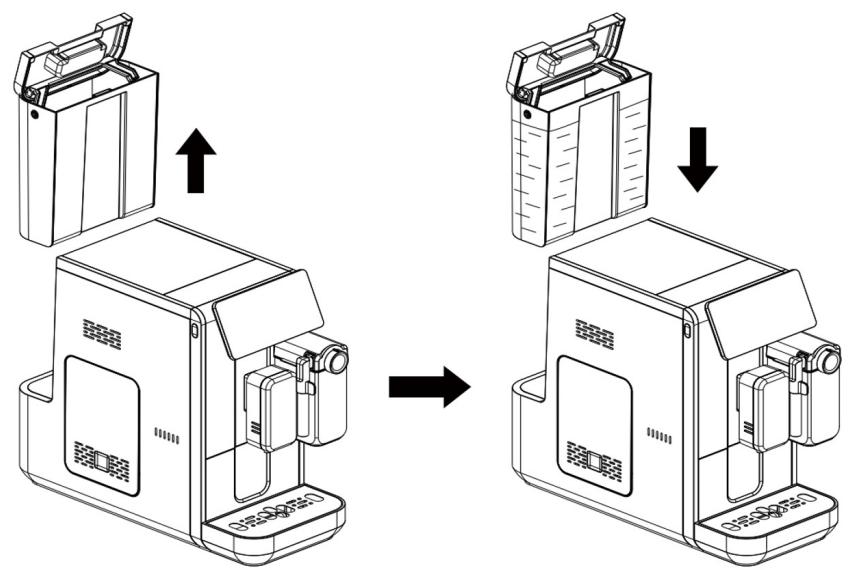
Fig./Img./Abb./Afb./Rys. 8
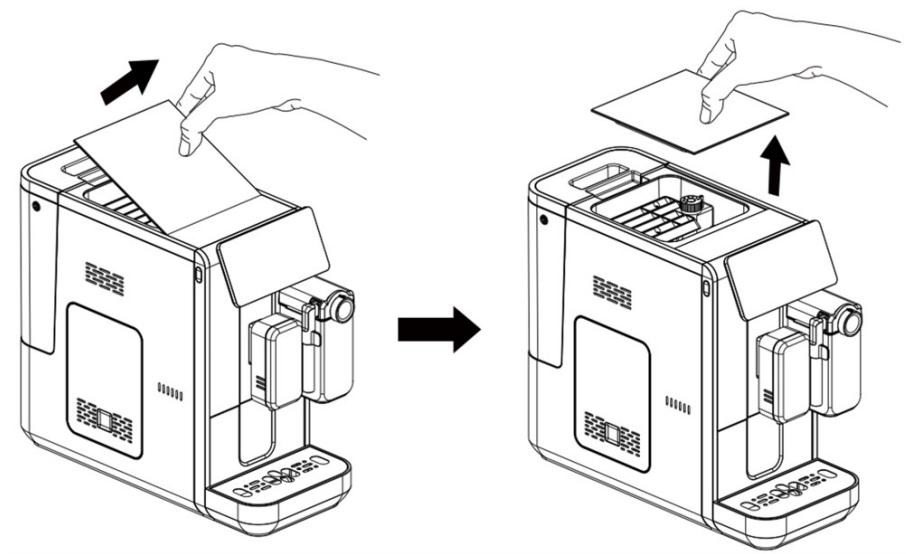
Fig./Img./Abb./Afb./Rys. 10

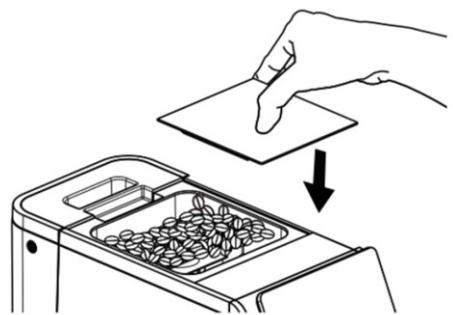
Fig./Img./Abb./Afb./Rys. 11

Fig./Img./Abb./Afb./Rys. 13
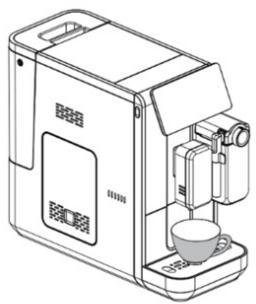

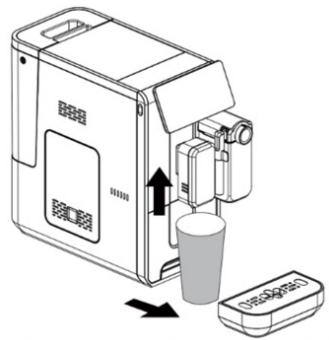

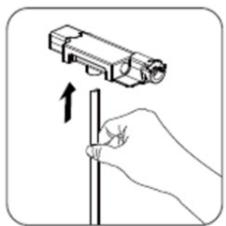


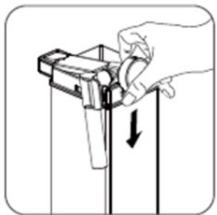

Fig./Img./Abb./Afb./Rys. 12
Fig./Img./Abb./Afb./Rys. 14

Fig./Img./Abb./Afb./ Rys. 15

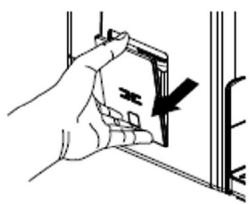

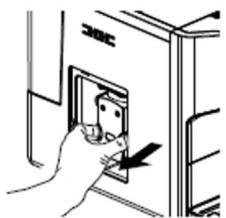
Fig./Img./Abb./Afb./Rys. 16
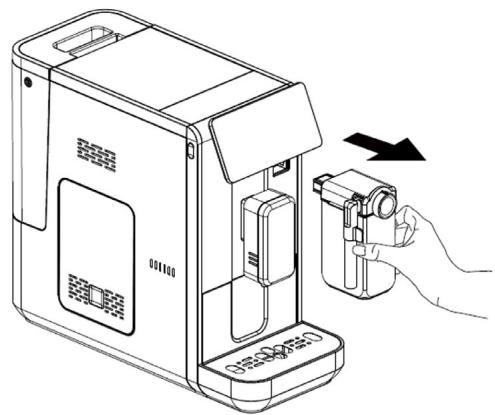
Fig./Img./Abb./Afb./Rys. 17

Fig./Img./Abb./Afb./Rys. 18
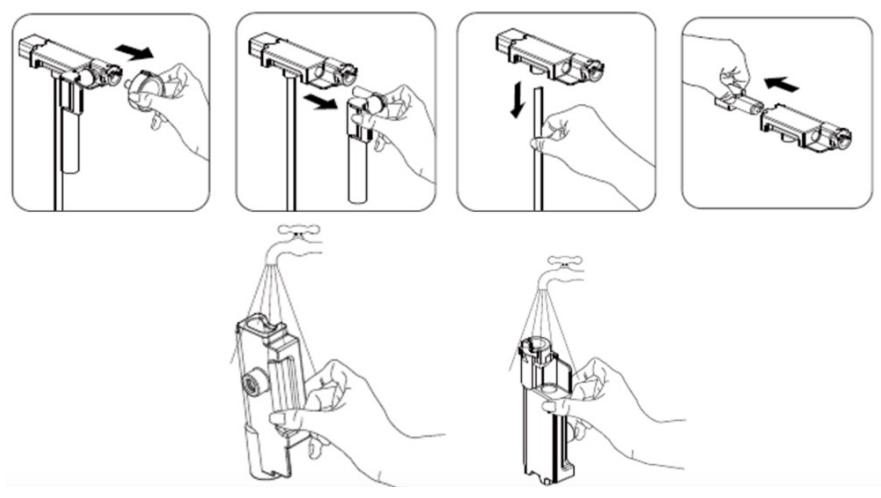
Fig./Img./Abb./Afb./Rys. 19

Fig./Img./Abb./Afb./Rys. 21
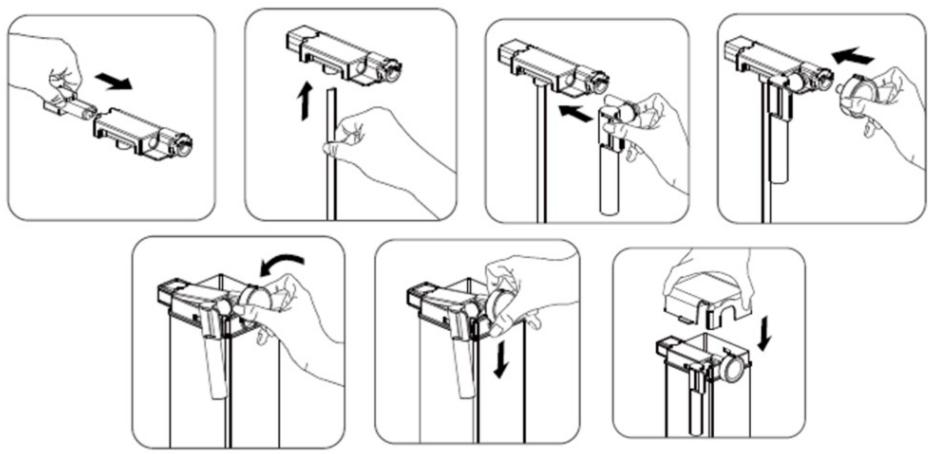
Fig./Img./Abb./Afb./Rys. 20
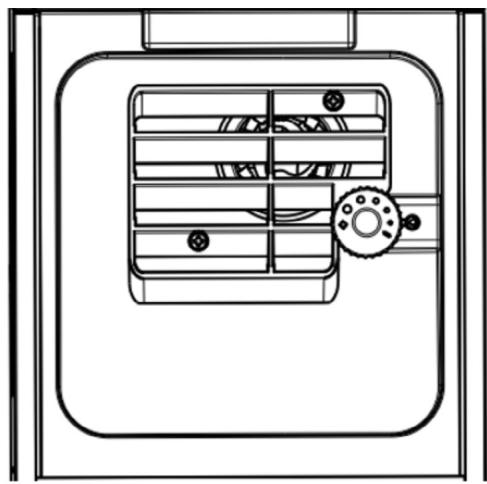
Fig./Img./Abb./Afb./Rys. 22
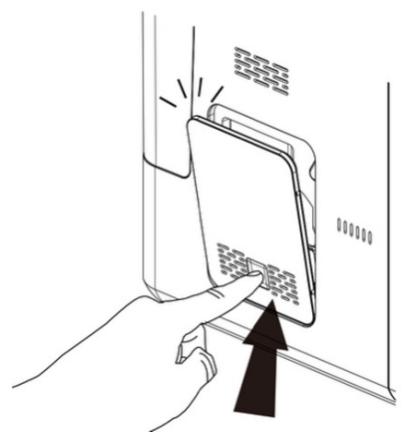
Fig./Img./Abb./Afb./Rys. 23
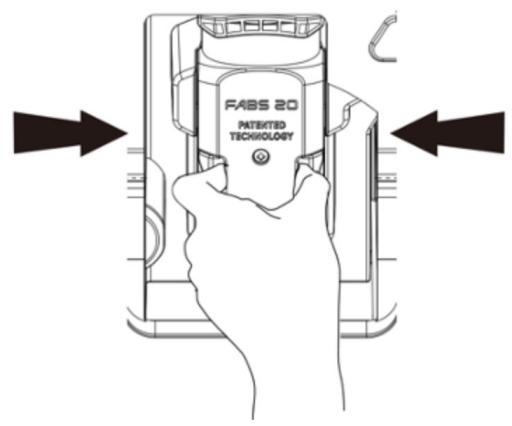
Fig./Img./Abb./Afb./Rys. 25

Fig./Img./Abb./Afb./Rys. 24

Fig./Img./Abb./Afb./Rys. 26

Fig./Img./Abb./Afb./Rys. 27
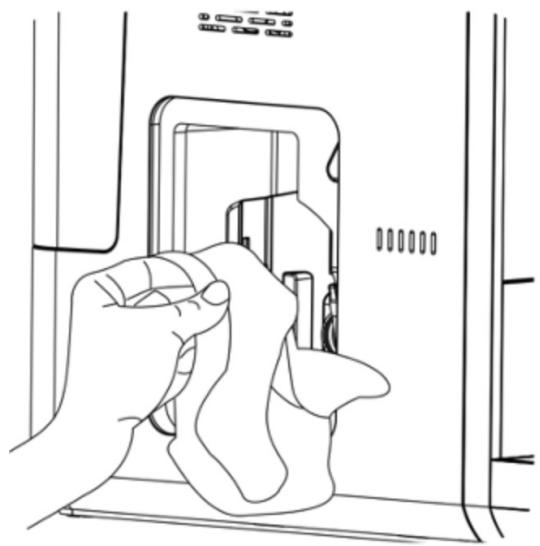
Fig./Img./Abb./Afb./ Rys. 29

Fig./Img./Abb./Afb./Rys. 28
www.cecotec.es
- SOMMAIRE
- BEFORE USE
- BOX CONTENT
- OPERATION
- INSTALLATION
- FILLING THE WATER TANK (FIG. 8)
- FILLING THE COFFEE BEAN CONTAINER
- COFFEE PREPARATION
- PREPARATION OF TWO CUPS OF COFFEE (FIG. 13)
- ASSEMBLING THE AUTOMATIC MILK-FROTHING SYSTEM
- BREWING LATTE
- BREWING CAPPUCCINO
- HOT WATER PREPARATION
- PREPARING FROTHED MILK
- DAILY CLEANING OF THE COFFEE MAKER
- CLEANING THE BREWING UNIT (FIG. 16)
- CLEANING THE WATER TANK
- CLEANING THE AUTOMATIC MILK-FROTHING SYSTEM
- CLEANING OF INTERNAL MILK CONNECTION
- TURNING OFF THE MACHINE
- AUTOMATIC SHUT-OFF
- MENUS AND BEVERAGE CUSTOMISATION
- MODE SELECTION
- TROUBLESHOOTING
- CLEANING AND MAINTENANCE
- DESCALING
- SYSTEM-EMPTYING FUNCTION
- MANUAL RINSING
- CLEANING OF THE COFFEE MAKER
- CLEANING THE GROUND-COFFEE OUTLET
- RECYCLING OF ELECTRICAL AND ELECTRONIC EQUIPMENT
- COPYRIGHT
- SIMPLIFIED EU DECLARATION OF CONFORMITY
- PIÈCES ET COMPOSANTS
- IMAGE 1
- PROBLEEMOPLOSSING
Brand : CECOTEC
Model : Cremmaet Lungo Latte
Category : Coffee machine