Cremmaet Cube A92 Eu01 119704 - Coffee machine CECOTEC - Free user manual and instructions
Find the device manual for free Cremmaet Cube A92 Eu01 119704 CECOTEC in PDF.


| Product type | Espresso coffee machine with milk frother |
| Brand | Cecotec |
| Model | Cremmaet Cube A92 Eu01 119704 |
| Dimensions (L × H × D) | 33 × 28 × 23 cm |
| Weight | 4.1 kg |
| Power supply | 220-240 V ~ 50 Hz, 1100 W |
| Water tank capacity | 1.5 L |
| Maximum pressure | 15 bars |
| Functions | Espresso, ristretto, cappuccino, latte macchiato |
| Integrated milk frother | Yes (panarello) |
| Steam wand | Yes |
| Portafilter | Double (for 1 or 2 cups) |
| Removable water tank | Yes |
| Removable drip tray | Yes |
| Included coffee filters | 2 (1 cup and 2 cups) |
| Care and cleaning | Washable removable parts with warm soapy water; regular descaling |
| Safety | Automatic shut-off, overheating protection, steam lock |
| Spare parts and repairability | Available from Cecotec customer service |
| General information | Household use only; do not leave children unsupervised |
| Box contents | Machine, portafilter, filters, dosing spoon, tamper, manual |
Frequently Asked Questions - Cremmaet Cube A92 Eu01 119704 CECOTEC
User questions about Cremmaet Cube A92 Eu01 119704 CECOTEC
0 question about this device. Answer the ones you know or ask your own.
Ask a new question about this device
Download the instructions for your Coffee machine in PDF format for free! Find your manual Cremmaet Cube A92 Eu01 119704 - CECOTEC and take your electronic device back in hand. On this page are published all the documents necessary for the use of your device. Cremmaet Cube A92 Eu01 119704 by CECOTEC.
USER MANUAL Cremmaet Cube A92 Eu01 119704 CECOTEC
Safety instructions 8
-
Parts and components 40
-
Before use 40
-
Product installation 41
-
Operation 41
-
Cleaning and maintenance 45
-
Troubleshooting 47
-
Technical specifications 48
-
Disposal of old electrical and electronic appliances 49
-
Technical support and warranty 49
-
Copyright 49
-
Simplified EU Declaration of Conformity 49
SOMMAIRE
Read these instructions thoroughly before using the appliance. Keep this instruction manual for future reference or new users.
- The appliance can be used by people with reduced physical, sensory, or mental capabilities or lack of experience and knowledge if they have been given supervision or instruction concerning use of the appliance in a safe way and understand the hazards involved.
- The appliance is not intended to be used by children. Keep the appliance and its power cable out of the reach of children.
- Cleaning and maintenance tasks should not be carried out by children.
- Children must not play with the appliance.
- Check the power cable regularly for visible damage. If the power cord is damaged, it must be replaced by Cecotec's official Technical Support Service or similar qualified personnel to avoid risks.
- This appliance is designed for domestic use only and is not intended for bars, restaurants, farmhouses, hotels, motels, and offices.
- Do not immerse the cable, plug, or any other part of the appliance in water or any other liquid or expose electrical connections to water. Make sure your hands are dry before handling the plug or switching on the appliance.
- WARNING: the filling opening must not be opened during operation.
- WARNING: care must be taken to avoid spillage of liquids on the cable.
-
Warning: incorrect or improper use can be dangerous for the user and damage the appliance. Use the appliance only for the purposes described in this manual. The surface of the heating element is subject to residual heat after use.
-
Always disconnect the appliance from the power supply if it is left unattended and before assembly, disassembly, or cleaning.
- It is your responsibility to make sure every user is informed about the warnings and precautions stated in this instruction manual. Do not use the appliance for any use other than the one specified in this manual.
- Make sure that the mains voltage matches the voltage stated on the rating label of the appliance and that the wall outlet is earthed.
- Disconnect the appliance from the mains in any of the following circumstances:
A Before filling up the water tank.
B Before removing or installing any of the appliance's parts.
C Before cleaning or maintenance.
D When the appliance is not working properly.
E After using the appliance.
- Empty the water tank when the appliance is not going to be used for some time.
- Make sure the appliance has cooled down completely before removing or installing parts and before cleaning it.
- Always use cold water. The use of hot water or other liquids may damage the appliance.
- Use the grinder to grind only coffee beans.
- Do not use caramelised or frozen coffee beans. This appliance can only be used with natural coffee beans.
- Never leave the appliance unattended when it is connected to a mains power supply.
-
Do not let the cable protrude over the edge of the table or worktop or come into contact with hot surfaces or sharp edges.
-
Place the appliance on a flat, stable surface. Do not use or place the appliance on a hot or damp surface.
- Do not use the appliance if the drip tray is not properly positioned.
- Do not use the appliance if any of its parts are damaged or if the appliance is not working properly.
WARNING: this appliance has undergone a quality control before its commercialisation with the aim of ensuring its correct operation. After the quality control testing, the appliance is cleaned thoroughly, therefore, although it is unlikely to occur, there could be rests of water or coffee
INSTRUCTIONS DE SÉCURITÉ
- External drip tray
- Drip tray grid
- Internal drip tray
- Coffee grounds container
- Coffee brewing unit
- Coffee spout
- Control panel
- Coffee bean container lid
- Water tank
- Coffee bean container
- Power cord
- Cleaning brush
NOTE:
The graphics in this manual are schematic representations and may not exactly match the product.
2. BEFORE USE
- This appliance is packaged in a way as to protect it during transport. Take the appliance out of its box and remove all packaging materials. You can keep the original box and other packaging elements in a safe place to prevent damage to the appliance if you need to transport it in the future. If you wish to dispose of the original packaging, make sure all packaging materials are recycled accordingly.
- Make sure all parts and components are included and in good conditions. If there is any piece missing or in bad conditions, contact the official Cecotec Technical Support Service immediately.
- Do not remove the serial number of the appliance in order to keep a correct traceability of it in case of assistance.
Box content
- Superautomatic coffee machine
- Cleaning brush
- Descaling cleaning agent
- Instruction manual
3. PRODUCT INSTALLATION
- Remove protective plastics, stickers, and any other packaging material from the appliance.
- Place the appliance on a stable surface close to a power socket. In addition, make sure to leave some free space on the sides of the coffee machine as shown in Figure 2.
- Insert the external drip tray. Make sure it is properly positioned. Fig. 3
- Fill up the water tank.
- Fill the coffee bean container.
- Unwind the power cord and insert the plug into a socket with the appropriate voltage.
4. OPERATION
Filling up the water tank
- When the ⚙️ indicator light flashes, fill the water tank.
- To do this, lift up the tank. You can use the lid as a handle. Fig. 4
- Fill it up to the "MAX" mark and put it back in place. Make sure it is properly positioned.
- Press the 🔒 touch icon until hot water comes out. Then, the coffee machine will enter standby mode.
Note: To fill the water tank, remove it from the coffee machine. Do not fill it while it is in place. Fig. 5
Warning: Never fill up the tank with hot water, lukewarm water, carbonated water, or any other liquid that could damage the tank or the coffee machine.
Filling the coffee bean container
Fig. 6
When the 📞 indicator flashes, it means that the coffee bean container is empty. To fill it, follow the steps below:
- Remove the container lid.
- Fill it with coffee beans.
- Replace the lid.
Warning: Fill the container only with coffee beans. Do not use any other type of coffee; doing so could damage the coffee machine.
Control panel
 | If this indicator flashes, it means that the water tank is empty. |
 | If this indicator flashes, it means that the coffee bean container is empty. |
 | If this indicator lights up and remains steady, it means that the coffee grounds container is full.If this indicator flashes, it means that the drip tray or coffee grounds container is not properly positioned. |
 | If this indicator remains steady, it means that the coffee brewing unit is not properly positioned. |
 | If this indicator remains steady, it means that the coffee machine needs descaling. If this indicator flashes, it means that the descaling process is running. |
 | Power button |
 | Espresso touch icon |
 | Long espresso touch icon |
 | Hot water touch icon |
Brewing coffee
- Press the power button to switch on the coffee machine. Make sure the drip tray is positioned under the coffee spout and there is water in the corresponding tank.
- The coffee machine will then perform an automatic rinse cycle and dispense a small amount of water (equivalent to a small cup). If desired, you can stop this process by pressing the hot water touch icon. Afterwards, the appliance will enter standby mode.
- Place a glass or cup under the coffee spout and adjust its height depending on the container to be used. If the container is too large, you can remove the drip tray or adjust its position as shown in the figure.
- Depending on the amount of coffee you want, press either the espresso or long espresso touch icon.
-
The coffee icon you press will light up, indicating that the appliance is preparing the coffee. If you want to stop the coffee flow, press the same icon again.
-
Once the appliance goes back to standby mode, the coffee will be ready for drinking.
Note:
- If you press the espresso touch icon, you will get a drink with higher coffee concentration. The values for both types of coffee can be adjusted.
- Press the hot water touch icon to clean the inside of the coffee machine before first use.
Dispensing hot water
- Place a container under the coffee spout.
- Press the hot water touch icon. This will light up and the coffee machine will begin dispensing hot water. If you want to stop this process, press the same touch icon again.
- Once the appliance goes back to standby mode, hot water will be ready to dispense.
Switching off the coffee machine
Press the power button to switch off the coffee machine.
Automatic shut-off
This coffee machine features an automatic shut-off system. The automatic shut-off time will vary depending on the selected operating mode.
Adjusting values
Adjusting the amount of coffee/hot water
The coffee machine can memorise the desired amount of coffee (both types) and hot water.
- When brewing coffee or dispensing hot water, press and hold the touch icon of the selected option. The coffee machine will continue dispensing the chosen drink.
- When the amount of drink corresponds to the desired quantity, release the touch icon. The coffee machine will beep twice, indicating that the drink quantity has been saved.
Note: If you want to reset the dispensed amount of coffee or hot water, press and hold the power button for 5 seconds when the internal drip tray is open, and the coffee machine is switched off. After this time, the appliance will beep twice to indicate that the factory setting has been restored.
Adjusting the grinding level
You can adjust the grinder to adapt it to the coffee's roast by turning the adjustment knob in the coffee bean container. The dots on the knob indicate the grinding level. Fig. 7
When the grinder is grinding the beans, you can turn the adjustment knob to modify the level.
Warning: Do not adjust the grinder when it is not running, otherwise it could be damaged.
Selecting the desired mode
The coffee machine has 3 different settings:
ENGLISH
- Default
- ECO
- Quick
Note:
- In ECO mode, the coffee machine will save more energy.
- In Quick mode, you can brew coffee faster than in Default mode.
| Quick mode | Default mode | ECO mode | |
| Icon illumination | Yes | Yes | No |
| Preheating* | No | Yes | Yes |
| Automatic shut-off time | 30 min | 20 min | 10 min |
| Drink quantity memory | Yes | Yes | Yes |
Note: The preheating function moistens the ground beans with a small amount of water before fully extracting the coffee. This causes the coffee to expand to create greater pressure in the appliance. This way, all coffee oils are extracted more easily, which significantly improves the drink's flavour.
- When the coffee machine is in standby mode, press and hold the power button for 5 seconds.
- At this time, the button will flash. The status of the different touch icons will depend on the selected mode:
| Hot water touch icon | Espresso touch icon | Long espresso touch icon (access) | |
| In ECO mode | Light steadily on | Flashing | Flashing |
| In Quick mode | Flashing | Light steadily on | Flashing |
| In Default mode | Flashing | Flashing | Light steadily on |
- Press the hot water touch icon to enter ECO mode, the espresso icon for Quick mode, and the long espresso icon for Default mode.
- The coffee machine will beep twice to indicate that you have selected one of the above modes.
Note: If you press a touch icon that is not flashing, the coffee machine will not respond.
- If you do not want to modify the mode, press the power button again and wait 5 seconds for the appliance to return to standby mode.
5. CLEANING AND MAINTENANCE
Daily cleaning
To extend the coffee machine's useful life, clean it regularly. To do so, follow the steps below:
- Remove the external drip tray. Fig. 8
- Empty the water from the drip tray and wash it. Then, dry it thoroughly.
- Slide out the internal drip tray and the coffee grounds container. Fig. 9
- Empty the coffee grounds container and clean it with drinking water. Then dry it.
Note: When the indicator lights up, the coffee grounds container must be emptied.
-
Gently press the sides to release the coffee brewing unit. Fig. 10
-
Remove the unit. Fig. 11
-
Wash it with drinking water. Then dry it. Fig. 12
-
Finally, place it back to its original position and close the lid.
Note: If the ⚠️ indicator lights up and remains steady, it means that the unit is not properly positioned.
- Place the coffee grounds container in the internal drip tray and then put both parts in their original position. Fig. 13
Note: If the indicator flashes, it means the coffee grounds container is not in place.
- Place the exterior drip tray back in its original position. Fig. 14
When the indicator flashes, it means you need to perform a descaling process. This process should be performed at least once a month to ensure optimal coffee machine operation. If the water hardness in your area is high, you should do it more frequently.
To descale the coffee machine, follow these steps:
- Fill the water tank to the "MAX" level.
- Add the descaling product in the water tank.
Warning: Do not use vinegar or any other cleaning product to descale the coffee machine; doing so could damage it.
-
Connect the coffee machine to the power socket.
-
Then place a large empty container under the coffee spout.
-
When the coffee machine is in standby mode, press and hold the power button and the espresso touch icon 📋 for 5 seconds. At this point, the coffee machine will beep twice and the espresso touch icon 📋 will flash.
-
Press this touch icon to confirm that you want to start the descaling process. To return to standby mode, press the power button.
Note: When the descaling process is running, the indicator will flash.
Warning: Avoid contact with hot water.
ENGLISH
- When there is no water left in the tank, the indicator and the espresso touch icon will flash. In addition, the hot water icon will be lit. Remove the remaining solution from the water tank and fill it again with tap water up to the "MAX" mark. After this step, press the espresso touch icon again. At this point, the coffee machine will resume the descaling process.
- When this is complete, the machine will turn off automatically.
Note: The descaling process takes some time. The coffee machine will automatically turn off when it has finished.
Internal system cleaning
It is recommended to activate the cleaning of the internal system before storing the coffee machine. To do so, follow the steps below:
- When the coffee machine is in standby mode, press and hold the power button and the long espresso touch icon 📋 for 5 seconds.
- At this time, the hot water icon will flash to indicate that the internal system cleaning is activated. If you press these two controls again before removing the water tank, the coffee machine will enter standby mode.
- When the cleaning process is completed, the coffee machine will automatically turn off when it has finished.
Warning: When using the coffee machine again (after cleaning the internal system), press the hot water touch icon until the appliance dispenses water.
Cleaning the coffee spout
It is recommended to clean the coffee spout after use or if the appliance has not been used for a long time.
- When the coffee machine is in standby mode, press and hold the power button and the hot water touch icon for 5 seconds.
- At this time, the hot water icon will flash to indicate that cleaning is activated. The coffee spout will then dispense a small amount of water.
Warning: Hot water will be dispensed from the coffee spout to the external drip tray. Avoid contact with hot water.
- After cleaning, the coffee machine will return to standby mode.
Cleaning
- Unplug the cord from the power supply.
-
Discard the drip-tray water.
-
Use a damp cloth or a non-abrasive cleaning product to clean water stains from the appliance.
Warning: Do not use any abrasive cleaning agents to clean the appliance.
Cleaning the coffee brewing unit
To clean this unit, follow the steps below:
- Remove the external drip tray. Fig. 15
- Slide out the internal drip tray and the coffee grounds container. Fig. 16
- Press both sides of the coffee brewing unit. Fig. 17
- Remove the unit. Fig. 18
- Rinse the unit with tap water. Allow it to dry completely before reinstalling. Fig. 19
- Use a brush to clean the ground coffee spout. Fig. 20
- Use a cloth to thoroughly clean the inside of the coffee machine. Make sure it is completely clean before replacing the internal drip tray and coffee grounds container. Fig. 21
6. TROUBLESHOOTING
| Problem | Cause | Solution |
| The coffee machine does not work properly. | The coffee machine is not connected to the mains socket. | Connect the charger and switch on the appliance.Check the power cord and plug. |
| The touch icons do not respond or are delayed. | - The coffee machine is subject to electromagnetic interference.The control panel is dirty. | - Disconnect the coffee machine from the mains.Restart the coffee machine after a few minutes.- Clean the control panel with a cloth. |
| Coffee is not hot enough. | - You have not preheated the cup or glass.The coffee brewing unit is too cold. | - Heat the cup or glass.- Perform a cleaning process of the internal system before brewing coffee. |
| Coffee does not come out. | The last time the coffee machine was used, a cleaning process of the internal system may have been performed. | Press the hot water touch icon until the coffee machine dispenses water. |
| The coffee quality is bad. | The first time, the grinder does not pour enough coffee into the brewing unit. | Discard the coffee. The following coffees will be of good quality. |
| The coffee has no foam. | The coffee beans are not fresh. | Change the brand of coffee beans. |
| The coffee machine takes too long to heat up. | Too much scale has accumulated. | Descale the appliance. |
| The interior drip tray has a lot of water in it. | There's too-fine ground coffee blocking the water spout. | Adjust the coffee grind level to a coarser level while operating the grinder. |
| The coffee is dispensed too slowly. | There's too-fine ground coffee blocking the water spout. | Adjust the coffee grind level to a coarser level while operating the grinder. |
| The [4650] indicator flashes, but there are still coffee beans in the tank. | The interior ground-coffee outlet is blocked. | To clean this part, follow the steps in the “Cleaning and maintenance” section. |
| The [7600] indicator continues to flash, even though the descaling process has been completed. | The process has not been completed. | To perform a descaling process, follow the steps outlined in this manual. The coffee machine will automatically turn off when it has finished. |
7. TECHNICAL SPECIFICATIONS
Product reference: EU01_119704
Product: Cremmaet Cube
Power: 1150-1350 W
Voltage: 220-240 V
Frequency: 50-60 Hz
Technical specifications may change without prior notification to improve product quality.
Made in China | Designed in Spain
8. DISPOSAL OF OLD ELECTRICAL AND ELECTRONIC APPLIANCES
This symbol indicates that, according to the applicable regulations, the appliance and/or batteries must be disposed of separately from household waste. When this product reaches the end of its shelf life, you should dispose of the cells/batteries/accumulators and take them to a collection point designated by the local authorities.
For detailed information on how to properly dispose of electrical and electronic appliances and/or batteries, consumers should contact their local authorities. Compliance with the above guidelines will help protecting the environment.
9. TECHNICAL SUPPORT AND WARRANTY
Cecotec shall be liable to the end user or consumer for any lack of conformity that exists at the time of delivery of the product under the terms, conditions and deadlines established by the applicable regulations.
Repairs should be carried out by qualified personnel.
If at any moment you detect any problem with your product or have any doubt, do not hesitate to contact Cecotec's official Technical Support Service at +34 96 321 07 28.
10. COPYRIGHT
The intellectual property rights over the texts in this manual belong to CECOTEC INNOVACIONES, S.L. All rights reserved. The contents of this publication may not, in whole or in part, be reproduced, stored in a retrieval system, transmitted, or distributed by any means (electronic, mechanical, photocopying, recording or similar) without the prior authorization of CECOTEC INNOVACIONES, S.L.
11. SIMPLIFIED EU DECLARATION OF CONFORMITY
CE Cecotec Innovaciones hereby declares that this appliance complies with the essential requirements and other relevant provisions of the regulations applicable in the European Union. This appliance has been designed, manufactured and tested to meet the required safety and quality standards. The full text of the EU Declaration of Conformity can be found on the following website:https://cecotec.es/es/information/declaration-of-conformity
FRANÇAIS
1. PIÈCES ET COMPOSANTS
Image 1
3. INSTALLATION DU PRODUIT
Fig./Img./Abb./Afb./Rys.1
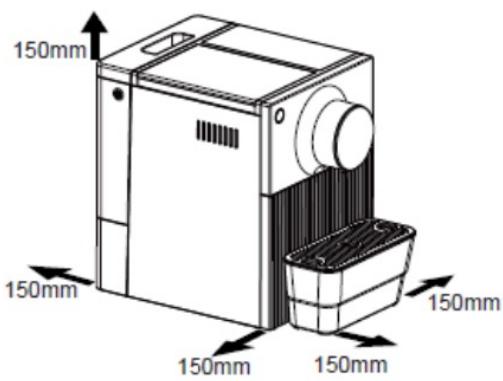
Fig./Img./Abb./Afb./Rys. 2

Fig./Img./Abb./Afb./ Rys. 3
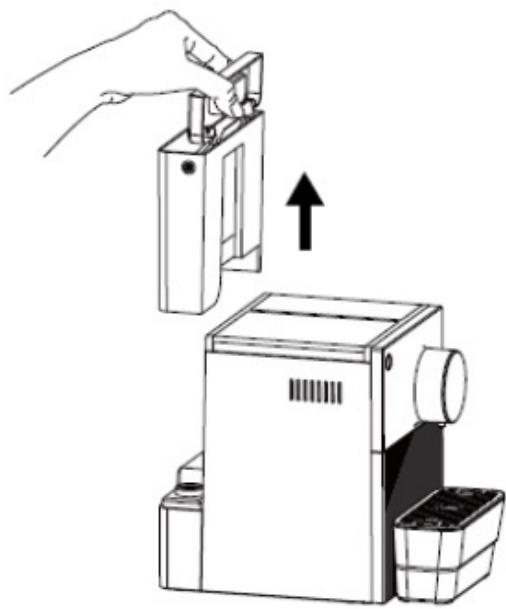
Fig./Img./Abb./Afb./Rys. 4

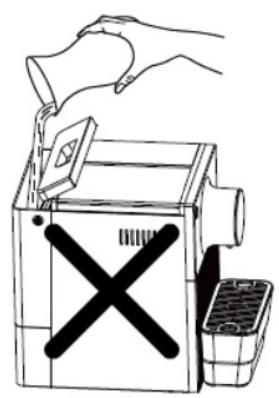
Fig./Img./Abb./Afb./Rys. 5
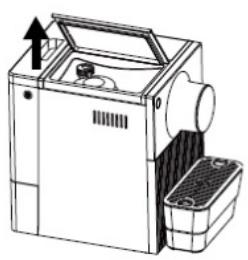
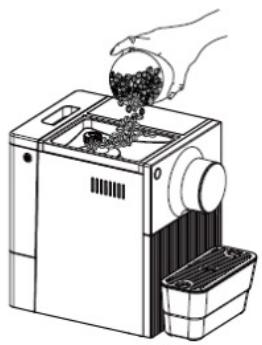
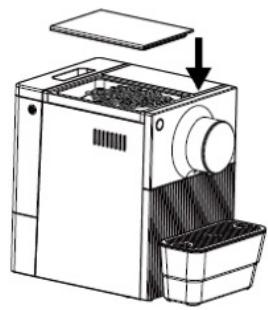
Fig./Img./Abb./Afb./Rys. 6

Fig./Img./Abb./Afb./Rys. 7

Fig./Img./Abb./Afb./Rys. 8

Fig./Img./Abb./Afb./ Rys. 9
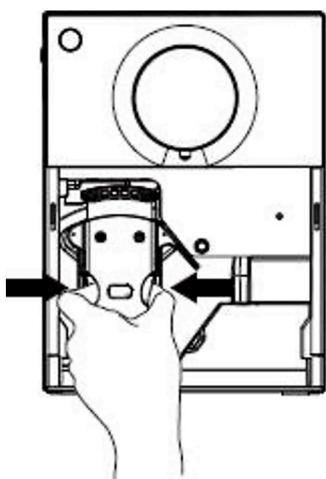
Fig./Img./Abb./Afb./Rys.10

Fig./Img./Abb./Afb./ Rys. 11
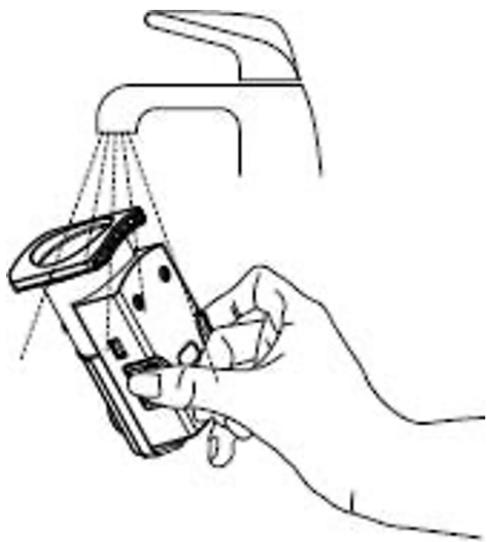
Fig./Img./Abb./Afb./ Rys. 12

Fig./Img./Abb./Afb./ Rys. 13

Fig./Img./Abb./Afb./ Rys. 14
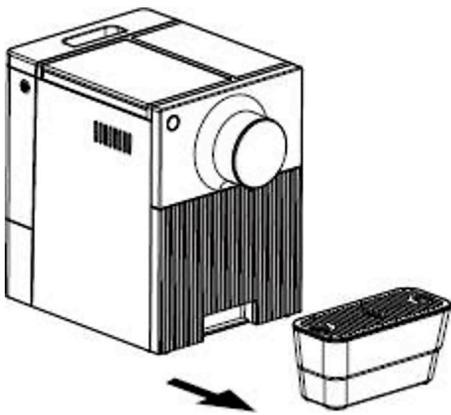
Fig./Img./Abb./Afb./ Rys. 15
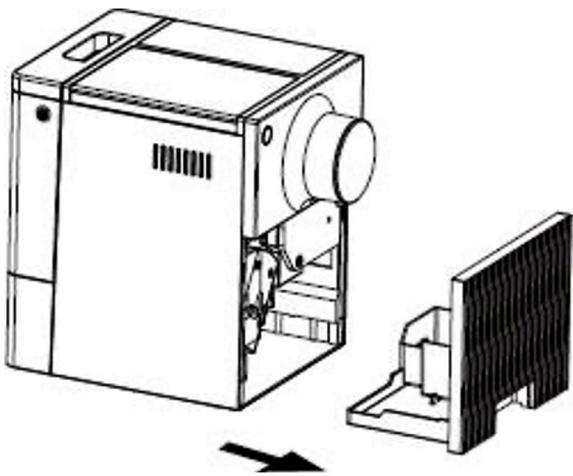
Fig./Img./Abb./Afb./ Rys. 16

Fig./Img./Abb./Afb./ Rys. 17

Fig./Img./Abb./Afb./ Rys. 18
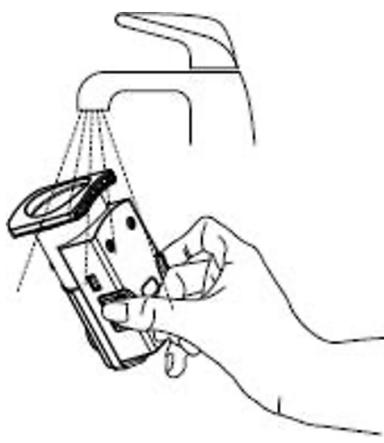
Fig./Img./Abb./Afb./Rys. 19
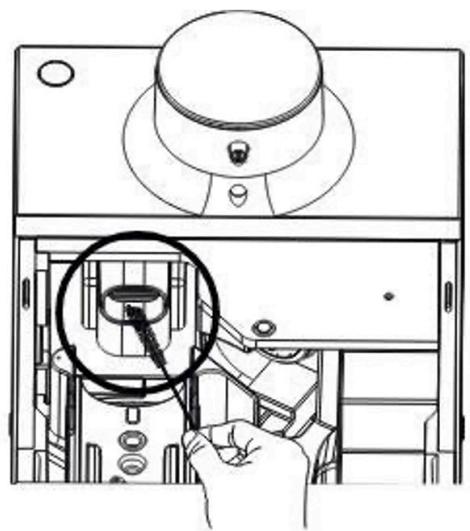
Fig./Img./Abb./Afb./ Rys. 20

Fig./Img./Abb./Afb./ Rys. 21
www.cecotec.es
- SOMMAIRE
- INSTRUCTIONS DE SÉCURITÉ
- NOTE
- BEFORE USE
- BOX CONTENT
- PRODUCT INSTALLATION
- OPERATION
- FILLING UP THE WATER TANK
- FILLING THE COFFEE BEAN CONTAINER
- BREWING COFFEE
- DISPENSING HOT WATER
- SWITCHING OFF THE COFFEE MACHINE
- AUTOMATIC SHUT-OFF
- ADJUSTING VALUES
- ADJUSTING THE GRINDING LEVEL
- SELECTING THE DESIRED MODE
- ENGLISH
- CLEANING AND MAINTENANCE
- DAILY CLEANING
- INTERNAL SYSTEM CLEANING
- CLEANING THE COFFEE SPOUT
- CLEANING
- CLEANING THE COFFEE BREWING UNIT
- TROUBLESHOOTING
- TECHNICAL SPECIFICATIONS
- DISPOSAL OF OLD ELECTRICAL AND ELECTRONIC APPLIANCES
- TECHNICAL SUPPORT AND WARRANTY
- COPYRIGHT
- SIMPLIFIED EU DECLARATION OF CONFORMITY
- FRANÇAIS
- PIÈCES ET COMPOSANTS
- IMAGE 1
- INSTALLATION DU PRODUIT
Brand : CECOTEC
Model : Cremmaet Cube A92 Eu01 119704
Category : Coffee machine