Conga Rockstar Cyclonic Xl - Vacuum Cleaner CECOTEC - Free user manual and instructions
Find the device manual for free Conga Rockstar Cyclonic Xl CECOTEC in PDF.


| Product type | Bagless canister vacuum cleaner |
| Brand | Cecotec |
| Model | Conga Rockstar Cyclonic XL |
| Suction technology | Cyclonic |
| Dust container capacity | Large capacity (XL) |
| Usage | Household use only |
| Power supply | Mains electricity |
| Rated voltage | 220-240 V ~ 50-60 Hz |
| Filtration | Cyclonic |
| Dimensions (L x W x H) | 430 x 260 x 320 mm |
| Weight | 5.5 kg |
| Cable length | 5 m |
| Floor types | Hard floors and carpets |
| Assembly | Simple, according to the manual |
| Maintenance | Empty the container and clean the filters periodically |
| Safety | Unplug before cleaning or maintenance |
| Cable check | Check regularly to avoid any damage |
| Spare parts | Available from the official Cecotec After-Sales Service |
| Repairability | Official Cecotec technical service |
| Recycling | Compliant with the WEEE directive |
| Compliance | EU Declaration of Conformity |
Frequently Asked Questions - Conga Rockstar Cyclonic Xl CECOTEC
User questions about Conga Rockstar Cyclonic Xl CECOTEC
0 question about this device. Answer the ones you know or ask your own.
Ask a new question about this device
Download the instructions for your Vacuum Cleaner in PDF format for free! Find your manual Conga Rockstar Cyclonic Xl - CECOTEC and take your electronic device back in hand. On this page are published all the documents necessary for the use of your device. Conga Rockstar Cyclonic Xl by CECOTEC.
USER MANUAL Conga Rockstar Cyclonic Xl CECOTEC
cecòtec
Safety instructions 8
-
Parts and components 52
-
Before use 52
-
Assembly 53
-
Operation 53
-
Troubleshooting 54
-
Cleaning and maintenance 54
-
Recycling of electrical and electronic equipment 56
-
Copyright 56
-
Simplified EU Declaration of Conformity 56
SOMMAIRE
EU01_115425_Conga Rockstar Cyclonic XL
EN • The coding in this manual is generic and applies to all code variants of the appliance.
Read the following instructions carefully before using the appliance. Keep this instruction manual for future reference or new users.
- This appliance can be used by children aged 8 years and above and people with reduced physical, sensory or mental capabilities or lack of experience and knowledge if they have been given supervision or instruction concerning the use of the appliance in a safe way and understand the hazards involved. Children must not play with the appliance. Cleaning and user maintenance must not be carried out by children without supervision.
- This appliance is intended for domestic use only and is not suitable for use in commercial establishments such as bars, restaurants, farms, hotels, motels, and offices.
- Inspect the power cord regularly for visible damage, especially the charger cable, plug, and housing. If the cord is damaged, it must be replaced by Cecotec's Official Technical Support Service to avoid any hazard.
- Do not attempt to repair the appliance yourself. Contact Cecotec's Official Technical Support Service for any doubt.
- Switch off and unplug the appliance from the mains power supply when not in use for extended periods, before cleaning, before assembling or disassembling components and before carrying out maintenance tasks. Do not leave the appliance unattended when plugged to a power outlet.
- Ensure that the mains voltage matches the voltage stated on the product's rating label and that the socket is properly earthed.
-
Do not use the appliance if it has been dropped or if there are any visible signs of damage.
-
Do not use any accessory that has not been recommended by Cecotec, as they might cause injuries or damage.
- Do not place the appliance close to heat sources, flammable substances, or wet surfaces where it could fall, nor allow it to come into contact with water or other liquids. Do not use outdoors.
- Do not use the appliance to vacuum liquids, lit matches, cigarette ends, hot ash, or on wet surfaces.
- Stop using the appliance if you notice an abnormal sound or sense a temperature higher than usual.
- Keep the air outlet unblocked to avoid losing suction power.
- Check the suction tube from time to time to make sure it is not blocked.
- Take special care when using the appliance near stairs.
- Do not block the appliance openings or airflow. Keep openings free of any objects, and do not block them with clothes or your fingers.
- Do not immerse the cord, plug, or any other non-removable part of the appliance in water or any other liquid or expose electrical connections to water. Make sure your hands are completely dry before handling the plug or switching on the appliance.
- Do not drag the appliance by the cable. Do not use the cord as a handle. Do not allow the cable to get caught between the door and the frame and do not stretch it over sharp edges or corners. Do not crush the power cable with the full weight of the appliance. Keep the cable away from heat sources.
- Do not vacuum hard or sharp objects such as glass, screws, or coins, or hot coals, cigarettes, matches, or any other hot smoking or burning objects.
- Do not use the appliance without the filters properly fitted.
-
Use the appliance only on dry surfaces and indoors.
-
Do not use it for any purpose other than those described in this manual.
- Do not use the vacuum cleaner to clean pets or any animal.
- WARNING: if the appliance's suction openings, the hose, or the telescopic tube are obstructed, turn off the vacuum cleaner and remove the obstruction before resuming use.
- Before starting up the appliance, be sure to remove any large or sharp objects that could damage the dust container and hose.
- WARNING: hold the plug when rewinding the cable to avoid damaging the former.
INSTRUCTIONS DE SÉCURITÉ
A. Handle
B. Hose
C. Suction power knob
D. Tube
E. Floor brush
F. Hose connector
G. Dust container
H. Power switch
I. Cord rewind button
Note:
The graphics in this manual are schematic representations and may not exactly match the product.
2. BEFORE USE
- This appliance comes in a packaging designed to protect it during transport. Remove the appliance from its box. You can keep the original box and other packaging materials in a safe place to prevent damage to the appliance if you need to transport it in the future. If you wish to dispose of the original packaging, make sure all items are recycled properly.
- Check that all parts and components are included and in good condition. If any of them are missing or damaged, please contact Cecotec's Official Technical Support Service immediately.
Box content:
- Cylinder vacuum cleaner
- Crevice tool
- Furniture tool
- Metal telescopic tube
- Instruction manual
- Do not remove the product's serial number in order to keep proper traceability if technical assistance is required.
3. ASSEMBLY
Hose removal
- Disconnect the plug from the socket.
- To release the hose, press the button on the end of the hose and pull firmly to remove it from the air inlet duct. Fig. 2
Assembling the extension tubes and accessories
Follow these steps to assemble the tubes and accessories:
-
Attach the extension tube to the hose handle. Push it until it clicks into place. Fig. 3A
-
Adjust the length of the telescopic tube as required. To do this, press the adjustment button and extend or retract the tube to the desired height. Fig. 3B
-
Attach the desired accessory (such as the floor brush) to the end of the last extension tube. Push it until it is firmly attached. Fig. 3C
4. OPERATION
- Before using the vacuum cleaner, unwind the required length of cord and insert the plug into the socket.
Note: Do not pull the cord beyond the red mark.
-
To retract the power cord, press the cord rewind button with one hand and guide the cord with the other to ensure it does not become entangled or cause damage.
-
Press the power button to start the appliance.
Using the cleaning accessories
Dual-position carpet/hard floor brush.
Position 1: Extended bristles for hard floors. Brush with bristles out. Fig. 4
Position 2: Retracted bristles for carpets. Brush with bristles tucked in. Fig. 5.
Crevice tool
For cleaning radiators, corners, edges, drawers, etc.
Furniture tool
For cleaning curtains, bookshelves, books, inlaid furniture, lamps and other delicate objects.
Adjusting the telescopic tube height
The vacuum cleaner's telescopic tube allows you to adjust its length to suit your height for a
ENGLISH
more comfortable cleaning.
To adjust the tube height:
- Locate the adjustment button at the joint of the two tube sections.
- Press the adjustment button.
- While holding the button, slide the lower tube section up or down to achieve the desired length.
- Release the button to lock the tube in the selected position. Make sure the tube is firmly locked before using the vacuum cleaner.
5. TROUBLESHOOTING
| Problem | Possible cause | Possible solution |
| Reduced airflow and cleaning power. | The dust container is full. | Empty the dust container regularly. |
| The filter is not completely dry. | Make sure the filter is completely dry before using the appliance. | |
| Possible filter damage or reduced performance. | Detergents have been used to clean the filters. | Do not use detergents to clean the filters. |
| The dust container does not fit into the vacuum cleaner. | The filter is not properly fitted. | Fit the filter correctly (refer to the filter cleaning section). |
6. CLEANING AND MAINTENANCE
Cleaning the dust container
To maintain optimal performance of your vacuum cleaner and ensure consistent suction, it is important to empty and clean the dust container regularly, preferably after each use or when it reaches the maximum fill mark.
- Make sure the vacuum cleaner is switched off and disconnected from the power supply.
- Locate the release button on the top of the dust container. Press it to release the dust container from the vacuum cleaner body and carefully remove it. Fig. 6.
- Locate the opening mechanism at the bottom of the dust container. Open it to completely empty the contents into a waste bin. Fig. 7
- Once empty, you can clean the inside of the container with a slightly damp cloth if necessary to remove fine dust.
Cleaning the filter
To ensure optimal performance of your vacuum cleaner and extend the filter's service life, it is important to clean the foam filter regularly. It is recommended to clean it when you notice that it is dirty or that the suction power decreases.
Follow these steps to clean the foam filter:
- Once you have removed the dust container from the vacuum cleaner, locate the foam filter.
- This is located at the top of the container, under the lid.
- Remove the foam filter by gently pulling upward or following the arrow direction. Fig. 8
- Wash the foam filter with cold or warm water. If needed, you can use a small amount of mild soap.
VERY IMPORTANT:
- Allow the foam filter to air dry completely before replacing it in the vacuum cleaner.
- Do not use tumble dryers or expose to direct sunlight or heat sources.
-
A damp filter can damage the vacuum cleaner motor. Make sure it is completely dry (may take 24 hours or more, depending on ambient humidity) before next use.
-
Once the filter is completely dry, place it back into position inside the dust container.
-
Make sure it is securely in place before closing the dust container lid and reinstalling it on the vacuum cleaner.
Caution:
- Due to frequent use, dust will accumulate in the vacuum cleaner filters. This is normal and will not affect filter performance. If the amount of dust accumulated in the filtration system affects the suction power and vacuum cleaner performance, it is recommended to remove the filters and replace them with new ones. This should be done once every six months or when suction power has noticeably decreased.
- Keep the suction inlet free from any obstruction at all times. Otherwise, the motor may overheat and become damaged.
- Frequently check all filters for possible damage, preferably after each cleaning task. If the filters are damaged, replace them immediately. Always unplug the vacuum cleaner from the mains socket when checking filters.
- Do not wash filters in the washing machine or dishwasher.
Note: If filters are worn or if you cannot remove the dirt, replace them with new ones. Do not use the vacuum cleaner without installing the filters or if the filters are damaged. Otherwise, vacuumed dust will enter the appliance and could damage the motor.
7. RECYCLING OF ELECTRICAL AND ELECTRONIC EQUIPMENT

This symbol indicates that, according to the applicable regulations, the product and/or battery must be disposed of separately from household waste. When this product reaches the end of its shelf life, you should dispose of the batteries/accumulators and take them to a collection point designated by the local authorities.
For detailed information on how to properly dispose of electrical and electronic equipment and/or the corresponding batteries, consumers should contact their local authorities.
Compliance with the above guidelines will help protecting the environment.
8. COPYRIGHT
The intellectual property rights over the texts in this manual belong to CECOTEC INNOVACIONES, S.L. All rights reserved. The content of this publication may not, either in part or in its entirety, be reproduced, stored in a retrieval system, transmitted or distributed by any means (electronic, mechanical, photocopying, recording or similar) without prior authorisation from CECOTEC INNOVACIONES, S.L.
9. SIMPLIFIED EU DECLARATION OF CONFORMITY
CE Cecotec Innovaciones hereby declares that this appliance complies with the essential requirements and other relevant provisions of the regulations applicable in the European Union. This appliance has been designed, manufactured and tested in compliance with required safety and quality standards. The full text of the EU Declaration of Conformity can be found on the following website: https://cecotec.es/es/information/declaration-of-conformity
1. PIÈCES ET COMPOSANTS
Image 1
5. PROBLEEMOPLOSSING
Fig./Img./Abb./Afb./Rys.1
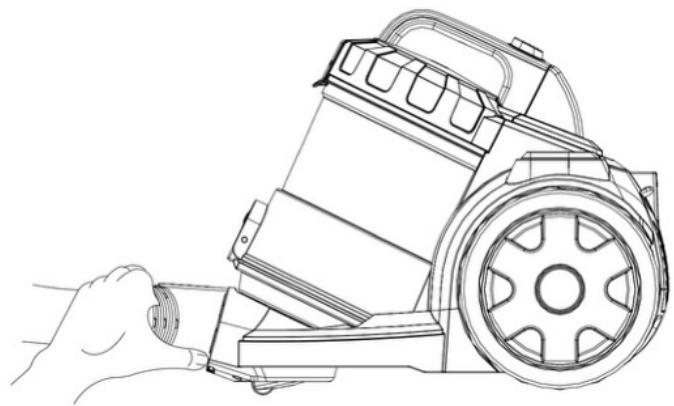
Fig./Img./Abb./Afb./Rys. 2

3A

3B

3C
Fig./Img./Abb./Afb./Rys. 3
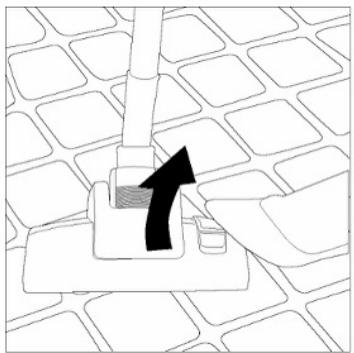
Fig./Img./Abb./Afb./Rys. 4

Fig./Img./Abb./Afb./Rys. 5
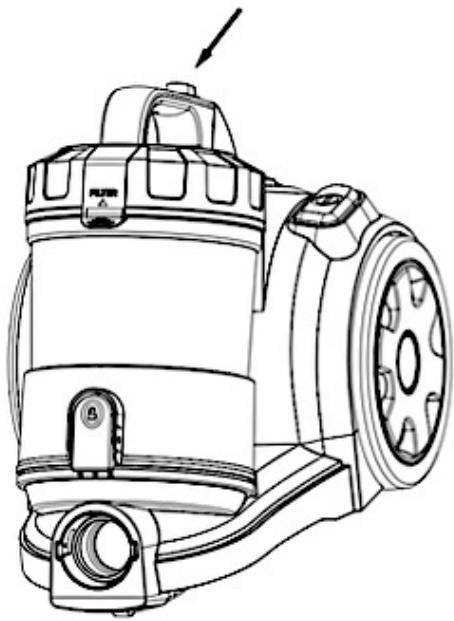
Fig./Img./Abb./Afb./Rys. 6
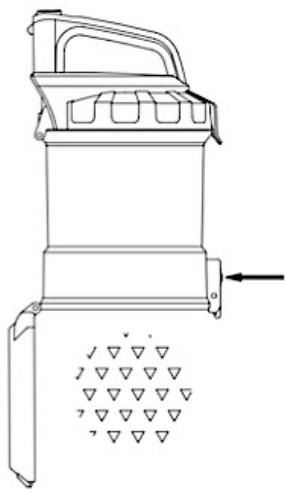
Fig./Img./Abb./Afb./Rys. 7

Fig./Img./Abb./Afb./Rys. 8
www.cecotec.es


- SOMMAIRE
- INSTRUCTIONS DE SÉCURITÉ
- NOTE
- BEFORE USE
- BOX CONTENT
- ASSEMBLY
- HOSE REMOVAL
- ASSEMBLING THE EXTENSION TUBES AND ACCESSORIES
- OPERATION
- USING THE CLEANING ACCESSORIES
- CREVICE TOOL
- FURNITURE TOOL
- ADJUSTING THE TELESCOPIC TUBE HEIGHT
- ENGLISH
- TROUBLESHOOTING
- CLEANING AND MAINTENANCE
- CLEANING THE DUST CONTAINER
- CLEANING THE FILTER
- VERY IMPORTANT
- CAUTION
- RECYCLING OF ELECTRICAL AND ELECTRONIC EQUIPMENT
- COPYRIGHT
- SIMPLIFIED EU DECLARATION OF CONFORMITY
- PIÈCES ET COMPOSANTS
- IMAGE 1
- PROBLEEMOPLOSSING
Brand : CECOTEC
Model : Conga Rockstar Cyclonic Xl
Category : Vacuum Cleaner