Bolero Flux Cre 385500 A - Refrigerator CECOTEC - Free user manual and instructions
Find the device manual for free Bolero Flux Cre 385500 A CECOTEC in PDF.


| Product type | Island suspended extractor hood |
| Brand | Cecotec |
| Model | Bolero Flux Cre 385500 A |
| Usage | Domestic use only |
| Number of speeds | 3 speeds + booster mode |
| Lighting | Integrated with dedicated control |
| Minimum installation distance | 65 cm above the cooking surface |
| Charcoal filters | Included (2 filters) |
| Mounting kit | Included |
| Electrical supply | 220-240 V ~ 50 Hz |
| Control type | Push buttons |
| Safety | Do not flambé under the hood |
| Air extraction | Do not exhaust into a combustion fumes conduit |
| Box contents | Hood, manual, mounting kit, charcoal filters |
| Manual languages | French, German, Spanish, Greek, Arabic |
Frequently Asked Questions - Bolero Flux Cre 385500 A CECOTEC
User questions about Bolero Flux Cre 385500 A CECOTEC
0 question about this device. Answer the ones you know or ask your own.
Ask a new question about this device
Download the instructions for your Refrigerator in PDF format for free! Find your manual Bolero Flux Cre 385500 A - CECOTEC and take your electronic device back in hand. On this page are published all the documents necessary for the use of your device. Bolero Flux Cre 385500 A by CECOTEC.
USER MANUAL Bolero Flux Cre 385500 A CECOTEC


Safety instructions 7
- Parts and components 29
- Before use 29
- Installation 29
- Operation 31
- Cleaning and maintenance 32
- Troubleshooting 33
- Recycling of electrical and electronic equipment 33
- Copyright 34
- Simplified EU Declaration of Conformity 34
SOMMAIRE
EN · The coding in this manual is generic and applies to all code variants of the appliance.
Read the following instructions carefully before using the appliance. Keep this instruction manual for future reference or new users.
- This appliance can be used by children aged 8 years and above and people with reduced physical, sensory or mental capabilities or lack of experience and knowledge if they have been given supervision or instruction concerning the use of the appliance in a safe way and understand the hazards involved. Children must not play with the appliance. Cleaning and user maintenance must not be carried out by children without supervision.
- This appliance is intended for domestic use only and is not suitable for use in commercial establishments such as bars, restaurants, farms, hotels, motels, and offices.
- If the power cord is damaged, it must be replaced by Cecotec's Official Technical Support Service or similar qualified personnel to avoid risks.
- There must be adequate ventilation of the room when the kitchen hood is used at the same time as gas or other fuel burning appliances.
- There is a risk of fire if cleaning is not carried out according to the instructions.
-
Do not flambé under the kitchen hood.
-
CAUTION: Accessible parts can become hot when used with cooking appliances.
- Air must not be discharged into a duct used to exhaust fumes from gas or other fuel burning appliances.
- The minimum distance between the worktop and the lowest part of the kitchen hood must be at least 65 cm. If the installation instructions for the gas hob specify a greater distance, this must be taken into account.
- Air discharge regulations must be complied with.
INSTRUCTIONS DE SÉCURITÉ
The graphics in this manual are schematic representations and may not exactly match the product.
2. BEFORE USE
- This appliance comes in a packaging designed to protect it during transport. Remove the appliance from its box. You can keep the original box and other packaging materials in a safe place to prevent damage to the appliance if you need to transport it in the future. If you wish to dispose of the original packaging, make sure all items are recycled properly.
- Check that all parts and components are included and in good condition. If any of them are missing or damaged, please contact Cecotec's Official Technical Support Service immediately.
Box content:
- Hanging island hood
- Instruction manual
- Assembly kit
- Carbon filters
- Do not remove the product's serial number in order to keep proper traceability if technical assistance is required.
3. INSTALLATION
Requirements and safety
- Installation may only be carried out by an electrician or qualified person.
- Do not discharge air into a duct used for exhausting combustion gases (gas or other fuels). This restriction does not apply to appliances that only recirculate air within the room.
ENGLISH
- Operation with external extraction (safety with ambient air-dependent combustion appliances):
- Warning: Risk of poisoning from returning combustion gases if insufficient air supply. In extraction mode, the hood creates negative pressure in the kitchen and adjoining rooms; without make-up air, toxic gases may be drawn back from chimneys or flues.
- Ensure sufficient fresh air supply and free air circulation. A wall-mounted inlet/outlet box alone is insufficient to ensure compliance with the limit value.
- The negative pressure in the combustion appliance room must not exceed 4 Pa (0.04 mbar). This can be achieved through non-sealable openings in doors/windows combined with an air inlet/outlet wall box. Consult a professional chimney sweep to evaluate the building's ventilation system and necessary measures.
-
If the hood is used exclusively in recirculation mode, operation is possible without restrictions.
-
Before and after installation, thoroughly clean the surroundings to prevent dust or construction debris from being drawn in during initial start-up.
- Install the unit only in a suitable location.
- Check the ceiling: it must support a minimum load of 120 kg and have a minimum thickness of 30 mm.
- Check the route of electrical cables and others in the ceiling/wall to avoid drilling through them.
- Check the condition and capacity of electrical cables.
- Installation by a specialist is recommended.
Minimum installation distances
- Minimum distance from the lower edge of the hood body:
• to ceramic and cast iron hobs: 65 cm
• to gas hobs: 70 cm
• to coal/oil/wood fires: 85 cm
- During and after installation, use a spirit level to ensure the hood is perfectly level.
Otherwise, grease and/or condensation may accumulate in the appliance corners.
- Figure 2 shows the hood dimensions.
Ceiling assembly
Important:
- Use wall plugs and screws suitable for the ceiling material. Consult a qualified installer or technician to choose appropriate anchors or screws.
-
Installation requires at least two people.
-
Position the hood mounting plate on the ceiling and mark drill hole positions. Fig. 3
-
Attach the cords to the locking clip. Fig. 4
-
Thread the cords through the decorative panel and screw the decorative panel to the suspension plate with screws. Fig. 5.
- With another person's help, lift the hood. Secure the support cords to the corresponding brackets on the hood's top. Adjust cord length before fixing the hood body to the support cords. Fig. 6.
Activated carbon filter installation
Fig. 7
- Recommended when using the hood in recirculation mode, as it reduces odours.
- Remove grease filters before installing the carbon filter.
- Place the carbon filter on the fan housing shaft, fitting the filter holes onto the shaft.
- Turn the carbon filter clockwise until it stops turning (it will lock).
- To remove, rotate anticlockwise.
- Reinstall the grease filters.
Note: Ensure the filter is properly locked; otherwise, it could become loose and present a hazard. With carbon filters installed, suction power is reduced.
4. OPERATION
- On/Off button: press to turn off the motor.
- Low power button: press to activate low speed. Press again to turn off motor.
- Medium power button: press to activate medium speed. Press again to turn off motor.
- High power/booster button: press to activate high speed. Press again to turn off motor.
- Light button: turns LED lighting on and off.
Booster
- Activation: press and hold high power/booster button until it flashes. The Booster level activates and appliance will run at maximum level for 5 minutes.
- Automatic end: after 5 minutes, a buzzer will sound and speed will immediately return to high power.
- Manual deactivation: to deactivate Booster before time ends, briefly press high power/booster button. The appliance will change to high power.
Timer
- Activation: simultaneously press and hold low power button and high power/Booster button until On/Off button flashes; 5-minute countdown begins.
- Countdown end: after 5 minutes, a buzzer will sound, all button lights will turn off, and motor and light will automatically switch off. After shutdown, hood will continue buzzing for 5 seconds if no other operation is performed. It can be stopped by pressing any button during buzzing.
ENGLISH
- Cancellation: countdown can be cancelled at any time by repeating the simultaneous press of the two indicated buttons.
5. CLEANING AND MAINTENANCE
Warnings:
- Switch off and unplug the hood from the socket before any cleaning or maintenance.
- The hood's external surfaces are susceptible to scratches and stains. Use mild cleaning agents and immediately remove any residue of alkaline or acidic substances (lemon juice, vinegar) after cleaning.
Stainless steel surfaces
- Clean stainless steel regularly to ensure a long service life.
- Use a specific stainless steel cleaner.
- Always wipe in the direction of the grain to avoid scratching the surface.
Control panel surface
- Clean with a damp cloth and mild washing-up liquid.
- Ensure the cloth is clean and well wrung out before use.
- After cleaning, remove moisture with a soft, dry cloth.
Cleaning grease filters
- Clean the grease filter monthly to prevent fire risk.
- The filter accumulates grease, smoke and dust, affecting hood efficiency.
- If not cleaned, grease residue accumulates. Wash with water and a small amount of washing-up liquid and allow to air dry completely before reinstalling.
Lighting
- LED lighting must only be repaired or replaced by qualified personnel.
- The appliance must be disconnected from the mains for this purpose.
- When replacing a lamp, ensure the new one does not have a higher wattage than the original.
- Before connecting the hood, verify that the voltage indicated on the rating plate (V) corresponds to your household supply voltage.
6. TROUBLESHOOTING
| Problem | Possible cause | Solution |
| The light turns on, but the motor does not work. | Ventilation is obstructed. | Clear the obstruction. |
| The capacitor is faulty. | Replace the condenser, contact Cecotec's Official Technical Support Service. | |
| The motor is faulty. | Replace the motor, contact Cecotec's Official Technical Support Service. | |
| The light does not turn on and the motor does not run. | The LED light is faulty. | Replace the LED light, contact Cecotec's Official Technical Support Service. |
| The plug is loose. | Insert the plug firmly into the power socket. | |
| The kitchen hood vibrates. | The impeller (fan wheel) is damaged. | Replace the impeller, contact Cecotec's Official Technical Support Service. |
| The motor is not firmly secured. | Secure the motor, contact Cecotec's Official Technical Support Service. | |
| The hood is not firmly fixed to the wall. | Secure the hood. | |
| Smoke or steam is not properly extracted. | The distance between the hood and the hob is excessive. | Reduce the height of the hood. |
| Smoke or steam is not properly extracted. | There is excessive airflow through the cooking zone. | Reduce airflow by closing windows or doors. |
7. RECYCLING OF ELECTRICAL AND ELECTRONIC EQUIPMENT

This symbol indicates that, according to the applicable regulations, the product and/or battery must be disposed of separately from household waste. When this product reaches the end of its shelf life, you should dispose of the batteries/accumulators and take them to a collection point designated by the local authorities.
ENGLISH
For detailed information on how to properly dispose of electrical and electronic equipment and/or the corresponding batteries, consumers should contact their local authorities. Information regarding national packaging recycling systems and their marking can be found on our website. Compliance with the above guidelines will help protecting the environment.
8. COPYRIGHT
The intellectual property rights over the texts in this manual belong to CECOTEC INNOVACIONES, S.L. All rights reserved. The content of this publication may not, either in part or in its entirety, be reproduced, stored in a retrieval system, transmitted or distributed by any means (electronic, mechanical, photocopying, recording or similar) without prior authorisation from CECOTEC INNOVACIONES, S.L.
9. SIMPLIFIED EU DECLARATION OF CONFORMITY
CE Cecotec Innovaciones hereby declares that this appliance complies with the essential requirements and other relevant provisions of applicable European Union regulations. This appliance has been designed, manufactured and tested in compliance with required safety and quality standards. The full text of the EU Declaration of Conformity can be found on the following website:
https://cecotec.es/es/information/declaration-of-conformity
1. PIÈCES ET COMPOSANTS
Img. 1
https://cecotec.es/es/information/declaration-of-conformity
1. CZĘŚCI I KOMPONENTY
Rys. 1
Fig./Img./Abb./Afb./Rys. 3

Fig./Img./Abb./Afb./Rys. 4

Fig./Img./Abb./Afb./ Rys. 5
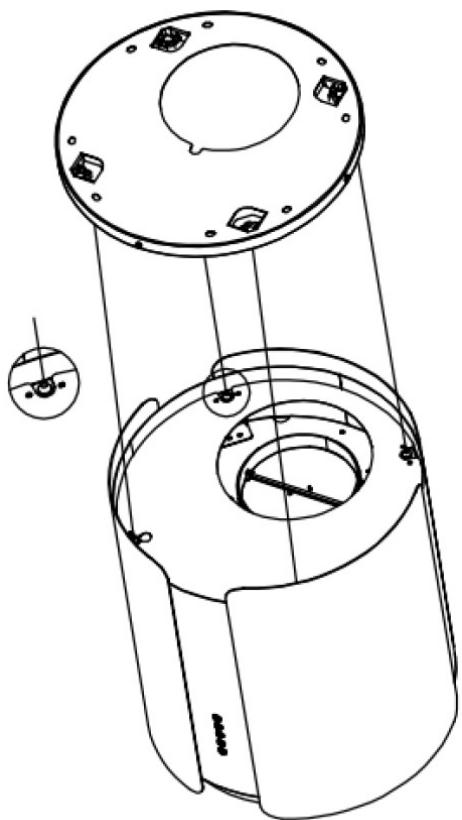
Fig./Img./Abb./Afb./Rys. 6
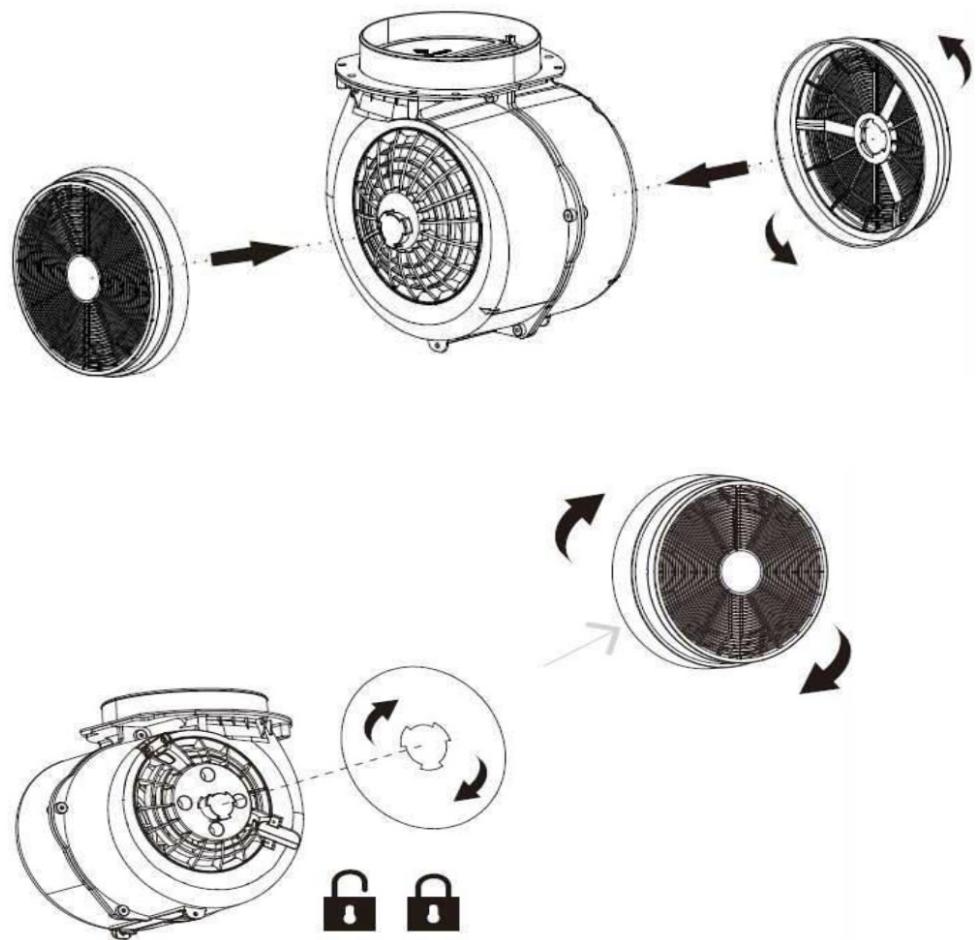
Fig./Img./Abb./Afb./Rys. 7
www.cecotec.es
- SOMMAIRE
- INSTRUCTIONS DE SÉCURITÉ
- BEFORE USE
- BOX CONTENT
- INSTALLATION
- REQUIREMENTS AND SAFETY
- ENGLISH
- MINIMUM INSTALLATION DISTANCES
- CEILING ASSEMBLY
- IMPORTANT
- ACTIVATED CARBON FILTER INSTALLATION
- FIG. 7
- OPERATION
- BOOSTER
- TIMER
- CLEANING AND MAINTENANCE
- WARNINGS
- STAINLESS STEEL SURFACES
- CONTROL PANEL SURFACE
- CLEANING GREASE FILTERS
- LIGHTING
- TROUBLESHOOTING
- RECYCLING OF ELECTRICAL AND ELECTRONIC EQUIPMENT
- COPYRIGHT
- SIMPLIFIED EU DECLARATION OF CONFORMITY
- PIÈCES ET COMPOSANTS
- IMG. 1
- CZĘŚCI I KOMPONENTY
- RYS. 1
Brand : CECOTEC
Model : Bolero Flux Cre 385500 A
Category : Refrigerator