
RUN'N' DRIVE WIRELESS 3-IN-1 RUMBLE FORCE - Gaming accessory THRUSTMASTER - Free user manual and instructions
Find the device manual for free RUN'N' DRIVE WIRELESS 3-IN-1 RUMBLE FORCE THRUSTMASTER in PDF.
| Brand | THRUSTMASTER |
| Model | RUN'N' DRIVE WIRELESS 3-IN-1 RUMBLE FORCE |
| Product type | Universal wireless game controller (PlayStation 1/2/3 and PC) |
| Dimensions (approx.) | 160 x 105 x 60 mm |
| Weight (with batteries) | Approximately 250 g |
| Power supply | 2 LR03/AAA batteries (not included) |
| Battery life | Variable depending on usage; automatic standby after 5 minutes of inactivity |
| Wireless technology | 2.4 GHz radio frequency with USB/Gameport receiver |
| Wireless range | Up to 10 meters |
| Vibration motors | 2 independent motors (for PS2 and PC) |
| Analog sticks | 2 progressive analog sticks |
| Optical wheel | Progressive optical wheel with sensitivity adjustment (Normal/High) |
| Triggers | 2 programmable progressive triggers |
| Programmable buttons | MAPPING, PRESET, HOME buttons, and connectors |
| Internal memory | EEPROM saving profiles even when powered off |
| Compatibility | PlayStation 1, 2, 3 and PC (Windows XP/Vista) |
| Maintenance and cleaning | Clean with a dry, soft cloth. Do not use liquids. |
| Safety | Avoid humidity and extreme temperatures. Disconnect before cleaning. |
| Spare parts and repairability | No spare parts available. In case of failure, contact technical support. |
| General information | 2-year warranty. Made in China. CE marking. Recycling at end of life. |
Frequently Asked Questions - RUN'N' DRIVE WIRELESS 3-IN-1 RUMBLE FORCE THRUSTMASTER
User questions about RUN'N' DRIVE WIRELESS 3-IN-1 RUMBLE FORCE THRUSTMASTER
0 question about this device. Answer the ones you know or ask your own.
Ask a new question about this device
Download the instructions for your Gaming accessory in PDF format for free! Find your manual RUN'N' DRIVE WIRELESS 3-IN-1 RUMBLE FORCE - THRUSTMASTER and take your electronic device back in hand. On this page are published all the documents necessary for the use of your device. RUN'N' DRIVE WIRELESS 3-IN-1 RUMBLE FORCE by THRUSTMASTER.
USER MANUAL RUN'N' DRIVE WIRELESS 3-IN-1 RUMBLE FORCE THRUSTMASTER
Wireless Rumble Force
3-in-1 Compatible
PS3°/PS2°/PC
Run'N' Drive
Wireless Rumble Force
3-in-1 Compatible
PS3®/PS2®/PC

User Manual
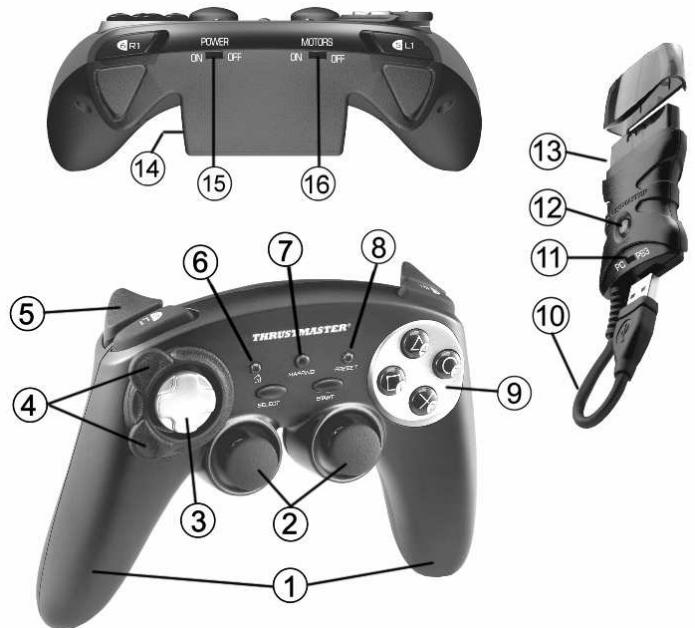
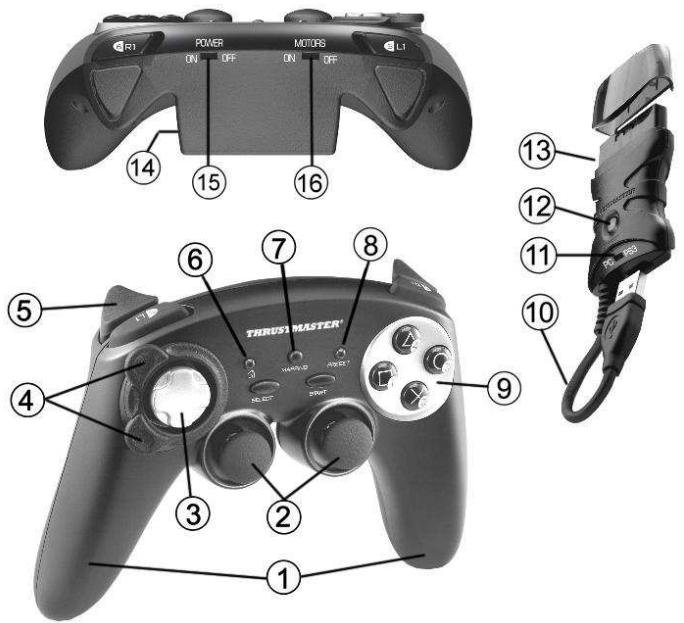
TECHNICAL FEATURES
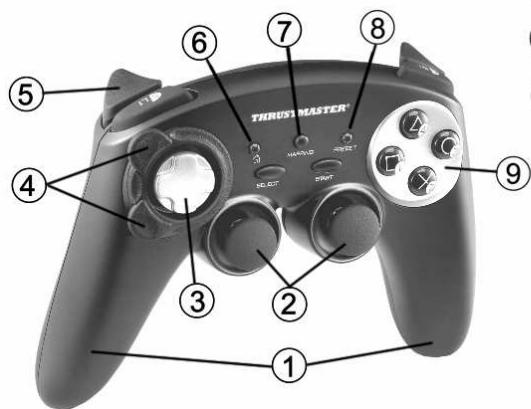
- 2 independent vibrating motors (for PlayStation® 2 and PC)
- 2 progressive analog mini-sticks
- D-Pad
- Progressive optical wheel
- 2 progressive triggers
- HOME LED button for Playstation®3 and MODE for PC
-
MAPPING LED button (for programming and indicating connection status)
-
PRESET LED button (to select programming)
- Action buttons
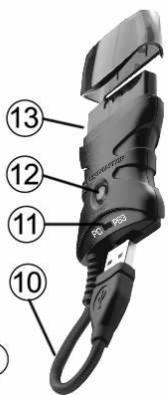
- PC and PlayStation® 3 USB connector
- "PC" or "PS3" USB selector
- CONNECT LED button on receiver
- PlayStation® 2 "Gameport" connector
- Battery compartment
- POWER ON/OFF switch
- MOTORS ON/OFF switch
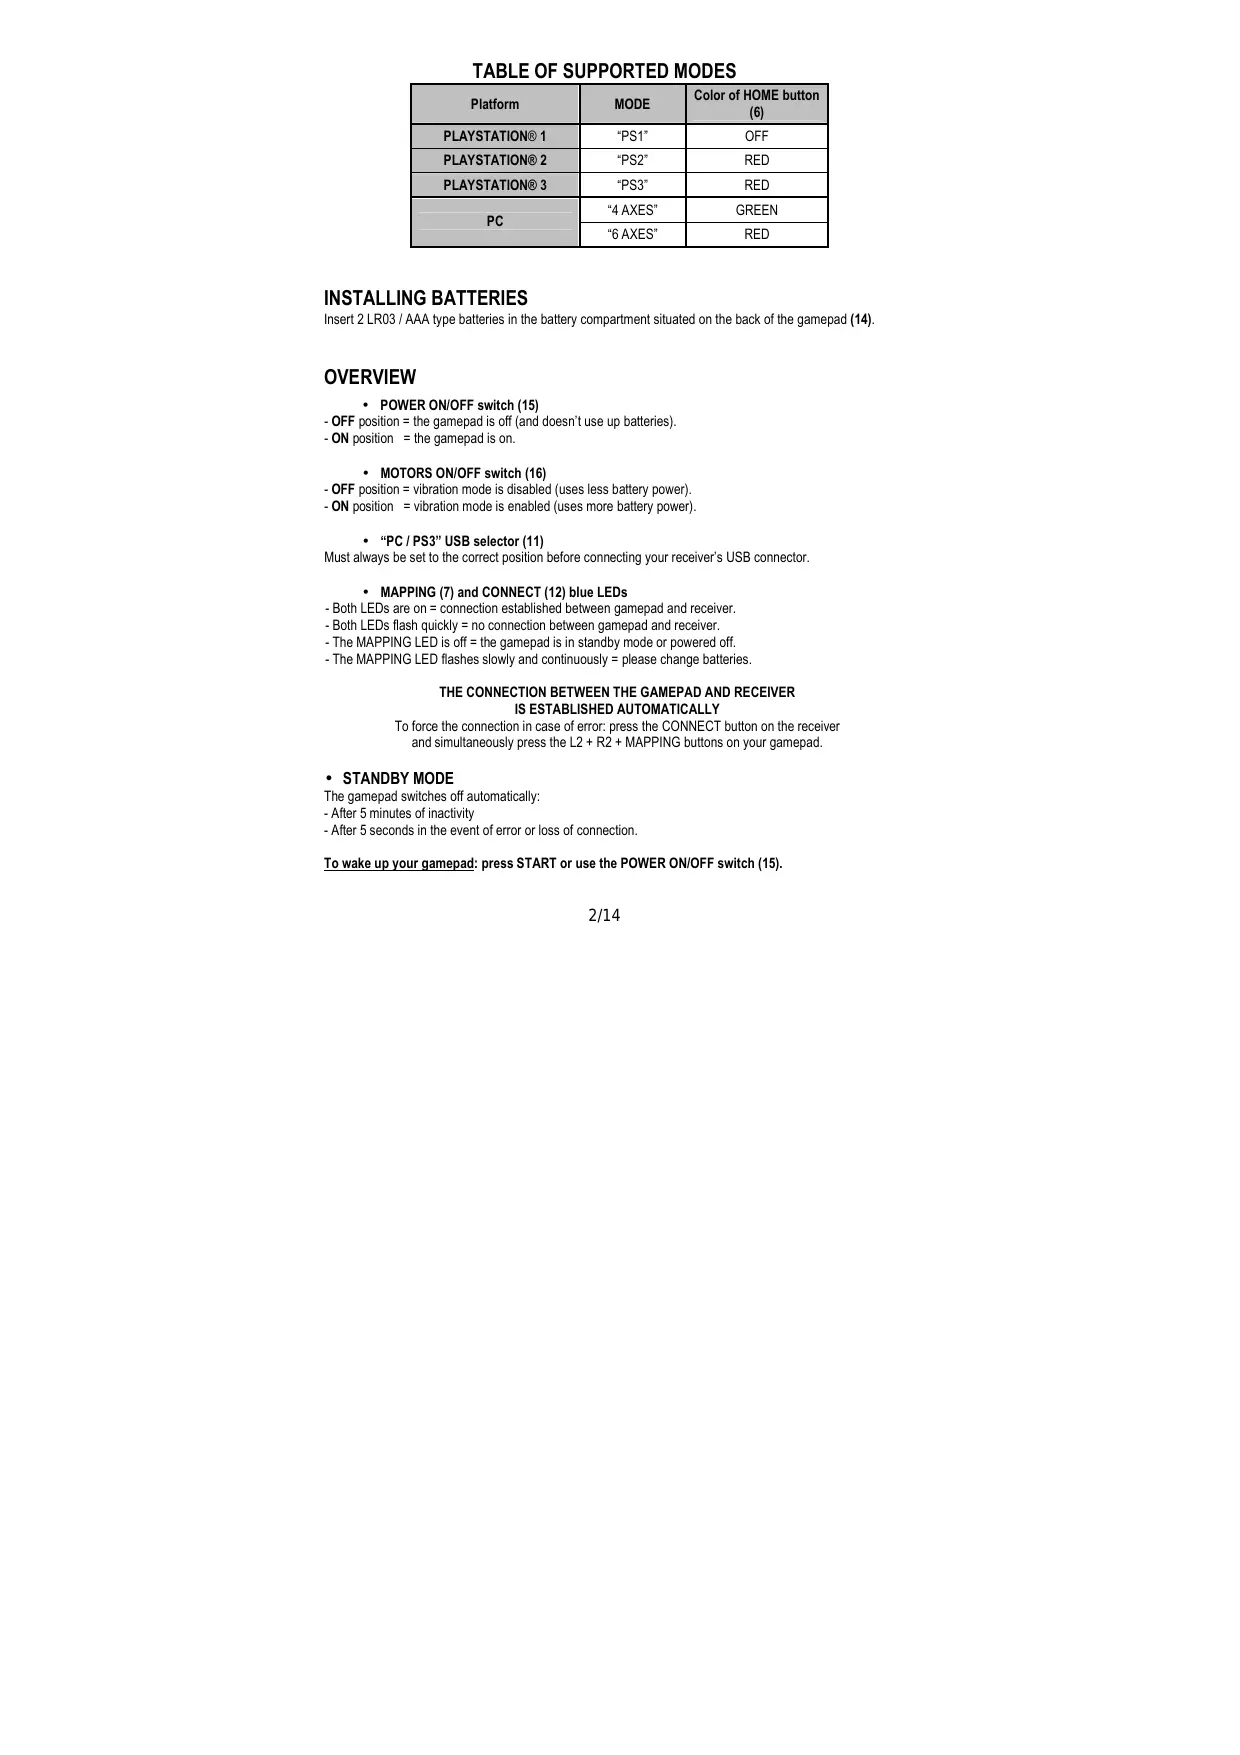
TABLE OF SUPPORTED MODES
| Platform | MODE | Color of HOME button (6) |
| PLAYSTATION® 1 | "PS1" | OFF |
| PLAYSTATION® 2 | "PS2" | RED |
| PLAYSTATION® 3 | "PS3" | RED |
| PC | "4 AXES" | GREEN |
| "6 AXES" | RED |
INSTALLING BATTERIES
Insert 2 LR03 / AAA type batteries in the battery compartment situated on the back of the gamepad (14).
OVERVIEW
-
POWER ON/OFF switch (15)
-
OFF position = the gamepad is off (and doesn't use up batteries).
- ON position = the gamepad is on.
MOTORS ON/OFF switch (16)
- OFF position = vibration mode is disabled (uses less battery power).
-
ON position = vibration mode is enabled (uses more battery power).
-
"PC / PS3" USB selector (11)
Must always be set to the correct position before connecting your receiver's USB connector.
-
MAPPING (7) and CONNECT (12) blue LEDs
-
Both LEDs are on = connection established between gamepad and receiver.
- Both LEDs flash quickly = no connection between gamepad and receiver.
- The MAPPING LED is off = the gamepad is in standby mode or powered off.
- The MAPPING LED flashes slowly and continuously = please change batteries.
THE CONNECTION BETWEEN THE GAMEPAD AND RECEIVER IS ESTABLISHED AUTOMATICALLY
To force the connection in case of error: press the CONNECT button on the receiver and simultaneously press the L2 + R2 + MAPPING buttons on your gamepad.
STANDBY MODE
The gamepad switches off automatically:
- After 5 minutes of inactivity
- After 5 seconds in the event of error or loss of connection.
To wake up your gamepad: press START or use the POWER ON/OFF switch (15).
PLAYSTATION® 3
INSTALLATION ON PLAYSTATION® 3
- Set your receiver's USB selector to the "PS3" position.
- Connect the USB connector to USB port #1 on the console.
- Switch on your console.
- Switch on your gamepad using the POWER ON/OFF switch (15).
- Once a connection has been established: start up your game.
You are now ready to play!
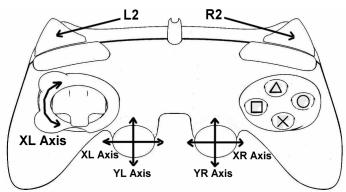
PLAYSTATION® 3 MODE
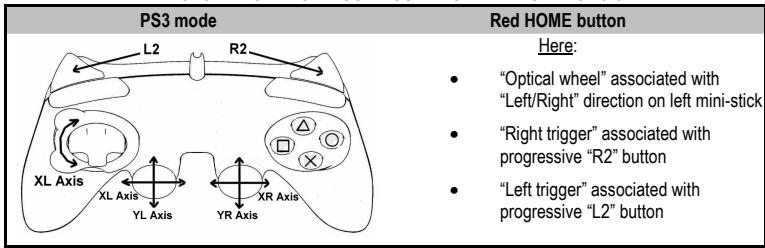
"AUTOMATIC PRESET" CONFIGURATION - PLAYSTATION® 3
USING THE "HOME" BUTTON (6)
Your gamepad's "HOME" button allows you to exit games, access menus and directly switch off your PlayStation®3 system.
IMPORTANT NOTES FOR PLAYSTATION® 3
- The USB selector on your receiver (11) must always be set to "PS3" before connecting the receiver.
- In "1 Player" mode: If your official gamepad is powered on, you must switch it to "gamepad port 2" in order for your "Run'N' Drive" gamepad to be functional.
- On PlayStation® 3, the "Run'N' Drive" gameplay is only compatible with PlayStation® 3 games (and will not work with PlayStation® 2 games) and does not feature a motion sensor.
PLAYSTATION® 2
INSTALLATION ON PLAYSTATION® 2
- Connect the receiver's PS2 Gameport connector (13) to port #1 on the console.
- Switch on your console.
- Switch on your gamepad using the POWER ON/OFF switch (15).
- Once a connection has been established: start up your game.
You are now ready to play!
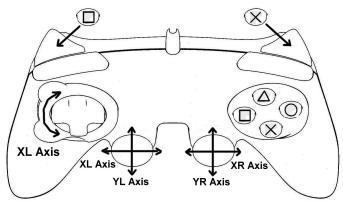
PLAYSTATION® 2 MODE
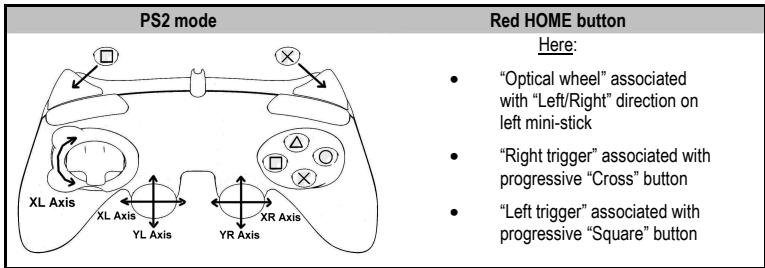
"AUTOMATIC PRESET" CONFIGURATION - PLAYSTATION® 2
IMPORTANT NOTE FOR PLAYSTATION® 2
Never connect the USB connector (10) to your PlayStation® 2 (to avoid the risk of damaging your gamepad or your console).
PC
INSTALLATION ON PC
The CD-ROM included with this product lets you install the Force Feedback drivers.
- Set the USB selector on the receiver (11) to the "PC" position.
- Insert the installation CD-ROM and follow the instructions. Once the installation is complete, click Finish and restart your computer.
- Once your computer has restarted, connect the receiver's USB connector to one of your computer's USB ports. Windows® XP or Vista will automatically detect the new device.
- Switch on your gamepad using the POWER ON/OFF switch (15).
- Click Start/Settings/Control Panel and then double-click Game Controllers.
The Game Controllers dialog box displays the gamepad's name with OK status.
-
In the Control Panel, click Properties to configure your gamepad:
-
Test device: allows you to test and view the buttons, D-pad, mini-sticks, triggers and optical wheel.
- Test forces: allows you to test and configure vibration effect settings.
You are now ready to play!
IMPORTANT NOTES FOR PC
- The USB selector on your receiver (11) must always be set to "PC" before connecting the receiver.
SELECTING "AXES" ON PC
- Selecting axes via "Software":
On page 1 of the Control Panel, click the number of axes you wish to use and then click OK.
- Selecting axes via "Hardware":
Press the HOME button (6) to select the number of active axes.
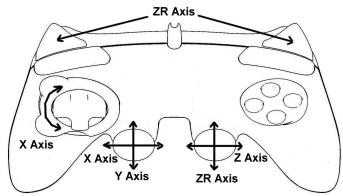
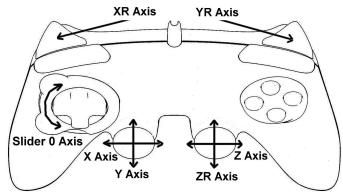
2 "AXES" MODES AVAILABLE ON PC
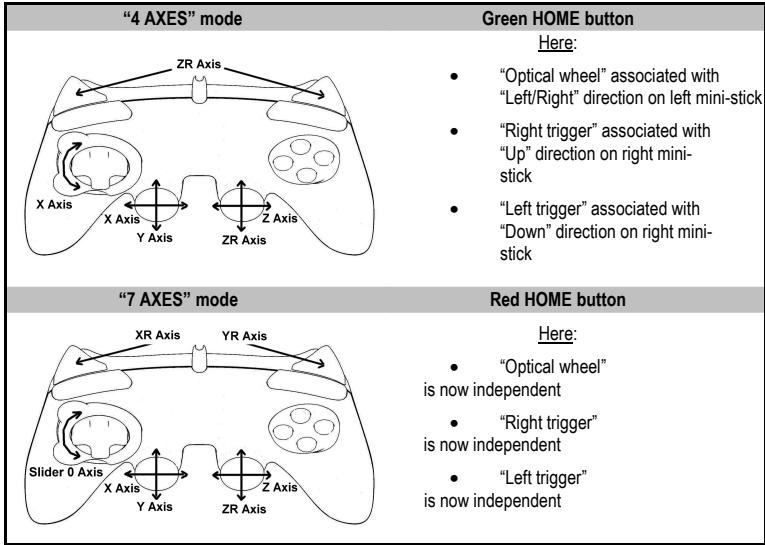
"AUTOMATIC PRESET" CONFIGURATION - PC
To find out all of the possibilities offered on PC, try them out in the Windows "Game Controllers" section
ADVANCED FUNCTIONS
ADJUSTING THE OPTICAL WHEEL'S SENSITIVITY
The optical wheel (4) has 2 sensitivity modes:
- Normal sensitivity (the default mode)
- High sensitivity (must be set)
Setting "High Sensitivity" mode:
| Steps | Action | HOME button |
| 1 | Raise and hold the “UP” direction on the optical wheel | Flashes continuously |
| 2 | Press and release the MAPPING button (7) |
Your optical wheel is now more sensitive (Procedure must be carried out each time the gamepad restarts or is disconnected)
- Returning to "Normal Sensitivity" mode:
| Steps | Action | HOME button |
| 1 | Lower and hold the “DOWN” direction on the optical wheel | Does not flash |
| 2 | Press and release the MAPPING button (7) |
Your optical wheel has now returned to Normal Sensitivity (the default mode)
2 PROGRAMMING MODES
The PRESET button and LED (8) allows you to view the type of programming selected: AUTOMATIC (preprogrammed) or MANUAL (programmed by yourself). A single press of this button allows you (even during the course of a game) to switch from one programming mode to the other.
- "AUTOMATIC PRESET" (PRESET button OFF)
This represents the default programming: the functions of the optical wheel and the triggers are preprogrammed, as are the positions of the buttons and the directions of the mini-sticks and of the D-Pad.
PLEASE REFER TO THE "AUTOMATIC PRESET" CONFIGURATION DIAGRAMS
- "MANUAL PRESET" (PRESET button GREEN)
This represents your own personal programming:
- The buttons, directions of the mini-sticks and of the D-Pad can either be
- programmed on the optical wheel and on the triggers,
- or switched between themselves.
- You can modify the programming to your liking and whenever you wish.
- The programming is automatically saved inside your gamepad (even when disconnected).
- When your "MANUAL PRESET" is clear, it is identical to the "AUTOMATIC PRESET".
PROGRAMMING THE OPTICAL WHEEL AND TRIGGERS
The 2 directions of the optical wheel and the 2 progressive triggers can be programmed using the MAPPING button (7).
Examples of possible applications:
Programming a button, direction of a mini-stick or of the D-Pad:
- onto the "up" or "down" direction of the optical wheel
- onto the "right trigger" or "left trigger"
- Programming procedure on optical wheel and triggers:
| Steps | Action | PRESET button color |
| 1 | Enable "MANUAL PRESET" (8) by pressing the button. | Lit up green |
| 2 | Press and release the MAPPING button (7). | Lit up red |
| 3 | Press and release the button or direction to program. | Flashes red |
| 4 | Raise or lower the direction on the optical wheel or press the trigger onto which you wish to place your function. | Lit up green |
Your "MANUAL PRESET" is now enabled and up to date
(with your programming applied to the optical wheel or triggers)
SWITCHING BUTTONS/MINI-STICKS/D-PAD
All progressive buttons (on PS2 and PS3) or digital buttons (on PC), as well as directions of the mini-sticks and of the D-Pad can be switched using the MAPPING button (7).
Examples of possible applications:
- Switch buttons between themselves
- Switch the 2 mini-sticks
(in this case, you will to have to map the 4 directions of the first mini-stick to the 4 directions of the second mini-stick)
- Switch the D-Pad with a mini-stick
(in this case, you will have to map the 4 D-Pad directions to the 4 directions of the mini-stick in question).
Procedure for switching buttons, mini-sticks and D-Pad
- Does not work for the triggers.
- Works for the optical wheel but only on PC and in "7 axes" mode.
| Steps | Action | PRESET button color |
| 1 | Enable "MANUAL PRESET" (8) by pressing the button. | Lit up green |
| 2 | Press and release the MAPPING button (7). | Lit up red |
| 3 | Press and release the button or direction to switch. | Flashes red |
| 4 | Press and release the button or direction onto which you wish to place your function. | Lit up green |
Your "MANUAL PRESET" is now enabled and up to date (with the 2 functions switched).
EEPROM MEMORY
- Your gameplay features an internal chip which saves all of your "MANUAL PRESET" programming (even when the gameplay is switched off or disconnected for a long period of time).
- You can save a different "MANUAL PRESET" for each platform used: PlayStation® 1, PlayStation® 2, PlayStation® 3, PC 4 Axes and PC 7 Axes
TO ERASE YOUR "MANUAL PRESET"
| Action | PRESET button color | |
| 1 | Enable your “MANUAL PRESET” (8). | Lit up green |
| 2 | Press and hold the MAPPING button (7) for 2 seconds. | Flashes green 2 seconds |
Your "MANUAL PRESET" is now clear (and once again identical to the "AUTOMATIC PRESET").
RETURNING TO "FACTORY SETTINGS"
You can erase all of your programming or settings:
| Steps | Action | MAPPING button color |
| 1 | Press the MAPPING + SELECT + START buttons simultaneously | Flashes blue 5 seconds |
All of your "MANUAL PRESETS" (= PC + PS2 + PS3) or settings are now clear.
Note: this procedure will completely restart your gamepad
(on PC, we therefore recommend that you do this outside of games).
POSSIBLE USES IN GAMES
The optical wheel (thanks to its technology and degree of rotation greater than that of any mini-stick) offers unparalleled precision and stability in all types of games: racing (ultra-precise steering), flying (rudder), action and FPS (progressive zoom), sports (measured shot, strength of hit), etc.
The triggers (thanks to their progressive action and range of mechanical travel greater than that of any button) offer extremely precise control in all types of games: racing (progressive and independent acceleration and braking, handbrake), action and FPS (rate of fire, lateral movement), sports (measured pass or shot, strength of hit or jump, running speed), etc.
SOME EXAMPLES AND TIPS:
- There are numerous configuration possibilities, depending on the game you are playing.
- In certain games (racing type), do not hesitate to test out the 2 sensitivity modes for your optical wheel (Normal or High) in order to optimize its precision and responsiveness.
DIFFERENT EXAMPLES ACCORDING TO TYPE OF GAME
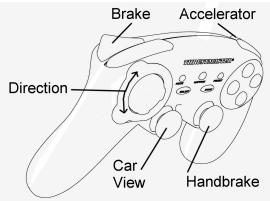
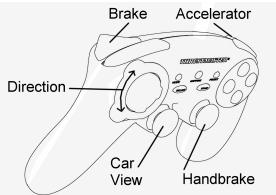
Action/Adventure ("Car" mode)
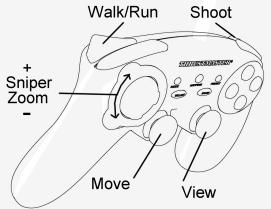
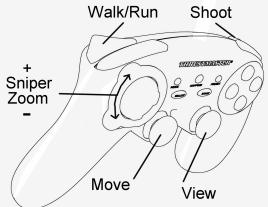
Action/Adventure ("On foot" mode)
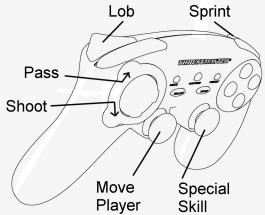
Sports ("Ball game" type)
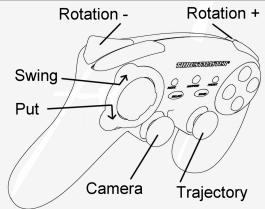
Sports ("Golf" type)
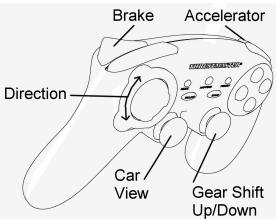
Car racing ("Simulation" type)
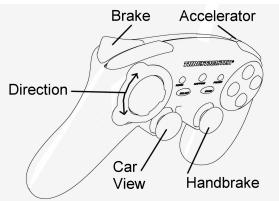
Car racing ("Arcade/Rally" type)
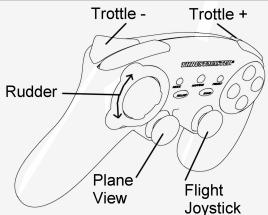
Flying ("Simulation" type)
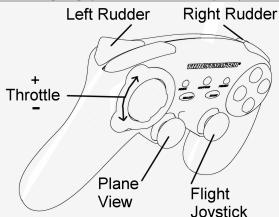
Flying ("Arcade/Action" type)
USING MORE THAN ONE "Run'N' Drive Wireless" GAMEPAD AT THE SAME TIME (in Multiplayer mode)
You can use up to 4 "RunN' Drive Wireless" gamepads at the same time (in multiplayer mode).
Channel detection is carried out automatically
In case of error or to force the connection: press the CONNECT button on the receiver and simultaneously press the L2 + R2 + MAPPING buttons on your gamepad.
TROUBLESHOOTING AND WARNINGS
- My gamepad doesn't function correctly or seems improperly calibrated:
- In the event of malfunction due to electrostatic emission, exit the game, switch off your gamepad and disconnect the receiver from your console or your PC.
To play again, reconnect the receiver, switch your gamepad back on and start the game again.
-
Never move the mini-sticks, the optical wheel or the triggers when connecting your gamepad (to avoid any calibration problems).
-
On PC, if the game does not accept "7 axes" mode (undesired effects), switch your gamepad to "4 axes" mode (the standard gamepad mode).
- I can't configure my gamepad in a game:
- In your game's "Options / Controller / Gamepad" menu: select the most appropriate configuration.
- Please refer to your game's user manual or online help for more information.
- You can also use your gamepad's "programming" function to resolve this type of problem.
- On PC or PS3, my gamepad doesn't function correctly:
- Exit your game, disconnect your gamepad, verify that the "PC/PS3" USB selector (11) is in the proper position, then reconnect everything.
- On PC, the vibrations are continuous:
- Decrease the intensity of force effects in your game's controller options or adjust the forces in the gamepad's control panel.
- The MAPPING LED flashes slowly and continuously:
- Please change batteries.
When you're done using your gamepad, we recommend that you always set the gamepad's POWER ON/OFF switch (15) to the OFF position (to save your batteries).
TECHNICAL SUPPORT
If you encounter a problem with your product, please go to http://ts.thrustmaster.com and click Technical Support. From there you will be able to access various utilities (Frequently Asked Questions (FAQ), the latest versions of drivers and software) that may help to resolve your problem. If the problem persists, you can contact the Thrustmaster products technical support service ("Technical Support"):
By email:
In order to take advantage of technical support by email, you must first register online. The information you provide will help the agents to resolve your problem more quickly. Click Registration on the left-hand side of the Technical Support page and follow the on-screen instructions. If you have already registered, fill in theUsername and Password fields and then click Login.
By telephone:
| United Kingdom | 08450800942Charges at local rate | Monday to Friday from Noon to 4pm and 5pm to 10pm Saturday from 9am to Noon and 1pm to 7pm Sunday from 9am to Noon and 1pm to 4pm |
| United States | 1-866-889-5036Free | Monday to Friday from 7am to 11am and from Noon to 5pm Saturday and Sunday from 7am to Noon (Eastern Standard Time) |
| Canada | 1-866-889-2181Free | Monday to Friday from 7am to 11am and from Noon to 5pm Saturday and Sunday from 7am to Noon (Eastern Standard Time) |
| Denmark | 80887690Free | Monday to Friday from 1pm to 5pm and 6pm to 11pm (English) Saturday from 9am to 1pm and 2pm to 8pm Sunday from 10am to 1pm and 2pm to 5pm |
| Sweden | 0200884567Free | Monday to Friday from 1pm to 5pm and 6pm to 11pm (English) Saturday from 9am to 1pm and 2pm to 8pm Sunday from 10am to 1pm and 2pm to 5pm |
| Finland | 0800 913060Free | Monday to Friday from 2pm to 6pm and 7pm to Midnight (English) Saturday from 10am to 2pm and 3pm to 9pm Sunday from 11am to 2pm and 3pm to 6pm |
WARRANTY INFORMATION
Worldwide, Guillemot Corporation S.A. ("Guillemot") warrants to the consumer that this Thrustmaster product will be free from material defects and manufacturing flaws for a period of two (2) years from the original date of purchase. Should the product appear to be defective during the warranty period, immediately contact Technical Support, who will indicate the procedure to follow. If the defect is confirmed, the product must be returned to its place of purchase (or any other location indicated by Technical Support).
Within the context of this warranty, the consumer's defective product will, at Technical Support's option, be either repaired or replaced. Where authorized by applicable law, the full liability of Guillemot and its subsidiaries (including for indirect damages) is limited to the repair or replacement of the Thrustmaster product. The consumer's legal rights with respect to legislation applicable to the sale of consumer goods are not affected by this warranty.
This warranty shall not apply: (1) if the product has been modified, opened, altered, or has suffered damage as a result of inappropriate or abusive use, negligence, an accident, normal wear, or any other cause not related to a material defect or manufacturing flaw; (2) in the event of failure to comply with the instructions provided by Technical Support; (3) to software not published by Guillemot, said software being subject to a specific warranty provided by its publisher.
Additional warranty provisions
In the United States of America and in Canada, this warranty is limited to the product's internal mechanism and external housing. Any applicable implied warranties, including warranties of merchantability and fitness for a particular purpose, are hereby limited to two (2) years from the date of purchase and are subject to the conditions set forth in this limited warranty. In no event shall Guillemot Corporation S.A. or its affiliates be liable for consequential or incidental damage resulting from the breach of any express or implied warranties. Some States/Provinces do not allow limitation on how long an implied warranty lasts or exclusion or limitation of incidental/consequential damages, so the above limitation may not apply to you. This warranty gives you specific legal rights, and you may also have other legal rights which vary from State to State or Province to Province.
COPYRIGHT
© 2007 Guilemot Corporation S.A. All rights reserved. Thrustmaster® is a registered trademark of Guilemot Corporation S.A. PlayStation® is a registered trademark of Sony Computer Entertainment, Inc. Windows® and Windows® XP are registered trademarks of Microsoft Corporation in the United States and/or in other countries. Pentium® is a registered trademark of Intel Corporation. All other trademarks and brand names are hereby acknowledged and are the property of their respective owners. Illustrations not binding. Contents, designs and specifications are subject to change without notice and may vary from one country to another. Made in China.
ENVIRONMENTAL PROTECTION RECOMMENDATION

At the end of its working life, this product should not be disposed of with standard household waste, but rather dropped off at a collection point for the disposal of Waste Electrical and Electronic Equipment (WEEE) for recycling.
This is confirmed by the symbol found on the product, user manual or packaging.
Depending on their characteristics, the materials may be recycled. Through recycling and other forms of processing Waste Electrical and Electronic Equipment, you can make a significant contribution towards helping to protect the environment.
Please contact your local authorities for information on the collection point nearest you.
FAQs, tips and drivers available at www.thrustmaster.com
Run'N' Drive
Wireless Rumble Force
3-in-1 Compatible
PS3®/PS2®/PC
2 MODES D'AXES DISPONIBLE SUR PC
Wireless Rumble Force
3-in-1 Compatible
PS3®/PS2®/PC

Handbuch
UBERSICHT
Wireless Rumble Force
3-in-1 Compatible
PS3®/PS2®/PC
Handleiding
TWEE PROGRAMMEERMODI
PROBLEM OPLOSSEN EN WAARSCHUWINGEN
INFORMATIE MET BETREKKING TOT DE GARANTIE
Wireless Rumble Force
3-in-1 Compatible
PS3®/PS2®/PC

Manuale d'uso
CARATTERISTICTECNICHE
Wireless Rumble Force
3-in-1 Compatible
PS3®/PS2®/PC

Manual del usuario
CHARACTERISTICAS TECNICAS
PARABORRAR TU "MANUAL PRESET"
Wireless Rumble Force
3-in-1 Compatible
PS3®/PS2®/PC
PykoBoDCTBO NOIb3OBaTeJIa
TEXHNUECKNEXAPAKTEPNCTUKN
1.2 HeaBcIMbIX MoToPora
Bn6paOnHHo6pTaHNOBc3n
(dnaPlayStation® 2 n IPK)
2.Да nponopuohanbHbix anahorobbIX MHNH-ДКИCTKIA
3. ManinnyIaTOp D-Pad
4.Пророрцоньнoi onTnueckmДаТУК
5.Два nponopuznoHaNbHbIX Tprnrepa
6. Khoinka HOME LED Дпя Playstation@3
н MODE (PEKIM) Дпя ПК
- Khonika MAPPING LED (Для пэргамmarовая и Инд сotingаши coedinehenia)
8.Khonka PRESETLED (dЯвьбoga ржима пограимьовая) - KomaHnBHe KHOJKN
- USB-pa3bemДЯгпюкноченя ПК и PlayStation® 3
11.пеклоча teleportхимаUSB“PC"ил“PS3” - Khoinka npneMnka CONNECT LED
- Pazem irpoBoro nopTa PlayStation® 2
- Otcek Дябата
- Bыклочаел nbntaн Power ON/OFF
- Bыклочаель моторов MOTORS ON/OFF
TABJIUCA NOIDEPXKNBAEMbIX PEXKIMOB
| Платфорma | PEXКМ | Ц比特 Кнолки HOME (6) |
| PLAYSTATION® 1 | "PS1" | Выкп. |
| PLAYSTATION® 2 | "PS2" | КРACHьй |
| PLAYSTATION® 3 | "PS3" | КРACHьй |
| ПК | "4 OСИ" | ЗЕLEньий |
| "6 OCEИ" | КРACHьй |
YCTAHOBKA BATAPEEK
UctahOBIne Tbe 6aTapeKn TnPa LR03 / AAA B OTeCek IJa 6bTaapeEe Ha TbIbHoN CTOpOHe IrPoBOro KOthpOJIpepa (14).
0630P
BbIKIyOaTeNb NITaHnI POWER ON/OFF (15)
BbIKJIouaTeJIb MOTOpOB MOTORS ON/OFF (16)
Tenepb MoXHO NaHnHaBt Hpy!
PEXKIM PLAYSTATION® 3
KOHΦIγPALIY“ABTOMATUÇECKME IPEДΥCTAHOBKIN”-PLAYSTATION® 3
PeximPS3
Kpachara KhoNka HOME
3decb:
OnTnueckm daTnuk COOTBETCTBYET KHOIIKAM BnEbo/BnpaBO'Ha naLeboM mHnH-IXoOHTke
"Ipabby tprrrep" COOTBECTByeT nponopunohbHON KHONKE "R2"
"Jebby tprnrep"cooTBeCTByeT nponopunohanbHOH KHONKE "L2"
KHONTKA "HOME" (6)
C nmoiueho KnoHKn "HOME" irpoBOrO KOHTpOJIpepa MoKHO BbIITN I3 INrPbI, BoITN B MeHIO HnAprrMyo BbIKIOHtB CnCTeMy PlayStation® 3.
BAXHBIE 3AMEYAHNIO PABOTE C PLAYSTATION® 3
- Célektop USB ha πρηεmNHke (11) Σιχκην BCerda 6bɪt b yctaHOBnB nnoJoxHne "PS3" nepei noKIIouHneM πρηεmNHka.
- B peximme ondoro irpoka "1 Player": Ecni KOHTpOJIpe (oФициьня Всря) BKIQUeH, Heo6xOДМО nepeKIOUHTb erо Ha «IopT 2 KOHTpOJIpeA», YTO6bI 6ecnpobOJHOn irpOBoI KOHTpOJIpe "Run'N'Drive" paBOTan.
- B npncstabke PlayStation® 3, kontrponnep "Run'N" Drive" coBmecTMM toIbko c nprpamn dny PlayStation® 3 (и несят豌роты с ргамп ду PlayStation® 2) и не подержьаertФункшо DTaHTKMA DBIXEHA
PLAYSTATION® 2
IIOJKIIIOUHEHNE K PLAYSTATION® 2
- Ппсоевине разьем PS2 уровoro пота nepedingу (13) К поту #1 на консл.
- BkHIOUHTe KOHCOJIb.
- BkIIOHHTe IrpoBoi KOHTpOJIepe np Ni NOMOoi BbIKIIouaTeIa POWER ON/OFF (15).
4.Поссе установлесоединя:3anyctte ngpy.
Tenepb MoXHO NaHnHaB nIpy!
PEXKIM PLAYSTATION® 2
KOHΦιγΑΡΙΥΑ “ABTOMATΥCHECKI ΠΡΕύγCTAHOBΚΟ” - PLAYSTATION® 2
PeximPS2
Kpaacha Khoonka HOME
3decb:
ONTHECKINDatYHK COOTBETCTBYET KHONKAM BBeBO/BnpaBOHaJIeBOM MHNH- DKOICTNIKE
"Ipabby trnrrrep" COOTBETCTBYET nponopunohanbHNo KHONKE "Cross
"Jebby trnprrp" trnprrp cooTbctByet nponopunohalbno kHONKE "Square
BAXHBIE 3AMEYAHIA NO PABOTE C PLAYSTATION® 2
Hikorda He noikouaTe pa3bem USB (10) K PlayStation® 2 (BO n36eHne noBpeXdHnI INpOBoKoHTPOJIpe aII KOHcONI).
#
IIOKIIIOUCHNEKII
CD-DnCK, noCTabJIeMbI C n3dJIeHbEM, no3BONaIeT yctAHOBITb IpaIbEpbl Force Feedback.
1.YctahOBite ceJIeKTop USB ha npHmHnke (11) B noJIOxHeHne "PC".
2. BctabBe yCTaHOBOHb CD-DnCK n CNeDyTe IHCTpyKlunm. Nocle 3aBepeHnry yCTaHOBKn HAKMITE Finish (3akOnHTb) n nepe3arpy3nte KOMNbIOpTep.
3. Пocne_TOК, камьнотер зурstс,TоДКичHTe pa3bEM USB npHmHnka K OdHOMy m3 nopTOB USB ha KMblTepe.ОпацIHONHbIe CnCTeMby Windows® XP ИИ Vista abTOMaTHeckn 6OBHApKAT HOBOE yctpoCTBO.
4. BkIIOHTe IrpoBoi KOHTpOJIepe np Ni NOMoOns BbIKJIouaTeTl PAWER ON/OFF (15).
5. ŒeɪkHnTe Start (Iyck)/Settings (HactpOka)/Control Panel (IaHenb ynpablenna), nocne Yero cDenaTae DBOHNo IeTHOK Ha IyHKe Game Controllers (IrpoBbie KOHTponPnepbl).
Duaioeoe OkHO Game Controllers (MapoeBie KOHmpoNneBb) bbyodum UMa uepoeoKOHmpoNepa u KhoNKy cOsmoHnU OK.
- BOKHE Control Panel (Панень уралени), Виберпгунк Properties (Свояства) И Виноштейн'te Hachtpoikу мрового контPORлега:
Khoika Test device (Ppobepntb yctpoCTBO): n03B0nIeT npOBepNT b n pOcMOptb KHOJIa, MaHInyIaTOp D-pad, MHN-IXKOCTMKN, TPNITpeBb I ONTIYueckn DaTNUK.
Khoika Test forces (IpoBepntb obaThyO CB3b): no3BOJlEe IpoBepntb n HAcTPOtB 3oPfKeTb B6paun dIra NCIOJIb3OBaHn.
Tenepb MOxHO NaHnHaB nIpy!
BAKHbIE 3AMEUHINIO PABOTE CIK
- CenekTop USB Ha npimemnke (11) DoJIxHcBcerda 6bITb yCTaHOBIne B nOIOXHeMe "PC" nepeI noKIIIOUHeHmnpimemnHnka.
BbIbOP“OCEHNAIK
"PpOrpaMMHbI" BbIbOp oei:
Ha ctpaHnue 1 PAnenu npablenna (Control Panel) BbIbepeTeMbIbIy NcCIO oEi n HaxMnTE OK.
"AnnapaThbI" BbIbOp oCeI:
Haxmte KhoNY HOME (6) Iy BbIbopa KOJIueCTBa AKTINBbIX OcEi.
2 PEXKIMA OCEI, IMEIOUINECRA HA PIK
KOHΦIγPΑΙΥ “ABTOMATΥEÇΚΕ ΠΡΕΝΥCTAHOBΚΟ” - ΠΚ
PeknM "4 OCH"
3eJeha KhoIka HOME
3decb:
OHTTHeCKn DaTtNk COOTBETCTBYET KHOITKAM BBeBO/Bpabo>HaJeBOMMHNH-DXoJcTKe
"Pnabbl Tprrrep"cooBtctbByet HanpnaBneHMO"BBePx npBaBO rMnH- DKOHTkA
"Jebby TprTep" COOTBETCTBYET HANpABJeHNO "BnH3" npaboro MMnI-DKoIcTnka
Pexm"7OCEI
Kpacha KhoKa HOMe
3decb:
HACTPOIKA YUBCTBNTIEJbHOCTN ONTNUECKOIO DATUKIA
OnTnueckn DaTnK (4) NMeet 2 pexkma YyBCTBnteIbHOCTn:
- HOpMaJIbHaN aYbCTBNTeJIbHOCTb (IO yMOJUaHnIO)
- BbICOKaYyBCTBNTeJIbHOCTb (HaCTpaNbaETcA)
HactpoKa pexmAma "BbICOKOyUBCTBNTBHOCTN"
| ЗтANы | ДeйСТВиE | КнОпа HOME |
| 1 | Быберіе и уdeckівайіе наразавление BBEPX на ОпТИЧЕСКOM датниKE | НeнрeperьИно міngаET |
| 2 | Нaхміte и отПусHTе КнОпіу MAPPING (ПЕPEОПРЕДЕЛЕНИЕ) (7) |
Tenepbontuueckn daTuHK 6ydet 6oee yBCTBntbHbIM.
Bb mokeTe coxpaHnItb pa3JIuHhIe "TIOJIb3OBATEJIbCKIe HACTPOIKN" nIg KaJdoI ncNoJIb3yEmo InilatfOpMbI:
PlayStation® 1, PlayStation® 2, PlayStation® 3, PK 4 oc n i PK 7 ocei.
KAK CTEPETb HABOP IOJIb3OBATEJIbCKmX IPEyCTAHOBOK "MANUAL PRESET"
Action/Adventure (peXIM "TpaHcNIOpT")
Action/Adventure (peKIM "Peeuin")
IrgpoBoi KOHTpOJIpep pa6oTaET He npabunbH Onn He OTKaJIN6pOBaH:
B Cnyae h enolanaoko, 03knaikoux B CBAH CTaTHeCKM 3NEKPTNCHETOMB, BblnIte N3 nRbI, BblKnOHTHe IrpoBoW KOHPTONLepN OTOcEOHNHITE PEPEDATNHOT OK MOnblbTePA INKOHCOIN.
Ha PIK, noctoHHbIe Bn6paun:
- YmehbUnite INHTeCNBHOCTb 3ΦΦeKTOB o6paTHoN CB3n B npaMeTPax IrPbI ININ HAcTpoTe 3ΦΦeKToB o6paTHoN CB3n Ha naHEni ynpaBnEHHI rPoBOrO KOHTpONpeA.
CbeToIOm MAPPING MeIeHHO HenpepbIBHO MmraE:
-3aMeHnTe 6aTaepKn.
Ito oKoHauHUI uCnoJIb3OeAHua IaOpOBIM KOHmPonIpom peKoMeHyemcEceDa cmaUmb bIKnIOvamEnb POWER ON/OFF (15) e nIoXeHe UFF (eo u36ExaHue pa3pa 6amapeek).
TEXHNUECKA NIOIDEPXKA
ПИЗВОЗКИЕВЕМ NOПБЕМ, CB8AANHbX C I NCSILTOBAAHEM NOKTPONPPEA, 3aJIDHTe Na B6E-CaIIT h/1s.Thrustmaster.com I nepejntte No cSbJIne Technical Support (TexNHeCKA NOdEPKx). Ha 30t CTpNAHIE eCTb DcTNO K pAsINHbIM yTHNIATAM (caTcO 3aZdaAeMbe BonpoCb (FAQ), camblé HObBE bepCMn DpaJIeBepOB n porpammmoro oobceNeHn) -3to MOKET NOMOy peueHENIO noPbOBeMb. Eecn 3To He NOMIo, MOKHO CB8a3bTaC O cnJy6o TexNHcckoi NOdEPKnx Thrustmaster ("Technical Support"):
YPKOBDCTBO NOIb3O8ATENI YNANKOBY.
B 3aBcHmOCTO CbOCTB, MATEPnAbIy MOIT pepehabTcB NOBTOPHUO nepep60TKy. NIObTOPHNApeP60TKA OTOXoBD 3NEKTPrueCheKOrO I 3NEKTPOHORO 6OpbyDobAHMO KBEHTs3HauTeHJIbHbIK BnADB COxPAHeNHcOkpyXaoueI cPeDbI.
06patneBcMecThbIeopraHbIbNactn3aHmΦOpmaueHoeObnKnaHemnyKHe pnpemaTaknxOTOXoB.
- Run'N' Drive
- Wireless Rumble Force
- TECHNICAL FEATURES
- INSTALLING BATTERIES
- OVERVIEW
- THE CONNECTION BETWEEN THE GAMEPAD AND RECEIVER IS ESTABLISHED AUTOMATICALLY
- STANDBY MODE
- PLAYSTATION® 3
- INSTALLATION ON PLAYSTATION® 3
- PLAYSTATION® 3 MODE
- USING THE "HOME" BUTTON (6)
- IMPORTANT NOTES FOR PLAYSTATION® 3
- PLAYSTATION® 2
- INSTALLATION ON PLAYSTATION® 2
- PLAYSTATION® 2 MODE
- IMPORTANT NOTE FOR PLAYSTATION® 2
- PC
- INSTALLATION ON PC
- IMPORTANT NOTES FOR PC
- SELECTING "AXES" ON PC
- "AXES" MODES AVAILABLE ON PC
- ADVANCED FUNCTIONS
- ADJUSTING THE OPTICAL WHEEL'S SENSITIVITY
- PROGRAMMING MODES
- PROGRAMMING THE OPTICAL WHEEL AND TRIGGERS
- Examples of possible applications:
- - Programming procedure on optical wheel and triggers:
- SWITCHING BUTTONS/MINI-STICKS/D-PAD
- Procedure for switching buttons, mini-sticks and D-Pad
- EEPROM MEMORY
- RETURNING TO "FACTORY SETTINGS"
- POSSIBLE USES IN GAMES
- SOME EXAMPLES AND TIPS:
- USING MORE THAN ONE "Run'N' Drive Wireless" GAMEPAD AT THE SAME TIME (in Multiplayer mode)
- Channel detection is carried out automatically
- TROUBLESHOOTING AND WARNINGS
- - My gamepad doesn't function correctly or seems improperly calibrated:
- - I can't configure my gamepad in a game:
- - On PC or PS3, my gamepad doesn't function correctly:
- - On PC, the vibrations are continuous:
- - The MAPPING LED flashes slowly and continuously:
- TECHNICAL SUPPORT
- By email:
- WARRANTY INFORMATION
- Additional warranty provisions
- COPYRIGHT
- ENVIRONMENTAL PROTECTION RECOMMENDATION
- MODES D'AXES DISPONIBLE SUR PC
- UBERSICHT
- TWEE PROGRAMMEERMODI
- PROBLEM OPLOSSEN EN WAARSCHUWINGEN
- INFORMATIE MET BETREKKING TOT DE GARANTIE
- CARATTERISTICTECNICHE
- CHARACTERISTICAS TECNICAS
- TEXHNUECKNEXAPAKTEPNCTUKN
- YCTAHOBKA BATAPEEK
- 0630P
- BbIKIyOaTeNb NITaHnI POWER ON/OFF (15)
- BbIKJIouaTeJIb MOTOpOB MOTORS ON/OFF (16)
- PEXKIM PLAYSTATION® 3
- Kpachara KhoNka HOME
- KHONTKA "HOME" (6)
- BAXHBIE 3AMEYAHNIO PABOTE C PLAYSTATION® 3
- IIOJKIIIOUHEHNE K PLAYSTATION® 2
- PEXKIM PLAYSTATION® 2
- Kpaacha Khoonka HOME
- BAXHBIE 3AMEYAHIA NO PABOTE C PLAYSTATION® 2
- #
- IIOKIIIOUCHNEKII
- BAKHbIE 3AMEUHINIO PABOTE CIK
- BbIbOP“OCEHNAIK
- PEXKIMA OCEI, IMEIOUINECRA HA PIK
- 3eJeha KhoIka HOME
- Kpacha KhoKa HOMe
- HACTPOIKA YUBCTBNTIEJbHOCTN ONTNUECKOIO DATUKIA
- KAK CTEPETb HABOP IOJIb3OBATEJIbCKmX IPEyCTAHOBOK "MANUAL PRESET"
- IrgpoBoi KOHTpOJIpep pa6oTaET He npabunbH Onn He OTKaJIN6pOBaH:
- Ha PIK, noctoHHbIe Bn6paun:
- CbeToIOm MAPPING MeIeHHO HenpepbIBHO MmraE:
- TEXHNUECKA NIOIDEPXKA
Brand : THRUSTMASTER
Model : RUN'N' DRIVE WIRELESS 3-IN-1 RUMBLE FORCE
Category : Gaming accessory