
RUN'N' DRIVE WIRELESS 3-IN-1 - Gaming accessory THRUSTMASTER - Free user manual and instructions
Find the device manual for free RUN'N' DRIVE WIRELESS 3-IN-1 THRUSTMASTER in PDF.
| Product Type | 3-in-1 multi-platform wireless controller (PlayStation 1, 2, 3 and PC) |
| Brand | Thrustmaster |
| Model | Run'N' Drive Wireless 3-in-1 |
| Dimensions (approx.) | 15 x 10 x 6 cm |
| Weight (with batteries) | Approx. 300 g |
| Power Supply | 2 LR03 / AAA batteries |
| Connectivity | Wireless via USB receiver (PC/PS3) and Gameport (PS2) |
| Main Features | Progressive optical wheel, 2 progressive triggers, 2 analog sticks, digital cross, 2 independent vibration motors, action buttons, HOME button, MAPPING button, PRESET button |
| Supported Modes | PS1, PS2, PS3, PC 4-axis, PC 7-axis |
| Wireless Range | Approx. 10 meters (depending on environment) |
| Battery Life (estimated) | Up to 20 hours (depending on use) |
| Programming | Automatic and manual presets, inversion of buttons/sticks/cross, sensitivity adjustment of optical wheel |
| Memory | Internal EEPROM to save profiles |
| Number of Simultaneous Players | Up to 4 controllers |
| Maintenance and Cleaning | Use a soft, dry cloth. Do not use chemical products. |
| Safety | Do not expose to moisture or shocks. Turn off the controller after use using the POWER switch. |
| Spare Parts and Repairability | Contact Thrustmaster technical support. Repair by the manufacturer. |
| Warranty | 2 years, material and manufacturing defects |
| General Information | Made in China. © 2007 Guillemot Corporation S.A. Thrustmaster is a registered trademark. |
Frequently Asked Questions - RUN'N' DRIVE WIRELESS 3-IN-1 THRUSTMASTER
User questions about RUN'N' DRIVE WIRELESS 3-IN-1 THRUSTMASTER
0 question about this device. Answer the ones you know or ask your own.
Ask a new question about this device
Download the instructions for your Gaming accessory in PDF format for free! Find your manual RUN'N' DRIVE WIRELESS 3-IN-1 - THRUSTMASTER and take your electronic device back in hand. On this page are published all the documents necessary for the use of your device. RUN'N' DRIVE WIRELESS 3-IN-1 by THRUSTMASTER.
USER MANUAL RUN'N' DRIVE WIRELESS 3-IN-1 THRUSTMASTER
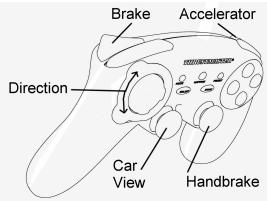
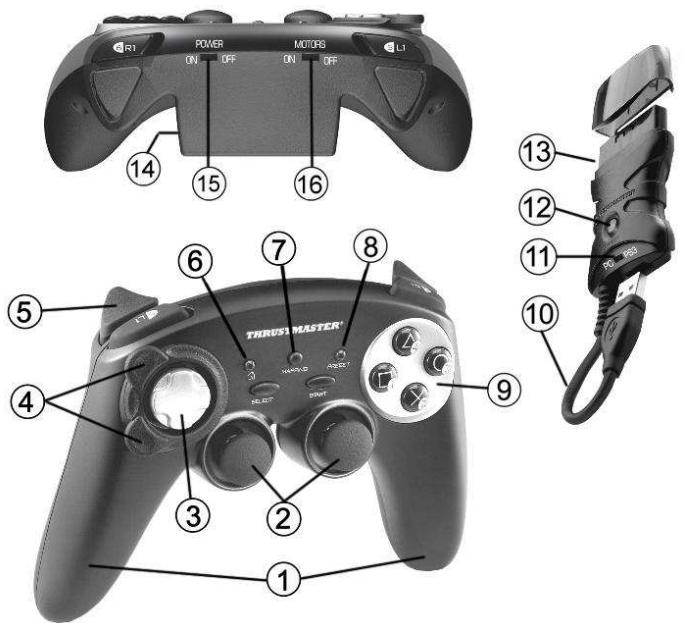
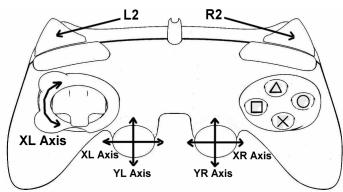
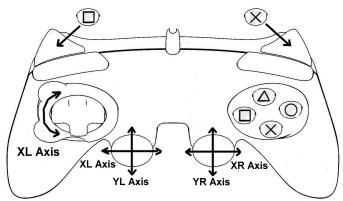
- 2 independent vibrating motors (for PlayStation® 2)
- 2 progressive analog mini-sticks
- D-Pad
- Progressive optical wheel
- 2 progressive triggers
- HOME LED button for Playstation®3 and MODE for PC
-
MAPPING LED button (for programming and indicating connection status)
-
PRESET LED button (to select programming)
- Action buttons
- PC and PlayStation® 3 USB connector
- "PC" or "PS3" USB selector
- CONNECT LED button on receiver
- PlayStation® 2 "Gameport" connector
- Battery compartment
- POWER ON/OFF switch
- MOTORS ON/OFF switch
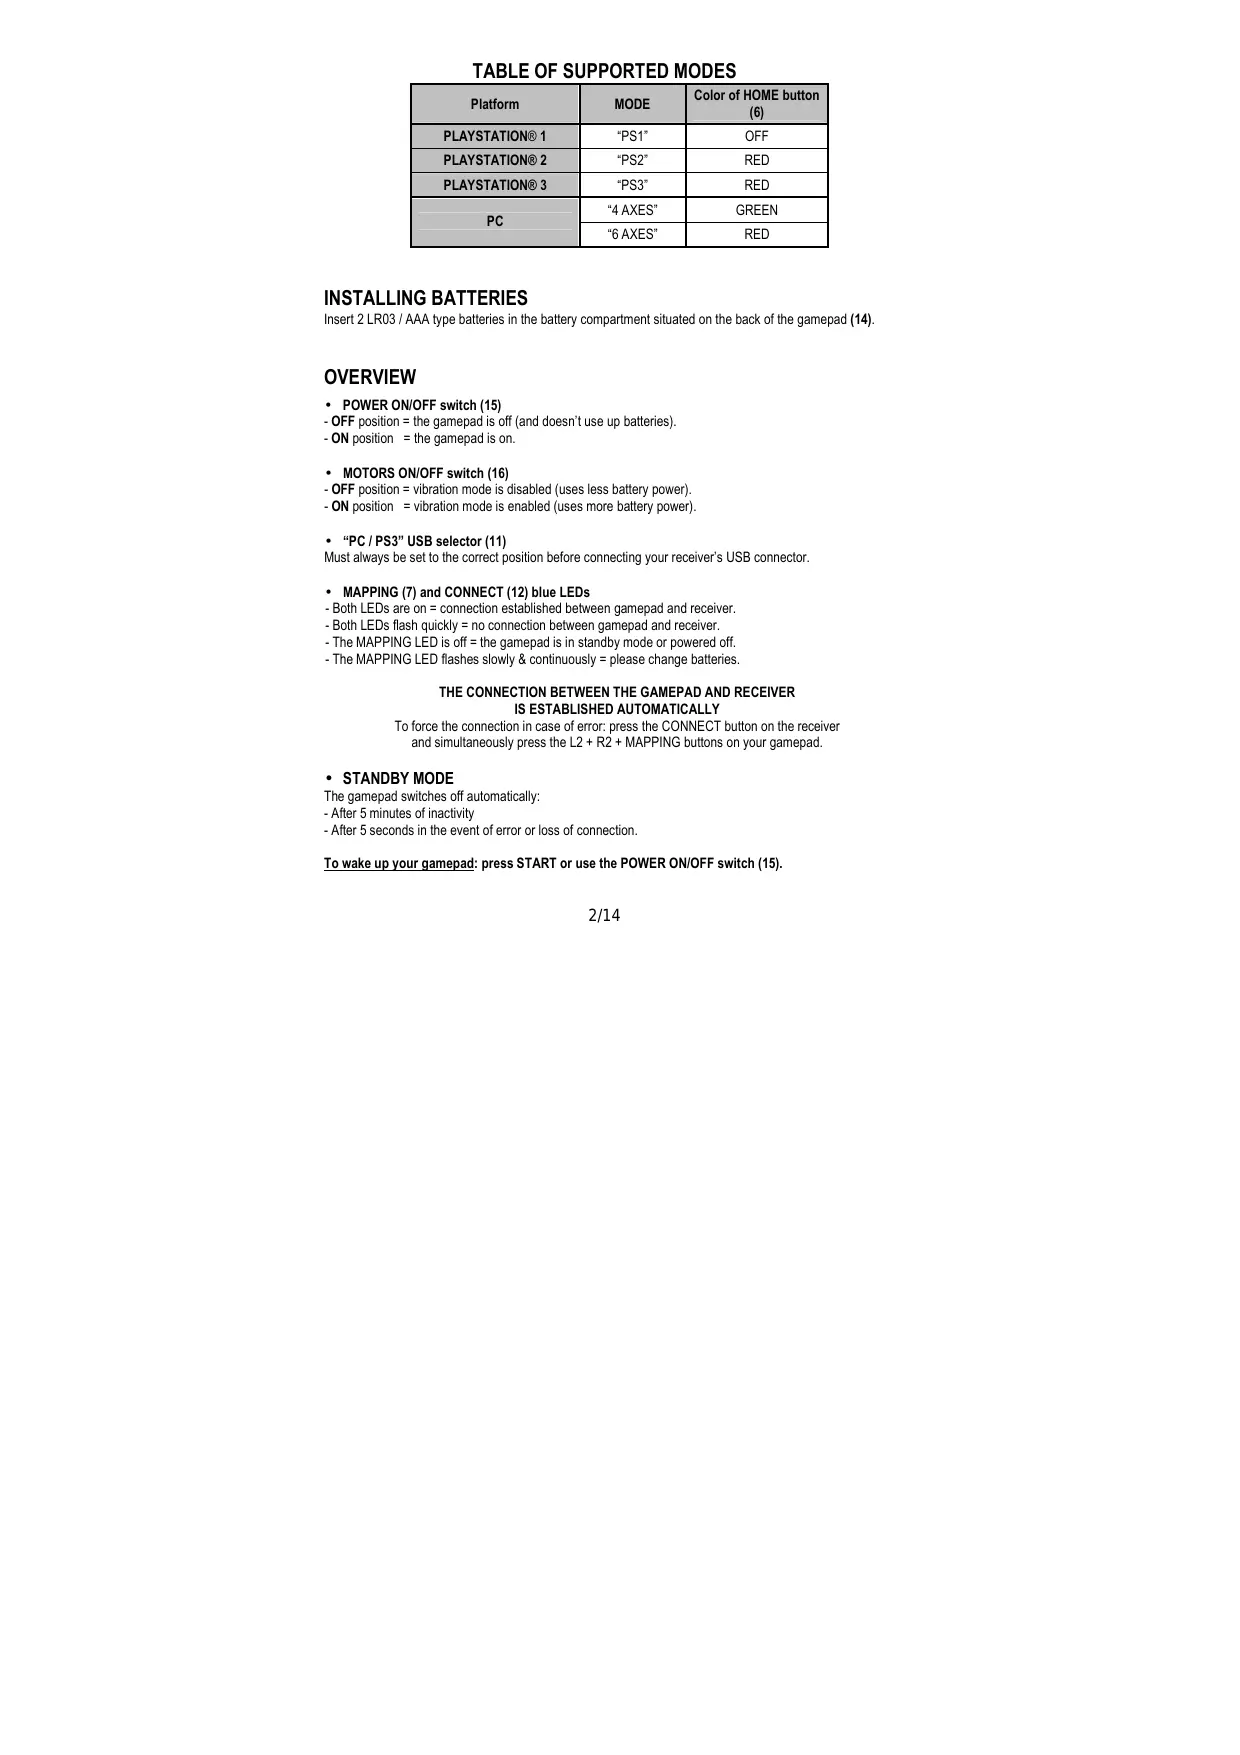
TABLE OF SUPPORTED MODES
| Platform | MODE | Color of HOME button (6) |
| PLAYSTATION® 1 | "PS1" | OFF |
| PLAYSTATION® 2 | "PS2" | RED |
| PLAYSTATION® 3 | "PS3" | RED |
| PC | "4 AXES" | GREEN |
| "6 AXES" | RED |
INSTALLING BATTERIES
Insert 2 LR03 / AAA type batteries in the battery compartment situated on the back of the gamepad (14).
OVERVIEW
-
POWER ON/OFF switch (15)
-
OFF position = the gamepad is off (and doesn't use up batteries).
-
ON position = the gamepad is on.
-
MOTORS ON/OFF switch (16)
-
OFF position = vibration mode is disabled (uses less battery power).
-
ON position = vibration mode is enabled (uses more battery power).
-
"PC/PS3" USB selector (11)
Must always be set to the correct position before connecting your receiver's USB connector.
-
MAPPING (7) and CONNECT (12) blue LEDs
-
Both LEDs are on = connection established between gamepad and receiver.
- Both LEDs flash quickly = no connection between gamepad and receiver.
- The MAPPING LED is off = the gamepad is in standby mode or powered off.
- The MAPPING LED flashes slowly & continuously = please change batteries.
THE CONNECTION BETWEEN THE GAMEPAD AND RECEIVER IS ESTABLISHED AUTOMATICALLY
To force the connection in case of error: press the CONNECT button on the receiver and simultaneously press the L2 + R2 + MAPPING buttons on your gamepad.
STANDBY MODE
The gamepad switches off automatically:
-
After 5 minutes of inactivity
-
After 5 seconds in the event of error or loss of connection.
To wake up your gamepad: press START or use the POWER ON/OFF switch (15).
PLAYSTATION® 3
INSTALLATION ON PLAYSTATION® 3
- Set your receiver's USB selector to the "PS3" position.
- Connect the USB connector to USB port #1 on the console.
- Switch on your console.
- Switch on your gamepad using the POWER ON/OFF switch (15).
- Once a connection has been established: start up your game.
You are now ready to play!
PLAYSTATION® 3 MODE
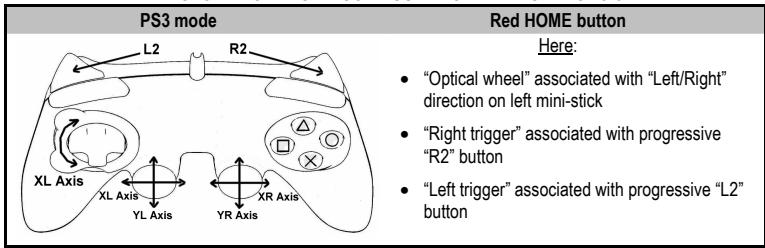
"AUTOMATIC PRESET" CONFIGURATION - PLAYSTATION® 3
USING THE "HOME" BUTTON (6)
Your gamepad's "HOME" button allows you to exit games, access menus and directly switch off your PlayStation®3 system.
IMPORTANT NOTES FOR PLAYSTATION® 3
- The USB selector on your receiver (11) must always be set to "PS3" before connecting the receiver.
- In "1 Player" mode: If your official gamepad is powered on, you must switch it to "gamepad port 2" in order for your "Run'N' Drive" gamepad to be functional.
- On PlayStation® 3, the "Run'N' Drive" gameplay is only compatible with PlayStation® 3 games (and will not work with PlayStation® 2 games) and does not feature a motion sensor.
PLAYSTATION® 2
INSTALLATION ON PLAYSTATION® 2
- Connect the receiver's PS2 Gameport connector (13) to port #1 on the console.
- Switch on your console.
- Switch on your gamepad using the POWER ON/OFF switch (15).
- Once a connection has been established: start up your game.
You are now ready to play!
PLAYSTATION® 2 MODE
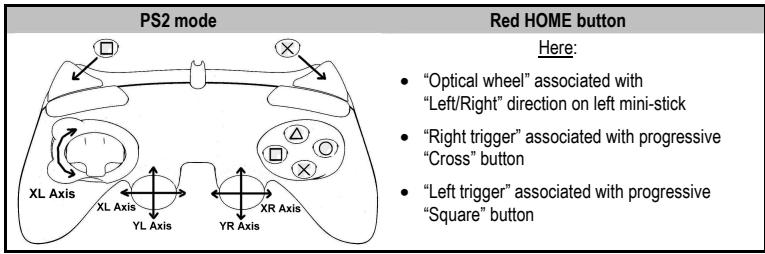
"AUTOMATIC PRESET" CONFIGURATION - PLAYSTATION® 2
IMPORTANT NOTE FOR PLAYSTATION® 2
Never connect the USB connector (10) to your PlayStation® 2 (to avoid the risk of damaging your gameplay or your console).
PC
INSTALLATION ON PC
- Set the USB selector on the receiver (11) to the "PC" position.
- Connect the receiver's USB connector to one of your computer's USB ports. Windows® XP or Vista will automatically detect the new device.
- Switch on your gamepad using the POWER ON/OFF switch (15).
- Click Start/Settings/Control Panel and then double-click Game Controllers.
The Game Controllers dialog box displays the gamepad's name with OK status.
- In the Control Panel, click Properties to test and view the buttons, D-pad, mini-sticks, triggers and optical wheel.
You are now ready to play!
IMPORTANT NOTES FOR PC
- The USB selector on your receiver (11) must always be set to "PC" before connecting the receiver.
- "Advanced Programming Software" for PC is also available for download on our website at the following address:
http://ts.thrustmaster.com/
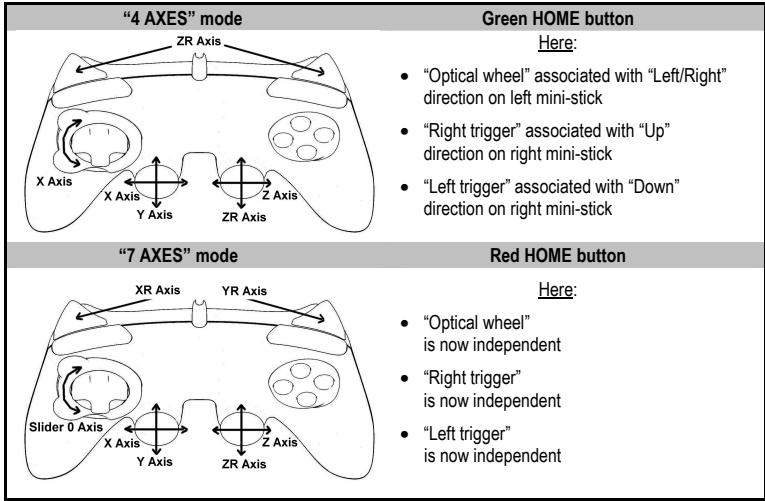
SELECTING "AXES" ON PC
- Selecting axes via "Software":
After installing the "Advanced Programming Software", go to page 1 of the Control Panel, click the number of axes you wish to use and then click OK. - Selecting axes via "Hardware":
Press the HOME button (6) to select the number of active axes.
2 "AXES" MODES AVAILABLE ON PC
"AUTOMATIC PRESET" CONFIGURATION - PC
To find out all of the possibilities offered on PC, try them out in the Windows "Game Controllers" section (once you have installed the "Advanced Programming Software")
ADVANCED FUNCTIONS
ADJUSTING THE OPTICAL WHEEL'S SENSITIVITY
The optical wheel (4) has 2 sensitivity modes:
- Normal sensitivity (the default mode)
-
High sensitivity (must be set)
-
Setting "High Sensitivity" mode:
| Steps | Action | HOME button |
| 1 | Raise and hold the “UP” direction on the optical wheel | Flashes continuously |
| 2 | Press and release the MAPPING button (7) |
Your optical wheel is now more sensitive (Procedure must be carried out each time the gamepad restarts or is disconnected)
- Returning to "Normal Sensitivity" mode:
| Steps | Action | HOME button |
| 1 | Lower and hold the “DOWN” direction on the optical wheel | Does not flash |
| 2 | Press and release the MAPPING button (7) |
Your optical wheel has now returned to Normal Sensitivity (the default mode)
2 PROGRAMMING MODES
The PRESET button and LED (8) allows you to view the type of programming selected: AUTOMATIC (preprogrammed) or MANUAL (programmed by yourself). A single press of this button allows you (even during the course of a game) to switch from one programming mode to the other.
- "AUTOMATIC PRESET" (PRESET button OFF)
This represents the default programming: the functions of the optical wheel and the triggers are preprogrammed, as are the positions of the buttons and the directions of the mini-sticks and of the D-Pad.
PLEASE REFER TO THE "AUTOMATIC PRESET" CONFIGURATION DIAGRAMS
- "MANUAL PRESET" (PRESET button GREEN)
This represents your own personal programming:
- The buttons, directions of the mini-sticks and of the D-Pad can either be
- programmed on the optical wheel and on the triggers,
- or switched between themselves.
- You can modify the programming to your liking and whenever you wish.
- The programming is automatically saved inside your gamepad (even when disconnected).
- When your "MANUAL PRESET" is clear, it is identical to the "AUTOMATIC PRESET".
PROGRAMMING THE OPTICAL WHEEL AND TRIGGERS
The 2 directions of the optical wheel and the 2 progressive triggers can be programmed using the MAPPING button (7).
Examples of possible applications:
Programming a button, direction of a mini-stick or of the D-Pad:
- onto the "up" or "down" direction of the optical wheel
- onto the "right trigger" or "left trigger"
- Programming procedure on optical wheel and triggers:
| Steps | Action | PRESET button color |
| 1 | Enable "MANUAL PRESET" (8) by pressing the button. | Lit up green |
| 2 | Press and release the MAPPING button (7). | Lit up red |
| 3 | Press and release the button or direction to program. | Flashes red |
| 4 | Raise or lower the direction on the optical wheel or press the trigger onto which you wish to place your function. | Lit up green |
Your "MANUAL PRESET" is now enabled and up to date
(with your programming applied to the optical wheel or triggers)
SWITCHING BUTTONS/MINI-STICKS/D-PAD
All progressive buttons (on PS2 and PS3) or digital buttons (on PC), as well as directions of the mini-sticks and of the D-Pad can be switched using the MAPPING button (7).
Examples of possible applications:
- Switch buttons between themselves
- Switch the 2 mini-sticks
(in this case, you will to have to map the 4 directions of the first mini-stick to the 4 directions of the second mini-stick)
- Switch the D-Pad with a mini-stick
(in this case, you will have to map the 4 D-Pad directions to the 4 directions of the mini-stick in question).
- Procedure for switching buttons, mini-sticks and D-Pad
- Does not work for the triggers.
- Works for the optical wheel but only on PC and in "7 axes" mode.
| Steps | Action | PRESET button color |
| 1 | Enable "MANUAL PRESET" (8) by pressing the button. | Lit up green |
| 2 | Press and release the MAPPING button (7). | Lit up red |
| 3 | Press and release the button or direction to switch. | Flashes red |
| 4 | Press and release the button or direction onto which you wish to place your function. | Lit up green |
Your "MANUAL PRESET" is now enabled and up to date (with the 2 functions switched).
EEPROM MEMORY
- Your gameplay features an internal chip which saves all of your "MANUAL PRESET" programming (even when the gameplay is switched off or disconnected for a long period of time).
- You can save a different "MANUAL PRESET" for each platform used: PlayStation® 1, PlayStation® 2, PlayStation® 3, PC 4 Axes and PC 7 Axes
TO ERASE YOUR "MANUAL PRESET"
| Action | PRESET button color | |
| 1 | Enable your “MANUAL PRESET” (8). | Lit up green |
| 2 | Press and hold the MAPPING button (7) for 2 seconds. | Flashes green 2 seconds |
Your "MANUAL PRESET" is now clear (and once again identical to the "AUTOMATIC PRESET").
RETURNING TO "FACTORY SETTINGS"
You can erase all of your programming or settings:
| Steps | Action | MAPPING button color |
| 1 | Press the MAPPING + SELECT + START buttons simultaneously | Flashes blue 5 seconds |
All of your "MANUAL PRESETS" (= PC + PS2 + PS3) or settings are now clear. Note: this procedure will completely restart your gamepad (on PC, we therefore recommend that you do this outside of games).
POSSIBLE USES IN GAMES
The optical wheel (thanks to its technology and degree of rotation greater than that of any mini-stick) offers unparalleled precision and stability in all types of games: racing (ultra-precise steering), flying (rudder), action and FPS (progressive zoom), sports (measured shot, strength of hit), etc.
The triggers (thanks to their progressive action and range of mechanical travel greater than that of any button) offer extremely precise control in all types of games: racing (progressive and independent acceleration and braking, handbrake), action and FPS (rate of fire, lateral movement), sports (measured pass or shot, strength of hit or jump, running speed), etc.
SOME EXAMPLES AND TIPS:
- There are numerous configuration possibilities, depending on the game you are playing.
- In certain games (racing type), do not hesitate to test out the 2 sensitivity modes for your optical wheel (Normal or High) in order to optimize its precision and responsiveness.
DIFFERENT EXAMPLES ACCORDING TO TYPE OF GAME
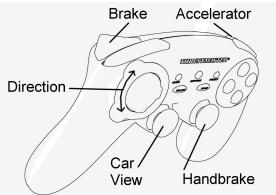
Action/Adventure ("Car" mode)

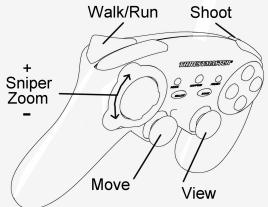
Action/Adventure ("On foot" mode)
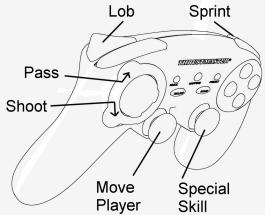
Sports ("Ball game" type)
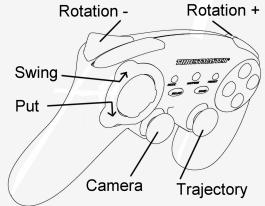
Sports ("Golf" type)
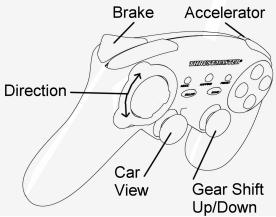
Car racing ("Simulation" type)
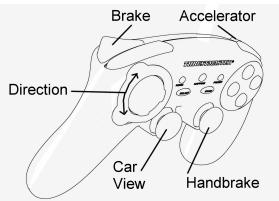
Car racing ("Arcade/Rally" type)
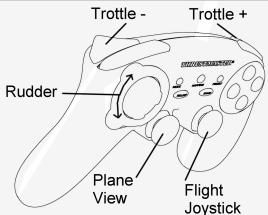
Flying ("Simulation" type)
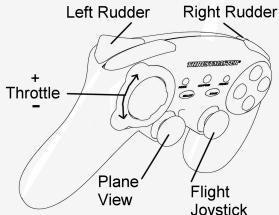
Flying ("Arcade/Action" type)
USING MORE THAN ONE "Run'N' Drive Wireless" GAMEPAD AT THE SAME TIME (in Multiplayer mode)
You can use up to 4 "RunN' Drive Wireless" gamepads at the same time (in multiplayer mode).
Channel detection is carried out automatically
In case of error or to force the connection: press the CONNECT button on the receiver and simultaneously press the L2 + R2 + MAPPING buttons on your gamepad.
TROUBLESHOOTING AND WARNINGS
- My gamepad doesn't function correctly or seems improperly calibrated:
- In the event of malfunction due to electrostatic emission, exit the game, switch off your gamepad and disconnect the receiver from your console or your PC.
To play again, reconnect the receiver, switch your gamepad back on and start the game again. - Never move the mini-sticks, the optical wheel or the triggers when connecting your gamepad (to avoid any calibration problems).
-
On PC, if the game does not accept "7 axes" mode (undesired effects), switch your gamepad to "4 axes" mode (the standard gamepad mode).
-
I can't configure my gamepad in a game:
-
In your game's "Options / Controller / Gamepad" menu: select the most appropriate configuration.
- Please refer to your game's user manual or online help for more information.
-
You can also use your gamepad's "programming" function to resolve this type of problem.
-
On PC or PS3, my gamepad doesn't function correctly:
- Exit your game, disconnect your gamepad, verify that the "PC/PS3" USB selector (11) is in the proper position, then reconnect everything.
The MAPPING LED flashes slowly and continuously: - Please change batteries.
When you're done using your gamepad, we recommend that you always set the gamepad's POWER ON/OFF switch (15) to the OFF position (to save your batteries).
TECHNICAL SUPPORT
If you encounter a problem with your product, please go to http://ts.thrustmaster.com and click Technical Support. From there you will be able to access various utilities (Frequently Asked Questions (FAQ), the latest versions of drivers and software) that may help to resolve your problem. If the problem persists, you can contact the Thrustmaster products technical support service ("Technical Support"):
By email:
In order to take advantage of technical support by email, you must first register online. The information you provide will help the agents to resolve your problem more quickly. Click Registration on the left-hand side of the Technical Support page and follow the on-screen instructions. If you have already registered, fill in theUsername and Password fields and then click Login.
By telephone:
| United Kingdom | 08450800942Charges at local rate | Monday to Friday from Noon to 4pm and 5pm to 10pm Saturday from 9am to Noon and 1pm to 7pm Sunday from 9am to Noon and 1pm to 4pm |
| United States | 1-866-889-5036Free | Monday to Friday from 7am to 11am and from Noon to 5pm Saturday and Sunday from 7am to Noon (Eastern Standard Time) |
| Canada | 1-866-889-2181Free | Monday to Friday from 7am to 11am and from Noon to 5pm Saturday and Sunday from 7am to Noon (Eastern Standard Time) |
| Denmark | 80887690Free | Monday to Friday from 1pm to 5pm and 6pm to 11pm (English) Saturday from 9am to 1pm and 2pm to 8pm Sunday from 10am to 1pm and 2pm to 5pm |
| Sweden | 0200884567Free | Monday to Friday from 1pm to 5pm and 6pm to 11pm (English) Saturday from 9am to 1pm and 2pm to 8pm Sunday from 10am to 1pm and 2pm to 5pm |
| Finland | 0800 913060Free | Monday to Friday from 2pm to 6pm and 7pm to Midnight (English) Saturday from 10am to 2pm and 3pm to 9pm Sunday from 11am to 2pm and 3pm to 6pm |
WARRANTY INFORMATION
Worldwide, Guillemot Corporation S.A. ("Guillemot") warrants to the consumer that this Thrustmaster product will be free from material defects and manufacturing flaws for a period of two (2) years from the original date of purchase. Should the product appear to be defective during the warranty period, immediately contact Technical Support, who will indicate the procedure to follow. If the defect is confirmed, the product must be returned to its place of purchase (or any other location indicated by Technical Support).
Within the context of this warranty, the consumer's defective product will, at Technical Support's option, be either repaired or replaced. Where authorized by applicable law, the full liability of Guillemot and its subsidiaries (including for indirect damages) is limited to the repair or replacement of the Thrustmaster product. The consumer's legal rights with respect to legislation applicable to the sale of consumer goods are not affected by this warranty.
This warranty shall not apply: (1) if the product has been modified, opened, altered, or has suffered damage as a result of inappropriate or abusive use, negligence, an accident, normal wear, or any other cause not related to a material defect or manufacturing flaw; (2) in the event of failure to comply with the instructions provided by Technical Support; (3) to software not published by Guillemot, said software being subject to a specific warranty provided by its publisher.
Additional warranty provisions
In the United States of America and in Canada, this warranty is limited to the product's internal mechanism and external housing. Any applicable implied warranties, including warranties of merchantability and fitness for a particular purpose, are hereby limited to two (2) years from the date of purchase and are subject to the conditions set forth in this limited warranty. In no event shall Guillemot Corporation S.A. or its affiliates be liable for consequential or incidental damage resulting from the breach of any express or implied warranties. Some States/Provinces do not allow limitation on how long an implied warranty lasts or exclusion or limitation of incidental/consequential damages, so the above limitation may not apply to you. This warranty gives you specific legal rights, and you may also have other legal rights which vary from State to State or Province to Province.
COPYRIGHT
© 2007 Guilemot Corporation S.A. All rights reserved. Thrustmaster® is a registered trademark of Guilemot Corporation S.A. PlayStation® is a registered trademark of Sony Computer Entertainment, Inc. Windows® and Windows® XP are registered trademarks of Microsoft Corporation in the United States and/or in other countries. Pentium® is a registered trademark of Intel Corporation. All other trademarks and brand names are hereby acknowledged and are the property of their respective owners. Illustrations not binding. Contents, designs and specifications are subject to change without notice and may vary from one country to another. Made in China.
ENVIRONMENTAL PROTECTION RECOMMENDATION

At the end of its working life, this product should not be disposed of with standard household waste, but rather dropped off at a collection point for the disposal of Waste Electrical and Electronic Equipment (WEEE) for recycling.
This is confirmed by the symbol found on the product, user manual or packaging.
Depending on their characteristics, the materials may be recycled. Through recycling and other forms of processing Waste Electrical and Electronic Equipment, you can make a significant contribution towards helping to protect the environment.
Please contact your local authorities for information on the collection point nearest you.
FAQs, tips and drivers available at www.thrustmaster.com
Run'N' Drive
Wireless
3-in-1 Compatible
PS3/PS2/PC
Run'N' Drive Wireless
3-in-1 Compatible
PS3®/PS2®/PC

Handbuch
ÜBERSICHT
Run'N' Drive Wireless
3-in-1 Compatible
PS3/PS2/PC

Handleiding
TWEE PROGRAMMEERMODI
PROBLEM OPLOSSEN EN WAARSCHUWINGEN
INFORMATIE MET BETREKKING TOT DE GARANTIE
PARABORRAR TU "MANUAL PRESET"
PykoBoDCTBO IOnb3OBaTeJIa
TEXHUNECKMEXAPAKTEPNUKIN
- 2 He3aBcMbIbX MOTOPa B6paQHOHNO
6bpaTHO C83n (ДЯ PlayStation® 2)
2.Два nponoporiohaIbIbIX anHANOBOBIX MHNKOKSTKIA - MannyTop D-Pad
4.Проронрц�оньн оптуескдатчК
5.Два npponopuznoHaNbHbIX TprIrrepa - KhoNka HOMELEDIPLaPlaystation@3 n MODE (PEKIM)IPLI
- Khoika MAPPING LED (Дяяпограмповаяни Инданкацим COCTORHA coedinendnaya)
8.Khonka PRESET LED (Дя Вьбора рекима погрмнорань)
9. KomaHnBie KhoNKn
10. USB-pa3bEmДЯп рОДКЛЮЧЕНИ ПИЗ PlayStation® 3
11. Пеккноатель рекима USB "PC" ип "PS3"
12. KhoIIka npHmHnKa CONNECT LED
13. Pa3bEm irpOBO rno npTa PlayStation® 2
14. Otcek Дябата
15. BbiknouateIb nItaHnPOWER ON/OFF
16. BbIKHouaTeIb MOTOpOB MOTORS ON/OFF
TABJIUCA NOIDEPXKINBAEMbIX PEXKIMOB
BbIKIyOaTeNb NITaHnN POWER ON/OFF (15)
BbIKJIouaTeJIb MOTOpOB MOTORS ON/OFF (16)
Tenepb MoXHO NaHnHaBt Hpy!
PEXKIM PLAYSTATION® 3
KOHΦIγPALIY “ABTOMATUÇECKME IPEДΥCTAHOBKIN” - PLAYSTATION® 3
PeximPS3
Kpachara KhoNka HOME
3decb:
OnTnueckm daTnuk COOTBETCTBYET KHOIIKAM BnEbo/BnpaBO'Ha naLeboM mHnH-IXoOHTke
"Ipabby tprrrep" COOTBECTByeT nponopunohbHON KHONKE "R2"
"Jebby tprnrep"cooTBeCTByeT nponopunohanbHOH KHONKE "L2"
KHONTKA "HOME" (6)
C nmoiueho KnoHKn "HOME" irpoBOrO KOHTpOJIpepa MoKHO BbIITN I3 INrPbI, BoITN B MeHIO HnAprrMyo BbIKIOHtB CnCTeMy PlayStation® 3.
BAXHBIE 3AMEYAHNIO PABOTE C PLAYSTATION® 3
- Célektop USB ha πρηεmNHke (11) Σιχκην BCerda 6bɪt b yctaHOBην B nολοχηne "PS3" nepei noɪkIIOUθηHem πρηεmNHka.
- B peximme ondoro irpoka "1 Player": Ecni KOHTpOJIpe (oФициьня Всря) BKIQUeH, Heo6xOДМО nepeKIOUHTb erо Ha «IopT 2 KOHTpOJIpeA», YTO6bI 6ecnpobOJHOn irpOBoI KOHTpOJIpe "Run'N'Drive" paBOTan.
- B npncstabke PlayStation® 3, kontrponnep "Run'N" Drive" coBmecTMM toIbko c nprpamn dny PlayStation® 3 (и несят豌роты с ргамп ду PlayStation® 2) и не подержьаertфункшдатчka dBnxenha.
PLAYSTATION® 2
IIOJKIIIOUHEHNE K PLAYSTATION® 2
- Ппсоевине разьем PS2 Ирворо пота nepedingу (13) К поту #1 на сонл.
- BkHIOUHTe KOHCOJIb.
- BkIIOHHTe IrpoBoi KOHTpOJIepe np Ni NOMOoi BbIKIIouaTeIa POWER ON/OFF (15).
- Nocne yctaHOBnEHH CoeHNHeHH: 3anyCTte nRpy.
Tenepb MoXHO NaHnHaB nIpy!
PEXKIM PLAYSTATION® 2
KOHΦιγΑΡΙΥΑ “ABTOMATΥEČΚΙ ΠΡΕύγCTAHOBΚΙ” - PLAYSTATION® 2
PeximPS2
Kpaacha Khoonka HOME
3decb:
ONTHECKIN DaTCHK COOTBETCTBYET KHONKAM BBeBOB/BnpaBOHa JEBOB MHNH- DKOICTNIKE
"Ipabby trnrrrep" COOTBETCTBYET nponopunohanbHNo KHONKE "Cross
"Jebby tprtrrep" tprtrp cooTbctByet nponopunohalbno hKnOke "Square
BAXHBIE 3AMEYAHNIO PABOTE C PLAYSTATION®2
Hikorda He noikouaTe pa3bem USB (10) K PlayStation® 2 (BO n36eXaHne NOBpeXdHnI INpOBoR OKHTPOJIepa UNI KOHCOIN).
#
IIOKIIIOUCHNEKII
- YctahOBHTe celenkTOp USB ha npneMHnke (11) B noIOJoxHe "PC".
- NOKIIIOHTe pa3bEM USB pRnEMNkA K ODHOMY I3 NOPTOB USB HA KOMMbItepe. OpeaioHHbIE CNTEmbl WindowsXP INI Vista aBtOMaTHeCKN oHApyKaT HOBOE yCTpoCTBO.
- BkIIOUHTe IrpoBoi KOnTPOINeP np Ni NOMOuN BbIKIOUaTeIe PAWOR ON/OFF (15).
- Μεληκητe Start (Πγκ)Settings (Hactροῦ)Control Panel (Πανηνβγανβενη), nος γεροσες Σελητe Δυθουή Μεπιχόκ ἀνηκτe Game Controllers (Irροβέν Κακτροπηρεύ).
Duaioooe Okho Game Controllers (HapoeBie KOhmpoJIneBb) bIbOum UMa upeo0e KOHmpoJIepa u KhONky ccoMOnHua OK.
- Bokhe Control Panel (Panhel ynpablenen), Bb6peTne TnyKT Properties (Cboctba) and pObeptb npocMToTeB KHONK, MaHmNpyIaTOp D-pad, MMHN-DXKOCTMKN, TprrtebpIu ONTmueckn daTtuk.
Tenepb MoXHO NaHnHaTaB nRpy!
BAXHBIE 3AMEUAHNIO PABOTE C IK
- Cenektrop USB ha npimemnke (11) doJxeh BCerda 6bItb yctahOBJIeB n noIOXHeMe "PC" nepeI NOKIIOChEMnpimemnka.
- ПО расиwerpenHOrO порarammIoRbAnHЯ "Advanced Programming Software" дя ПК доctуно дя загузкс с нашero веб-узда no anpecy:
http://ts.thrustmaster.com
BbIBOP“OCEHNAIK
"PpOgPamMhBb" Bb6Op oCeI:
Pocne yctaHOKn "Advanced Programming Software" (nporpaMMb paCINpeHORo nporpaMMPOBAHNA) ha cTpAniue 1 PAnenynynpabEnenia (Control Panel) BbIbePeTe MblbYcNcOcN oN HAKMTE OK.
"AnnapaThb" BbIbOp ocei:
Haxmnte KhoNky HOME (6)ДЯ BbIbopa KOnIyecTbA kTNBbIx Ocei.
2 PEXKIMA OCEI, IMEIOUINECRA HA PIK

KOHΦIγPΑΙΥ “ABTOMATΥEÇΚΕ ΠΡΕΝΥCTAHOBΚΟ” - ΠΚ
Pekim“4OCN
3eJeha KhoKa HOME
3decb:
OnTHeckn DaTtMk COOTBETCTByET KHOIIKAM BNeBO/Bnpabo>HaJeBOM MmHn-ДxOJOCTKe
"Пары Тлигер" cootbetctbyet нанразьменno"Bвэрп"napaboro мин- Джоctпka
"Jebby TprTrep" COOTBETCTBYET HANpABLeHnO "BnH3" npaboro MMnI-DKoIcTnKa

Pezim“7OCEI
Kpacha KhoKa HOMe
3decb:
- HOpMaJIbHaN aYbCTBNTeJIbHOCTb (IO yMOJUaHnIO)
- BbICOKaJyBCTBNTeJIbHOCTb (HaCTpaNbaETcA)
HactpoKa pexmAma "BbICOKOyUBCTBnTeBHoCTn":
Bb mokeTe coxpaHnItb pa3JIuHhIe "TIOJIb3OBATEJIbCKIe HACTPOIKN" nIg KaJdoI ncNoJIb3yEmo InilatfOpMbI:
PlayStation® 1, PlayStation® 2, PlayStation® 3, PK 4 oc n i PK 7 ocei.
KAK CTEPETb HABOP IOJIb3OBATEJIbCKmX IPEyCTAHOBOK "MANUAL PRESET"
Action/Adventure (pekmim "tpaHcnpT")
Action/Adventure (pezm "Peeu"
Cnopt(IrPbICMMyOH)
Cnopt(ronbφ)
TOnKHnHa aBTO (CmMyJrTopbI)
IrgpoBoi KOnTpOJIpep pa6oTaET He npabunbH Onn He otKaJIN6pOBaH:
B Cnyae h enolanaoko, 03knaikoux B CBNs Co tAnTHeCKM 3NEKPTNCHETOMB, BbIyNTte N3 nRPI, BblKIOHHTne IRPOBOK KOHPTONEPu OTOcEOHNHTe PEPaDHKT O KCMbIOTepa IIN KOHCOIN.
Длв ВОЗБНОВЕНИЕ Иръ, ПОДСоЕДИНITE ПпсЕМнIK, BКПЮЧЕТЕ ИрpoВОй KOHTрОЛпeР И НачнITE Иру ChOBa.
- He nepeBnIaIe MInHn-DxKoCTNkN, ONTNUeCKne DaTtNkN IIN TpUITrepb Bo BVPm NOdKlIOChEny KOHTPOnJIpeBa (Ou N36EkaHane HapuyenH naPoceca KaIb6PbovKn).
- Ha PIK, ecn m rpa He npinHMaet pexmM 《7OceI》(BO3NkaHOT HeKeJatelbHbIe NocIeCTBIA), nepeKIIouHte IrpOBo KONTpOJIep B pexmM 《4OCN》(CTaHdpTbI).
JHE MORY HAcTpOntbIrpoBoi KOHTpOJIpeB INrpe:
YPKOBDCTBO NOIb3O8ATENI YNANKOBY.
B 3abcmnOteoTc0bctB,MatpeinablMOTypepebaC8NOBTOPHYIOpepe60TKy. NIObTOHPaNEp6OToKtXTODko3NeKTPrueckoroN3NEKTPOHORO6OpbyODAHMA MoKET BHECT3HAHTeINbIbKnBkADBcOxAOPAHENe OKpyxAouoeI cPdEi.
06patneBcMecThbIeopraHbIbNactn3aHmΦOpmaueHoeObnKnaHemnykhtepnpemaTaknxOTOXoB.