
RUN'N' DRIVE 3-IN-1 - Gaming accessory THRUSTMASTER - Free user manual and instructions
Find the device manual for free RUN'N' DRIVE 3-IN-1 THRUSTMASTER in PDF.
| Brand | THRUSTMASTER |
| Model | RUN'N' DRIVE 3-IN-1 |
| Product type | Multifunction wired game controller |
| Compatibility | PlayStation 1, PlayStation 2, PlayStation 3, PC (Windows) |
| Connectors | PS2 Gameport connector, USB connector |
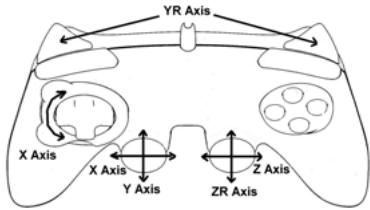
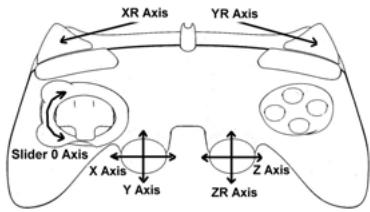
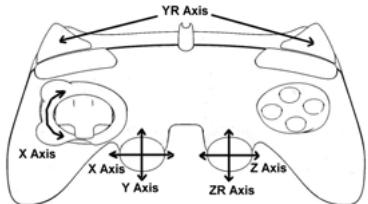
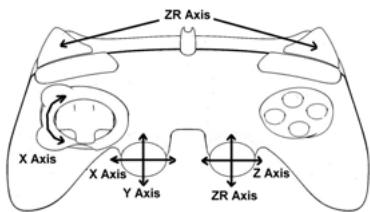
| Analog sticks | 2 progressive analog sticks |
| Digital action buttons | 2 digital action buttons |
| Optical wheel | Progressive optical wheel with 2 sensitivity modes (Normal and High) |
| Progressive triggers | 2 progressive triggers |
| Digital cross | Yes, 4 directions |
| MAPPING button | Yes, for custom programming |
| MODE button with LED | Yes, to select the platform or number of axes |
| PRESET button with LED | Yes, to switch between automatic and manual preset |
| Vibration motors | 2 independent motors (PlayStation 2 only) |
| Internal memory | EEPROM chip to save manual programming |
| Power supply | Via USB cable or Gameport, no batteries |
| Dimensions (estimated) | Approximately 15 x 10 x 6 cm |
| Weight (estimated) | Approximately 350 g |
| Cable length (estimated) | Approximately 2.5 m |
| Maintenance | Clean with a soft, dry cloth. Avoid solvents. |
| Safety precautions | Disconnect in case of electrostatic discharge. Do not connect USB on PS2. |
| Warranty | 2 years (see conditions) |
| Technical support | Website: thrustmaster.com, email, phone (Canada, France, Switzerland, Belgium) |
| Recycling | Do not dispose of with household waste. Deposit at WEEE collection point. |
Frequently Asked Questions - RUN'N' DRIVE 3-IN-1 THRUSTMASTER
User questions about RUN'N' DRIVE 3-IN-1 THRUSTMASTER
0 question about this device. Answer the ones you know or ask your own.
Ask a new question about this device
Download the instructions for your Gaming accessory in PDF format for free! Find your manual RUN'N' DRIVE 3-IN-1 - THRUSTMASTER and take your electronic device back in hand. On this page are published all the documents necessary for the use of your device. RUN'N' DRIVE 3-IN-1 by THRUSTMASTER.
USER MANUAL RUN'N' DRIVE 3-IN-1 THRUSTMASTER
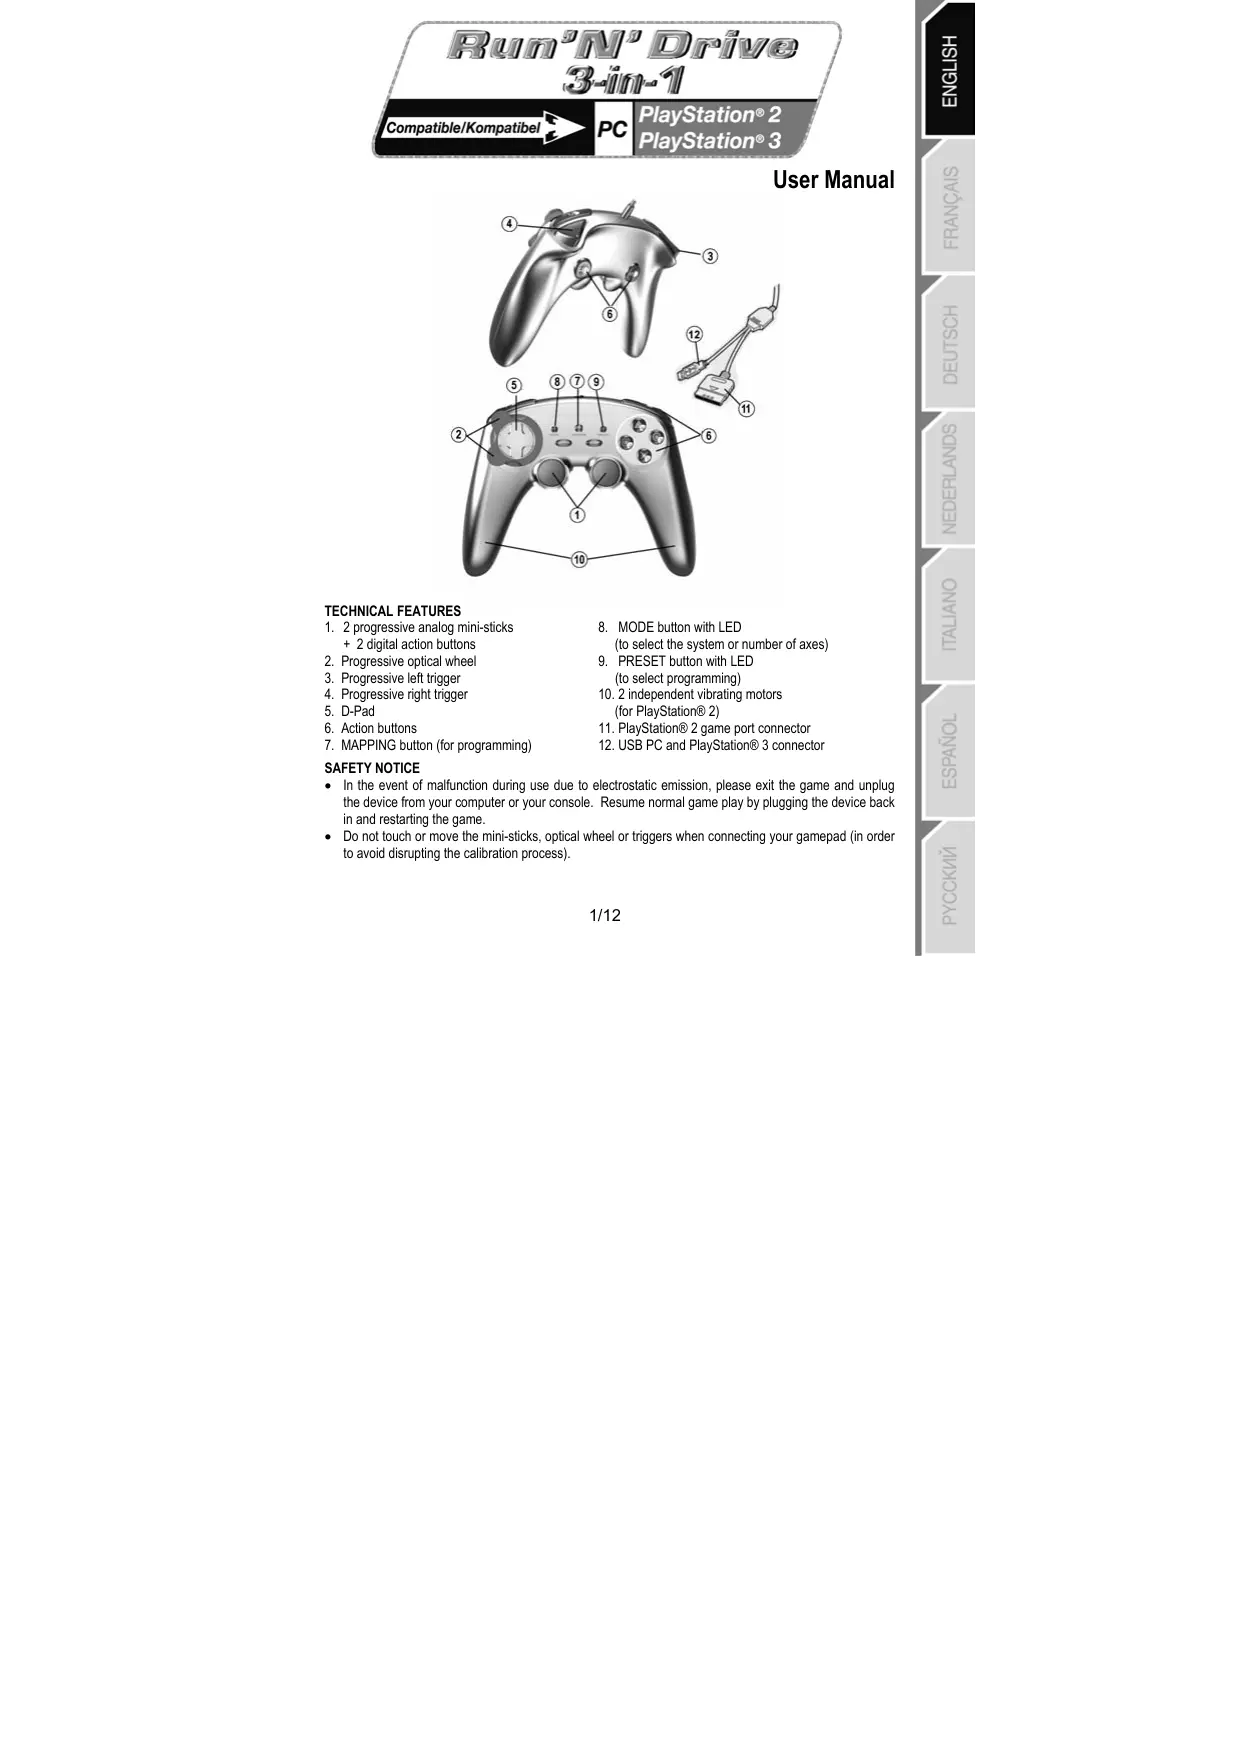
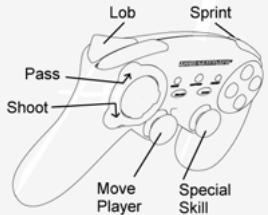
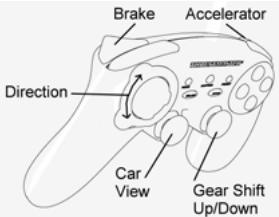
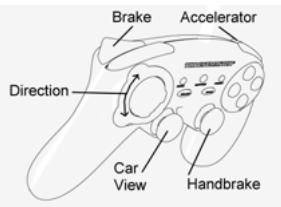
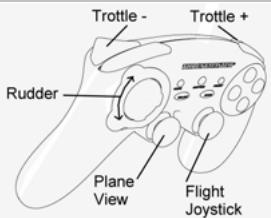
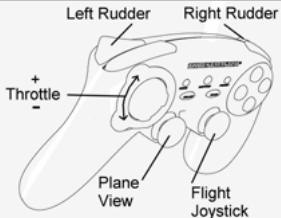
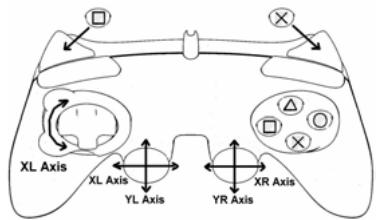
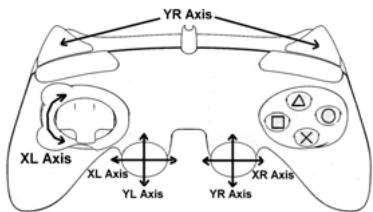
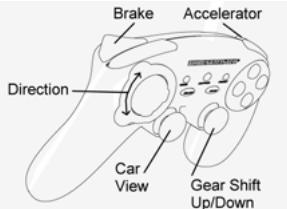
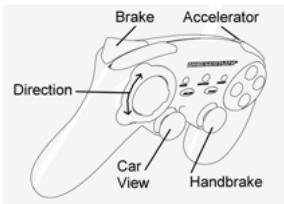
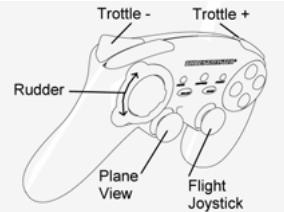
- 2 progressive analog mini-sticks
- 2 digital action buttons
- Progressive optical wheel
- Progressive left trigger
- Progressive right trigger
- D-Pad
- Action buttons
-
MAPPING button (for programming)
-
MODE button with LED (to select the system or number of axes)
- PRESET button with LED (to select programming)
10.2 independent vibrating motors (for PlayStation® 2) - PlayStation® 2 game port connector
- USB PC and PlayStation® 3 connector
SAFETY NOTICE
- In the event of malfunction during use due to electrostatic emission, please exit the game and unplug the device from your computer or your console. Resume normal game play by plugging the device back in and restarting the game.
- Do not touch or move the mini-sticks, optical wheel or triggers when connecting your gamepad (in order to avoid disrupting the calibration process).
TABLE OF SUPPORTED MODES
| System | MODE | Color of MODE button (8) |
| PLAYSTATION® 1 | "PS1" | OFF |
| PLAYSTATION® 2 | "PS2" | GREEN |
| PLAYSTATION® 3 | "PS3" | OFF |
| PC | "4 AXES" | OFF |
| "5 AXES" | RED | |
| "7 AXES" | GREEN |
PLAYSTATION® 2
INSTALLATION ON PLAYSTATION® 2
-
Connect the PS2 game port connector (11) to a game port on your console.
-
Turn on your console and launch the game.
You are now ready to play!
ATTENTION: NEVER CONNECT THE USB CONNECTOR (12) TO YOUR PLAYSTATION® 2 (to avoid the risk of damaging your gamepad and/or your console)
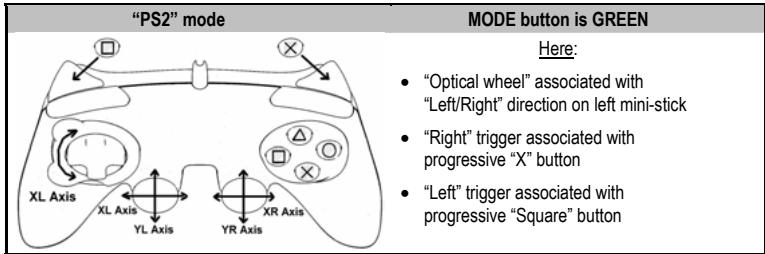
"PLAYSTATION® 2" MODE
- "PS1" mode: the MODE button is Off (exclusively reserved for "PlayStation® 1" games)
- "PS2" mode: the MODE button is Green (exclusively reserved for "PlayStation® 2" games)
"AUTOMATIC PRESET" CONFIGURATION - PLAYSTATION® 2
PLAYSTATION® 3
INSTALLATION ON PLAYSTATION® 3
- Connect the USB connector (12) to a USB port on your console.
- Turn on your console.
- Switch your gamepad to "PS3" mode = the MODE button should be Off. (to do so, if necessary, press the button until it switches off).
- Launch the game.
You are now ready to play!
"PLAYSTATION® 3" MODE
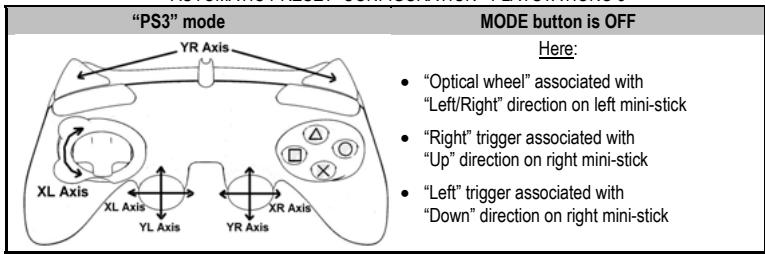
"AUTOMATIC PRESET" CONFIGURATION - PLAYSTATION® 3
Important notes for "PlayStation® 3":
-
On "PlayStation® 3", the MODE button must absolutely be "OFF" (and not red or green). To do so, press the button if necessary.
-
The "Run'N' Drive" gamepad does not feature a "motion sensor" or "PS" button, as does the official gamepad included with your console.
-
In "1 Player" mode: if your official gamepad is powered on, you must switch it to "controller port 2" for your "Run'N' Drive" gamepad to be functional.
-
On "PlayStation® 3", the "Run'N' Drive" gameplay is only compatible with "PlayStation® 3" games (and will not function with "PlayStation® 2" games).
-
To exit your "PlayStation® 3" games, use the "PS" button on your official gamepad.
PC
INSTALLATION ON PC
- Connect the USB connector (12) to one of your computer's USB ports. Windows 98/Me/2000/XP/Vista will automatically detect the new device.
- Driver installation
The drivers are installed automatically. Follow the on-screen instructions to complete the installation.
- Select Start/Settings/Control Panel and then double-click Game Controllers (or Gaming Options, depending on your operating system).
The Game Controllers dialog box displays the gamepad's name with OK status.
- In the Control Panel, click Properties to configure your gamepad:
Test device: allows you to test and view the buttons, D-pad and axes for the 2 mini-sticks, for the optical wheel and for the 2 triggers.
You are now ready to play!
NOTE: “ADVANCED PROGRAMMING SOFTWARE” FOR PC IS ALSO AVAILABLE FOR DOWNLOAD ON OUR WEBSITE:
http://ts.thrustmaster.com/
SELECTING THE NUMBER OF AXES ON PC
- Selection of axes via "Software": On page 1 of the Control Panel, click the number of axes you wish to use and then click OK. (Only available with the "Advanced programming software" available for download on our website).
- Selection of axes via "Hardware":
Press the MODE button (8) to select the number of active axes.
3 "AXES" MODES AVAILABLE ON PC
"AUTOMATIC PRESET" CONFIGURATION - PC
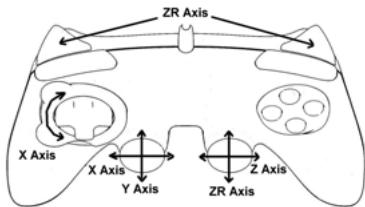
"4 AXES" mode
MODE button is OFF
Here:
- "Optical wheel" associated with "Left/Right" direction on left mini-stick
- "Right" trigger associated with "Up" direction on right mini-stick
"Left" trigger associated with "Down" direction on right mini-stick
"5 AXES" mode
MODE button is RED
Here:
- "Optical wheel" associated with "Left/Right" direction on left mini-stick
- "Right" and "Left" triggers are now independent but combined between themselves
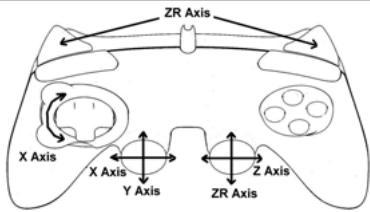
"7 AXES" mode
MODE button is GREEN
Here:
- "Optical wheel" is now independent
"Left" trigger is now independent - "Right" trigger is now independent
For a better idea of all the possibilities offered on PC, try them out in the Windows "Game Controllers" section (once you have installed the "Advanced programming software")
ADVANCED FUNCTIONS
ADJUSTING THE OPTICAL WHEEL'S SENSITIVITY
The optical wheel (2) has 2 sensitivity modes:
- Normal sensitivity (default mode)
-
High sensitivity (must be adjusted)
-
Adjustment for "High sensitivity" mode:
The optical wheel is now more sensitive
| Steps | Action | Color of MODE button |
| 1 | Raise and hold the "UP" direction on the optical wheel | Flashes Red 2 seconds |
| 2 | Press and release the MAPPING button (7) |
(Repeat this procedure each time you restart your console or disconnect the gamepad)
- Adjustment to return to "Normal sensitivity" mode:
| Steps | Action | Color of MODE button |
| 1 | Lower and hold the “DOWN” direction on the optical wheel | Flashes Green 2 seconds |
| 2 | Press and release the MAPPING button (7) |
The optical wheel has now returned to normal sensitivity (the default mode)
2 PROGRAMMING MODES
The PRESET button and LED (9) allows you to view the type of programming selected:
AUTOMATIC (preprogrammed) or MANUAL (programmed by yourself). A single press of this button allows you (even during the course of a game) to switch from one programming mode to another.
- "AUTOMATIC PRESET" (PRESET button OFF)
This represents the default programming: The functions of the optical wheel and the triggers are preprogrammed, as are the positions of the buttons and the directions of the mini-sticks and of the D-Pad.
PLEASE REFER TO THE "AUTOMATIC PRESET" CONFIGURATION DIAGRAMS
- "MANUAL PRESET" (PRESET button GREEN)
This represents your own personal programming:
- The buttons, directions of the mini-sticks and of the D-Pad can either be:
- Programmed on the optical wheel and on the triggers; or
- Switched between themselves.
- You can modify the programming to your liking and whenever you wish.
- The programming is automatically saved inside your gamepad (even when disconnected).
- When your "MANUAL PRESET" is clear, it is identical to the "AUTOMATIC PRESET".
PROGRAMMING THE OPTICAL WHEEL AND TRIGGERS
The 2 directions of the optical wheel and the 2 progressive triggers can be programmed using the MAPPING button (7).
Examples of possible applications:
Programming a button, direction of a mini-stick or of the D-Pad:
- onto the "up" or "down" direction of the optical wheel
- onto the "right" trigger or "left" trigger
- Programming procedure on optical wheel and triggers:
| Steps | Action | Color of PRESET button |
| 1 | Enable “MANUAL PRESET” (9) by pressing the button | Lit up Green |
| 2 | Press and release the MAPPING button (7) | Lit up Red |
| 3 | Press and release the button or direction to program | Flashes Red |
| 4 | Raise or lower the direction on the optical wheel Or press the trigger onto which you wish to place your function | Lit up Green |
Your "MANUAL PRESET" is now enabled and up to date (with your programming applied to the optical wheel or triggers)
SWITCHING BUTTONS/MINI-STICKS/D-PAD
All progressive buttons (on PS2 and PS3) or digital buttons (on PC), as well as directions of the mini-sticks and of the D-Pad can be switched using the MAPPING button (7).
Examples of possible applications:
- Switch buttons between themselves
- Switch the 2 mini-sticks
(in this case, you will to have to map the 4 directions of the first mini-stick to the 4 directions of the second mini-stick)
- Switch the D-Pad with a mini-stick
(in this case, you will have to map the 4 D-Pad directions to the 4 directions of the mini-stick in question).
- Procedure for switching buttons, mini-sticks and D-Pad
(does not work with the optical wheel and triggers, except for on PC in "7 axes" mode)
| Steps | Action | Color of PRESET button |
| 1 | Enable “MANUAL PRESET” (9) by pressing the button | Lit up Green |
| 2 | Press and release the MAPPING button (7) | Lit up Red |
| 3 | Press and release the button or direction to switch | Flashes Red |
| 4 | Press and release the button or direction onto which you wish to place your function | Lit up Green |
Your "MANUAL PRESET" is now enabled and up to date (with the 2 functions switched)
EEPROM MEMORY
- Your gamepad features an internal chip which serves to retain all of your "MANUAL PRESET" programming in memory (even when the gamepad is switched off or disconnected for a long period of time).
- You can save 1 different "MANUAL PRESET" for each system used (PS1, PS2, PS3, PC 4 Axes, PC 5 Axes or PC 7 Axes). The exception is for "PS3" and "PC 4 Axes", which use the same "MANUAL PRESET" (modifying or erasing one of these will have the same effect on the other).
TO ERASE A "MANUAL PRESET"
| Steps | Action | Color of PRESET button |
| 1 | Enable your “MANUAL PRESET” (9) | Lit up Green |
| 2 | Press and hold the MAPPING button (7) for 2 seconds | Flashes Green 2 seconds |
Your "MANUAL PRESET" has now been erased (and is identical to the "Automatic Preset")
TO RETURN TO "FACTORY SETTINGS"
You cane erase all of your programming and settings with a single step:
| Steps | Action | Color of PRESET button |
| 1 | Press the MAPPING + SELECT + START buttons simultaneously | Flashes Green and Red 2 seconds |
All of your "MANUAL PRESETS" (= PC + PS2 + PS3) or settings have now been erased
Note: On PC, we recommend that you do not carry out this step while in a game.
POSSIBLE USES IN GAMES
The optical wheel (thanks to its technology and degree of rotation greater than that of any mini-stick) offers unparalleled precision and stability in all types of games: racing (ultra-precise steering), flying (rudder), action and FPS (progressive zoom), sports (measured shot, strength of hit), etc.
The triggers (thanks to their progressive action and range of mechanical travel greater than that of any button) offer extremely precise control in all types of games: racing (progressive and independent acceleration and braking, handbrake), action and FPS (rate of fire, lateral movement), sports (measured pass or shot, strength of hit or jump, running speed), etc.
SOME EXAMPLES AND TIPS:
- There are numerous configuration possibilities, depending on the game you are playing.
- On PC, if a game does not accept your programming (undesired effects) in "5 or 7 axes" mode, switch your gameplay to "4 axes" mode (the standard mode).
- In certain (racing style) games, don't hesitate to test out the 2 sensitivity modes for the optical wheel (Normal or High) in order to optimize its precision and responsiveness.
DIFFERENT EXAMPLES ACCORDING TO TYPE OF GAME
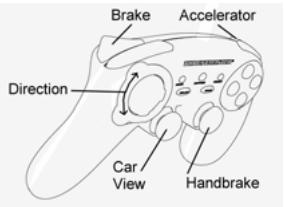
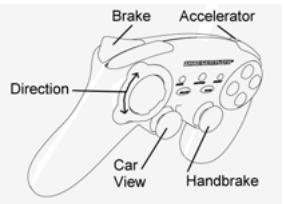
Action/Adventure ("Car" mode)
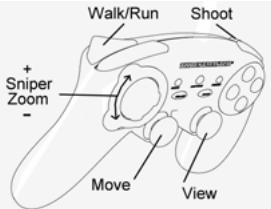
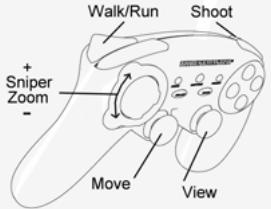
Action/Adventure ("On foot" mode)
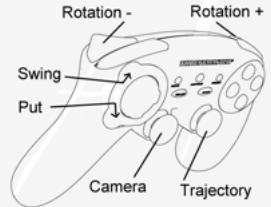
Sports ("Ball game" type)
Sports ("Golf" type)
Car racing ("Simulation" type)
Car racing ("Arcade/Rally" type)
Flying ("Simulation" type)
Flying ("Arcade/Action" type)
TECHNICAL SUPPORT
If you encounter a problem with your product, please go to http://ts.thrustmaster.com and click Technical Support. From there you will be able to access various utilities (Frequently Asked Questions (FAQ), the latest versions of drivers and software) that may help to resolve your problem. If the problem persists, you can contact the Thrustmaster products technical support service ("Technical Support"):
By email:
In order to take advantage of technical support by email, you must first register online. The information you provide will help the agents to resolve your problem more quickly. Click Registration on the left-hand side of the Technical Support page and follow the on-screen instructions. If you have already registered, fill in theUserName and Password fields and then click Login.
By telephone:
| United Kingdom | 08450800942Charges at local rate | Monday to Friday from Noon to 4pm and 5pm to 10pm Saturday from 9am to Noon and 1pm to 7pm Sunday from 9am to Noon and 1pm to 4pm |
| United States | 1-866-889-5036Free | Monday to Friday from 7am to 11am and from Noon to 5pm Saturday and Sunday from 7am to Noon (Eastern Standard Time) |
| Canada | 1-866-889-2181 Gratisuit / Free | Monday to Friday from 7am to 11am and from Noon to 5pm Saturday and Sunday from 7am to Noon (Eastern Standard Time) |
| Denmark | 80887690Free | Monday to Friday from 1pm to 5pm and 6pm to 11pm (English) Saturday from 9am to 1pm and 2pm to 8pm Sunday from 10am to 1pm and 2pm to 5pm |
| Sweden | 0200884567Free | Monday to Friday from 1pm to 5pm and 6pm to 11pm (English) Saturday from 9am to 1pm and 2pm to 8pm Sunday from 10am to 1pm and 2pm to 5pm |
| Finland | 0800 913060Free | Monday to Friday from 2pm to 6pm and 7pm to Midnight (English) Saturday from 10am to 2pm and 3pm to 9pm Sunday from 11am to 2pm and 3pm to 6pm |
WARRANTY INFORMATION
Worldwide, Guillemot Corporation S.A. ("Guillemot") warrants to the consumer that this Thrustmaster product will be free from material defects and manufacturing flaws for a period of two (2) years from the original date of purchase. Should the product appear to be defective during the warranty period, immediately contact Technical Support, who will indicate the procedure to follow. If the defect is confirmed, the product must be returned to its place of purchase (or any other location indicated by Technical Support).
Within the context of this warranty, the consumer's defective product will, at Technical Support's option, be either repaired or replaced. Where authorized by applicable law, the full liability of Guillemot and its subsidiaries (including for indirect damages) is limited to the repair or replacement of the Thrustmaster product. The consumer's legal rights with respect to legislation applicable to the sale of consumer goods are not affected by this warranty.
This warranty shall not apply: (1) if the product has been modified, opened, altered, or has suffered damage as a result of inappropriate or abusive use, negligence, an accident, normal wear, or any other cause not related to a material defect or manufacturing flaw; (2) in the event of failure to comply with the instructions provided by Technical Support; (3) to software not published by Guillemot, said software being subject to a specific warranty provided by its publisher.
Additional warranty provisions
In the United States of America and in Canada, this warranty is limited to the product's internal mechanism and external housing. Any applicable implied warranties, including warranties of merchantability and fitness for a particular purpose, are hereby limited to two (2) years from the date of purchase and are subject to the conditions set forth in this limited warranty. In no event shall Guillemot Corporation S.A. or its affiliates be liable for consequential or incidental damage resulting from the breach of any express or implied warranties. Some States/Provinces do not allow limitation on how long an implied warranty lasts or exclusion or limitation of incidental/consequential damages, so the above limitation may not apply to you. This warranty gives you specific legal rights, and you may also have other legal rights which vary from State to State or Province to Province.
COPYRIGHT
© 2007 Guilemot Corporation S.A. All rights reserved. Thrustmaster® is a registered trademark of Guilemot Corporation S.A. Playstation® is a registered trademark of Sony Computer Entertainment, Inc. Windows® and Windows® XP are registered trademarks of Microsoft Corporation in the United States and/or other countries. Pentium® is a registered trademark of Intel Corporation. All other trademarks and brand names are hereby acknowledged and are property of their respective owners. Illustrations not binding. Contents, designs and specifications are subject to change without notice and may vary from one country to another. Made in China.

ENVIRONMENTAL PROTECTION RECOMMENDATION
At the end of its working life, this product should not be disposed of with standard household waste, but rather dropped off at a collection point for the disposal of Waste Electrical and Electronic Equipment (WEEE) for recycling.
This is confirmed by the symbol found on the product, user manual or packaging.
Depending on their characteristics, the materials may be recycled. Through recycling and other forms of processing Waste Electrical and Electronic Equipment, you can make a significant contribution towards helping to protect the environment.
Please contact your local authorities for information on the collection point nearest you.
FAQs, tips and drivers available at www.thrustmaster.com
3 MODES D'AXES DISPONIBLE SUR PC
"PLAYSTATION® 2" MODUS
MODUS "PLAYSTATION® 2"
"4 ASSEN"-modus
MODE-knop is UIT
Hier:
"5 ASSEN"-modus
MODE-knop is ROOD
Hier:
INFORMATIE MET BETREKKING TOT DE GARANTIE
PykoBODCTBWO nonb3OBaTeTn

TEXHUNECKNEXAPAKTEPNCTIKN
- 2npoPOnIOHaJIbIbIX anAIONOBrbIX MHHJDKOKTtKa
+2UΦpOBbIe KOMaHdHbIe KHOJIKN - PpOnpzHOHaJIbHbI ONTtueckn DaTtHK
- PpOnpUHOHaJIbHbI JIeBbI TprIrrep
- PpOnpOpCuHOHaNbHbI npaBbI TprIrTeP
- Mannylantop D-Pad
- KomahdHbIe KhoIIK
- KhoNka MAPPING (PEPEONPENEJIENHE) (Длгп рограмmarpoвань)
8.Khonka MODE (PEXIM) cHnDnkauene (JIA BbIbopa CnCTeMbI INI KOnJIYeCTBa OceI)
9. Khonka PRESET (NPEDYCTAHOBKN) c
HnKnauei
(DЯн Blybopa pezhma npoprpaMmnpoBaHn)
10.2 He3aBcMbIx MOTOPa B6paCIOHOHOBpaTHO CB3N (DnPaPlayStation® 2)
11. Pâzbem严禁 NOДКЛЮЧЕНИЙ KИRGВОМУ NOPTY PlayStation® 2
12. USB-pa3bEmДЯп родклоченя ПКИ PlayStation© 3
3AMEYAHNE ITO TEXHNIKE BE3OINACHOCTN
B cnuyae Henoanadok Bo BPEM RA60TBI, BO3HNIKAOUIX B C87R N C 3NEKTKPOCTAHTUeCKM INUYHHeHEM, BbIINTE nI rPbI yTOcoEIHNITE YcTPOJCTBO OT KOMNbTepe IIN KOHCoII. ChOba noDknIOHITe YcTPOJCTBO N HauNITE mRpy CHaJIaA.
He KacaiTeCb MHHN-DKOHCTNKOB, ONTNueCKO DaTnKa HIN TprrIeRpo BO BVPeM NoKnHcHnna HrpoBOro KOHTPOJIpeRa (BO n36EkaHne IppeBIAHnna Pnocecca KaHn6pBKN).
TABINU A NOIDEPXKNAEBMbx PEXKMOB
| Систema | PEXКIM | Цов Кнокки PEXКIM (MODE) (8) |
| PLAYSTATION® 1 | "PS1" | Выкп. |
| PLAYSTATION® 2 | "PS2" | 3ЕЛECHы |
| PLAYSTATION® 3 | "PS3" | Выкп. |
| ПК | "4 OСИ" | Выкп. |
| "5 OCEй" | КРACHы | |
| "7 OCEй" | 3ЕЛECHы |
PLAYSTATION® 2
IIOKJIIOUHEHEKPLAYSTATION2
1.ПодклочпетаьемдгИровороHopтPS2(11)КИровOMу npToHa KOHcOJIH.
2. BkIIOHTe KOHCOB n 3aNCTte irpy.
Tenepb MoXHO NaHnHaTb Nrgy!
BHIMAHHE 3APNEUAETCIPOKJIIOUYb PA3bEM USB (12) K PLAYSTATION® 2 (o u36e汗ue noepzdeHua zpo800 konmponpea unu koncoiu)
PEXUM "PLAYSTATION® 2"
- pexm "PS1": KhoIka pexmMA MODE BbIKHouHea (3ape3epBnpoBaHO INKIIIOHTeIbHO DЯI rIp "PlayStation® 1")
- pexim "PS2": KhoIka peximma MODE cBeTITc8eJIeHbIM (aape3epBnpoBaHO NckIIOHTeIbHO dIra Inp "PlayStation® 2")
KOHΦιγΑΡΙΥΑ “ABTOMATΙΝΕČΚΙ ΠΡΕДΥCTAHOBΚΙ” - PLAYSTATION® 2
pexum "PS2":
KhoNka MODE cBeTnTc 3EJIeHbIM
3decb:
- ONTMHECKM DATYK COOTBETCTBYET KHONKAM 《BNeBO/BnpaBO》 HA NEBO MHNH-DKOKIHTNIKE
《Правь》Триггет COOTBETCTBYET nponopuzHOaJIbHOH KhoNKe «X»
《Пелевий》тгггсрcoьтctbyet nponopunohnbohknONKe《Kbapat》
PLAYSTATION® 3
IIOKJIIOUHEHME K PLAYSTATION® 3
1.Подкlioчite USB-pa3bem(12)KUSB-nopTu ha KOHcOJI.
2. BkHouHte KOHcOJIb.
3. IpeeknOHTe KOHTpOJIeB pEeKIM "PS3".Ipn 3tOM KhoNkA MODE dOJInKa horachyTB. (dIa 3TOro npn Heo6xOIMOcTHnHaxmaiTe KhoNkY doTex np, noka OHa he noracHT).
4. 3anyctnte irpy.
Tenepb MoXHO NaHnHaTb Hpy!
PEXUM "PLAYSTATION® 3"
KOHФИГУРALДА “ABTOMATUNCHECKIЕ ПЕДУCTAHOBКIN” - PLAYSTATION® 3
Pexim "PS3"
Khoinka MODE BbIKJIIOUeHA
3decb:
Ottuueckn daTnIK COOTBETCTBYET KHOIKAm BnBo/BnpaboHa NtOBOM MInH-DxOCTMke
«Павын»Трирет cootbetctbyet HanpavBneHNO «Верх» npaboro MmN-ДжоИтka
- 《Глев》тprinser COOTBETCTBYET
нарразileнно《Виз》Ha npabom МИн-
ДжоитIKE
Baxhnbie 3ameuHnno pa6oTe c "PlayStation® 3"
-B npncTabke"PlayStation© 3", KhoNka MODE dOJIxHa 6bITb BbIKJIIOUeHA (He cBETNTc Hn KpaChbIM, HN 3eJIeHbIM).
ДяЗТOrO pRn Heo6xOaMIOCTN HaxMNTe KhoNkY.
-BKoTHpOJIpee"Run'N'Drive"OTcYCTbYeT《dAaMkDnBxKeHnra》N KHOIIKa“PS",MeIOUHeecBaOΦIuaIbHoB BepCmKoHTpOJIpea,BXoJaIeBOKOMPiNeKT KOHcONl.
-BpeXnme OJHOrO irpoka "1 Player": EcIIN KOHTroJIeR (OfMuaJIbHaB aBercn) BKIOHeH, Heo6xOIMOppeKIIIOUHTb erO Ha
"controller port 2", утобны Конторпег "Run'N" Drive" paBOTAN.
-Bnpictabke"PlayStation ⑧ 3",KoHTpOJIneP"Run'N'Drive"coBMeTmToIbKOcIrgamnIgai "PlayStation ⑧ 3"
(и He byeDt paBoTaTb cnrgpMaN "PlayStation® 2").
-ДяВьхаяиnp"PlayStation®3"noьзутесьКнок"PS"КоНрллпаофицальов Всим.
#
IIOKIIIOUCHENKII
- Пдклоче pa3bem USB (12) К endomy n 3 npToB USB kaKmblTepe. OepaLIOHbIe CnCTeMbI 98/Me/2000/XP/Vista abTomatueckn obnapyMBAOT HOBOE yCTpoCTBO.
- UctanOBka dpaBepa
Драиьеры yctаанавлmaютca abTomatueckи. Дязabершени рpocecca yctahOBKи BblnoHЯп Te nHTpykIM, KOTOPbIe 6ydyT NOYBnTbCЯ HaКрaine.
- BvBepeTne Start (Tyck)/Settings (HactPtoKa)/Control Panel (Taenb ynpaBHeu), nocne yero cdenaiTe DBOHOn UIeYOK H nyHKTe Game Controllers (IrpoBte KoTHPONpeB) (mN Gaming Options (MroBoBte ycTPOIcTBa, 3aBAICIMoCTO NT yctAHOBHeHOn OonePAUHOHO NcSTEmb).
Дuaоьоье OKHO Game Controllers (Иразьг le KoHmpoJIpebl) bIbOdum UMa uApO8O20 KOHmpoIIepa U KhoNkY COsMOnHua OK.
- B OkHe Control Panel (Pahenb ynpaBneHn), Bb6epnte NyHKT Properties (CboiCTba) BbINOJIHNTe HAcTPOkIy MToPoBOrO KOHTpOJIpepa.
KhONKa Test device (PpOBeRtB yCToIcTBo): no3B0JraT npOBeRtB n npOCMToPb TaHaChAeHMe KHOOK KOHTpOJIpe, MaHmnyIaTopa D-pad, oCn dByx MMHN-DKOJICTMKOB, ONTNUeCKO OaTUnka n 2 TnpIRTEPO
Tenepb MoXHO NaHnHaB nIpy!
ПТМЕЧАНЕ ПО ДДЯ PACСИРЕНΗΟ ПОГРAMМЮВАНИ “ADVANCED PROGRAMMING SOFTWARE” ДОCTУПно ДДЯ 3АРУЗКИ СHAWEFO BEБ-УЗА:
http://ts.thrustmaster.com/
BbIBOP YINCSIA OCEHNAIK
- "T\rop\rammmbHb" b\bOp ooei: Ha strpnae 1 Panaenynpaene (Control Panel) b\bEpnite mbuho uncno ooe i n hakmite OK. (Danha yhkuiae peaunyetcr TOnIbko npni nomoupi IIO "Advanced programming software", meoueerocra ha naehem be6-yane).
"AnnapaTbH"BbIbOp oei: Haxmte KhONky MODE (8)Ipy BbIbOpa KOJIIncTeBa aKTHBbIX oei.
3 PEXKMA OCEI, IMEIOUNECRA HA PIK
KOHΦIγPALIЯ“ABTOMATUÇECKIPEIYECTAHOBKN”-ПК
PeknM "4 OCN
Khoinka MODE BbIKIOUeHA
3decb:
ДЛЯ BO3BPATA K 3ABODCKIM HACTPOИКAM
BbMOKeTe ydaJIntb cpa3y BCE NOJIb3ObaTeIbckne HAcTPOKn OdHM DeIcTBnEM:
Action/Adventure (peXIM "TpaHcNopT")
Action/Adventure (peKIM "Peeuin")

Cnopt(mPbICMRAHOM)
Cnopt(ronb)
ABTOHKN (CIMyIaTOpbl)
ABTOROHKn (apkaIb/paIIIN)
Ponet(CmymyTopb)

Ponet (apkaab)
TEXHnueCKA NOIDEPKKKA
ПИ ВОЗн��овени npob6nem,Cama8bHnx C nHONJtOBa8nHm KOHTPOnJIpe,3aIyNTe HBe6-aiht/ht.tshtrmaster.com u nepejntne no cblnke Technical Supplection (Tsehnueckan noDaePKx). Ha 3toi tpaHnue ectb doctyn k pazmHbIM yTnInITAM (cAto 3zadabaembe BONpOcB (FAQ), camb He bocB vpcBm dpaIeBorN o npoPPAMHOrO obceNeuHry) -3TO moKET nomOchpeueHHIO npOBeMb. EcnI 3TO he NOMORIO, MOKHO CB8atcs co cnXkBo Tne TnvceckO noDepeKxh Thrustmaster ("Technical Support"):
No 3JNEKTPOHHN NOUTe:
Tc0b6IOTOpBBA3ZPACO B OTdEN TExHmckoN ONDePKRNNO NtEe,Heo6xmoIz aepnIcTprPOBaTcB. IpeOCTaBnEHNAHIOHMDpAmaNOMOKHTBbCTpee peuNTbnpoNEM. PepeJUHne NO cBlyKe Registration (peHctpaun)KOTOPAHXoDITCnCEBaHa NTcPAHINeTexHmckoN ONDePKRNNK Technic Support n CnEDyIte INhctpyuKIMNH A KxPae.EcTNbl yKee 3apERiCTprPOBaHb, BBeDHTe HMaONbSObTeRnA npaln, 3aTeM UeJIKNHTE Logn (bxO).
INHΦOPMAUJRA O TAPAHTN
B0 Bexc 3pAxAK, Kopnoprna Guillemot Corporation S.A. ("Guillemot") dae raptanHIO na HENDAI Thrustmaster B TOM,TOY 3TN iN ENDRA HE IMEOT DEPKETOB MATEPANOB INN pNO3BQCTBA HA (2) roda DTaBt NOKyIKN. Pm6bAPKHEHIM DEFkTA B TceHNi raptAHNIHO cOpa KHeMeDNHBO CBAKITEb CO cSyKbo TseHMeCKONoDPeKKn, KOtpora PA3b1HNC nOteADHNEbOCHb DeCTBN. Ecn DeFekNT noDTBpeITCR, HsEINIE HeoBXODIMo BepHTb NO mecTy PNPOBETENH INN dpyrOe, YkaaHHoe cTsyKOH TeNtXeHKeCN oNDPeKKn).
ECNHmncnpaHoe 3eIeJeNo nnonaadTnIO yNcOyraRapAHNTN, OHO 6yETnIb60 zMaeho, NIO 6TO pEmOTnHOBAPBOA. Ipn HauHnUc pyenlmpuOeTo zakoHDoTeJIbCTBA, HAMboBuaa OTBeTCTBEHNHOCTB (BKNIOJAA KOCSEHHIEy bYbIKTN) KORnpaUM Guillemot n e eeOpHeNx npEepnTMy oOnpHaHEe pEMOTMnI INIzAmEOHn 3eIeNt Hrastmaster. OpDInecKeMH npBa nort6BeHTeBn BTOHouMeN zakoHOdATEJIbCTBA, prnmeHMOrO K pOdoXam nort6BeHTeBcKHX ToBApOB He BNIKOT Ha ykaah3Hbe rapAnTHnIIbHe 08a3teJIbCTBA.
37a rapatnHRe h paCnPOCTPAHTRE: (1) H n3eINI MOIOfMIOUPOBANHBE, BCKbTbHe, DpOABOTAHNBIE INI NOBPEKHENBIE Bpe3yJIte HtepnAIBNHO rIN Ipy60r oBpaEHNJI, HcEOMPTORI bHCTOB, HcCTAOHNI cNtOBA, HOPMAIHOH N3OCA, INI IMEIOJIme IIOBOI dyTOI DEΦKe, TH CBA3AHBI C KAcYCTBM OMaTEPNA IINI M3rOBeHNEH; (2) B cTHyae HecNOBIOHNEH IITCRYKUN, BvaIHAnHJ TNeTcKNO pODeEKPQK; (3) HA npOrAMMbHIE pNOyKtI, PpAbaOToANTHHIE He Guillemot, paCnPOCTPAHTREca rAPaHI/OTBETCTBEHCHOTc PAbaOCTNaNK pPpONMM.
ABTOPCKME IIPABA
© 2007 Guillemot Corporation S.A. BCE npaba aazaunheh. Thrustmaster® JIaIEETA zapeHCTPPOBAHbIM TOBAPbIM 3HAOK Guillemot Corporation S.A. PlayStation® JIaIEETCA zapeHCTPPOBAHbIM TOBAPbIM 3HAOK Computer Entertainment, Inc. Windows® et Windows® XP JIaIEOTCA zapeHCTPPOBAHbIM TOBAPbIMM 3HAKAM Microsoft Corporation B CIUA i dpyntx ctabhax. Pentium® JIaIEETCA zapeHCTPPOBAHbIM TOBAPbIM 3HAOK Intel Corporation. BCE zapeHCTPPOBAHbIM TOBAPbHE 3HAKNi TTOBIOBE MAPKIN JIaIEITC O6CTBEHHOCb1O COOTBCTBYOUHIX BnAIDJIeCE. INIIOCTPAUHN MORYT HE NOIHOCTbIO COOTBCTBOBaIB PeaIbHIb IMADJIEM. CoDEpXAHNE, TEHXNHcECKHe xapakTeNCTmIKn HfynHKMN MORYT N3MeHtbc6e3 PpeyIpyKeDENrN I OTNIHbATCBJr Dn PA3INHbIX CTpAN. IVsROTBHeO B KItae.
PEKOMEHDAUINIPO3AUHTEOKPYKAIOUCECPEdi

PocneOkohanyika cpoka cnkybbl DaHoe 3dJeane chNeydtYrtnnnoBbA BmECTe C bStOBtBM MycopoM, BO hNtKHeC bOpaTOKhNEpKTHnecKO HnKTePOHOrHO OoBpOyDnB.
DAnHue Oy3aNnOIOBpEKDAeTc COoBETCTbYoUIM CMBOIOMN, HAnHeCENHbM HA 3NdEInne, pykoBDCTBO NIO3OBATEINI INI yKoAOKB.
B 3aBcImOCTN OCBIOCTB, MATEPnAbI MOYr nepeBaTaBCA B NOBTOHyo nepepa60TKy.
TOBTHA HNEpBaTOn 0xTOD8 3NkETKcHcFO 3NkETPOHOrO 6OpOyBaHAn MoKET BHECTnHTeJIbIhKn BILAd N COXaHENE OkpyKaIoIe CpeDbI.
6bpaTInTeCb B MeCTbIe opraHbI BlaCTn 3a HnΦopMauné O 6nXaJWe mnyKte npHema TAKNX OTXoOB.