
DVD 619 HC - DVD player CLATRONIC - Free user manual and instructions
Find the device manual for free DVD 619 HC CLATRONIC in PDF.

| Product type | DVD player |
| Brand | CLATRONIC |
| Model | DVD 619 HC |
| Supported disc formats | DVD, CD, CD-R/RW, MP3, JPEG |
| Video outputs | Composite (RCA), S-Video, YUV (component), SCART (Peritel) |
| Audio outputs | Analog stereo (RCA), coaxial digital |
| Special functions | Programmed playback, repeat, zoom, title/chapter search |
| Power supply | 220-240 V ~ 50 Hz |
| Power consumption | 15 W (max) |
| Dimensions (W x D x H) | 43 cm x 26 cm x 4 cm |
| Weight | 1.5 kg |
| Operating temperature | 5 °C to 35 °C |
| Operating humidity | 20% to 80% (non-condensing) |
| Cleaning | Clean with a soft, dry cloth. Do not use abrasive products. |
| Safety | Do not expose to moisture. Unplug before cleaning. Use only on a stable surface. |
| Included accessories | Remote control, audio/video cable, CR2025 battery for remote control |
| Repairability | Repairability index not communicated. Contact CLATRONIC customer service. |
Frequently Asked Questions - DVD 619 HC CLATRONIC
User questions about DVD 619 HC CLATRONIC
0 question about this device. Answer the ones you know or ask your own.
Ask a new question about this device
Download the instructions for your DVD player in PDF format for free! Find your manual DVD 619 HC - CLATRONIC and take your electronic device back in hand. On this page are published all the documents necessary for the use of your device. DVD 619 HC by CLATRONIC.
USER MANUAL DVD 619 HC CLATRONIC
RCA Audio/Video Anschlüsse
Slow motion (Zeitlupe)
Progressive Outputs (DVD) 39
Assemblations and system operators 20
Weergavefunctions. 44-45
Pauzefunctie 44
2 Stand-by-indicator
Schakelt de installment in of UIT.
Radio Data System (RDS)/Programma Types (PTY)
Soften: soft-focus-effect.
OFF: awhile, albeit somewhat, is still a good idea.
Right sur: awhile, albeit somewhat more than a quarter of the time, after which he had begun to be able to do some work.
Subwoofer: awhile, perhaps a bit more than subwoofer's usual.
WAT U NOG MOET WETEN
33 Tasto FM MODE / REPEAT A-B
Important Safety Instructions 83
Placement. 83
Safety 83
Warranty ^+ Guarantee 83+107
Disc Formats 84
Disc Formats 84
Regional Code. 84
No Disc Function or Operation 84
General Information on DVD. 84-85
What is DVD? 84
Icons 84
Setting Language of Subtitle 84
Screen 84
Multiple Camera Angles 84
Title and Chapters 85
Before You Start 85
Remote Control. 85
Inserting the Batteries. 85
Remote Control Elements / Functions ....86-87
Unit Control Elements / Functions 88
Front Panel 88
Rear Panel 88
Display 89
Display Information 89
Connections 90-93
Antenna 90
Scart cable. 90-91
RCA Audio/Video connections 90
S-Video connections .90
Cinch/Scort cable .90
Cinch/Scat Cable. 90
Component Video Output / (DVD) 91
Progressive Outputs (DVD) 91
Connecting other devices. 91
Digital connection. 91
Listening via other audio devices 91
Connecting to VCR 91
Watching a DVD 92
Watching a Videotape. 92
Playing the sound of TV programmes via the unit. 92
Speaker and subwoofer connections 92
Positioning the speakers 93
Wall-mounting of rear surround speakers 93
Switching on DVD Player and TV. 93
Adjusting the Sound. 94-95
Speaker Setting. 94
Sound Quality 94
Dolby Digital 94
Dolby Pro Logic II. 94
Speaker Selection. 95
Playing a Disc. 96-97
Pause. 96
StopPlayback 96
Skip 96
Fast Forward/Fast Reverse 96
Slow Motion. 96
Skip Buttons 96
Zoom 96
Multi Angle 96
Audio 96
Subtitle 97
Special DVD Functions 97-98
On-screen information 97
Title. 97
Chapter 97
Time 97
Angle 97
Audio 97
Subtitle 97
GOTO Function 97
Show Certain Titles 98
Skip to Certain Chapter or Track 98
Search with Time 98
Angle Setting 98
Audio Format Setting 98
Subtitle Setting. 98
Programming 99
Programming Audio Titles 99
Repeat Functions 99
Repeating a Title 99
Repeating a Chapter 99
Resetting the Repeat Function 99
Repeating an Audio Track. 99
Repeating the Entire CD 99
Resetting the Repeat Function 99
Repeating Sections 99
Playing MP3 and Picture File Disc 100
Playing MP3 Disc 100
Pause 100
Stop Prev./Next Button 100
Reverse/Forward Buttons. 100
MP3 On-screen Display 100
Replaying a Picture File Disc. 100
Radio 101
Setting Stations Manually 101
Automatic Station Search 101
Storing Radio Stations 101
Tuning into Stored Radio Station 101
Radio Data System (RDS) Programme Types (PTY) 101
Radio Text 101
How to Use 102-105
Switching On 102
DVD Set-up Menu 102
Language Setting 102
Video 102-103
TV Format 102
Video Output 102
Brightness 103
English 168
Edges 103
Audio 103-104
Digital Out. 103
L/R Speakers 103
Subwoofoe 103
Subwoofer 103
Surround Delay. 103
Centre Delay. 104
Pink Noise 104
Level Setting. 104
Factory Set 105
How to 105
Troubleshooting 105
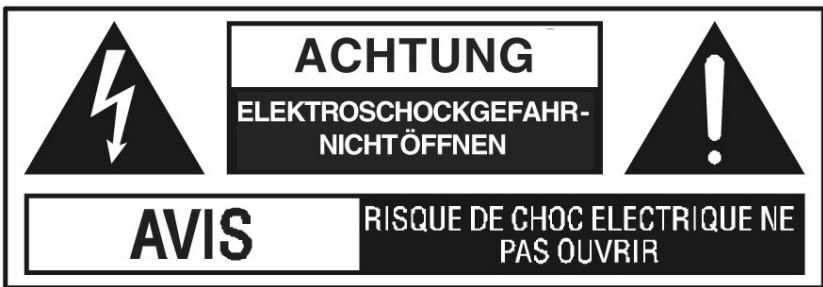
To prevent the risk of electric shock do not open the device marked by the above symbols. There are no parts inside the device which are to be serviced or exchanged by the user.
Placement
To prevent a fire, electric shock or possible destruction of electronic components inside the device do not expose the device to rain or highly humid environments. Also, avoid direct exposure to sunlight or heat. Be sure to choose a location for the device that does not restrict the air flow to the sides and rear of the unit. Do not place your TV on top of the DVD player.
Safety
When connecting or disconnecting the power cord, always hold the plug and not the cord itself. If the unit will not be used for a longer period of time we recommend disconnecting the device.
Warranty
Your unit has been has been designed and manufactured with utmost care. Should you nonetheless experience any malfunction, please refer to your dealer. We vouch to remedy all defects within the warranted period which are proven to have been caused by material defects or manufacturing errors.
The warranty claim must be ascertained within the period of warranty upon presentation of the receipt. Please enclose a precise description of the malfunction with the device, and pack the unit carefully in its original packaging. Please refer also to the last page of this operation manual.
Disc Formats
The DVD Player can playback discs bearing any of the following labels:

DVDs
[8cm (3")/12cm (5") disc]

Audio CDs
[8cm (3“)/12cm (5“) disc]

CD-R CD-RW Compatible
Regional Code
As DVDs are an ideal medium for showing movies of prime replay quality the film studios co-operated in accounting for their publication rights. All movie DVDs are therefore labelled with a regional code.
The code for our region is 2.

If the regional code on the disc is not identical with the stipulated regional code the disc can not be played.
No Disc Function or Operation
When the symbol appears on the TV screen, it indicates that the function or operation attempted is not available at that time. This occurs because the CD manufacturer determines the specific functions. Certain functions may not be available on some discs. Be sure to read the documentation provided with the disc.
GENERAL INFORMATION ON DVD
What is DVD?
DVD stands for Digital Versatile Disc which is a new technology to store video and audio data of particularly high picture and sound quality.
Icons
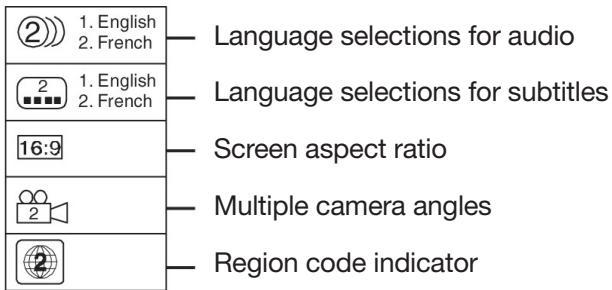
Language Selection/Subtitle
A DVD can be available with several language selections and several subtitle settings.
Screen
A DVD can produce up to three formats, 16:9, 4:3 or letterbox (broad screen on regular 4:3 TVs with black top and bottom bands)
Multiple Camera Angles
DVD enables video programmes which recorded different camera angles of the respective scenes.
GENERAL INFORMATION ON DVD
Notes:
This unit supports 2-channel (L/R) Audio and 5.1 ch (Multi-channel).
When playing a CD-G (Graphics) or CD Extra disc the audio part is played, but the graphic images are not.
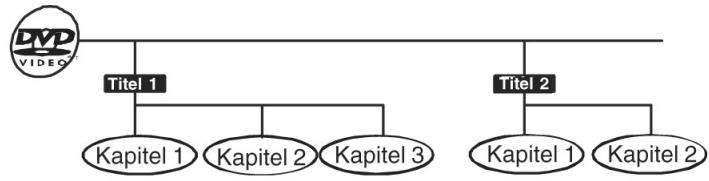
Titles, Chapters and Tracks
DVDs are divided into "titles" and "chapters". If the disc has more than one movie on it, each movie would be a separate "title". "Chapters" are sections of titles.
Audio and Video CDs are divided into "tracks". A "track" is usually one song on an Audio CD.

BEFORE YOU START
Using the Remote Control
- Point the Remote Control at the REMOTE SENSOR located on the Unit.
- When there is a strong ambient light source, the performance of the infrared REMOTE SENSOR may be degraded, causing unreliable operation.
- The recommended effective distance for remote operation is about 5m at a 30^ angle.
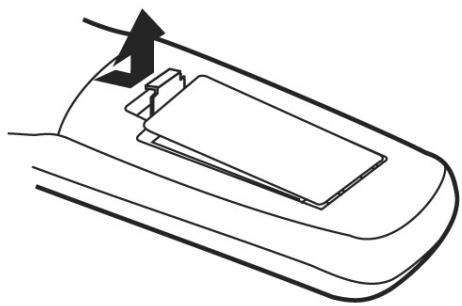
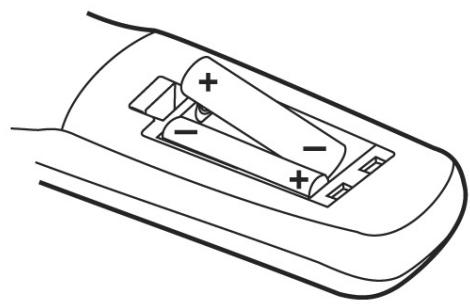
Inserting the Batteries
- Open the battery cover to the back of the remote control.
- Place two AA size batteries into the compartment. Observe the + / - polarity.
- Close the cover of the battery compartment.
Notes:
Be sure to exchange weak batteries in time. Do not mix old and new batteries and only use batteries of the same type. If the remote control will not be used for a longer period of time remove the batteries from the compartment to avoid damage caused by battery leakage.
ENGLISH
1 STANDBY / ON button
Turns the DVD player on and puts it in standby mode.
2 RETURN button
Return to the normal operation after using the SETUP menu.
3 Number (0 - 9) and (+10) buttons
Use the number buttons to directly enter the number of the Chapter or audio track and to programme audio CD track sequences, as well as to enter a password code. For numbers beyond 10 first press +10 and then the single digit number button.
4 5.1 / 2.1 CHANNELS button
Selects between 5.2 and 2.1 channel mode.
5 MEMORY button
Enter the number of a selected chapter or track. Enter the number of a selected station.
6 DIMMER button
Turns the display backlight ON and OFF.
7 PRO LOGIC II button
In AV_IN mode, switches to Dolby Pro Logic mode for VHS tapes encoded with Dolby Pro Logic.
8 VOLUME (+ / - ) buttons
Adjust the volume.
9 SETUP button
Selects the Set Up menu of the DVD Player.
10 ▲/▼ CURSOR buttons
Use to highlight selections on a menu screen and adjust certain settings.
11 SLOW button
Perform slow reverse playback of DVDs.
12 TUNING buttons
REV: Fast reverse playback.
FWD: Fast forward playback.
TUNING: Scan all available radio stations.
13 STOP button
Stop playback
14 PREV button
Sets previous title, chapter and stores radio station.
15 CLEAR button
Clear input selections and cancel certain playback-functions.
16 DISPLAY button
Displays all technical information on the disc inserted in tray.
17 ANGLE button
Camera angle for film sequences from different positions.
18 SUBTITLE
Select the subtitle language.
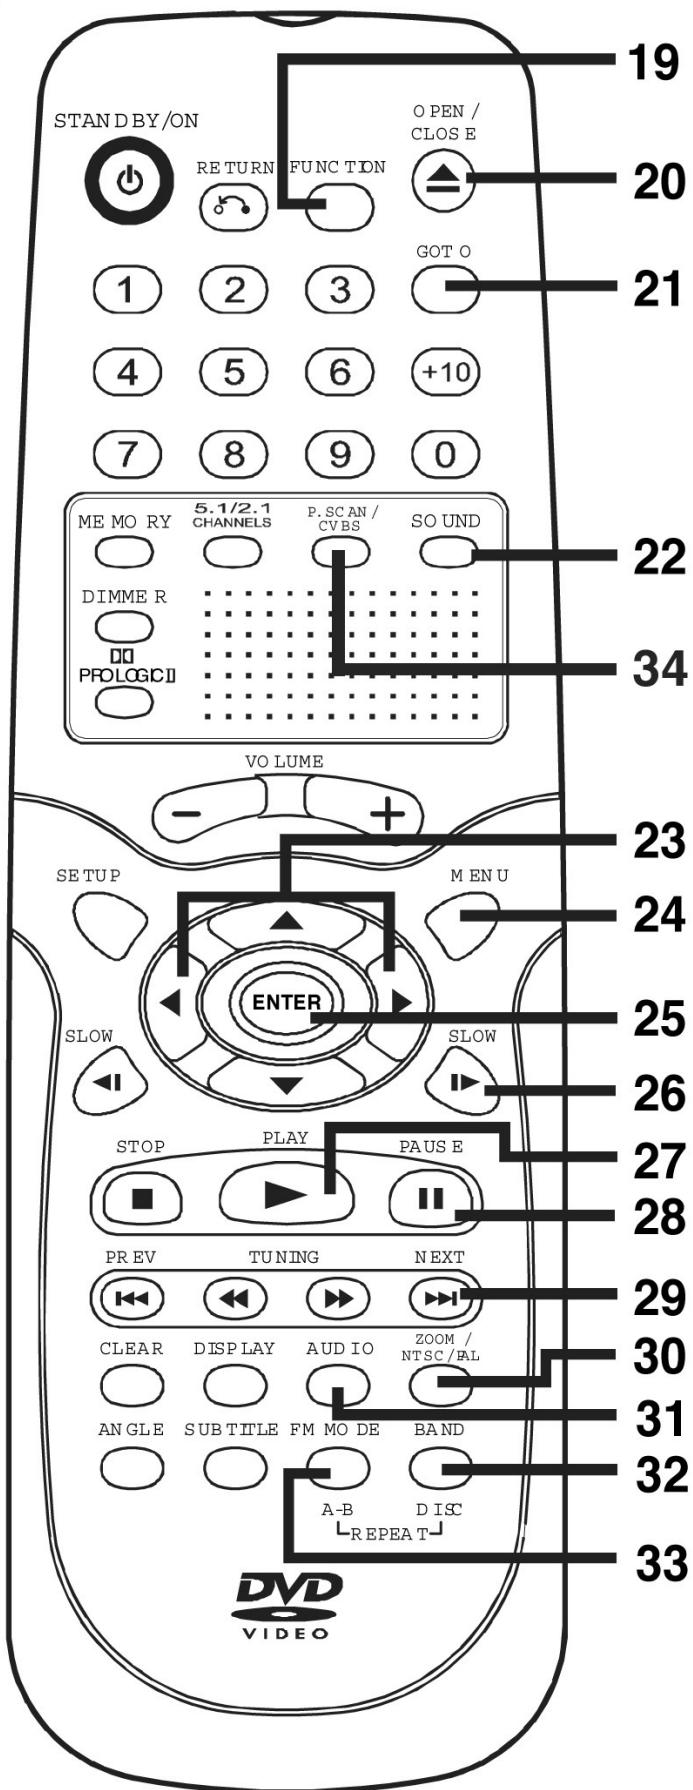
19 FUNCTION button
Display the FUNCTION screen where you can check orchange various setting.
20 OPEN / CLOSE button
Use to open or close the disc tray.
21 GOTO button
Skip directly to a specific location on a DVD disc.
22 SOUND button
Selects sound balance and tone controls for adjustment with the cursor buttons.
23 / CURSOR buttons
To select functions on the menu screen.
24 MENU button
Open and close DVD menus
25 ENTER button
Confirm selections made on the menu screen.
26 SLOW
Slow motion.
27▶PLAY button
Start playback.
28 II PAUSE button
To briefly interrupt playback, frame advance.
29 NEXT I button
Move to next title, chapter or stored station.
30 ZOOM button
Zooms in.
31 AUDIO button
Select an audio title on a DVD or select an Audio
output mode o
32 BAND/REPEAT-DISC button
Switch between AM(MW) or FM.Repeat chapter or title of a DVD.Repeat single track or whole CD.
33 FM MODE/REPEAT A - B button
Set FM MODE to FM STEREO for FM stereo sound or toFM MONO for mono sound.Perform point-to-point repeat playback on a DVD or CD.
34 Video output
Change-over (optional)
Front and Top Panel
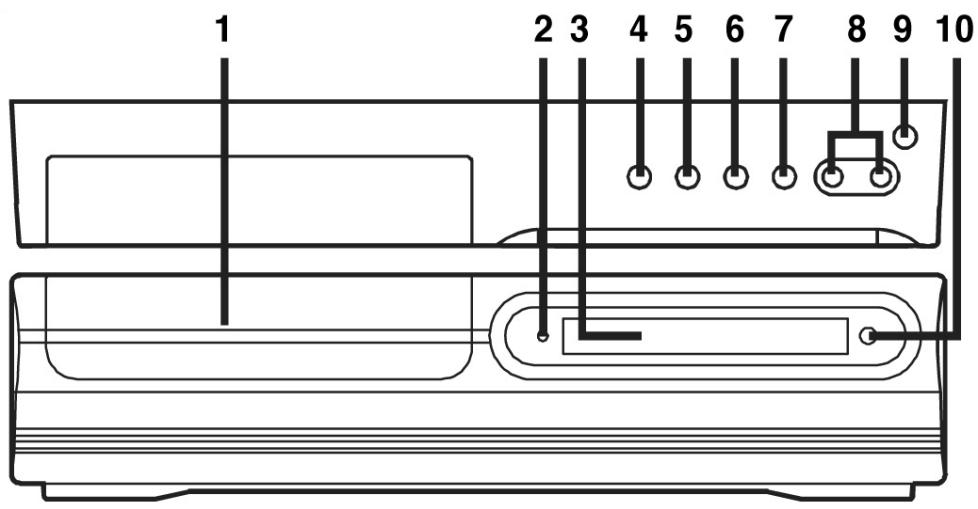
1 Disc tray
Open or close tray by pushing OPEN/CLOSE button. Place a disc on the disc tray, label side up.
2 STANDBY indicator
When the Unit is turned on by pressing theSTANDBY/ON button.
3 Display window
Display system information.
4 OPEN/CLOSE button
Use to open and close the disc tray.
5 PLAY button
Press to start or resume playback
6 STOP button
Stop playing a disc.
7 FUNCTION button
8 Volume control
Adjust the volume.
9 STANDBY/ON button
Turn the power on or off.
10 Remote sensor
Note: Screen saver
If no button is pressed within 2 minutes, the function will active, If you want to return the normal screen,press any button.
Rear Panel

11 AM(MW) LOOP ANTENNA terminal
12 COMPONENTVIDEOjacks(Y,PB/CB,PR/CR)
13VIDEO OUT jack
14 DIGITAL AUDIO OUT jack
15VIDEO IN (VCR) jack
16 SCART socket
17 AUDIO IN (R/L) jacks
18 Right FRONT speaker terminals
19 Subwoofer LB Terminals
20 Left REAR speaker terminals
21 FM ANTENNA jack
22 Left/Right AUDIO OUT jacks
23 S-VIDEO OUT jack
24 Right REAR speaker terminals
25 CENTER speaker terminals
26 Left FRONT speaker terminals
27 Power cord
DISPLAY
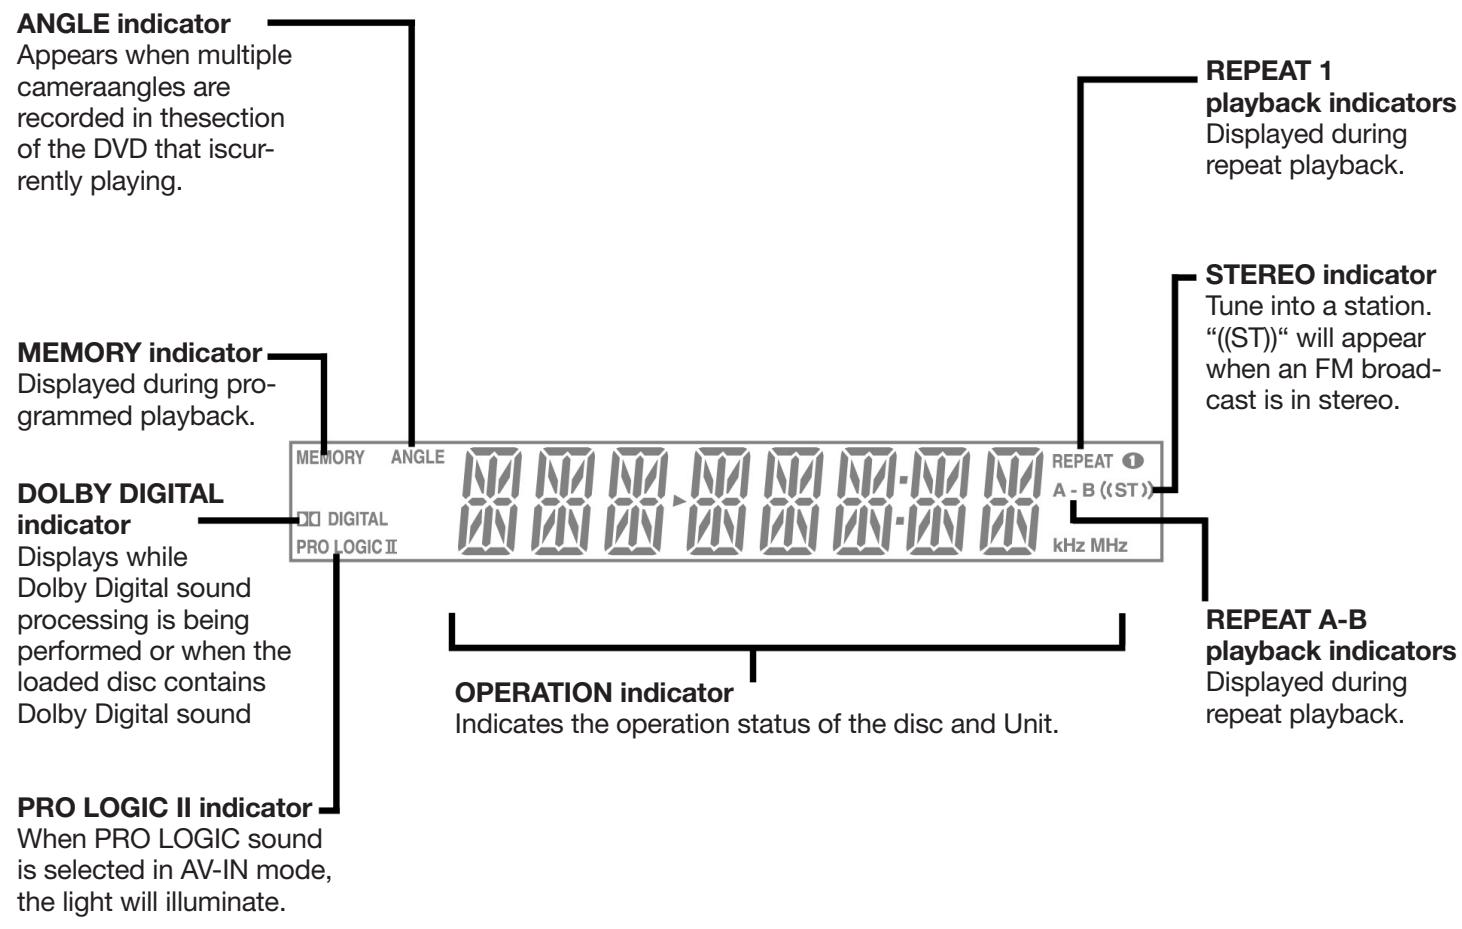
ENGLISH
Display Information
The DVD displays the information shown below on the TV screen and on the Unit's DVD display depending on the operation status.
| TV Screen | Unit Display | Remarks | |
| If no disc is loaded when the Main Unit is switched on. | No Disk | NO DISC | Appears when the tray is closed and:1 There is no disc in the tray.2 The disc type is not playable in this Unit.3 The disc is not loaded correctly (upside-down, etc.) |
| Tray open | ▲ | OPEN | |
| Tray closed | ▲ Close | CLOSE | |
| Loading | LOAD... | LOAD | |
| Stopped | ■ Stop | The display changes to show other indicators (total time, etc.) | |
| Playing | ▶ Play | ||
| Paused | II Pause | Freezes the image on the screen or pauses audio playback. | |
| Fast forward | ▶ x 2 | The display changes to show other indicators (total time, etc.) | |
| Fast reverse | ▲ x 2 | ||
| Slow | ▲/■ 1/2 | Does not function for Audio CDs. | |
| Repeat A - B | Rep A-Rep A-B | A-B | Repeat a specific section. |
| S | The operation is not permitted by the DVD Unit or the disc. |
Ensure that the cord is not connected to the outlet when performing the connections. Disconnect the unit if not used for a longer period of time.
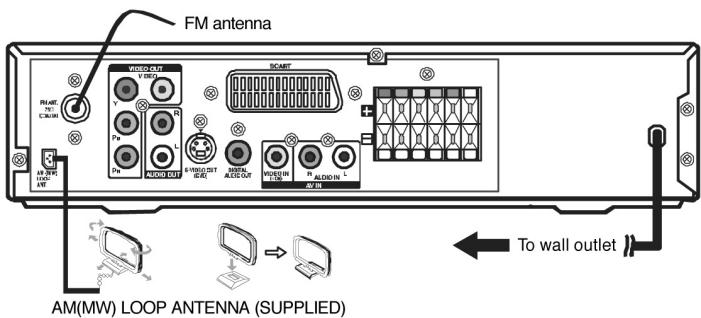
Antenna
For better reception
FM
Connect FM antenna (included) to the FM ANTENNA jacks.
AM (MW)
Connect the loop antenna (included) to the AM (MW) LOOP ANTENNA terminals.
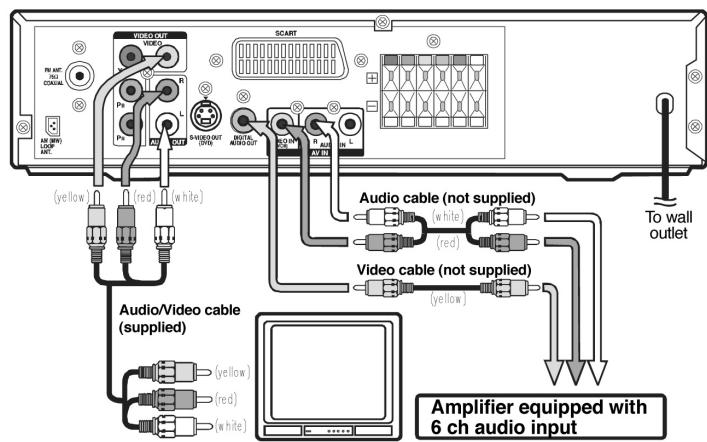
Connecting your TV
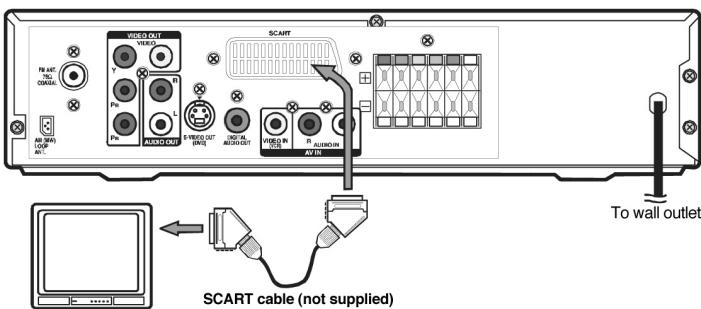
The unit can be connected to your TV in several different ways, depending on the design of your TV.
To connect a TV use either a Scart cable, video cable, S-Video cable or Audio/Video cable.
SCART cable
Use the SCART cable (not supplied), connect the SCART cable from the unit to your TV.
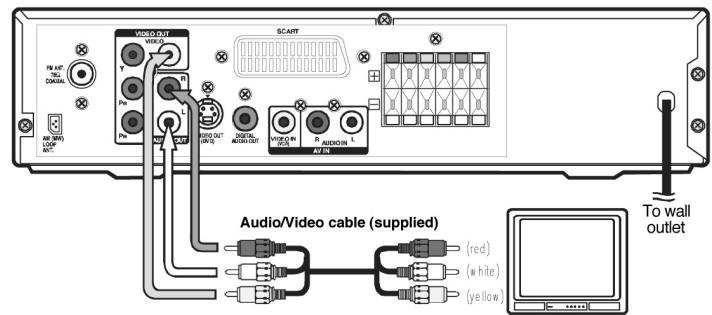
RCA Audio/Video cable
Use the Audio/Video cable (supplied). Connect the VIDEO OUT and left/right AUDIO OUT jacks on the unit to the VIDEO IN and left/right AUDIO IN jacks on your TV.
or
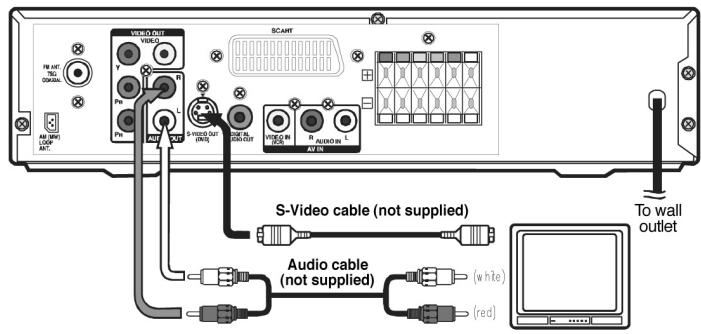
S-Video cable
Use an S-Video cable (not supplied) and the Audio/Video cable (supplied).
- Use an S-Video cable to connect the S-VIDEO (DVD) jack on your unit to the S-VIDEO IN jack on your TV.
- Next, use the Audio/Video cable to connect the left and right Audio Out jacks of the unit with the left and right Audio In jacks on your TV.
or
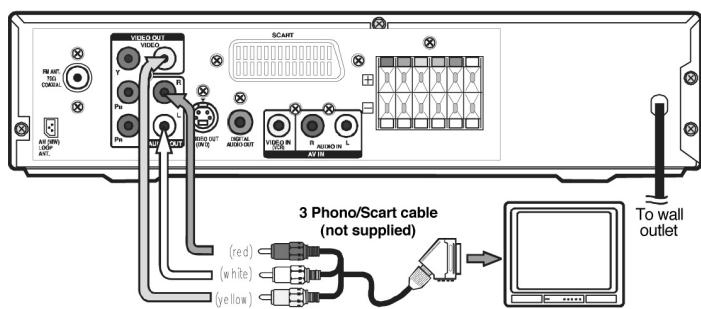
Cinch/Scart cable
Use the cinch/Scart cable (not supplied). Connect the VIDEO OUT and left/right AUDIO OUT jacks on the unit and Scart to your TV.
or
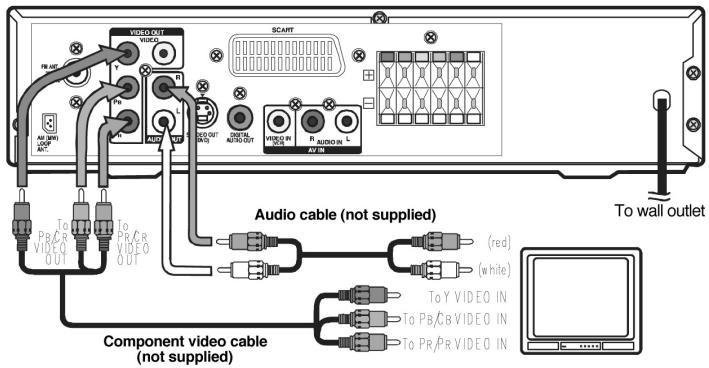
Component video outputs (DVD)
Some TVs or monitors are equipped with component video inputs. Using the Audio cable (not supplied), connect the left/right AUDIO OUT jacks on your Unit to the left/right AUDIO IN jacks on your TV and the Component video cable (not supplied), connect the Green plug Y VIDEO OUT jack on your Unit to YVIDEO IN jack on your TV, the Blue plug PB/CB VIDEO OUT jack on your Unit to PB/CBVIDEO IN jack on your TV and the Red plug PR/CDVIDEO OUT jack on your Unit to PR/CRVIDEO IN jack on your TV to view the higher quality picture playback.
or
Progressive outputs (DVD)
Some TVs or monitors are equipped with component video inputs that are capable of reproducing a progressively scanned video signal.
Using the Audio cable (not supplied), connect the left/right AUDIO OUT jacks on your Unit to the left/right AUDIO IN jacks on your TV and the Component video cable (not supplied), connect the Green plug YVIDEO OUT jack on your Unit toYVIDEO IN jack on your TV, the Blue plug PB/CBVIDEO OUT jack on your Unit to PB/CBVIDEO IN jack on your TV and the Red plug PR/CDVIDEO OUT jack on your Unit to PR/CRVIDEO IN jack on your TV to enjoy highest quality picture with less flicker.
Notes:
- When connecting the DVD player to your TV, switch off and disconnect both units.
- Connect the DVD Player directly with the TV. Should you wish to connect the DVD player with a VTR or a TV/VTR combination or VCR the image can be distorted since the DVDs are copy-protected.
Press the SETUP button and select Video Output to YUV. Connect the Component Video cable to the TV, press the P-Scan button on the remote control when the DVD has stopped. Now select the output signal for a better picture quality.
Attention:
When progressive output is activated there is no video signal from the S-Video and RCA (CVBS) video jacks.
Ensure that your TV supports the progressive scan component video signal, press the P-Scan button twice until CVBS displays to return to CVBS video signal.
Notes:
Connect the Unit to your TV directly. If you connect the Unit through a VCR, the playback picture will be distorted because DVD discs are copy protected.
When you connect the Unit to other equipment, be sure to turn off the power and unplug all of the equipment from the wall outlet before making any connection.
Connecting another source
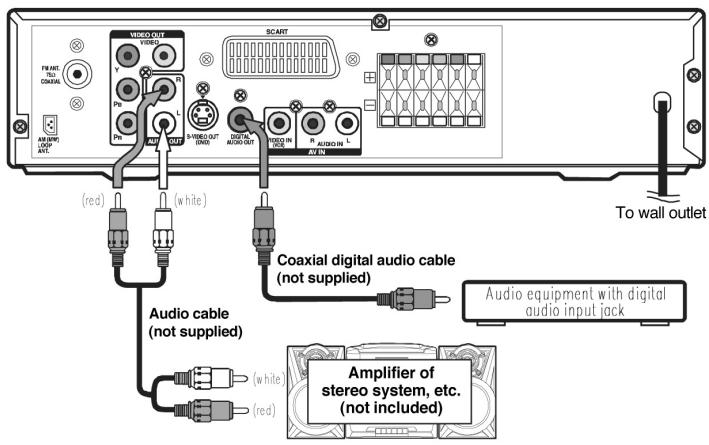
Analogue connections
Using the Audio cable (not supplied) connect the left/right AUDIO OUT jacks on your unit to the AUDIO IN jack of the stereo system.
Digital connection
Using the Coaxial Digital Audio cable (not supplied), connect the DIGITAL AUDIO OUT on your Unit to the DIGITAL AUDIO IN jack on your other device.
Listening via another audio device
- Turn on the Unit.
- Turn on your audio device and follow the instructions included with it to select the AUDIO IN or DIGITAL IN function.
Connecting a VCR
Audio/Video cable
Using the supplied Audio/Video cable, connect the yellow plug from VIDEO OUT jack on your Unit to VIDEO IN jack on your TV, connect the left and right AUDIO OUT jacks on your Unit to AUDIO IN jacks on your TV. If you want the sound come from the speakers of the Main Unit, you need not to connect these left and right Audio cable from the Main Unit to your TV.
Video cable
Using the Video cable (not supplied), connect theVIDEO IN (VCR) jack on your Unit to VIDEO OUT jack on your VCR.
Audio cable
Using the Audio cable (not supplied), connect the left/right AUDIO IN jacks on your Unit to the AUDIO OUT jacks on your VCR.
ENGLISH
Watching a DVD
- Turn on the Unit, use the FUNCTION button on the remote control or the front panel to select „DVD".
- Turn on your TV and follow the instructions included with it to select VIDEO function which is correspond to the VIDEO IN jack you need connected with the Main Unit.
Watching a Videotape
- Turn on the Unit, use the FUNCTION button on the remote control or the front panel to select „AV_IN".
- Turn on your TV and follow the instructions with it to select VIDEO function which corresponds to the VIDEO IN jack that is connected with the Main Unit.
- Turn on the VCR and follow the instructions with it to play the videotape.
Notes:
- If you want sound from the Unit and sound from equipment connected to it (see next page) to come only from the speakers of the Unit, do not connect the left and right audio plugs from the Unit to your TV.
Sound from the VCR or other external equipment will not be heard from the television if you connect the television with a scart to scart cable.
To hear the sound from TV programmes through the unit
To hear the sound of the TV programmes through the DVD amplifier proceed as follows:
- Connect the VCR as described above. If your television does not have the round (RCA-style) connectors you can get an RCA to scart input adapter.
- Press the FUNCTION button on the DVD Amplifier Unit to get AV_IN mode, shown on the front panel display.
- On the television, select the AV or scart input channel for the DVD amplifier Unit.
- On the VCR, select the television programme you want to watch.
- On the DVD amplifier Unit select normal stereo or Pro Logic decoder modes according to your preference.
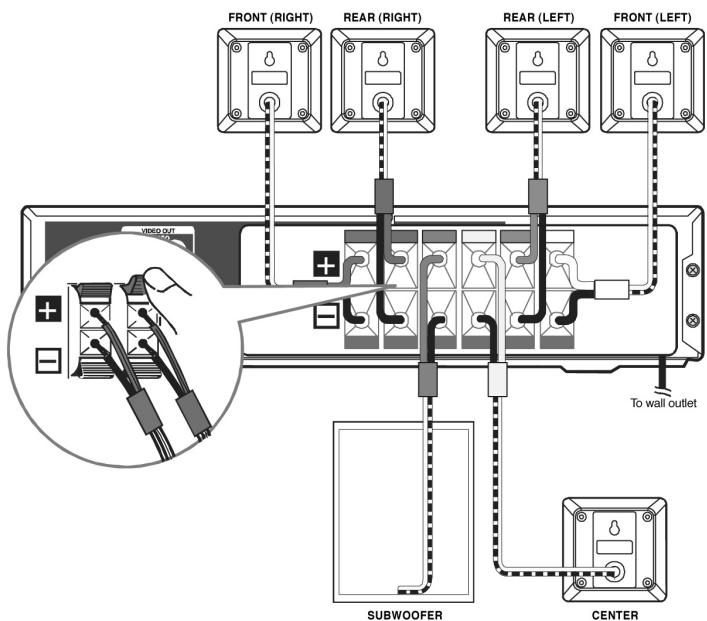
Speaker & subwoofer connections
The speaker cables are differentiated by colour to facilitate the connection. Plug the positive (+) and the negative (-) ends of the speaker cords into the respective jacks to the rear of the device. Now connect every speaker cable with the connecting jacks.
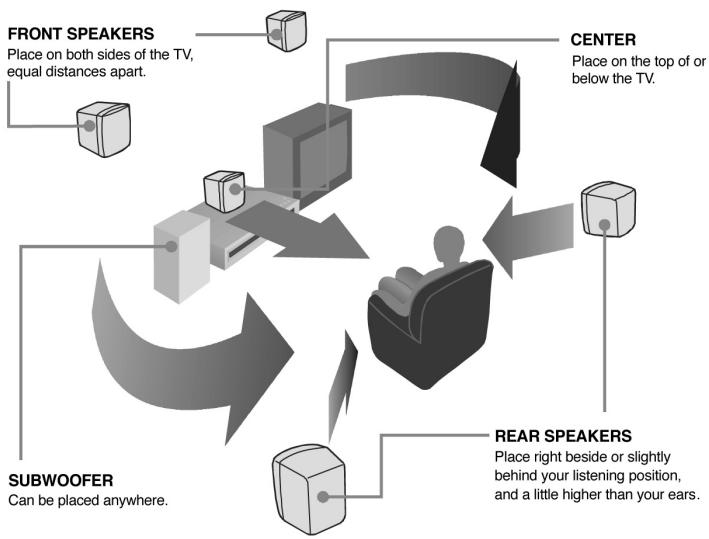
Positioning the speakers
The centre speaker should be placed on or below the TV.
The front speakers should be placed at an even distance to the TV to the right and left of the same.
The subwoofer can be positioned voluntarily.
Rear speakers should preferably be placed beside or slightly behind the seating position, approximately at listening level.
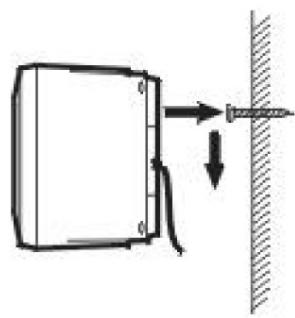
Mounting of the rear surround speakers
- Mark the correct mounting position on the wall.
- Insert a fixing screw(s) at the marked position on the wall.
- Align the slot hole(s) of the speaker over the screw and pull the speaker downward until it is firmly hooked.
Turning on the DVD Player and the TV
1) Press the Standby/On button on the remote control or the Function button or the Play button to switch on the device.
2) Switch on your TV.
3) Select the AV channel.
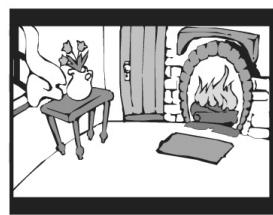
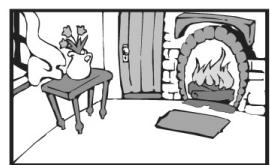
4) If the device was connected correctly with the TV, the screen will display the DVD logo as illustrated.

Speaker setting
To set the surround sound with Pro Logic use the remote control to perform the following changes to the speaker balance:
Front speaker (left)
- Press the SOUND button repeatedly to display LEFT 5, then press the cursor button to adjust the sound level. It will show on the display of the Unit.
Front speaker (right)
- Press the SOUND button repeatedly to display RIGHT 5, then press the cursor button to adjust the sound level. It will show on the display of the Unit.
Center speaker
- Press the SOUND button repeatedly to display CENT 10, then press the cursor button to adjust the sound level. It will show on the display of the Unit.
Rear speaker (left)
- Press the SOUND button repeatedly to display REAR L10, then press the cursor button to adjust the sound level. It will show on the display of the Unit.
Rear speaker (right)
- Press the SOUND button repeatedly to display REAR R10, then press the cursor button to adjust the sound level. It will show on the display of the Unit.
Subwoofer
- Press the SOUND button repeatedly to display SUB 10, then press the cursor button to adjust the sound level. It will show on the display of the Unit.
Note:
- If you do not press any button within a few seconds, the display will return to normal.
To adjust the sound quality
Press the Sound button to select an equalisation mode (bass, treble). Press the cursor button to adjust the level.
Bass: the low range of sounds
Treble: the high range of sounds
Dolby Digital
Dolby Digital is a sound system developed by Dolby Laboratories Inc. that gives movie theatre ambience to audio output when the Unit is connected to a Dolby Digital 5.1 channel processor or amplifier. This Unit automatically recognizes DVDs that have been recorded with Dolby Digital.
As not all DVDs are recorded in this mode be sure they feature this logo when purchasing a DVD.

DOLBY

G I T A L
Dolby Pro Logic II
This system guarantees the full band width of a two-channel system by using a surround decoder, and is marked by the following symbol:

DOLBY

GITAL

LOGIC II
Speaker selection
- When the DVD has stopped press the 5.1 CH and 2.1 CH buttons on the remote control to perform different speaker settings as described in the table below.
- When in AV-IN Function Mode press the Pro Logic II button on the remote control repeatedly to select the different speaker modes.
- The Subwoofer can be activated or deactivated via the Set Up menu.
The following table shows which speakers are working in the various modes:
| FUNCTION | DISCS | 5.1/2.1CHButton | L/R SPEAKER(SMALL/LARGE) | SUB-WOOFERON/OFF | Dolby Pro Logic II Selection | ||||
| EMU | MA-TRIX | MU-SIC | MO-VIE | BY PASS | |||||
| DVD MODE | DVD /CD | 5.1CH | SMALL | ON | 5.1 | 5.1 | 5.1 | 5.1 | 5.1 or 2.1 |
| LARGE | ON | 5.1 | 5.1 | 5.1 | 5.1 | 5.1 or 2 | |||
| --- | OFF | 5 | 5 | 5 | 5 | 5 or 2 | |||
| 2.1CH | SMALL | ON | 2.1 | 2.1 | 2.1 | 2.1 | 2.1 | ||
| LARGE | ON | 2 | 2 | 2 | 2 | 2 | |||
| --- | OFF | 2 | 2 | 2 | 2 | 2 | |||
| MP 3 | 5.1CH | --- | --- | 5.1 | 5.1 | 5.1 | 5.1 | 5.1 | |
| 2.1CH | --- | ON | 2.1 | 2.1 | 2.1 | 2.1 | 2.1 | ||
| --- | --- | OFF | 2 | 2 | 2 | 2 | 2 | ||
| PCM DVD | 5.1CH | --- | ON | 5.1 | 5.1 | 5.1 | 5.1 | 5.1 | |
| --- | OFF | 5 | 5 | 5 | 5 | 5 | |||
| 2.1CH | SMALL | ON | 2.1 | 2.1 | 2.1 | 2.1 | 2.1 | ||
| LARGE | ON | 2 | 2 | 2 | 2 | 2 | |||
| --- | OFF | 2 | 2 | 2 | 2 | 2 | |||
| TUNER | --- | --- | --- | --- | 2.1 | 2.1 | 2.1 | 2.1 | 2.1 |
| AV_IN | --- | --- | SMALL | ON | 5.1 | 5.1 | 5.1 | 5.1 | 5.1 |
| LARGE | ON | 5.1 | 5.1 | 5.1 | 5.1 | 5.1 | |||
| --- | OFF | 5 | 5 | 5 | 5 | 5 | |||
5.1. Represents FRONT LEFT/RIGHT, REAR LEFT/RIGHT, CENTER speakers and SUBWOOFER
2.1. Represents FRONT LEFT/RIGHT speakers and SUBWOOFER
5 Represents FRONT LEFT/RIGHT, REAR LEFT/RIGHT and CENTER speakers.
2 Represents FRONT LEFT/RIGHT speakers
Note:
If you have connected your TV set to the player using a scart cable, you will not hear any sound through the television when playing DVDs with DOLBY DIGITAL sound, but only through the loudspeakers of the Home Cinema Set.
The prerequisite for playing a CD is the successful connection of the devices.
- Press the Standby/On button on the unit or on the remote control.
- Select DVD with the Function button.
- Press the OPEN / CLOSE button. The disc tray opens.
- Place the disc on the disc tray with the label side up. Press the OPEN / CLOSE button. The disc tray closes.
- The CD is being loaded and the display will indicate this accordingly. The unit will automatically start playing as soon as loading has been completed. If not, press the Play button.
Pause function
To briefly interrupt playback press the Pause II button. Pause will appear on the display. To resume playback, press the Play button.
Stopping playback
Press the Stop button when you want to interrupt playback. If you wish to resume playback then press the Play
- button. If the playback is to be ended press the Stop button a second time.
Skip buttons
Skip to a certain title of a DVD or a CD using the Skip buttons. Press the Rev Skip button once to skip to the beginning of the previous title. Press the Forw Skip button to skip to the next title. For Audio CDs use the number buttons on the remote control to go directly to a chosen track.
Fast Forward/Fast Reverse
Press the FFWD or REV button during playback. The disc will be forwarded or reversed at double speed. There are four speed levels to choose from. Every time the FFWD or REV button is pressed the speed is changed accordingly: 2x, 4x. 8c. and 20x. Once you have reached the desired section, press the Play button.
Notes:
Forwarding or reversing to the desired section can also be performed by holding the FFWD or REW buttons.
Slow motion
Again, choose between two speeds. The speeds are changed as follows every time one of the Slow buttons is pressed: 1 / 2 - 1 / 4 . To return to normal playback press Play .
Skip button
While in playback press one of the Skip buttons to skip to the previous or next title or chapter. The display will indicate this accordingly. Playback will start automatically.
Zoom in
To zoom in on an image press ZOOM during playback. Use the cursors to target a particular excerpt. To return to regular playback press Zoom until OFF is displayed.
Multi angle
Some DVDs contain scenes which have been shot from a number of different angles. For these discs, the same scenecan be viewed from each of these different angles.
- While you are playing a DVD with different angles recorded, press the ANGLE button to view the number of the current angle.
- Press the ANGLE button repeatedly to change the scene to the next angle in those recorded. About two seconds later, playback continues from the new angle you selected. If no button is pressed within 10 seconds, playback continues without changing the current angle.
This function can only be used for discs on which scenes shot from multiple angles have been recorded. If only one angle is recorded, “1/1” is displayed.
Audio
On some discs, the sound is recorded in two or more formats. Follow the directions below to select the type of playback.
- While a disc is playing, press the AUDIO button to show the current audio format number, e.g. 1/3.
- Press the AUDIO button repeatedly to select the desired audio format. About two seconds later, playback continues in the new audio format.
If only one audio format is recorded, the number does not change. About two seconds later, playback continues in the new audio format.
Subtitle
A DVD can hold many different language subtitles. Depending on the basic settings made in the Set Up menu for subtitles, only this language version is available even if the DVD contains another language version.
- While a DVD is playing, press the SUBTITLE button to display the current language setting
- Press the SUBTITLE button repeatedly to select the desired subtitle language.
Notes:
- If only one language is recorded, the language does not change.
- About two seconds later, playback continues with the new subtitle you selected.
- If no button is pressed within 10 seconds, playback continues without changing the current subtitle setting.
- On some DVDs, subtitles are activated from the main menu of the DVD. Press the MENU button to activate themain menu.
SPECIAL DVD FUNCTIONS
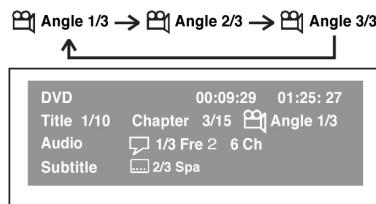
Screen information
Use the Display button to check and change the current settings for Audio, subtitle and camera angle.
- While the disc is playing, press the DISPLAY button to display the screen shown below. Elapsed time: Elapsed time from the beginning of the chapter which is currently playing. Remaining time: Remaining time of the title which is currently playing.
- Press the DISPLAY button twice to display the screen shown as below. Press the ANGLE, AUDIO and SUB-TITLE button to change the selected item.
Title
- The number of the title currently playing and total titles of disc.
- Press the GOTO button to set your desired title, then press the ENTER button to confirm.
Chapter
- The number of the chapter currently playing and total chapters of the currently played title.
- Press the GOTO button to set your desired chapter, then press the ENTER button to confirm.
Time
- Elapsed time from the beginning of the currently playing chapter and the remaining time from the beginning of the currently playing title. Press the GOTO button to set your desired point to start playback, then press the ENTERbutton to confirm.
Angle
- If the disc was produced with different angle settings 1/3 is displayed next to the camera symbol. When a disc with only one angle is played back 1/1 is displayed next to the camera symbol. Use the GOTO button to set the various angles here, too.
Audio
- The type of audio currently selected is displayed. Changes can be performed with the Audio button. Press the AUDIO button to set the audio type.
Subtitle
- The current status is displayed. Changes can be performed with the Subtitle button. Should the disc feature one language setting only then 1/1 is displayed with the respective language on the screen.
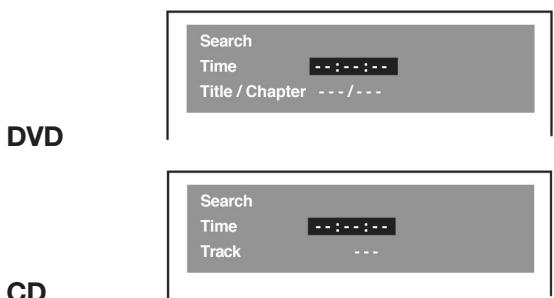
GOTO function
Usually the disc is divided into titles, and the titles are divided into chapters. Audio CDs are divided into tracks. Use the GOTO function to go to a certain section (title or chapter) of the disc during playback.
Note:
After settings, press the DISPLAY button again to return to the normal screen.
Locating a specific title
If a DVD disc contains title numbers, you can locate a specific title by directly selecting a title number.
- In stop mode, press the GOTO button.
- Press the cursor button to highlight a specific field and press the corresponding number button(s) for the title you want.
- Press the ENTER button to confirm. The Unit will start playback about 3 seconds later
Pressing the CLEAR button resets the title number.
Locating a specific title / chapter or track
If you know the title / chapter / track number you want to play, you can locate a specific title / chapter / track by directly selecting a title / chapter / track number.
- Press the GOTO button to search your desired title / chapter / track.
- Press the cursor button to highlight a title / chapter / track and press the corresponding number button(s) for the chapter you want.
- Press the ENTER button to confirm.
Pressing the CLEAR button resets the title / chapter / track number.
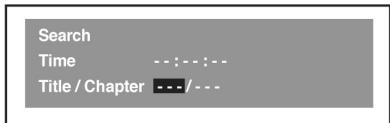
Locating a specific time
You can move to a specific location by entering its corresponding time (hours, minutes, seconds).
- Press the GOTO button.
- Press or button to highlight time.
- Press the corresponding number buttons.
- The first two numbers you enter represent hours. The second two numbers you enter represent minutes. The third two numbers you enter represent seconds.
- Press ENTER to confirm.
Notes:
Some discs may not respond to this process.
- Some scenes may not be located as precisely as you specified.
- This method for accessing specific locations is available only within the current title of the DVD disc.
- You can move through the menu by pressing the and buttons.
- Pressing the CLEAR button resets the time.
Angle setting
- Press the DISPLAY button twice. The FUNCTION menu is displayed on the screen and you can see how many angles are recorded on the disc.
- Press the ANGLE button repeatedly to select your desired angle. The Unit will change to your desired angle about 3 seconds later.
- Press the Display button again to return to the regular screen.
Audio format setting
- Press the DISPLAY button twice. The FUNCTION menu is displayed on the screen and you can see how many audio formats are recorded on the disc.
- Press the AUDIO button repeatedly to select your desired type of audio. The Unit will change to your desired type audio about 3 seconds later.
- Press the Display button again to return to the regular screen.
Subtitle setting
- Press the DISPLAY button twice. The FUNCTION menu is displayed on the screen and you can see how many subtitle formats are recorded on the disc.
- Press the SUBTITLE button repeatedly to select your desired language. The Unit will change to your desired language about 3 secondslater.
- Press the Display button again to return to the regular screen.
The device allows you to programme Titles and Chapters.
Programming a chapter
- Press the MEMORY button while the disc is stopped.
- Enter the title numbers in Use or button to move the highlight to chapter and enter the chapter numbers.
- Use , , or button to move to the Chapter field and again enter the respective number.
- Once you have entered the two numbers use the Cursor buttons to switch to the next programme number.
- Repeat steps 2 and 3 until all titles and chapters have been stored.
- Press the PLAY button to start the programmed playback.
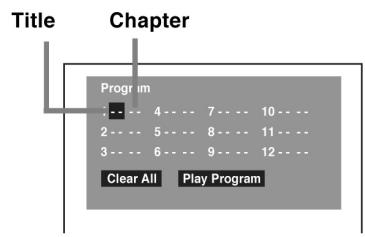
Notes:
- If you press the STOP button, the programmed selections will be cleared.
- If pressing the CLEAR button while entering the programming the number last entered will be erased.
Programming an audio track
- Press the MEMORY button while the disc is stopped.
- Enter the track numbers in ---
- Use , , or button to move to the next programming field.
- Again, enter the number of the desired audio track.
- Once all numbers have been set press the Play button to start playback.
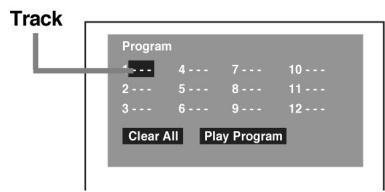
Notes:
- If you press the CLEAR button during programming the current number will be erased.
REPEAT FUNCTIONS
This device allows you to set various repeat modes.
Repeating a title
You can play the same title repeatedly. While the disc is playing, press the REPEAT DISC button until the "Repeat Title" indicator displays on the screen. The current title is repeated until the function has been erased.
Repeating a chapter
While the disc is playing, press the REPEAT DISC button until the "Repeat Chapter" indicator displays on the screen. The current chapter is repeated until the function has been erased.
Resetting the repeat function
To erase a set repeat function press the REPEAT DISC button until REPEAT OFF appears on the display.
Repeating an audio track
While the disc is playing, press the REPEAT DISC button until the "Repeat Single" indicator displays on the screen.
Repeating the complete CD
While the disc is playing, press the REPEAT DISC button until REPEAT ALL appears on the display.
Resetting the repeat function
To erase a set repeat function press the REPEAT DISC button until REPEAT OFF appears on the display.
Repeating a specific section
Even an individual section can be repeated. This function can only be set within the same title. The repeat function can not be activated if the section was recorded with several camera angles.
- While the disc is playing press the REPEAT A-B button at the beginning of the section you want to play repeatedly. Rep A- is displayed.
- Press the REPEAT A-B button again at the end of the section. Rep A-B isdisplayed.
- To resume normal playback press the Repeat A-B button until Off appears on the display.
Notes:
Sections can only be repeated in the same title and only if the scenes were recorded with a single camera angle.
This Unit will play MP3 and Picture files recorded on CD-R and CD-RW discs.
Playing a MP3 file disc
- Press the OPEN /CLOSE button, the disc tray opens.
- Insert a MP3 file disc on the disc tray with the label side up.
- Press the OPEN/CLOSE button, the disc tray closes.
- The Unit will take a short while to load the disc and automatically begin playback.
Pause function
Press Pause to briefly interrupt playback. Press Pause again to resume playback.
Stop
Press Stop to completely end playback. When pressing the Play button playback commences with the first track.
Prev/Next button
The Search and Skip buttons can also be activated for playing back an MP3 track.
Fast Forward / Rewind buttons
While playing back an MP3 track the FFWD and REV buttons can not be used.
On-screen display on an MP3
Turn on your TV to view the on-screen display of MP3 files.
- Press the Menu button on the remote control to display the directory.
- Use the cursors on the remote control to select the desired directory and confirm your entry with ENTER.
- Now use the cursor on the remote control to select the desired file and confirm your choice with ENTER.
- The chosen file has been located and will be played back.
Notes:
- The ability of this Unit to read MP3 discs is dependent on the following:
The Bit Rate must be within 64 - 256 kbps. - The total number of files on the disc should not exceed 254.
- The maximum number of directories should not exceed 32.
- File names should be named using 12 or fewer letters and/or numbers, and must incorporate the "MP3" file extension. EXAMPLE: 12340000.MP3
- When recording on CD-R discs, use 74-minute (650MB) discs.
- The CD-R or CD-RW should be „finalised“ in computer by “single session format”.
Playing a Picture file disc
A picture file CD has the size and format of a regular CD. You can order a picture CD when developing your regular film. Your pictures will then be stored on a picture CD.
Use your computer to create a JPG CD - provided you own a digital camera and a CD burner.
Playing a Picture file disc
- Press the OPEN/CLOSE button, the disc tray opens.
- Insert a Picture CD on the disc tray with the label side up.
- Press the OPEN/CLOSE button, the disc tray closes.
- The unit will take a short while to load the disc.
- Press the PLAY button. The next picture will automatically display after 6 seconds.
Notes:
- If you press the MENU button on the remote control in full-screen review, the Unit will display a menu of 9 thumbnail images.
- Press the Stop button to access the Menu and select the individual files using the cursor buttons.
- Change to the next file using the Next and Prev buttons.
- To view one image in full-screen use the cursors to highlight the image and press ENTER.
- When pressing Play the pictures are played as a slide show at 6 second intervals on the screen.
- Use Pause to briefly interrupt the playback and press the Play button to resume playback.
- Or select a file using the GOTO function. Enter the desired file number and press Enter.
- The chosen picture can now be displayed with the Zoom button in three different dimensions.
- Use the Angle button to turn the picture by 90^ respectively.
Tuning into a station manually
- Press the ON/OFF button on the device. The standby light is on.
- Set the Function button until the display indicates the frequency band.
- Select the desired band (FM/AM) with the band selector.
- Press the TUNING button to tune into the desired station.
If you have selected an FM station broadcasting in stereo bring the FM mode switch into STEREO. Stereo will appear on the display.
If the broadcast signal is too weak and an unpleasant background noise can be heard we recommend setting this switch to Mono. The station is then received in Mono mode only while the background noise is greatly reduced.
Tuning into a station automatically
Holding the Tuning button for around 2 second starts the automatic search for stations. The search will stop as soon as a station is found with a sufficiently strong signal.
Presetting stations
A total of 40 radio stations can be preset which can then be directly tuned into via the number buttons. 20 FM stations and 20 AM stations:
- Press the ON/OFF button on the device. The standby light is on.
- Set the Function button until the display indicates the frequency band.
- Select the desired band (FM/AM) with the band selector.
- Tune into the desired station with the tuning button.
- Press the Memory button on the remote control.
- Use the NEXT or PREV button to select the memory number and confirm your entry with the Memory button. If this number is already assigned press the Memory button twice.
- Repeat steps 3 - 6 until all radio stations have been set.
Tuning into a preset station
- Press the ON/OFF button on the device.
- Set the Function button until the display indicates the frequency band.
- Select the desired radio station with the number buttons.
Notes:
When assigning a number beyond 10 first press the +10 button and then the respective number. Example: For memory number 15 first press +10 and then 5.
The set radio station can also be set in playback mode with the Prev/Next button.
Radio Data System (RDS) / Programme Types (PTY)
Today many stations transmit so-called RDS (Radio Data System) codes that contain a variety of additional information along with regular sound signals through FM broadcasting.
If the stereo is currently receiving an RDS station, it displays the station name.
Radio text
Some RDS stations transmit information known as Radiotext. Radiotext provides additional information about the station and its programmes. To activate this function proceed as follows:
- Select the desired RDS station with the SKIP buttons on the remote control, or select RDS station directly with the numbered button on the remote control.
- To call up Radiotext keep pressing the DISPLAY button on the remote control, until "RT" displayed.
If Radiotext is not provided by the selected station, only the station frequency will be shown in the display. It takes about 2 minutes to receive all Radiotext character.
Switching On
The requirement here is that the DVD Player has been connected with the TV and the additional components of your Audio unit as previously described. In addition, the devices have to be switched on and the TV has to be set to AV mode.
- Press the Power to the front of the DVD Player. The standby light is on.
- Then press the Power button on the remote control or press the Play button or the Function on the device itself to switch on the unit.
- Set the desired source using the Function button (DVD/FM/AUX).
DVD Set Up Menu
When starting your device for the first time you should familiarise yourself with the various settings. We wish to point out that the basic settings have already been made by the manufacturer, such as English language version for the sound, etc.
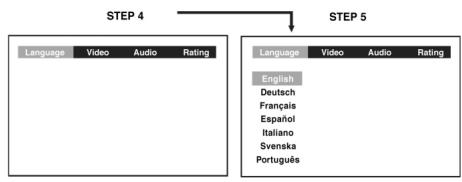
Language setting
- Press the FUNCTION button until DVD appears on the display.
- Press the STOP button so that no disc is playing.
- Press the SETUP button. The menu appears on the screen.
- Use or cursor button to select the Language, then press the ENTER button.
- Once these settings have been made press the Return button to return to the normal screen.
Video setting
Screen format setting
- Press the SETUP button.
- Use or cursor button to select Video, then press the ENTER button.
- Use or cursor button to select TV Shape, then press the ENTER button.
- Use or cursor button to shift and select the TV type, then press the ENTER button.
- To exit the FUNCTION SETUP MENU and return to the normal screen, press the RETURN button.
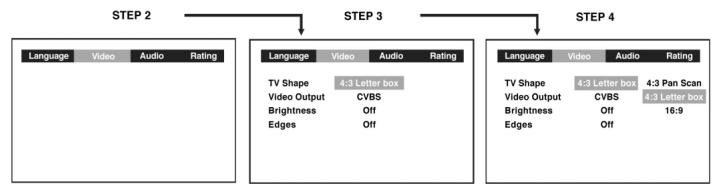
4:3 Pan Scan
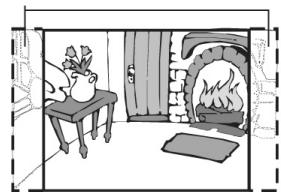
This picture format changes a wide screen recording to ensure that the centre part is always viewed on a 4:3 scale.
4:3 Letter Box
When wide-screen video material is played in this mode on a conventional TV screen, black bands appear at the top and bottom of the screen.
16:9 Wide Screen
This is the correct mode for playing wide-screen videos on a wide-screen TV. • You must also set the screen mode on your wide-screen TV to „FULL“.
Notes:
Again, it is the manufacturer of the DVD which determines the available picture formats. Therefore, when buying a DVD, check the available picture formats. The availability of the picture formats also depends on your TV. If you select 16:9 wide screen mode and you own a 4:3 TV the DVD playback picture will be distorted on the screen. Ensure at all times whether the chosen picture format corresponds with your TV.
Video Output
- Press the SETUP button.
- Use or cursor button to select Video, then press the ENTER button.
- Use or cursor button to select Video Output, then press the ENTER button.
- Enter CVBS and confirm your choice with Enter.
- To exit the FUNCTION SETUP MENU and return to the normal screen, press the RETURN button.
Always set Video Output in CVBS, otherwise the picture on the TV may be distorted. If this occurs and you can not see the picture, proceed as follows:
- Change into DVD mode.
- Open the DVD tray.
- Press the Set Up button, then , Enter, , Enter, , Enter & Return
Brightness
- Press the SETUP button.
- Use or cursor button to select Video, then press the ENTER button.
- Use or cursor button to select Brightness, and then press the ENTER button.
- Use or cursor button to shift and select the Off/On, then press the ENTER button.
- If you want to exit the SETUP MENU and return to the normal screen, press the RETURN button.
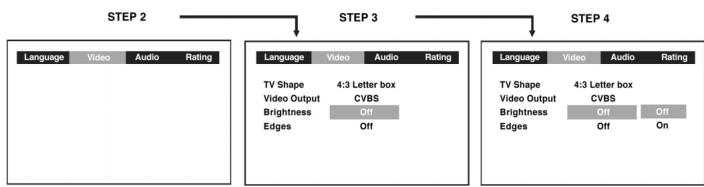
On: Picture will be brighter to clarify details.
Off: Picture will have deepened colors.
Edges
- Press the SETUP button.
- Use or cursor button to select Video, then press the ENTER button.
- Use or cursor button to select Edges, and then press the ENTER button.
- Use or cursor button to shift and select the Sharpen / Soften / Off, then press the ENTER button.
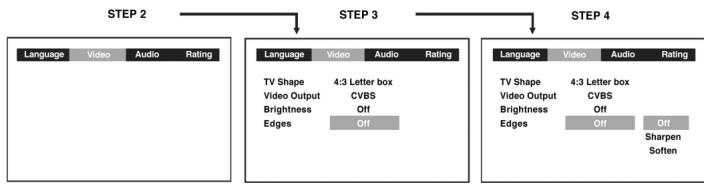
Sharpen: Fine detail will be easier to see.
Soften: Soft-focus effect.
Off: Picture will be returned to normal.
Audio setting
Digital Out
- Press the SETUP button.
- Use or cursor button to select Audio, press the ENTER button.
- Use or cursor button to select Digital Out, and then press the ENTER button repeatedly to select Digital Out type.
- To exit the FUNCTION SETUP MENU and return to the normal screen, press the RETURN button.
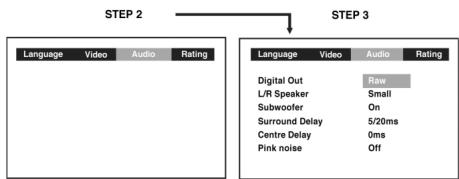
RAW: Does not have a Dolby Digital Decode.
PCM: Do have a Dolby Digital Decode.
L/R Speaker
- Press the SETUP button.
- Use or button to select the Audio, press the ENTER button.
- Use or button to L/R Speaker, and then press the ENTER button.
- Use or button to select the desired setting, and then press the ENTER button.
- To exit the FUNCTION SETUP MENU and return to the normal screen, press the RETURN button.
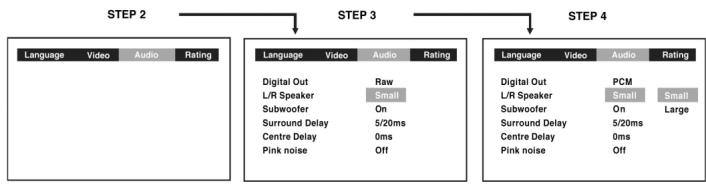
Small: Small size of Speaker.
Large: Large size of Speaker.
Subwoofer
- Press the SETUP button.
- Use or button to select the Audio, press the EN-TER button.
- Use or button to select Subwoofer, and then press the ENTER button.
- Use or button to select the desired setting, and then press the ENTER button.
- To exit the FUNCTION SETUP MENU and return to the normal screen, press the RETURN button.
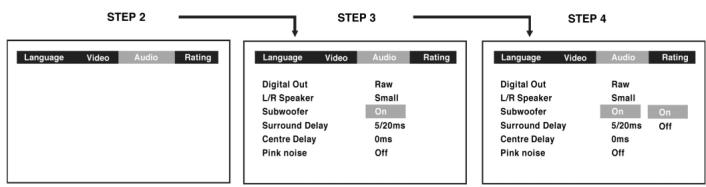
On: Should be selected if your subwoofer is connected.
Off: Subwoofer will not emit any sound.
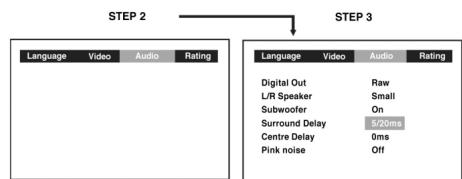
Surround Delay
Setting the delay depends on where the Surround Speakers and the front loudspeakers have been placed. If the Surround Speakers are positioned closer to the listener than the front speakers the delay can compensate for the distance.
- Press the SETUP button.
- Use the cursor button to select the Audio, press the ENTER button.
- Use the cursor button to select Surround Delay and repeatedly press the ENTER button to select the desired Surround Delay. Your selection is highlighted on the screen.
Centre Delay
Again, selecting the correct Centre Delay depends on the position of the centre speakers. If the distance between the centre speaker to the listener is less than the distance between the right and left front speaker to the listener, the delay is balanced.
- Press the SETUP button.
- Use the cursor button to select the Audio, press the ENTER button.
- Use the cursor button to select Centre delay, then repeatedly press the ENTER button to select the desired Centre Delay type. Your selection is highlighted on the screen.
- To exit the FUNCTION SETUP MENU and return to the normal screen, press the RETURN button.
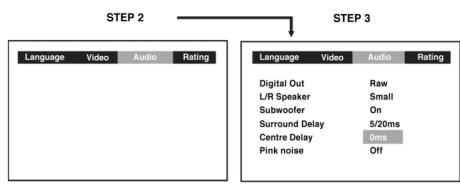
Pink noise
- Press the SETUP button.
- Use or button to select the Audio, press the ENTER button.
- Use or button to select Pink noise, and then press the Enter button.
- Use or button to select the desired setting, and then press the ENTER button.
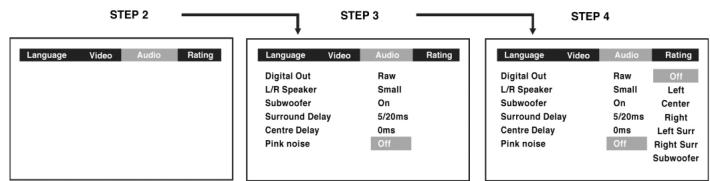
OFF: Pink noise is always switched off.
Left: Pink noise comes out from front left speaker for testing.
Centre: Pink noise comes out from center speaker for testing.
Right: Pink noise comes out from front right speaker for testing.
Left sur: Pink noise comes out from rear surround left speaker for testing.
Right sur: Pink noise comes out from rear surround right speaker for testing.
Subwoofer: Pink noise comes out from subwoofer for testing.
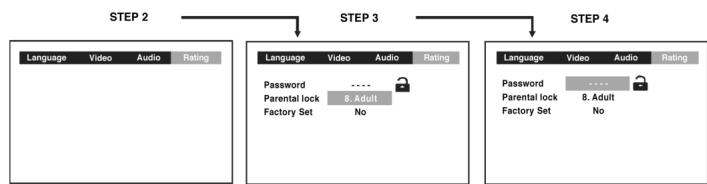
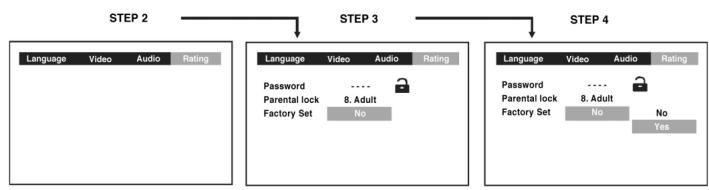
Setting a password
Some discs are programmed to edit out the playback of entire individual scenes, or even the entire DVD (parental lock). The parental lock can be set via the Set Up menu.
There are eight different levels. Level 1 is safe for kids' viewing, Level 8 is for adult viewing only.
Level 1: Kid Safe
Level 2: G
Level 3: PG
Level 4: PG-13
Level 5: PG-R
Level 6: R
Level 7: NC-17
Level 8: Adult
To ensure that your children exclusively watch movies suitable for viewing by children, Levels 2-8 have to be locked. You may access these discs via a password.
Rating setting
- Press the SETUP button.
- Use the cursor button to select Rating, press the ENTER button.
- Use the cursor button to select parental lock and then press the ENTER button repeatedly to set the parental locklevel.
- Use or button to shift and select Password, enter your 4-digit security code and then press the ENTER button.
- Press the ENTER button to exit the Set Up menu.
If you make a mistake before pressing the ENTER button, press the CLEAR button and enter your 4-digit security code again.
If the parental lock was set successfully the display will indicate a closed lock. If no parental lock was set the lock is displayed as open. After setting the level and password only opened sectors can be viewed without entering the password.
If you forget the password, you can erase your current password by pressing number button 8 on the remote four times, then press the ENTER button to confirm the setting.

Indicates parental lock is NOT active.

The parental lock is active.
Factory Set
If you want to return the initial language setting to the factory default, do the following:
- Press the SETUP button.
- Use the cursor button to select the Rating, then press the ENTER button.
- Use the cursor button to shift and select the Factory Set, then press the ENTER button.
- Use the cursor button to shift and select Yes, then press the ENTER button.
- To exit the FUNCTION SETUP MENU and return to the normal screen, press the RETURN button.
ENGLISH
When you reset the Unit to the factory default, the Unit will take 3-5 seconds to reset.
HOW TO
Handle a CD
Never touch the surface of a CD. Hold the disc exclusively by its inner and outer edges.
If dust or other particles soil the CD use a soft dry cloth to remove from the centre to the edges.
Do NOT use anti-static spray, benzene, thinner or vinyl solvents to clean the CD. Chemicals may destroy the surface of the disc.
Do not stick or write anything on the CD.
Always store the CD in its intended cover.
Do not expose the CDs for a longer period of time to direct sunlight or extreme heat.
Clean the device
Be sure to turn off the device and disconnect the power cord before cleaning. Wipe the device with a soft, slightly moist cloth.
Important
Always remove all discs before transporting the device!
TROUBLESHOOTING
Before calling customer service if you have problems with this device, please search for the possible fault in the table below. With a few simple tests or minor adjustments you may be able to rectify the problem so that the device functions correctly again.
| Symptom (frequent) | Remedy |
| No power | Insert the mains plug into the socket. |
| • No playback even if PLAY is pressed. •Playback begins but stops again immediately. | •Condensation has formed: Wait approx. 1 to 2 hours until the device has dried out. •The device can only play back the following media: DVDs, video CDs, CDs, MP3s and JPEGs. •The disc may be dirty and require cleaning. •Ensure that the disc has been inserted with the label facing upwards. |
| Symptom (frequent) | Remedy |
| No picture. | ·Ensure that the device is proper-ly connected. ·Ensure that the television is turned to „video“. |
| ·No sound. ·Distorted sound. | ·Ensure that the device is proper-ly connected. ·Ensure that the television and stereo system have been adjust-ted correctly. ·Adjust the main volume via the remote control. |
| The picture is distorted during fast forward or fast rewind. | In this case the picture is sometimes a little distorted - this is normal. |
ENGLISH
| Symptom (frequent) | Remedy |
| No fast forward (or fast rewind) playback. | Some discs have sectors which do not allow fast forward (or reverse) playback. |
| No 4:3 (16:9) picture. | Select the correct setting corresp- ponding to the characteristics of your television („TV Aspects“). |
| No Surround Sound. | Select the correct setting under „Audio Output“ corresponding to your stereo system. |
| No operation possible via the remote control. | ·Check whether the batteries have been inserted with the correct polarity (+ and -). ·The batteries are flat and must be replaced. ·Point the remote control in the direction of the sensor on the device. ·Do not use the remote control at a distance of more than 5 metres from the sensor |
| Buttons do not work (on the device and/or on the remo- te control). | ·Remove any obstacles between the remote control and the sensor on the device. ·Switch the device off and then on again. Alternatively, switch the device off, remove the mains plug and re-insert it in the socket (it is possible that the device is not working due to extern- nal circumstances such as a thunderstorm or static electricity etc.). |
| Menu screen is not or only partially displayed on the television screen. | Select the corresponding type of screen according to the operating instructions of the television set. |
| No colour | Turn the TV type to the German colour norm PAL. Confirm the SE-TUP button to return to the menu. |
| Symptom (DVD) | Remedy |
| Audio soundtrack and/or subtitle language is not the one selected in the basic setup. | If the audio soundtrack and/or subtitle language is not on the disc, the language selected in the basic settings cannot be heard or seen. |
| The display appears in French (for example). | The setting in the menus under „Disc Languages“ is French. Select French. |
| No subtitles. | • Subtitles only appear on DVDs on which subtitles have been recorded. • Subtitles have been switched off from the television picture. Press the „SUBTITLE“ button. |
| No alternative audio soundtrack (or subtitle) language is selected. | • No alternative language is selec-ted on discs on which only one language has been recorded. • On some discs the alternative language cannot be selected with the AUDIO or SUBTITLE button. Try to select it from the DVD menu if there is one. |
| Angles cannot be changed. | This function depends on the availability of the software. Even if a DVD has been recorded from different angles, these may only be available for certain scenes (when the ANGLE symbol lights up on the device). |
| Symptom (Video CD) | Remedy |
| There is no menu | This function is only possible with video CDs with Playback Control. |
| VCD/ SVCD does not play back. | With the disc inserted, switch over the PBC function using the menu button. |
| CD-RWs do not play back. | CD-RWs must not be written with hard disc simulation tools such as Packed CD, In CD or similar programmes. |
| CD-Rs and CD-RWs do not play back, or only play back with errors. | The error rate of CD-R and CD-RW media depends on: • the media type • the writing program (possibly carry out an UPDATE) • the writer and its firmware (possibly carry out an UPDATE) • the writing speed (the lower the better) |
This device has been tested according to all relevant current CE guidelines, such as electromagnetic compatibility and low voltage directives, and has been constructed in accordance with the latest safety regulations.
Subject to technical changes without prior notice!
Guarantee
The device supplied by our Company is covered by a 24 month guarantee starting on the date of purchase (receipt).
During the life of the guarantee any fault of the device or its accessories *) ascribable to material or manufacturing defects will be eliminated free of charge by repairing or, at our discretion, by replacing it. The guarantee services do not entail an extension of the life of the guarantee nor do they give rise to any right to a new guarantee!
Proof of the guarantee is provided by the proof of purchase. Without proof of purchase no free replacement or repair will be carried out.
For repairs or replacement during the life of the guarantee return the device in its original packing together with the proof of purchase to your dealer.
*) Damage to accessories does not mean automatic free replacement of the whole machine. In such cases please contact our hotline. Broken glass or breakage of plastic parts are always subject to a charge.
Defects to consumables or parts subject to wearing (e.g. motor pistons, kneading blades, drive shafts, spare remote control, spare toothbrushes, saw blades, etc.) as well as cleaning, maintenance or the replacement of said parts are not covered by the guarantee and hence are to be paid!
The guarantee lapses in case of unauthorized tampering.
After the expiry of the guarantee
After the expiry of the guarantee repairs can be carried by the competent dealer or repair service against the payment of the ensuing costs.
SPIS TRESCI
Wañne wskazówki 109
Ustawianie 109
Bezpieczestewo 109
Gwarancja 109+133
Formaty dysków 110
Formaty dyskow 110
Kod regionalny. 110
Surround Delay 129
Centre Delay 130
4 Przycisk OPEN/CLOSE
Multi Angle (Uhly kamery) 148
Audio 148
Subtitle (Titulky) 149
Vyber kapitoly (Chapter) 149
Casovy posun (Time) 149
Uhel kamery (Angle) 149
Nastaveni Audio 149
Titulky (Subtitle) 149
Funkce GOTO 149