
DVD 592 - DVD player CLATRONIC - Free user manual and instructions
Find the device manual for free DVD 592 CLATRONIC in PDF.

| Product type | DVD player |
| Brand | CLATRONIC |
| Model | DVD 592 |
| Dimensions (W x D x H) | 43 x 26 x 5 cm |
| Weight | 1.5 kg |
| Power supply | 230 V ~ 50 Hz |
| Playable formats | DVD, DVD±R/RW, CD, CD-R/RW, MP3, JPEG, DivX |
| Main functions | Play, stop, pause, fast forward/reverse, repeat, program, zoom, search |
| Connections | HDMI output, composite output (CVBS), coaxial digital audio output, stereo audio output |
| Security | Parental lock (parental control) |
| Maintenance | Clean with a soft, dry cloth. Do not use abrasive products. |
| Repairability | Spare parts available on request from the manufacturer |
| General information | Instruction manual available in multiple languages. 2-year warranty. |
Frequently Asked Questions - DVD 592 CLATRONIC
User questions about DVD 592 CLATRONIC
0 question about this device. Answer the ones you know or ask your own.
Ask a new question about this device
Download the instructions for your DVD player in PDF format for free! Find your manual DVD 592 - CLATRONIC and take your electronic device back in hand. On this page are published all the documents necessary for the use of your device. DVD 592 by CLATRONIC.
USER MANUAL DVD 592 CLATRONIC
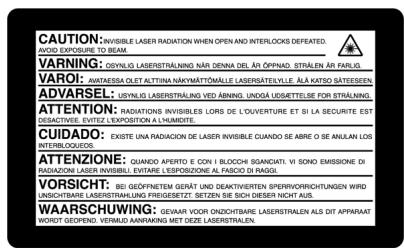
THIS PRODUCT CONTAINS A LOW POWER LASER DEVICE.
Safety Information
Please Note:
This device is designed only for use in a temperate climate. It must only be connected to an alternating current supply of 220-240V/50Hz. The device must not be used under any other circumstances.
Important:
- The DVD player is a class 1 laser product. The device uses an invisible laser beam which may produce hazardous rays. Please ensure that you use the device only for the purposes for which it is designed and in accordance with instructions.
- When the device is connected to a standard mains power socket do not put your eyes too close to the opening in the device and do not look inside the player.
- Any use of the operating controls, any settings or use of the device which deviate from those described in these instructions may result in your being exposed to the hazardous rays.
- Do not open any covers or repair the device yourself. Please contact qualified specialists if this device requires maintenance or repairs.
Warning:
- In order to avoid risks such as fire or electric shock, please do not expose the device to rain or moisture.
- In order to avoid risks such as fire, electric shock or interference, please use only the recommended accessories.
Precautions
Please read these precautions carefully before using the device.
Protection of the Mains Lead
In order to prevent the device from malfunctioning and to protect against electric shocks, fire or injury, please note the following:
- Always remove the plug by pulling the plug itself and not the lead.
- Never touch the mains plug or lead with wet hands.
- Keep the mains lead away from heaters.
- Never put a heavy object on the electric lead.
- Never try to repair or replace the mains lead yourself.
The mains lead may only be replaced by a qualified electrician!
Positioning
Please avoid setting up the device in the following surroundings:
- In direct sunshine, where there is exposure to heaters or in closed vehicles.
- In high temperatures (over 35^ ) or high humidity (over 90% ).
- In extremely dusty surroundings.
Otherwise internal parts may be seriously damaged
When the device is not being used:
- Please turn the device off when it is not being used.
- Should you not use the device for a prolonged period, please remove the mains plug from the socket.
Do not insert your fingers or other objects into the device
- Touching internal parts of this device is dangerous and may result in serious damage to the device. Do not try to take the device apart.
- Do not insert any foreign bodies into the CD drawer.
Keep away from water, fire and magnets
- Keep the device away from vases, baths, wash basins etc. If liquid enters the device this may cause serious damage.
- Open sources of fire, such as burning candles, must not be placed on the device.
- Never place magnetic items, such as loudspeakers, in the vicinity of the device.
Ventilation
- Please maintain a free space of 5cm around the device to ensure adequate ventilation.
- Do not cover any ventilation slits with objects such as magazines, tablecloths, curtains etc.
- Please position the device horizontally and do not place any heavy items on it.
- Do not place the device on amplifiers or other devices which may heat up.
Condensation
In the following situations moisture may develop on the lens:
- Immediately if a heater is switched on.
In a steaming or very damp room. - If the device is transferred from cold to warm surroundings.
If moisture has formed inside the device, it is possible that the device will no longer function correctly. In this case please turn off the power and wait for approximately one hour until the moisture has evaporated.
What to do if there is television interference while you are watching a programme.
Depending on the reception conditions there may be interference to the television picture when you are watching a television programme and the device is switched on.
This is not a malfunction of the device or television.
Switch the device off if you want to watch a television programme.
DISC FOR PLAYBACK
This DVD player is capable of playing the following types of discs with the corresponding logos:
Usable Discs:
| Disc Types | Marks | Recording Types | Disc Size | Max. Playing Time |
| DVD | VIDEO VIDEO TM | Audio + Video | 12 cm | Approx. 240 min. (Single-sided) |
| Approx. 480 min. (Double-sided) | ||||
| 8 cm | Approx. 80 min. (Single-sided) | |||
| Approx. 160 min. (Double-sided) | ||||
| AUDIO-CD | COMPACT DISC DIGITAL AUDIO | Audio | 12 cm | 74 Min. |
| 8 cm | 20 Min. |

DIGITAL
Dolby Digital disc

DTS Disc

Digital Audio disc

Stereo disc

NTSC broadcast system in USA, Canada, Japan, South Korea, etc.

PAL broadcast system in U.K., France, Australia, etc.
Manufactured under license from Dolby Laboratories.
"Dolby" and the double-D symbol are trademarks of Dolby Laboratories.
Region Code
Both the DVD player and the disc are coded by region.
These regional codes must match in order for the disc to play. If the codes do not match, the disc will not play.
The Region Number for this player is descriptor on the rear panel of the player.
Disc structure
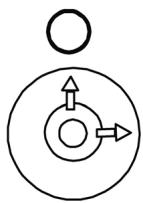
A DVD video disc consists of "title", and each title may be divided into some "chapters" (See Example 1.)
For example, if a DVD disc contains some movies, each movie may have its own title number, and it may be further divided into some chapters.
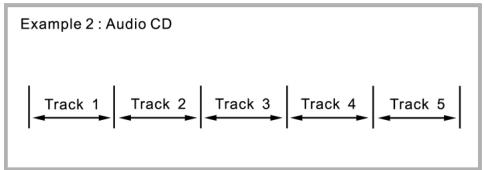
On the other hand, Audio CD consist of "tracks". (See Example 2.) In general, each track has its own track number. (On some discs, each track may also be divided by indexes.)

DESCRIPTION
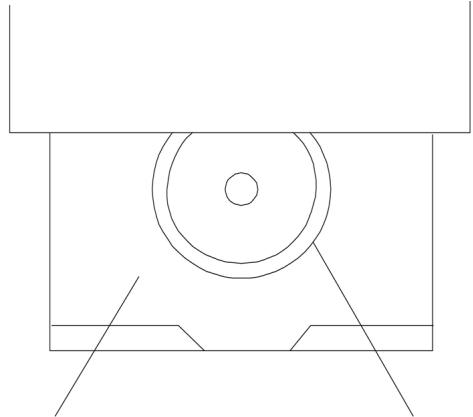
Front Panel
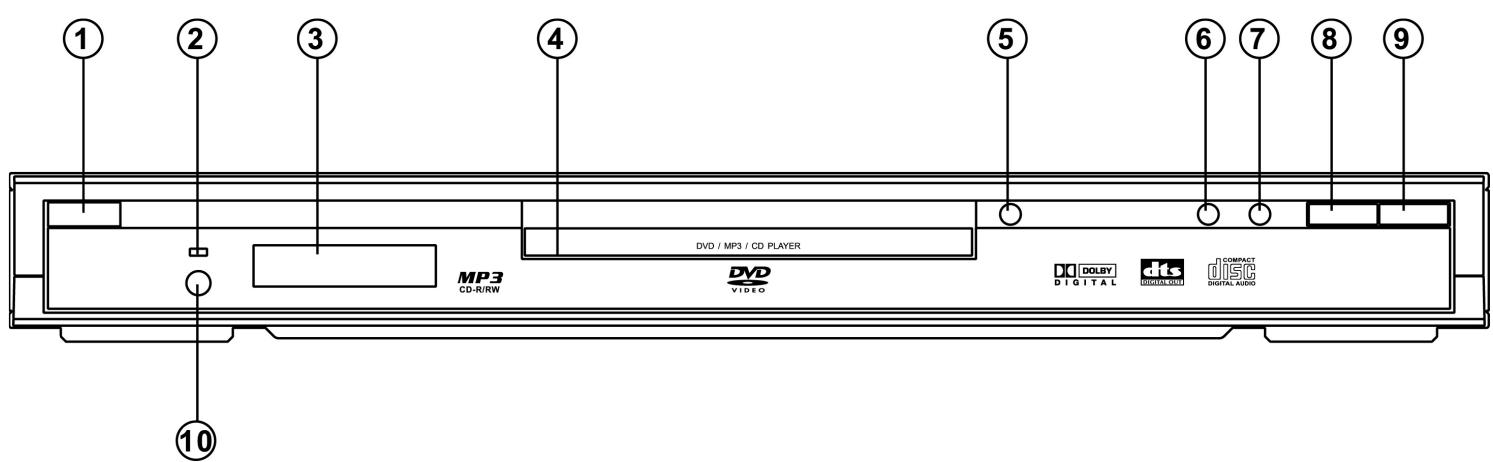
- POWER - To switch standby modes.
- STANDBY INDICATOR
- DISPLAY
- DISC TRAY
- OPEN/CLOSE - To open or close the disc tray
-
PREV - Press to skip to the previous chapter/track.
-
NEXT - Press to skip to the next chapter/track.
- STOP - To stop playing the disc.
-
PLAY/PAUSE
-
To start disc playback.
-
To interrupt disc playback.
-
REMOTE SENSOR
Rear Panel
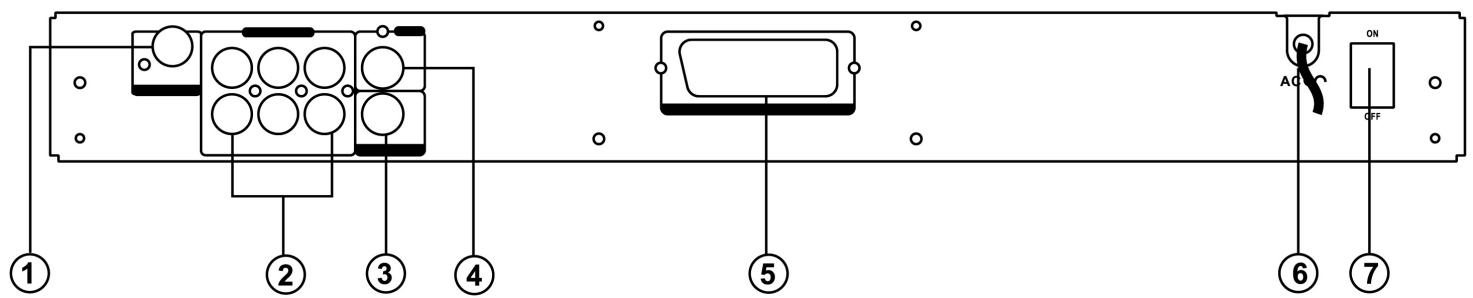
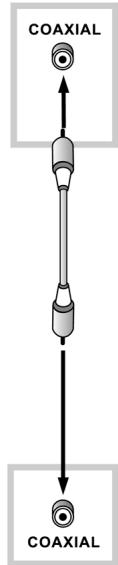
- DIGITAL OUT-COAXIAL
- Connect to audio equipment with digital-coaxial audio input.
- 5.1ch Analog audio out jacks.
- to an amplifier with 5.1 ch analog input jacks.
- S-VIDEO OUT
-
Connect to a TV with SVHS video input.
-
VIDEO OUT
- Connect to a TV with video input.
- SCART OUT
- Connect to a TV with SCART input.
- AC POWER CORD
- Connect to a standard AC outlet.
- POWRE ON / OFF
Remote control Unit
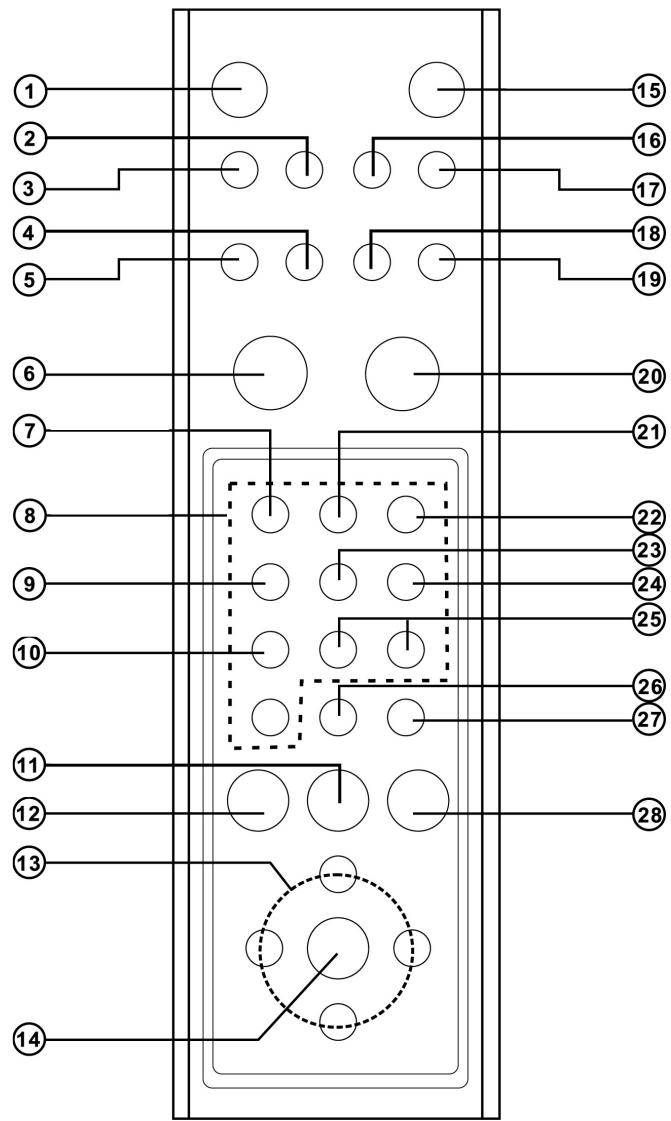
- POWER
- To switch to standby mode.
- TITLE/PBC
- Press to access a DVD's title menu.
- DVD MENU/RETURN
- Press to access a DVD's Disc menu.
- Go back to previous menu.
- DIGEST (VCD and CD only)
- Press to preview VCD/CD track.
5.PROGRAM - Press to access program mode.
- PLAY
- Press to start playback.
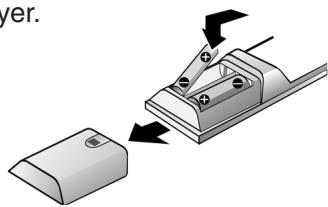
Insert Batteries (Remote Control Unit)
You can control the player with the supplied remote control unit. Insert two R6 (size AA) batteries by matching the + and - markings inside the compartment. When using the remote unit, point it at the remote sensor on the player.
- ZOOM
Press to enlarge the picture.
-
NUMBER BUTTONS (0-9)
-
Select numbered item in a menu.
-
ANGLE
-
Select a DVD camera angle.
10.AUDIO
- Select an audio language.
11.NEXT
- Press to go to the next chapter or track.
12.PREV
- Press to go to the previous chapter or track.
13.(left/right/up/down) select an item in the menu.
14.ENTER
Acknowledgement menu selection.
15.DISPLAY
- Press during playback to see current disc information or the TV screen.
16.SUBTITLE
- Select a subtitle language.
17.MUTE
- Press to silence the volume, press again to restore the volume.
18 SETUP
- Press to access or remove the setup menu of the player
19.GOTO
- Press to search for a specific chapter or playing time.
20.STOP
- Press to stop playback.
21.REPEAT
- Press to play a chapter, title, track or disc repeatedly.
22.REPEAT A-B
- Press to repeat a specific segment.
23.SHUFFLE
- Press to play track in random order.
24.PAUSE/STEP
- Pause playback temporarily/frame-by-frame playback.
25.SLOW
- Press to play slow reverse/forward playback of DVD.
26.REV
- Press to search backward during playback.
27.FWD/CLEAR
-
Press to search forward during playback.
-
Clear input selections.
28.SHIFT
- Press to number lock on the buttons with number printed on the surface.
Notes:
- Do not leave the remote control unit in the extremely hot or humid place.
- Do not use a new battery with an old one.
- Do not expose the remote sensor to direct light from the sun or lighting apparatus. Doing so may cause a malfunction in controlling the player.
- If you do not use the remote control unit for an extended period of time, remove the batteries to avoid possible damage from battery leakage and corrosion.
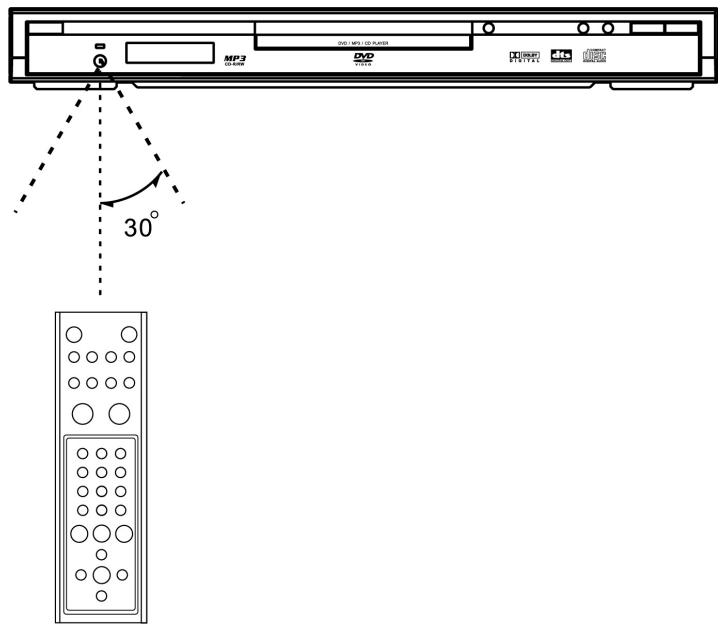
Range of Operation of the Remote Control
The remote control can be used up to approximately 5 meters in a straight line.
It can also be operated at a horizontal angle of up to 30^ from the remote sensor.
CONNECTION TO ATV (FOR VIDEO)
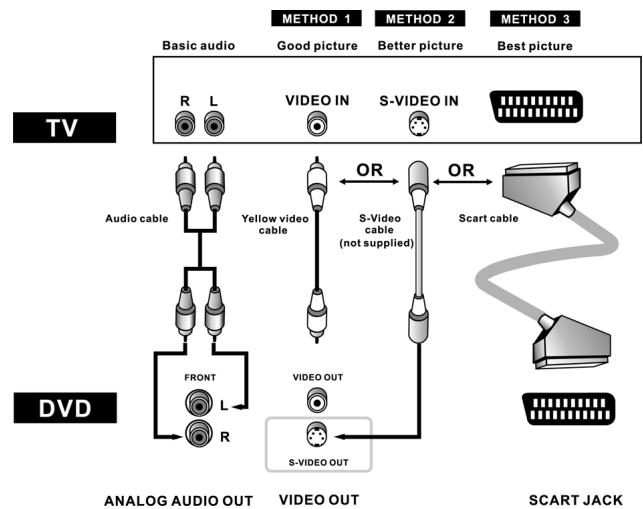
METHOD 1 DVD Player + TV with Video input jack
METHOD 2 DVD Player + TV with S-Video input jack
METHOD 3 DVD Player + TV with Scart input jack (Audio & video)
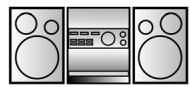
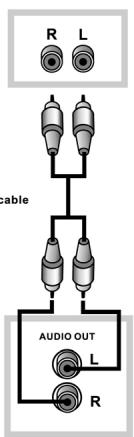
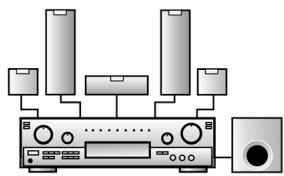
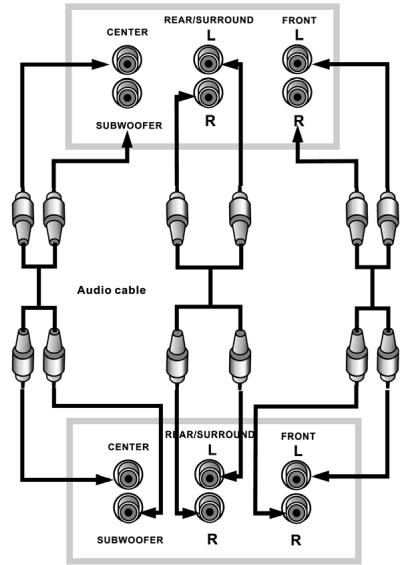
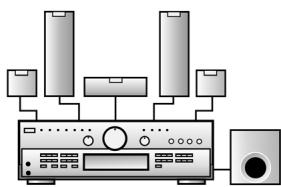
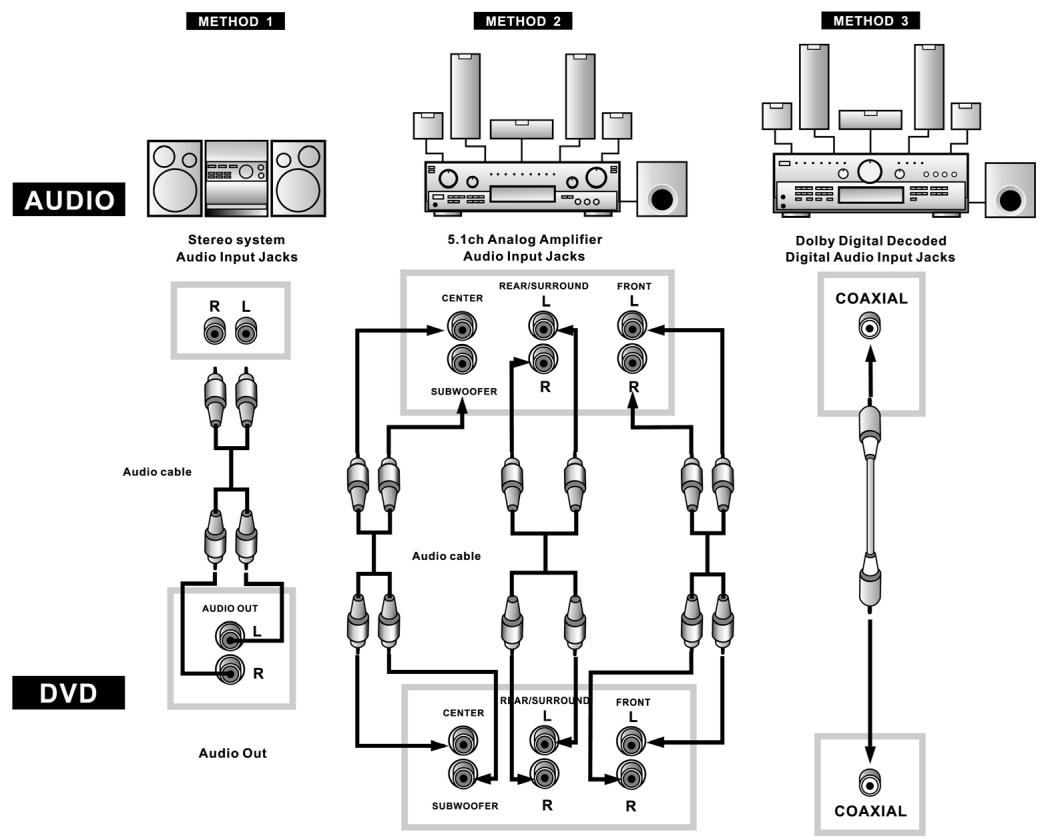
CONNECTION TO AN AUDIO SYSTEM
The following diagram shows examples of connections commonly used to connect the DVD player to TV sets with other audio equipment.
Before Connecting the DVD player
- Be sure to turn off the power to all components in the system before connecting another component.
- Refer to the instruction Manuals for your TV, stereo system and other components to be connected to the DVD player.

- METHOD 1 DVD Player + Stereo System
- METHOD 2 DVD Player + Amplifier with 5.1ch Analog input jacks
METHOD 3 DVD Player + Amplifier with Dolby Digital Decoder/DTS Decoder
BASIC PLAYBACK
Powering on the player and playing the disc
- Press POWER button. If there is a disc in the tray, the player will begin to play it once the power is on.
- Press OPEN / CLOSE button to open the tray to either change the disc or insert a disc.
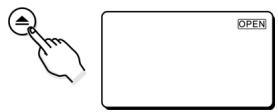
- Once the disc is in the tray, press OPEN/CLOSE button to close the tray. Once closed, the player will begin to play the disc.
Stopping playback
- Press STOP button once to stop playback and show the logo screen. The player memorizes the location where playback is stopped, if last memory is ON.
- Press PLAY button to resume playback from the location where playback is stopped.
- When the STOP button is pressed twice, the resume function will be cleared.
Pausing playback
- Press PAUSE / STEP button once to pause playback. The sound is muted during PAUSE mode.
- Press PLAY button to resume normal playback.
Search Forward/Search backward
- Press FWD button to fast forward through the disc. The speed can be selected by pressing the key further (2x, 4x, 6x, 8x, normal) for DVD / (1x, 2x, 3x, 4x, normal) for VCD.
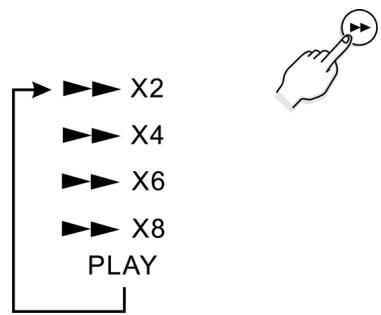
- Press PLAY button to resume normal playback.
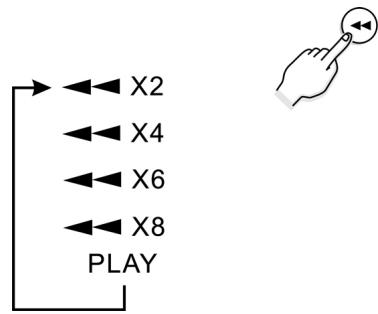
- Press REV button to fast reverse through the disc. The speed can be selected by pressing the key further (2x, 4x, 6x, 8x, normal) for DVD / (1x, 2x, 3x, 4x, normal) for VCD.
- Press PLAY to resume normal playback.
Slow motion Forward / Backward
- Press SLOW forward button to play a disc in slow motion.
Each time the SLOW forward button is pressed, the slow motion speed changes (2x, 4x, 8x, normal speed for DVD) / (1x, 2x, 3x, 4x, normal speed for VCD). - Press PLAY button to resume normal playback.
- Press SLOW backward button to play a disc in slow reverse.
Each time the SLOW backward button is pressed, the slow reverse speed changes (2x, 4x, 8x, normal speed for DVD) / (1x, 2x, 3x, 4x, normal speed for VCD). - Press PLAY button to resume normal playback.
Skipping to the Next / Previous chapter/track
- Press NEXT button to skip forward to the beginning of the next chapter (DVD) or track (Audio CD).
- Press PREV button once to skip backward to the previous chapter (DVD) or beginning of the current track (Audio CD).
- Press PREV button twice to skip backward to the previous track (Audio CD).
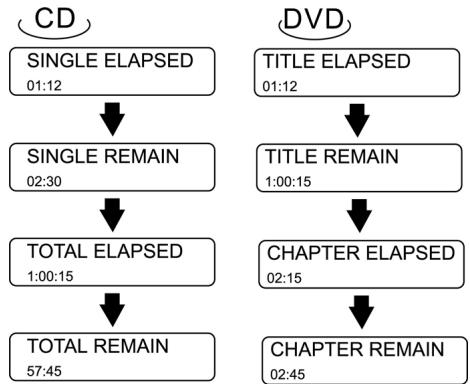
Checking the Remaining Time
- Press the DISPLAY button to check the elapsed time and remaining time as illustrated.
REPEAT PLAY
Repeat Viewing / Listening
- Press REPEAT button to repeat the chapter, title and all for DVD disc; track and all for CD disc.
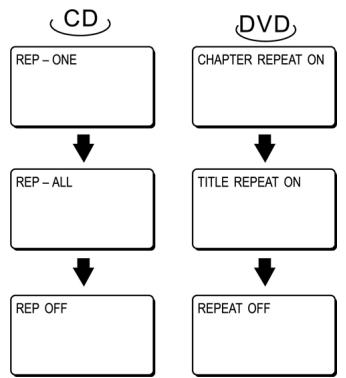
TITLE REPEAT ON / REP-ALL - repeat entire title When playback reaches the end title of the disc, playback resumes at the beginning.
CHAPTER - repeat current chapter
When playback reaches the end of the current chapter, playback jumps back to the beginning of the chapter.
REP-ONE - repeat current track / song
When playback reaches the end of the current track / song, playback jumps back to the beginning of the track / song.
A BRepeat playback
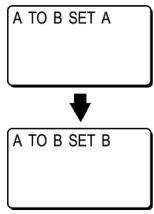
- Press A - B button once at the beginning of the segment (point A) you want to play repeatedly.
- Press A - B button again at the end of the segment (point B).
- The player automatically returns to point A and starts repeat playback of the selected segment (A - B).
- Press A - B button a third time to disable repeat A - B playback and allow playback to continue in normal.
PROGRAM PLAY (For VCD or CD only)
- Press STOP button and then press PROG button.

- Enter the track with the number buttons (0 - 9) on the remote control. The OSD will display the following:

- Press ENTER.

- Track 5 will store in program 1, repeat step may store up to 99 program.
- To delete the program, please push the STOP button and open the CD door.
RANDOM PLAY(shuffle)—For VCD or CD only
- Press SHUFFLE button during playback to toggle between ON and OFF. The setting are as follow: ON = Random mode enabled. When playback reaches the end of the current track, playback jumps to a random track. OFF = Random model disabled. (OSD) off. (Must press STOP key first before to use)
USING DISC MENU / TITLE
To select the disc menu
- You can use the menus for the audio language, subtitle language, etc. DVD menu contents differ from disc to disc.
- Press the DVD MENU button during playback. The menu screen appears.
-
Use the up/down or left/right button to access the different features.
-
Press the ENTER button
-
The selected item will play.
Using the Title Menu
- For DVD's containing multiple titles, you can view the title of each movie.
If and how this function is working depends on the respective DVD.
AUDIO LANGUAGE / SUBTITLE LANGUAGE (only applicable to DVD disc)
Selecting the Audio Language
- Press AUDIO button to select different audio languages (eg. English, French, Spanish, German, .......depending on the number of languages recorded on a DVD disc).
Selecting the Subtitle Language
- Press SUBTITLE button to select different subtitle languages (eg. English, French, Spanish, German, ....depending on the number of languages recorded on a DVD disc).
ZOOM
- Press ZOOM button repeatedly during playback to select zoom 1.5x, 2x, 3x to change the size of the picture.
While an image is enlarged, you can use UP/DOWN, LEFT/RIGHT buttons to shift the view and display the part you wanted.
ANGLE
- Press the ANGLE button during playback to select the desired angle.
- This function only works with discs on which multiple scenes were shot from different angles.
MOVE TO A TITLE, CHAPTER OR TIME DIRECTLY
- Press the STOP button.
- Press the GOTO button.
Each time the button is pressed, it repeats as shown below.
DVD: May select the TITLE, CHAPTER or DIRECT JUMP to desired location immediately.
VCD: Only DIRECT JUMP to desired location immediately.
CD: Only DIRECT JUMP to desired location immediately. e.g. The Song 1 = 3min,
Song 2 = 4min
Song 3 = 6min
The total time = 13 min
When set the time to 00:05:00, the player will jump to Song 2 and start on 2min.
DIGEST PLAY (For VCD or CD only)
- Press STOP first and then press the DIGEST button and the following menu will appear.
| 1. INTRO | 3. TRACK |
| 2. DISC | 4. EXIT |
VCD
- Press the number key to select INTRO, DISC, TRACK and EXIT and then press ENTER button.
- INTRO: Each track will be play first 8 seconds.
DISC: The title will be divided into several parts according to the number of track it contains. (Press the number to select the window you'd like to see, and press the ENTER button.) - TRACK: The title will be divided by 5 minute. (Press the number to select the window you'd like to see, and press the ENTER button.)
CD
- Press the number key to select INTRO or EXIT and then press ENTER button.
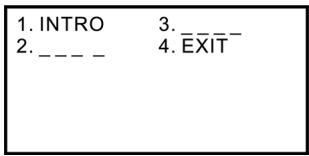
- INTRO: Each track will be play first 12 seconds. (Anytime press the PLAY button, the current song will continue playing and disable the INTRO function.
JPEGPlayback
Some CD-Rs may contain pictures in a JPEG format. For example, you may have photographic film developed with pictures stored in JPEG format. Then you can playback those JPEG files in this player.
Some useful features are described below:
- When you insert a disc with JPEG files, the files or pictures available for playback will be listed on the screen.
- Press UP / DOWN buttons to select the folder or file and press ENTER.
- After you open one JEPG file, each subsequent file will appear automatically for a few seconds. To keep the JEPG image on the screen longer, press PAUSE button to pause the image.
- During playback, press UP / DOWN, LEFT / RIGHT to rotate or flip the image.
| SMART NAVI | |
| ROOT | ROOT 0 |
| JEPG01 1 | |
| JEPG02 2 | |
| JEPG03 3 | |
| JEPG04 4 | |
| JEPG05 5 | |
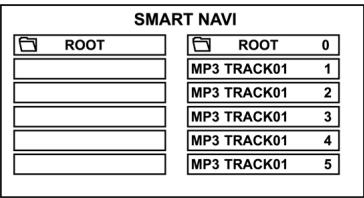
MP3Playback
This system has a built in MP3 decoder. You can playback MP3 tracks (files) recorded on CD-R, CD-RW.
Starting playback
It is recommended you turn on you TV when playing back an MP3 disc.
1. Press the OPEN/CLOSE button to load a disc.
- The menu will show up the folders and the files in root directory.
2. Use the UP/DOWN buttons to select the desired music folder, then press ENTER.
3. Use the UP/DOWN buttons again to select a song file. Press ENTER to begin playback of the song file.
| SMART NAVI | |
| ROOT | ROOT 0 |
| MP3 TRACK01 1 | |
| MP3 TRACK01 2 | |
| MP3 TRACK01 3 | |
| MP3 TRACK01 4 | |
| MP3 TRACK01 5 | |
PLAY MODE
- The indication corresponding to the selected mode appears on the TV screen.
- Use the LEFT / RIGHT and UP/DOWN buttons to select play mode.
- Use the LEFT/RIGHT buttons to select the desire music folder, then press ENTER.
- Use the LEFT/RIGHT and UP/DOWN buttons to select the song file, then press ENTER.
NOTE:
May using the REPEAT button in remote control to play a FOLDER REPEAT, DISC, DISC REPEAT, DISC SCAN, SINGLE, FOLDER, REP-ONE (Repeat one song) repeatedly.
SPECIAL FEATURE
This player can playback MPEG/DivX (.avi) & MPEG (.mpg) files and compatible with DVD/SVCD/VCD/CD/MP3/JPEG CD/CD-R/CD-RW/DVD-R
- Compatible with DivX 3.11, 4.XX, 5.02, 5.03 encoder standard.
Starting playback (MPEG 4 / DivX)
It is recommended you turn on you TV when playing back MPEG/DivX disc.
1. Press the OPEN / CLOSE button to load disc.
- The menu will show up the folders and the files in root directory.
2. Use the / buttons to select the desired folder, then press ENTER.
3. Use the / buttons again to select a (.avi) files. Press ENTER to begin playback of the file.
| SMART NAVI | |
| ROOT | 0 |
| FOLDER | 1 |
| FOLDER | 2 |
| FOLDER | 3 |
| SK-176X96_2 | 4 |
| SK-176X96_2 | 5 |
SETUP MENU
The SETUP MENU let you to customize the DVD player by allowing you to select various language preferences, set up a parental level, turn captions and screen saver on and off, adjust what type of television screen you have and more. Below, find the menu, and then find the corresponding page that describes the features of the selected menu option.
- Press the SETUP button.
- Press the UP/DOWN buttons to select the menus/screens.
- Press the ENTER button to select the highlighted option.
Press SET UP in the stop or playback mode (in DVD mode).
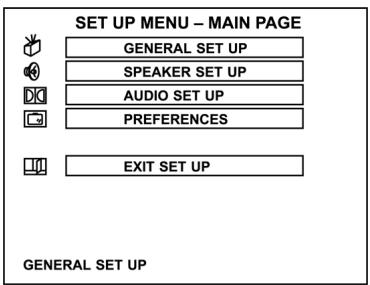
- The SET-UP menu is display
- Press UP/DOWN buttons to select, and press ENTER button to enter.

- The SETUP menu operation, can set up the general, speaker, audio, and perferences.
- To exit SETUP menu. Press DOWN button to select the EXIT SETUP to exit.
General Setup
Select GENERAL SETUP in the SETUP MENU and then select the desired option using the cursor buttons to navigate through the menus/screens and press the ENTER button to select.
1. Set up the TV DISPLAY
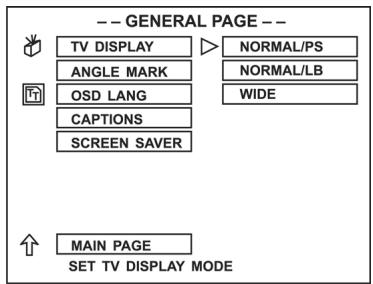
NORMAL/PS: Pan scan. Select when the unit is connected to a conventional TV. Video material formatted in the Pan Scan style is played back with the left and right edges are cut off.
NORMAL/LB: Letter Box. Select when the unit is connected to a normal TV. Wide-screen images are shown on the screen with a black band at the top and bottom.
WIDE: Select when the unit is connected to a wide-screen TV.
Note:
The displayable picture size is preset on the DVD disc. Therefore the playback picture of some DVD discs may not conform to the picture size you select.
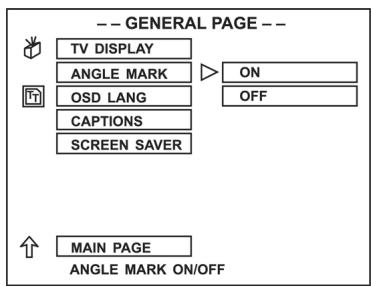
2. Set up ANGLE MARK
- Some DVD disc is record by serval video camera from the different angles to take, when playback, can select the one of the angle to watch. ON open the angle OFF close the angle
- The disc must have the angle mark, the set up can work.
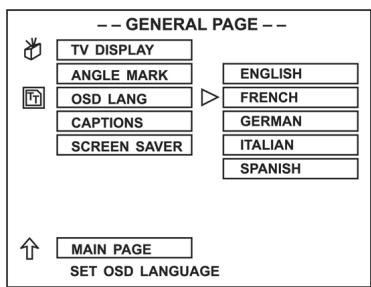
3. Set up the OSD LANG
- You can select the TV display language.
4. Set up CAPTIONS
ON - open the option. OFF - close the option.
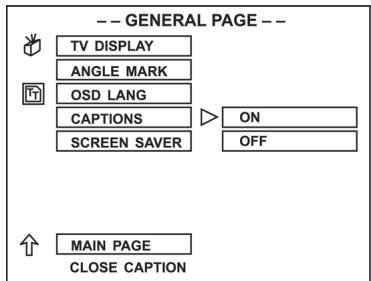
The TV set must support closed captions function.
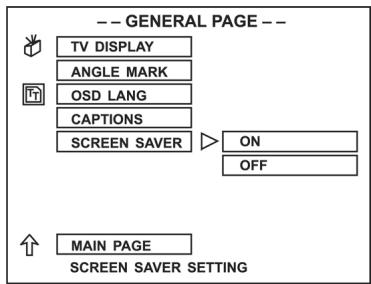
5. Set up SCR Saver
- When no disc or playback stop some time, the unit will automatic open the Screen saver function. This time the screen will become black, only the DVD patten move on the screen. This function is protect the TV screen long time display will be hurt.
Speaker Setup
- Press UP/DOWN button to select the SPEAKER SET UP and press ENTER.
- The left is the main catalog, the right is the children catalog.
- Press LEFT/RIGHT button to enter the children catalog and press ENTER to confirm.
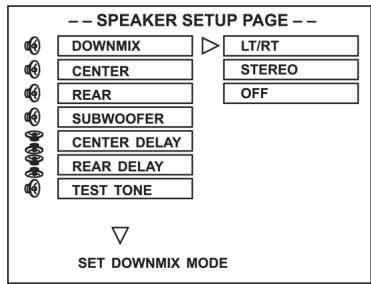
1. Set up the DOWNMIX MODE
- LT/RT When the playback disc with the PROLOGIC DOLBY stereo, select this item, through this unit's decode system, you can enjoy effect in your room similar the movie theater with two front speaker.
- STEREO When sources is two channel, the audio output is the common stereo signal. When sources is 5.1 channel, only output the left and right 2 channel signal.
OFF close the DOWNMIX and active the 5.1channel manual.
When active 5.1 channel manual. You may control CENTER, REAR, SUBWOOFER SPEAKER ON/OFF and CENTER/REAR SPEAKER delay time. TEST TONE may check the all speaker connect properly.
Audio Setup
- Press UP/DOWN button to select the AUDIO SET UP and press ENTER.
- The left is the main catalog, the right is the children catalog.
- Press LEFT/RIGHT button to enter the children catalog and press ENTER to confirm.
1. Set up the SPDIF OUTPUT
SPDIF/RAW when the digital audio output connection with the DOLBY decode functio power amplify, please select this function.
NOTES: When using built-in amplifier, audio output must set to analog, otherwise rear and center speaker will no signal output. When set to SPDIF/RAW or SPDIF/PCM, 5.1 signal may through digital out to external amplifier. Show or hide the captions.
- SPDIF/PCM when connect the 2 channels digital analog or stereo analog AUX, playback the DOLBY digital disc, please select this funtion.
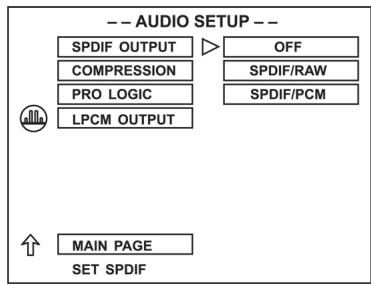
- Press UP/DOWN button to select SPDIF OUTPUT, then press ENTER.
- Press UP/DOWN button to select OFF, SPDIF/RAW, or SPDIF/PCM, then press ENTER.
- Choose OFF if you used built-in amplifier.
- Choose SPDIF/RAW if you connected to a Stereo using the Player's COAXIAL Digital Audio Out jacks and your Stereo is PCM-compatible.
2. Set up the COMPRESSION
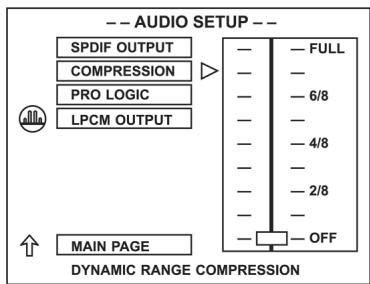
Dynamic Range Compression
Dynamic Range Compression reduces volume change by letting you adjust the difference between soft and loud sounds.
Press UP/DOWN button to set Dynamic Range Compression to 1/8 through FULL or to turn it OFF, then press ENTER.
To hear the full range of range of sounds as recorded, choose OFF or a lower ratio such as 1/8 or 2/8. To minimize the difference in volume between loud segments and quiet scenes, choose a higher ratio such as 6/8 or FULL.
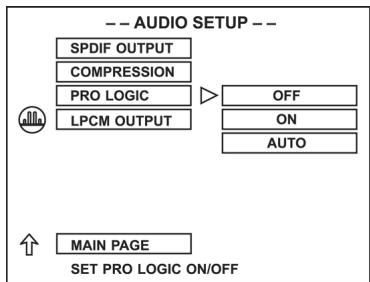
3. Set up the PRO LOGIC
PROG LOGIC ON
Select this item, all 2 channel signal playback disc with the PRO LOGIC decode system to 5.1 channel. This function must set the DOWNMIX to OFF.
PRO LOGIC OFF
Pro Logic is switched off.
PRO LOGIC AUTO
Function is switched automatically.
4. Set up the LPCM OUTPUT
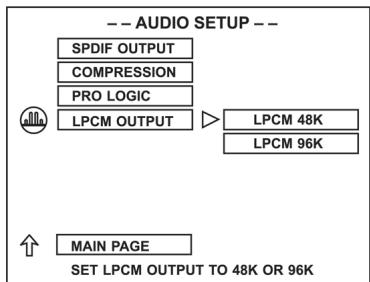
LPCM 48K:
In the linear PCM setting "48K" means that the maximum "Digital Output Sampling Rate" is 48 KHz. If the encoded sampling rate of the title track is 96 KHz the output is forcibly converted to 48 KHz.
LPCM 96K:
If "96K" has been selected the maximum output sampling rate is 96K and no enforced conversion takes place.
Preference Setup
(Only in the STOP mode or open the tray.)
Press UP/DOWN button to select the PREFERENCES
SET UP and press ENTER.
- The left is the main catalog, the right is the children catalog.
Press LEFT/RIGHT button to enter the children catalog and press ENTER to confirm.
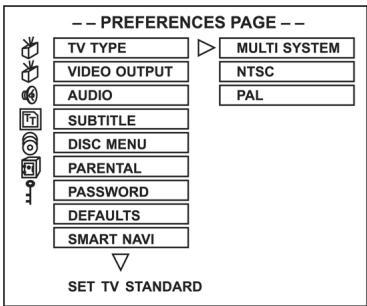
1. Set up theVIDEO (TV Type)
Please adjust the Video Out in this way, that he meets the system of the TV, the model will be connected to.
- If you are using a PAL television set, select the PAL output signal;
- If you are using an NTSC television, select the NTSC output signal;
- Select MULTI if your television set has a multisystem.
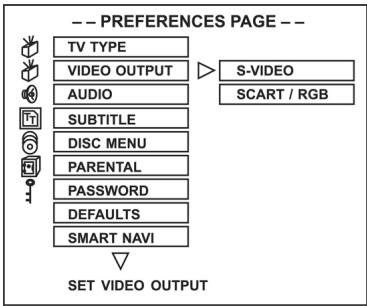
2. Set up the VIDEO OUTPUT
- If connect the S-VIDEO terminal, please select S-VIDEO.
- If connect the RGB, please select RGB (Scart version only).
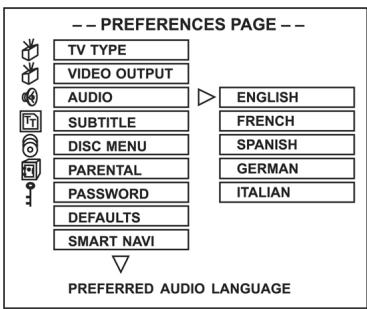
3. Set up the AUDIO
- The audio is decide by disc, only the disc supports the language format, the audio set up just can work. For example, the disc has English and German two FORMATS, you can select the English or German is decide the disc.
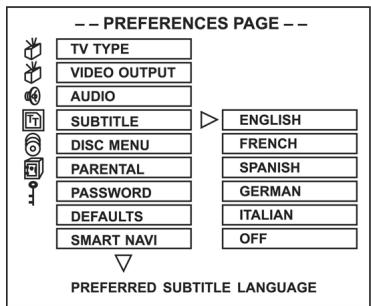
4. Set up the SUBTITLE
- Subtitle is the words of the disc play audio, as same the audio set up, must the disc support, the sub-title just can work.
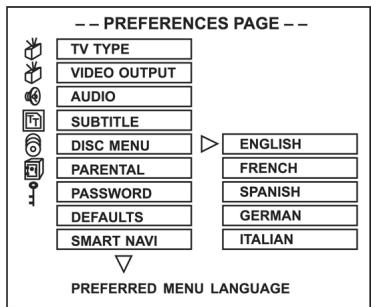
5. Set up the DISC MENU
- Set up the disc menu subtitle language, it is decide the disc.
6. Set up the PARENTAL
- When playback with the parent lock function disc, can use the PARENTAL to control the disc, and with the password.
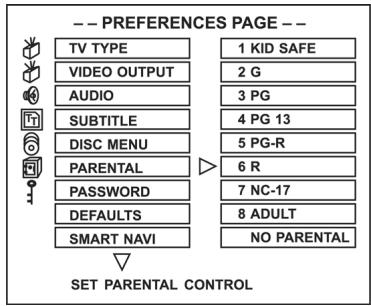
RATING EXPLANATIONS
- KID SAF - Kid safe; it is safe even for kids.
- G - General Audience; recommended as acceptable for viewers of all ages.
- PG - Parental Guidance suggested.
- PG 13 - Material is unsuitable for children under age 13.
- PG-R – Parental Guidance-restricted; recommended that parents restrict children under age 17 from viewing or allow children to view only when supervised by a parent or adult guardian.
- R - Restricted, under 17 requires accompanying parent or adult guardian.
- NC-17 - NO children under age 17; not recommended viewing for children under age 17.
- ADULT - Mature material; should be viewed only by adults due to graphic sexual material, violence, or language.
- NO PARENTAL - Disable the parental lock function.
7. Set up the PASSWORD
- CHANGE set up the new pass word, first enter "CHANGE", and appear the change menu, input the original "xxxx", move to the new password, input the new password, and press ENTER to confirm.
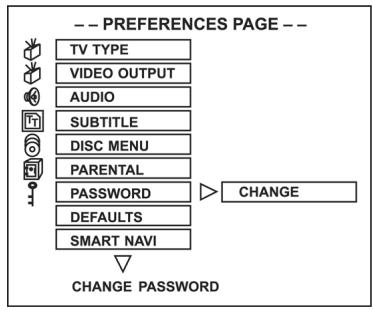
To clear 4-digit password: If you forget your password, the super password is "3308".
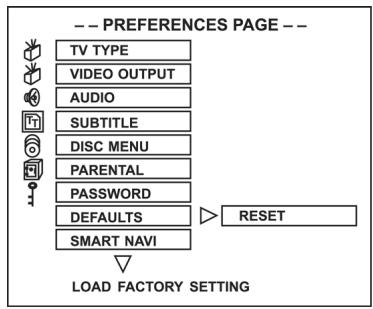
8. Set up the DEFAULTS
- If you don't want to save the all of the set up by yourself, select it.
- If you select RESET all functions are returned to the original factory settings of the device.
Note: This menu only set up at open the door station, other station it is grey.
9. Set up the SMARTNAVI
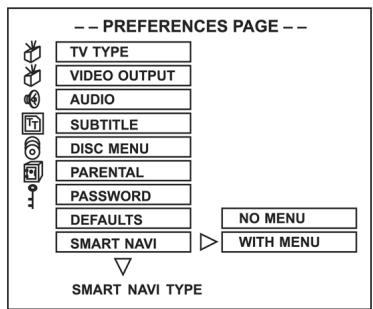
- NO MENU
The JPEG CD and MP3 disc will not show the menu and run the files automatic.
WITH MENU
All NON-DVD / CD / VCD disc will show the SMART-NAVI menu in TV screen. You may using UP / DOWN /LEFT / RIGHT button in remote control to select the desire files.
Troubleshooting
Before calling customer service if you have problems with this device, please search for the possible fault in the table below. With a few simple tests or minor adjustments you may be able to rectify the problem so that the device functions correctly again.
Symptom
(frequent)
Remedy
No power
- No playback even if PLAY is pressed.
- Playback begins but stops again immediately.
Insert the mains plug into the socket.
- Condensation has formed: Wait approx. 1 to 2 hours until the device has dried out.
- The device can only play back the following media: DVDs, video CDs, CDs, MP3s and JPEGs.
- The disc may be dirty and require cleaning.
- Ensure that the disc has been inserted with the label facing upwards.
No picture.
- Ensure that the device is properly connected.
- Ensure that the television is turned to "video".
No sound.
- Ensure that the device is properly connected.
Distorted sound.
- Ensure that the television and stereo system have been adjusted correctly.
- Adjust the main volume via the remote control.
The picture is distorted during fast forward or fast rewind.
In this case the picture is sometimes a little distorted - this is normal.
No fast forward (or fast rewind) playback.
Some discs have sectors which do not allow fast forward (or reverse) playback.
No 4:3 (16:9) picture.
Select the correct setting corresponding to the characteristics of your television ("TV Aspects").
No Surround Sound.
Select the correct setting under "Audio Output" corresponding to your stereo system.
No operation possible via the remote control.
- Check whether the batteries have been inserted with the correct polarity (+ and -).
- The batteries are flat and must be replaced.
- Point the remote control in the direction of the sensor on the device.
- Do not use the remote control at a distance of more than 5 metres from the sensor
Buttons do not work (on the device and/or on the remote control).
- Remove any obstacles between the remote control and the sensor on the device.
Switch the device off and then on again. Alternatively, switch the device off, remove the mains plug and re-insert it in the socket (it is possible that the device is not working due to external circumstances such as a thunderstorm or static electricity etc.).
Menu screen is not or only partially displayed on the television screen.
Select the corresponding type of screen according to the operating instructions of the television set.
No colour
Turn the TV type to the German colour norm PAL. Confirm the SETUP button to return to the menu.
Symptom (DVD) Remedy
Audio soundtrack If the audio soundtrack and/or subtitle and/or subtitle language is not on the disc, the language is not in the basic settings cannot be heard or seen.
the one selected in the basic setup.
The display The setting in the menus under "Disc appears in French Languages" is French. Select French. (for example).
No subtitles. Subtitles only appear on DVDs on which subtitles have been recorded.
- Subtitles have been switched off from the television picture. Press the "SUBTITLE" button.
No alternative au- No alternative language is selected dio soundtrack (or on discs on which only one langua-subtitle) language has been recorded.
- On some discs the alternative language cannot be selected with the AUDIO or SUBTITLE button. Try to select it from the DVD menu if there is one.
Angles cannot be changed. This function depends on the availability of the software. Even if a DVD has been recorded from different angles, these may only be available for certain scenes (when the ANGLE symbol lights up on the device).
Symptom
(Video CD) Remedy
There is no menu This function is only possible with video CDs with Playback Control.
VCD/ SVCD does With the disc inserted, switch over not play back. the PBC function using the menu button.
CD-RWs do not play back. CD-RWs must not be written with hard disc simulation tools such as Packed CD, In CD or similar programmes.
CD-Rs and CD- The error rate of CD-R and CD-RW RWs do not play media depends on:
- the media type
- the writing program (possibly carry out an UPDATE)
- the writer and its firmware (possibly carry out an UPDATE)
- the writing speed (the lower the better)
For your Information:
This product is equipped with copyright protection technology which is itself protected by specific American patent claims and other intellectual copyrights in the possession of the Macrovision Corporation and other holders of rights. Use of this copyright protection technology is only permitted with the authorisation of the Macrovision Corporation and is limited to home and other restricted performance situations unless express approval is given by the Macrovision Corporation. Dismantling or disassembly of this protection technology is prohibited.
How to Handle and Care for your CDs
Handling Precautions
- Hold the CD by the edges so that the surface is not covered in fingerprints.


Fingerprints, dirt and scratches may cause the CD to jump and distort the sound.
- Do not write on the label side with a ballpoint pen or other writing utensil.
- Do not use any record cleaning spray, petrol, diluting agent, antistatic fluid or any other kind of solvent.
- Please ensure that you do not bend or drop the CD.
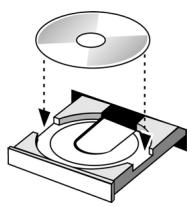
- Never insert more than one CD into the CD compartment.
- Do not try to close the door if the CD has not been correctly inserted into the CD compartment.
CD COMPARTMENT

CD
- Please make sure that you always store the CD in its original case when not being used.
If the Surface is Dirty
- Wipe the CD gently with a soft, moist (water only) cloth.
- When wiping CDs always move the cloth from the centre of the CD to the outer edge.

(If you wipe the CD in a circular manner you will cause circular scratches which will produce noises on the CD.)
- If a CD is moved from cold to warm surroundings it is possible that moisture will form on the CD. Wipe off the moisture with a soft, dry cloth that is free of fluff before inserting the CD.
Incorrect CD Storage
You may damage the CD if you store it in the following locations:
exposed to direct sunlight
- damp or dusty locations
- locations exposed to a direct source of heat or heating.
Maintenance
- Please ensure that before any maintenance is carried out the device is switched off and the plug removed from the power supply.
- Wipe the device with a dry, soft cloth. Should the surfaces become extremely dirty, please wipe them with a cloth that has been immersed in a weak soapy water solution and then wrung out before wiping off with a dry cloth.
- Never use alcohol, petrol, diluting agent, cleaning liquid or other chemicals. Do not use any compressed air to remove dust.
Definition of Terms
Angle
On some DVDs there are scenes that have been recorded simultaneously from a number of different viewing angles (the same scene from the front, the left, the right etc.). With such DVDs the ANGLE button can be pressed to see the scene from the various angles.
Chapter Number
These numbers are recorded on DVDs. A title is divided up into many sections, each of which has a number. Specific sections of the video presentation can be quickly found using these numbers.
DVD
This term refers to optical CDs of a high-density on which high-quality picture and sound recordings have been made using digital signals. Through the use of a new video compression technique (MPEG) and a high-density recording technique it is possible to record long and aesthetically pleasing videos on DVDs (for example, an entire feature film can be recorded). DVDs consist of two 0.6 mm-thin discs. The greater the density, the more information can be recorded. A DVD has a greater capacity than a single-side 1.2 mm-thick disc. The fact that two thin discs are combined means that at some time in the future it will be possible to have double-sided playback with even longer playback times.
PBC (Playback Control)
This is recorded on video CDs (version 2.0). The scenes or information can be seen (or heard) interactively via the television screen using the menu that appears on the screen.
Subtitles
These are printed lines of text that appear at the bottom of the screen and translate or explain the dialogue. Subtitles are recorded on DVDs.
Time Number
This shows the running time recorded on the DVD. If a DVD contains two or more films, the films are numbered as title 1, title 2, etc.
Track Number
This number refers to tracks recorded on video CDs and CDs. They make it possible to search for and find specific tracks (e.g. songs) very quickly
Video CD
Video CDs contain picture and sound recordings whose quality is comparable to a video cassette. This device also supports video CDs with Playback Control (version 2.0).
SPECIFICATIONS
| Power Requirement | AC 230V, 50Hz |
| Power Consumption | 20W |
| Signal System | NTSC/PAL |
| Weight | 2.1kg |
| Dimensions | 430(L) x 260(W) x 49(H)mm |
| Operating Temperature Range | +5° to +35°C |
| Operating Humidity Range | 5 to 90% (no condensation) |
Discs Played
-
DVD-VIDEO disc 12cm single-sided, single-layer 12cm single-sided, dual-layer 12cm double-sided, single-layer
-
Compact Disc (CD-DA, MP3-CD) 12cm disc 8cm disc
S Video Output
| Y output level | 1 Vp-p (75 Ohm) |
| C output level | 0.30 Vp-p (75 Ohm) |
| Number of connectors | 1 |
Video Output
| Output level | 1 Vp-p (75 Ohm) |
| Output connector | RCA type |
| Number of connectors | 1 |
Audio Output
| Output Level | 2 Vrms (1kHz, 0db) |
| Output connector | RCA type |
Audio Signal Output Characteristics
| 1. S/N ratio | |
| CD audio | 90db (EIAJ) |
| 2. Dynamic range | |
| DVD (Linear audio) | 80db |
| CD audio | 80db (EIAJ) |
| 3. Total hamonic distortion | THD + SN 70db |
Digital Audio Output
| Output connectors | |
| Coaxial digital output | RCA type |
Specifications are subject to change without notice. Weight and dimensions are approximate.
This device has been tested according to all relevant current CE guidelines, such as electromagnetic compatibility and low voltage directives, and has been constructed in accordance with the latest safety regulations.
Subject to technical changes without prior notice!
Guarantee
The device supplied by our Company is covered by a 24 month guarantee starting on the date of purchase (receipt).
During the life of the guarantee any fault of the device or its accessories *) ascribable to material or manufacturing defects will be eliminated free of charge by repairing or, at our discretion, by replacing it. The guarantee services do not entail an extension of the life of the guarantee nor do they give rise to any right to a new guarantee!
Proof of the guarantee is provided by the proof of purchase. Without proof of purchase no free replacement or repair will be carried out.
For repairs or replacement during the life of the guarantee return the device in its original packing together with the proof of purchase to your dealer.
^* Damage to accessories does not mean automatic free replacement of the whole machine. In such cases please contact our hotline. Broken glass or breakage of plastic parts are always subject to a charge.
Defects to consumables or parts subject to wearing (e.g. motor pistons, kneading blades, drive shafts, spare remote control, spare toothbrushes, saw blades, etc.) as well as cleaning, maintenance or the replacement of said parts are not covered by the guarantee and hence are to be paid!
The guarantee lapses in case of unauthorized tampering.
After the expiry of the guarantee
After the expiry of the guarantee repairs can be carried by the competent dealer or repair service against the payment of the ensuing costs.
TITLE REPEAT ON/REP-ALL
| SMART NAVI | |
| ROOT | ROOT 0 |
| JEPG01 1 | |
| JEPG02 2 | |
| JEPG03 3 | |
| JEPG04 4 | |
| JEPG05 5 | |
Reproducción MP3
| SMART NAVI | |
| ROOT | ROOT 0 |
| MP3 TRACK01 1 | |
| MP3 TRACK01 2 | |
| MP3 TRACK01 3 | |
| MP3 TRACK01 4 | |
| MP3 TRACK01 5 | |
| SMART NAVI | |
| ROOT | ROOT 0 |
| JEPG01 1 | |
| JEPG02 2 | |
| JEPG03 3 | |
| JEPG04 4 | |
| JEPG05 5 | |
MP3 - weergave
| SMART NAVI | |
| ROOT | ROOT 0 |
| MP3 TRACK01 1 | |
| MP3 TRACK01 2 | |
| MP3 TRACK01 3 | |
| MP3 TRACK01 4 | |
| MP3 TRACK01 5 | |
Weergavemodus
METHOD 1
Stereo system
Audio Input Jacks
Audio Out
METHOD 2
5.1ch Analog Amplifier
Audio Input Jacks
METHOD 3
Dolby Digital Decoded
Digital Audio Input Jacks
| SMART NAVI | |
| ROOT | ROOT 0 |
| JEPG01 1 | |
| JEPG02 2 | |
| JEPG03 3 | |
| JEPG04 4 | |
| JEPG05 5 | |
Odtwarzanie MP3
| SMART NAVI | |
| ROOT | ROOT 0 |
| MP3 TRACK01 1 | |
| MP3 TRACK01 2 | |
| MP3 TRACK01 3 | |
| MP3 TRACK01 4 | |
| MP3 TRACK01 5 | |
Opcja odtwarzania
| SMART NAVI | |
| ROOT | ROOT 0 |
| JEPG01 1 | |
| JEPG02 2 | |
| JEPG03 3 | |
| JEPG04 4 | |
| JEPG05 5 | |
MP3 - lejatszás
| SMART NAVI | |
| ROOT | ROOT 0 |
| MP3 TRACK01 1 | |
| MP3 TRACK01 2 | |
| MP3 TRACK01 3 | |
| MP3 TRACK01 4 | |
| MP3 TRACK01 5 | |
Lejatszás üzemmod
C zelbIO npoΦnJIaKTnKp nCKa BOCnPamHeHnIy 3JIeKTPoWoka He noDbBepraIte I3JeJIne DeIcTBIO BLnXHOCTN IJIN DoJd.
C ueIbIO npEIoTbPaUeHnI pNcKa BOCnIaMeHeHnI, 3JIeKtpOuoka IJIN HePnIaTHbIX NOMEx, INCNoJIb3yIte TOJIbKO peKOMeHdyEmble npINHaIdJeXHOCTN.
MepblnpedocTopoXhocTn
IpepeTcKAKBKLIOUHTbN3dJIeNE TtuaTeJbHO O3HaKoMbTeCb C HnXeCJIeNyUOuIMM MepaMn IpeDOctOPOXHOCTN.
BepereceTeBoKa6eIb
YTO npEIOITbpaNTb HeNCnPaBHOCTN 3JeJIINy 3aIHTbcra OT NopaxKeHNI 3JeKTPnueCKNM TOKOM, NOJapa I TpaBMnPOBaHnI NOCTOpOHnIX JInC CO6JIOnaIte CJIeDyUOuIne MEpbI 6e3OnaCHOCTN:
TAHNTe 3a BUNKy, a He 3a Ka6eJIb.
HnB Koem Cnyae He npKacaiTec b MOKpbIM pykam K BUNJIke NJIN Ka6eJIIO.
He octablne CeTeBOK Ka6eJIb B6JIn3n NCTOCHNKOB TENla.
HnB KOeM Cnyae He CTaBbTe Ha cTeBOi Ka6eJIb TjXeJIbIe IpeIMetbl.
HnB KOem CJlyuae He nbItaTeCb CamN NOUHNHT bnn 3ameHHT cTeBOi Ka6eJIb.
3aMeHa HEnCpBnHO CTeBOrO Ka6eJa DOnyckaetc ToJIbKO JInzOM, IMEIOUIM COOTBETCTBeHHOE 3JeTpoTeXnueCKoe O6pa3OBaHHe N ONblT.
MecTo yCTaHOBKn
I36eraIte CTabNtB n3JeIne B MeCTax CO CNeIyIOUIMN yCJOBnIaMn:
Bo3deIcTBnE npraMbIX COJIHeuHbIX Lyuei, nCTOCHNKOB TeIIa, He OCTaBIAIte erO B 3aKpbITOM aBTOMo6NIe. BbICOKa TeMnepaTypa (60Jee 35^ ) nIN BBICOKa BlaxHOCTb (60Jee 90% ).
3KCTpeMaJIbHO IIbIbHOe NOMEUHeHne.
B npotnbHom cnyae əleKtpoHnka n3dJIIna MOKeT pOlyuHTb cepbe3HbIe NOBpeJdeHnI.
Ecn He noIb3yeTeCb n3dennem
Ecn He nolb3yeTeCb n3dennm, BbIKIOuHTe erO. Ecn Je He 6yndeTe nolb3OBaTbCn3dennm IInTEJbHOe Bpemr,TO BbIHbTe BNJKy n3 p03ETKn.
He cyuTe naIbCuI nII npyIne npeDMeTb Bn3dJIne
PnPKacTbCk BHyTpEHHM Yactm N3JeNna ONaCHO n 3TO MOKeT npNBecTn K cepBe3HbIM NOBpeJdeHnma. He nbTaIteCb pa3o6paTb N3JeJIne.
He BCTabIaIe B OTe C D nOcTOpOHnX npEIMeTOB.
DépXnTe n3dJIne Ha paCCTOaHm OT BoJbI,OrHa N MaHHTOB
Дерхи-teизделега hapcctoHи OT Ba3 CцBetamn, BaHHо, yMbIbAlbHnka n T.D. EcIn BOda ПОпадТВ BHytpbИЗдELЯ,эTO MOKETnpINBECTN K cepbe3HbIM NOBpeXdENHЯМ.ОКрblTьн OOrHb,К пИмepy Горяшю CBeу, HeJIb3Я CTaBNTb Ha ИЗдELINE.
HnB KOem clyuae He NODHOCITE K I3JeIIO MaHHTHbIe npedMeTbI, KaK HApPIMep rPOMKOrOBOpNTeIi.
Bentnlaun,cknaDnpOBaHne
C cIeJIbIO oOecneueHn BeHTnJIaun He CTaBbTe OKJIO n3JeJIy HnKaKnx IpeDMeTOB 6JIuXe 5 cm.
He 3aKpbBaIe BeHTnJIauCIOHhIe OTBepCTNkKaIMNIJI6o IpeDMeTaM, KaK Ra3Etbl, CkaTepTn, 3aHaBeCn n T.D.
YctaHOBNTe n3dJIne B TOpn3OHTaJIbHOM NIOLOXeHIn N He CTaBBTe Ha HrO TjXeJIbIe IpeDmETbl.
He cTaBbTe n3dJIeNe Ha ycIJIteJIb nn dpyroJ 3JIeKTPoPn6Op, KOtOpbIe MOrYT HArpeBaTbcJ.
KoHdeHcaunBlaarn
IocJIeIOBaTeJIbHOCTb CeKTopHbIX KOIOB DOJXHa COOTBeTCTBOBaTb Dpyr Dpyr, YTObI YTeHne DNCKa 6blIO BO3MOxHbIM. EcII N KOJIbI HE COOTBeTCTBYIOT dpyr Dpyr, YTeHne DnCKa He BO3MOxH0.
CekTopbIe KoIbI dIaHnHO rIpepa hXoJrTcHa erO o6paTHoN CTOpOHe.
CTpykTypaДиSCa
ДиCK DVD-Video COCTOIT N3 OTdJIbHbIX "Ha3BaHn"(Title), npuHem NOJ KajdbIM Ha3BaHnEM MOyT HaxoIITbcra pa3JIuHbIe "rJaBbI" (Chapter) (cM. pnc. 1). EcnI Ha dNcKe, HapnpMeP, 3aIncAHO HeCKOJIbKO ΦIbMOB, TO KaJbIe ΦIbM MoKET IMEtB

CO6CTBENHoe Ha3BaHne (HOMep) n eue pa3 NOpa3JeHn Hc CO6CTBENHbIe rJaBbl.
BCTabIeHne 6aTaapeek (Iy)
HnHexeJeUOaJ dNaIarpMaJa DEMOHCTpnpyeT pa3JIuHbIe BO3MOxHOCTN, KOToPbIe NcNoJIb3yOTcJ IJI npKJIuOeHnA DVD-PIeepa K TeJeBn3Opy nII My3bIkaJIbHOMy ueHTpy.
Peped nodkloucheHem DVD nleepa
- Перд NOДКЛЮЧЕНЕМ HOБьIX KOMПОHEHTOB KIMHeLOшЕмся KOMПЛЕKCу yбeДиTEcB TOM, YTO BCEKOMПОHEТы KOMПЛЕKCa BbIKЛЮЧЕHы.
- BHNMaTeJIbHo IpoUHTaIe pyKOBoIDCTBO NOJIb3OBeTelaIy TeJIeBn3Opa, CtepeO-KOMJIeKCaN IpyrNX KOMIOHeHToB, K KOToPbIM 6yJeT noJKNlUoyatbcra DVD-nJeeep.
MeToD 1
DVD-πeep + cTepeo-KomnIeKc
MeToD 2
DVD-πeep + yCunIteMb c
aHaIoROBbIM BxOdom 5,1ch
MeToD 3
DVD-πeep + ycunIteMb c
dEkoJepeom Dolby Digital nll
dekoJepeom DTS
HopmaJIbHoe BocnpOn3VeJeHne
Ponck Bnpeep/Onck Ha3a
TITLE REPEAT ON/REP-ALL-NOBTOP BCEFO Ha3BaHnIa
Karda 3aKoHnTcB OcnpOn3BeJeHne nocJeHne IopoxKn CD nscKa, BocnpOn3BeJeHne cTapTyeTcE ue pa3 cHaJa.
CHARTER- NOBTOP TEKUSei rJaBbl
Korda 3aKoHHTcB BOCnPOUN3BeDEHne TEKUSei rJaBbl, NaHHeTcB BOCnPOUN3BeDEHne eToi Xe rJaBbl cHaayana. REP-ONE- NOBTOp TEKUSei dopoxkN/peChn
Korda 3aKoHHTcB BOCnPOUN3BeDEHne TEKUSei dopoxkN/peChn, NaHHeTcB BOCnPOUN3BeDEHne eToi Xe dopoxkN/peChn cHaayana.
Повторговocпpon3ВedeHneA←→B
B haçaIe OTpe3ka (nyHKT A), KOtOpbI JKeJaTe NOBTOpITb, HaxMITE KHOJKy A-B.
B KOHcE OTpE3Ka (nyHKT B), KOTOpbI JxJeaTe NOBTOPHTb, HaxMNTe eUe pa3 KHOJky A-B.
-ПлесьавTomatnueeCKNВернетск
Кпункту АистартуET
ВOCпpon3вedeHne Выбразного
OTpeЗka (A-B).
- YTO6bI NOTUINITb NOBtOp BOCnpoN3BeDEHne OTpe3ka (A-B) Haxmnte KhoIky A-B TpeTni pa3. BOCnpOu3BeDEHne npoJOnKInTcB HOPMaJIbHOM nopJKe.
ClyaHbI npAIOK BOCpOu3BeDeHn8 (shuffle) (TolbKO VCD nJN CD dNcKn)
- Haxmnte BO BpemB OBCnpO3BeJeHnKHOkky "SHUFFLE", yTO6bI NMeTb BO3MOxHOCtB nepeKJIouaTb MeJy "ON" n "OFF". YcTaHOBka 03NaHaet CJIeDyUoSee:
"ON" - pexim clyuahoro nopraika BOCnpo3BeDeHnBkIouhen. Korga 3akOHHTcB OBCnpo3BeDeHneTeKyuie DOpOxKn, NaHHeTcB OBCnpo3BeDeHnHOBOi, clyuaHb bI6paHHo dOpOxKn.
"OFF" - рекиmsclуаногоряквоспpon3veденьыкючe.Ha дисплee поВИТС"OFF"(нжмte кногу "STOP",чTOБь NOЛьЗOBaTбдисплем в дальншem).
Повьанке Meю DISKи TITLE
OTKpbItne MeHIO Disk
- MeHIO nCnOJb3yeTcR c ZeIbIO BbIbOpa Ra3bika npocLyuINBaHHra, cy6TntPoB u T.D. MeHIO pa3JIuHbIX DVD nICKOB OTIIuHaOTcR dpyr OT dpyra.
- Haxmnte BO Bpemr Bocnpou3BeJeHnKHOJky MeHIO DVD.MehIO nOaBntcHa dncJIee.
- Пи помоши Кногор CO срелками (Вверх/ВнИЗ) Или (ВпразBO/BЛевО) BCTаньTe Ha HeобхODIMынpyнКТ MEHIO.
- HaxmTe KhoNky "ENTER": - NaHHeTcBOCnpon3BeJeHne BbI6paHHoro NyHKTa.
| SMART NAVI | |
| ROOT | ROOT 0 |
| JEPG01 1 | |
| JEPG02 2 | |
| JEPG03 3 | |
| JEPG04 4 | |
| JEPG05 5 | |
Bocnpon3BeJeHne φopMaTa MP3
3Ta MoJeIb PJIeepa OChauEHa DeKoOpom FOpMaTa MP3. 3To N03BOJIAET BOCPPOIN3BOIDITb DOPOKKN (paIJIb), 3aIIncAHHbIe B FOpMaTe MP3 Ha CD-R n CD-RW dNcKaX.
CTapT BocnpOn3BedeHn
- Ha Bpemr BOCPOn3BcEHeHnI DnCKOB C 3aPiNCbIO B φOpMaTe MP3 peKOMeHdyeTcR BkJIIOuTaTb TelenBu3Op.
- Дял загузки диста нажмпту "OPEN/CLOSE".
B MeHIO NOBNTcHa3BaHHe NaKn i CnICOK coJepXIMOrO B BVNe Root Directory. - Bb6epnte npn nOMoUKNHONOK co cTpeJkAmn BBepx/BHN3 Heo6XoDmMyIO My3bIkaJIbHyIO paIKy INoDTBepdnte Bb6Op KHOIkoN "ENTER".
- Дя Вьбopa onpeДeJIeHNoI neCHN BOCNoJb3yITeCb OЯТь Jose KHO冈KaMn CO CTpeJIkAmN
BBepx/BHn3, 3aTeM Haxmnte IJI cTapTa BocnpoIN3BeJeHnKHOInKy "ENTER".
Pexmm Bocnpon3BedeHn
Ha 3kpaHe TeIeBn3Opa IIOBbIaTcR N3o6paXeHne, COOTBeTCTByIOUSee BbIbpaHHOMy pexIMy.
1. Дя Вьбopa ржима BOCPON3BedeHЯ BOCNoJIb3yITeCb KHOПКAMN CO CTpeJIKAMN.
2. BbIbePnte npn nOMOuN KHOJOK CO cTpeJIkAmn BnpaBO/BJeBO Heo6xoDmMyO My3bIkaJIbHyIO NaIKy I NOITBepdnte BbIbOp KHOJKOJ "ENTER".
3. BbIeRnTe npn pOMoUng KHOJOK CO cTpeJIkamN OnpdeJeHnyIO neCHIO N IOdTBeRnTe BbI6Op KHOJKOIN "ENTER".
Приимechаиме:чTOбы IOВТОРИТь ИДИN ИЗ рЕЖIMOB: FOLDER REPEAT, DISC, DISC REPEAT, DISC SCAN, SINGLE, FOLDER, REP-ONE (noBToP TOJIbKO OДнОйпесни) наdmITE KHONKу "REPEAT" на пунtle ДИСТАнцIHOHOrу управлия.
CNEUHAJIbHbIEФYHKcN
TapaHTnHbI cPOK Ha TeppuTOpu N Pocchcko
Feepaun yCTaHaBJIbAeTcR nOLHOMOHTbIMN
npdCTaBtTeJAMN.
Kaccobiyuek yBJIeTcra rapaHTnHbIM TaIOHOM.Be3 HrO HeBO3MOKeH 6ecPNaTHbI peMOHT nIN 3aMeHa n3dJIIny.
B clyuae BO3HnKHOBXHnI npITeH3n I NO rapaHTnI, npeIbYBNTe I3dEJIne B IONHOJKOIMJIeKTAUIN, C OpIgIHaJIbHOy YNaKOBKoN KACCOBbIM YeKOM TOPROBOI TOUKe, IpOdaBWei 3TO I3dEJIne.
*) DeΦeKtBi npHnAdJIeXHoCTe He ClyXaT npuHNoI dIy aBTOMaTUnCeCKo 3aMeHb BCErO n3dEIny. B 3tOM cLyUae N03BOHnTe HAM, NOxAynCTa, No rOpRyE nnHn! Pa3bIe CTEKJAAHbIe I NOlOMaHbIe PnlaCTMaCCOBbie DEtaJIIN BO3MeUaIOTcra TOnbKO 3a DOnOJIHNHeBHyIO OPlaTy!
DeΦeKtbl n3HaunBaembIX npnHaJnxHocte NnTpyuixxca DeTaIeN (HaNPIMep KOHTaKTHbIe 5eTKMOTOPOB, CMEcITeNbHbIE KpIOKN, pINBOdHbIe peMHN, 3aNaChbIe NylbTbI ynpaBLeHnA, 3aNaChbIe 3y6HbIe 5eTKN, NlNbHbIe IOnOTHa n T.d.), a TaKxe YnCTKa, Texo6ClyXnBaHne Nll 3aMeHa Tpyuixxca DeTaJIeN He NnonaIaIOT nOd rapaHTnO, n NoTOMy npoBOdTcR 3a OTdeLbHyIO ONIaTy!
TapaHTn TepaETc npBCKpbITn n3JeJIy IocToPOHHMn JIuCaMn.
Pocne rapaHTn
IocJIe OKOHuaHnI cPoKa rapaHTnI, peMOHT n3JeIiN IpnO3BOIDTCsA 3a ONJaTy, COOTBeTCTBYIOUIMM MaCTepCKnMI NII NpYHKTaMn CepBnCHOrO O6cLyKuBaHnI.
- Safety Information
- Please Note:
- Important:
- Warning:
- Precautions
- Protection of the Mains Lead
- Positioning
- When the device is not being used:
- Do not insert your fingers or other objects into the device
- Keep away from water, fire and magnets
- Ventilation
- Condensation
- What to do if there is television interference while you are watching a programme.
- DISC FOR PLAYBACK
- Usable Discs:
- Region Code
- Disc structure
- DESCRIPTION
- Front Panel
- Rear Panel
- Remote control Unit
- Insert Batteries (Remote Control Unit)
- Notes:
- Range of Operation of the Remote Control
- CONNECTION TO AN AUDIO SYSTEM
- BASIC PLAYBACK
- Powering on the player and playing the disc
- Stopping playback
- Pausing playback
- Search Forward/Search backward
- Slow motion Forward / Backward
- Skipping to the Next / Previous chapter/track
- Checking the Remaining Time
- REPEAT PLAY
- Repeat Viewing / Listening
- A BRepeat playback
- PROGRAM PLAY (For VCD or CD only)
- RANDOM PLAY(shuffle)—For VCD or CD only
- USING DISC MENU / TITLE
- To select the disc menu
- Using the Title Menu
- AUDIO LANGUAGE / SUBTITLE LANGUAGE (only applicable to DVD disc)
- Selecting the Audio Language
- Selecting the Subtitle Language
- ZOOM
- ANGLE
- MOVE TO A TITLE, CHAPTER OR TIME DIRECTLY
- DIGEST PLAY (For VCD or CD only)
- VCD
- CD
- JPEGPlayback
- MP3Playback
- Starting playback
- PLAY MODE
- NOTE:
- SPECIAL FEATURE
- Starting playback (MPEG 4 / DivX)
- SETUP MENU
- Press SET UP in the stop or playback mode (in DVD mode).
- General Setup
- Set up the TV DISPLAY
- Set up ANGLE MARK
- Set up the OSD LANG
- Set up CAPTIONS
- Set up SCR Saver
- Speaker Setup
- Set up the DOWNMIX MODE
- Audio Setup
- Set up the SPDIF OUTPUT
- Set up the COMPRESSION
- Set up the PRO LOGIC
- Set up the LPCM OUTPUT
- LPCM 48K:
- LPCM 96K:
- Preference Setup
- Set up theVIDEO (TV Type)
- Set up the VIDEO OUTPUT
- Set up the AUDIO
- Set up the SUBTITLE
- Set up the DISC MENU
- Set up the PARENTAL
- RATING EXPLANATIONS
- Set up the PASSWORD
- Set up the DEFAULTS
- Set up the SMARTNAVI
- Troubleshooting
- Symptom
- (frequent)
- Remedy
- Symptom (DVD) Remedy
- (Video CD) Remedy
- For your Information:
- How to Handle and Care for your CDs
- Handling Precautions
- If the Surface is Dirty
- Incorrect CD Storage
- Maintenance
- Definition of Terms
- Chapter Number
- DVD
- PBC (Playback Control)
- Subtitles
- Time Number
- Track Number
- Video CD
- SPECIFICATIONS
- Discs Played
- S Video Output
- Video Output
- Audio Output
- Audio Signal Output Characteristics
- Digital Audio Output
- Guarantee
- After the expiry of the guarantee
- TITLE REPEAT ON/REP-ALL
- Reproducción MP3
- MP3 - weergave
- Weergavemodus
- Odtwarzanie MP3
- Opcja odtwarzania
- MP3 - lejatszás
- Lejatszás üzemmod
- MepblnpedocTopoXhocTn
- BepereceTeBoKa6eIb
- MecTo yCTaHOBKn
- Ecn He noIb3yeTeCb n3dennem
- He cyuTe naIbCuI nII npyIne npeDMeTb Bn3dJIne
- DépXnTe n3dJIne Ha paCCTOaHm OT BoJbI,OrHa N MaHHTOB
- Bentnlaun,cknaDnpOBaHne
- KoHdeHcaunBlaarn
- CTpykTypaДиSCa
- BCTabIeHne 6aTaapeek (Iy)
- Peped nodkloucheHem DVD nleepa
- HopmaJIbHoe BocnpOn3VeJeHne
- Ponck Bnpeep/Onck Ha3a
- Повторговocпpon3ВedeHneA←→B
- ClyaHbI npAIOK BOCpOu3BeDeHn8 (shuffle) (TolbKO VCD nJN CD dNcKn)
- Повьанке Meю DISKи TITLE
- OTKpbItne MeHIO Disk
- Bocnpon3BeJeHne φopMaTa MP3
- CTapT BocnpOn3BedeHn
- Pexmm Bocnpon3BedeHn
- CNEUHAJIbHbIEФYHKcN
- Pocne rapaHTn
Brand : CLATRONIC
Model : DVD 592
Category : DVD player