
DVD 582 - DVD player CLATRONIC - Free user manual and instructions
Find the device manual for free DVD 582 CLATRONIC in PDF.

| Product type | DVD player |
| Brand | CLATRONIC |
| Model | DVD 582 |
| Dimensions (L x D x H) | 430 x 265 x 52 mm (excluding protrusions) |
| Weight | 3 kg |
| Power supply | AC 220-240 V, 50 Hz |
| Power consumption | 25 W (approx. 3.5 W standby) |
| Compatible disc formats | DVD-Video, CD-Audio, Video CD, MP3, JPEG, Kodak Picture CD |
| Video system | PAL / NTSC |
| Video outputs | Composite (RCA), S-Video, SCART, YUV (component) |
| Audio outputs | Analog stereo audio (RCA), digital coaxial |
| Audio formats | Dolby Digital, MPEG Audio, PCM |
| Playback functions | Random playback, A-B repeat, program, zoom, angle change |
| Available languages | Up to 32 subtitle languages, 8 audio languages |
| Parental control | Yes (password lock) |
| Remote control | Yes, with UM-3 batteries |
| Operating temperature | +5 to +35 °C |
| Operating humidity | 5 to 90% (non-condensing) |
| Care and cleaning | Clean with a soft, dry cloth; do not use chemical products |
| Spare parts and repairability | Spare parts available (remote control, etc.); repair by authorized service |
Frequently Asked Questions - DVD 582 CLATRONIC
User questions about DVD 582 CLATRONIC
0 question about this device. Answer the ones you know or ask your own.
Ask a new question about this device
Download the instructions for your DVD player in PDF format for free! Find your manual DVD 582 - CLATRONIC and take your electronic device back in hand. On this page are published all the documents necessary for the use of your device. DVD 582 by CLATRONIC.
USER MANUAL DVD 582 CLATRONIC
Instructions for use
Page 22-41
PL
Instrukcja obstugi
Strona 42-61
H


Digitale Audioanschlüsse 7
Option 4: Y, Pb/Cb, Pr/Cr
Digitale Audioanschlüsse
PROGRAMM:SPUR (01-16)
| 1 | 5 | 6 | _ |
| 2 | 3 | 7 | _ |
| 3 | 6_ | 8 | _ |
| 4 | _ | 9 | _ |
| 5 | _ | 10 | _ |
| EXIT | START | NEXT ▷ |
P/I - Progressive-Scan
Overview of the Operating Controls 23
Safety Information 24
Precautions 24
Characteristics 25
Selecting the Disc for the
Connected Television Set 25
General Connection
Digital Audio Connections 27
Preparing the Remote Control 28
Operation:
General Operation: 29
GeneralPlayback: 29
StoppingPlayback 30
Skipping + / - 30
Fast Forward / Fast Rewind FWD / RWD 30
Pause / Frame by Frame Picture 30
MENU and TITLE 30
SUBTITLES - Changing the Language 30
Audio Soundtrack - Changing the Language . 30
Changing the Viewing Angle 31
ON SCREEN DISPLAY 31
RETURN 31
RANDOM 31
REPEAT 31
Programming of DVDs/ VCDs/ CDs 32
Repeat A-B 32
GOTO Function 32
Picture ZOOM 33
Volume Control 33
VRMT 33
P/I 33
Playback of MP3 Files 33
Playback of JPEG
and Kodak Picture CD 34
Basic Setup:
Basic Setup 34
General Setup 35
Television Display 35
Angle Function 35
OSD LONG 35
Screen Saver 35
AUDIO Setup Page 35
Loudspeaker Setup 35
Downmixing 35
SPDIF OUTPUT 35
LPCM OUT 36
DOLBY DIGITAL Setup 36
VIDEO Setup 36
Components 36
Preferences Setup 37
Television Type 37
AUDIO/Subtitles/DISC MENU 37
Blocking Function (Child Safety) 37
Factory Settings 37
Version 37
Password 37
For your Information:
Handling and Care of your CDs 38
Troubleshooting 39
Definition of Terms 40
Technical Data 40
Guarantee 41
Overview of the Operating Controls

Device
1 CD compartment
2 DISPLAY window
3 Signal sensor for the remote control
4 OPEN / CLOSE button
5 PLAY button
6 STOP button
7 SKIP - button
8 SKIP + button
9 STANDBY lamp
10 STANDBY button
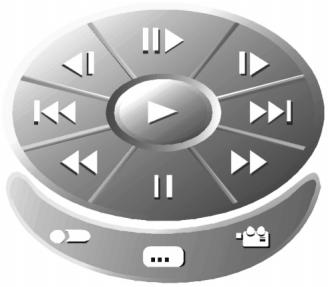
Remote Control
1 POWER button ( © )
2 Number buttons
3 SETUP button
4 CURSOR (Joystick) / ENTER buttons
5 PAUSE/STEP button
6 SKIP button (
7 SKIP button (▶)
8 GOTO button
9 VRMT button
10 PROGRAM button
11 RANDOM button
12 VOLUME button (-)
13 VOLUME button (+)
14 OPEN/CLOSE button
15 TITLE button
16 ANGLE button
17 SUBTITLE button
18 AUDIO button
19 MENU buttons
20 STOP button (■)
21 FASTFWD button (▶▶)
22 FASTRWD button (
23 P/I button
24 RETURN button
25 REPEAT button
26 A-B REPEAT button
27 ZOOM button
28 DISPLAY button
29 CLEAR button
To The Customer
We should like to take this opportunity to thank you for your decision to purchase this DVD /VIDEO CD/CD player.
You are advised to read these operating instructions carefully before trying to use the device. Please also note the precautionary measures.
Safety Information
Please Note:
This device is designed only for use in a temperate climate. It must only be connected to an alternating current supply of 220-240V/50Hz. The device must not be used under any other circumstances.
Important:
- The DVD player is a class 1 laser product. The device uses an invisible laser beam which may produce hazardous rays. Please ensure that you use the device only for the purposes for which it is designed and in accordance with instructions.
- When the device is connected to a standard mains power socket do not put your eyes too close to the opening in the device and do not look inside the player.
- Any use of the operating controls, any settings or use of the device which deviate from those described in these instructions may result in your being exposed to the hazardous rays.
- Do not open any covers or repair the device yourself. Please contact qualified specialists if this device requires maintenance or repairs.
Warning:
- In order to avoid risks such as fire or electric shock, please do not expose the device to rain or moisture.
- In order to avoid risks such as fire, electric shock or interference, please use only the recommended accessories.
Precautions
Please read these precautions carefully before using the device
Protection of the Mains Lead
In order to prevent the device from malfunctioning and to protect against electric shocks, fire or injury, please note the following:
- Always remove the plug by pulling the plug itself and not the lead.
- Never touch the mains plug or lead with wet hands.
- Keep the mains lead away from heaters.
- Never put a heavy object on the electric lead.
- Never try to repair or replace the mains lead yourself. The mains lead may only be replaced by a qualified electrician!
Positioning
Please avoid setting up the device in the following surroundings:
- In direct sunshine, where there is exposure to heaters or in closed vehicles.
- In high temperatures (over 35^ ) or high humidity (over 90% ).
In extremely dusty surroundings.
Otherwise internal parts may be seriously damaged
When the device is not being used:
- Please turn the device off when it is not being used.
- Should you not use the device for a prolonged period, please remove the mains plug from the socket.
Do not insert your fingers or other objects into the device
- Touching internal parts of this device is dangerous and may result in serious damage to the device. Do not try to take the device apart.
- Do not insert any foreign bodies into the CD drawer.
Keep away from water, fire and magnets
- Keep the device away from vases, baths, wash basins etc. If liquid enters the device this may cause serious damage.
- Open sources of fire, such as burning candles, must not be placed on the device.
- Never place magnetic items, such as loudspeakers, in the vicinity of the device.
Ventilation
- Please maintain a free space of 5cm around the device to ensure adequate ventilation.
- Do not cover any ventilation slits with objects such as magazines, tablecloths, curtains etc.
- Please position the device horizontally and do not place any heavy items on it.
- Do not place the device on amplifiers or other devices which may heat up.
Condensation
In the following situations moisture may develop on the lens:
- Immediately if a heater is switched on.
In a steaming or very damp room. - If the device is transferred from cold to warm surroundings.
If moisture has formed inside the device, it is possible that the device will no longer function correctly. In this case please turn off the power and wait for approximately one hour until the moisture has evaporated.
What to do if there is television interference while you are watching a programme.
Depending on the reception conditions there may be interference to the television picture when you are watching a television programme and the device is switched on. This is not a malfunction of the device or television. Switch the device off if you want to watch a television programme.
Important: As soon as the devices are connected please read the basic setup on page 35.
Characteristics
DVD: A completely new dimension of video entertainment
- Subtitles can be displayed in up to 32 languages.
- The audio soundtrack can be heard in up to 8 languages.
- The multi-angle function makes it possible to select from the various viewing angles from which the scenes were filmed (this is limited to DVDs which were recorded using cameras from various viewing angles). The number of recorded languages depends on the DVD.
High Digital Sound Quality
- The digital output can be adapted to various types of signal for connection to various digital inputs.
- This device can play back music CDs in MP3 format.
Many Practical Functions
- Direct access to your favourite scenes (title / chapter / time / track search).
- Up to 20 scenes can be programmed into the memory [DVD only].
- Child protection mode prevents the playback of CDs which are not suitable for all age groups [DVD only].
Compatible with PAL DVD/VCD, NTSC DVD /VCD
- This device can play back CDs in PAL or NTSC format. However, the device must be connected to a television set that has a multisystem and can play back both PAL DVD/ VCD and NTSC DVD/ VCD. Use of a multisystem television set is recommended.
Compatible with Video CDs and Audio CDs as well as the DVD formats supported by the device.
This device can play back CDs with the following logos:
MP3
CD recorded in MP3 format

DVD (8 cm disc/12 cm disc)

VCD (8 cm disc/12 cm disc)

CD (8 cm disc/12 cm disc)

CDs recorded with JPEG files or as photo CDs
Selecting the Disc for the Connected Television Set
DVD CDs and video CDs contain recordings in the PAL and NTSC systems.
Please consult the table below in order to select the correct type of CD for your television set.
| Connected Television Set | Disc | Television Screen |
| Multisystem | PAL | Playback in the PAL system |
| NTSC | Playback in the NTSC system | |
| NTSC | PAL | There is no clear picture on the screen. |
| NTSC | Playback in the NTSC system | |
| PAL | PAL | Playback in the PAL system |
| NTSC | There is no clear picture on the screen. |
Produced under license from Dolby Laboratories.
"Dolby" and the double D symbol are trademarks of Dolby Laboratories.
Confidential unpublished works,
Copyright 1992-1997 Dolby Laboratories Inc.
All rights reserved.
This product is equipped with copyright protection technology which is itself protected by specific American patent claims and other intellectual copyrights in the possession of the Macrovision Corporation and other holders of rights. Use of this copyright protection technology is only permitted with the authorisation of the Macrovision Corporation and is limited to home and other restricted performance situations unless express approval is given by the Macrovision Corporation. Dismantling or disassembly of this protection technology is prohibited.
General Connection
- Turn all POWER (power on / off) switches on the player and the other devices to be connected to OFF before making the connection.
- Read thoroughly the instructions of the devices that you want to connect beforehand.
Connecting to Stereo Television Sets [A]
![CLATRONIC DVD 582 - Connecting to Stereo Television Sets [A] - 1](/content/2019/07/157803/images/e94dbab7135d64db3449939a0b6821655e6cceee8268d9eac8816eed8841bce0.jpg)
A
![CLATRONIC DVD 582 - Connecting to Stereo Television Sets [A] - 2](/content/2019/07/157803/images/5e48c63269f0103a316c82cf6fb29b448989541d066858e2873ad4a8f1429f96.jpg)
1 Television set (optional)
2 DVD player
3 Front audio output (red, white)
4 S-video cable (option 1)
5 To audio input connection (red, white)
6 To 21-pin scart connection input (TV)
7 To S-video input connection (option video 1)
8 AC power lead
9 Mains output (AC220-240, 50Hz)
10 21-pin scart connection to DVD player (option video 2)
11 To AV input connection (option video 3)
12 AV lead (optional) (option video 3)
13 Y, Pb/Cb, Pr/Cr output (video option 4)
14 To Y, Pb/Cb, Pr/Cr input of the television set (video option 4)
15 POWER (POWER ON / OFF) SWITCH
Note:
There are four possible ways to connect this DVD player:
Option 1: S-video.
Option 2: SCART to SCART.
Option 3: RCA-video output.
Option 4: Y, Pb/Cb, Pr/Cr
(This function can only be used if your television set is equipped with a P-SCAN or video component input). Only one of these possible connections should be used in order to avoid picture interference.
S-Video Output Connection
The S (separate) video output connection separates the colour (C) and brightness signals (Y) before they are passed to the television set in order to produce a sharper picture.
Please use an S-video cable if you connect the player to a television set with an S-video output connection in order to produce the sharpest picture possible.
Connecting to Single-Channel Television Sets [B]
![CLATRONIC DVD 582 - Connecting to Single-Channel Television Sets [B] - 1](/content/2019/07/157803/images/f76579a6a42854101a05230aa6e163fe8aa7f2ef5cc51a7fbc3147ae239adfd1.jpg)
B
![CLATRONIC DVD 582 - Connecting to Single-Channel Television Sets [B] - 2](/content/2019/07/157803/images/6334f8d625e58a25d8e7fd6c3a24d46116ffdc2d0fd068a8aa85f47a04954bb3.jpg)
1 Television set (to be connected)
2 DVD /CD player
3 21-pin scart connection
4 To television set input connection
5 To DVD output connection
Connecting to Audio Equipment [C]
![CLATRONIC DVD 582 - Connecting to Audio Equipment [C] - 1](/content/2019/07/157803/images/eb13747dfe6e094a8b90205c692d108042c7e992a133fca85cb28d6883d55b7c.jpg)
C
![CLATRONIC DVD 582 - Connecting to Audio Equipment [C] - 2](/content/2019/07/157803/images/4eb29cb7cf953719e16f465a10b861227ac1e709329ea393e89d568df22afe11.jpg)
1 Audio device (optional)
2 Television set (optional)
3 DVD / CD player
4 Audio (optional)
5 To audio input connections (red, white)
6 21-pin scart connection (see above [A])
Important:
- When DVDs are played back it is possible that the volume of the television set is lower than during television programmes, etc. In this case simply adjust the volume to the desired level.
- If the DVD / CD player is connected to a television set through a video recorder it is possible that with some DVDs the picture is not displayed correctly. Should this be the case, do not connect the player via a video recorder.
Please Note:
When the video outputs of the DVD player are connected to the TV set and the TV is functioning normally, please remove all other connections between the DVD player and the television set in order to prevent interference and ensure the quality of the television picture.
Digital Audio Connections
Connecting to a Decoder with Dolby Digital Processor or MPEG Processor A
In the case of DVDs recorded in Dolby Digital or MPEG Audio, the Dolby Digital bitstream or MPEG Audio bitstream is output by the COAX Digital Audio output connection of the device. If the player is connected to a Dolby Digital Decoder or MPEG Audio Decoder, you can enjoy cinema audio quality in your own home (a coax audio cable (not supplied) is required if you want to use an optional Dolby Digital Decoder or MPEG Audio Decoder.)
Information on the Audio Output of the Digital Coax Connector Output of the Device
| Disc | Sound Recording Format | Coax Digital Audio Output of the Connection |
| DVD | Dolby Digital | Dolby Digital bitstream (2-5,1ch) or PCM (2ch)(48kHz/16bit) |
| Linear PCM (48/96 kHz 16/20/24 Bit) | Linear PCM(2ch) only 48kHz sampling/16 Bit)*2 or no output*1 | |
| MPEG1 MPEG2 | MPEG2 audio bitstream or PCM(2ch)(16 Bit)*1 | |
| Video CD | MPEG1 | PCM (44.1 kHz sampling) |
| CD | Linear PMC | Linear PCM (44.1 kHz sampling) |
1 The type of audio output from the connection can be selected in the basic setup.
2 Sound with 96kHz sampling is converted to 48 kHz sampling when it is output via the digital coax output connection of the device.
For your Information:
- Dolby Digital is a Digital sound compression technique developed by the Dolby Laboratories Licensing Corporation
This technology supports 5.1-channel surround sound as well as stereo (2-channel) sound, whereby a high number of sound data can be efficiently recorded onto one CD. - Linear PCM is a signal recording format used for CDs. While CDs are recorded at 44.1 kHz / 16 bit, DVDs are recorded at between 48 kHz /16 bit and 96 kHz / 24 bit.
Precautions to be taken with the Digital Coax Audio Output Connector:
- Do not connect a digital output to an analogue amplifier input otherwise any attempt to play back DVDs could produce such a high sound level that your ears or loudspeakers could be damaged.
Preparing the Remote Control
Inserting the Batteries A
A
When inserting the batteries ensure that the (+) and (-) poles are correctly aligned as shown in the diagram.
Lifetime of the Batteries
- The batteries will normally last for approximately one year; however this depends on the frequency and type of use of the remote control.
- If the remote control does not work even if held close to the device, the batteries need to be replaced.
- Use batteries of size UM-3.
Important:
- Do not use any rechargeable (Ni-Cd) batteries.
- Do not try to recharge, short-circuit, disassemble or heat batteries or throw them into the fire.
- Do not drop the remote control or subject it to any other impacts. This could damage internal parts or result in malfunctions.
- Do not mix old and new batteries.
- If the remote control is not going to be used for a prolonged period, please remove the batteries. Otherwise electrolyte could leak out of the batteries, causing not only malfunctions, but also burns on contact with the body.
- Wipe off all electrolyte residues from the remote control and install new batteries.
- If your body should come into contact with electrolyte in any way, wipe it off carefully with water.
Please Note!
Old batteries should not be thrown into the domestic waste! Please return them to a place where they can be recycled or disposed of properly.
Operating Range of the Remote Control B
B
Hold the remote control at a distance of not more than approximately 7m from the remote control sensor and within an angle of approximately 60^ to the front of the device.
- The operating range may vary depending on the brightness of the room.
Important:
- Do not point any bright lamps at the remote control sensor
- Do not place any objects between the remote control and the remote control sensor.
- Do not use the remote control of this device while you are using the remote control of another device at the same time.
Playing Back Audio CDs
- Turn on the power switch. Then press the standby button followed by the OPEN/CLOSE button in order to open the CD compartment. Insert an audio CD with the label facing upwards into the CD compartment. Press the OPEN/CLOSE button again to close the CD compartment.
- The device reads the content of the CD and begins to play it back automatically.
- In order to read CD information such as the number of tracks and playing time on the television screen (OSD), press the DISPLAY button.
- Press the SKIP +/- buttons to select the previous or next track. You can also select a track directly using the number keys.
General Operation
Preparations
- Switch the television set ON and select "Video" as the input.
- Turn on the power switch of your stereo system if the player is connected to one.
- Turn on the power switch of your DVD player.
GeneralPlayback
- Press the standby button on the device.
- Press the OPEN / CLOSE button on the device or on the remote control in order to open the CD compartment.
Open
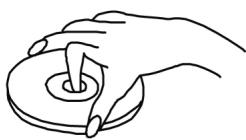
- Insert a CD into the CD compartment.
Hold the CD without touching either of the surfaces and insert it with the printed side facing upwards. Line up the CD with the guide mechanism and position it on the central hub.
(1) 8 ~cm CD
(2) 12 ~cm CD
- Press PLAY on the device or on the remote control.
Close

Loading
The CD compartment is closed automatically and playback begins.
- When the OPEN / CLOSE button is pressed the CD compartment closes.
- If you have inserted a DVD, playback begins automatically.
- If you have inserted a video CD / CD, you may need to press PLAY in order to start playback.
- If a menu appears on the television screen In the case of interactive DVDs or video CDs with playback control a menu appears on the television screen. With DVDs please use a CURSOR to make the desired selection and then press ENTER. For video CDs please use the NUMBER keys and then press ENTER.
- Press STANDBY on the remote control or on the device in order to switch the device from "On" to "Standby" or vice versa. When switched to standby the device still uses a little energy.
Please Note:
- The CD continues to turn while the menu is displayed even if the specific track has finished. If you do not wish to play back any further tracks, press the STOP button in order to make the menu disappear.
- If the CD is inserted upside down (and you have inserted a single-side CD), the letters "NO DISC" appear in the display.
For your Information:
If appears when a button is pressed, this means that the player or the CD does not allow this function.

StoppingPlayback
Press STOP
In order to facilitate operation for you:
In the case of DVDs and video CDs (without PBC) press STOP to turn the device to the Memory Stop Status. Then press PLAY to continue playback where you left off. Press STOP again to finish playback completely (some DVDs do not have the Memory Stop Status function). In the case of video CDs with PBC press the STOP button to finish playback completely. If the menu playback is switched off, operation is as for DVDs.
Skipping + or -
Skipping +
Press SKIP + during playback. The device skips forward one chapter (DVD) or one track (VCD/CD) every time this button is pressed.
Skipping -
Press SKIP - during playback. If the button is pressed once in the middle of the chapter/track, playback returns to the beginning of that chapter/track. If the button is pressed again, the device skips backwards by one chapter/track each time it is pressed.
For your Information:
If the SKIP - / + button is pressed while a video CD is being played, a menu is sometimes called up.
Fast Forward / Fast Rewind FWD / RWD
Press fast forward FAST FWD (▶▶) or fast rewind FAST RWD (▲▲) on the remote control or device during playback.
FR X2
FF X8
For your Information:
If the FAST FWD or FAST RWD button is pressed once the CD is played forwards or in reverse at double speed. If the button is pressed repeatedly the CD is played back at 4, 8, 16 and 32 times the normal speed. When pressed again, normal playback continues. Normal playback can be continued at any time by pressing the PLAY button.
Pause / Frame by Frame Picture
Pressing PAUSE / STEP during Playback.
II
1
For your Information:
During playback, pressing the PAUSE button interrupts playback temporarily. When the PAUSE button is pressed a second time the STEP function, i.e. frame by frame picture display, is activated. Each picture is shown one after the other. In order to return to normal playback, press the PLAY button.
MENU and TITLE
Pressing MENU or TITLE on the Remote Control
- DVDs are normally divided up into various titles which in turn are subdivided into chapters. Video CDs/CDs are divided up into tracks.
- CDs: Press TITLE on the remote control and the disc being played automatically returns to the title programme. To make your selection, press the CURSOR buttons on the remote control and confirm with the ENTER button. It is possible that some CDs do not support this function
- DVDs: Press the MENU button on the remote control and the disc being played automatically returns to the chapter menu. To select the chapter you want, press the CURSOR buttons on the remote control and confirm with the ENTER button in order to start playback.
- In the case of VCDs with PBC, pressing the MENU button switches the PBC menu on and off.
Changing the SUBTITLE Language [DVDs only]
- It is possible to change to another subtitle language if it is available (this can only be done with DVDs on which subtitles have been recorded in different languages). Press the SUBTITLE button on the remote control. Alternative subtitle languages appear each time
, , , is pressed (various DVDs have different displays.)
![CLATRONIC DVD 582 - Changing the SUBTITLE Language [DVDs only] - 1](/content/2019/07/157803/images/a902f93035256b51ce3e176afc41a1ac783eee3bfbf3dae696aa41dee51f01bd.jpg)
- If no subtitles have been recorded the symbol “ ” appears on the television screen.
For your Information:
If the power is switched on and off or the DVD removed, the subtitles appear the next time in the language selected in the basic setup of the DVD player. If this language does not exist on the DVD, the language included in the DVD factory setting appears.
Changing the Audio Soundtrack Language
- It is possible to change to another soundtrack language if this is available (this is only possible with DVDs on which soundtracks have been recorded in various languages.)
DVD:
Some DVDs have a multi-audio output function. Repeated pressing of the AUDIO button on the remote control selects the available audio sections.
If no audio soundtrack language has been recorded, the symbol “ ” appears on the television screen.
VCD/CD:
CDs: Repeated pressing of the AUDIO button on the remote control selects the available audio sections.

Changing the Viewing Angle (ANGLE) [DVDs only]
- Some DVDs contain scenes recorded simultaneously from a number of different angles. With such DVDs it is possible to view the same scene from each of these angles if the ANGLE button is pressed. The recorded viewing angles depend on the DVD that has been inserted.
- If the DVD contains multiple angles, the symbol " / " appears on the screen. If there are 3 angles for example, press the ANGLE button on the remote control to view all the angles that are available. The OSD shows 1/3 followed by 2/3 followed by 3/3 followed by 1/3 again etc.
![CLATRONIC DVD 582 - Changing the Viewing Angle (ANGLE) [DVDs only] - 1](/content/2019/07/157803/images/4348eaa35ccc4a0d162fa835143c1cc3973d73d9ff2483c7e2b5a018efc741b9.jpg)
If no multiple angles have been recorded the symbol "O appears in the display.
ON SCREEN DISPLAY
During playback, press the DISPLAY button on the remote control in order to display the following information:
- With DVDs the DISPLAY function brings up the following display:
Press the DISPLAY button in order to cancel the function.
- With VCDs (PBC OFF) & CDs the DISPLAY function brings up the following display:
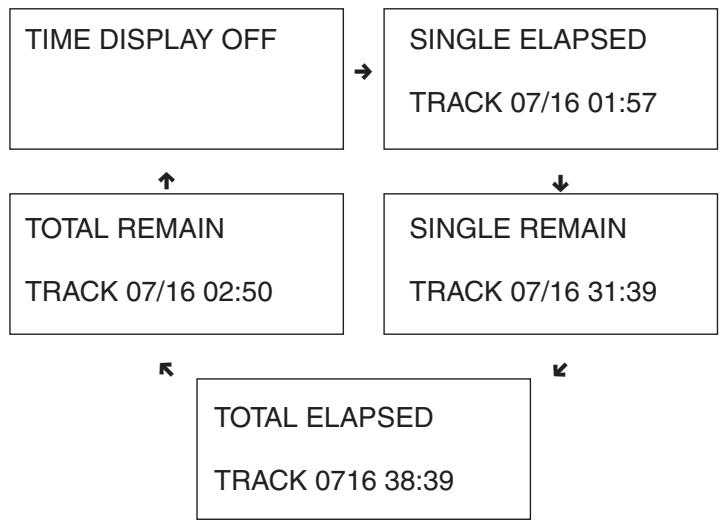
The playing time that has elapsed and the remaining time of the current programme
- With VCDs (PBC ON) the DISPLAY function brings up the following display:

RETURN
When the "RETURN" button is pressed on the remote control the main menu of the DVD is displayed. If the RETURN button is now pressed again, the DVD returns to the film sequence which was previously interrupted.
RANDOM
When this button is pressed the following appears on the screen:

When the RANDOM button is pressed, a chapter or track is played back in random order.
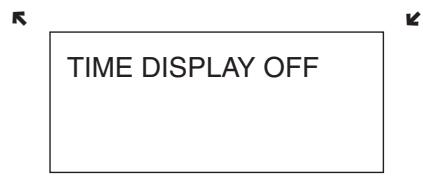
REPEAT Function
During DVD playback, press the REPEAT button several times in order to select whether you would like to repeat a chapter, a title or everything.

In the case of VCDs or CDs, by repeatedly pressing the REPEAT button you can repeat one track or all tracks.

Programming
DVDs
If you would like to play back a specific TITLE/SECTION, switch the device to the STOP mode and press the PROGRAM button on the remote control and then the keys of the numbers that you see on your television screen, such as:
PROGRAM: TT(01)/CH(01)
| 1. | TT 1 | CH 1 | 6. | TT _ | CH _ |
| 2. | TT _ | CH _ | 7. | TT _ | CH _ |
| 3. | TT _ | CH _ | 8. | TT _ | CH _ |
| 4. | TT _ | CH _ | 9. | TT _ | CH _ |
| 5. | TT _ | CH _ | 10. | TT _ | CH _ |
| EXIT | START | NEXT ▷ |
To select "START" you can use the CURSOR buttons and then press ENTER to start playback of the program.
VCDs/CDs
If the device is in the STOP mode and you would like to play back tracks 5, 6 and 3, for example, press the PROGRAM button on the remote control and then the 5, 6 and 3 number keys which you then see the on the television screen:
PROGRAM: TRACK (01-16)
| 1 | 5 | 6 | _ |
| 2 | 3 | 7 | _ |
| 3 | 6_ | 8 | _ |
| 4 | _ | 9 | _ |
| 5 | _ | 10 | _ |
| EXIT | START | NEXT ▷ |
To select "START" you can use the CURSOR buttons and then press ENTER to start playback of the program.
It is not possible to program MP3 tracks.
Repeat A-B Function (enables continuous repetition of specific sections of the disc)
- Press the A-B button on the remote control when the position has been reached from which playback is supposed to start. REPEAT A- appears in the display. Press the A-B button again when that point has been reached where playback should finish. REPEAT A-B SET appears in the display. The A-B segment now repeats the section continuously until the A-B button is pressed a third time.
GOTO Function
It is possible to put in a time, title or chapter number directly if you would like to perform a rapid search of the disc. The player will then begin playback from this position.
In the case of DVDs the following appears in the display when the GOTO button is pressed:-
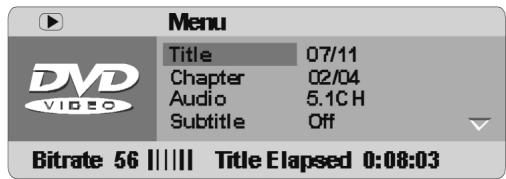
This menu provides you with the following information: The first line shows you the current title number and the total number of titles. The second line is the current chapter number and the total number of chapters. The third line shows the current status of the AUDIO function, while the bottom line shows the current status of the subtitle function.
Moving to a title or chapter.
For example, chapter 2 in title 6:
TITLE 06/06 CHAPTER 02/08
Press GOTO on the remote control and the screen shows the above menu. Use the cursor buttons to select the title line. Then press the ENTER button in order to select the TITLE. Press 06 to select title 6. If you would like to select the chapter, use the cursor buttons to select the chapter line and repeat the steps above.
With the cursor buttons it is also possible to call up the total title time and the total chapter time. If you would like to select a specific time, press the ENTER button and then enter the desired starting time using the number keys. By pressing the GOTO button again you can return to normal screen playback.
For VCDs (PBC OFF)
In the case of VCDs a similar menu appears when the GOTO button is pressed as for DVDs. Only the menu items are different. Using the cursor buttons you can select the tracks, disc time, track time, status of the REPEAT function or the status of the display. By pressing the ENTER button you can select the menu item that you would like to change. In the case of the times you can use the number keys to pre-select a time. The VCD is then played back from this point. By means of the other menu items you can use the cursor buttons to make various adjustments.
Your selection is confirmed using the ENTER button.
For CDs: When the GOTO button is pressed on the control of the following appears in the display:
DISC GO TO:
Press the GOTO button again and you will see the following:
TRACK
GO TO:
Press the GOTO button a third time and you will see the following:
SELECT TRACK:
/16
You can select the desired time or track using the number keys.
Picture ZOOM
Depending on the disc being played back, by repeatedly pressing the ZOOM button it is possible to enlarge the picture accordingly: ZOOM double size, ZOOM triple size, ZOOM quadruple size, ZOOM 1/2 size, ZOOM 1/3 size, ZOOM 1/4 size and ZOOM OFF.
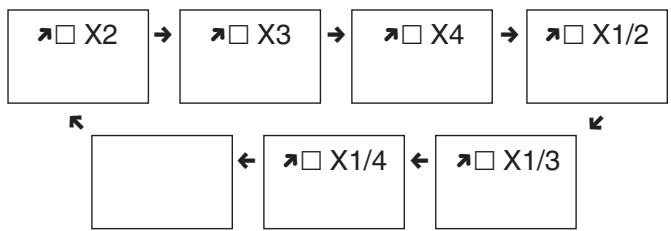
- In the ZOOM mode you can adjust the picture ideally using the CURSOR buttons
Adjusting the VOLUME
- Press the VOLUME + on the remote control in order to increase the volume. Press VOLUME - to reduce the volume.
VRMT
When this button is pressed the following appears:
The cursor buttons can be used to make your selection. Then use the ENTER button to confirm your selection.
P/I - Progressive Scan
Press this button to pre-select the P-SCAN or INTERLACE setting.
Please note:
If you pre-select the P-SCAN function in the TV settings of INTERLACE (PAL) television sets, the INTERLACE television set will not transmit the pictures. The pictures will disappear. You can press the P/I button again in order to return to the INTERLACE setup.
Please note that Progressive Scan can only be used via the Y, Pb/Cb, Pr/Cr output. Depending on the projector or television technology used, the quality of the pictures may fluctuate.
Playing back MP3 Files
This device is able to play back recordings made in MP3 format. Please follow the instructions below for correct operation:
- Press the "STANDBY" button (= ON) and then the "OPEN/CLOSE" button in order to open the drawer. Insert the CD with the MP3 recording with the label facing upwards. Press the "OPEN/CLOSE" button again to close the drawer. After a few seconds a menu will appear on the television screen showing all the albums/directions on the CD, as shown in the diagram:
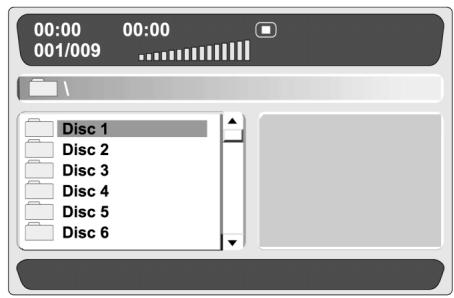
MENU 1
With the UP/DOWN cursor you can select the desired disc. If you select disc 1 the menu appears as follows:
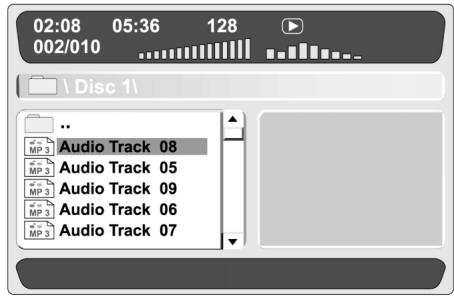
MENU2
In this menu you can select the desired track. In the first line some times are displayed: The elapsed time of the currently selected track and the total time of the track currently playing. The first line also shows the number 128; this is the bitrate of the track on the MP3. The second line is the track that you have selected on the disc. The third line shows the disc selected by you from among all the discs on the MP3. The final five lines show the name of the track.
- Press the left cursor button to return to menu 1 so that you can select the desired disc.
- Press the REPEAT button to skip through the play modes:

- Press the DISPLAY button and you will see the possible changes in Menu 2. In the first line of the menu the number 128 changes to Directory. In the second line the current playback mode is added. Press the DISPLAY button again in order to return to Menu 2.
- While a track is being played you can use the UP/DOWN button to select any desired track.
- It is also possible to use the fast forward and fast rewind buttons.
In MP3 mode it is not possible to program the order of tracks. The PROGRAM button only allows you to switch between the directory and file views.
Playing back JPEG and Kodak Picture CDs
Kodak Picture CDs
- Press the STANDBY button followed by the OPEN/CLOSE button in order to open the CD compartment. Insert the Kodak Picture CD with the label facing upwards. Press the OPEN/CLOSE button again to close the CD compartment.
- The device reads the contents of the CD and automatically begins to play back a slideshow.
- By pressing the STOP button you can change to a miniature view of the pictures.
- In this menu it is possible to use the cursor buttons.
- In order to confirm your selection please press the ENTER button.
JPEG CDs
- Press the STANDBY button followed by the OPEN/CLOSE button in order to open the CD compartment. Insert the JPEG CD with the label facing upwards. Press the OPEN/CLOSE button again to close the CD compartment.
- The device reads the contents of the CD and automatically starts a menu in which you can see the contents of the CD.
- In this menu you can use the cursor keys to select any desired directory or picture and confirm with the ENT-ER button.
- If you select a picture, a slideshow is started from this picture. Once the end of the slideshow has been reached, the device automatically returns to the start menu.
- If you press the STOP button during the slideshow you will see a miniature view of the pictures as with the Kodak Picture CD.
Basic Setup
When the basic setup has been entered the player can always be operated under the same conditions. The settings remain in the memory even when the power is switched off.
- The basic setup has to be entered in the setup mode, although the function can be set in any mode.
-
Using the setup menu you can adjust the playback mode or set various outputs etc.
-
If in the STOP or playback mode the SETUP button is pressed on the remote control, a display appears on the screen as shown in illustration 1. Press the SETUP button again in order to leave the setup menu and return to the television display.
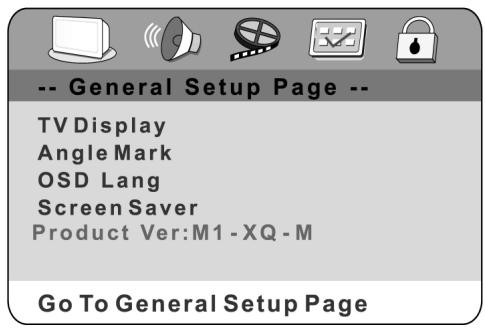
ILLUSTRATION 1
- Use the up/down cursor to select the desired menu item and then press the ENTER button. You should now see a display as shown in illustration 2. On each page of the menu the menu items are listed from left to right. Use the CURSOR button on the remote control to move through the options or to set them on the right-hand side. Then use the up/down CURSOR in the list of options and press the ENTER button to make your selection. Use the left CURSOR button to return to the left-hand side of the menu and carry out further changes.
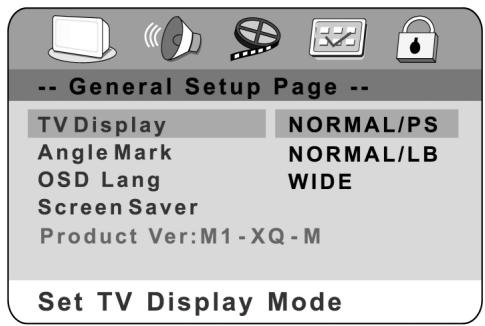
ILLUSTRATION 2
- Use the left/right CURSOR buttons to select the main settings page, the audio settings page, the video settings page, the preferences page or the page containing the password settings. If you see illustration 2 in the menu, you first have to press the left-hand cursor button to return to the menu as shown in illustration 1. Then use the right/left CURSOR to select the page of audio settings etc.
Please Note:
If you select the function in this menu, remarks on the function are shown at bottom left. If you select the preferences page, the DVD must be in the stop mode.
General Setup
Press for SETUP button on the remote control - the general setup page appears on the screen (= GENERAL SETUP PAGE). With the up/down CURSOR you can now select the television display, angle symbol, screen menu language andscreensaver (illustration 2).
Television Display
- NORMAL/PS - 4x3 Pan Scan When this setting is selected the picture fills the entire screen. However, part of the picture (particularly on the left-hand and right-hand sides) cannot be seen.
- NORMAL/LB - 4x3 "Letterbox"
- Select this setting if you would like to watch the film in the original format. You will now see the entire frame of the film, but this will take up less space on the screen.
- WIDE - 16x9 Wide Screen Select this setting if your DVD player is connected to a "wide screen" television set.
Angle Symbol
You can watch the DVD picture from various angles when this function is activated [however this is only possible if the DVD also supports this function].
OSD LANG
The "on-screen display" can be set to various languages
Screensaver
When the DVD player is not active (after approximately four minutes of inactivity) the screenshot may be activated to lengthen the service life of the TV monitor.
AUDIO Setup
Loudspeaker Setup
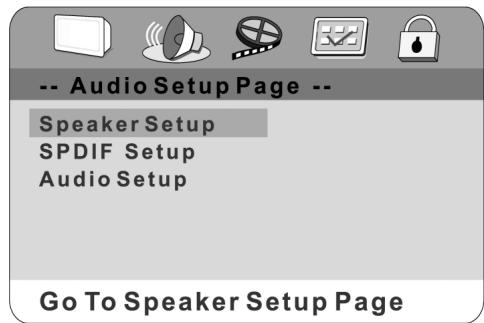
Press the UP/DOWN CURSOR in order to select items in the loudspeaker settings.
Downmixing
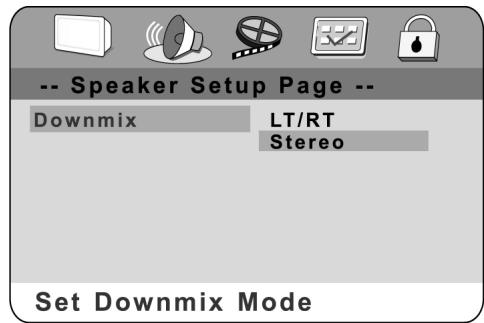
STEREO or LT/RT: If you have only two loudspeakers connected you should choose one of these options.
SPDIF OUTPUT
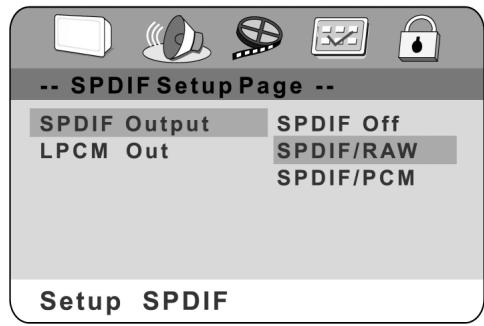
Press the left button to return to the audio setup page and then use the up/down cursor to select the SPDIF settings.
- OFF: The output display is pre-set to the "analogue" format. You should select this setting if you play back the CD on your DVD player via the right-hand and left-hand SPDIF OUTPUT sockets. When this function is selected there is no display from the coaxial port.
- SPDIF/RAW: Select this option if the DVD player is connected via the coaxial DIGITAL OUT port to an amplifier. The amplifier that is to be connected must have Dolby Digital decoding.
- SPDIF/PCM: Select this option if the DVD player is connected to a 2-channel Digital Modus or a stereo amplifier. During playback of a Dolby Digital or MPEG CD the output of the coaxial port is in PCM 2-channel format. These programmes have an uncompressed digital stereo soundtrack for improved sound quality. During playback it is possible to hear discreet stereo sound coming from the left and right loudspeakers at the front.
LPCM OUT
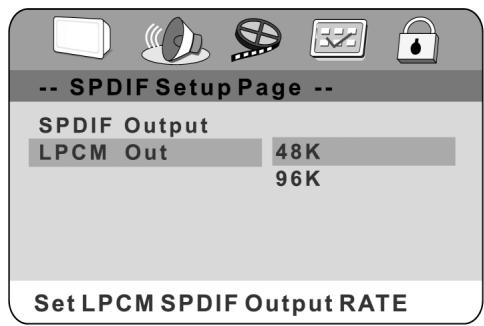
LPCM 48K:
In the linear PCM setting "48K" means that the maximum "Digital Output Sampling Rate" is 48 KHz. If the encoded sampling rate of the title track is 96 KHz the output is forcibly converted to 48 KHz.
LPCM 96K:
If "96K" has been selected the maximum output sampling rate is 96K and no enforced conversion takes place.
Dolby Digital Setup
DUAL MONO:
There are four modes available: STEREO, L-MONO, R-MONO and MIX-MONO.
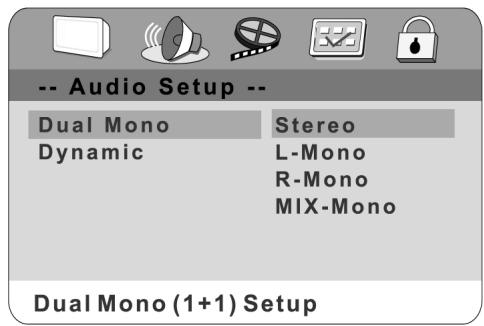
Description of the Audio Playback
| MODUS | Left Loudspeaker | Right Loudspeaker |
| STEREO | Stereo-l | Stereo-r |
| L-MONO | l-Mono | l-Mono |
| R-MONO | r-Mono | r-Mono |
| MIX-MONO | l-Mono + r-Mono | l-Mono + r-Mono |
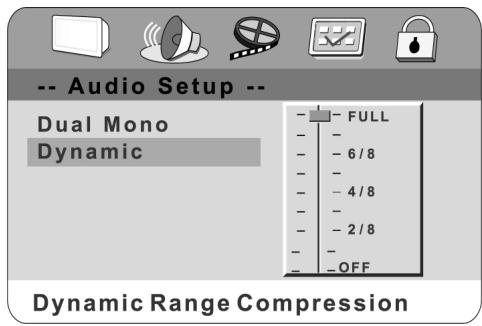
Dynamic:
This function makes it possible to change the dynamic sound output. The playback of loud noises (shots, explosions) is toned down, thus making it possible for you to watch your favourite film without disturbing others.
Video Setup
Components
In this display you have a choice of the following component signals OFF, YUV or RGB.
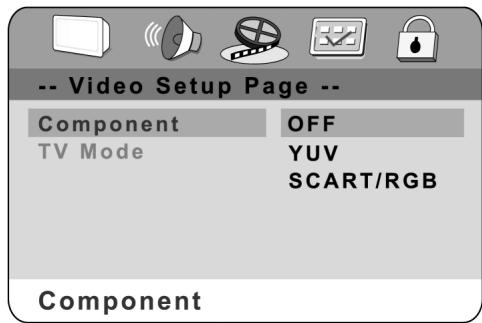
- Off:
The video frequency output has video and S-video.
YUV:
The video frequency output has video, S-video and YUV. In this function the TV mode is active. You may select INTERLACE or P-SCAN.
RGB:
The video frequency output has video, S-video and RGB.
Please Note:
If you pre-select the P-SCAN function when using an INTERLACE (PAL) television the INTERLACE television will not transmit pictures. The pictures will disappear. You can press the P/I button again in order to return to the INTERLACE setting.
Preferences Setup
The DVD player must be in the stop mode or the DVD disc drawer must be open in order for you to be able to call up the preferences menu. To put the player in the stop mode press the STOP button twice.
Type of Television System
Adjust the video output such that it corresponds to the television system to which the device is connected:
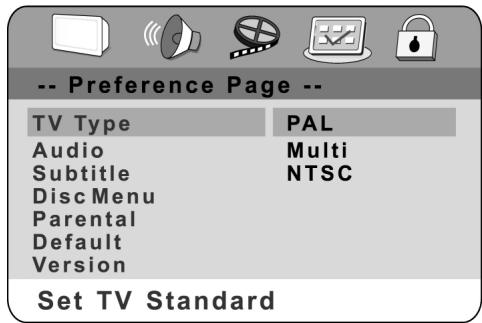
- If you are using a PAL television set, select the PAL output signal;
- If you are using an NTSC television, select the NTSC output signal;
- Select MULTI if your television set has a multisystem.
Please Note:
In order to produce the best DVD picture we recommend the use of a multisystem television for the playback of DVD films in the "MULTI" mode.
AUDIO/SUBTITLES/DISC MENU
The DVD player will show the AUDIO, subtitles or DISC MENU in your language. If the disc does not contain the language selected by you, the player will display the language on the CD which is included in the factory settings.
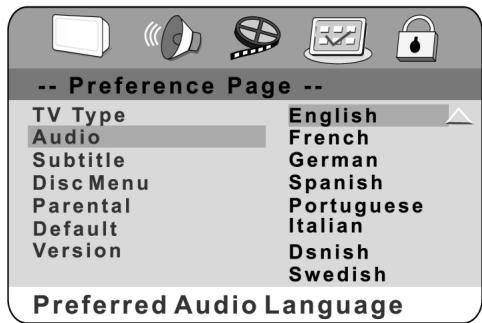
Please Note:
The audio and subtitle language depend on the languages available in the disc menu.
Blocking Function (Child Protection)
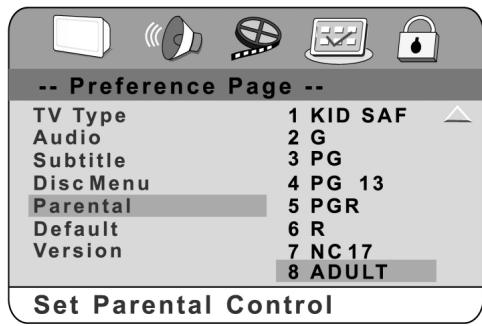
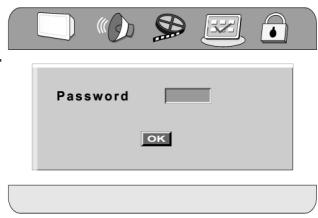
If one of the parental control functions is selected, the "password VERIFY PAGE" appears on the screen. If
the disc that is to be played back has been recorded with a blocking function, you can enter a minimal age depending on the classification of the disc or your own personal wishes. For example, PG-R has been selected: You will see an image as
shown on the right - enter the password in order to set up the blocking function. No DVDs can now be played back with a classification higher than PG-R. Parental control classifications are listed from a low to a high level. Children are the lowest level, parents the highest.
Factory Settings
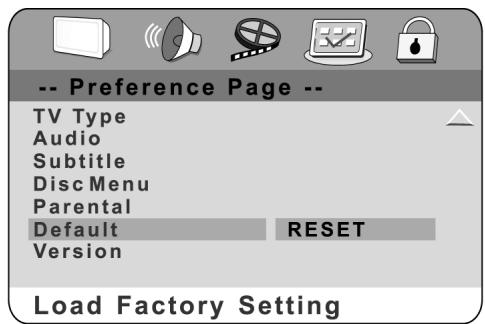
If you select RESET all functions are returned to the original factory settings of the device.
Version
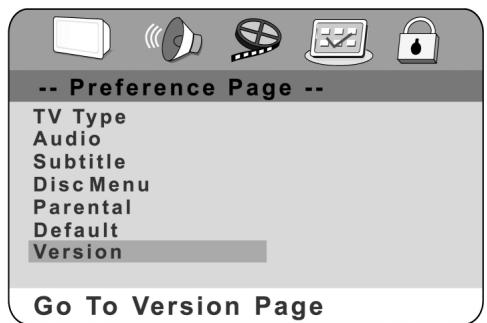
When this function is selected you will receive information on the versions.
Password
This should be selected to change the code. The screen shows that you first have to enter the old password and then the new one. The new password then has to be re-entered as confirmation.
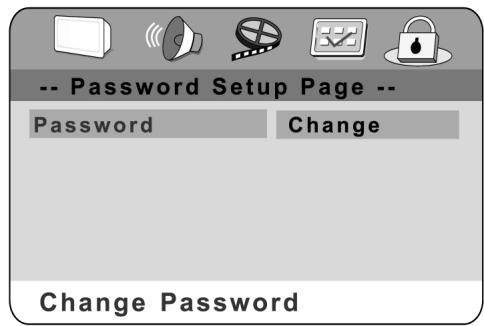
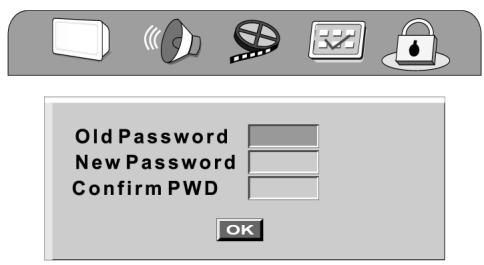


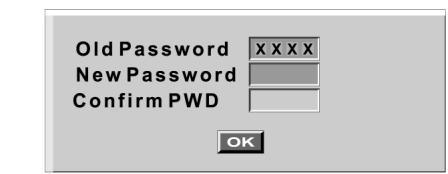
Note:
The original password is 0000 when the device is switched on for the first time.
For your Information:
How to Handle and Care for your CDs
Handling Precautions
- Hold the CD by the edges so that the surface is not covered in fingerprints.

Fingerprints, dirt and scratches may cause the CD to jump and distort the sound.
- Do not write on the label side with a ballpoint pen or other writing utensil.
- Do not use any record cleaning spray, petrol, diluting agent, antistatic fluid or any other kind of solvent.
- Please ensure that you do not bend or drop the CD.
- Never insert more than one CD into the CD compartment.
- Do not try to close the door if the CD has not been correctly inserted into the CD compartment.
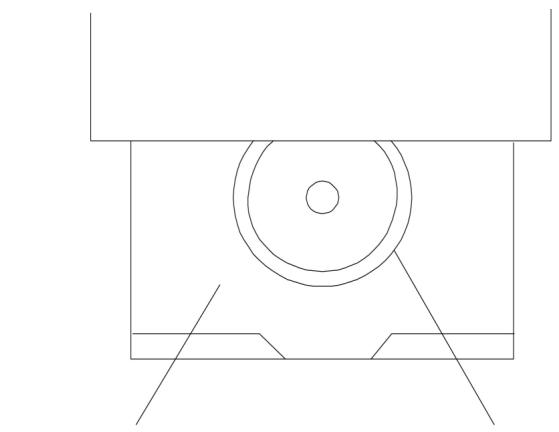

CD COMPARTMENT
CD
- Please make sure that you always store the CD in its original case when not being used.
If the Surface is Dirty
- Wipe the CD gently with a soft, moist (water only) cloth.
- When wiping CDs always move the cloth from the centre of the CD to the outer edge.

(If you wipe the CD in a circular manner you will cause circular scratches which will produce noises on the CD.)
- If a CD is moved from cold to warm surroundings it is possible that moisture will form on the CD. Wipe off the moisture with a soft, dry cloth that is free of fluff before inserting the CD.
Incorrect CD Storage
You may damage the CD if you store it in the following locations:
exposed to direct sunlight
- damp or dusty locations
- locations exposed to a direct source of heat or heating.
Maintenance
- Please ensure that before any maintenance is carried out the device is switched off and the plug removed from the power supply.
- Wipe the device with a dry, soft cloth. Should the surfaces become extremely dirty, please wipe them with a cloth that has been immersed in a weak soapy water solution and then wrung out before wiping off with a dry cloth.
- Never use alcohol, petrol, diluting agent, cleaning liquid or other chemicals. Do not use any compressed air to remove dust.
Troubleshooting
Before calling customer service if you have problems with this device, please search for the possible fault in the table below. With a few simple tests or minor adjustments you may be able to rectify the problem so that the device functions correctly again.
Symptom (frequent) Remedy
| No power | Insert the mains plug into the socket. |
| • No playback even if PLAY is pressed. •Playback begins but stops again immediately. | •Condensation has formed: Wait approx. 1 to 2 hours until the device has dried out. •The device can only play back the following media: DVDs, video CDs, CDs, MP3s and JPEGs. •The disc may be dirty and require cleaning. •Ensure that the disc has been inserted with the label facing upwards. |
| No picture. | •Ensure that the device is properly connected. •Ensure that the television is turned to "video". |
| •No sound. •Distorted sound. | •Ensure that the device is properly connected. •Ensure that the television and stereo system have been adjusted correctly. •Adjust the main volume via the remote control. |
| The picture is distorted during fast forward or fast rewind. | In this case the picture is sometimes a little distorted - this is normal. |
| No fast forward (or fast rewind) playback. | Some discs have sectors which do not allow fast forward (or reverse) playback. |
| No 4:3 (16:9) picture. | Select the correct setting corresponding to the characteristics of your television ("TV Aspects"). |
| No Surround Sound. | Select the correct setting under "Audio Output" corresponding to your stereo system. |
| No operation possible via the remote control. | •Check whether the batteries have been inserted with the correct polarity (+ and -). •The batteries are flat and must be replaced. •Point the remote control in the direction of the sensor on the device. •Do not use the remote control at a distance of more than 7 metres from the sensor |
| Buttons do not work (on the device and/or on the remote control). | •Remove any obstacles between the remote control and the sensor on the device. Switch the device off and then on again. Alternatively, switch the device off, remove the mains plug and re-insert it in the socket (it is possible that the device is not working due to external circumstances such as a thunderstorm or static electricity etc.). |
Symptom (frequent) Remedy
| Menu screen is not or only partially displayed on the television screen. | Select the corresponding type of screen according to the operating instructions of the television set. |
| No colour | Turn the TV type to the German colour norm PAL. Confirm the SETUP button to return to the menu. |
Symptom (DVD) Remedy
| Audio soundtrack and/or subtitle language is not the one selected in the basic setup. | If the audio soundtrack and/or subtitle language is not on the disc, the language selected in the basic settings cannot be heard or seen. |
| The display appears in French (for example). | The setting in the menus under "Disc Languages" is French. Select French. |
| No subtitles. | • Subtitles only appear on DVDs on which subtitles have been recorded. • Subtitles have been switched off from the television picture. Press the "SUBTITLE" button. |
| No alternative audio soundtrack (or subtitle) language is selected. | • No alternative language is selected on discs on which only one language has been recorded. • On some discs the alternative language cannot be selected with the AUDIO or SUBTITLE button. Try to select it from the DVD menu if there is one. |
| Angles cannot be changed. | This function depends on the availability of the software. Even if a DVD has been recorded from different angles, these may only be available for certain scenes (when the ANGLE symbol lights up on the device). |
Symptom Remedy (Video CD)
| There is no menu. | This function is only possible with video CDs with Playback Control. |
| VCD/ SVCD does not play back. | With the disc inserted, switch over the PBC function using the menu button. |
| CD-RWs do not play back. | CD-RWs must not be written with hard disc simulation tools such as Packed CD, In CD or similar programmes. |
| CD-Rs and CD-RWs do not play back, or only play back with errors. | The error rate of CD-R and CD-RW media depends on: • the media type • the writing program (possibly carry out an UPDATE) • the writer and its firmware (possibly carry out an UPDATE) • the writing speed (the lower the better) |
Definition of Terms
Angle
On some DVDs there are scenes that have been recorded simultaneously from a number of different viewing angles (the same scene from the front, the left, the right etc.). With such DVDs the ANGLE button can be pressed to see the scene from the various angles.
Chapter Number
These numbers are recorded on DVDs. A title is divided up into many sections, each of which has a number. Specific sections of the video presentation can be quickly found using these numbers.
DVD
This term refers to optical CDs of a high-density on which high-quality picture and sound recordings have been made using digital signals. Through the use of a new video compression technique (MPEG) and a high-density recording technique it is possible to record long and aesthetically pleasing videos on DVDs (for example, an entire feature film can be recorded). DVDs consist of two 0.6 mm-thin discs. The greater the density, the more information can be recorded. A DVD has a greater capacity than a single-side 1.2 mm-thick disc. The fact that two thin discs are combined means that at some time in the future it will be possible to have double-sided playback with even longer playback times.
PBC (Playback Control)
This is recorded on video CDs (version 2.0). The scenes or information can be seen (or heard) interactively via the television screen using the menu that appears on the screen.
Subtitles
These are printed lines of text that appear at the bottom of the screen and translate or explain the dialogue. Subtitles are recorded on DVDs.
Time Number
This shows the running time recorded on the DVD. If a DVD contains two or more films, the films are numbered as title 1, title 2, etc.
Track Number
This number refers to tracks recorded on video CDs and CDs. They make it possible to search for and find specific tracks (e.g. songs) very quickly
Video CD
Video CDs contain picture and sound recordings whose quality is comparable to a video cassette. This device also supports video CDs with Playback Control (version 2.0)
Technical Data
| Power supply: | AC 220-240V, 50Hz |
| Power consumption: | 25 W (approx. 3.5 W if the current is switched to OFF via the Power button or the remote control) |
| Signal system: | PAL/NTSC |
| Weight: | 3 Kg |
| Dimensions: | 430(B) x 265(D) x 52(H)mm (excluding projections) |
| Operating temperature range: | +5 bis +35°C |
| Operating | |
| humidity range: | 5 bis 90% (no condensation) |
Compatible Discs:
1. DVD-VIDEO CDs
12cm single side, single layer
12cm single side, double layer
12cm double side, double layer (one layer per side)
8cm single side, single layer
8cm single side, double layer
8cm double layer, double side (one layer per side)
2. Compact Discs (CD-DA,VIDEO CD)
12cm CDs
8cm CDs
S-Video Output:
Y output level: 1 Vp-p (75Ω)
C output level: 0,300 Vp-p (75Ω)(PAL)
0,286 Vp-p (75Ω)(NTSC)
Output connection: S connection (1 system)
Video Output:
Output level: 1 Vp-p (75Ω)
Output connection: Pin socket (2 systems)
Audio Output:
Output level: 2 Vrms (1kHz, 0dB)
Output connection: Pin socket
5,1ch mixed output: 1 system (2ch)
Audio Signal Output Characteristics:
| 1. Frequency response: DVD (linear audio): 4Hz-22kHz (48kHz sampling) CD audio: 4Hz-22kHz (96kHz sampling) 2Hz-20kHz (EIAJ) |
- Signal-to-noise ratio: CD audio: 115dB (EIAJ)
| 3. Dynamic range: DVD (linear audio): CD audio: | 102dB 99dB (EIAJ) |
- Total harmonic distortion: CD audio: 0,0025% (EIAJ)
Digital Audio Output:
Digital coax output: Pin socket
| Pickup: | Wavelength: 655nm Laser strength: CLASS 1 |
The technical data is provided without obligation and may change at any time without prior notice.
This device has been tested according to all relevant current CE guidelines,
such as electromagnetic compatibility and low voltage directives, and has been constructed in accordance with the latest safety regulations.
Subject to technical changes without prior notice!
Guarantee
The device supplied by our Company is covered by a 24 month guarantee starting on the date of purchase (receipt).
During the life of the guarantee any fault of the device or its accessories *) ascribable to material or manufacturing defects will be eliminated free of charge by repairing or, at our discretion, by replacing it. The guarantee services do not entail an extension of the life of the guarantee nor do they give rise to any right to a new guarantee!
Proof of the guarantee is provided by the proof of purchase. Without proof of purchase no free replacement or repair will be carried out.
For repairs or replacement during the life of the guarantee return the device in its original packing together with the proof of purchase to your dealer.
*) Damage to accessories does not mean automatic free replacement of the whole machine. In such cases please contact our hotline. Broken glass or breakage of plastic parts are always subject to a charge.
Defects to consumables or parts subject to wearing (e.g. motor pistons, kneading blades, drive shafts, spare remote control, spare toothbrushes, saw blades, etc.) as well as cleaning, maintenance or the replacement of said parts are not covered by the guarantee and hence are to be paid!
The guarantee lapses in case of unauthorized tampering.
After the expiry of the guarantee
After the expiry of the guarantee repairs can be carried by the competent dealer or repair service against the payment of the ensuing costs.
Spis tresci
Włączenia:
Copyright 1992 - 1997 Dolby Laboratories.