CDP 549 - CD Player CLATRONIC - Free user manual and instructions
Find the device manual for free CDP 549 CLATRONIC in PDF.

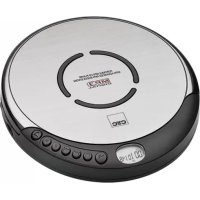
| Product type | Portable CD player |
| Brand | CLATRONIC |
| Model | CDP 549 |
| Power supply | 2 AA 1.5 V batteries (not included) or DC 4.5 V / 500 mA mains adapter (not included) |
| Dimensions (approx.) | 140 x 140 x 30 mm |
| Weight (approx.) | 300 g (without batteries) |
| Disc formats | Audio CD |
| Playback functions | Play, pause, stop, next, previous, fast search, repeat one track or whole disc, random play, intro (first 10 seconds), track programming |
| Anti-shock | ESP (15-second electronic buffer memory) enable/disable |
| Outputs | Headphone jack (PHONES) 3.5 mm, LINE-OUT jack, DC 4.5 V jack |
| Settings | Volume, BASS-BOOST (bass enhancement), key lock (HOLD ON/OFF) |
| Display | LCD screen showing track number, elapsed time, playback mode, battery status |
| Mains power | DC 4.5 V / 500 mA mains adapter (not supplied) |
| Battery power | 2 AA 1.5 V batteries (not supplied) |
| Power consumption | Low (battery or mains) |
| Maintenance and cleaning | Clean with a soft, dry cloth. Do not use solvents or abrasive products. |
| Safety | Class 1 laser; do not open the casing; avoid moisture; use only the recommended adapter |
| Spare parts and repairability | Batteries, mains adapter (not supplied), headphones; repair by an authorized professional |
| General information | 24-month warranty; compliance with European standards |
Frequently Asked Questions - CDP 549 CLATRONIC
User questions about CDP 549 CLATRONIC
0 question about this device. Answer the ones you know or ask your own.
Ask a new question about this device
Download the instructions for your CD Player in PDF format for free! Find your manual CDP 549 - CLATRONIC and take your electronic device back in hand. On this page are published all the documents necessary for the use of your device. CDP 549 by CLATRONIC.
USER MANUAL CDP 549 CLATRONIC
General safety instructions
GB
To avoid the risk of fire or an electric shock, you should not expose the device to rain or moisture. Consequently, do not use the device in the immediate vicinity of water - for example near a bath tub, a swimming pool or in a damp cellar.
Use the device only for the intended purpose.
Only connect the device at a properly installed plug socket. Pay attention that the specified voltage corresponds to the voltage of the plug socket. When using external mains supply, pay attention to the correct polarity and voltage. Always place the batteries in the correct direction.
Assemble the device in such a way that the available ventilation openings are not covered.
Never open the housing of the device. Incorrect repairs can constitute a considerable risk for the user. Should the device become damaged, in particular the mains supply cable, do not operate the device any longer, but rather have it repaired by an expert. Check the mains supply cable regularly for damage.
For safety reasons a broken or damaged mains lead may only be replaced by an equivalent lead from the manufacturer, our customer service department or a similar qualified person.
If the device is not used for a longer period, remove the plug connector from the plug socket or take out the batteries.
These symbols may be found on the machine and are intended to indicate the following:

The lightning symbol should advise the user of parts in the inside of the device which carry dangerously high voltage levels.

The symbol with an exclamation mark should advise the user of important operation or maintenance instructions in the accompanying documentation.

Devices bearing this symbol work with a „class 1 laser“ for tracing the CD. The built-in safety switches should prevent the user being exposed to dangerous laser light, which is invisible to the human eye, when the CD compartment is opened.
Under no circumstances should these safety switches be bypassed or manipulated, as this could result in a danger of exposure to the laser light.
GB
Commissioning the device
Battery Mode (not supplied)
- Open the battery compartment on the inside of the machine
- Insert 2 1.5V AA type batteries. Match the polarities correctly (see the inside of the battery compartment).
- If the device is not used for a long period of time, remove the batteries to avoid the „spilling“ of battery acid.
- A battery symbol in the display shows you the remaining capacity of the batteries that are inserted. Always change the battery set completely, do not change just one battery.
Warning: batteries are not to be disposed of together with domestic wastes. Dispose of the used batteries at the relevant collection bin or at your dealer's. Never throw batteries into the fire.
AC Adapter Mode (not supplied)
You can also use the device with an adapter.
- Insert the AC adapter into a duly installed 230V/50Hz protective contact outlet.
- Connect the CD player to the AC adapter by connecting the jack of the adapter into the 4.5V/DC socket.
- When using an adapter (4.5V DC/500 mA) match the polarities correctly as indicated on the CD player.
General Operating
BASS-BOOST: increases the bass sound.
VOLUME: is used to set the volume of the music.
LINE-OUT: for connection to a stereo system, for example.
4,5 V socket: for connecting a mains adapter.
PHONES: for connecting head- or earphones.
CHARGE: This switch is located on the inside of your machine. The charging function is activated when connected to an external mains line. Make sure that there are no batteries in the battery compartment. Danger of explosion! Use only appropriate rechargeable batteries!
HOLD ON/OFF: key block protecting against the accidental pressing of keys.
Switching off
You can switch the device off by pressing the STOP button once, or twice if the CD is playing. The CD player also switches off automatically if the STOP button is pressed and the player is not operated for a further 30 seconds.
Playing CDs
- Shift the OPEN key to the right to open the CD compartment.
- Insert a CD with the label facing upwards and press carefully over the button until it snaps into place. Close the CD compartment.
- Press the PLAY/PAUSE button to start the playback. "--" appears in the display, i.e. number of tracks and the total running time.. The CD starts from the first track. The track currently being played and the time that has elapsed are shown in the display.
- To remove a CD, press the STOP key, open the CD deck with the OPEN key and take out the CD carefully.
Always keep the CD deck cover closed.
Description of the CD buttons:
PLAY/PAUSE: You can briefly interrupt the playing. Renewed pressing of the button will re-start the playing from the same place.
PREV: Press once = This starts the current track again from the beginning.
Press a second time = This jumps back to the previous track.
Press a third time = This plays the song before etc. If the button is kept pressed down, the machine starts to search through the tracks.
NEXT: With this button you can jump to the following track or the next track but one etc. If the button is kept pressed down, the machine starts to search through the tracks.
STOP: The CD is stopped. By pressing once again, the unit is switched off.
ESP: It fills the 15-second electronic memory to protect against the jumping of the CD.. This fills the electronic 15-second memory in order to prevent the CD from jumping. After the player has been switched on this appears in the display to show that the anti-shock function has been activated and the memory is being charged. Press the ESP button if you want to deactivate this function.
MODE: The following functions can be selected with the MODE key:
Press once = 1: the current track is repeated continuously;
Press a second time =_, ALL": the whole CD is played continuously;
Press a third time = ,INTRO"; Then press the PLAY/PAUSE button and all tracks are played for 10 seconds.
GB
Press a fourth time = The word "SHUFF" flashes in the display. All the tracks are played one after other at random. Press a fifth time = all the functions are reset. The normal play mode is resumed.
Programmed Play
- Press the STOP key
- Press the PROG key.
- PROG and "00" (track number) flashes on the display. The memory slot number can be seen on the right.
- Select the desired track with the PREV/NEXT button and press the PROG key again.
- The display changes to memory slot 02.
- Select the next track with the PREV/NEXT key and press the PROG key again. Repeat the procedure until all the desired tracks are selected.
- Press the PLAY/PAUSE key. The playback starts. Press this button to pause briefly the playback.
- Press once the STOP key to stop the playback while retaining the program.
- To resume the playback of the program press first the PROG key once and then the PLAY/PAUSE key.
- To delete the program, press the STOP key twice.
The device stops automatically once the entire sequence of programmed tracks is completed. The programmed sequence remains in the memory until the CD is taken out of the CD deck or until the device is switched off. In order to play the preprogrammed order of tracks again, press the PROG button and then start the player.
It is possible to combine the pre-programmed tracks with the MODE function. After you have programmed the tracks and started the machine, please press the MODE button up to three times so that the functions 1^ , ALL^ and INTRO^ can be used as described in the section entitled "MODE".
This device has been tested according to all relevant current CE guidelines, such as electromagnetic compatibility and low voltage directives, and has been constructed in accordance with the latest safety regulations.
Subject to technical changes without prior notice!
Guarantee
The device supplied by our Company is covered by a 24 month guarantee starting on the date of purchase (receipt).
During the life of the guarantee any fault of the device or its accessories *) ascribable to material or manufacturing defects will be eliminated free of charge by repairing or, at our discretion, by replacing it. The guarantee services do not entail an extension of the life of the guarantee nor do they give rise to any right to a new guarantee!
Proof of the guarantee is provided by the proof of purchase. Without proof of purchase no free replacement or repair will be carried out.
For repairs or replacement during the life of the guarantee return the device in its original packing together with the proof of purchase to your dealer.
*) Damage to accessories does not mean automatic free replacement of the whole machine. In such cases please contact our hotline. Broken glass or breakage of plastic parts are always subject to a charge.
Defects to consumables or parts subject to wearing (e.g. motor pistons, kneading blades, drive shafts, spare remote control, spare toothbrushes, saw blades, etc.) as well as cleaning, maintenance or the replacement of said parts are not covered by the guarantee and hence are to be paid!
The guarantee lapses in case of unauthorized tampering.
After the expiry of the guarantee
After the expiry of the guarantee repairs can be carried by the competent dealer or repair service against the payment of the ensuing costs.