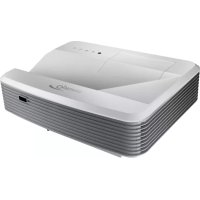
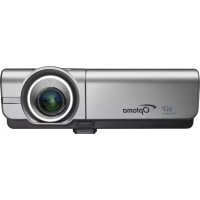
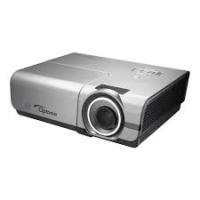
PT100 - Projector OPTOMA - Free user manual and instructions
Find the device manual for free PT100 OPTOMA in PDF.
User questions about PT100 OPTOMA
0 question about this device. Answer the ones you know or ask your own.
Ask a new question about this device
Download the instructions for your Projector in PDF format for free! Find your manual PT100 - OPTOMA and take your electronic device back in hand. On this page are published all the documents necessary for the use of your device. PT100 by OPTOMA.
USER MANUAL PT100 OPTOMA
Important Safety Instructions GB2-3
Your Projector GB-4
About Your Projector GB-4
Connecting Your Projector GB4-5
Connecting a Computer GB-5
Connecting a DVD Player GB-5
Using Your Projection GB6-11
Turning Your Projector ON GB-6
Turning Your Projector OFF GB-6
Adjusting the Projector Focus GB-6
Adjusting Projection Image Size GB-7
Adjusting the Angle GB-7
Using the Control Panel GB-8
Using the On-Screen Display GB-8
Menu Operation GB9-11
Audio GB-11
Troubleshooting Your Projector GB-12
PACKAGE CONTENTS
Your projector comes with all the items shown below. Ensure that you have all the items.
- Composite Video Cable
- AC Adapter
- User's guide
- Supplementary Information
Registered trademark:
DLP^ and the DLP logo are registered trademarks of Texas Instruments
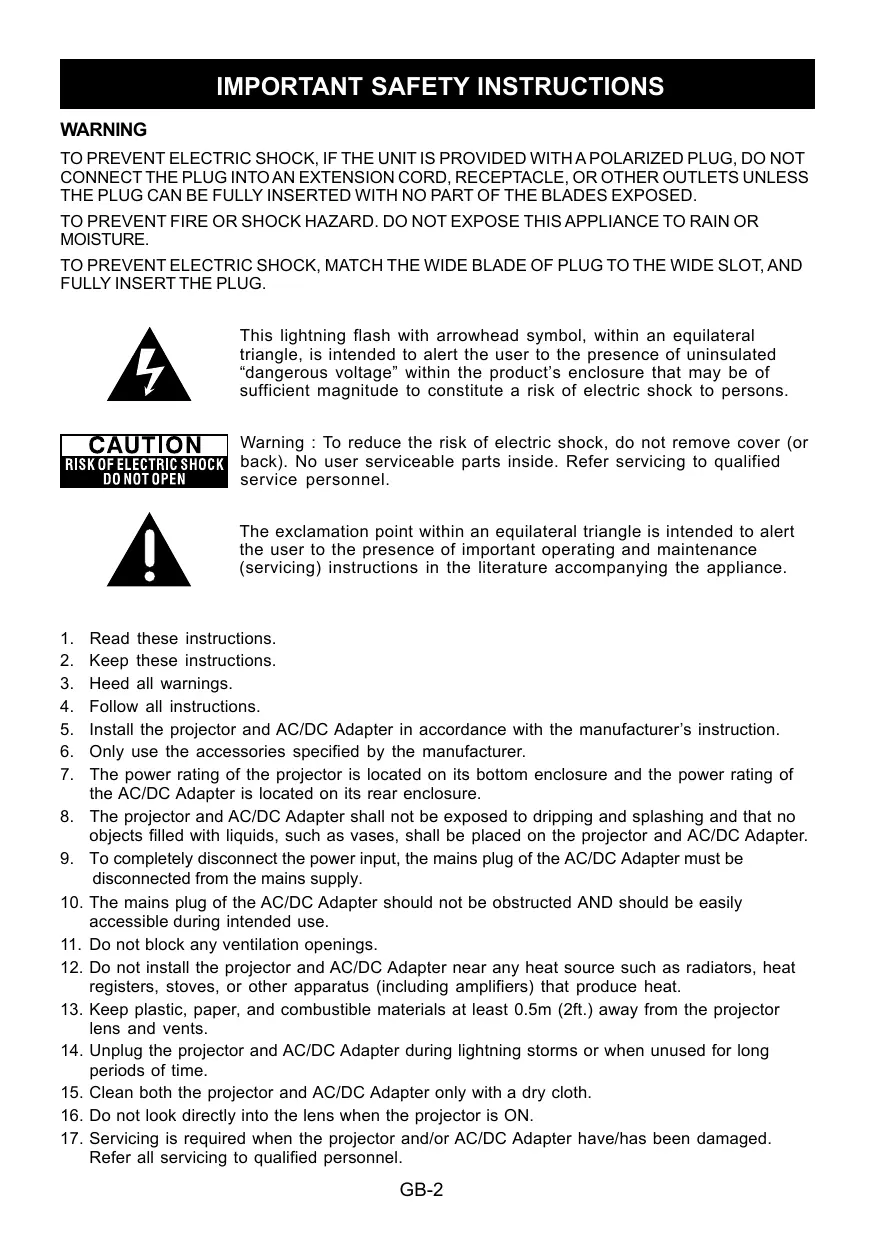
IMPORTANT SAFETY INSTRUCTIONS
WARNING
TO PREVENT ELECTRIC SHOCK, IF THE UNIT IS PROVIDED WITH A POLARIZED PLUG, DO NOT CONNECT THE PLUG INTO AN EXTENSION CORD, RECEPTACLE, OR OTHER OUTLETS UNLESS THE PLUG CAN BE FULLY INSERTED WITH NO PART OF THE BLADES EXPOSED.
TO PREVENT FIRE OR SHOCK HAZARD. DO NOT EXPOSE THIS APPLIANCE TO RAIN OR MOISTURE.
TO PREVENT ELECTRIC SHOCK, MATCH THE WIDE BLADE OF PLUG TO THE WIDE SLOT, AND FULLY INSERT THE PLUG.
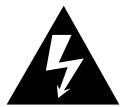
This lightning flash with arrowhead symbol, within an equilateral triangle, is intended to alert the user to the presence of uninsulated "dangerous voltage" within the product's enclosure that may be of sufficient magnitude to constitute a risk of electric shock to persons.

Warning : To reduce the risk of electric shock, do not remove cover (or back). No user serviceable parts inside. Refer servicing to qualified service personnel.

The exclamation point within an equilateral triangle is intended to alert the user to the presence of important operating and maintenance (servicing) instructions in the literature accompanying the appliance.
- Read these instructions.
- Keep these instructions.
- Heed all warnings.
- Follow all instructions.
- Install the projector and AC/DC Adapter in accordance with the manufacturer's instruction.
- Only use the accessories specified by the manufacturer.
- The power rating of the projector is located on its bottom enclosure and the power rating of the AC/DC Adapter is located on its rear enclosure.
- The projector and AC/DC Adapter shall not be exposed to dripping and splashing and that no objects filled with liquids, such as vases, shall be placed on the projector and AC/DC Adapter.
- To completely disconnect the power input, the mains plug of the AC/DC Adapter must be disconnected from the mains supply.
- The mains plug of the AC/DC Adapter should not be obstructed AND should be easily accessible during intended use.
- Do not block any ventilation openings.
- Do not install the projector and AC/DC Adapter near any heat source such as radiators, heat registers, stoves, or other apparatus (including amplifiers) that produce heat.
- Keep plastic, paper, and combustible materials at least 0.5m (2ft.) away from the projector lens and vents.
- Unplug the projector and AC/DC Adapter during lightning storms or when unused for long periods of time.
- Clean both the projector and AC/DC Adapter only with a dry cloth.
- Do not look directly into the lens when the projector is ON.
- Servicing is required when the projector and/or AC/DC Adapter have/has been damaged. Refer all servicing to qualified personnel.

INFORMATION TO USER
FCC statement:
This device complies with Part 15 of the FCC Rules. Operation is subject to the following two conditions: (1) This device may not cause harmful interference, and (2) This device must accept any interference received, including interference that may cause undesired operation.
Warning:
Changes and modifications to this unit not expressly approved by the party responsible for compliance could void the user's authority to operate the equipment.
NOTE:
This equipment has been tested and found to comply with the limits for a Class B digital device, pursuant to Part 15 of the FCC Rules. These limits are designed to provide reasonable protection against harmful interference in a residential installation. This equipment generates, uses and can radiate radio frequency energy and, if not installed and used in accordance with the instructions, may cause harmful interference to radio communications. However, there is no guarantee that interference will not occur in a particular installation. If this equipment does cause harmful interference to radio or television, which can be determined by turning the equipment OFF and the user is encouraged to try to correct the interference by one or more of the following measures :
- Reorient or relocate the receiving antenna.
- Increase the separation between the equipment and receiver.
- Connect the equipment into an outlet on a circuit different from that to which the receiver is connected.
- Consult the dealer or an experienced radio / TV technician for help.
IC statement:
This class B digital apparatus complies with Canadian ICES-003.
About Your Projector
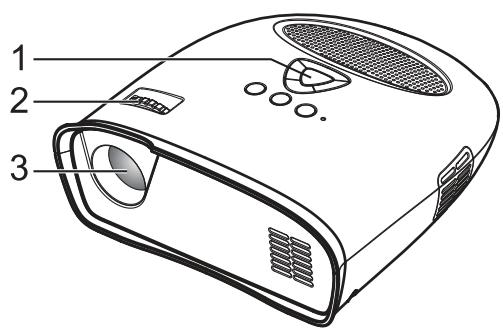
- Control panel
- Focus Ring
- Lens
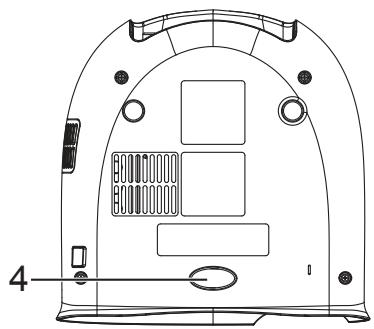
- Adjustable foot
CAUTION: Safety Instructions
- Do not use the projector near appliances that generate a lot of heat.
- Do not use the projector in areas where there is an excessive amount of dust. The dust may cause the system to fail and the projector will automatically shutdown.
- Ensure that the projector is placed in a well-ventilated area.
- Do not block the ventilation slots and openings on the projector.
- Ensure the projector operates between ambient temperatures (5^ to 35^)
- Do not operation or store the projector in areas of high humidity.
CONNECTING YOUR PROJECTOR
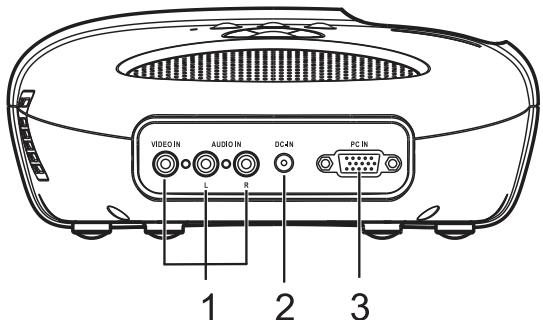
- Composite Video/Audio Input Connector
- DC Jack
- PC Input Connector
CAUTION:
Before you begin any of the procedures in this section, follow the Safety Instructions as described on pages 2 and 3.
CONNECTING YOUR PROJECTOR
Connecting a Computer
Connecting a Computer using a VGA Cable
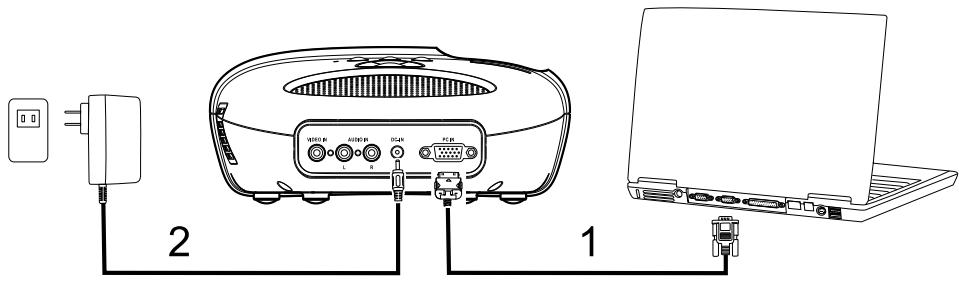
- VGA Cable
- AC Adapter
Connecting a DVD Player
Connecting a DVD Player using a Composite Video Cable
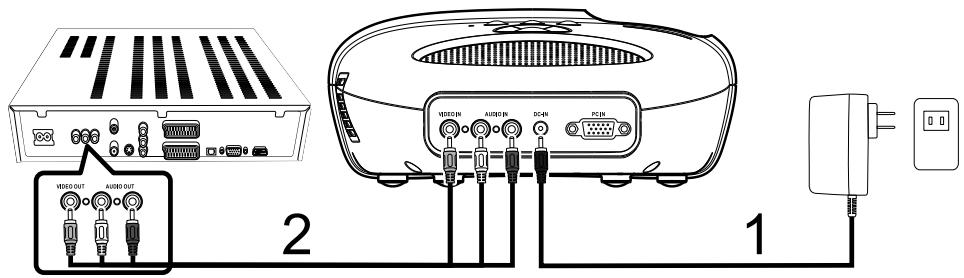
- AC Adapter
- Composite Video Cable
USING YOUR PROJECTOR
Turning Your Projector ON
NOTE : Turn ON the projector before you turn ON the image source.
- Connect the Composite Video Cable, or VGA Cable into the projector.
- Connect Composite Video Cable, or VGA Cable to the image sources.
- Press the POWER ON/OFF Button (see "Using Your Projector" on page 8 to locate the POWER ON/OFF Button).
- Turn ON your image source (computer, DVD player, etc.).
- If the source is different from the previously used source, please use the SOURCE Button to choose the source you would like to display.
(Note: DLP Projector factory default selection is composite video source).
If a Composite Video or PC VGA "Source not found" message appears on the screen, ensure that the appropriate cables are securely connected.
If you have multiple image sources connected to the projector, press the SOURCE Button on the control panel to select the desired image source.
Turning Your Projector OFF
NOTE : Unplug the projector after properly shutting down as explained in the following procedure.
- Press the POWER ON/OFF Button.
- The cooling fans continue to operate for a few seconds.
- Disconnect the AC Adapter.
- Disconnect any Composite Video or PC VGA Input Cables from the projector.
Adjusting the Projector Focus
- Rotate the Focus Ring until the image is clear. The projector focuses at distances ranging between 24" to 144" (60 cm to 366 cm).
- Move the projector forward or backward to zoom in and out.
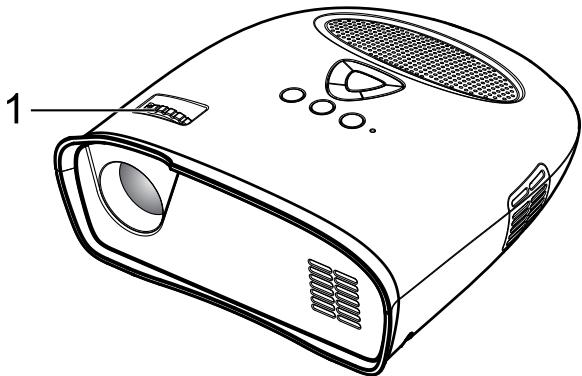
- Focus Ring
Adjusting Projection Image Size
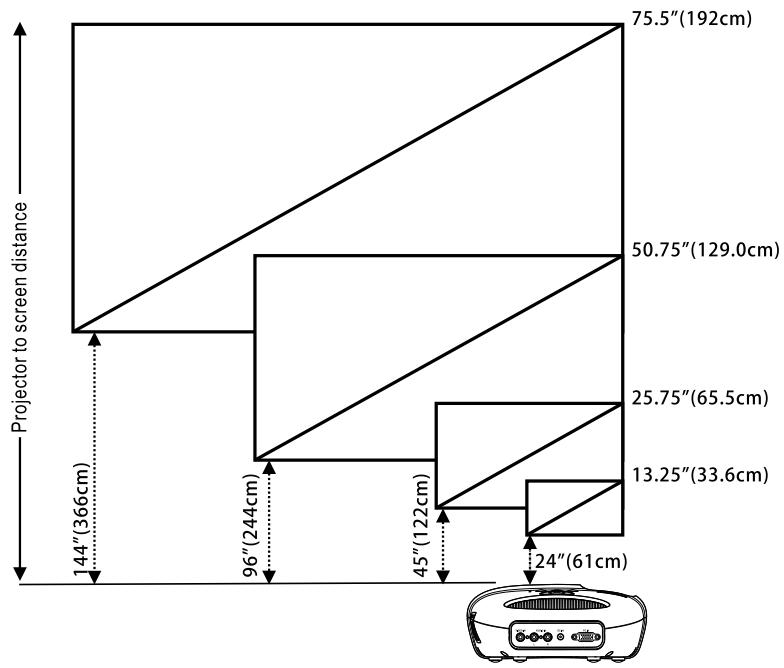
| Distance | Width | Height | Diagonal |
| 24"(61cm) | 11"=29.3cm | 6.5"=16.5cm | 13.25"=33.6cm |
| 45"(122cm) | 22.5"=57.0cm | 12.5"=32.0cm | 25.75"=65.5cm |
| 96"(244cm) | 42.25"=112.4cm | 24.5"=62.5cm | 50.75"=129.0cm |
| 144"(366cm) | 66"=168.0cm | 37"=94cm | 75.5"=192cm |
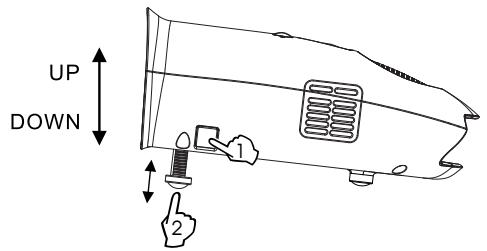
Adjusting the Angle
The one front foot is adjustable by pressing and releasing the side key (1), the foot (2) in order to tilt the projected image up or down.
Using the Control Panel
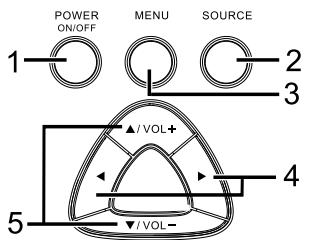
- POWER ON/OFF - Turn the projector on and off. For more information, see "Turning Your Projector On" and "Turning Your Projector Off" on page 6.
- SOURCE - Press to toggle through PC input (VGA) and composite sources.
- MENU - Press to activate the On Screen Display (OSD).
- , - Press to select OSD items when the OSD Menu is active after activate OSD.
- / VOL+ , / VOL- . Press to adjust the OSD setting under the displayed OSD menu when the OSD Menu is active. Press to increase/decrease the volume level when the OSD Menu is not active.
Using the On-Screen Display
The projector has an On-Screen Display (OSD) that can be displayed by pressing the MENU Button with or without an Image Source.
To navigate through the tabs in the Main Menu, press the or Button on the control panel.
To select an option, press the / VOL+ or / VOL- Button on the control panel. When an item is selected, the item name changes from grey text to black text.
USING YOUR PROJECTOR
Menu operation
Press MENU Button to see the top level menu.
Use and Buttons to select Image Preference, Image Size, Image Orientation, Input Source, or Language Menu.
Image Preferences Menu
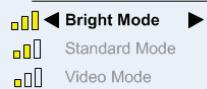
Image Preferences

Image Preferences
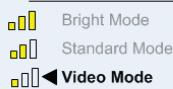
Image Preferences
Use / VOL+ and / VOL- Buttons to select Bright Mode, Standard Mode, Video Mode.
BRIGHT - Select when viewing images in a well lit room.
STANDARD - Select when connected to XBOX 360 / PS2 / PS3 / Wii or when viewing images from a computer.
VIDEO - Select when viewing images of which brightness should be kept relatively low, such as movies and music performance.
Image Size Menu

Image Size
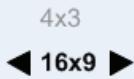
Image Size
Use / VOL+ and / VOL- Buttons to select 4 × 3 Size, and 16 × 9 Size.
4 x 3 - Select when viewing images intended to be displayed with 4:3 aspect ratio.
16 x 9 - Select when viewing images intended to be displayed with 16:9 aspect ratio, or to have PC VGA images fill entire screen (Factory default setting for Composite Video & PC VGA).
Image Orientation Menu
Image Orientation
R<\n>Front Projection
Short Edge Flip
B Long Edge Flip
Short+Long Edge Flip
Image Orientation
Use / VOL+ and / VOL- Buttons to select Front Projection, Short Edge Flip, Long Edge Flip, Short+Long Edge Flip, so that the image will be flipped in the same way as the letter "R" next to each option shows. (Factory default is Front Projection)
USING YOUR PROJECTOR
Input Source Menu
Input Source

Composite Video

PC VGA/
Component Video
Input Source

Composite Video

PC VGA/
Component Video
Use / VOL+ and / VOL- Buttons to select Composite Video or PC (VGA) Input. (Factory default is composite video)
Composite Video On Screen Display(OSD)

Composite Video
After composite video source is connected, "Composite Video OSD" may continue to display for few seconds, until source detection is finished, and composite video image appears on the screen.

Composite Video
Source Not Found
If composite video is not detected "Composite Video Source Not Found OSD" will appear. If this happens, please check that composite video source is plugged in and turned ON.
PC VGA On Screen Display(OSD)

PC VGA
After PC VGA source is connected, "PC VGA OSD" may continue to display for few seconds, until source detection is finished, and PC VGA image is appears on the screen.

PC VGA/
Component Video
Source Not Found
If PC VGA is not detected "PC VGA Source Not Found OSD" will appear.
If this happens please check PC VGA Source is plugged in and that resolution is set to 640 x 480 @ 60 Hz or 800 x 600 @ 60 Hz or 1024 x 768 @ 60 Hz.
If PC VGA source is Apple™ PC then resolution should be set to 1024 x 768 @ 60 Hz.
USING YOUR PROJECTOR
Language menu

Use VOL+ and VOL- buttons to select language, English, Franks, Deutsche, Nederlands, Espanol.
Audio
Use / VOL+ or / VOL- Buttons to change the volume from the speaker, and Volume bar icons will be displayed for a short time when this is done. If the volume is reduced to minimum then Mute icon will be displayed for a short time.

Reset to Factory Default Settings
and Buttons pressed simultaneously will set the projector settings to factory defaults.
TROUBLESHOOTING YOUR PROJECTOR
If you experience problems with your projector, see the following troubleshooting tips.
Problem-Possible Solution
| No image appears on the screen | Ensure that the external graphics port is enabled if you are using a portable computer. Ensure that all the cables are securely connected. See on page 5. Ensure that the pins of the connectors are not bent or broken. |
| Partial, scrolling, or incorrectly displayed image | Right-click the unused portion of your Windows desktop, click Properties and then select Settings tab. Verify the setting is 640 x 480, or 800 x 600, or 1024 x 768 pixels for the external monitor port. If you experience difficulty in changing resolutions or your monitor freezes, restart all the equipments and the projector. If problem persists, upgrade your computer graphic card driver (video driver) to its latest version and test again with projector. |
| Image is out of focus | Adjust the Focus Ring on the projector lens. Ensure that the projection screen is within the required distance from the projector (24" [60 cm] to 144" [366 cm]). |
| The image is stretched | Please adjust Image Size Menu setting to correct aspect ratio for the source video being displayed. |
| Projector stops | The projector has overheated. Turn the display on again after the projector cools down. If the problem persists, contact customer service. |
| Fan stops then projector stops | A projector fan has failed and the projector will automatically shutdown. If the problem persists, contact customer service. |
INHoud
| Distancia | Ancho | Altura | Diagonal |
| 24" (61 cm) | 11" = 29,3 cm | 6,5" = 16,5 cm | 13,25" = 33,6 cm |
| 45" (122 cm) | 22,5" = 57,0 cm | 12,5" = 32,0 cm | 25,75" = 65,5 cm |
| 96" (244 cm) | 42,25" = 112,4 cm | 24,5" = 62,5 cm | 50,75" = 129,0 cm |
| 144" (366 cm) | 66" = 168,0 cm | 37" = 94 cm | 75,5" = 192 cm |
Ajuste del ángulo
Optoma Technology, Inc.
3178 Laurelview Court
Fremont CA 94538
U.S.A.
Phone: (1) (888) 289 6786
Optoma Europe Ltd
42 Caxton Way,
Watford Business Park
Watford, Herts
WD18 8QZ
U.K.
Phone: +44-1923-691-800