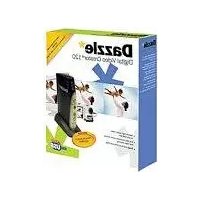
MOVIEBOX USB - Video Capture Card PINNACLE - Free user manual and instructions
Find the device manual for free MOVIEBOX USB PINNACLE in PDF.
User questions about MOVIEBOX USB PINNACLE
0 question about this device. Answer the ones you know or ask your own.
Ask a new question about this device
Download the instructions for your Video Capture Card in PDF format for free! Find your manual MOVIEBOX USB - PINNACLE and take your electronic device back in hand. On this page are published all the documents necessary for the use of your device. MOVIEBOX USB by PINNACLE.
USER MANUAL MOVIEBOX USB PINNACLE
Pinnacle MovieBox USB Professional Quality Movie Making
QUICK START GUIDE
KURZANLEITUNG
GUIDE DE DEMARRAGE RAPIDE
KORTE HANDLEIDING
GUIDA RAPIDA
MANUAL BREVE DE INSTRUCCIONES
GUIA DE INICIO RAPIDO
© Pinnacle Systems 2003
All rights reserved.
No part of this manual may be reproduced or transferred to other media without explicit written permission from Pinnacle Sysrems., Braunschweig, Germany.
All brand or product names are trademarks or registered trademarks of their respective holders.
© Pinnacle Systems 2003
© Pinnacle Systems 2003
© Pinnacle Systems 2003
© Pinnacle Systems 2003
This Quick Start Guide explains how to install the Pinnacle hardware and software.
Important text passages are marked with the "notepad" and this format.
Numbers mark step by step instructions:
- Start Windows.
All keyboard commands appear in this font:
Setup
Menu, commands, options, or buttons which the user can select are written in italics.


This chapter tells you which computer system components are required for the operation of MovieBox USB and what is included in the MovieBox USB package contents.
SYSTEM REQUIREMENTS

Please make sure your system meets the following requirements before installing MovieBox USB:
Computer
Intel Pentium or AMD Athlon 500 MHz or higher (1 GHz recommended)
- USB 1.1 or USB 2.0 port (USB2.0 recommended)
- Windows 98SE, Windows Millennium, Windows 2000 or Windows XP (Windows XP recommended)
- DirectX 8 or higher compatible graphics card (ATI Radeon 9700 or Nvidia Geforce 3 or higher with at least 32 MB RAM recommended)
DirectX8 or higher compatible sound card
128 MB of RAM (256 MB recommended)
- CD-ROM drive (optional: CD or DVD burner required to create Video CD, S-Video CD or DVD)
Speakers
Mouse
A microphone, if you want to record voice-overs
300 MB of free hard disk space to install software.
45 MB of disk space for every minute of video captured at DVD quality.
Video equipment
MovieBox USB can capture from and output video to:
- Any analog (8mm, Hi8, VHS, SVHS, VHS-C or SVHS-C) camcorder or VCR.
- Any DV, Digital8 or MicroMV camcorder with analog outputs (capture only)
PACKAGE CONTENTS
Please make sure your MovieBox USB system is complete before you begin the installation. The system includes:
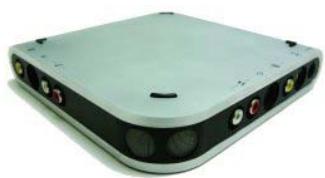
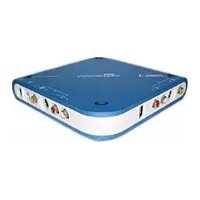
MovieBox USB
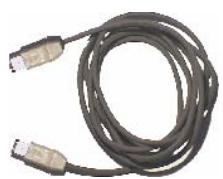
USB-cable
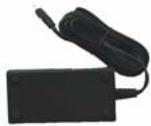
Power supply with separate power cable (no illustration)

Pinnacle Studio Manual

This Quick Start Guide


Pinnacle Studio "Programs" and "Content" CD-ROMs
If any parts are missing, please contact your retailer.
SOFTWARE INSTALLATION
Please be sure to read the license agreement in the appendix of the Studio manual before opening the CD-ROM packaging and installing the software, as by opening the CD-ROM packaging you will be expressing your absolute agreement with the conditions contained in the said license agreement.
If you do not agree, do not open the software package and return the complete package to the point of purchase.
You have received 2 CD-ROMs, named "Programs" and "Content". The Programs-CD is containing all the necessary data to install the Studio software and tools. The Content-CD is containing the Motion Menus which are video standard dependent (PAL, NTSC) and 3rd Party software (Adobe Acrobat Reader and Real Player).
To install the software, please proceed as follows:

SERIAL NUMBER: During installation you will be asked for your serial number. You will find this number on the Studio CD "Programs" or on the accompanying documentation. Please make a note of this number before putting the CD in your CD-ROM drive.
1. Switch your computer on.
Switch on your computer. Windows is started automatically.
If your computer is configured in such a way, that Windows is not started automatically, start Windows now.

Important for Windows 2000 and Windows XP: log in with administrator rights.
2. Insert the CD-ROM "Programs".
Insert the CD-ROM "Programs" into the CD-ROM drive of your computer.
Now, the setup program will start automatically or you start setup.exe or Welcome.exe from your CD-ROM.
3. Follow the instructions.
Follow the instructions of the Pinnacle installation program.
When the hardware installation program is started, please select "MovieBox USB" as your device. Then again follow the instructions.

After the Studio installation and the reboot of the system, the installation program normally asks for the "Content-CD" to be inserted.
On some systems, this will not happen. In this case you should install the "Content-CD" before starting Studio.
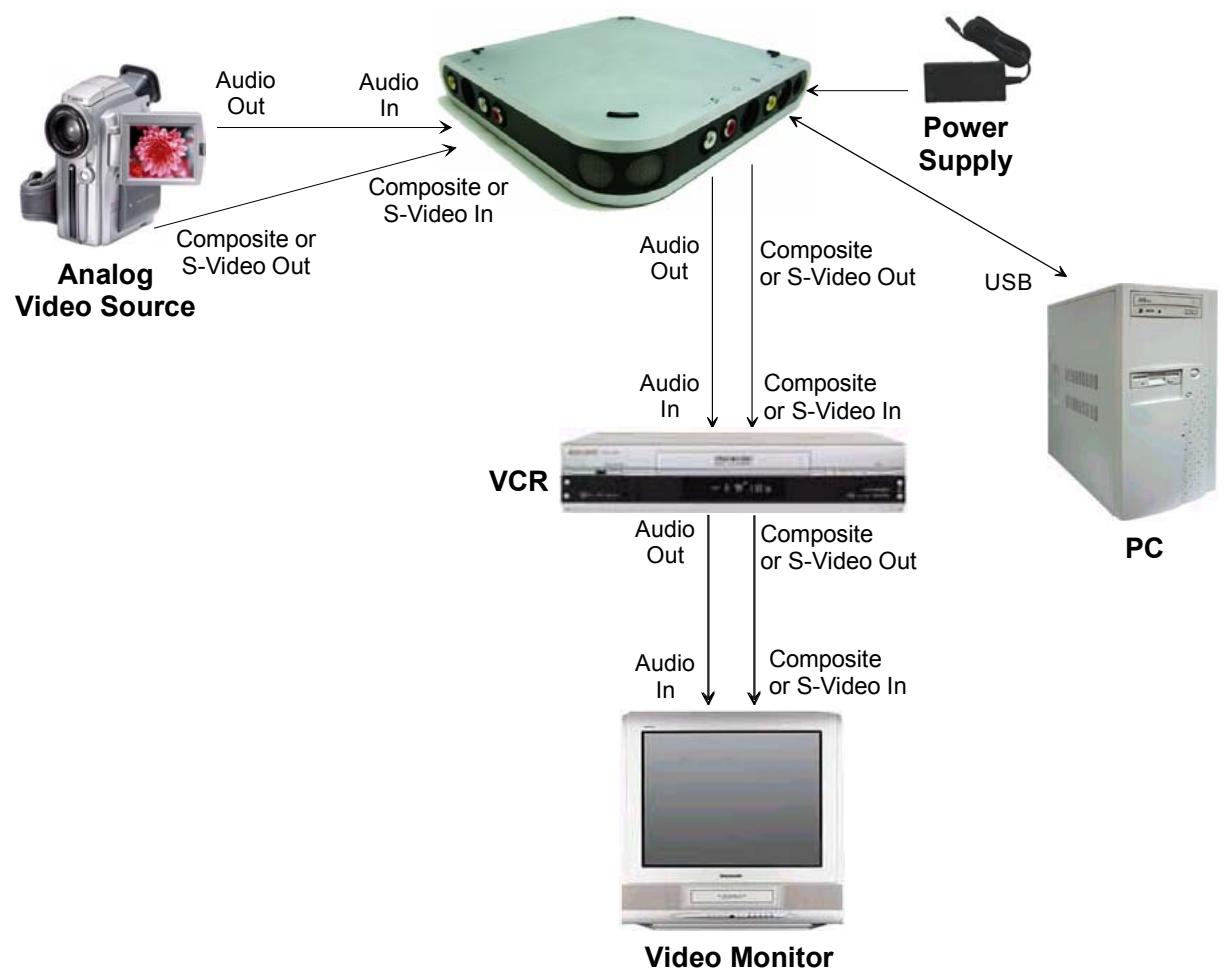
The following chapter tells you how to connect your video devices to the MovieBox USB. To do so you will need the appropriate cables.

Important Be sure your PC, MovieBox USB and video equipment are all turned OFF before making any connections.
HOW TO CONNECT THE DEVICES
The following illustrations show how to connect MovieBox USB to your PC and video equipment.
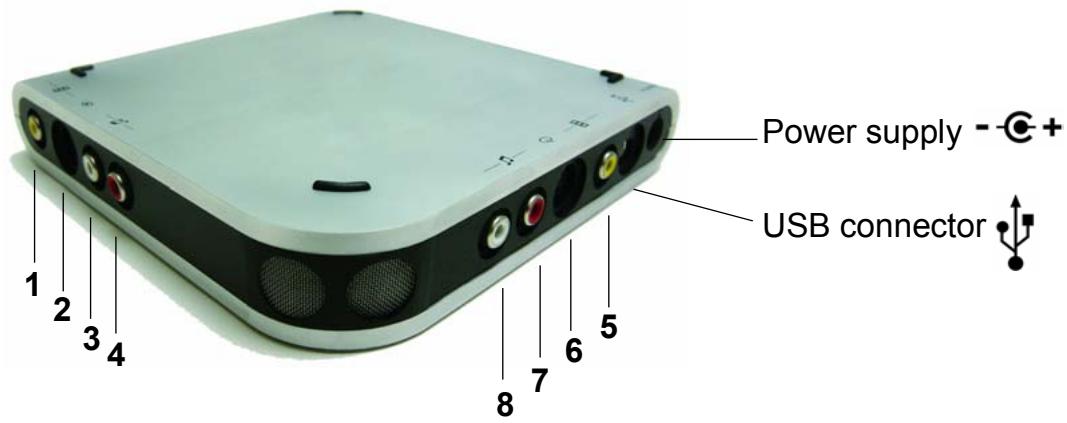

Inputs

Video IN
1 Composite
2 S-Video

Outputs
Video OUT
5 Composite
6 S-Video

Audio IN
3 Left
4 Right

Audio OUT
7 Right
8 Left
Now, have some fun...
Now that you have installed the MovieBox USB, you can use it immediately. We strongly recommend you take this opportunity to experience Studio digital video editing.
Pinnacle Systems has FREE 24 x 7, self-service troubleshooting assistance. 24 hours a day, 7 days a week, you have three ways to find answers to your questions.
To access technical support got to http://www.pinnaclesys.com/support/studio8
From here you may choose the following support options:
1. FAQ's (Frequently Asked Questions).
View 100's of technical questions and their solutions on a wide range of subjects. This is the best way to get your questions answered. Here you can easily find answers to the most common questions, as well as download the latest updates. They are sorted with the 20 most commonly read questions listed. It is also easy to sort the documents by problem category, by using the "Category" pull down menu.
2. Ask a Question, Find an Answer.
Simply type in your question to see a list of the most likely solutions. Using this natural language search, you can type in your question or the symptom of your problem, such as "I am having problems outputting to tape" or "I get an error message when I try to capture". If you do not get relevant solutions, try rephrasing your question. For example, instead of entering "I get an error", try "I get an error that states that my data rate is below 4000 kbs when I capture".
You can also select a Category from the pull down list to see questions/issues grouped together. For example, if you have a question about installing the hardware or software, choose the Category "Setup, Install and Configuration Issues" to see the top 10 installation questions. The categories follow the main features of Studio 8, Capture, Edit, Make and Output, along with some other general categories.
3. Discussion Forum.
There are over 100,000 users that have registered to use this FREE service. Search Pinnacle Systems' online Discussion Forum to see if someone has already encountered your question. Post your question on the Discussion Forum and get help from Pinnacle Systems and other users. This forum is also searchable so you can—for example—type in "dropping frames and discussions with solutions on this topic will be displayed.
Once you post to the Discussion Forum, you can get an email notification when someone has replied to your question. To get email notification, after you post your question, simply click on the Email button in the upper right hand corner of the Discussion Forum browser window, then click OK.
4. Email Support.
If you are unable to find answers to your questions using our website, Pinnacle Systems also offers troubleshooting and technical support by email. Email is usually responded to within 48 hours (excluding weekends and holidays). Use the Ask a Question section of the support web site to submit an email. Before the email is submitted, 5 suggested solutions to your issue will be presented to you. Please review them. Over 70% of customer that begin to submit their question, find their answer in these suggested solutions.
KEY PARTS
Hardware
- External Video Capture and Output device
HiSpeed USB 2.0 (USB 1.1 compatible) -Interface - MPEG1/2 Video/Audio compression hardware
Composite, S-Video Right and Left Audio Inputs and Outputs
Power Supply
USB Cable
Software
Drivers for Windows XP, 2000, Me
Installation program
Studio Application
KEY FEATURES
- Capture in MPEG2 ML@MP (4:2:0) program stream muxed with MPEG1 Layer II audio
Capture in MPEG1 system stream muxed with MPEG1 Layer II audio
Playback to PC Monitor and/or to tape
This chapter gives you important hints as well as tips & tricks on the subject video capturing.
HARDWARE REQUIREMENTS
Hard disk speed
If the hard disk works too slow, the PC cannot save the digitised images fast enough and the drop-out rate increases. The drop-out rate is the number of images which are not saved during capturing. This results in jerky playback. Your hard disk should offer a transfer rate of 5 MBytes/sec under Windows.
To take advantage of the full transfer rate, the option "DMA" should be checked in the Device Manager for your hard disk (see "Settings in Windows Me" or "Settings in Windows 2000 and Windows XP").
Memory
In general: The more memory available, the better.
Video source requirements
If you can choose between the Composite- and the S-Video input, for quality reasons prefer the S-Video input.
ENHANCED-IDE HARD DISKS
With some E-IDE hard disks, high data rates result in an unsmooth playback when playing back video files, because the hard disk is recalibrated while a file is read. This is not a malfunction of our product but is due to the functionality of your hard disk and the other system components.
If you have received a disk with special busmaster drivers with your E-IDE hard disk and/or motherboard, please install these drivers in your system, because the disk performance will be improved considerably.
For accelerating the transmission of large amounts of data like in this case the video data, activate the DMA (Direct Memory Access) for all hard disks of your computer (see "Settings in Windows Me" or "Settings in Windows 2000 and Windows XP").
HINTS FOR IMPROVING THE CAPTURE PERFORMANCE OF YOUR HARD DISK
General
During capturing of videos a large amount of data is transferred from the capture board to the hard disk. You might find that your system cannot keep up with the required amount of data transfer for the settings you have chosen.
When capturing, your system might pause, the video might be jerky or jitter (not smooth), and some of the frames might be dropped (not saved to disk). Playback quality of such a video is typically unsatisfactory.
To avoid such problems, we herein have described a number of practices to optimise your system.

Please, bear in mind that each system is reacting different. Something that improves performance on one system might not be effective on another system.
Installing hard disks
The Windows operating systems support 32-bit hard disk access. Please check in Start/Settings/Control Panel/System/Device Manager whether your hard disk drive or your SCSI controller has been detected by Windows correctly (no yellow or red warnings in the Device Manager behind the device groups). If not, the data transfer rate of your hard disk will not suffice for a satisfying quality when recording and playing back video.
If possible, install a second hard disk for capturing and saving all of your video clips. For recording and playing back video a SCSI hard disk with SCSI controllers should be preferred.
You can save temporary files to your system hard disk or another partition. The Windows operating systems access system files during recording and playback. If these files are located on the same hard disk as the video clips, the head has to be repositioned, which leads to one or more dropped frames (unsmooth playback).
Optimising the hard disk(s)
Because capturing of videos is a very hard-disk intensive procedure, optimising the files on the hard disk that you will use for capturing is the most important task in optimising capture performance. In the following you will find some detailed suggestions for doing this.
Partitioning the hard disk
You can reserve a complete hard disk or a partition of the hard disk exclusively for digitising video clips.
When you format such a hard disk/partition, please do not use the format type Quick (erase) as this leaves old data on the disk. Format the hard disk/partition with the option Full.
Defragmenting the hard disk(s)
Usually, the hard disk is searched for free spaces. If a hard disk is in use for some time, the files are fragmented and saved in different segments of the disk. During the video digitising process the hard disk tries to fill the free gaps. This increases the access time and the drop-out rate. In this way some images are missing and the video playback is jerky. After defragmentation the images are saved on a contiguous segment, i.e. they are not separated any more.
For this purpose, Windows offers a defragmenting tool.
If you have two hard drives - a system drive for the operating system and the programs and a drive for the video data to be saved - you should defragment both. The system drive is carrying out important tasks during video editing and therefore should be optimised, too.

To reach an optimal performance, the capture drive should be defragmented before each capture session and the drive containing your saved images should be defragmented before each playback.
SETTINGS IN WINDOWS ME
The system applet of the Windows Me Control Panel contains several options you can enable or disable for optimal capture performance. During capturing the drive should write as much data as possible and not spend time with software optimisations or checking for system changes.
To access these options in Windows, click the Start menu. Under Settings click Control Panel, and double-click the System applet. In the window System Properties you can make the desired settings.
Device Manager tab:
Click CD-ROM and select your CD-ROM drive. Click the Properties button, select the Settings tab and clear the Auto insert notification check box. Click OK.
Additionally, in the list under Disk Drives click on the available disk(s) of your computer (one after the other). For each drive activate the checkbox DMA under Properties in the Settings tab and confirm with OK.
Performance tab:
Click the File System button and drag the Read-ahead optimisation slider to None (the default is Full).
While still on the File System Properties dialog, select the
Troubleshooting tab and check Disable write-behind caching for all drives. Confirm with OK.
You will have to restart your machine now for the new settings to take effect.
SETTINGS IN WINDOWS 2000 AND WINDOWS XP
The system applet of the Windows 2000/Windows XP Control Panel contains several options you can enable or disable for optimal capture performance. During capturing the drive should write as much data as possible and not spend time with software optimisations or checking for system changes.
To access these options in Windows, click the Start menu. Under Settings click Control Panel, and double-click the System applet. In the window System Properties you can make the desired settings.
- Click on the Hardware tab, then on the Device Manager... button under Device Manager:
In the list under IDE ATA/ATAPI Controller first click on Primary IDE Channel using the right mouse button and choose Properties from the context menu. Then go to the Further Settings tab.

If two devices are shown, carry out the following settings for both devices.
Pay attention to what appears in the Current transmission mode box at the bottom. If Ultra DMA mode is displayed, the correct setting is already active and you do not need to make any changes.
If this is not the case, choose the DMA, if available setting from the Transmission mode list box. Ultra DMA mode will then appear after the computer has been restarted.
Confirm with OK.
Now click on Secondary IDE channel in the list with the right mouse button and carry out the same settings as for the primary IDE channel.
You will have to restart your machine now for the new settings to take effect.
REDUCING NONCAPTURE-RELATED MACHINE ACTIVITY
Anything that interrupts the system or consumes CPU time for purposes other than capture can potentially decrease capture performance. Consider performing the following tasks to see if they affect performance on your system.
Close all applications except the capture application
Turn off the screen saver
To do so, right-click the desktop, click Properties, select the Screen Saver tab, choose (None) from the screen saver drop-down combo box and confirm with OK.
Turn off TSR (Terminate and Stay Resident) programs
TSR programs are programs that perform certain operations after the computer has been started and install a part of the program permanently into the memory. The resident (still active) part is continuously performing certain background operations now, for example virus scan operations.
TSR programs displayed in the taskbar
If there are TSR programs displayed at the right bottom of your taskbar, you can turn them off in the following way:
Right-click the corresponding symbol in the taskbar and select the option Exit or Close from the context menu that appears now.
TSR programs not displayed in the taskbar
In this case start the Task Manager with the keyboard command CTRL + ALT + DEL. Select the applications to be turned off one after the other and click the button End Task.
The corresponding symbols disappear from the taskbar now or they are indicated with a red "Warning" sign.
Turn off your printer
Disable your network card
If you have a network card in your computer, disable it. Sending and receiving data over the network can interrupt the system, even if you are not actively doing anything over the network.
TSR-(Terminate and Stay Resident) Programme deaktivieren
Onglet Performances:
Désactiver les programmes TSR-(Terminate and Stay Resident)

Pinnacle Studio "Programs" and "Content" CD-ROMs
1. FAQ's (Frequently Asked Questions).
TSR (Terminate and Stay Resident) programma's deactiveren
1. FAQ's (Frequently Asked Questions).
1. FAQ's (Frequently Asked Questions/Perguntas freqüentes).
Pinnacle Systems, Inc. (Pinnacle) warrants your new hardware against defects in materials and workmanship for a period of 24 months from the date of your original purchase of the new product. If product fails to be free of defects in materials and workmanship during the warranty period, Pinnacle will repair, or at its sole option, replace the product, provided that you return it (postage prepaid, with proof of your purchase from the original retailer) to Pinnacle during the warranty period. Pinnacle may repair or replace the product with functionally equivalent new or reconditioned components or products.
To obtain warranty service, please check the Support Center information that accompanies your product. To access the Support Center, click on the Windows Start menu and select:
Programs/"Your Pinnacle Product"/Help/Pinnacle Service & Support Center.
or visit the Pinnacle Systems Web site http://www.pinnaclesys.com for the latest Pinnacle Customer Support contact information.
Replacement products will be returned to you at Pinnacle's expense via ground delivery service. Extra freight charges will apply for expedited shipping, or to points outside of territories where Pinnacle maintains a customer service department, if such service is available. Replacement products will be covered for the remainder of the original 24-month warranty period, or for a period of 90 days, whichever is longer.
WARRANTY EXCLUSIONS
This limited warranty does not cover defects caused by (a) accident, misuse, abuse or neglect, (b) improper operation, maintenance, installation, adjustment, or any alteration or modification of any kind, or (c) repairs or disassembly not performed by Pinnacle.
THIS LIMITED WARRANTY IS Pinnacle'S ONLY WARRANTY, AND Pinnacle EXPRESSLY EXCUSES ALL OTHER WARRANTYES, EXPRESS OR IMPLIED, INCLUDING WITHOUT LIMITATION IMPLIED WARRANTYES OF MERCHANTABILITY, FITNESS FOR A PARTICULAR PURPOSE AND NONINFRINGEMENT. EXCEPT FOR THE EXPRESS LIMITED WARRANTY ABOVE, THE PRODUCT IS SOLD "AS IS," AND YOU ASSUME THE ENTIRE RISK AS TO THE PRODUCT'S SUITABILITY TO YOUR NEEDS, ITS QUALITY AND ITS PERFORMANCE. IN NO EVENT WILL Pinnacle BE LIABLE FOR ANY DIRECT, INDIRECT, SPECIAL, INCIDENTAL OR CONSEQUENTIAL DAMAGES RESULTING FROM ANY DEFECT IN THE PRODUCT OR FROM ITS USE, EVEN IF ADVISED OF THE POSSIBILITY OF SUCH DAMAGES.
All exclusions and limitations in this limited warranty are made only to the extent permitted under applicable law and shall not apply to the extent in conflict with the express requirements of applicable law. This limited warranty gives you specific rights, and you may also have other rights that vary from state to state or country to country.
EXCUSIONS DE LA GARANTIE
of征求意见 of the European Union's National Strategy for the 2015-2030 Years on the European Union's strategy to improve its competitiveness in the field of information technology.
Programs/"Your Pinnacle Product"/Help/Pinnacle Service & Support Center.
This certification is based on: Test report(s) generated by EMI-test laboratory
Braunschweig, 29. Januar 2003 / January 29th, 2003

Bernd Riemann
Engineering Manager Hardware

Finanzdirektor / Director Finance
NOTE: Shielded cables should be used for a composite interface. This is to ensure continued protection against radio frequency interference.
FCC WARNING STATEMENT
NOTE: This equipment has been tested and found to comply with the limits for a Class B digital device, pursuant to Part 15 of the FCC Rules. These limits are designed to provide reasonable protection against harmful interference in a residential installation. This equipment generates, uses and can radiate radio frequency energy and, if not installed and used in accordance with the instructions, may cause harmful interference to radio communications. However, there is no guarantee that interference will not occur in a particular installation. If this equipment does cause harmful interference to radio or television reception, which can be determined by turning the equipment off and on, the user is encouraged to try to correct the interference by one or more of the following measures:
Reorient or relocate the receiving antenna.
- Increase the separation between the equipment and receiver.
- Connect the equipment into an outlet on a circuit different from that to which the receiver is connected.
- Consult the dealer or an experienced radio/TV technician for help.
CAUTION
Changes or modifications not expressly approved by the party responsible for compliance could void the user's authority to operate the equipment.
Shielded interface cable must be used in order to comply with the emission limits.
LABEL WARNING
This device complies with Part 15 of the FCC Rules. Operation is subject to the following two conditions: (1) this device may not cause harmful interference, and (2) this device must accept any interference received, including interference that may cause undesired operation.
Pinnacle Systems
MovieBox USB

Tested To Comply With FCC Standards
FOR HOME OR OFFICE USE