
GN 7100 - Headphones JABRA - Free user manual and instructions
Find the device manual for free GN 7100 JABRA in PDF.
| Product Type | Telephone headset with base |
| Brand | JABRA |
| Model | GN 7100 |
| Power Supply | 24 AAA batteries (for the base) |
| Connection Technology | QD (Quick Disconnect) connector for headset |
| Display | Backlit digital display (10 digits, duration, clock) |
| Built-in Clock | Yes, adjustable to 12 or 24 hours |
| Call Signal Adjustment | Volume (3 positions: off, low, high) and tone (3 intensities) |
| Speed Dialing | 3 memory keys (M1-M3) with online/offline storage and from redial |
| Redial | Automatic last number redial with verification |
| Mute Function | Microphone mute button with indicator light |
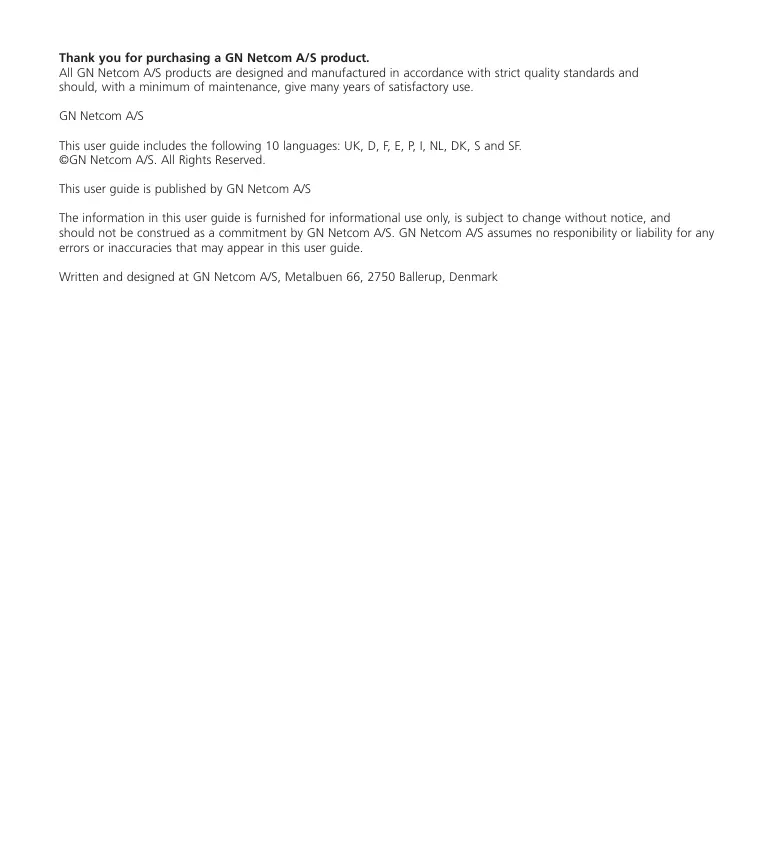
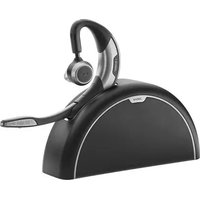
| Headset Compatibility | GN Netcom headsets with QD connector |
| Dialing Memory | Up to 32 digits, display of last 10 |
| Box Contents | Telephone base, line cord, headset support, headset (not included?) |
| Maintenance | Clean the device with a soft, dry cloth |
| Safety | Use only recommended batteries; do not expose to moisture |
Frequently Asked Questions - GN 7100 JABRA
User questions about GN 7100 JABRA
0 question about this device. Answer the ones you know or ask your own.
Ask a new question about this device
Download the instructions for your Headphones in PDF format for free! Find your manual GN 7100 - JABRA and take your electronic device back in hand. On this page are published all the documents necessary for the use of your device. GN 7100 by JABRA.
USER MANUAL GN 7100 JABRA
Thank you for purchasing a GN Netcom A/S product.
All GN Netcom A/S products are designed and manufactured in accordance with strict quality standards and should, with a minimum of maintenance, give many years of satisfactory use.
GN Netcom A/S
This user guide includes the following 10 languages: UK, D, F, E, P, I, NL, DK, S and SF.
©GN Netcom A/S. All Rights Reserved.
This user guide is published by GN Netcom A/S
The information in this user guide is furnished for informational use only, is subject to change without notice, and should not be construed as a commitment by GN Netcom A/S. GN Netcom A/S assumes no responsibility or liability for any errors or inaccuracies that may appear in this user guide.
Written and designed at GN Netcom A/S, Metalbuen 66, 2750 Ballerup, Denmark
English
Connecting the telephone
- Mount the headset stand in the holder on the right side of the telephone.
- Connect the telephone line cord to the telephone. Insert your headset in the QD-connector. GN 7100 can be used with all GN Netcom headsets.
- Open the battery compartment underneath the telephone. Insert the battery and close the battery compartment.
- You can install the telephone on the wall using the enclosed wall fitting. Mount the fitting on the wall and attach the telephone. Turn the headset stand 90^ towards the top of the telephone.
Setting the clock
The telephone has a built-in real time clock. It shows the actual time and the time for incoming calls in the memory.
- Press the On/Off button.
- Press the Set Mode button to enter set mode.
The display shows a blinking hour code.
- Press the HOUR button to adjust the hour. Press the button successively to set the hours.
- Press the MIN button to adjust the minutes. Press the button successively to set the minutes.
- Press the Set Mode button to leave set mode.
Press the On/Off button to turn off the telephone.
Setting the time mode
- Press the On/Off button to connect the telephone. Press the Set Mode button to display the clock. Then press the Time Mode button to toggle the RTC function between 12-hour clock and 24-hour clock mode.
Displaying the clock
- Press the HOUR button to display the clock while using the telephone. To return to display call duration, press the HOUR button again.
Adjusting the call signal
You can adjust the volume and the sound of the call signal on the left side of the telephone.
The Transmission volume control has three positions: Off, Low and High.
The Signal Sound control can be set in three different modes: Low, Medium, High.
Placing a call
Put on your headset.
- Press the On/Off button and wait for a dial tone. The online indicator on the On/Off button lights up.
- Enter the telephone number. The digits are shown in the display.
Note: The telephone can handle up to 32 digits but the display can only show the last ten digits entered.
- Adjust the volume in your headset, using the Receive Volume control on the right side of the telephone.
- Press the On/Off button to end the call.
Answering a call
- Put on your headset.
- Press the On/Off button to answer the call.
- Press the On/Off button to end the call.
Functions on the telephone
Repeating the last number dialled
If you do not get an answer or the line is busy, the radial button can be used to save and radial the number.
- The last number dialled is automatically saved in the memory.
To radial: Press the On/Off button to connect and then the Redial button.
To check the last number dialled: Press the On/Off button. Then press the Memory Check button followed by the Redial button.
Muting the microphone
- To talk without the caller hearing you, press the Mute button on the telephone. You are still able to hear your caller. When the microphone is muted, the indicator next to the button lights up.
Displaying contents of radial
- Press the On/Off button to connect the telephone. Press the Memory Check button and then the Redial button.
One-touch buttons
- It is possible to save your most used telephone numbers into the memory buttons. You can then call the numbers by pressing one button only.
There are three ways of storing numbers.
A Store number while disconnected
- Press the On/Off button
Press the Store button - Dial telephone number (* & # can be included, but not R)
Press the Store button again
Press M1, M2, or M3 - Press the On/Off button again to disconnect
B Store number while dialling
- Press the On/Off button
- Dial phone number (* & # can be included, but not R)
Press the Store button
Press M1, M2, or M3 - Press the On/Off button again to disconnect
C Store number from radial content
Press the On/Off button
Press the Memory Check button
- Press the Redial button
Press the Store button
Press M1, M2, or M3
- Press the On/Off button again to disconnect
Displaying one-touch numbers
- Press the On/Off button followed by the Memory Check button. Press M1, M2, or M3 to display the stored number. (*, #, and R appear differently in the display)
Calling one-touch numbers
Press the On/Off button and wait for dial tone. Press M1, M2, or M3.
Deleting one-touch numbers
- The stored numbers cannot be deleted. The number can be changed by following one of the procedures for storing numbers. Alternatively, store the number as a 0.
Note: If your telephone system awaits a new dialling tone after the "zero" when placing external calls, you will have to store only the external number – without the "zero". When calling, press "zero", await dialling tone and then press memory key.
Battery low
- When the battery power gets too low, the battery symbol light up in the display. Battery type: 24A size AAA.
Troubleshooting
- Make sure that everything is connected correctly and that you have a fresh battery (See user guide for instructions). If the telephone still does not work, continue to the next step.
- Disconnect all extra equipment. If the telephone works, the error lies with the other equipment.
- Replace the GN 7100 telephone with another well-working telephone. If the other telephone works the error lies with the GN 7100 telephone.
- If the other well-working telephone does not work, the error probably lies with your telephone cord.
If you have any problems or questions regarding your telephone, please contact your reseller.
Deutsch
Telefon anschließen


- Thank you for purchasing a GN Netcom A/S product.
- English
- Connecting the telephone
- Setting the clock
- Setting the time mode
- Displaying the clock
- Adjusting the call signal
- Placing a call
- Answering a call
- Functions on the telephone
- Repeating the last number dialled
- Muting the microphone
- Displaying contents of radial
- One-touch buttons
- A Store number while disconnected
- B Store number while dialling
- C Store number from radial content
- Displaying one-touch numbers
- Calling one-touch numbers
- Deleting one-touch numbers
- Battery low
- Troubleshooting
- Deutsch
- Telefon anschließen
Brand : JABRA
Model : GN 7100
Category : Headphones