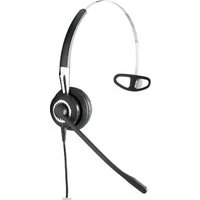
BIZ 2400 - Headphones JABRA - Free user manual and instructions
Find the device manual for free BIZ 2400 JABRA in PDF.


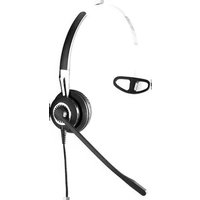
| Brand | Jabra |
| Model | BIZ 2400 |
| Type | Professional headset (mono or duo) |
| Connectivity | Quick Disconnect (QD) connector |
| Wearing Styles (Mono) | Headband, ear hook, neckband |
| Wearing Styles (Duo) | Headband only |
| Microphone | Noise-cancelling, adjustable boom, 360° rotation |
| Ear Cushion | Replaceable, snaps onto ear plate |
| Ear Gel (Ear Hook) | Provides stability, locks into ear hook ring |
| Compatibility | Phones and computers via QD adapters |
| Weight | Approx. 45 g (mono with headband) |
| Dimensions | Not specified |
| Power Source | None (passive, powered by device) |
| Cable Length | Not specified |
| Materials | Plastic, metal, foam, rubber |
| Care Instructions | Clean with electronic wipes; avoid water |
| Accessories Included | Headband, ear cushions, ear hooks (S/L), ear gel, neckband (varies by model) |
| Country of Origin | China |
| Certifications | CE |
| Warranty | Not specified in manual |
Frequently Asked Questions - BIZ 2400 JABRA
User questions about BIZ 2400 JABRA
0 question about this device. Answer the ones you know or ask your own.
Ask a new question about this device
Download the instructions for your Headphones in PDF format for free! Find your manual BIZ 2400 - JABRA and take your electronic device back in hand. On this page are published all the documents necessary for the use of your device. BIZ 2400 by JABRA.
USER MANUAL BIZ 2400 JABRA

This user guide is published by GN Netcom A/S.
The information in this user guide is furnished for informational use only, is subject to change without notice, and should not be construed as a commitment by GN Netcom A/S. GN Netcom A/S assumes no responsibility or liability for any errors or inaccuracies that may appear in this user guide.
Written and designed at GN Netcom A/S, Lautrupbjerg 7, 2750 Ballerup, Denmark, www.jabra.com.
PART OVERVIEW
HEADBAND ASSEMBLY
1 Headband
2 Ear cushion

EAR HOOK ASSEMBLY*
5 Ear hook ring 6 Ear gel
7 Ear hooks (Small/Large)

HEADSET
3 Headset
4 Quick disconnect connector

NECKBAND ASSEMBLY*
8 Neckband 9 Neckband ring


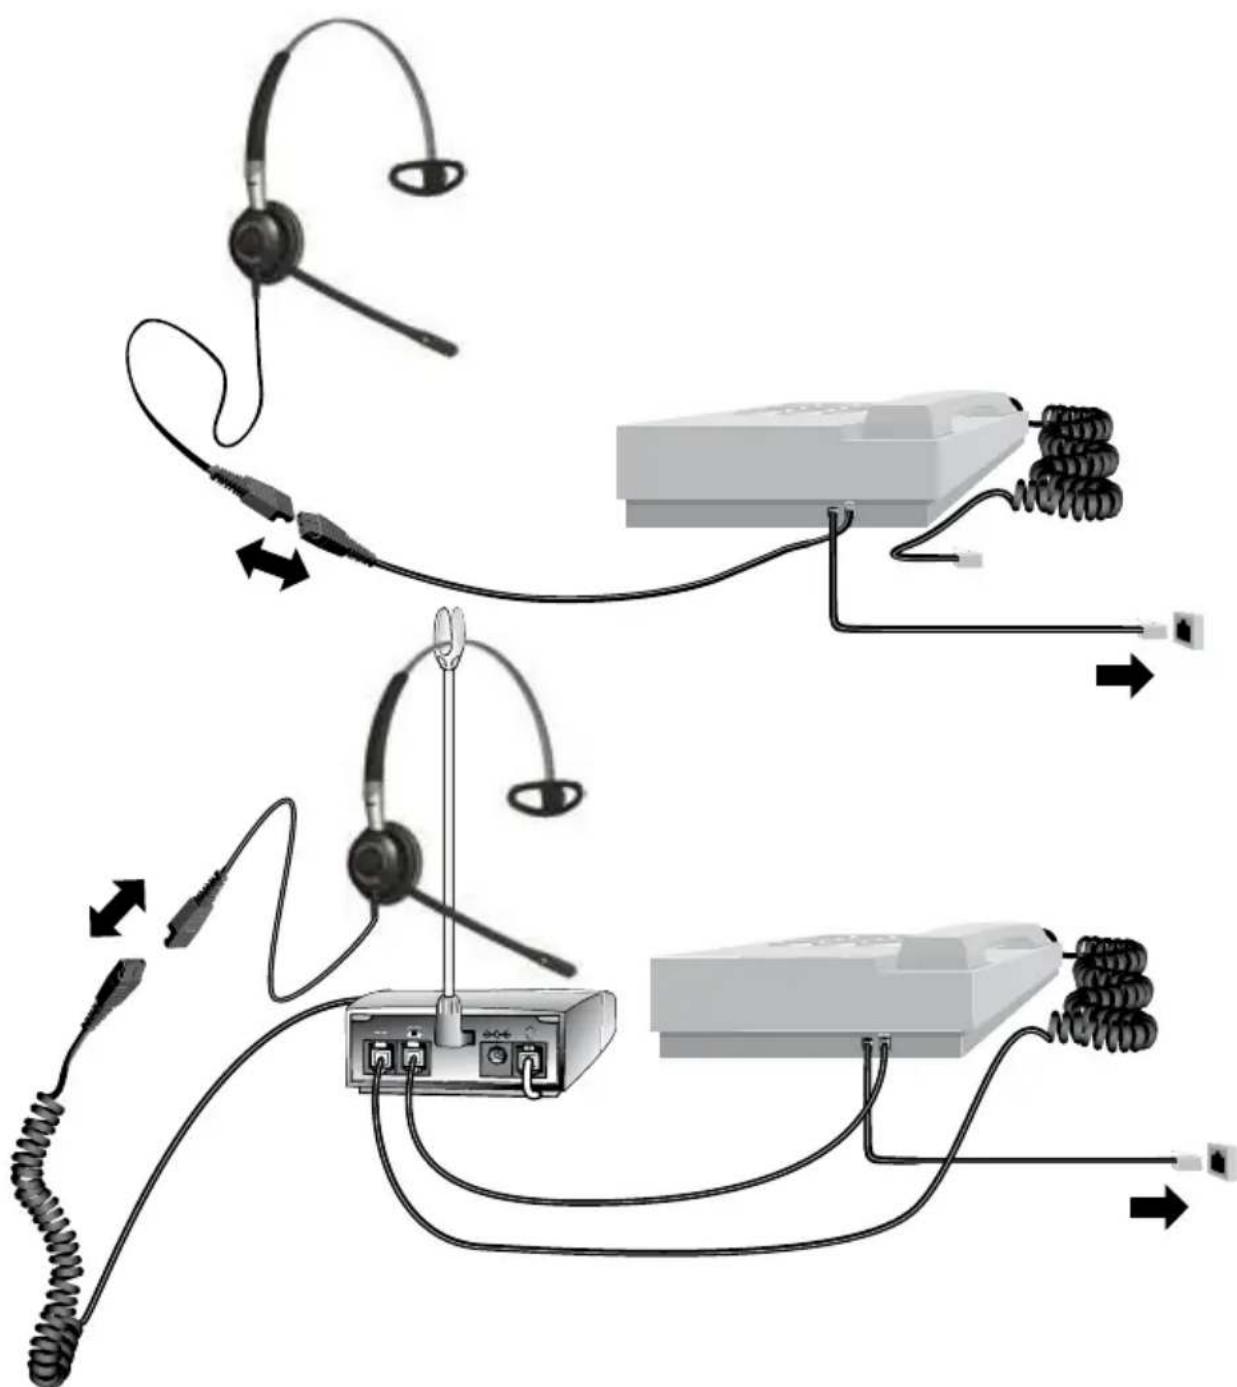
CONNECTING THE HEADSET TO THE PHONE:
- Plug the headset into an adapter cord suited to your phone system
- Unplug the handset from the phone*
- Connect the adapter cord to the handset port
*If your phone has a headset port, connect the adapter cord directly to the headset port.
ENGLISH
Thank you for buying a GN Netcom A/S product.
All GN Netcom A/S products are designed and manufactured in accordance with strict quality standards and should, with a minimum of maintenance, give many years of satisfactory use.
WEARING THE HEADSET WITH THE HEADBAND
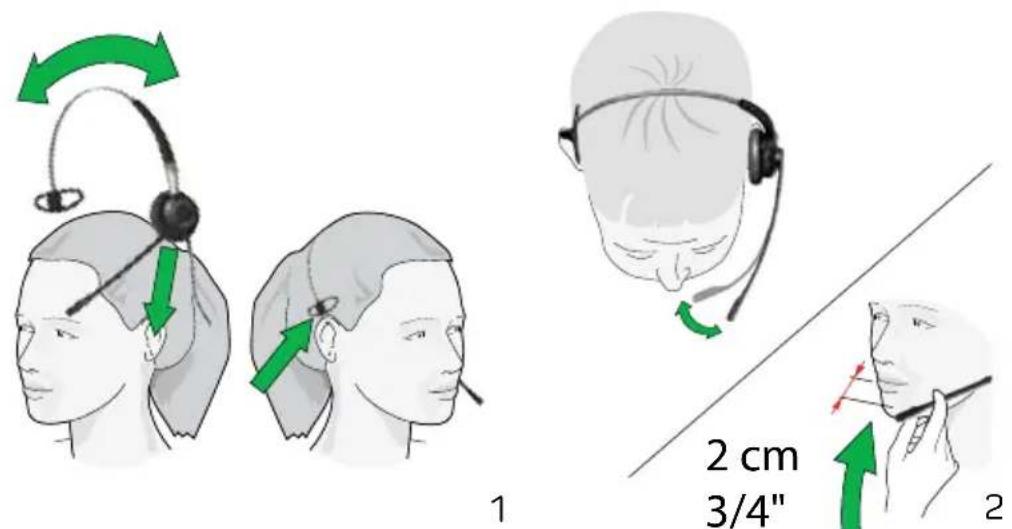
All mono Jabra BIZ TM 2400 models include a headband attachment. To use it:
1. How to wear the headband.
Place the headband over your head, with the headset positioned against your preferred ear and the T-bar positioned just above the opposite ear. Adjust the headband for optimal fit on your head.
2. How to position the microphone.
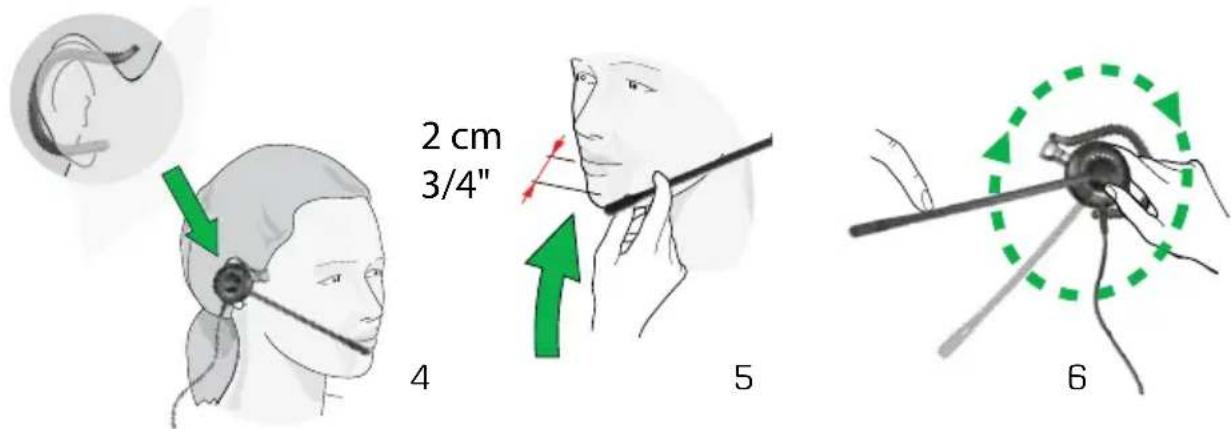
Adjust the microphone by rotating it around the headset and flexing the boom arm until it is positioned less than 2 cm from the front of your mouth.
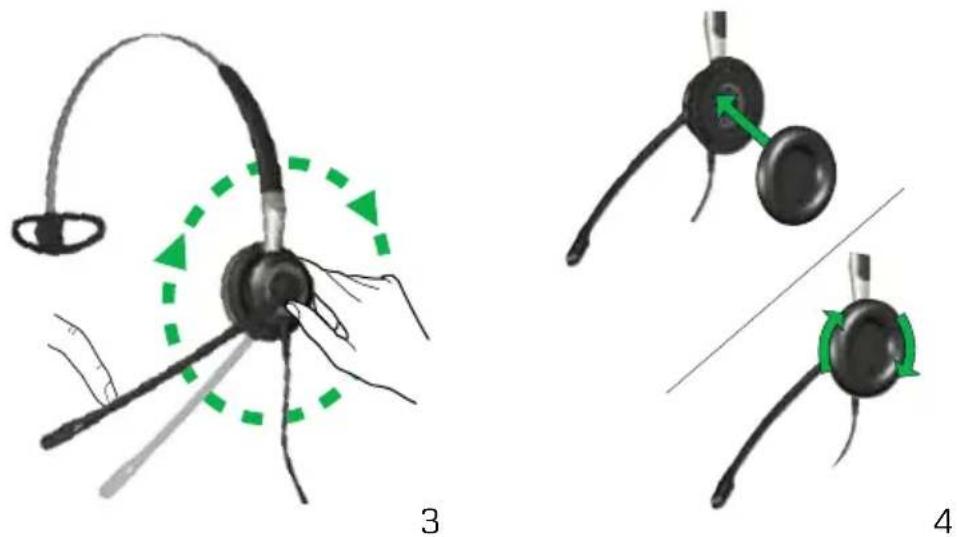
3. How to rotate the boom arm.
The boom is free to rotate 360°.
4. How to attach the ear cushion.
Align the ear cushion with the headset ear plate so that the groove in the ear cushion slips around the ridge of the headset ear plate. Rotating the cushion will ensure it snaps securely into place.


5. How to remove the headband
Remove the ear cushion by gently pulling it off the ear-plate. Push on the inner part with your thumb until the headset clicks out of the headband.
6. How to press the headset into the headband ring on the headband.
Hold the headband in one hand and the headset in the other. Align the headset against the outside of the headband ring with the headset cable pointing down. Gently press the headset into the headband ring until it clicks into place.
WEARING THE HEADSET WITH AN EAR HOOK
Two sizes of ear hook are included with some Jabra BIZ 2400 models. They can be purchased as an accessory for any mono model. To use it:



1. How to attach the ear gel.
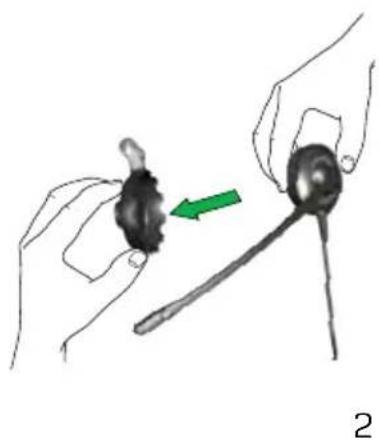
The ear gel is a round rubber part which helps stabilize the headset on your ear. Place the ear gel inside the ear hook ring. Gently push the ear gel through the hole so that it sits in the hole. Once you click the headset into the ear hook ring, the ear gel will be locked into place.
2. How to press the headset into its ear hook ring on the ear hook.
Hold the ear hook ring in one hand and the headset in the other. On the inside surface of the ear hook ring you will find "L" and "R" markings. Align the cable of the headset with the "R" marking if you wish to wear it on you right ear, or "L" if you wish to wear it on your left ear. Gently press the headset into the ear hook ring until it clicks into place.

3
3. How to position the ear hook on the ear hook ring for left or right ear use.
The ear hook wearing style has two parts: an ear hook and an ear hook ring. One end of the ear hook forms a pin that presses into a loop on the ear hook ring and holds it there.
You will wear the headset with the ear hook behind your ear and the ear hook opening pointing down towards your jaw. Decide on which ear you would like to wear the headset and assemble the ear hook and ear hook ring appropriately.
To change from one ear to the other, pull the ear hook up and away from the loop, and press into the other side of the loop. Then remove the headset from the ear hook ring. Rotate it and replace it again with the cable positioned at the 'L' or 'R' for the selected wearing side as described in point 2.
4. How to wear the ear hook.
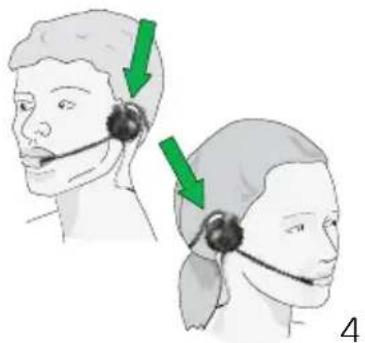
To wear the headset, slip the ear hook behind your ear while keeping the ear gel centred into the middle part of your ear. The ear hook comes in two sizes for optimal fit. Please try both for best personal support and fit.
5. How to position the microphone.
Adjust the microphone by rotating it around the headset and flexing the boom arm until it is positioned less than 2 cm from the front of your mouth.
6. How to rotate the boom arm.
The boom is free to rotate 360°.
WEARING THE HEADSET WITH THE NECKBAND
A neckband wearing style is included with some Jabra BIZ 2400 models. Neckbands can be purchased as an accessory for any mono Jabra BIZ 2400. To use it:

1
1. How to press the headset into the neckband ring.
The neckband can be assembled for wearing on either the left or right ear. Decide whether you would like to wear your headset on your left or right ear and position the neckband ring appropriately. Hold the neckband ring in one hand and the headset in the other. Align the headset against the outside of the neckband ring with the headset cable pointing down. Gently press the headset into the neckband ring until it clicks into place.

2. How to attach the ear cushion.
Align the ear cushion against the neckband ear plate so that the groove in the ear cushion slips around the ridge of the ear plate. Rotating the cushion will ensure it snaps securely into place (you can remove it as you attach it).
3. How to position the neckband on the neckband ring.
Attach the neckband by sliding the left or right tip of the neckband through the loop in the neckband ring. Note the small bump inside the neckband ring; this must align with the groove on the tip of the neckband.
2 cm 3/4"


4. How to wear the neckband.
Wear the neckband so the band goes around the back of your neck and the bowed sections go over your right and left ear respectively, whilst the ear cushion sits on your ear.
5. Position the microphone.
Adjust the microphone by rotating it around the headset and flexing the boom arm until it is positioned less than 2 cm from the front of your mouth.
6. How to rotate the boom arm.
The boom is free to rotate 360°.
WEARING A DUO HEADSET
(Duo models only)
The duo version of Jabra BIZ 2400 is always worn as a headband. To wear and adjust your headset:

1
2
1. Adjust the headband length.
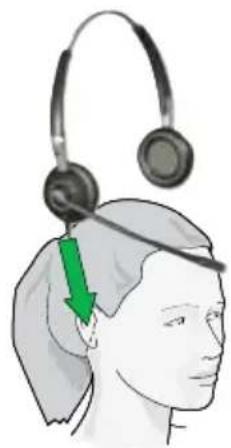
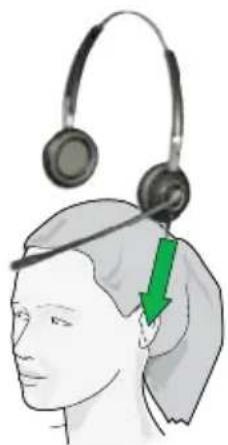
The headband is adjustable in length to fit the size of your head. Push or pull the top section of the headband until the headset fits comfortably.
2. How to wear the headset.
Position one speaker over each ear with the headband going over the top of your head, just as with a traditional pair of headphones. The headset can be worn on either the left or right ear, simply rotate the boom arm as needed.

3. How to position the microphone.
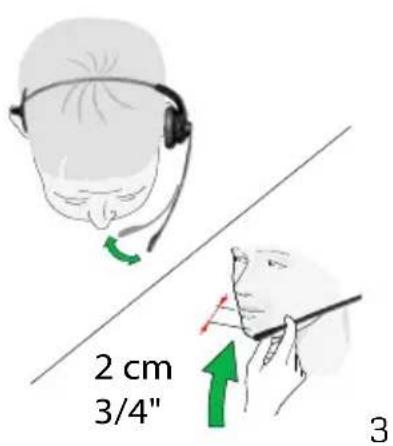
Adjust the microphone by rotating it around the headset and flexing the boom arm until it is positioned less than 2 cm from the front of your mouth.
4. How to rotate the boom arm.
The boom is free to rotate 360°.
CONNECTING THE HEADSET TO A PHONE OR COMPUTER
The headset features a Quick Disconnect (QD) connector, which enables you to use the headset with a variety of telephones, computers and other sound sources by attaching any of the QD cords and adapters available from GN Netcom A/S.
To connect your headset to a QD adapter, simply press its connector into the similar connector on your adapter. Then connect the adapter to a telephone or computer and your headset is ready to use.
You can disconnect your headset at any time without terminating the current call (if any). To do so, hold the QD adapter with your thumb and index finger and pull the connectors apart. Always pull on the connectors, never on the cords.
For more information about QD adapters, please see the documentation that came with your adapter and/or go to www.jabra.com.
CARE, CLEANING AND MAINTENANCE
- Avoid getting the headset wet and never submerge it in water.
- Avoid stretching, bending or twirling the wire; this will weaken the connectors and the wire itself and may result in loss of audio.
- Do not block the microphone holes on either side of the boom arm. Advanced Jabra BIZ 2400 models feature a small hole on both the inward and outward facing sides of the boom. This front-facing hole is a noise-cancelling feature and does not allow extra noise into the microphone.
- You can clean the ear cushions or other parts of the headset by using a cleaning wipe designed for use with electronic and plastic equipment. Allow to dry before replacing them. Suitable tissues are available from GN Netcom A/S; contact your GN Netcom A/S representative for details. After extensive use, the ear cushion may become worn. New ear cushions are available from GN Netcom A/S.
Jabra
A BRAND BY
GN Netcom
© 2012 GN Netcom A/S. All rights reserved. Jabra® is a registered trademark of GN Netcom A/S. All other trademarks included herein are the property of their respective owners. The Bluetooth® word mark and logos are owned by the Bluetooth SIG, Inc. and any use of such marks by GN Netcom A/S is under license. (Design and specifications subject to change without notice).
MADe IN CHINA
CE

- PART OVERVIEW
- CONNECTING THE HEADSET TO THE PHONE
- ENGLISH
- THANK YOU FOR BUYING A GN NETCOM A/S PRODUCT
- WEARING THE HEADSET WITH THE HEADBAND
- HOW TO WEAR THE HEADBAND
- HOW TO POSITION THE MICROPHONE
- HOW TO ROTATE THE BOOM ARM
- HOW TO ATTACH THE EAR CUSHION
- HOW TO REMOVE THE HEADBAND
- HOW TO PRESS THE HEADSET INTO THE HEADBAND RING ON THE HEADBAND
- WEARING THE HEADSET WITH AN EAR HOOK
- HOW TO ATTACH THE EAR GEL
- HOW TO PRESS THE HEADSET INTO ITS EAR HOOK RING ON THE EAR HOOK
- HOW TO POSITION THE EAR HOOK ON THE EAR HOOK RING FOR LEFT OR RIGHT EAR USE
- HOW TO WEAR THE EAR HOOK
- WEARING THE HEADSET WITH THE NECKBAND
- HOW TO PRESS THE HEADSET INTO THE NECKBAND RING
- HOW TO POSITION THE NECKBAND ON THE NECKBAND RING
- HOW TO WEAR THE NECKBAND
- POSITION THE MICROPHONE
- WEARING A DUO HEADSET
- ADJUST THE HEADBAND LENGTH
- HOW TO WEAR THE HEADSET
- CONNECTING THE HEADSET TO A PHONE OR COMPUTER
- CARE, CLEANING AND MAINTENANCE
- JABRA
Brand : JABRA
Model : BIZ 2400
Category : Headphones