BABYCALL 2 - Baby monitor BEABA - Free user manual and instructions
Find the device manual for free BABYCALL 2 BEABA in PDF.

User questions about BABYCALL 2 BEABA
0 question about this device. Answer the ones you know or ask your own.
Ask a new question about this device
Download the instructions for your Baby monitor in PDF format for free! Find your manual BABYCALL 2 - BEABA and take your electronic device back in hand. On this page are published all the documents necessary for the use of your device. BABYCALL 2 by BEABA.
USER MANUAL BABYCALL 2 BEABA
PLEASE READ THE FOLLOWING INSTRUCTIONS CAREFULLY AND KEEP FOR FUTURE REFERENCE.
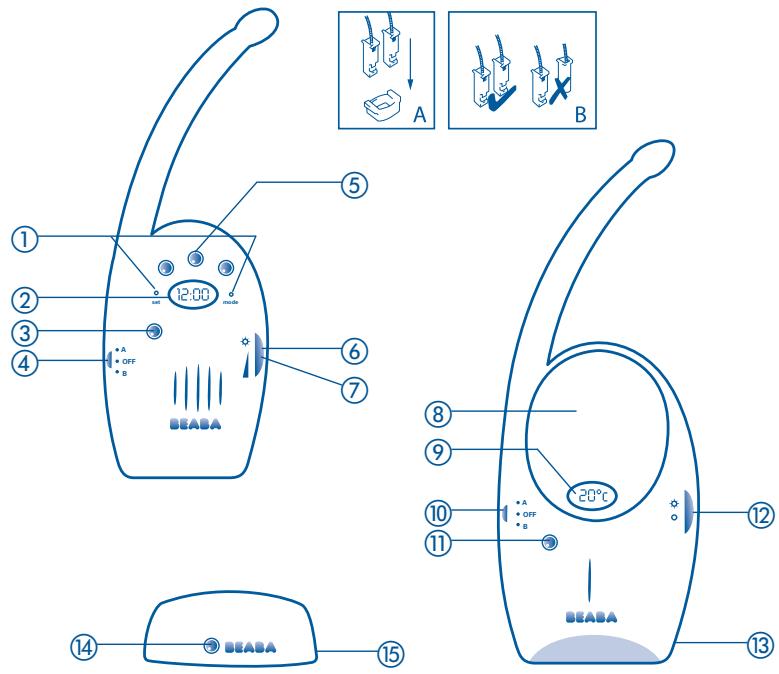
Parents receiving unit
① Clock adjustment points
②Clock
③ Power-on indicator
On - Off by selecting a channel (A or B)
⑤ LED display
⑥ LED display indicator
Volume control
Baby transmitter unit
Night light
Room temperature display
On - Off by selecting a channel (A or B)
10 Power-on indicator
12 Nightlight control switch
③ 230V/9V (SELV*)
Plug-in adapter
Base station
14 Charging indicator
15 230V/9V (SELV*)
Plug-in adapter
- Secondary low voltage
This monitoring device consists of a BABY TRANSMITTER UNIT
featuring a night-light and room temperature display and a
PARENTS RECEIVER UNIT featuring a clock and a luminous sound
transmission level indicator. Babycall II MONITORS BABY'S SLEEP FROM A
DISTANCE
GB
BABY TRANSMITTER UNIT
Mains-operated only using one of the two 230V / 50Hz adapters supplied (hazardous voltage). Il must be stood upright, with front panel facing the baby from a distance of 1 - 2 metres.
Transmission: selecting Channel A or B will start transmission: the green power-on LED glows.
Night light: the night-light works independently of the transmitter and is activated by pressing the right-hand button.
Temperature: the room temperature is only displayed when the transmitter is working.
PARENTS RECEIVER UNIT
Stands on its recharging base for mains operation using the second adapter provided or as a portable, running off rechargeable battery provided.
Reception: selecting Channel A or B will start reception : the green power-on LED glows. Important: the transmitter and receiver units must be switched to the same channel.
TWO RECEPTION MODES
AUDIO
Audio reception works when the unit is in its base station or in portable mode: turn the right-hand knob downwards to adjust the volume level to suit.
Recharging: the battery for portable reception automatically recharges when the unit is in its base plugged into the mains :
- Green indicator light glowing = charging
- Green indicator light out = charging completed
The receiver must be charged for 16 hours prior to first use in portable mode, and for 12 hours after that when reception deteriorates or suffers from interference such as crackling.
VISUAL
Visual reception works when the unit is in its base station or in portable mode: turn the right-hand knob upwards. The LEDs over the clock indicate the intensity of the sounds being made.
CLOCK
When setting up, remove the protective tab covering the button cell LR44-1,5V under the rechargeable battery (unscrew the cover plate).
Setting up: using an appropriate pointed instrument.
- Month: press SET once : the date and the time flash up alternately. Press SET a second time : adjust the month by pressing MODE.
- Date: press SET three times. Adjust by pressing MODE.
- Hour: press SET four times. Adjust by pressing MODE "A" for a.m. or "P" for p.m., depending on the time of day.
- Minutes: press SET five times. Adjust by pressing MODE. Press SET again to revert to the hour display, then press MODE to start at "00" seconds.
In use
- Hours/minutes: basic display.
- Month/Day: press once on MODE. Display automatically resets to hours/minutes.
- Seconds: press twice on MODE. Press MODE again to return to hours/minutes display.
PRECAUTION AND USAGE HINTS
The performance of babycall II, like any other radio wave transmitter, depends on what sort of obstructions there are between the transmitter and the receiver units, the atmospheric conditions, how the transmission and receiving units are oriented and the proximity of household appliances. Televisions and radios should be at least three metres away from the receiver unit.
The units should always be kept upright when in use.
Test the sound transmission and reception quality when using for the first time and regularly after that, making sure the units are far enough apart from one another.
The transmitter is a voice-activated device that automatically goes into stand-by mode when there is no noise, thereby reducing receiver battery discharge and mains power consumption (when it cuts in, an audible click is made).
To maximise the life of the rechargeable battery and get the best performance from babycall II, we recommend you run the receiver unit on mains power.
Avoid carrying the receiver around with you when reception is getting faint.
Keep the units away from all sources of dampness or intense heat (radiators, full sunlight...). The maximum ambient service temperature for babycall II is 28^ .
ONLY USE THE ADAPTERS SUPPLIED.
NEVER DISMANTLE OR IMMERSE THE UNITS IN LIQUIDS.
PERMANENT DAMAGE MAY BE CAUSED BY FAULTY CONNECTIONS OR IF THE RECHARGEABLE BATTERY SHORT-CIRCUITS. In particular do not connect the receiver unit polarity contacts to metal objects.
→ Never attempt to open flat batteries or throw them onto a fire or into water.
During storms babycall II should not be used, unplug it from the mains adapter
GB
VERY IMPORTANT - SAFETY
Adapters, recharging base station, transmitter and receiver units must be kept out of children's reach.
Babycall II should never be substituted for active baby monitoring by an adult.
Disconnect from the electrical mains using the adapter.
The mains outlet must be installed close to the unit and must be easy to reach.
CLEANING AND SERVICING BATTERIES
Appliances should be UNPLUGGED before wiping them clean with a damp cloth or a squeezed sponge. Do not use detergent.
Flat batteries: replace like for like
-
Watch button cell: LR44-1,5V
-
Rechargeable: Clover-leaf: 3,6V-280mAh
REPLACING RECHARGEABLE BATTERY
Receiver unit in "OFF" position
Unscrew the retaining screws on the battery cover plate.
Remove the discharged battery after removing the plug from the main socket.
Check polarity when inserting the new battery.
Note: if the shape of the plug supplied with the new battery is unsuitable, remove the plastic collar grip and separate the 2 connectors (DWG A). Try to make the connection again matching the polarities as follows: black/black wire, red/red wire - make sure the connectors are the same way round (DWG B).
Replace the cover plate first checking that the wires are tucked in properly and screw down.
Reminder: the appliance should be powered up with the new battery in place for 16 hours before using the receiver in portable mode.
PROBLEM SOLVING
Green power on LED does not light up:
- Check that the adapters are plugged in
- Recharge the battery
No green LED on the base station:
- Charging completed
- Check that the adapter is plugged in
- Replace the receiver unit properly on the base station
Green LED on: no sound transmission:
- Check the position of the volume control
- Recharge the battery
Reception too weak, crackling:
- Check the battery
- Recharge the battery
- Bring the units closer together
- Check which way they are pointing
- Turn up the volume level
- Move the receiver unit away from any electrical appliances you have running
- Place the receiver unit on its base station plugged into the mains (boots radio signal)
- Change channels (on both units)
Hissing:
- Turn down the volume level
- Move the receiver unit away from the transmitter
Clock stopped:
With battery cover off:
- Check the button battery is in the right position
- Replace the flat button battery
GUARANTEE
In addition to the legal warranty provided for by law on hidden defects, in
GB
ant event, BEABA guarantees this product exclusively for domestic usage against any manufacturing fault or material defect.
The warranty period is 1 year from the date of purchase. During this period, the product will either be repaired or replaced free of charge.
The guarantee is only valid if proof of purchase is produced with the product.
It does not cover damage resulting from any use of the product not described in the instructions or of the product is knocked or dropped.
BEABA will not be held responsible for material damage or personal accidents resulting from any installation that does not comply with legal or statutory provisions.
Calling a guarantee does not give right to damages and interest.
We reserve the right to implement any modifications to the technical, design or colour specifications that we wee fit to do.
This document has no contractual value apart from its guarantee clauses.
WARNING
Do not use your appliance if it is not working correctly or if it has been damaged. If this happens you should contact Beaba service centre.
Tel: +33 (0)4 74 73 15 63 savbeaba@groupe-berchet.com