
CD MP3 USB CAR RADIO MD 80877 - Car stereo MEDION - Free user manual and instructions
Find the device manual for free CD MP3 USB CAR RADIO MD 80877 MEDION in PDF.

| Brand | MEDION |
| Model | CD MP3 USB CAR RADIO MD 80877 |
| Product type | Car radio |
| Operating voltage | DC 12V, negative ground connection |
| Dimensions (W x D x H) | 178 x 165 x 50 mm |
| Output power | 4 x 25 W RMS |
| Fuses | 1 A (red), 15 A (pink), 0.5 A (yellow) |
| Radio bands | FM1, FM2, FM3 (87.5-108 MHz), MW (522-1620 kHz), LW (144-290 kHz) |
| CD player | Audio CD, CD-R, CD-RW, MP3 (ISO 9660 & Joliet) |
| Supported audio formats | MP3, WMA (playback via CD, USB, SD/MMC) |
| RDS functions | AF, REG, TA, EON, PTY |
| Display | Display of RDS and ID3 Tag information |
| Front panel | Detachable with anti-theft protection (flashing LED) |
| Sound settings | Volume, bass, treble, balance, fader, loudness, DSP (Flat, Pop, Classical, Rock) |
| Inputs | USB port, SD/MMC slot, antenna input, ISO connector |
| Outputs | RCA (for external amplifier), antenna relay cable |
| Safety | Class 1 laser, road safety instructions, child protection |
| Cleaning | Soft, dry cloth, no solvents |
| Operating temperature | Avoid extreme temperatures, condensation |
| Weight | Approx. 1.2 kg (estimate) |
| Repairability | Do not open, contact an authorized service center |
| Standards | Directive 72/245/EEC (electromagnetic compatibility) |
Frequently Asked Questions - CD MP3 USB CAR RADIO MD 80877 MEDION
User questions about CD MP3 USB CAR RADIO MD 80877 MEDION
0 question about this device. Answer the ones you know or ask your own.
Ask a new question about this device
Download the instructions for your Car stereo in PDF format for free! Find your manual CD MP3 USB CAR RADIO MD 80877 - MEDION and take your electronic device back in hand. On this page are published all the documents necessary for the use of your device. CD MP3 USB CAR RADIO MD 80877 by MEDION.
USER MANUAL CD MP3 USB CAR RADIO MD 80877 MEDION
EON-TA (,,Enhanced Other Network Information")
Volume/basses/aigus/balance/fader
TA ("Traffic Announcement") - RADIOGUIDAGE
EON-TA ("Enhanced Other Network Information")
EON-TA ("Enhanced Other Network Information")
BEEP 2ND, BEEP ALL o BEEP OFF
EON-TA ("Enhanced Other Network Information"):
BEEP 2ND, BEEP ALL o BEEP OFF
TA ("Traffic Announcement") - VERKEERSINFORMATEI
EON-TA ("Enhanced Other Network Information")
BEEP 2ND, BEEP ALL of BEEP OFF
- RELEASE:Remove the control panel
- EJECT: Eject CD
- MULTIJOG: Sets volume, bass, treble, balance and fader
- SEL: Sound settings: volume, base, treble, balance, fader; EON settings menu
- MU: Mute
- CD compartment
- Display
- PWR:Switch the player on or off
- Modem: Choose either radio or CD mode
- MMC SD: MMC/SD-compartment
- Cover for USB/SD/MMC
- AF: Sets Radio Data System mode
- TA (Traffic alarm): Traffic information
- PTY: Display PTY information
15.-20.: Station buttons M1-M6 - PLAY/PAUSE: Start/pause playback/Playback first track, number button M1
- INT: Play track, number button M2
- RPT: Set repeat function, number button M3
- RDM: Random playback, number button M4
- Number button M5
- Number button M6
- A.P.: Automatic channel memory/Play channel, Search MP3 track, folder and directory
- SCN: Searches for AF stations
- BND: Select band in radio mode, display ID3 tag information MP3 mode
- TUNE/ TRACK/ SKIP +: Search forwards through channels/CD tracks
TUNE/ TRACK/ SKIP -:Search backwards through channels/CD tracks - CLK: Set/display clock time
- USB: USB connection
Behind the front cover
- RESET:Return to factory settings
- Theft LED: Flashes when control panel is removed
TABLE OF CONTENTS
Safety instructions 4
Keep electrical equipment out of reach of children 4
Road safety 4
Never undertake your own repairs. 4
CD-player 4
Cleaning the device 5
Installation 5
Installation. 6
Installation instruction 6
Connection options 7
Inserting the radio into the ISO slot 8
The ISO adapter plug 9
Removing the unit 10
Control panel 11
Operation 12
Basic operation 12
Radio functions 14
RADIO DATA SYSTEM 15
EON settings menu 16
PTY functions 19
Playing CDs 20
Playing MP3-CDs 21
Play data from USB/SD/MMC data media 23
Troubleshooting 24
Disposal information 25
Technical data. 26
SAFETY INSTRUCTIONS

About these instructions
Please read these instructions carefully before using the device. Note the warnings on the device and in the operating instructions Store the operating instructions in the car. If you sell or give the car radio away, please ensure that you also pass on these instructions.
Keep electrical equipment out of reach of children
Never allow children to use electrical devices unattended.
If swallowed, batteries may endanger life. For this reason, keep the radio and batteries out of reach of children. If a battery is swallowed, please obtain immediate medical assistance.
Keep plastic packaging out of the reach of children. There is a risk of asphyxiation.
Road safety
Road safety should be your top priority. Use your car radio only in suitable traffic conditions. Please ensure that you are familiar with the radio before setting off.
You should always be able to hear police, fire and other emergency service sirens in good time while in your vehicle. For these reasons, please play your radio at an appropriate volume while driving.

Never undertake your own repairs
Never try to open and/or repair the device yourself. There is a risk of electric shock. If there is a defect contact our Service Centre or other suitable specialist workshop.
CD player
The CD player is a class 1 laser product. The device has a safety system that prevents dangerous laser rays escaping from the device during normal use. In order to avoid injury to the eyes, never manipulate or damage the unit's security system.

Handle the disc mechanism with care
Never place any objects other than CDs into the disc mechanism. These can damage the precision-engineered closing mechanism.
Cleaning the device
Use a dry soft cloth to clean the device. Avoid the use of chemical solutions and cleaning products because these may damage the unit's surface and/or inscriptions.
Installation
If you wish to install your car radio yourself, please refer to the installation and connection instructions in this manual.
GB
INSTALLATION
Installation instructions
- Insert the unit into the proper shaft or select a location to install the unit that will not affect the driver's ability to drive.
- Connect the cable shortly before finally installing the device. Ensure that this has been inserted correctly and that the system works properly.
- If changes have to be made to the vehicle, consult your vehicle dealer/ specialist workshop.
- Install the unit in such a manner that no injury can be caused during heavy braking.
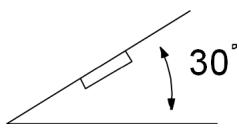
- If the unit is installed out of balance by over 30^ to the horizontal it may affect the output.
- Avoid installing the unit near strong heat sources (e.g. direct sunlight or heating air), dust, pollution or excessive shocks.
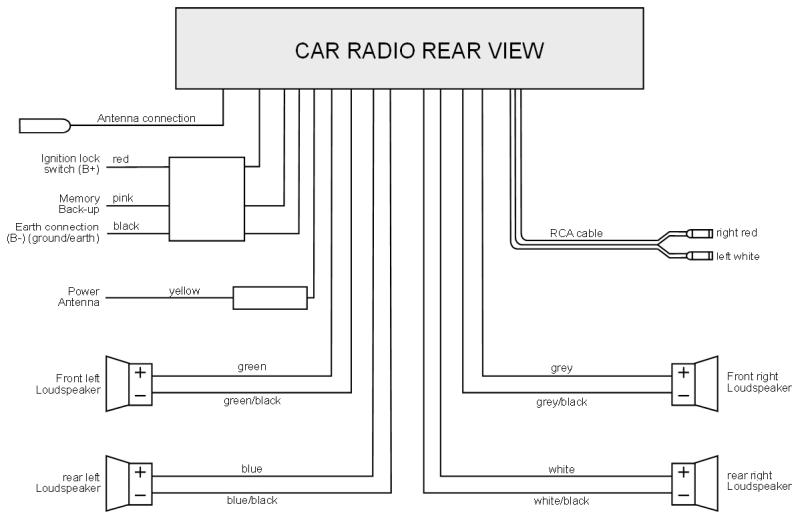
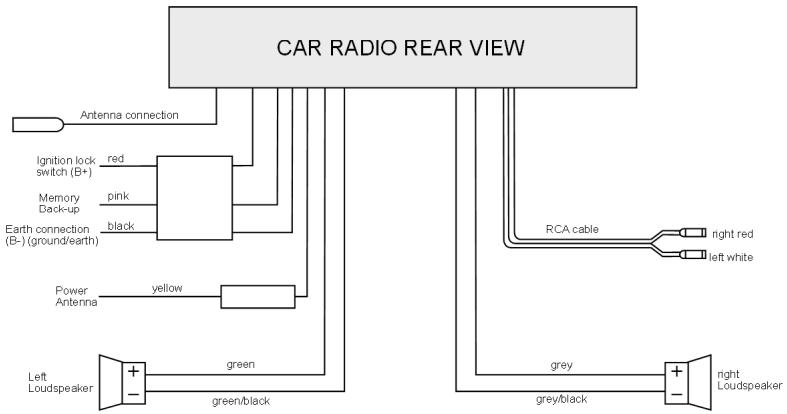
Connection options
Important information

Ensure that the pink memory back-up cable is connected to the permanent plus. Otherwise channel saving will not work.
You can connect an external amplifier to the RCA cable (red and white cinch socket). Please refer to your instructions for the external amplifier.
Four loudspeakers (quad system)
Two loudspeakers (dual system)
Inserting the radio into the ISO slot
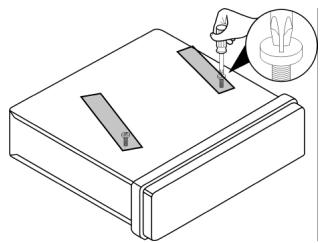
- Before installation always remove the two transportation safety screws in the top radio casing (recognizable because of their red flags)!
Assembly
The car radio can be fitted in any standard ISO slot for car radios. If your vehicle has no ISO slot, please consult a specialist workshop, dealer, or the specialist department of a car equipment warehouse.
- Now remove the mounting frame from the casing of the car radio.
- Insert the mounting frame in the ISO installation slot.
- Bend the flaps in the mounting frame with a screwdriver so that it is fixed firmly in place in the installation slot (see diagram).
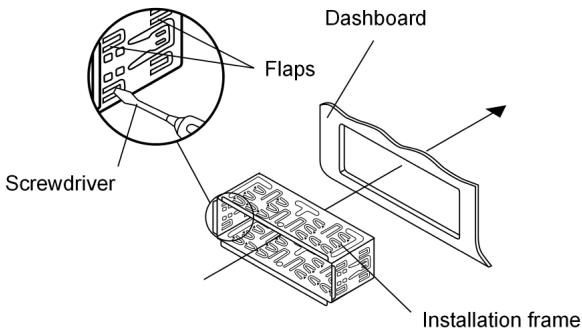
- Check that the frame is held securely.
- Now connect the car radio's ISO block to the vehicle's two ISO plugs.
- Connect the vehicle's antenna cable to the radio antenna socket.
- Push the car radio carefully into the slot until it fits securely.

Please use the car radio's ISO block for installation. These adapters can be obtained from specialist workshops, dealers, or specialist departments of car equipment warehouses.
If the ISO block is separated from the radio the warranty will become null and void!

While pushing the radio, take care to ensure that the cables are not damaged during the process.
- Press the RESET button (27) using the tip of a pen or another pointed object.
- Insert the control panel as described below.
The ISO adapter plug
Use the car's ISO adapter plug for the car radio's ISO socket block to produce a secure electrical connection.
Back-up cable
Ensure that the pink backup cable is pointed towards the permanent plus.
After making all the connections, press the RESET button (27).
Antenna relay cable
The blue cable is available for a relay-controlled antenna. The relay extends the antenna automatically when the radio is switched on. When it is switched off the antenna is retracted.
This relay cable can also be used to control an external amplifier. Please refer to the amplifier's operating instructions for the correct connections.

Never connect the blue cable to the engine cable; this could damage the radio!
Arrangement of the ISO block
| BLOCK B – Speakers | BLOCK A – Electricity supply | |||
| B 1|3|5|7|2|4|6|8| | 1 | rear right + | 1 | |
| 2 | rear right - | 2 | ||
| 3 | front right + | 3 | ||
| A 1|3|5|7|2|4|6|8| | 4 | front right - | 4 | Switched plus (permanent 12V supply from main electrical system) |
| 5 | front left + | 5 | Car antenna (also for external amplifiers, etc.) | |
| 6 | front left - | 6 | ||
| 7 | rear left+ | 7 | Alternating plus (alternating 12V voltage, via ignition) | |
| 8 | rear left - | 8 | Earth | |
Problems due to incorrect cable connections
In some vehicle models, the standard arrangement of the cables [4] and [7] in the ISO block A (see above) is exchanged at the factory.
If this is the case in your vehicle, certain functions may be impaired: stations may not be stored properly, for example.
To solve this, the red cable (switched plus) and the pink cable (permanent plus) will need to be reversed in the ISO block.
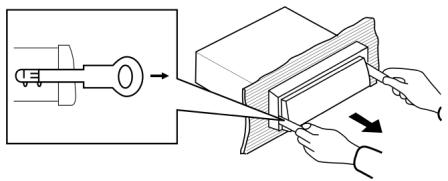
Removing the unit
To remove the unit, first remove the blind frame and introduce the left and right key into the corresponding slit on the side of the unit. The flaps will be bent back and you can remove the unit.
Control panel
Inserting the control panel
- Insert the control panel in the frame to the right and then press it into the frame on the left side. If the headphones are correctly mounted you will hear a "click".
- Verify that the control panel is properly located. If the control panel is not installed properly, error messages appear in the display and/or several keys will not function properly.
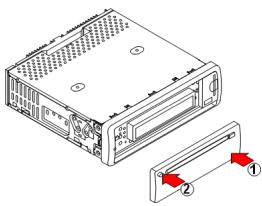
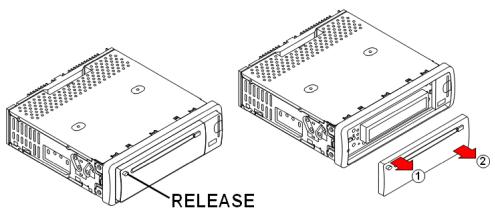
Removing the control panel
- Press the RELEASE button (1) The control panel is released and you can remove it from the left.
For protection, always keep the control panel in its case.
OPERATION
Basic operation
Switching on/off
- Press the PWR button (8) to switch the radio on or off.
Volume
- Turn the MULTIJOG (3) to adjust the volume to the level required.

Always set the volume such that you can still clearly hear the sirens from emergency vehicles!
Volume/Bass/Treble/Balance/Fader
- Press the SEL (4) button to display the current settings for volume (VOL), bass (BAS), treble (TRE), balance (BAL) and fader (FAD).
- You can change the settings using the MULTIJOG control dial (3). In the balance setting you can regulate the left/right volume distribution, and the fader setting regulates the front (F) /back (R) distribution.
Mute
- Press the MU (5) button to turn the sound off completely.
- You can switch the mute setting off by pressing any button. The mute setting is also cancelled if you receive a PTY or TA (traffic alarm) station.
MODE
- Press the MOD button (9) to switch between radio reception (display: RADIO) and CD/MP3 operation (display: DISC). If a USB media (Display: USB) has been connected or an SD/MMC card (Display: CARD) inserted you can also select to play back these media.
RESET
- To reset the car radio to the factory settings press the RESET button (27) with a pointed object, e.g. a pen.
-
Confirm the RESET (27)
-
when you connect the cable for the first time,
- if not all function buttons work properly,
- if an error message is displayed.
Setting clock time
Press the CLK button (25) to display the time.
After switching on for the first time or after pressing RESET the time resets itself automatically when receiving a channel using the Radio Data System. Proceed as follows to set the time manually:
While the time is displayed hold down the CLK (25) button. The time indicator flashes.
Turn the MULTIJOG control dial to the right to set the hours and to the left to set the minutes.
To save the new time press the CLK (25) button again or wait until the display resets.
GB
Radio functions
Selecting the waveband
- Press the BND (23) button to change between the FM1, FM2, FM3, MW (medium wave) and LW (long wave) frequency bands. You can store up to 6 stations in each band.

The three frequency bands FM1, FM2 and FM3 all cover the same frequency range (87.5 and 108 MHz), which means that you can save up to 18 channels.
Searching for a station
- Hold down one of the TUN/TRK/SKIP+/- (24) buttons for two seconds to start searching for channels automatically. The device will search for the next station automatically. Press one of the TUN/TRK/SKIP+/- (24) buttons to stop searching for channels automatically.
- If you press one of the buttons briefly you can move the channel frequency up or down manually.
Searching for an AF station
In one of the bands FM1, FM2 or FM3 press the SCN button(22) to search the UKW band in order to find stations that are broadcasting an AF signal. Stations that broadcast an AF signal broadcast alternative frequencies that also broadcast the selected channel.
The scanning process stops for 5 seconds each time it finds a station and then continues. Press the SCN (22) button to stop the search before it is finished.
Save station
- After the search function has found a station press one of the M1-M6 (15-20) buttons for around three seconds. A beep will sound to indicate that the station has been stored. You can save up to 6 stations in each bandwidth (FM1, FM2, FM3, MW and LW).
The device switches to normal channel display again after a few seconds.
Calling up stations
- Press the BND (23) button to select the frequency in which you have stored the station.
- You can open one of the saved stations by pressing one of the M1-M6 (15-20) station buttons.
Storing stations automatically (AP)
- Press the A.P. button. (21) to play each saved station on a frequency for around 5 seconds.
- Press the A.P. button (21) for around 2 seconds. The three frequencies FM1, FM2 and FM3 are searched for the six strongest stations and the stations found are saved in programme spaces 1 - 6 for each frequency range. Then the station that is saved in memory space 1 in frequency FM1 is played.
- Press one of the M1-M6 (15-20) buttons to stop searching.
RADIO DATA SYSTEM
RDS is a service provided by radio stations. In addition to traditional music and voice services they also broadcast additional information in the form of encrypted digital signals and these are analysed and displayed by the car radio. On the display you can now see the programme name and other information (traffic information, the track of the track currently being played, etc.).
Alternative frequencies (AF button)
- Briefly press the AF button (12) briefly to switch the AF function for the RDS mode on or off. If the function is on the display shows RF . If reception is now weak the radio switches automatically to an RDS station that is broadcasting the same programme.
The AF indicator in the display flashes when RDS information is received.
Regional programme mode (AF button)
Some stations transmit regional programmes at particular times.
- To switch the regional programme mode on or off hold down the AF button (12) for longer than 2 seconds. The display now shows REG ON. To switch on the regional mode wait until the display changes back to the radio display.
- REG ON: The radio only searches regional stations with traffic announcements.
- REG ON: The radio only searches stations with traffic announcements beyond the region.
TA ("Traffic Announcement")
- Briefly press the TA button (13) to switch this function on or off.
If the device is in TA mode (TA is shown on the screen) and a CD is playing the radio is switched on immediately if a traffic announcement is transmitted.
Stations that broadcast traffic announcements are shown by TP on the screen. If EON cannot find any radio traffic service in another program, it occasionally switches to the EON relay station. The volume is increased if it is below the threshold.
If the TA function is on you can use the TUN/TRK/SKIP+/- (24) button to only save/find stations that broadcast traffic announcements during automatic station search.
You can interrupt the radio if it changes from CD/MP3 mode or from a channel without traffic announcements to a channel with traffic announcements. For this press the TA button (13). The TA function is now paused without the TA mode being switched off.
EON (Enhanced Other Network Information)
The extended other network information (EON) provides additional functions for locating a traffic announcement station. In particular, the device also switches to traffic announcements if you are listening to a station that does not provide travel announcements. After the announcement it switches back to the previous station.
- Hold down the TA button (13) for longer to choose between the EON TA LOCAL/EON TA DISTANCE modes.
EON-LO - Local mode: In this mode a search is made for traffic announcement stations in the local area. EON TRL0 flashes in the display.
EON-DX – Long-distance mode: This mode searches for traffic announcement stations in a wider area. EON TR DXflashes in the display.
EON settings menu
-
Hold down the SEL button (4) in the radio mode. The EON setting menu opens.
-
Press the SEL button (4) repeatedly to open the sub-menus: You can change the setting in a sub-menu using the MULTIJOG (3) control dial. The settings do not require confirmation and are saved as soon as the display returns to radio or CD mode.
TA SEEK or TA_ALARM
TA SEEK: If you leave the reception range or the signal for traffic announcements becomes weaker the search process is started and searches for the strongest TA station (station with traffic announcements).
TA ALARM: If you leave the reception area or the signal for traffic announcements becomes weaker an alarm signal sounds.
PI SOUND or PI MUTE
PI SOUND: Station search with sound.
PI MUTE: The sound is muted when searching for stations.
RETUNE L or RETUNE S
- RETUNE L ("long"): The search for a station with the correct PI code lasts for 90 seconds.
RETUNE S ("short"): The search for a station with the correct PI code lasts for 30 seconds.
MASK DPI or MASK ALL
- MASK DPI: Hides AF stations that have a different PI code.
- MASK ALL: Hides AF stations that have a different PI code and all stations that do not have a PI but have the same transmission frequency.
BEEP 2ND, BEEP ALL or BEEP OFF
BEEP 2ND: A signal sounds if a button is pressed for a long time;
BEEP ALL: A signal sounds whenever a button is pressed,
BEEP OFF: Signal off.
SEEK1 or SEEK2
SEEK1: Station search stops when the next station is found.
SEEK2: Station search stops when you release one of the TUN/TRK/SKIP+/- (24) buttons and the next station is received.
DSP OFF, FLAT, POP M, CLASSICS or ROCK
DSP OFF: Audio output without digital effects (digital sound processing).
- FLAT,POP M,CLASSICS or ROCK: Various digital effects for audio output.

Please note that when the digital effect is switched on the BRS (Bass) and TRE (treble) settings are not available by pressing the SEL (4) button.
LOUD ON or LOUD OFF
LOUD ON: Loudness switched on.
LOUD OFF: Loudness switched off.
STEREO/MONO
- Set audio output to stereo or monotone. When receiving a stereo station a stereo icon is displayed on the screen
DX or LOCAL
DX: The sensitivity of reception is set to cross-regional stations.
- LOCAL: The sensitivity of reception is set to regional (local) stations.
VOL LAST or VOL ADJUST
VOL LAST: After switching on, the volume setting before the device was switched off is adopted.
- VOL ADJ: After switching on, a fixed volume setting is adopted; this can be set in the VOL ADJ sub-menu. For this press SEL (10) to open the A VOL setting. Set the volume level that is to be used when you next switch on using the MULTIJOG (3) control dial. The lowest value is 10.
PTY functions
PTY (Program Type Code)
- To activate the menu, press the PTY button (14). Then press one of the M1-M6 number buttons to select a PTY entry for music types.
- Press the PTY (14) button again to select a PTY entry for voice transmissions using the number buttons.
- When you now release the button the radio starts searching for stations that match the selected PTY entry automatically. The search stops at the first station. Please refer to the following table for the PTY entries:
| Key | Type of music | Type of speech programmes |
| M1 | POP M | NEWS, AFFAIRS, INFO |
| M2 | EASY M, LIGHT M | SPORT, EDUCATE, DRAMA |
| M3 | CLASSICS; OTHER M (other music) | CULTURE, SCIENCE, VARIED |
| M4 | JAZZ, COUNTRY | WEATHER, FINANCE, CHILDREN |
| M5 | NATION M; OLDIES | SOCIAL, RELIGION |
| M6 | FOLK M | TRAVEL, LEISURE, DOCUMENT |
Please note that this information will depend on the region, the broadcaster and the station.

If no RDS or PTY information is received "PTY NONE" is displayed on the screen.
Playing CDs
Information on playing CDs
Moisture and high humidity may cause the CD player to malfunction. If this occurs switch the vehicle's heater on to evaporate the humidity before use. Never expose the CD player to extremely high or low temperatures.
Inserting and removing CDs
- Insert the CD into the slot with the labelled side upwards (6). The CD will now be played automatically.
- Press the EJECT button (2) to remove the CD. The CD will be ejected. The car radio will change back to radio mode.

Do not drive with a CD projecting from the device. Remove the CD first.
Skip tracks/10 Skip tracks
- By pressing the TUNE/TRACK/SKIP+/- (24) buttons, you can select the previous or next track on the CD. The track number is shown on the display.
- Press the M5 (19) and M6 (20) buttons to jump forward or backwards 10 tracks.
Pausing the CD
- You can pause playback by pressing the PLAY/PAUSE (15) button (14). Pressing the button again will restart CD playback.
Fast forward/rewind
- Hold down the TUNE/TRACK/SKIP+ (24) or buttons for longer to start fast forward or backwards.
Preview track
- Press the INT button (16). S-INT is displayed on the screen. All tracks are played for 10 seconds each. If you press the button again the normal playback continues.
- Press the INT (16) button for longer when playing MP3s. D-INT is displayed on the screen and the first 10 seconds of each track in the current folder is played.
- Press INT again to continue normal playback.
Repeat a track
- Press the RPT button (17) to repeat the current track. Further pressing of the button will change the playback mode back to normal.
Random track playback
- Press the RDM button (18). The player will "shuffle" through the tracks, playing them in random order. Pressing the button again will change the playback mode back to normal.
Playing MP3 CDs
The basic functions are the same as those for audio CDs (refer to previous chapter). However, for MP3 CDs you can select the track and artist directly. The use of this function and other MP3-specific functions will depend to some degree on the MP3 CD itself. Please bear this in mind when producing this type of CD (refer to next chapter).
All common codes can be played back.
Produce/Display MP3 CDs; ID3 tags (BD button)

As with data CDs, MP3 CD-ROMs may contain individual tracks or folders. When producing an MP3 CD please ensure that you only save the tracks in folders and that none are saved on the same level as the folders. Mixing tracks and folders at the same level may produce playback problems.
When producing an MP3 CD you can also save so-called "ID3 tags" (we recommend using an ID3 tag editor for entries). This is a block of information stored on an MP3 CD lying "behind" the actual music information on the MP3. This may include such items as the artist, track, album name, year of publication and a short comment. The car radio can read this block of information and show it on the display.
- To display the ID3 tags press BND (23). The category changes each time you press the button: > TRACK > ARTIST > ALBUM NAME > YEAR OF PUBLICATION > COMMENT.
Searching for tracks (numbers) (A.P. button)
Search for track numbers
- Press the A.P. button. (21). Now enter the first digit of the track number using the MULTIJOG (3) control dial and confirm by pressing SEL (10). The cursor moves to the next digit.
- Now enter the second digit of the track number with the MULTIJOG (3) control dial. Confirm with SEL (4). The track with the entered number will be played back.
Search for track name (letters)
Press A.P. (21) twice.
- Now you can search for the start of a track by entering a letter via the MULTIJOG (3) control dial as per the table below. Press SEL (4) to move into the folders found.
- Press SEL 4) to start the first track with the letter that you entered.
- If a director is found with the selected letter you can open this directory and select a track using the MULTIJOG (3) control dial.
- You restart playback by pressing SEL (4).
- Within the directory you search using TUNE/TRACK/SKIP+/- (24).
Searching for directories
Searching from root directory
- Press A.P. (21) three times. The top directory appears for a few seconds; then the first directory or track.
- You open a directory by pressing SEL (4) and search by pressing TUNE/TRACK/SKIP+/- (24).
PLAY DATA FROM USB/SD/MMC DATA MEDIA
To play back USB media, SD or MMC cards first remove the cover from the side of the device by pulling it to the right.
Replace the cover when you are no longer using the USB or SD/MMC card slots to avoid dust front entering the slots.
USB media
You can connect an MP3 player or another data medium to the USB connection on the front of the unit.
Your car radio can process USB data media up to 1GB.
The directory structure may contain up to 1024 folders, 4096 files and a directory depth of 8 levels.
As soon as the external unit is connected, the car radio will search for MP3 or WMA files on the data medium and the message USB will appear on the screen (7). Files on the external data medium and search functions work in the same way as for MP3 CD's.
SD/MMC cards
You can insert SD and MMC cards that contain MP3 or WMA files into the SD/MMC card slot.
As soon as the card is inserted the car radio searches on the card for MP3 or WMA files and the CARD message is displayed on the screen (7). Playing back files on a SD or MMC card and the search function work in exactly the same way as for MP3-CDs.
TROUBLESHOOTING
| PROBLEM | POSSIBLE CAUSE | SUGGESTIONS |
| The device cannot be switched on. | The ignition is not switched on. | Switch on ignition by turning the key. |
| One of the fuses is defective. | Replace the fuse. | |
| The CD is not loaded or ejected. | There is already a CD in the car radio. | Remove the CD. |
| The CD has been put in the wrong way round. | Insert the CD with the label upwards. | |
| The disc is contaminated or damaged. | Clean the CD or insert another CD. | |
| The temperature in the car is too high. | Wait until the environmental temperature has normalised. | |
| Condensation! | Switch the player off for a few hours and then retry. | |
| No sound! | The volume has been set to minimum. | Increase the volume. |
| Cables are not properly connected. | Check the cable connections | |
| Function buttons do not work. | The integrated micro-computer cannot work because of interference. | Press the RESET (27) button. |
| The control panel is not properly fitted. | Check the correct fitting of the control panel. | |
| The CD skips. | The installation angle is more than 30°. | Correct the installation angle. |
| The disc is contaminated or damaged. | Clean the CD or insert another CD. | |
| Errors on CDs you have created yourself. | Check the CD in another playback device. | |
| Radio and/or automatic search do not work. | The antenna cable is not connected properly. | Check the correct location of the antenna cable. |
| The transmission signals are too weak. | Set the station manually. | |
| Station memory does not work. | The cable for the permanent plus (pink) is not connected properly. | Check the cable connections For this, refer to the “Installation” on Page 6 chapter. |
DISPOSAL INFORMATION
Packaging

All packaging and packaging materials that are no longer required can and should be recycled.

Device
At the end of its life, the radio should not be disposed of in household rubbish. Seek the advice of your local authority on correct, environmentally-friendly disposal.
TECHNICAL DATA
GENERAL INSTRUCTIONS
Operating voltage: DC 12V, negative earth connection
Casing dimensions: 178 × 165 × 50 ~mm(W × D × H)
Output power: 4 × 25 Watt (top music output)
Fuses: 1 A (red); 15 A (pink), 0,5 A (yellow)
RADIO
| Radio band | Frequency |
| FM1, FM2 and FM3 frequency bands | 87.5 – 108MHz |
| MW waveband | 522 KHz - 1620 KHz |
| LW | 144 KHz - 290 KHz |
CD/MP3 PLAYER
Laser output: Class 1 laser product
Frequency range 40Hz - 18kHz
MPEG rate 64 - 320kbps
MP3 playback ISO 9660 & Joliet MP3 format

SUPPORTED CD FORMATS
Audio CDs, CD-Rs and CD-RWs can all be played.


Please note:
These days there are many non-standard CD recording and copy protection procedures in use and a wide range of CD-R and CD-RW discs on the market. This can occasionally lead to read errors or delays. This does not mean the device is faulty.
This device has been approved in accordance with Directive 72/245/ EEC (last amended by Directive 95/54/EC) on "Electromagnetic compatibility" (so-called e approval).

Subject to technical changes.
VISTA GERAL
Painel de commando
Volume/graves/agudos/Balance/Fader
EON-TA ("Enhanced Other Network Information")
TA (Traffic Announcements) - INFORMACJE DROGOWE
EON-TA (Enhanced Other Network Information)
EON-TA (,,Enhanced Other Network Information")
EON-TA (,,Enhanced Other Network Information")
To ouotnma pnpopopiov otaoew "EON" oac npexi epioootepc
duvatotntec kat aynavaonno taohou nou mtabidie i npopopice c kivnonc.
Eidiokotepa, n ouokeun aalaczi autouata to otauo o evav otauo nou
muetabidei npopopiec kivnonc, akoukaai eav akoute allo otao, o onoioc
dev mtabidiei npopopoeic kivnonc. MetaTIC pnpopoeic kivnonc,
enavepxetai kai naI o npoyouevoc otaouc.
BEEP 2ND, BEEP ALL n BEEP OFF
BEEP 2ND: Otav eva koupi kpatetia nattmuévo yia apkετá δεutepoλεπτa, akouyεta evac xos.
BEEP ALL: Σε καθε πάτημα kούμιού ακόγεται ενας ἡχος.
BEEP OFF: v k o u y t a i k a v e v a c x o c