
MD 84003 LIFE P62033 - Car stereo MEDION - Free user manual and instructions
Find the device manual for free MD 84003 LIFE P62033 MEDION in PDF.

| Type de produit | Autoradio |
| Marque | Medion |
| Modèle | MD 84003 LIFE P62033 |
| Dimensions (L x P x H) | 178 x 160 x 50 mm |
| Tension d'alimentation | DC 12 V (masse négative) |
| Courant de fonctionnement max. | 10 A |
| Puissance de sortie | 4 x 20 W (RMS) |
| Gammes de fréquences radio | FM: 87.5–108 MHz, MW: 522–1620 kHz |
| Bluetooth | Version 2.1 + EDR, portée environ 10 m |
| Formats audio pris en charge | CD audio, MP3, WMA (via USB/SD), AUX |
| Connectivité | USB (1.1/2.0, jusqu'à 32 Go), SD/SDHC (jusqu'à 32 Go), AUX 3.5 mm, sortie RCA (2x) |
| Écran | Affichage LCD avec informations RDS |
| Fonctions principales | Radio RDS, lecteur CD/MP3, USB, SD, AUX, Bluetooth mains libres, téléphone |
| Entretien et nettoyage | Utiliser un chiffon sec et doux ; ne pas utiliser de produits chimiques |
| Sécurité | Débrancher la batterie avant installation ; ne pas ouvrir ou réparer soi-même |
| Accessoires fournis | Télécommande (pile CR2025 incluse), façade détachable, étui, cadre de montage, clés de démontage, câbles ISO, manuel, carte de garantie |
| Informations générales | Fabriqué par Medion AG, Allemagne ; CE, RoHS |
Frequently Asked Questions - MD 84003 LIFE P62033 MEDION
User questions about MD 84003 LIFE P62033 MEDION
0 question about this device. Answer the ones you know or ask your own.
Ask a new question about this device
Download the instructions for your Car stereo in PDF format for free! Find your manual MD 84003 LIFE P62033 - MEDION and take your electronic device back in hand. On this page are published all the documents necessary for the use of your device. MD 84003 LIFE P62033 by MEDION.
USER MANUAL MD 84003 LIFE P62033 MEDION

HINWEIS!
natural_image
Diagram of a server rack with an internal socket and cable, showing no text or symbols
HINWEIS!
natural_image
Diagram of a mechanical component with directional arrows indicating movement (no text or symbols)DE
EN

HINWEIS!
natural_image
Technical illustration of a mechanical clamp or bracket being cut with a tool, showing no text or symbols.Medion AG
Am Zehnthof 77
45307 Essen
Deutschland
1. About these Instructions....47
1.1. Warning symbols and key words used in these instructions ....47
1.2. Intended use....48
EN
2. Safety instructions 49
2.1. Keep electrical equipment out of reach of children 49
2.2. Purpose....49
2.3. Road safety 49
2.4. Never carry out repairs yourself....49
2.5. Sunlight 50
2.6. The CD player ....50
2.7. Drives and connections....50
2.8. Cleaning the device....50
2.9. Battery information....50
3. Package contents 52
4. Installation....53
5. Overview of the device 54
5.1. Control panel....54
5.2. Behind the control panel....56
5.3. Remote control....57
6. Installation and initial use .... 59
6.1. The ISO slot ....59
6.2. Fitting the mounting frame in the ISO slot....59
6.3. Connections on the back of the radio ....61
6.4. Test station memory 61
6.5. Using the car radio....62
7. Control panel....63
7.1. Attaching the control panel....63
7.2. Removing the control panel 63
7.3. Contacts....63
7.4. Reset 63
7.5. Removing the unit....64
8. Information on the cables 64
8.1. Overview of ISO socket A: power 64
8.2. Overview ISO connector B: speakers 65
9. First operation....67
9.1. Changing batteries....67
10.Operation....68
10.1. Basic functions....68
10.2. Radio functions....71
10.3. PTY ("Program Type") functions....73
45 of 86


10.4. Operation with data media (audio CDs, MP3, USB, SD, AUX) .....74
10.5. The CD drive....75
10.6. USB media....75
10.7. SD cards....76
10.8. Device connected to AUX IN....76
10.9. Playback functions....76
11. Bluetooth function....78
11.1. Pairing 78
11.2. Connection status....79
11.3. Telephone calls 79
11.4. A2DP mode 81
12.Troubleshooting....81
13.Disposal 83
14. Technical data....84
15. Declaration of conformity 85
16.Legal notice 85
1. About these Instructions
DE

Please be sure to read these operating instructions carefully and follow all instructions given. The instructions will help you to operate the device reliably and help increase its service life. Always store these instructions near the device. Keep these operating instructions so that you can pass them on with the device if you sell it.
EN
1.1. Warning symbols and key words used in these instructions
 | DANGER!Warning of immediate risk of fatal injury!WARNING!Warning: possible mortal danger and/or serious irreversible injuries!CAUTION!Warning: possible light or moderate injuries! |
 | CAUTION!Please follow the guidelines to avoid property damage. |
 | PLEASE NOTE!Additional information on using the device! |
 | PLEASE NOTE!Please follow the guidelines in the operating instructions. |
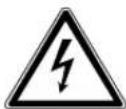
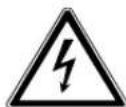
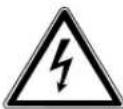
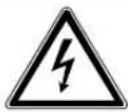 | WARNING!Warning: danger of electric shock! |
| • Bullet point/information on operating steps and results | |
| ▸ Tasks to be performed | |
1.2. Intended use
The car radio is an audio device for playing and listening to music (e.g. CD or radio) and has an additional Bluetooth function. The Bluetooth function enables you to connect your mobile phone to the car radio and make calls. The car radio is only designed for use in a motor vehicle.
The device is intended for private use only and not for industrial/commercial use. Please note that we shall not be liable in case of improper use:
- Do not modify the device without our consent and do not use any auxiliary equipment which we have not approved or supplied.
- Use only spare parts and accessories which we have supplied or approved.
- Follow all the instructions in these directions for use, especially the safety information. Any other use is deemed improper and can cause personal injury or damage to the product.
- Do not use the device in areas where there is a risk of explosion. This includes e.g. tank farms, fuel storage depots or areas in which solvents are processed. It is also not permitted to use this device in those areas where the air is polluted with fine particles (e.g. flour dust or sawdust).
- Do not expose the device to any extreme conditions. The following should be avoided:
-High humidity or moisture
-Extremely high or low temperatures
-Direct sunlight
-Open fire
2. Safety instructions
2.1. Keep electrical equipment out of reach of children
- Ensure that children do not play with the device by never allowing them to use it unsupervised. - This device is not intended for use by people (including children) with reduced physical, sensory or mental abilities or by those without experience and/or knowledge, unless they are supervised by a person responsible for their safety or they have been instructed in its use by that person.

DANGER!
Keep plastic packaging out of the reach of children. There is a risk of suffocation.
2.2. Purpose
- The car radio has only been designed for installation and operation in cars.
2.3. Road safety
- Road safety should be your top priority. Use your car radio only in suitable traffic conditions. Please ensure that you are familiar with the radio before setting off. - You should always be able to hear police, fire and other emergency service sirens in good time while in your vehicle. For this reason, please play your radio at an appropriate volume while driving.
2.4. Never carry out repairs yourself
- Do not use the device if the casing or cable is damaged.

WARNING!
Never try to open and/or repair the device yourself. There is a risk of electric shock.
DE
EN
- If there is a fault, please contact our Service Centre or another suitably qualified specialist workshop to avoid putting yourself at risk.
2.5. Sunlight
If the inside of the vehicle has become very hot, e.g. because of lengthy exposure to sunlight, do not operate the car radio immediately.
- Wait until you have been driving for a while and the car radio has had a chance to cool down.
2.6. The CD player
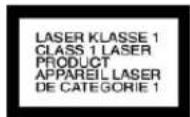
The CD player is a class 1 laser product. The device has a safety system that prevents dangerous laser rays from escaping during normal use. To avoid eye injuries, never tamper with or damage the safety system of the device.
2.7. Drives and connections
- Do not insert any foreign bodies into the openings of the car radio (disc compartment, USB slot, card slot, AUX slot). This could damage the compartments and slots.
- Always insert discs into the disc compartment with the title side upwards. Never apply excessive force to insert a disc or card or connect an external device. If you feel resistance, try a different method or medium.
2.8. Cleaning the device
- Use a dry, soft cloth to clean the device. Do not use chemical solutions and cleaning products because these may damage the surface and/or the inscriptions on the product.
WARNING!
Protect the device from moisture. Do not touch the device with wet hands. There is a risk of electric shock!
2.9. Battery information
- Keep batteries away from children. Seek medical attention immediately if a battery is swallowed.
50 of 86
- Only use new batteries.
- Please note the polarity (+/-) when inserting the batteries.
- ATTENTION! There is a risk of explosion if batteries are replaced incorrectly! Replace the batteries only with batteries of the same or equivalent type.
- Never try to recharge non-rechargeable batteries. There is a risk of explosion!
- Store batteries in a cool, dry place. Strong direct heat can damage batteries. Therefore, keep the product away from strong heat sources.
- Never short-circuit batteries.
- Never throw batteries into a fire.
- If the device is not going to be used for long periods, remove the batteries.
- Remove leaking batteries from the device immediately. Clean the contacts before inserting a new battery. There is a risk of chemical burns from battery acid!
• Always remove dead batteries from the device.
3. Package contents
Please check your purchase to ensure that all items are included. If anything is missing, please contact us within 14 days of purchase.
The following items are supplied with the product you have purchased:
- Car radio
- Remote control containing CR2025 battery
• 2 ISO sockets with cables - Control panel
- Case
- Mounting frame (inserted)
- 2 keys to remove the mounting frame and remove the device
• Additional mounting material for individual installation
• These operating instructions - Warranty card
4. Installation
We recommend that the device is installed by a trained technician. This ensures that the device will work perfectly. Incorrect cabling may result in damage to the device and your car. If you wish to install your car radio yourself, please refer to the installation and connection instructions in this manual.
WARNING!
Disconnect the minus pole from the car battery before installation! There is a risk of short-circuit and electric shock!
- Before installation, always remove the transportation lock (screws in the upper part of the radio casing, recognisable by their red flags).
- Check whether the terminal assignment of your vehicle matches the assignment of the car radio.
- Do not install the cables under tension, across sharp edges or close to parts that could heat up. Make sure you do not kink the cables or twist them.
- Insert the device into the proper slot or choose an installation location that will not affect the driver's ability to drive normally.
- Connect the cable briefly before finally installing the device. Ensure it has been connected correctly and that the system is working properly.
- If changes have to be made to the vehicle, consult your vehicle dealer/specialist workshop.
- Your warranty will be invalidated if you disconnect the adapter socket from the cable or cut the cable!
- Make sure that the device is installed in such a way that injuries cannot occur due to heavy braking.
- Avoid installing the unit near strong heat sources (e.g. direct sunlight or heating air), dust, pollution or excessive shocks. This could damage the device.
- If the unit is installed at an angle of over 30^ from the horizontal it may adversely affect performance.
- You must follow these instructions precisely during the assembly. Before reconnecting the car battery, check all of the connections.
DE
EN
5. Overview of the device
5.1. Control panel
1) OPEN - Fold down the control panel
2) : Telephone function: press before entering a telephone number; accept call
3) Press briefly: Search backwards through stations/music tracks; hold down: fast rewind
4) Dial/button:
Press repeatedly to select different settings:
change settings with the dial
Each setting only remains active for a few seconds before switching back to the default volume setting ("VOL").
Briefly press the dial to select the following audio settings:
- VOL: volume, BAS: bass, TRE: treble, BAL: balance of the left and right speakers, FAD: fader (volume of the rear speakers). Press the dial for longer to call up a different sequence of modes for setting the time etc. Within this sequence, switch to the next mode by pressing briefly:
- BEEP ON: Beep when buttons pressed.
- EQ OFF: Use the dial to select between the audio settings FLAT (normal), CLASSIC, ROCK and POP (see also "Dial/button - Set the volume and sound" on page 68).
- LOUD: Switch on loudness to increase bass and treble (ON) or switch off (OFF).
- LOC: Local search mode (see "Turning the regional programme mode on/off" on page 72). OFF: Normal reception.
- STEREO: In FM band select stereo or mono mode (MONO). The MONO setting can improve the reception if stereo reception is poor.
- AF ON: Switch the regional programme mode on or off.
DE
EN
- TA OFF ("Traffic Announcement"): Call up traffic announcements automatically
- REG ON: The radio only searches regional stations with traffic announcements.
REG OFF: The radio only searches stations with traffic announcements outside of the region.
- EON ON: Switch the "EON" function on and off (OFF); see "Radio Data System" on page 72.
- TA VOL: Set the default volume for traffic announcements.
- VOL: Set the volume for when the radio switches on (17 is the default setting).
5) Press briefly: Search forwards through stations/music tracks; hold down: fast forward
6) Display
7) POWER: Press and hold down to switch the car radio off,
8) POWER: Press briefly to switch the car radio on; MUTE: Switches off sound;
9) 1 ▶ II: Number button 1; Start/pause playback
10) MOD: Select operating mode (RADIO - DISC - USB - CARD - AUX);
11) 2 INT: Number button 2; Intro function (play track) for CD/MP3 playback
12) T-MENU/TRAN: Use the telephone function/toggle the call between the car radio and the mobile telephone
13) 3 RPT: Number button 3; Repeat (repeat function) for CD/MP3 playback
14) AUX IN: Audio input (3.5 mm jack socket)
15) USB connection
16) 6 DIR+: During MP3 playback: play back next directory
17) 5 DIR-: During MP3 playback: play back previous directory
18) 4 RDM: Number button 4; Random function (random playback) for CD/MP3 playback
19) 9 PTY: Number button 9; ("Program Type"): Find stations with specific programme content
20) SCAN/#: Automatic station search
21) TA/EQ: ("Traffic Announcement"): Call up traffic announcements automatically; set the equaliser
22) 0 DSP: Number button 0; Display time, hold down for longer to set the time
23) 7 AF("Alternative Frequency"): Press briefly to switch AF mode on and off; Hold down longer to switch the regional programme mode on and off in AF mode.
24) */+/AS/PS: Track search during MP3 CD playback
25) Infrared sensor for remote control
26) Microphone
55 of 86


27) /LOWBND: End/reject telephone call; select frequency band in radio mode; hold down longer to switch the loudness function on or off
5.2. Behind the control panel
28) Plug contacts for the control panel
29) LED for CD operation:
30) EJECT: Eject CD
31) CD drive
32) Retainers for the control panel
33) Reset button: Restore device to factory settings
34) SD card slot
5.3. Remote control
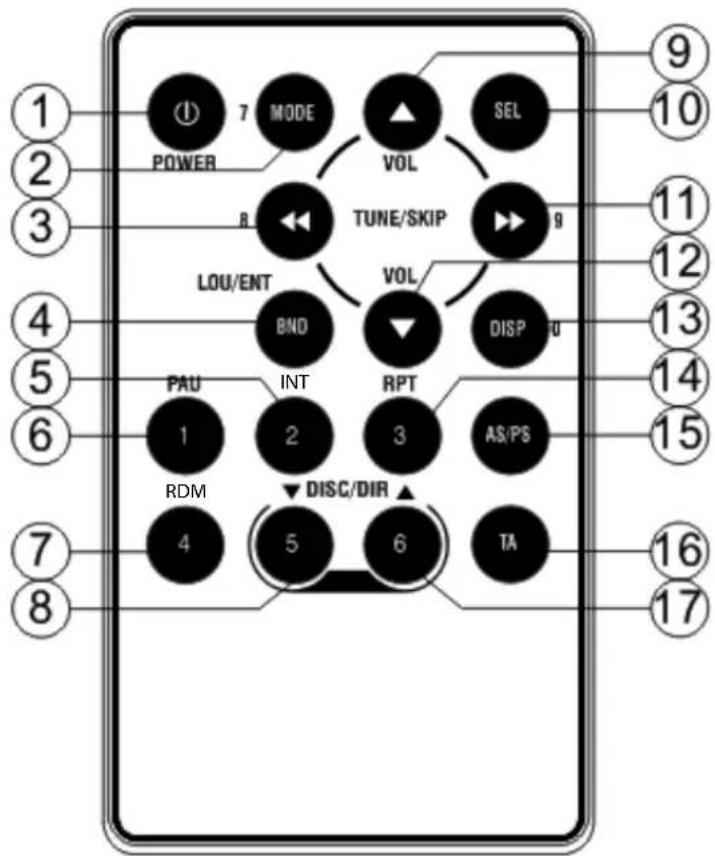
DE
EN
1) POWER: Press briefly to switch off the car radio
2) MODE 7: Select operating mode (RADIO - DISC - USB - CARD - AUX); Number button 7
3) 8: Press briefly: Search backwards through stations/music tracks; hold down: fast rewind; Number button 8
4) BAND: Select band in radio mode, display ID3 tag information MP3 mode
5) INT 2: Search for stations with alternative frequencies (AF stations); Number button 2
6) PAU 1: Pause/resume playback; Number button 1
7) RDM 4: SHUFFLE (shuffle function) in CD/MP3 mode; Number button 4
8) DIR 5: During MP3 playback: play back previous directory; Number button 5
9) VOL : Increase the volume
10) SEL: Press repeatedly to select different settings (see. N0. 4 on control panel)


11) 9:Press briefly: Search forwards through stations/music tracks; hold down: fast forward
12) VOL : Reduce the volume
13) DISP 0: ; Display time, hold down for longer to set the time Number button 0
14) RPT 3: Repeat (repeat function) for CD/MP3 playback; 3 RPT: Number button 3;
15) AS/PS: Track search during MP3 CD playback
16) TA: ("Traffic Announcement"): Call up traffic announcements automatically
17) DIR ▲ 6: During MP3 playback: play back next directory; Number button 6
6. Installation and initial use
DANGER!
Disconnect the minus pole from the car battery before installation!
There is a risk of short-circuit and electric shock!
6.1. The ISO slot
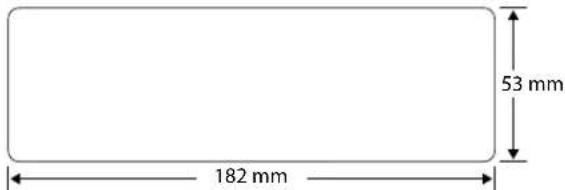
The car radio has been designed for installation in a standard ISO installation slot. It must measure at least 53 x 182 mm.
The ISO slot normally has two ISO sockets and one antenna socket.

NOTE!
If your vehicle does not have an ISO slot or the corresponding connections, the cable sockets supplied can be used. Contact your specialist workshop, retailer or departments in department stores. See also section "8. Information on the cables" on page 64.
6.2. Fitting the mounting frame in the ISO slot

CAUTION!
Follow the safety instructions for installation on "4. Installation" on page 53.
Before installation, always remove the two transportation safety screws in the top radio casing (recognizable by a red flag)!
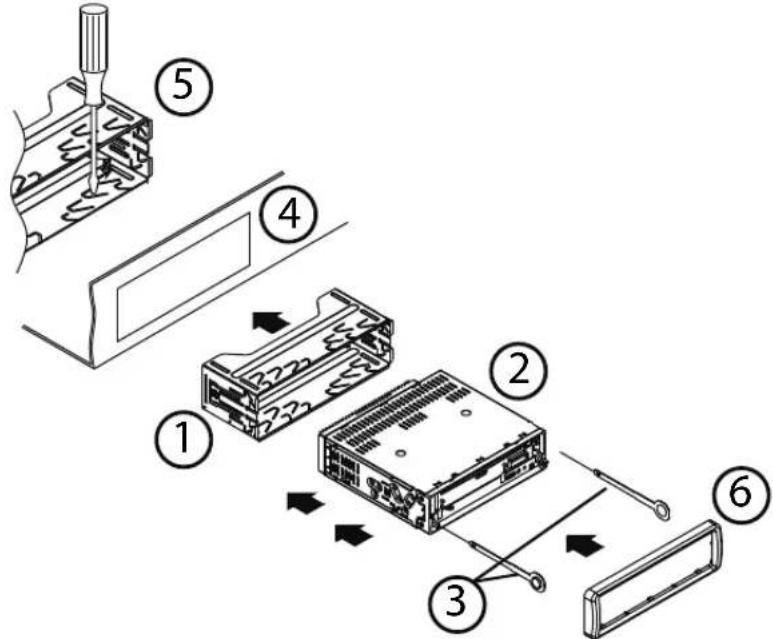
On delivery, the mounting frame (1) is pulled over the car radio (2). First remove the mounting frame from the casing of the car radio.
DE
EN


To do so, insert the two keys (3) supplied to the left and right between the device and mounting frame until the keys click into place.
Then use the key to slide the installation frame over the device towards the rear.
▶ Insert the mounting frame into the ISO installation slot (4).
To fix the mounting frame in the installation slot, use a screwdriver to bend as many flaps as possible outwards (5). Select the flaps that connect with the housing of the installation slot.

NOTE!
Check that the installation frame is held securely. The frame must be fixed securely so that it cannot release – even during sudden braking.
Before using the car radio and putting on the cover frame (6), make the electrical connections.
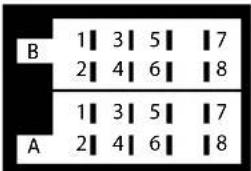
6.3. Connections on the back of the radio
Overview of the back of the radio:
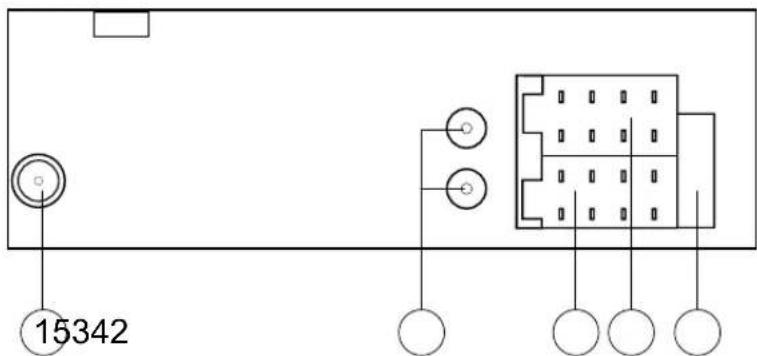
1) Antenna socket
2) Audio cinch sockets (red/white) with protective covers
3) ISO socket block A (power supply)
4) ISO socket block B (speaker)
5) Fuse 10 A
Prepare the cable connections
▶ Pull the connections in the ISO slot of your car out far enough that you can connect them to the connections on the car radio.
Connect the cables

NOTE!
Please use the car radio's ISO block for installation.
If your car's ISO plug does not match the car radio's ISO sockets, you can buy appropriate adapters in specialist workshops, retailers or department stores.
The two ISO plugs in your vehicle create safe and correct electrical connections (for the speakers and power connections). If, however, you want to route cables individually, we will explain the relevance of the cables at the end of this section.
Connect the vehicle's antenna plug to the car radio's antenna socket.
If you want to use an external amplifier, you can connect it with the red/white audio cinch sockets. Please refer to the operating instructions for the amplifier.
Connect the two ISO plugs on the vehicle with the two ISO blocks on the car radio (A for power and B for the speakers).
6.4. Test station memory
In some types of vehicle, the default assignment of permanent plus and alternating plus has been exchanged by the factory for the ISO block A in the ISO plug. This means that the station memory does not work.
DE
EN
Before finally inserting the car radio, use the following procedure to check whether the stations stay saved:
▶ Reconnect the car battery.
▶ Switch the vehicle's ignition on.
▶ Switch the radio on.
Save stations automatically by holding down the AS/PS button for around two seconds (see also "Automatic search for the 6 strongest stations (APS)" on page 72).
▶ Switch the vehicle's ignition off.
▶ Switch the ignition on again and test whether the stations are still saved (to do so press the station buttons 1 to 6).
If the stations have been saved you can insert the radio.
If the stations are no longer saved, you should use an adapter, available from specialist retailers, or arrange for a specialist workshop to modify the cables. In this case, please observe the information in chapter "8. Information on the cables" on page 64.
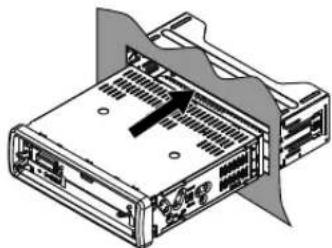
6.5. Using the car radio
▶ Push the car radio carefully into the slot until it clicks into place.
natural_image
Diagram of a server rack with internal ports and ventilation ducts (no text or labels)
NOTE!
When inserting the radio, make sure that the cables are not kinked, squashed or pulled tight.
▶ Then put the cover frame on the radio.
7. Control panel
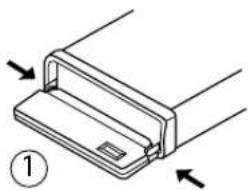
7.1. Attaching the control panel
▶ Latch the control panel; with the two pins on the lower edge at the rear, into the ret ainers provided for this purpose on the bottom edge of the frame (1).
▶ Fold up the control panel (2).

NOTE!
Check that the control panel is properly in place and secure. If the control panel is not fitted properly, error messages appear in the display and/or several keys will not function properly.
natural_image
Diagram of a mechanical component with arrows indicating direction, no text or symbols present
7.2. Removing the control panel
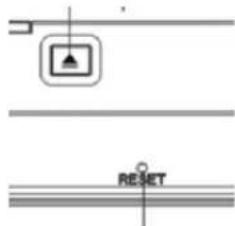
▶ Press the OPEN button. The control panel will fold down.
▶ Pull the control panel carefully out of the retainers.
7.3. Contacts

NOTE!
Removing the control panel will expose the contacts at the control panel and the radio.
Make sure the exposed contacts are not contaminated. The car radio might not function properly afterwards. For protection, always keep the control panel in its case.
▶ Clean the contacts if necessary with a clean, lint-free dry cloth.
7.4. Reset
To start up the radio use the tip of a pen or other sharp object to press the RESET opening.
If the car radio displays a defect that cannot be remedied through switching it off and back on, press the tip of a ballpoint pen or other sharp object into the RESET button opening.
DE
EN


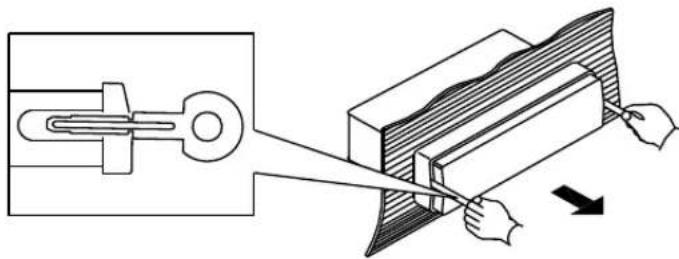
7.5. Removing the unit
To dismantle the unit, first remove the control panel and then the cover frame.
natural_image
Technical illustration of a mechanical clamp or bracket being cut with a tool, showing no text or symbols.Insert the left and right keys into the relevant slots on the sides of the device. The flaps will be bent back and you can remove the unit.
8. Information on the cables

NOTE!
The information on the cables is to be used if the cables are to be routed individually. To do so, contact a specialist workshop and hand over the ISO plug supplied and the information from this section.
You do not need the following information to connect the radio to the
ISO plugs in your vehicle.
Two ISO connectors with cables are supplied:
- Connector with electric cables for ISO socket block A
- Connector with speaker cables for ISO socket block B
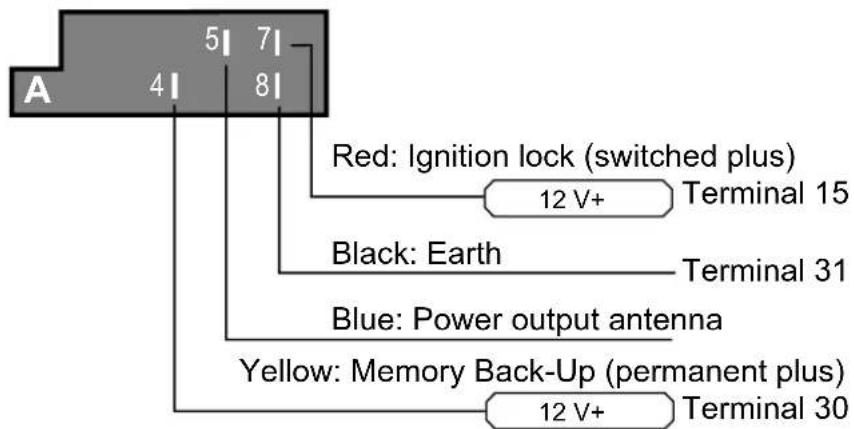
8.1. Overview of ISO socket A: power
64 of 86


Memory back-up (yellow)
The yellow memory back-up cable must be connected with the permanent plus. Otherwise the station memory function will not work.
DE
EN
Antenna relay cable (blue)
The blue cable is available for a relay-controlled antenna. The relay extends the antenna automatically when the radio is switched on. When it is switched off the antenna is retracted.
This relay cable can also be used to control an external amplifier. Please refer to the amplifier's operating instructions for the correct connections.

CAUTION!
Never connect the blue cable to the engine cable of the relay controlled antenna; this could damage the radio!
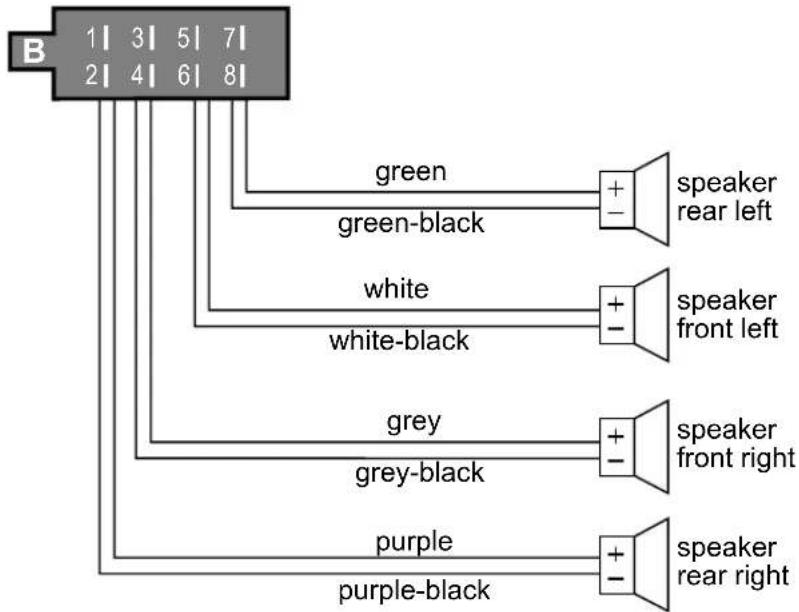
8.2. Overview ISO connector B: speakers
flowchart
graph TD
    A["1 3 5 7"] --> B["green"]
    A --> C["white"]
    A --> D["grey"]
    A --> E["purple"]
    B --> F["+"]
    C --> G["+"]
    D --> H["+"]
    E --> I["+"]
    F --> J["speaker rear left"]
    G --> K["speaker front left"]
    H --> L["speaker front right"]
    I --> M["speaker rear right"]

NOTE!
If the vehicle only has front speakers and the cables for the rear speakers are not needed, you must correctly insulate the exposed ends of these cables.
65 of 86

Assignment of the ISO socket block on the car radio
| ISO block | BLOCK B -Speakers | BLOCK A -Electricity supply | ||
 | 1 rear right + 1 | |||
| 2 rear right - 2 | ||||
| 3 front right + 3 | ||||
| 4 front right - 4 | Permanent plus (permanent 12 V supply from main electrical system);terminal 30 | |||
| 5 front left + 5 | Car antenna (also for external amplifiers, etc.) | |||
| 6 front left - 6 | ||||
| 7 rear left+ 7 | Alternating plus (alternating 12 V voltage, via ignition); terminal 15 | |||
| 8 rear left - 8 Earth; terminal 31 | ||||
Problems due to incorrect cable connections
In some types of vehicle, the default assignment of permanent plus and alternating plus has been exchanged by the factory for the ISO block A in the ISO plug. If this is the case in your vehicle, certain functions may be impaired: for example, stations may not be stored properly.
To solve this, the red cable (alternating plus) and the yellow cable (permanent plus) will need to be reversed in the ISO block. The specialist dealer has the appropriate adapters for this.


9. First operation
The remote control is supplied with a lithium battery (CR2025, V3).
To activate the remote control, simply remove the protective film from the battery compartment.
DE
EN
9.1. Changing batteries
▶ Open the battery compartment by pulling it out of the remote control at the indentation.
▶ Remove the used batteries.
▶ Insert a new lithium battery CR2025 with the positive pole (smooth side) facing up.
▶ Slide the compartment back into place.
10. Operation
10.1. Basic functions
Switching on/off
▶ Press the POWER button to switch the radio on. The radio will also switch on as soon as a data medium (CD/USB/CARD) has been inserted.
▶ Press the POWER button for approx. 0.5 seconds to switch the radio off.
Dial/button - Set the volume and sound
You can use the multifunctional dial/button to call up the volume and other sound settings.
| Setting | Display | Function | |
| Volume | VOL | Set the volume | |
| Bass | BAS | Set the bass | |
| Treble | TRE | Set the treble distribution | |
| Balance | BAL | Regulate right/left volume distribution | |
| Fader FAD F/ R | Set the volume distribution between front (F)/ rear (R) | ||
| Key tones | BEEP ON | Turn beep on (ON) or off (OFF) when buttons pressed | |
| Equalizer | EQ OFF | Use the dial to select between the audio settings FLAT (normal), CLASSIC, ROCK and POP | |
| Loudness | LOUD | Switch the loudness function on (ON) to increase bass and treble or off (OFF) | |
| Local station | LOC | ON: Only the strongest stations are received when searchingOFF: Normal reception, weaker stations are also recognised | |
| Mono/stereo setting | STEREO | In FM band select stereo or mono mode (MONO). The MONO setting can improve the reception if stereo reception is poor | |
| Alternative frequencies | AF ON | Switch the alternative frequencies mode on or off. When this function has been switched on, the radio always searches for the optimal radio frequency for the currently set station | |
| Traffic announcements | TA OFF | ("Traffic Announcement"): Call up traffic announcements automatically | |
| Regional programmes | REG ON | Some stations broadcast regional programmes. Select the setting REG ON if you only want the station's regional programmes to be played. In order to play nationwide programmes again, select the setting REG OFF. | |
| Changing stations | EON ON: | You can switch the EON function on (EON ON) or off (EON OFF) here.When the EON function is switched on, the radio switches to traffic announcements or PTY types when the TA or PTY functions have been set. | |
| Volume for traffic announcements | TA VOL | Set the default volume for traffic announcements | |
You can change the volume at any time by turning the dial/button. If you are in a menu, wait for around 5 seconds before the radio automatically leaves the menu.

NOTE!
Always set the volume to a level that you can still clearly hear the sirens of emergency vehicles!
▶ Press the dial/button to select another sound setting. The current value of the setting is shown in the display.
▶ You can turn the dial/button to change the setting.
Mute - switch the sound on or off
▶ Press the MUTE button to turn the sound off completely.
▶ You can switch the mute setting off by pressing any button.
The mute setting is also cancelled if you receive a PTY or TA (traffic announcement) station.
MODE - change operating mode
▶ Press the MODE button to switch between radio reception and media playback (CD, USB, etc.). The operating mode selected will be shown in the display.
| Operating mode Display | |
| Radio reception | RADIO |
| Playback from the CD drive | DISC |
| Playback from USB connection | USB |
| Playback from SD card | CARD |
| Play an external audio device | AUX |
DSP - display additional information
▶ You can change the screen display by pressing the DSP button repeatedly. Each message appears for just a few seconds.
| Operating mode Display additional information | |
| Radio mode with Radio Data System reception | Programme name > “CT” (clock time) time > frequency > PTY settings |
| Radio operation without Radio Data System reception | Frequency > “CT” (clock time) time > PTY settings |
| CD/USB or card operation “CT” (clock time) time for around 5 seconds | |

NOTE!
The PTY functions are sent in differing scope by different stations; see also chapter "Radio Data System" on page 72.
If no RDS or PTY information is received, PTY NONE is displayed on the screen.
If no frequency is received, PS NONE is displayed on the screen.
Settingthetime
After switching on for the first time or after pressing RESET, the time resets itself automatically when receiving a channel using the Radio Data System.
Proceed as follows to set the time manually:
▶ Call up the time.
▶ While the time is displayed hold down the DSP button. The time indicator flashes.
▶ Turn the dial/button to the right to set the hours and to the left to set the minutes.
To save the new time, press the DSP button again or wait until the display resets.
10.2. Radio functions
Selecting the band
▶ Press the BND button to change between the FM bands (FM1, FM2, FM3) and medium wave bands (MW1, MW2).
You can store up to six stations in each of the five bands.

NOTE!
The three FM frequency bands FM1, FM2 and FM3 all cover the same frequency range (87.5 to 108 MHz), which means that you can save up to 18 stations in the FM band.
Search for a station
▶ Press the ◀ or ▶ buttons to automatically start the station search.
Hold down either the ◀ or ▶ buttons for two seconds to switch off the automatic station search again. MANUAL will appear in the display.
▶ If you press either the ◀ or ▶ button briefly, you can move the channel frequency up or down manually.
If no button is pressed for 5 seconds, the automatic station search will be activated again and AUTO appears on the display.
Search for stations with alternative frequencies (AF)
Stations with an AF signal broadcast alternative frequencies for receiving the selected station, so that you can continue listening to the same radio programme over longer distances. (Further information on this service can be found in Chapter "Radio Data System" on page 72.)
▶ Press the BND button to select the frequency in which you would like to search for and, if necessary, store the station.
▶ Press the SCAN (INT/2 on the remote control) button to search through the FM band for stations broadcasting an AF signal.
The scanning process stops for 5 seconds each time it finds a station and then continues.
▶ If you want to listen to or store the station, press the SCAN button to stop the scanning process.
Storing stations manually
▶ After the search function has found a station, press one of the station buttons 1 to 6 for around three seconds.
A beep will sound to indicate that the station has been stored. You can save 6 stations in each band (FM1, FM2, FM3, MW1 and MW2).
The device will switch back into the normal station display after a few seconds.
DE
EN
Automatic search for the 6 strongest stations (APS)
With this function, the three frequency ranges FM1, FM2 and FM3 are searched for the six strongest stations and the stations found are saved in programme spaces 1–6 for each frequency range. Proceed as follows to call up the function:
Hold down the AS/PS button for around 2 seconds while the radio searches the frequency range. When the search is finished, the stations stored will be displayed for 5 seconds. Then the station that is saved in memory space 1 in frequency FM1 is played.
▶ Press one of the station buttons 1 to 6 to stop searching.
Preset station selector
▶ Press the BND button to select the frequency in which you have stored the station.
By pressing a station button 1 TO 6, you can locate the stations you have stored.
▶ Press the button AS/PS briefly to play each saved station for each frequency for around 5 seconds.
Radio Data System
Radio Data System (RDS) is a service provided by radio stations. In addition to traditional music and voice services, they also broadcast additional information in the form of encrypted digital signals that can be analysed and displayed by the car radio. On the display you can see the programme name and other information (traffic information, the title of the track currently being played, etc.).
Switch alternative frequencies on/off
▶ Briefly press the AF button to switch the AF functions for the Radio Data System mode on or off.
If the function is switched on, the display shows AF.
If the reception is weak, the radio switches automatically to an RDS station that is broadcasting the same programme.
The AF display flashes when the reception of the Radio Data System information deteriorates.
Turning the regional programme mode on/off
Some stations transmi t regional programmes at certain times.
To switch the regional programme mode on or off, hold down the AF button for longer than 2 seconds.
REG ON appears in the display.
To switch on the regional programme mode wait until the display changes back to the radio display.
- REG ON: The radio only searches regional stations with traffic announcements.
- REG OFF: The radio only searches stations with traffic announcements outside of the region.
TA - switching traffic announcements on/off
"TA" ("Traffic Announcement") is the traffic announcement mode. Most stations that broadcast RDS signals emit a signal before and after the traffic announcement. If the car radio receives this signal and the TA function is switched on, it will immediately switch from other operating modes (e.g. CD) to the radio. If the volume level is below 20 or if mute is activated, the volume will automatically be increased to 20 during the traffic announcement. The volume level will be restored after the announcement.
Stations that broadcast traffic announcements ("Traffic Programme") are identified by the TP symbol in the display.
▶ Press the TA button briefly to switch on the TA function.
If a station with traffic announcements has not been selected, the radio will search for one with traffic announcements. TA SEEK.will briefly appear in the display.
If the function is switched on, the symbol TA will appear at the top of the display.
You can interrupt the process if the radio changes from another operating mode or from a station without traffic announcements to a station with traffic announcements. Briefly press the TA button. The TA function is now paused without the TA mode being switched off.
If EON finds a traffic announcement signal in another programme, it occasionally switches to the EON relay station (see below).

NOTE!
If the TA function is activated, you can only find or store stations that broadcast a traffic announcement signal during the station search.
10.3. PTY ("Program Type") functions
"PTY" ("Program Type Code") is a function where the car radio specifically searches for stations with previously selected programme content. This is a service that is being increasingly supported by the radio stations.
▶ Press the PTY button repeatedly to select the required PTY function.
| Display PTY function Station search | |
| PTY MUSIC | Music A specific genre of music |
| PTY SPEECH | Language With specific speech input |
| PTY OFF | Switched off No preselection |
Then repeatedly press one of the station buttons 1 - 6 to select the required PTY entry. The station buttons are assigned as follows:
| Button | Music genre Type of speech programmes | |
| 1 | POP M, ROCK M NEWS , AFFAIRS, INFO | |
| 2 | EASY M, LIGHT M | SPORT , EDUCATE, DRAMA |
| 3 | CLASSICS; OTHER M (other music) | CULTURE, SCIENCE, VARIED |
| 4 | JAZZ, COUNTRY | WEATHER, FINANCE, CHILDREN |
| 5 | NATION M, OLDIES | SOCIAL, PHONE IN, RELIGION |
| 6 | FOLK M | TRAVEL, LEISURE, DOCUMENT (Documentary) |
If no further entries are made for 2 seconds, an automatic search begins for stations that match the selected PTY entry. The search stops when the first station is found.

NOTE!
Please note that this information depends on the region, the broadcaster and the station.
If no RDS or PTY information is received "PTY NONE" is displayed on the screen.
10.4. Operation with data media (audio CDs, MP3, USB, SD, AUX)
The car radio has various drives and connections that can play various audio formats:
| Drives and connections Data media and formats | |
| CD drive | For commercial audio CDs and self-made CDs with MP3 files. The CDs can also have a CD-R and CD-RW format. |
| USB connection For USB sticks* | or MP3 players* |
| SD card reader For SD memory | cards* with MP3 files |
| AUX IN connection | To connect external audio devices, e.g. a CD player, using a 3.5 mm jack plug |
*We cannot guarantee compatibility with all MP3 players, USB memory sticks and memory cards available on the market

NOTE!
The playback functions of the various data media are mostly identical and are described in chapter "10.9. Playback functions" on page 76.
MP3 files have their own search and display function that you can use to select a track (see "Displaying ID3 tags" on page 78).
Tracks may be stored in different directories (folders) on MP3 CDs or external data media (USB or SD cards). These directories can be played individually.
10.5. The CD drive
The CD drive is located behind the control panel. In addition to commercial audio CDs the car radio can also play CD-R and CD-RW formats.

INFORMATION ON PLAYING CDS
Moisture and high humidity may cause the CD player to malfunction. If this occurs, switch on the vehicle's heater to evaporate the moisture before use.
Do not expose the CD player to extremely high or low temperatures.
Inserting and removing CDs
▶ Press the OPEN button and fold down the control panel.
Insert the CD into the slot with the labelled side upwards. Flip the control panel upwards. The CD will now be played automatically.
▶ If the device is in another mode (radio, USB), you can select the CD drive with the MODE button.
To remove the CD, press the OPEN button and fold down the control panel. Press the ▲button. The CD will be ejected. The car radio will change back to radio mode.

CAUTION!
Do not leave an ejected CD in the CD compartment during the journey. Remove the CD immediately and fold up the control panel again.
Display when reading
When the data is being read "LOAD/DISC/LOAD" = reading table of contents is displayed ("TOC" = "table of contents"). If the data medium does not contain any data "NO FILES" is displayed.
10.6. USB media
You can connect an MP3 player or another USB data medium to the USB connection on the control panel. Your car radio can process USB data media up to 32 GB (certified). Here, the directory structure may contain up to 500 folders, 999 files and a directory depth of 8 levels.
The USB connection is fitted with a protective cover to prevent dust from getting into the connections.
DE
EN
Connecting a USB device
▶ Slide the protective cover on the USB connection to the side.
Connect your USB device (e.g. a USB stick) to the connection.
USB will appear in the display. The car radio searches for MP3 files on the data medium.
▶ If the device is in another mode (radio, CD), you can select the USB slot with the MODE button.
▶ If you are no longer using the USB connection, slide the protective cover back over the USB connection.
10.7. SD cards
You can insert SD cards containing MP3 files into the SD drive. The SD drive is located behind the control panel.
Inserting and removing cards
▶ Press the OPEN button to fold down the control panel.
Insert the memory card into the card slot with the contacts facing down and the bevelled corner pointing to the right and ensure that the card has clicked into place.
▶ Replace the control panel.
As soon as the card is inserted, the car radio searches on the card for MP3 files and the CARD message is shown on the display.
If the device is in another mode (radio, CD), you can select the SD card with the MODE button.
In order to remove the SD card, remove the control panel again and lightly press the SD card into the card slot. The card will be freed from the catch and you can then remove it.
10.8. Device connected to AUX IN
You can connect another audio device, e.g. a CD player, to a 3.5mm jack plug.
Connect the external audio device to the AUX IN socket on the control panel in order to play back audio files. The message AUX appears in the display.
If the device is in another mode (radio, CD), you can select the AUX connection with the MODE button.
10.9. Playback functions
Start and pause playback
▶ Press the 1 ▶ II button to start the playback.
▶ To pause playback, press the 1 ▶ II button again.
Press 1 ▶ II again to continue normal playback.
Skip track/skip 10 tracks (audio CDs)
Press the ◀◀ or ▶▶ buttons to jump to the previous track or the next track. The track number is shown on the display.
▶ Press the station buttons 5 or 6 to jump 10 tracks backwards or forwards.
Change directory (MP3 data media)
▶ Press the station buttons 5 or 6 to move up or down to a different directory level.
Fast forward/rewind
▶ Hold down the ◀ or ▶I buttons for longer to fast forward or rewind.
Preview track
In Audio CD, MP3, USB, SD mode: Briefly press the station button 2 INT. INT ON appears in the display. All tracks are played for around 10 seconds each.
Repeat track
In Audio CD, MP3, USB, SD mode: Briefly press the station button 3 RPT. RPT ONE (repeat current track) or RPT ALL (repeat all tracks on the data medium) appear in the display.
Activate random playback
In Audio CD, MP3, USB, SD mode: Briefly press the station button 4 RDM. RDM ON (random playback) or RDM OFF (no random playback) appear in the display.
Search for track numbers (only with WMA/MP3 data media)
Repeatedly press the AS/PS button to call up the search functions "NUM SCH" (search for track numbers), "FILE SCH" (search for file names) or "DIR SCH" (search for folders).
▶ Turn the dial/button to enter characters or enter a character with the number buttons as shown in the table below. If nothing is entered for two seconds, the device will switch to the next cursor position.
▶ Press the dial/button to start the search.
| AS/PS Delete character | |
| M1 A, B, C, 1 | |
| M2 D, E, F, 2 | |
| M3 G, H, I, 3 | |
| M4 J, K, L, 4 | |
| M5 M, N, O, 5 | |
| M6 P, Q, R, 6 |
DE
EN
| AF S, T, U, 7 | |
| TA/EQ V, W, X, 8 | |
| PTY Y, Z, SPACE,9 | |
| DSP _,-,+,0 | |
| Control dial Select all of the above-mentioned characters | |
Producing MP3 CDs; ID3 tags

NOTE!
Data CDs with MP3 files (CD-ROMs, USB sticks etc.) may contain individual tracks or folders. When producing a data medium, please ensure that you only save the tracks in directories and that none are saved on the same level as the directories. Mixing tracks and directories at the same level may produce playback problems.
When producing MP3 files you can also save "ID3TAGS" (we recommend using an ID3 tag editor for entries). This is a block of information stored on an MP3 CD lying "behind" the actual music information of the MP3. This may include such items as the artist, track, album name, year of release and a short comment.
The car radio can read this block of information and show it on the display. The various pieces of information are displayed in succession in scrolling text.
Displaying ID3 tags
▶ To display the ID3 tags, press the DSP button.
The category changes each time you press the button :
TITLE > ARTIST > ALBUMNAME.
11. Bluetooth function
The car radio has a Bluetooth function that enables you to use the radio as a hands-free device for your mobile phone.
Of course, this requires a mobile phone that supports the Bluetooth function and is compatible with the car radio.
11.1. Pairing

CAUTION!
Make sure that the only Bluetooth-compatible mobile phone near the car radio is the one that you want to use in the car.
Switch on this mobile phone and activate the Bluetooth function on the phone. You may need to refer to the operating instructions for your mobile phone.
78 of 86
As soon as the mobile phone has found the radio, a corresponding message will appear on the mobile phone (e.g. NEW DEVICE FOUND or similar).
The car radio will be shown on the mobile phone and you may be asked to enter a password. Enter the password "0000" for your car radio CAR KIT shown on the mobile phone.
The message "LINKED" will appear on the car radio and, when the mobile phone has been recognised, the Bluetooth name of the mobile phone. ^1
11.2. Connection status
The Bluetooth symbol in the display indicates which connection status currently exists:
• No Bluetooth symbol: no connection.
- Bluetooth symbol: connection has been established;
If a connection has been established, incoming and outgoing calls will be transferred from the mobile phone to the car radio.
Establishing a connection
You can establish a connection by executing the corresponding function on the mobile phone.
Breaking the connection
▶ You can break the Bluetooth connection via the mobile phone.
If the devices have been switched off and then switched back on again, the car radio will automatically search for connected devices. This takes about 10–15 seconds.
Terminating/restoring the connection on the car radio
Hold down the SCAN button. The car radio will terminate the Bluetooth connection.
▶ Hold down the SCAN button again. The Bluetooth connection will be restored.
11.3. Telephone calls
▶ Make sure your mobile phone is switched on and place it near the car radio.
Select numbers
You can enter the telephone number via your mobile phone as normal.
Alternatively, you can enter the telephone number using the remote control, as follows:
▶ Briefly press 📋. PHONE appears on the display.
▶ Enter the telephone number using the remote control's numeric buttons.
▶ If you have made a mistake, you can delete the numbers with the T-MEN/TRAN button.
If you want to completely delete a number, hold down the T-MEN/TRAN button for a moment.
If you want to call the number entered, press again. The call time will appear on the display.
Redialling numbers
Press the button twice to view the last telephone number called.
▶ Press again to call the number.
Alternatively, you can press the T-MEN/TRAN button; REDIAL appears on the display. Use the dial to select from a list of the most recent telephone numbers; this list includes numbers you dialled yourself and also numbers from incoming calls.
▶ Press to call the number.
Accept call
The ring tone of your mobile phone will be transferred to the speaker when your phone rings. PHONE and the number appear in the display.
▶ Press to accept the telephone call.
▶ Press to reject the telephone call.
If the car radio is in standby mode when an incoming call is received, it will automatically switch on. Once the call is ended, the car radio returns to standby mode.
During a call
The time of the call appears in the display during the call.
You can change a variety of functions:
- Controlling the volume: Turn the dial on the car radio. The default volume is 25.
- Switch to mute: Press the T-MEN/TRAN button to put the telephone call on hold. Press T-M again to switch the sound back on again.
- Switch the telephone call to the car radio: Hold down the T-MEN/TRAN button for approx. 3–4 seconds to switch the telephone call from the mobile phone to the car radio and from the car radio to the mobile phone.
Ending calls
▶ Press to end the telephone call.
Make calls from the lists "Phone book", "Received calls", "Dialled calls" or "Missed calls".
▶ Briefly press 📋. PHONE appears on the display.
▶ Repeatedly press the T-MEN/TRAN, button to display the entries for BOOK (phone book), RECEIVED (received calls), DIALED (dialled calls) or MISSED CALL.
80 of 86
▶ Use the ◀ or ▶ buttons to select a number from the corresponding list and press the button to call the number.
11.4. A2DP mode
Many mobile phones also have an audio playback function (MP3 player etc.). A2DP ("Advanced Audio Distribution Profile") is the ability to play audio files from Bluetooth devices. Your car radio has this option.
If your mobile is registered on the car radio, you can transfer the audio files via the car radio.
▶ Use the MODE button to select the operating mode PHONE. Start the music playback on your telephone.
▶ You can now pause/resume playback with the 1 ▶ II button.
▶ Use the ◀ or ▶ buttons to skip to the previous or next track. The track number is shown on the display.
▶ Hold down the ◀ or ▶I buttons for longer to fast forward or rewind.
12. Troubleshooting
| PROBLEM POSSIBLE CAUSE SUGGESTIONS | ||
| The device cannot be switched on. | The ignition is not switched on. | Switch on ignition by turning the key. |
| One of the fuses is defective. | Replace the fuse. | |
| The CD cannot be inserted. | There is already a CD in the car radio. | Remove the CD. |
| The CD cannot be fully inserted into the disc compartment. | The transportation lock on the top of the device was not removed during installation. | Remove the transportation lock. |
| The CD is not recognised. | The CD has been put in the wrong way round. | Insert the CD with the label upwards. |
| The disc is contaminated or damaged. | Clean the CD or insert another CD. | |
| The temperature in the car is too high. | Wait until the environmental temperature has normalised. | |
| No sound! | The volume has been set to minimum. | Increase the volume. |
| Cables are not properly connected. | Check the cable connections. | |
PROBLEM POSSIBLE CAUSE SUGGESTIONS
| Function buttons do not work. | The integrated micro-computer does not work because of interference. | Press the RESET button. |
| The control panel is not properly fitted. | Check the correct fitting of the control panel. | |
| The CD skips. | The installation angle is greater than 30°. | Correct the installation angle. |
| The disc is dirty or damaged. | Clean the CD or insert another CD. | |
| The vibrations in the vehicle are too great. | Wait until the road is more even again before playing back the CD. | |
| Errors on CDs you have created yourself. | Check the CD in another play-back device. | |
| Radio and/or automatic station search do not work. | The antenna cable is not connected properly. | Check the correct location of the antenna cable. |
| The station signals are too weak. | Set the station manually. | |
| Station memory does not work. | The cable for the permanent plus (yellow) is not connected properly. | Check the cable connections. To do this, refer to the section on installation and initial use. |
| Your mobile phone is not recognised. | The mobile phone is not compatible with the Bluetooth unit. | Check to see if it works with another mobile phone. |
| Condensation! Switch | ||
| The product may stop working correctly if it has been subject to voltage fluctuations or power surges. | Remove the front panel and press the RESET button twice to restore functionality. | |
13. Disposal

Packaging
Your device is packaged to protect it from transportation damage. Packaging is raw material and can be reused or added to the recycling system.

Appliance
According to Directive 2012/19 / EU do not dispose of the product in the household rubbish at the end of its service life. Take it to a local collection point for used appliances in order to comply with environmental regulations. Contact your local authority to find out where your nearest collection point is located.

Batteries
Batteries must be properly disposed of. Retailers who stock batteries and local authority collection points have appropriate disposal containers for this purpose. You can contact your local waste disposal company or municipal authorities for further information.
DE
EN
14. Technical data
GENERAL
Operating voltage: DC12 V, negative earth connection
Maximum operating current: 10 A
Dimensions: 178 x 160 x 50 mm (W x D x H)
Output power: max. 4 x 20 W (RMS)
RADIO (FREQUENCY RANGES)
VHF (FM): 87.5–108 MHz
Medium wave (MW): 522 to 1620 kHz
Bluetooth version: 2.1 + EDR
CD/MP3 PLAYER
Laser output: Class 1 laser product
Frequency range: 40 Hz–18kHz
MPEG rate: 32–320 kbps
MP3 playback ISO 9660 & Joliet MP3 format
Supported formats: audio CDs, CD-Rs, CD-RWs
CONNECTIONS
AUX: 3.5 mm jack plug
USB: 1.1 and 2.0 up to 32 GB
Memory cards: SD, SDHC; up to 32 GB
R.C.A. OUTPUT: 2 x Cinch (red/white)
These days, there are many non-standard CD recording and copy protection procedures in use, as well as a wide range of data media formats (CD-R, CD-RW, USB and SD cards).
Therefore, there may occasionally be read errors or delays. This does not mean that the device is faulty.
Subject to technical modifications!
CE
84 of 86
15. Declaration of conformity
Medion AG hereby declares that the product MD 84003 conforms to the following European requirements:
• R&TTE Directive 1999/5/EC
• EMC Directive 2004/108/EC
• Low Voltage Directive 2006/95/EC
• RoHS Directive 2011/65/EU.
DE
EN
Full declarations of conformity are available at http://www.medion.com/conformity.
16. Legal notice
Copyright © 2015
All rights reserved.
This operating manual is protected by copyright.
Mechanical, electronic and any other form of reproduction is prohibited without the written permission of the manufacturer
Copyright is owned by the company:

Medion AG
Am Zehnthof 77
45307 Essen
Germany
The operating manual can be reordered via the service hotline and is available for download via the service portal at www.medion.com/gb/service/start/.
You can also scan the QR code above and download the operating manual onto your mobile device via the service portal.

natural_image
Two horizontal bar designs with grayscale shades and a central crosshair symbol (no text or labels)

86 of 86

- HINWEIS!
- DE
- About these Instructions....47
- Safety instructions 49
- Package contents 52
- Installation....53
- Overview of the device 54
- Installation and initial use .... 59
- Control panel....63
- Information on the cables 64
- First operation....67
- 10.Operation....68
- Bluetooth function....78
- 12.Troubleshooting....81
- 13.Disposal 83
- Technical data....84
- Declaration of conformity 85
- 16.Legal notice 85
- About these Instructions
- Warning symbols and key words used in these instructions
- Intended use
- Safety instructions
- Keep electrical equipment out of reach of children
- DANGER!
- Purpose
- Road safety
- Never carry out repairs yourself
- WARNING!
- Sunlight
- The CD player
- Drives and connections
- Cleaning the device
- Battery information
- Package contents
- Installation
- Disconnect the minus pole from the car battery before installation! There is a risk of short-circuit and electric shock!
- Overview of the device
- Control panel
- Behind the control panel
- Installation and initial use
- The ISO slot
- Fitting the mounting frame in the ISO slot
- NOTE!
- Connections on the back of the radio
- Prepare the cable connections
- Connect the cables
- Test station memory
- Using the car radio
- Control panel
- Attaching the control panel
- Removing the control panel
- Contacts
- Reset
- Removing the unit
- Information on the cables
- Overview of ISO socket A: power
- Memory back-up (yellow)
- Antenna relay cable (blue)
- CAUTION!
- Overview ISO connector B: speakers
- Problems due to incorrect cable connections
- First operation
- Changing batteries
- Operation
- Basic functions
- Switching on/off
- Dial/button - Set the volume and sound
- Mute - switch the sound on or off
- MODE - change operating mode
- DSP - display additional information
- Settingthetime
- Radio functions
- Selecting the band
- Search for a station
- Search for stations with alternative frequencies (AF)
- Storing stations manually
- Automatic search for the 6 strongest stations (APS)
- Preset station selector
- Radio Data System
- Switch alternative frequencies on/off
- Turning the regional programme mode on/off
- TA - switching traffic announcements on/off
- PTY ("Program Type") functions
- Operation with data media (audio CDs, MP3, USB, SD, AUX)
- The CD drive
- INFORMATION ON PLAYING CDS
- Inserting and removing CDs
- Display when reading
- USB media
- Connecting a USB device
- SD cards
- Inserting and removing cards
- Device connected to AUX IN
- Playback functions
- Start and pause playback
- Skip track/skip 10 tracks (audio CDs)
- Change directory (MP3 data media)
- Fast forward/rewind
- Preview track
- Repeat track
- Activate random playback
- Search for track numbers (only with WMA/MP3 data media)
- Producing MP3 CDs; ID3 tags
- Displaying ID3 tags
- Bluetooth function
- Pairing
- Connection status
- Establishing a connection
- Breaking the connection
- Terminating/restoring the connection on the car radio
- Telephone calls
- Select numbers
- Redialling numbers
- Accept call
- During a call
- Ending calls
- Make calls from the lists "Phone book", "Received calls", "Dialled calls" or "Missed calls".
- A2DP mode
- Troubleshooting
- Disposal
- Packaging
- Appliance
- Batteries
- Technical data
- GENERAL
- RADIO (FREQUENCY RANGES)
- CD/MP3 PLAYER
- CONNECTIONS
- Subject to technical modifications!
- Declaration of conformity
- Legal notice
Brand : MEDION
Model : MD 84003 LIFE P62033
Category : Car stereo