
P 62010 - Car stereo MEDION - Free user manual and instructions
Find the device manual for free P 62010 MEDION in PDF.
| Brand | MEDION |
| Model | P 62010 |
| Product type | Multimedia car radio |
| Dimensions (W × D × H) | 180 × 175 × 55 mm |
| Power supply | 12 V DC |
| Fuse | 15 A (blue) |
| Output power | 4 × 15 W RMS |
| FM band | 87.5 - 108 MHz |
| AM (MW) band | 522 - 1620 kHz |
| Supported formats | Audio CD, CD-R, CD-RW, DVD, Video-CD, MPEG4, DVD+R, DVD-RW, DVD-R, DVD-RW, JPEG |
| USB port | USB 1.1/2.0 compatible, up to 8 GB |
| Card reader | SD (up to 1 GB), MMC (up to 512 MB), SDHC (up to 16 GB) |
| AV IN input | 3.5 mm jack |
| RDS functions | AF, TA, PTY |
| Audio settings | Bass, treble, balance, fader, equalizer (Classic, Rock, Pop), Loudness, subwoofer |
| Video safety | DVD playback only when stopped (parking brake cable) |
| Control panel | Removable, anti-theft |
| Remote control | Included with CR2025 battery |
| Cleaning | Dry, lint-free cloth; clean contacts regularly |
| Spare parts | 15 A fuse, CR2025 battery |
Frequently Asked Questions - P 62010 MEDION
User questions about P 62010 MEDION
0 question about this device. Answer the ones you know or ask your own.
Ask a new question about this device
Download the instructions for your Car stereo in PDF format for free! Find your manual P 62010 - MEDION and take your electronic device back in hand. On this page are published all the documents necessary for the use of your device. P 62010 by MEDION.
USER MANUAL P 62010 MEDION
RELIGION: Religion, Ethik
CD: Audio-CDs, CD-Rs,
CD-RWs
DVD, Video-CD: MPEG4, DVD+R, DVD-RW,
DVD-R, DVD-RW, JPEG
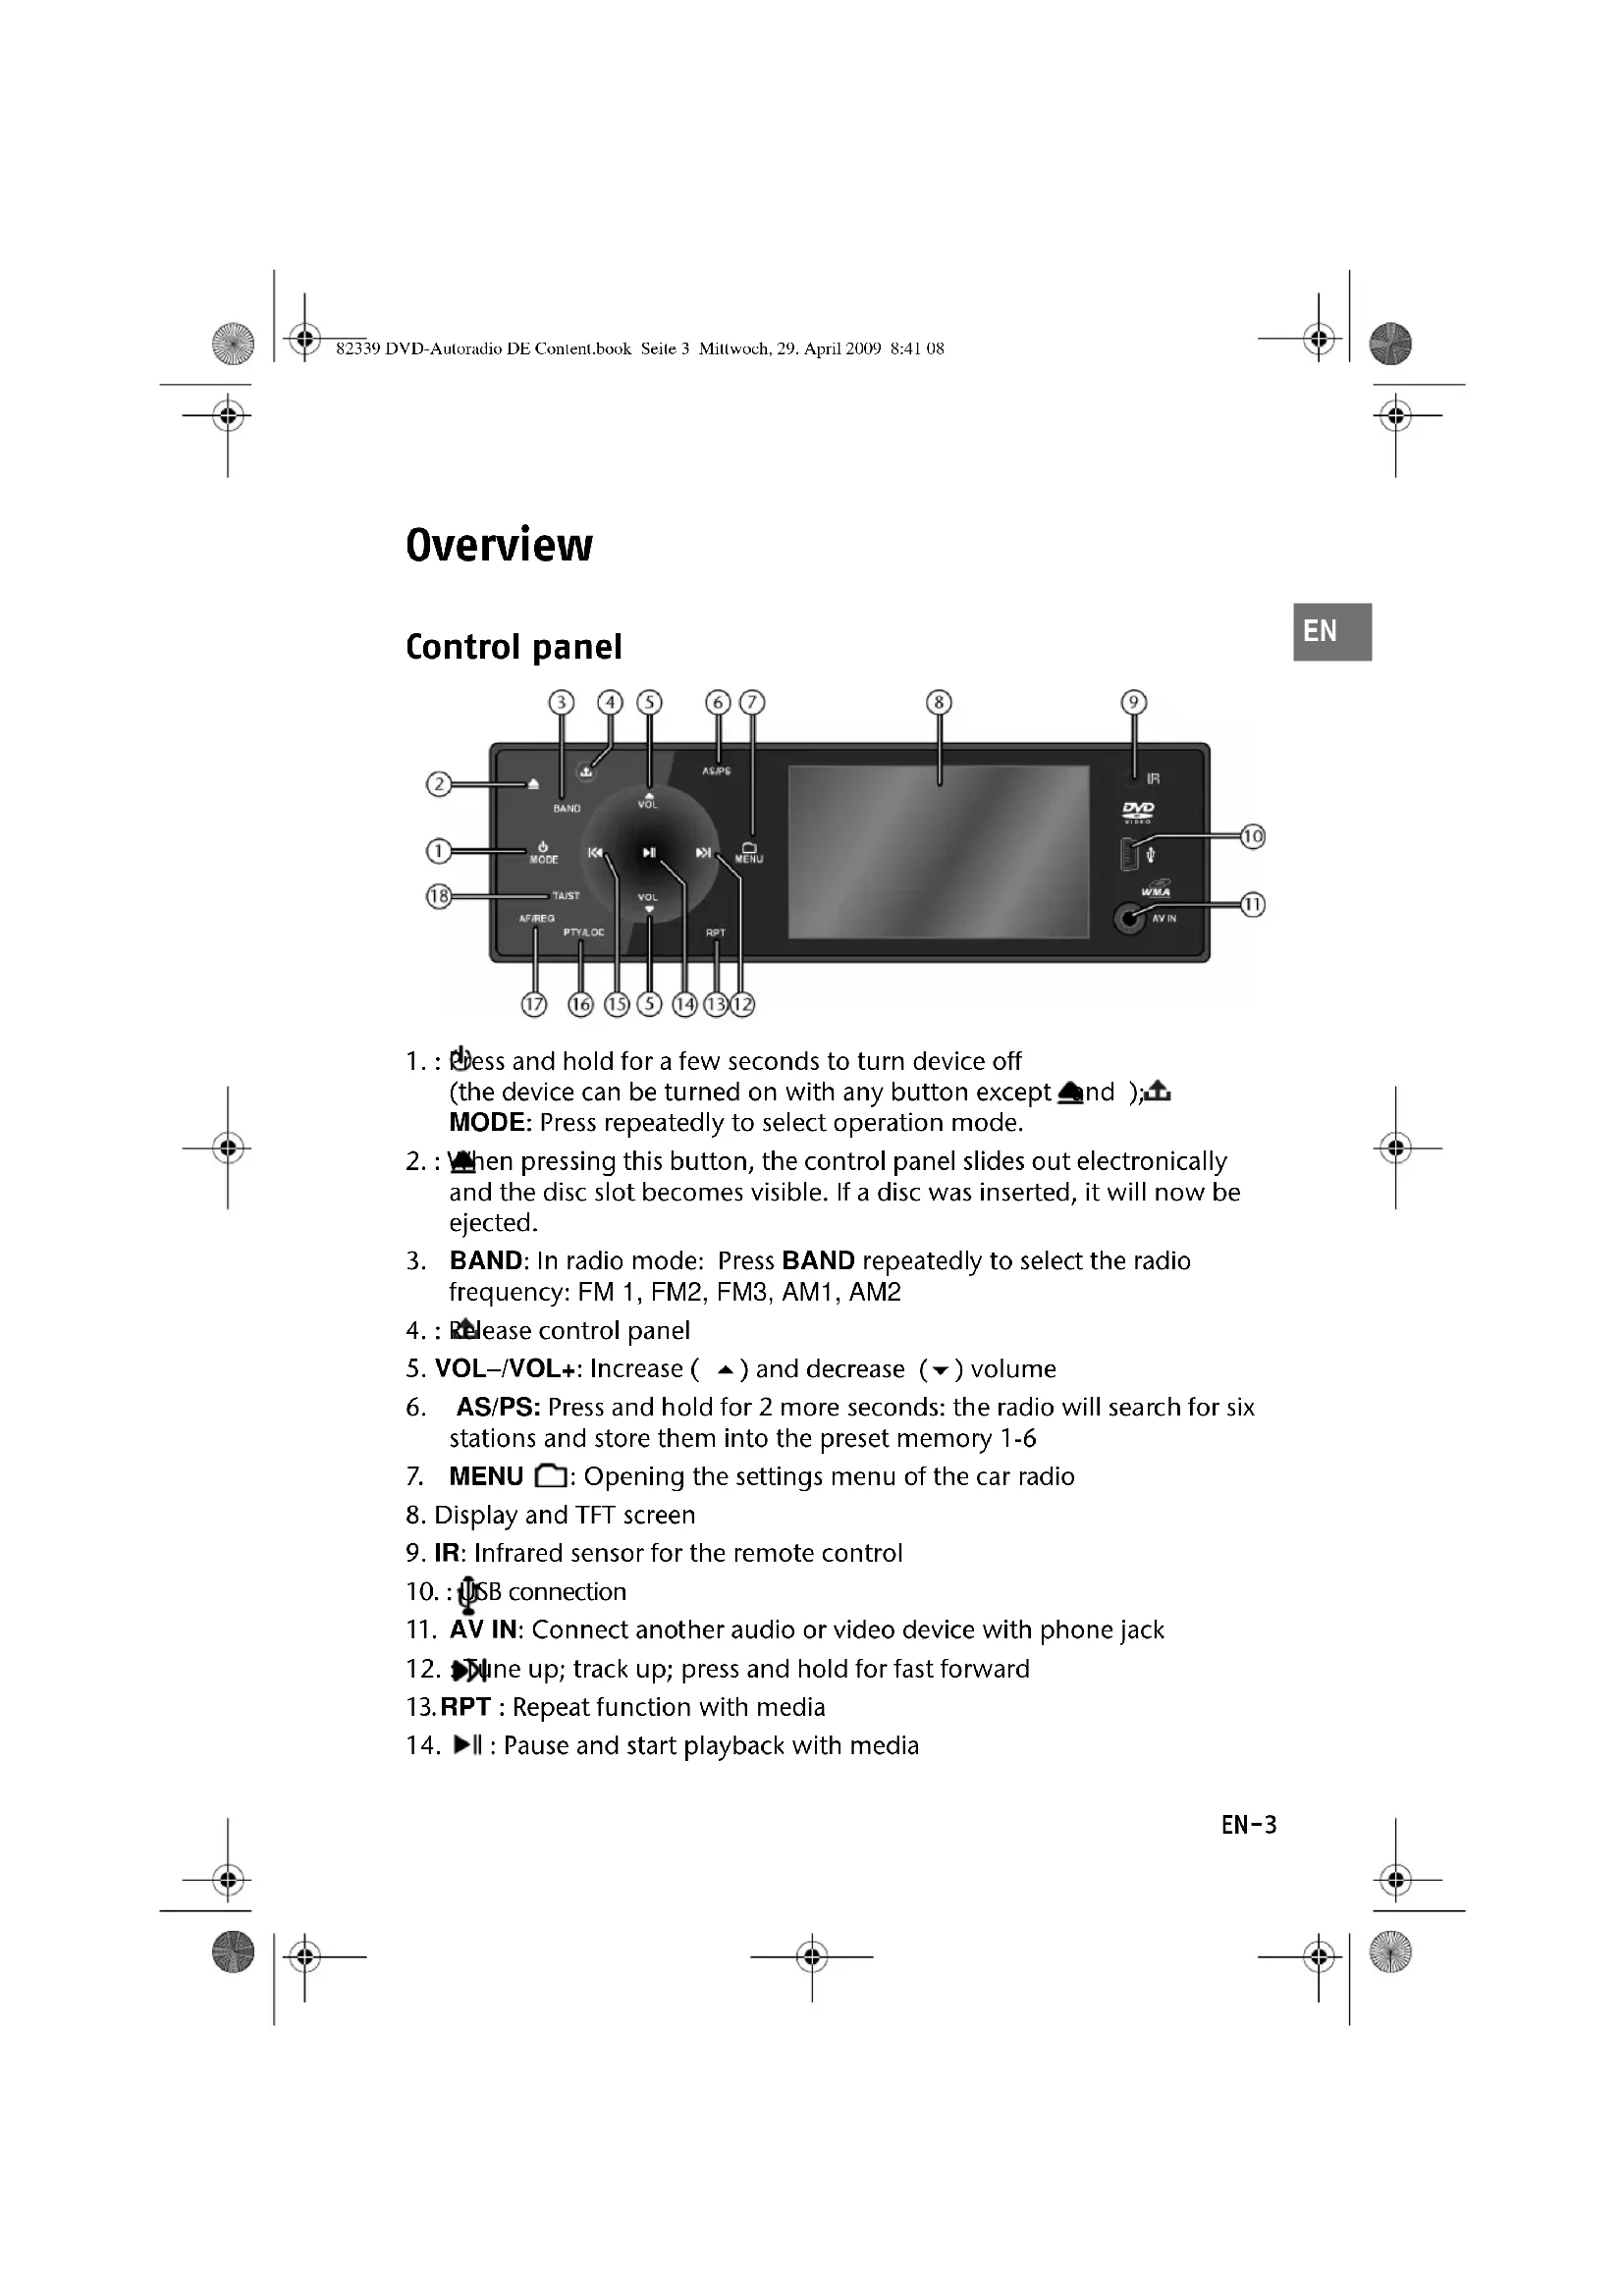
Overview 3
Control panel 3
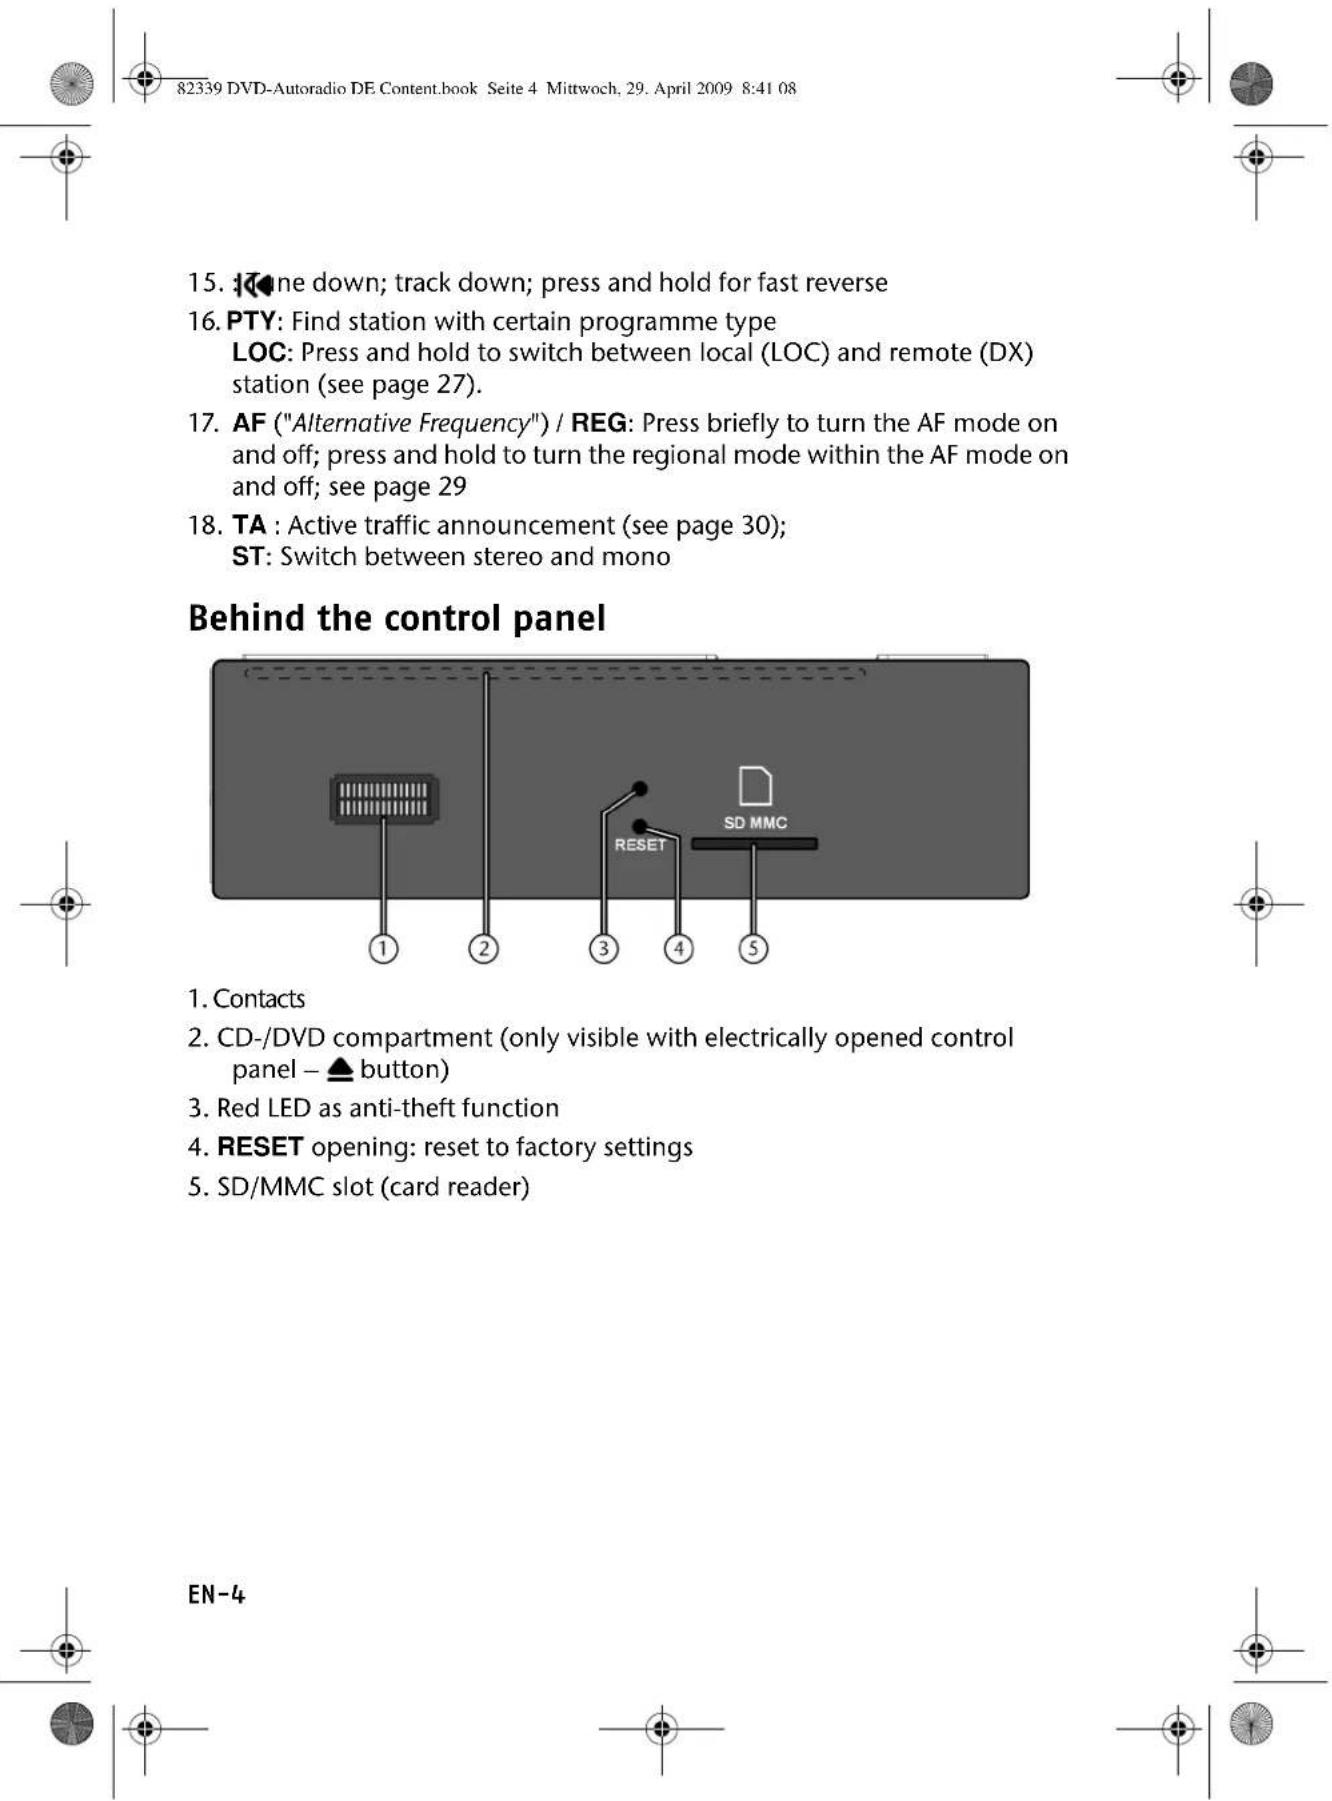
Behind the control panel 4
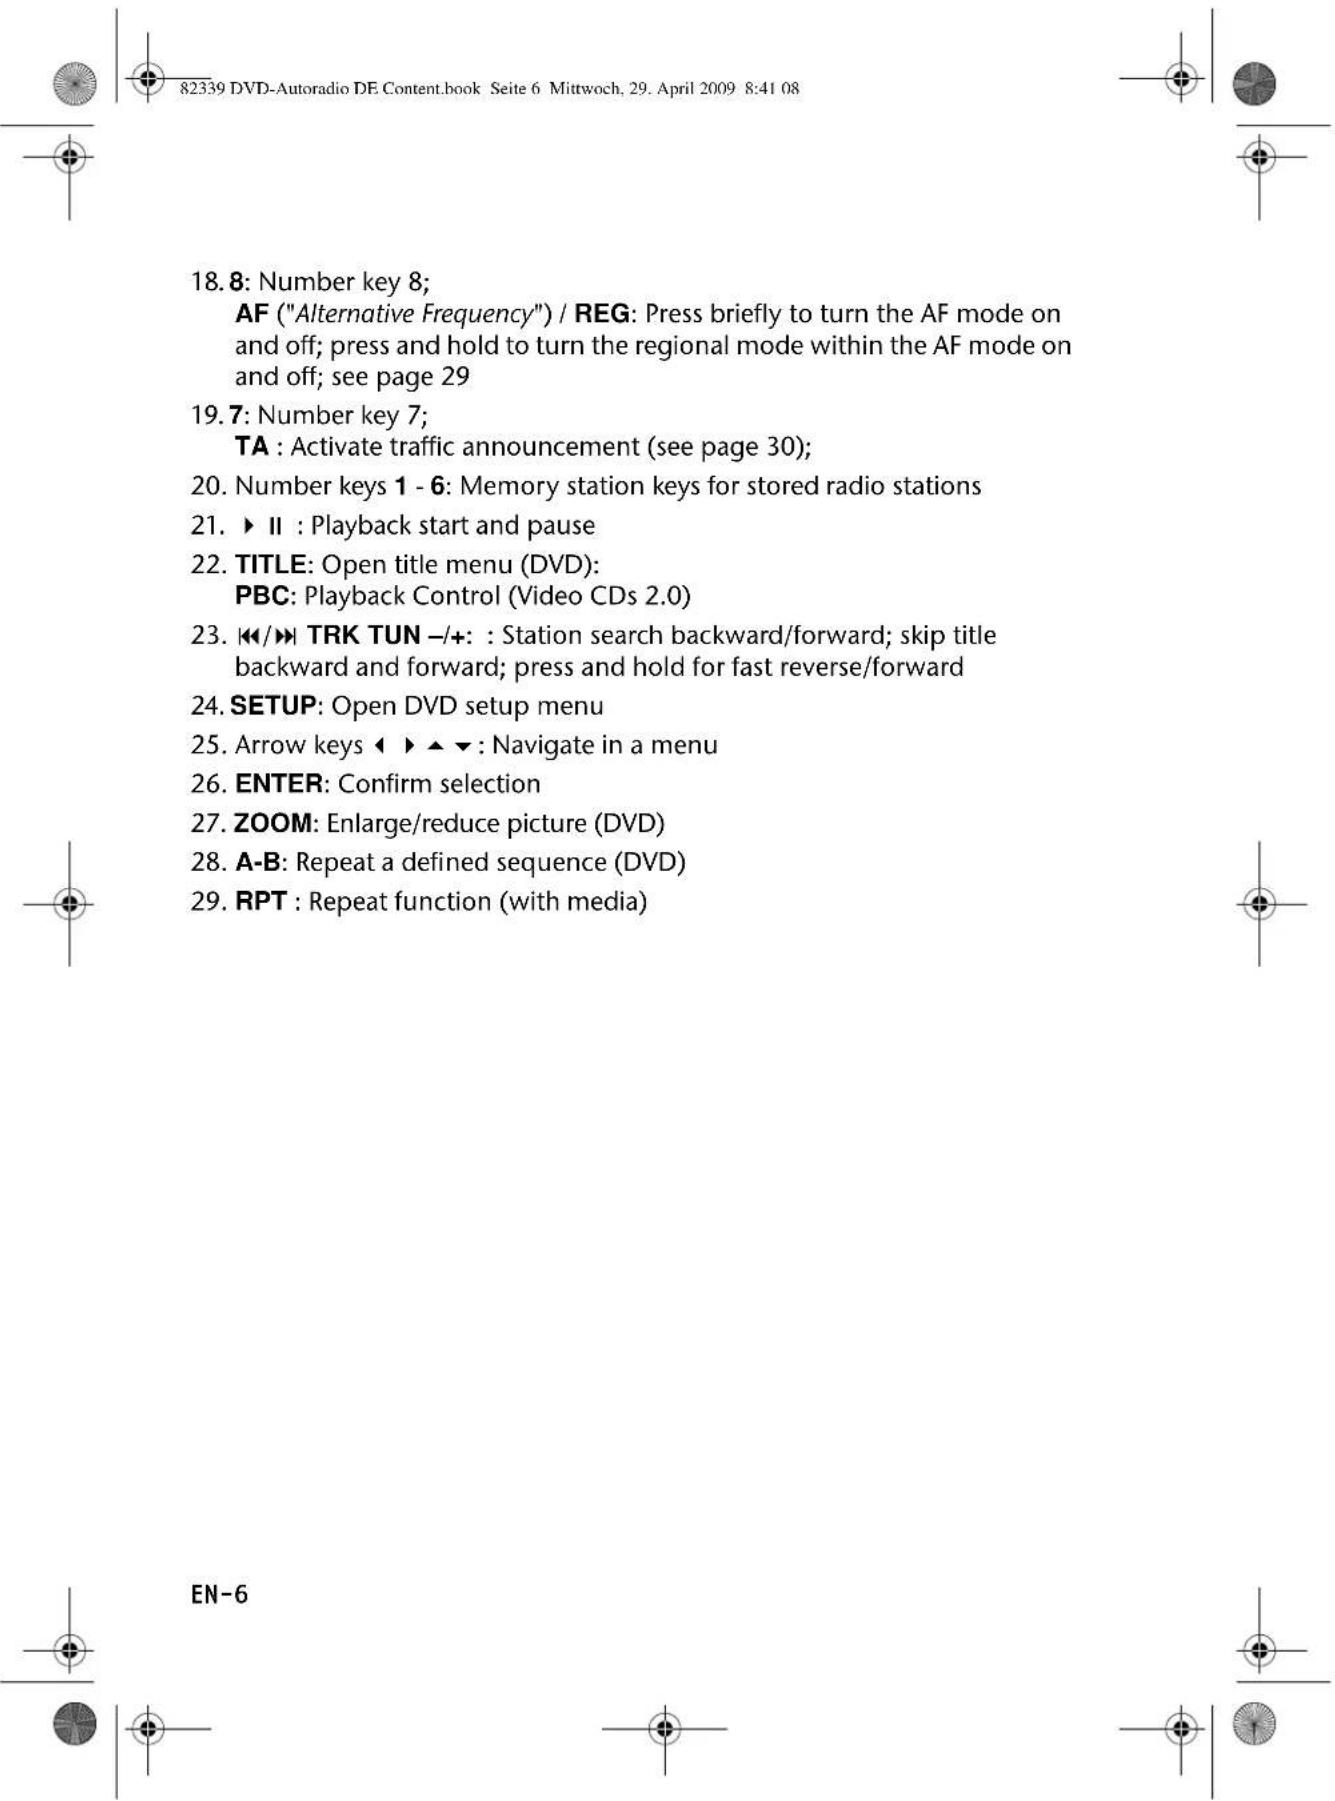
Remote control 5
Operating the remote control 7
Safety instructions 8
Keep electrical equipment out of the reach of children 8
Road safety 8
Installation 8
Never carry out repairs on your own 9
Sunlight 9
CD/DVD player 9
Drives and connections 9
Handling the batteries 9
Cleaning the device 10
Included in the box 11
Installation 12
Installation instructions 12
ISO installation slot and connections 13
Fit the installation frame 13
Connections at the rear 15
Inserting the car radio 18
Control panel 18
Reset 19
Removing the unit 19
Explanation for cable use 20
General functions 23
Time 23
Switching on/off 23
Volume 23
Operation mode 23
EN-1


Basic settings for the menu 24
Radio operation: basic functions 26
Select the band 26
Searching for a station 26
Save stations 27
Selecting stations 28
Radio mode: Radio Data System 29
Alternative frequencies (AF button) 29
TA - Traffic announcement 30
PTY functions 31
Operation with data media (DVDs, Audio CDs, MP3, USB,
SD/MMC and AV IN) 33
The CD/DVD drive 33
The USB connection 35
The SD/MMC card reader device 35
The AV IN connection 35
DVD operation 36
Playback functions 36
Calling up playback information 41
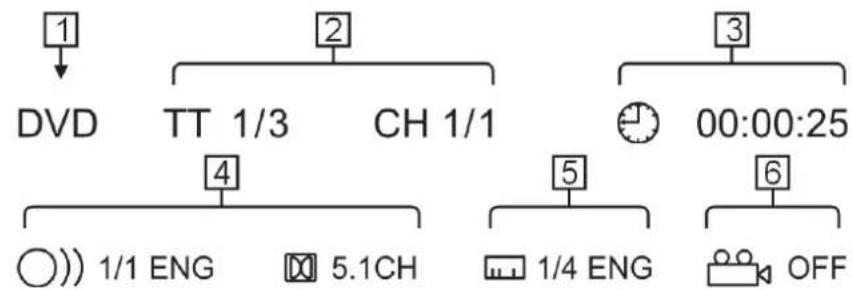
The DVD setup 42
Troubleshooting 44
Technical data 45
Disposal information 46


Remote control
- : turn the device on and off
- DISP: Display information for the current operation mode
- MODE: Press repeatedly to select operation mode
4.:ect disc (not in DVD mode); SLOW: Slow motion (DVD) - SUB-T: Subtitle (DVD)
- AUDIO: Audio selection (DVD)
7.ANGLE: Camera angle (DVD) - MUTE: Mute the sound
- VOL + / - : Increase or decrease volume; in menus: set a value
- MENU: Open the car radio setup
- : Fast reverse, fast forward (with media)
- ■: Stop playback
- GOTO: Go to a defined point on a disc; AS/PS: Search and store in preset memory
14.PROG:Title programming; LO/DX:Switch between local (LOC) and remote (DX) stations (see page 27).
15.RDM: Random playback (with media); MO/ST: Switch between stereo and mono reception in FM radio mode
16.0: Number key 0;
BAND: Select frequency band in radio mode (FM 1, FM2, FM3, AM1, AM2)
17.9: Number key 9;
PTY ("Programme Type"): Find stations with specific programme contents

EN
EN-5
Operating the remote control
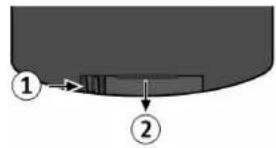
The remote control is supplied with a lithium battery cell (CR 2025, 3 V). Plastic film was placed between the contacts as transport protection.
Push the clip (1) a bit to the inside.
Pull out the battery compartment (2).
For first-time use: Remove the film.
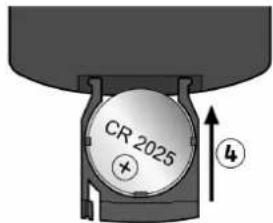
- Changing the battery: Take out the old battery cell and insert a new one in the compartment. The battery is under the holding clips and the side with the lettering is pointing up (3).
Slide the battery compartment shut (4).

EN
EN-7


Do not charge batteries (except rechargeable batteries).
Do not reverse the positive (+) and negative (-) terminals to avoid a short-circuit.
Do not forcibly discharge batteries.
Do not short-circuit batteries.
Do not heat or dispose of in fire.
Do not disassemble or deform the batteries.
Your hands and fingers may be injured, or the liquid of the battery may get into your eyes or adhere to your skin. If this happens, rinse with a large quantity of water immediately and consult a doctor.
- Do not expose batteries to strong impact such as dropping or throwing the batteries.
Check that the contacts in the device and on the batteries are clean before inserting the batteries; otherwise clean as necessary.
□ Promptly remove used batteries from the device.
Insulate the terminal parts with tape or similar when storing or disposing of the batteries.
Cleaning the device
Use a soft, dry cloth to clean the device. Avoid the use of chemical solutions and cleaning products, because these may damage the unit's surface and/or the labels on it.

The device must not get wet. Do not touch the device with wet or moist hands. Risk of electric shock!
Included in the box
Please check that the contents listed below are supplied with your package and notify us within 14 days of purchase if this is not the case.
The following are included in the delivery pack:
DVD car radio
Control panel
Remote control incl. batteries
USB adaptor cable
ISO connector with blank wires
Control panel case
Mounting frame (clipped on)
2 fitting wrenches for pulling off the mounting frame and pulling out the car radio once it is fitted
Further attachment material for individual installation
This manual
Warranty card
EN

EN-11


Installation
Installation instructions

Before the installation, disconnect the car battery! Risk of short-circuit and electric shock!
The hand brake cable and the cable for the rear view camera (see page 16) may only be connected by specialists. Have this installation performed by an authorised workshop if you do not have the necessary skills!
- Check if the terminal assignment of your vehicle matches the assignment at the car radio (see "ISO block assignment", pg. 13).
Do not install the cables under tension, not across sharp edges or close to parts that could become heated. Make sure you do not kink the cables or twist them.
Insert the device into the proper slot or choose an installation location that will not affect the driver's normal ability to drive.
Connect the cable shortly before finally installing the device. Ensure it has been connected correctly and that the system is working properly.
If changes have to be made to the vehicle, consult your vehicle dealer/ specialist garage.
Make sure that device is installed in such a way that injuries cannot occur due to heavy braking.
If the device is installed at an angle of over 30^ off the horizontal, this may reduce its optimal output capacity. - Avoid installing the device near strong heat (e.g. direct sunlight or heated air), dust, dirt or strong vibrations. This can damage the device.
You must follow these instructions precisely during the assembly. Before reconnecting the car battery, check all of the connections.
Maximum installation angle

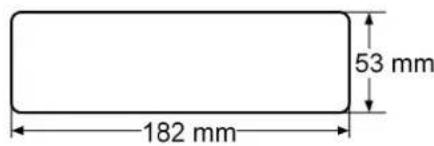
ISO installation slot and connections
The car radio is designed to be fitted in a standard ISO installation slot. The dimensions of this slot are 182mm× 53mm
EN
The ISO installation slot is normally equipped with two ISO plugs and an antenna plug.

If your vehicle has no ISO installation slot, or is not equipped with the connections, you may use the supplied cable sockets. Please consult a specialist garage, dealer, or the specialist department of a large store.
Fit the installation frame
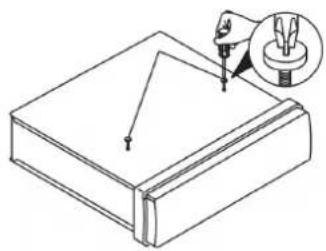
Before installation, always use a Phillips head screwdriver to remove the two transport safety screws in the top part of the radio casing (marked with yellow flags)!

The car radio is delivered with the installation frame fitted over it. First remove the mounting frame from the car radio casing.
To do so, push down the two clips at the sides of the car radio (1) and push the mounting frame off the radio from the rear (2).
EN-13


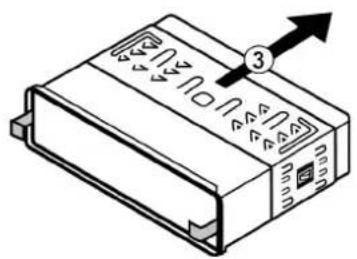
Then use the key to slide the installation frame over the device towards the rear (3).
Insert the mounting frame in the ISO installation slot.


To fix the mounting frame in the installation slot, use a screwdriver to bend down as many clips as possible. Choose the clips which fit tightly against the installation slot casing.
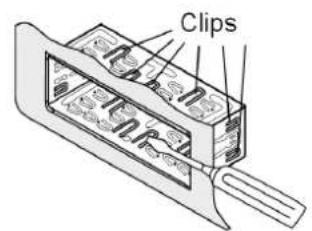

Next, make sure the frame fits tightly. The frame must be tightly fitted to prevent it from coming loose if the driver brakes sharply.

EN-14


Connections at the rear
Overview of the connections at the rear:

EN
Prepare the cable connections
Do not remove the flags from the cables. These are required for the correct connection.
Pull out the connections in your car ISO slot far enough for you to join them to the ones from the car radio.
Connect the cables
Please use the car radio ISO block for installation. Never disconnect the ISO block - If your car ISO plugs do not fit the car radio ISO sockets, you can buy suitable adapters in specialist garages, from dealers and the specialist departments of large stores.
Secure, proper electrical connections are provided by both car ISO plugs (for the loudspeakers and the power connections). In case you still wish to lay the cables yourself, we explain in detail the uses of the cables at the end of this chapter.
- Connect the connector of the ISO socket block to the socket for the ISO socket block at the rear of the car radio.
- Connect the both vehicle ISO plugs (one ISO plug for ISO Block A and one for ISO-Block B) to the car radio ISO block.
EN-15


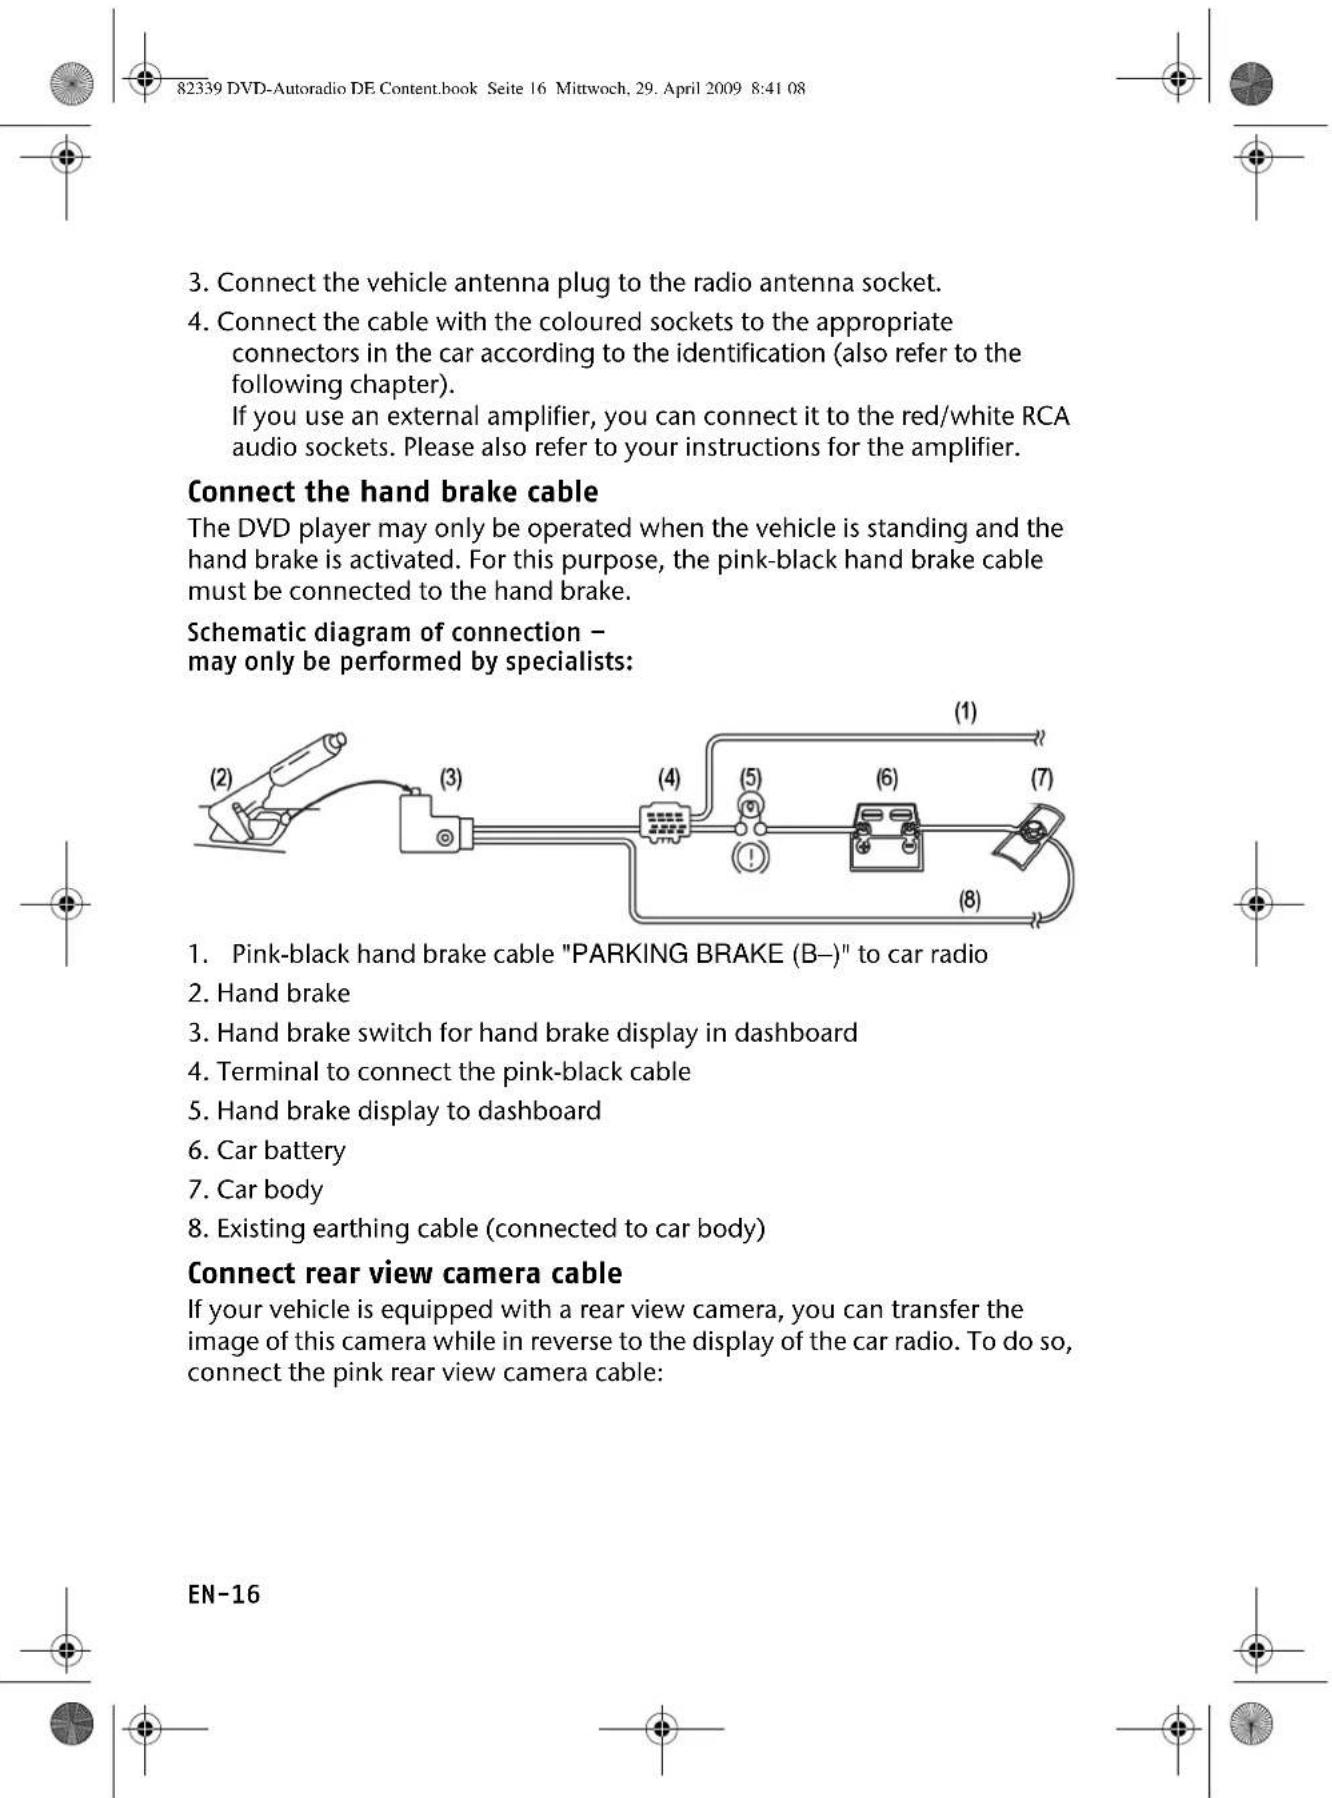

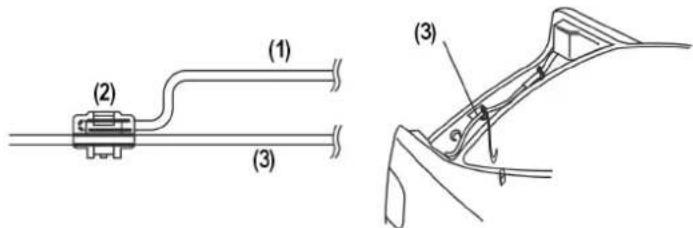
Schematic diagram of connection - may only be performed by specialists:
EN
- Pink rear view camera cable "CAMERA CONTROL ( + ) to car radio
- Terminal to connect the pink cable
- Existing reversing light cable
Test station memory
The standard arrangement for the standard plus and permanent plus cables in some vehicle models has been switched in the factory (see "Arrangement of the ISO block" on page 22). This may cause the station memory not to work. Before you finally install the car radio, try the following to find out if you stored the stations.
Reconnect the car battery.
Turn on the ignition.
Switch on the radio.
- Go through the automatic station saving process, holding down the AS/PS button for approx. two seconds (see also "Automatic saving" on page 27).
Switch off the radio.
- Switch on the ignition again and find out if the stations were been stored (press the station buttons 1 to 6).
If the stations were stored, you can install the radio.
If the stations are no longer in the memory, you should use an adapter (obtainable from the specialist store) or have the cable adapted in a specialist garage. If this is the case, refer to Chapter "Explanation for cable use" on page 20.

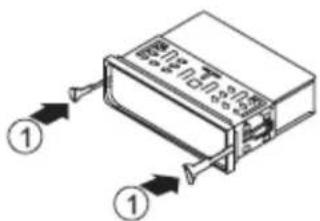
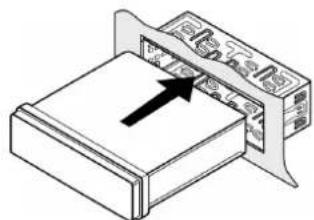
Inserting the car radio
- Push the car radio carefully into the slot until it engages.
While pushing the radio in, be careful of how you fit the cables; they should not be kinked, crushed or stretched.
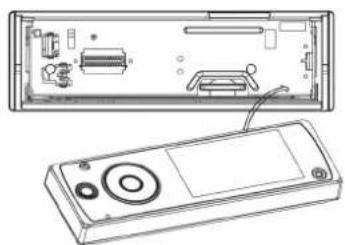
Control panel
Inserting the control panel
First, place the right side of the control unit into the frame.
Then carefully press the left side until it engages.
Make sure the control panel is positioned properly and securely. If the control panel is not fitted properly, error messages appear in the display and/or several buttons will not function properly.
Removing the control panel
Press the button. The control panel will be released and you can take it off.

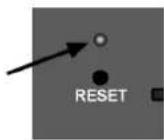
Anti-theft protection

If the control unit has not been inserted in the frame, the anti-theft LED on the unit will flash.
Contacts
Removing the control panel will expose the contacts at the control panel and the radio.

Make sure the exposed contacts are not contaminated. The car radio might not function properly afterwards.
For protection, always keep the control unit in its case.
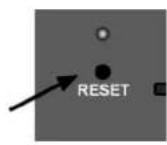
Reset
To start radio operation, press the RESET button with the point of a ballpoint pen or other sharp object.
If the car radio shows a defect that cannot be remedied through switching off and back on, press the cartridge of a ballpoint pen or other sharp object in the RESET button opening.
EN
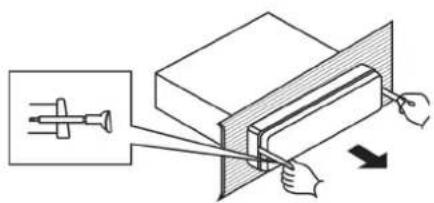
Removing the unit
Remove the control unit.
Pull out the frame.
- Insert the right and left keys in the slots on the sides of the set. The flaps will be folded back and you can remove the set.

EN-19


Explanation for cable use

The explanatory notes for cable use are intended for individual cable fitting cases. Consult a specialist garage and pass on the information contained in this chapter.
You do not need these explanatory notes when connecting the radio to your vehicle ISO plugs.
Two ISO connectors with cables are supplied:
Connector with electric cables for ISO socket block A
Connector with loudspeaker cables for ISO socket block B
Overview ISO connector A: Power

Notes on fitting cables.
Memory back-up (yellow)
The yellow memory back-up cable must be connected to the permanent plus. Otherwise the station memory will not work (see "Arrangement of the ISO block" on page 22).
Antenna relay cable (blue)
The blue cable is available for a relay-controlled antenna. The relay automatically extends the antenna when the radio is switched on. When it is switched off, the antenna is retracted.
This relay cable can also be used to control an external amplifier. Please refer to the amplifier operating instructions for the correct connections.

Never connect the blue cable to the engine cable; this could damage the radio!
EN-20

Overview ISO connector B: Loudspeaker

EN

If the vehicle only has front loudspeakers and the cables for the rear loudspeakers are not needed, you must professionally insulate the exposed ends of these cables.

EN-21


Arrangement of the ISO block
| BLOCK B – speakers BLOCK A – electricity supply | ||||
| 1 | r i g h | t | r e a r + 1 | |
| 2 | r i g h | t | r e a r - 2 | |
| 3 | r i g h | t | f r o n t + | |
| 4 rignt front - 4 Permanent plus (permanent 12 V supply from main electrical system) | ||||
| 5 left front + 5 Car antenna (also for external amplifiers, etc.) | ||||
| 6 left front - 6 | ||||
| 7 left rear + 7 Switched plus (switched 12 V voltage, via ignition) | ||||
| 8 | l e f t | r e a r - 8 | ||
3
E a r t h
Problems due to switched cables
In some vehicle models, the standard arrangement of cables and in the ISO block A are switched at the factory. If this is the case with your vehicle, certain functions may be impaired: stations may not be stored properly, for example.
To solve this, reverse the red cable (switched plus) and the yellow cable (permanent plus) in the ISO block. The specialist dealer has the appropriate adapters for this.
General functions

Do not switch on the radio for long periods of time when the motor is switched off. This could cause the car battery to discharge and the vehicle can no longer be started.
EN
Time
Your car radio is equipped with an RDS controlled clock. This is set automatically by the RDS station and keeps running even when the radio is switched off.
You can also use the menu to manually set the clock (see below).
Switching on/off
You can switch on the radio with any button except and
The radio will also be turned on when a disc or a card is inserted or an USB stick is connected.
Press and hold the button for a few seconds and the device will turn off.
Volume
Press the buttons VOL (+) or VOL (-) to increase or decrease the volume.
Press MUTE to turn off the sound and turn it on again.

Always set the volume so that you can still clearly hear the sirens from emergency vehicles!
Operation mode
Press the MODE button repeatedly to switch between radio reception, CD/DVD operation, USB operation, memory card operation and AV IN operation.
Note that media must be inserted or connected to make the mode accessible.


RESET
To reset the car radio to the factory settings, press the RESET button, which is located behind the control panel, with a pointed object such as a pen.
Press RESET
- before first use, after connecting the cable,
- if not all function keys are working,
- when an error message appears in the display.

Basic settings for the menu
Press MENU to open the setting menu for the car radio. You will find the following screens:
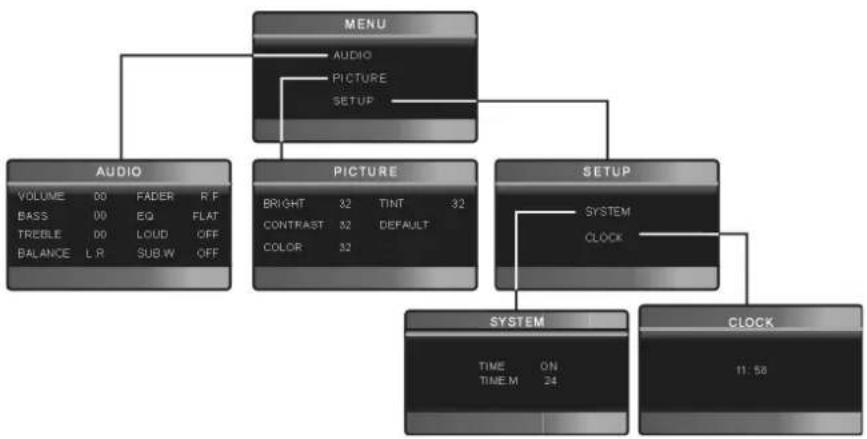
To select a menu entry, press on the main unit or the arrow keys on the remote control.
To confirm the selection and, if possible, open the subgenus, press MENU on the main unit or ENTER on the remote control.
To set a value, press on the main unit or VOL+/VOL- on the remote control.
Press MODE to access the previous screen or press MODE on the main unit or ZOOM on the remote control repeatedly to exit the settings menu.
EN-24


AUDIO menu
| VOLUME Adjust the basic volume of the device here. When switched on, the radio will play at this volume level. | |
| BASS | Basses |
| TREBLE | Trebles |
| BALANCE L-R | Balance between the left and the right speakers. |
| FADER R.F | Balance between the front and the rear speakers. |
| EQ | Equalizer: FLAT and preadjustments for CLASSIC, ROCK, POP |
| LOUD Loudness; emphasises high and low frequencies at a low volume level | |
| SUB.W | If a subwoofer is connected, you can now activate the subwoofer here. |
EN
PICTURE menu
| BRIGHT Brightness. | |
| CONTRAST | Contrast. |
| COLOUR | Colours. |
| TINT | Colour tints. |
| DEFAULT | Set the picture menu to default settings. |
SETUP
This menu has the submenus SYSTEM and CLOCK.
SYSTEM:Clock settings
| TIME Turn the time | display on or off. |
| TIME.M | Time mode: 12-hour or 24-hour mode. In 12 hour mode, "AM" or "PM" will appear resp. |
CLOCK: Set the clock
Select the hours with . Set the hours with
Select the minutes with. Set the minutes with
EN-25


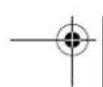
Radio operation: basic functions
In radio operation, the basic display will look similar to the following:
Select the band
Press the BAND button to switch between FM (FM1, FM2, FM3), and AM (AM1 and AM2). You can store six stations in each band.
The three bands FM1, FM2 and FM3 and the two band AM1 and AM2 each cover the same frequency width. This allows you to store up to 18 FM stations and up to 12 AM stations.
Searching for a station
Automatic search
- Briefly press the or scan buttons. The set will search for the next station.
To stop the search, press or again.
Manual search
Press and hold or scan buttons to start a manual station search. The display shows MANU.
Increase or decrease the value by briefly pressingor.
Stereo and Mono
FM stations are broadcast in stereo. If you have bad reception, it can sometimes be improved by switching to MONO with the ST button.
EN-26

Local searching mode
In the local searching mode (LOC), the automatic search will only find stations with a strong signal. You thus avoid finding too many stations in an area where many stations are broadcast.
- With the LOC (LO/DX) button, switch off the LOC mode (activate the DX mode) to also find more remote stations.
Searching for an AF station
In AF mode, the radio in the VHF band automatically changes to a station with an alternative frequency which transmits the same programme when the reception of the initial frequency is too weak ("AF" = "Alternative frequency") (also refer to the explanation "Alternative frequencies (AF button)" on page 29).
To turn on the AF mode, press AF once. The AF display will appear.
In one of the three band ranges FM1, FM2 or FM3, then press the key or to find stations in the VHF band ranges that are broadcasting an AF signal.
The search will stop each time a station is found.
To deactivate the AF mode, press AF again. The display will blank out. The AF mode is switched on in the delivered condition, or after a reset.
Save stations
Manual saving
After the search function has found a station, press and hold one of the 1-6 station buttons for about two seconds. The radio will switch back into automatic search mode after a few seconds.
Automatic saving
Press and hold the AS/PS button for about two seconds. The current band is scanned for the six strongest stations. The found stations are automatically stored on the station buttons 1-6. The scan stops for five seconds each time a station is found. The the station on station button 1 will be played.
To stop the scan, press one of the station buttons 1 to 6.
EN-27


Selecting stations
Selecting individual stations
Select the radio frequency by pressing BAND.
You can open one of the stored stations by pressing one of the station buttons 1-6.
Running through stored stations
You can call up the stored stations for the current transmission areas.
Select the radio frequency by pressing BAND.
Press AS/PS briefly. All stations are now played for approx.. 5 seconds.
When you hear the station you require, briefly press AS/PS.
PTY functions
"PTY" ("Program Type Code") is a function where the car radio specifically searches for stations with a pre-set programme content. This is a service that is being increasingly supported by the radio stations.
To activate the PTY menu, press the PTY button. The following display will appear:
EN

List of programme types
- Use key or on the remote control) to search for PTY stations. The station search will begin after a few seconds. The search stops when a station is found; the device will return to its normal mode if no station is found.
Use any button to cancel the search.

The following programme types are possible:
NEWS: news
AFFAIRS: Current events
INFO: Advise, information
SPORT: Sports events
EDUCATE: Education
DRAMA: Radio dramas
CULTURE:Culture
SCIENCE: Natural science and technology
VARIED: Miscellaneous
POP M: Pop music
ROCK M: Rock music
EASY M: Easy music
LIGHT M: Light classical music
CLASSICS:Classic
OTHER M: Other music
WEATHER:Weather
FINANCE: Finances, stock market
CHILDREN: Children's programmes
SOCIAL: Social events, activities.
RELIGION: Religion, ethnics
PHONE IN: Station with calling option
TRAVEL: Travelling
LEISURE: Recreational activities
JAZZ: |azz
COUNTRY: Country music
NATION M: Music of other countries
OLDIES: Oldie music
FOLKS M: Folk music
DOCUMENT:News reports
TEST: Emergency test
ALARM: Disaster reports
Please note that this information depends on the region, the broadcaster and the station.
Operation with data media (DVDs, Audio CDs, MP3, USB, SD/MMC and AV IN)
EN
The car radio has several drives and connections and can play back different formats:
| Drives and connections Data | media and formats |
| CD/DVD drive For DVDs and | video CDs. Only when car is standing still. Playable formats: MPEG4, DVD+R, DVD-RW, DVD-R, DVD-RW, JPEG disks. DVDs you created yourself must be finalised. |
| For commercial audio CDs and own CDs with MP3 or WMA files. The CDs can also have a CD-R and CD-RW format. | |
| USB connection For USB flash | drives* or MP3 players* |
| SD/MMC card reader For SD/ | MMC memory cards* with MP3 or WMA files |
| AV IN connection To connect | external audio devices, e. g. a CD player, using a 3.5 mm jack plug |
| * Compatibility with all MP3 players, USB flash drives or memory cards currently available on the market cannot be guaranteed. |

The playback functions of the different audio data media are mostly identical and are described together in these instructions (see page 36).
The CD/DVD drive
The disc drive is located behind the control panel.
Inserting and removing discs
Press the button (Eject) on the main unit. The control panel will move down.
- Insert the disc with the labelled side up into the slot. The data will be read. The display shows the start image and the indicator READ.
EN-33

Playback then begins.
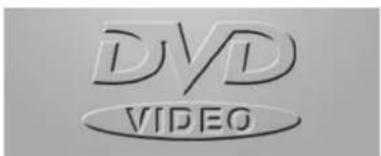
You will see a display as depicted here:
To remove the disc, press the button again on the main unit. The disc will be ejected. The car radio will change back to radio mode.
- Close the control panel again by tapping on the button on the lowered control panel.

The button on the remote control cannot be used as eject button in the DVD mode. Use MODE to switch to a different mode if you want to open the disc compartment with the remote control.

Do not drive with a CD protruding from the device.
Remove the CD immediately.
ESP - Electric Shock Protection
The device is equipped with an anti-shock function. This function compensates for vibrations, for instance, from a bumpy road and ensures playback without interruption even if the player is moving around.. When the player is switched on, the memory is automatically filled with data:
- with DVDs for 5 seconds;
with audio CDs for 10 seconds;
with MP3 CDs for 120 seconds; - with WMA CDs for 150 seconds.
The USB connection
You can connect an MP3 player or other data medium to the USB connection to the front of the unit.
Connecting a USB device
- Connect your USB device (e.g. a USB flash drive or MP3 player) to the connection. If necessary, use the supplied USB adapter cable for the mini USB connection.
The car radio searches for MP3 or WMA files on the data medium and the message USB appears in the display.
If the device is in an other mode (radio, CD), you can select the USB connection by pressing MODE.
Search and playback functions for files on an external storage medium work in the same way as for MP3 CDs.

Never remove the USB device while playing back data. First stop the playback, or use MODE to switch to another operation.
The SD/MMC card reader device
The SD/MMC drive is located behind the control panel.
Inserting and removing cards
Press the button to release the control panel.
- Insert the memory card into the card slot with the contacts facing down and the bevelled corner pointing to the right.
Re-insert the control panel. The car radio searches for MP3 or WMA files on the data medium and the message SD/MMC appears in the display.
If the device is in an other mode (radio, CD), you can select the USB connection by pressing MODE.
The AV IN connection
You can connect another audio device, e.g. an MPEG4 player, with a 3.5 mm jack plug to the AV IN socket of the car radio.
If the device is in an other mode (radio, CD), you can select the USB connection by pressing MODE. The message AV IN appears in the display.
Control the playback at the connected device.
DVD operation

Only operate video CDs when the car is standing still and the hand brake is activated. If you insert a DVD and the hand brake is off, you will see the following message in English: "DISABLED WHILE DRIVING".
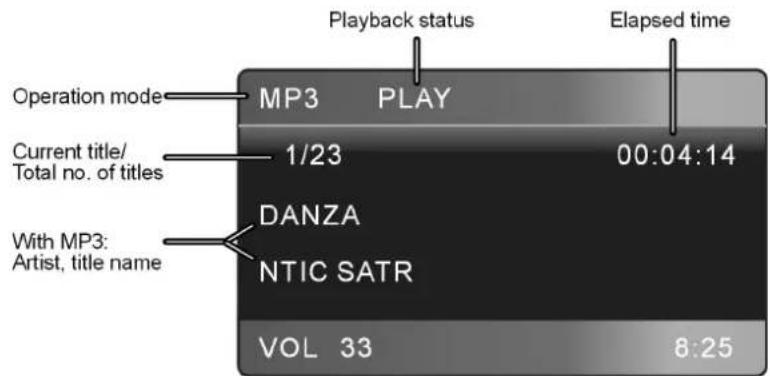
About DVDs
Video DVDs are divided into titles and chapters. A DVD may contain several titles, which may in turn be made up of several chapters. Titles and chapters are each numbered sequentially
With the DVD player in your car radio, you can play back DVDs with regional code 2 (Europe) and 0 (suitable for every DVD player).

Starting the DVD
Insert a DVD as described on page 33. Playback will start automatically.
If necessary, use MODE to select DVD operation.
Playback functions

Many of the functions described here can only be activated using the buttons on the remote control.
MP3/WMA display
Press the DISP button. You will see a display as shown here:

EN
Folders appear on the left, and tracks on the right.
Use the arrow keys to select a folder or a track and press ENTER to play back the folder or the track.
Displaying the file types
| Audio files |
| JPEG: picture files |
| Video files |
Pause and playback
You can pause playback using the or button. During the pause, "PAUSE" appears in the display.
Press the button again to continue the playback.
Press twice to stop playback completely.
Skipping tracks
- Use or to select the next or previous track. The track number is shown on the display.
Fast forward/rewind
Press or repeatedly to increase fast forward in several increments: 2X > 4X > 8X > 20X > normal playback.
EN-37


Also use to return to normal playback.
Slow motion (DVD, VCD and SVCD)
Press the /SLOW button repeatedly to increase slow motion in several increments: 1 / 2 > 1 / 3 > 1 / 4 > 1 / 5 > > 1 / 6 > 1 / 7
In DVD mode, the disc cannot be ejected with the button on the remote control. Switch to another operating type before ejecting the disc.
Use to return to normal playback.
Repeat (CD, MP3, VCD and SVCD)
Press the RPT button once. REP 1 appears in the display. The current track will then be repeated.
- Press the REP button twice.
REP DIR. appears in the display for MP3 data media. The current directory will be repeated.
REP ALL appears for other data media. All tracks will be repeated.
For MP3 data media, press the button a third time to repeat all tracks (REP ALL).
Pressing the button again will change the playback mode back to normal.
Repeat (DVD)
Press RPT repeatedly to choose between the following repeats: REP CHAPTER (repeat chapter) > REP TITLE (repeat title) > REP OFF (no repeat).
Repeat A-B (DVD)
Use this function to repeat a section you chose yourself.
Press A-B to establish the beginning of the section.
Press A-B again to establish the end of the section. The section will be repeated endlessly.
Press A-B one more time to return to normal playback.
Random track playback
Press the RDM button. This starts playback in random order.
- Pressing the button again will change the playback mode back to normal.
Language selection/subtitle selection (DVD)
If the DVD has several languages or subtitles, you can use the AUDIO button to choose another language, and the SUB-T button to choose another subtitle language.

Please note that it depends on the DVD whether these functions are possible or not. You might have to change the language using LANGUAGE SETUP (page 43).
Audio function (VCDs/S-VDSs)
Some video CDs or super video CDs have several audio channels. You can use the AUDIO button to choose the channels here:
STEREO > MONOL (only left channel) > MONOR (only right channel).
Camera perspectives (DVD)
Some DVDs have scenes that were filmed from several different perspectives. You can use the ANGLE button to change the perspectives.
Please note that the exact implementation of this function depends on the DVD.
Zoom function
Press the ZOOM button repeatedly to magnify and reduce the image in the following increments: ZOOM2 > ZOOM3 > ZOOM4 > ZOOM1/2 > ZOOM1/3 > ZOOM1/4 > OFF (normal video size).
With a magnified image, you can use to choose an image section.
Title menu (DVD)
- With the TITLE button (MENU button on the main unit), open the title menu of the DVD. Make your selection using the arrow keys and confirm with ENTER.
If you play back a VCD with PBC (playback control), you can also open the menu by pressing TITLE.
Title programming
Press the PROG button during playback to open the programming menu.
| VCD/SVCD/Audio CD DVD/MP3/MPEG4 | |
| PROGRAM 1 [___] 5 [___] 9 [___] 13 [___] 2 [___] 6 [___] 10 [___] 14 [___] 3 [___] 7 [___] 11 [___] 15 [___] 4 [___] 8 [___] 12 [___] 16 [___] PLAY CLEAR | PROGRAM T C T C T C T C 1----5----9----13----2----6----10----14----3----7----11----15----4----8----12----16----PLAY CLEAR |
Use the arrow keys to move to the first programme position.
EN-39


- Use the numeric keypad to enter the relevant title. For DVDs, enter the title ("T") and the chapter ("C" which contains the title.
- When your list is complete, use the arrow keys to move to PLAY and press ENTER to play back the titles.
GOTO function
The GOTO button enables you to directly select a particular location on the disc.
DVD
DVD TT (01)/12
CH(001)/001
00:00:39
VCD/CD/MP3
VCD TRK 09/18 PBC 00:00:12
Use the arrow keys to choose the category you would like to select: TT (Title), CH (chapter), TRK (track), or (time).
Use the numeric keypad to enter the relevant value.
- Then press ENTER as confirmation; the discs starts at the location you entered.
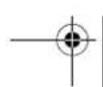
Calling up playback information
Press down the SUB-T once or twice to show information about the current playback status.
DVD

VCD/CD/MP3/JPEG
Meaning of the indicators
| 1 | DVD / VCD | Disc type |
| 2 | TT 1/3 | Current title / Total number of titles |
| CH 1/1 | Current chapter / Total number of chapters | |
| TRK 09/18 | Current track / Total number of tracks | |
| 3 time | T / C | Elapsed time for the title / chapter. |
| -/-T- / C- | Elapsed time for the title / chapter. | |
| 4 Audio | 1/1 ENG | Current language / Number of languages |
| 5.1 CH | 5.1 channel | |
| 5 | 1/4 ENG | Current subtitle language / Number of subtitle languages |
| 6 Camera perspective | ||
| 7 | u | M u |
| 8 | PBC | Playback control; only for VCD 2.0 with PBC |
EN-41
t

by pressing ENTER. Then enter a new four-digit password when prompted.

Write down your new password and keep in a safe place, because it cannot be reset to the factory settings.
EN
RATING: Parental control. Here you can set the authorisation level for DVDs. Class 1: Suitable even for small children; Class 8: For adults only.
DEFAULT: Reset all settings to the factory settings.
A new password and the authorisation level will be retained.
LANGUAGE SETUP: Language menu
OSD LANGUAGE:The language of the DVD menu and other screen information.
AUDIO LANG.: Default setting for the spoken language on the DVD, if available on the DVD.
SUBTITLE LANG.:Default setting for the subtitle language on the DVD, if available on the DVD.
MENULANG.: Default setting for the menu language on the DVD, if available on the DVD.
AUDIO SETUP
AUDIO OUT: SPDIF OFF: The coaxial digital output is not activated.
SPDIF RAW: To output a digital 2.0 channel data stream.
SPDIF PCM: Standard format to output a stereo format.
KEY: Boost the basses (B, -4, -2) or boost the trebles (+2, +4, #)
DIGITAL SETUP
OP MODE: LINE OUT: Volume differences are adapted. RF REMOD: Sound is played back without changes to the volume.
DYNAMIC RANGE: Here you can set the dynamics of the sound (see OP MODE) in single steps. OFF: Sound is played back without changes to the volume. FULL: Loud parts are played quietly, quiet parts are played more loudly.
DUAL MONO: Two-channel sound. STEREO: Stereo signal over left and right loudspeaker. L-MONO: Left mono channel over left loudspeaker. R-MONO: Right mono channel over right loudspeaker. MIX-MONO: Left and right mono sound over left and right loudspeaker.

Troubleshooting
| PROBLEM POSSIBLE CAUSE / SUGGESTION | |
| The device cannot be switched on. | The ignition is not switched on. |
| One of the fuses is defective. | |
| The CD cannot be loaded or is ejected. | There is already a CD in the car radio. |
| The CD has been put in incorrectly. | |
| The CD is dirty or damaged. | |
| The temperature in the car is too high. Wait until the environmental temperature has become normal. | |
| Condensation! Switch the car radio off for a few hours and then retry. | |
| No sound! The volu me has been set to minimum. | |
| Cables are not properly connected. | |
| Function buttons do not work. | The integrated microcomputer cannot work because of interference. Press the RESET button: |
| The control panel is not properly fitted. | |
| The CD skips. The in stallation angle is more than 30°. | |
| The disc is very dirty or damaged. | |
| Errors on CDs you have burned yourself. | |
| Radio and/or automatic search do not work. | The antenna cable is not connected properly. |
| The transmission signals are too weak. | |
| Station memory does not work. | The cable for the permanent plus (yellow) is not connected properly. |
| Device connected to the USB connection does not work. | The USB connection is intended for devices that conform to the USB standard. Not all devices available on the market comply with this standard. It is possible that a non-standard USB device is connected. |
| Card reader is not reading the card | Card is possibly damaged, dirty or incorrectly inserted. |
| DVD-related problems | |
| Poor image Was the correct colour format (PAL/NTSC) selected? | |
| The disc is not played | Is the country code of the DVD 2 or 0? |
Technical data
EN
General
Operating voltage: DC 12 V, negative earth connection
Casing dimensions: 180 × 175 × 55 mm ( W × D × H )
TFT-LCD Display: 3.5 inch (960 x 240 pixel)
Output power: 4 × 15 watt max (peak music output)
Fuses: 15 ampere (blue)
Radio
FM:87.5-108MHz
AM: 522 - 1620 kHz
Disc player
Laser output: Class 1 laser product
Frequency range: 40Hz - 18kHz
MPEG rate 64 - 320 kbps
MP3 playback ISO 9660 & Joliet MP3 format
Connection
AVIN: 3.5 mm phono jack
Supported formats
CD: Audio CDs, CD-R, CD-RW
DVD, Video CD: MPEG4, DVD+R, DVD-RW,
DVD-R, DVD-RW, JPEG
USB storage medium:
1.1 and 2.0 up to 8 GB (tested)
Memory cards:
SD up to 1 GB
MMC up to 512 MB
SDHC up to 16 GB (tested)


These days there are many non-standard CD recording and copy protection procedures in use and a wide range of CD-R and CD-RW discs on the market. This can occasionally lead to read errors or delays. This does not mean the device is faulty.
Subject to technical changes!
EN-45


Disposal information
Packaging

All packaging and packaging materials that are no longer required can and should be recycled.
Device

At the end of its life, the radio should not be disposed of as household garbage. Enquire about the options for proper, environmentally-friendly disposal.
Batteries

Do not dispose of used batteries in the household rubbish! They must be deposited at a collection point for used batteries.

FR
Sommaire
Vued'ensemble 3
FINANCE: finances, Bourse
(Audio-cd's, MP3, USB, SD/MMC, AV IN) 33
Cd-/dvd-station 34
USB-aansluiting 35
FINANCE: finance, burza
CHILDREN: dtske programy
