
MD 41804 - Car radio MEDION - Free user manual and instructions
Find the device manual for free MD 41804 MEDION in PDF.


| Product Type | Car Stereo |
| Brand | Medion |
| Model | MD 41804 |
| Dimensions (W x H x D) | Approx. 178 x 50 x 160 mm (1 DIN) |
| Weight | Approx. 0.5 kg |
| Power Supply | 12V DC (vehicle battery) |
| Max Power Output | 4 x 50W (peak) |
| Audio Formats Supported | CD, CD-R/RW, MP3, WMA |
| Radio Bands | FM, AM |
| Radio Presets | 30 (FM) + 10 (AM) |
| USB Port | Front USB 2.0 for MP3 playback |
| Auxiliary Input | 3.5mm front AUX |
| Display | LCD with white illumination |
| Remote Control | Included (IR) |
| Steering Wheel Control Compatible | Yes (requires adapter) |
| Equalizer Presets | Rock, Pop, Classic, Jazz, Flat |
| Clock | 12/24 hour with RDS time sync |
| Security | Detachable front panel |
| Maintenance | Clean with soft dry cloth; avoid liquids |
| Repair/Spare Parts | Contact Medion support or authorized service |
| General Information | User manual available online in PDF |
Frequently Asked Questions - MD 41804 MEDION
User questions about MD 41804 MEDION
0 question about this device. Answer the ones you know or ask your own.
Ask a new question about this device
Download the instructions for your Car radio in PDF format for free! Find your manual MD 41804 - MEDION and take your electronic device back in hand. On this page are published all the documents necessary for the use of your device. MD 41804 by MEDION.
USER MANUAL MD 41804 MEDION
Before operating your car radio, read these instructions carefully to familiarise yourself with this device. We recommend keeping these instructions in your car to refer to when you need them.
SAFETY ON THE ROADS

Road safety should be your top priority. Use your car radio only in suitable traffic conditions. Please ensure that you are familiar with the radio before setting off.
You should always be able to hear police, fire and other emergency service sirens in good time while in your vehicle. For these reasons, please play your radio at an appropriate volume while driving.
INSTALLATION
If you wish to install your car radio yourself, please refer to the installation and connection instructions at the start of this manual.

CD PLAYER
The CD player is a first class laser product.
The unit has a safety system that prevents dangerous laser rays from escaping from the unit during normal use. In order to avoid injury to the eyes never manipulate or damage the unit's security system.
OVERVIEW
FRONT SLOT COVER
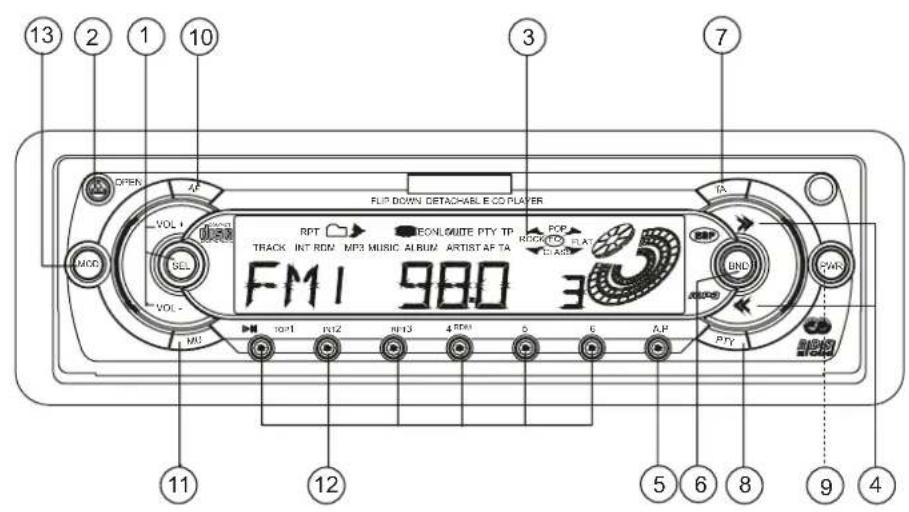

FUNCTIONS
- SEL and VOL+/VOL-: Multi-purpose buttons for audio settings/volume control
- OPEN: Opens the control panel
- LCD DISPLAY
- UP and DOWN buttons
- A.P.: Automatic station storage / MP3 search
- BND: Band selection switch
- TA: Traffic Announcement Identification
- PTY: Program Type Code
- POWER: On/off switch
- AF: Switches on RDS mode
- MUTE: Switch off sound
- PRESENT STATION (1-6) and Top/INT/RPT/RDM buttons
- MODE: Mode switch: radio / CD / MP3
- LED: LED anti-theft protection
- RESET: Reset to factory settings
CONTENTS
CONNECTION OPTIONS 5
4-speaker system....5
2-speaker system 5
INSTALLATION 6
Installation instructions....6
Preparation....6
Assembly 7
Inserting the control panel 7
Removing the control panel 8
Problems due to incorrect cable connections 8
OPERATION....9
Basic operation....9
Radio functions ....10
CD Player....12
MP3 Player....13
TROUBLESHOOTING 15
TECHNICAL DATA....16
CONNECTION OPTIONS
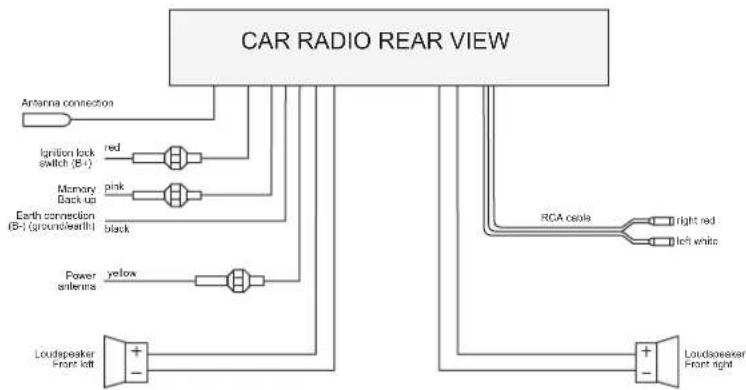
Memory back-up should be connected to permanent plus for the station memory.

flowchart
graph TD
    A["CAR RADIO REAR VIEW"] --> B["Antenna connection"]
    A --> C["Ignition lock switch (B+)"]
    A --> D["Memory Backup"]
    A --> E["Earn connection"]
    A --> F["pink black"]
    A --> G["pink red"]
    A --> H["pink blue"]
    A --> I["pink green"]
    A --> J["pink gray"]
    A --> K["pink white"]
    A --> L["Power antenna"]
    A --> M["Loudspeaker Front left"]
    M --> N["+"]
    M --> O["-"]
    M --> P["green/black"]
    M --> Q["blue"]
    M --> R["blue/black"]
    A --> S["RCA cable"]
    S --> T["right red"]
    S --> U["left white"]
    A --> V["gray"]
    V --> W["Loudspeaker Front right"]
    V --> X["+"]
    V --> Y["+"]
    V --> Z["gray/black"]
    V --> AA["white"]
    AA --> AB["Loudspeaker Front right"]
    AA --> AC["+"]
    AA --> AD["+"]
    AA --> AE["white/black"]
Memory back-up should be connected to permanent plus for the station memory.
flowchart
graph TD
    A["CAR RADIO REAR VIEW"] --> B["Antenna connection"]
    A --> C["Ignition lock switch (B+)"]
    A --> D["Memory Back up"]
    A --> E["Earth connection (B+) (ground/earth)"]
    A --> F["Black"]
    A --> G["Power antenna"]
    A --> H["Loudspeaker Front left"]
    A --> I["RCA cable"]
    I --> J["Right red"]
    I --> K["Left white"]
    A --> L["Loudspeaker Front right"]
An external amplifier can be connected to the cinch cables. Please refer to your instructions for the external amplifier.
INSTALLATION
INSTALLATION INSTRUCTIONS
- Insert the radio in the ISO slot for car radios in your vehicle, or select another location for installation where it will not affect the driver's ability to drive.
- Connect the cable shortly before finally installing the device and check the station memory function.
- If changes have to be made to the vehicle, consult a vehicle dealer or specialist workshop. Incorrect installation can lead to malfunctions affecting the complete electrical system of the vehicle.
- If necessary use vehicle-specific ISO adapters for installing the car radio. These adapters can be obtained from specialist workshops, dealers, or specialist departments of car equipment warehouses.
• Install the unit in such a manner that no injury can be caused during heavy braking or other driving situations.
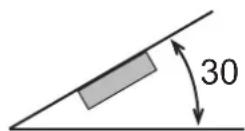
- Note that the functioning of the car radio may be impaired if it is installed at an angle of more than 30% from a level position.
- Ensure that the car radio is not exposed to excessive temperatures (e.g. from direct sunlight or air from the in-car heating system), dust, dirt, or excessive vibration.
PREPARATION
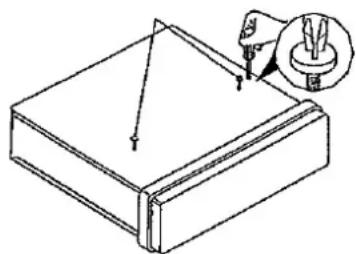
- Before installation always remove the two transportation safety screws in the upper part radio casing (recognisable by their red flags)!
- Now remove the mounting frame from the casing of the car radio.
- Remove screws before installing.
Remove screws
before installation.
natural_image
Technical line drawing of a mechanical component with a magnified inset showing a pin inserted into a slot (no text or symbols)ASSEMBLY
The car radio can be fitted in any standard ISO slot for car radios. If you vehicle has no ISO slot, please consult a specialist workshop, dealer, or a specialist department of a car equipment warehouse.
- Insert the mounting frame in the ISO installation slot.
- Bend the flaps in the mounting frame with a screwdriver so that it is fixed firmly in place in the installation slot (see diagram).
- Now connect the car radio's ISO block to the vehicle's two ISO plugs.
- Connect the vehicle antenna's cable to the car radio antenna socket.
- Push the car radio carefully into the slot until it fits securely.
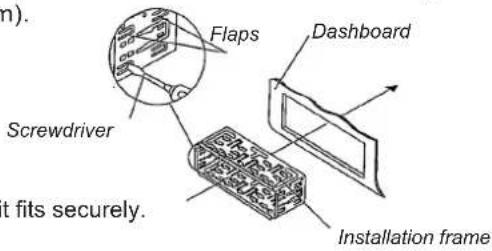
While pushing the radio, take care to ensure that the cables are not damaged during the process.
- Press the RESET BUTTON (15) using the tip of a pen or another sharp object.
- Insert the control panel as described in the next section.
Please use the car radio's ISO block for installation. These adapters can be obtained from specialist workshops, dealers, or specialist departments of car equipment warehouses. If the ISO block is separated from the radio the warranty will become NULL AND VOID!
INSERT THE CONTROL PANEL
- Push the car radio forward into the slot until it fits securely.
- Press von below and close the control panel, so that you can see the display.
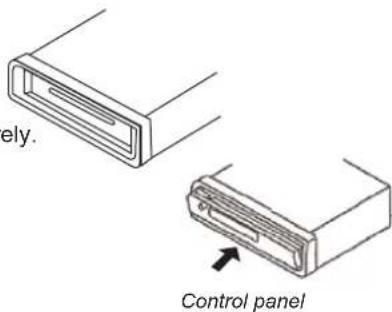
REMOVING THE CONTROL PANEL
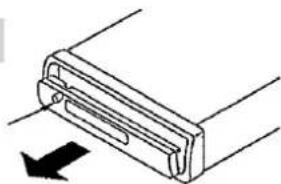
- Press the OPEN button (2).
• The control panel separates itself from the housing and you can remove it.
Open
natural_image
Pure mechanical component diagram without any text, numbers, or symbolsFor protection, always keep the control panel in its case.
PROBLEMS DUE TO INCORRECT CABLE CONNECTIONS
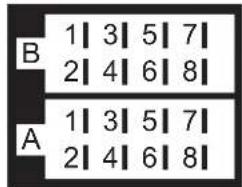
In some vehicle models, the standard arrangement of the cables [4] and [7] in the ISO block A (see below, "ARRANGEMENT OF THE ISO BLOCK") is exchanged at the factory.
If this is the case in your vehicle, certain functions may be impaired: stations may not be stored properly, for example.
To solve this, the red cable switched plus and the yellow cable (permanent plus) will need
to be reversed in the ISO block.
ARRANGEMENT OF THE ISO BLOCK
BLOCK B – Speakers BLOCK A – Electricity supply
1 - back right + 1 -
2-back right - 2 -
3 - front right + 3 -
4 - front right - 4 - Switched plus (permanent 12 V supply from main electrical system)
5 - front left + 5 - Auto. antenna (also for external amplifiers, etc.)
6 - front left - 6 -
7 - back right + 7 - Alternating plus (alternating 12 V voltage, via ignition)
8 - back right - 8 - Earth/ground
OPERATION
BASIC OPERATION
SWITCHING ON/OFF
- Press the POWER button (9) to switch the car radio on or off. VOLUME/BASS/TREBLE/BALANCE/FADER
- By pressing the SEL button (1) repeatedly you can display the volume, bass, treble, balance and fader settings and adjust them using the VOL+/VOL- (1) multi-keys control. MENU FUNCTIONS
- Hold down the SEL (1) key for longer than 1 second to call up the menu.
The individual menus are: MASK DPI/MASK ALL, DSP OFF/POP M/ROCK M/CLASS
M/FLAT M, LOUD ON/LOUD OFF, BEEP ON/BEEP OFF, SEEK 1/SEEK 2, STEREO/MONO, LOCAL/DX, VOL LAST/VOL ADJ.
Press the SEL (1) repeatedly to select the individual sub-menus. Choose your setting from a sub-menu using the VOL+/VOL- (1) keys.
MODE - Radio/CD mode
- Press the MODE (13) key to switch between the RADIO and CD modes
RADIO FUNCTIONS
SELECT BAND
Press the BND button (6) to switch between FM (FM1, FM2, FM3) and medium wave (MW1, MW2). You can store up to 6 stations in each band.
TUNING IN STATIONS
Press the tuning buttons (4). You can search forwards or backwards by holding down one of these buttons.
STORING STATIONS
After the tuning function has located a station, keep one of the number buttons 1-6 (12) held down for a few seconds. A beep will sound to indicate that the station has been stored.
FINDING STORED STATIONS
By pressing a number button 1-6 (12) you can locate the stations you have stored.
STORING STATIONS AUTOMATICALLY (AP)
By pressing the AP button (5) all stations that can be picked up will be stored in order.
REGIONAL PROGRAMME MODE
Some stations broadcast regional programmes. So that only these alternative frequencies for the required regional programmes are selected, hold down the AF button (10) until you hear a signal tone.
PTY (Program Type Code)
To activate the menu, press the PTY button (8).
You can now search for or select your preset stations by the following categories:
-> PTY MUSIC -> PTY SPEECH -> PTY OFF
Key
Type of music Type of speech programmes
1 POP M NEWS, AFFAIRS (current affairs),
INFO (information)
2 EASY M, LIGHT M SPORT, EDUCATE, DRAMA
3 CLASSICS CULTURE, SCIENCE,
OTHER M (other music) VARIED
4 JAZZ, COUNTRY WEATHER, FINANCE,
CHILDREN
5 NATION M, OLDIES SOCIAL, RELIGION
6 FOLK M TRAVEL, LEISURE,
DOCUMENT
Please note that this information will depend on the region, the broadcaster and the station.
RADIO (CONT.)
TA ("TRAFFIC ANNOUNCEMENT")
Hold down the TA button (7) to switch this mode on or off.
When the TA function is active during CDs or MP3 playback, the unit will automatically switch back to the radio mode. This can be interrupted by pressing the TA button again without switching off the TA function.
RDS (RADIO DATA SYSTEM)
RDS is a service provided by radio stations. In addition to traditional music and voice services they also broadcast additional information in the form of encrypted digital signals and these are analysed and displayed by the car radio.
Press the AF button (10) to switch the RDS mode on or off. On the display (3) you can now see the programme name and other information (traffic information, the title of the track currently being played, etc.).
The following different kinds of RDS services may be available:
• PI (Programme Identification Code):
The PI code is used by the radio to identify the station being received.
• PS (Programme Service Name):
This service allows the station's name to be displayed.
• AF (Alternative Frequencies):
The car radio automatically searches for an alternative frequency for the current station with the strongest signal.
- TP/TA (Traffic Programme / Traffic Announcement):
Traffic information
• EON (Enhanced Other Network Information)
If there is a traffic announcement, then this enables the radio to switch to the radio station broadcasting it even if you are currently listening to another station.
PTY (Programme Type Code)
This code enables you to search for your selected type of programme, for example a sport
Please note that the information displayed will depend on the region, the broadcaster and the station.
CD PLAYER
INSERTING AND REMOVING CDS
- To insert a CD press the OPEN button (2). Insert the CD into the slot. The CD will now be played. The display (3) will show [S-CDP].
- To remove the CD press the EJECT button, this is located on the rear of the front panel. The CD will be ejected. The car radio will change back to RADIO mode.
SKIPPING TRACKS
- By pressing the UP and DOWN buttons (4), you can select the previous or next track on the CD. The track number is shown on the display (3).
PAUSING CD PLAYBACK
- You can pause the CD by pressing the TOP button (12). Pressing the button again will restart playback.
FAST FORWARD/REWIND
- By holding down the UP and DOWN buttons (4) buttons for a little longer, you can "spool" forwards or backwards through the track being played.
SCANNING ALL TRACKS
- Press the INT button (12). The first 10 seconds (approx.) of every track will be played in order. Further pressing of the button will change the playback mode back to normal.
REPEATING A TRACK
- Press the RPT button (12). The current track will be repeated. Further pressing of the button will change the playback mode back to normal.
RANDOM PLAY OF ALL TRACKS
- Press the RDM button (12). The player will "shuffle" through the tracks, playing them in random order. Pressing the button again will change the playback mode back to normal.
MP3 PLAYER
An MP3 CD will start to play automatically as soon as it is inserted in the player. Please refer to "CD PLAYER OPERATION" for details of the button functions.
You can select the tracks and artists directly. The use of this function and other MP3-specific functions will depend to some degree on the MP3 CD itself. Please bear this in mind when producing this type of CD.
TRACK SEARCH (NUMBERS)
- Press the AP button (5). The display (3) will show [TRK SCH]. Now enter the number using the number keys. Confirm your selection by pressing the BAND "ENTER" button (6).
ARTIST SEARCH (LETTERS)
- Press the AP button (5) twice. The display (3) will show [FILE SCH]. Now enter the number using the number keys. Confirm your selection by pressing the BAND "ENTER" button (6).
- To limit the search you can also add the letters that come after the first letter. To do this, after entering the first letter press the SEL (1) button and enter the next letter. Confirm your selection by pressing the BAND "ENTER" button (6).
TABLE FOR MP3 SEARCHES
| Key Action | |
| A.P. (5) Select setting | |
| SEL (1) Confirm | |
| BND (6) Move between characters | |
| Multi-purpose control (1) Scroll through all available letters and numbers | |
When producing your MP3 CDs please ensure that the tracks are listed either individually or in folders. Never mix tracks and folders as this can lead to problems during playback and especially when searching. All standard MP3 codings can be played by the unit.
MP3-PLAYER (CONT.)
ID3 TAG
This feature refers to a block of information stored on an MP3 CD lying "behind" the actual music information on the MP3. Among other things, it includes the name of the artist, the name of the track, the name of the album, the year it was released, the style of music, and in some cases notes.
The car radio can read this block of information and show it on the display (3). This is more user-friendly than with an audio CD, where only the title (track) numbers are displayed.
When producing your MP3 CDs, please take care to ensure that you can input or modify the ID3 tag for your MP3 CDs yourself using an ID3 tag editor available from specialist providers.
TROUBLESHOOTING
| PROBLEM POSSIBLE CAUSE SUGGESTIONS | ||
| The unit cannot be The ignition is not Activate the ignition by switched on. switched on. turning the key. | ||
| The CD cannot There is already a Remove the CD from the unit be loaded or CD in the unit taken out. | ||
| The disk is Place the CD with the the wrong way up. label facing upwards. | ||
| No sound! | The volume is set Adjust the volume to the to minimum. required level. | |
| The cables are not Check connected properly. | the cable connections. | |
| Function buttons do not work! | The built-in microcomputer cannot function owing to interference. | Press the RESET button (15). |
| The control panel is not inserted properly. | Check that the control panel is inserted correctly. | |
| The CD jumps | The installation angle increases to 30°. | Correct the installation angle! |
| The CD is very dirty or faulty. | Clean the CD or place another CD in the player. | |
| Self-burned CDs do not play properly. | Check the self-burned CD in in another player. | |
| Radio and/or the automatic station memory do not work. | The antenna cable is not correctly connected. | Check the antenna cable for correct position. |
| The transmission signals are too weak. | Tune in the stations manually. | |
| Station storage function does not work. | The steady plus cable is not correctly connected. "INSTALLATION" chapter. | Check the cable connections. For this, refer to the |
TECHNICAL DATA
GENERAL
Operating voltageDC13.8 V, negative earth connection
Fitting dimensions 178 x 165 x 50 cm (W x D x H)
Output power 4 x 40 watt max.
4 x 25 watt RMS (10% THD)
Fuses 0.5 amp (red); 15 amp (pink); 0,5 amp (yellow)
RADIO
FM WAVEBAND
Frequency range 87.5 - 108 MHz
MW WAVEBAND
Frequency range 522 - 1620 kHz
CD/MP3 PLAYER
Frequency range 40 Hz – 18kHz
MPEG rate 64 - 320 k
MP3 Playback ISO 9660/Joliet format


SUPPORTED CD FORMATS
Audio CDs, CD-Rs and CD-RWs can all be played.
e13
012958
Please note:
These days there are many non-standard CD recording and copy protection procedures in use and a wide range of CD-R and CD-RW discs on the market. Therefore in individual cases there may be read errors or delays. This does not mean the unit is faulty.
- SAFETY ON THE ROADS
- INSTALLATION
- CD PLAYER
- OVERVIEW
- FUNCTIONS
- CONTENTS
- CONNECTION OPTIONS
- INSTALLATION INSTRUCTIONS
- PREPARATION
- ASSEMBLY
- INSERT THE CONTROL PANEL
- REMOVING THE CONTROL PANEL
- PROBLEMS DUE TO INCORRECT CABLE CONNECTIONS
- OPERATION
- BASIC OPERATION
- SWITCHING ON/OFF
- RADIO FUNCTIONS
- SELECT BAND
- TUNING IN STATIONS
- STORING STATIONS
- FINDING STORED STATIONS
- STORING STATIONS AUTOMATICALLY (AP)
- REGIONAL PROGRAMME MODE
- PTY (Program Type Code)
- Key
- RADIO (CONT.)
- TA ("TRAFFIC ANNOUNCEMENT")
- RDS (RADIO DATA SYSTEM)
- INSERTING AND REMOVING CDS
- SKIPPING TRACKS
- PAUSING CD PLAYBACK
- FAST FORWARD/REWIND
- SCANNING ALL TRACKS
- REPEATING A TRACK
- RANDOM PLAY OF ALL TRACKS
- MP3 PLAYER
- TRACK SEARCH (NUMBERS)
- ARTIST SEARCH (LETTERS)
- MP3-PLAYER (CONT.)
- ID3 TAG
- TECHNICAL DATA
Brand : MEDION
Model : MD 41804
Category : Car radio