
CG2400 - Tablet LEXIBOOK - Free user manual and instructions
Find the device manual for free CG2400 LEXIBOOK in PDF.

User questions about CG2400 LEXIBOOK
0 question about this device. Answer the ones you know or ask your own.
Ask a new question about this device
Download the instructions for your Tablet in PDF format for free! Find your manual CG2400 - LEXIBOOK and take your electronic device back in hand. On this page are published all the documents necessary for the use of your device. CG2400 by LEXIBOOK.
USER MANUAL CG2400 LEXIBOOK
The clock requires 2 non-rechargeable 1.5V AA batteries. Fit with specified batteries only.
Battery Installation:
- Open the battery compartment underneath the timer.
- Insert 2 × 1.5V AA batteries according to the diagram in the battery compartment.
- Close the battery compartment.
- Turn the timer on.
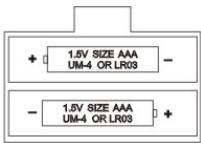
Do not use rechargeable batteries. Do not recharge the batteries. Remove storage batteries before recharging. Recharge storage batteries under adult supervision. Do not mix different types of battery and storage battery, or new and old batteries or storage batteries. Insert batteries and storage batteries according to the polarity. Remove used storage batteries from game. Do not short-circuit the battery or storage battery terminals. Fit with specified batteries or similar only. Keep batteries away from fire. If game remains unused for an extended period, remove batteries.
Soon after the batteries have been inserted, or if the timer emits an electric shock, it may need to be RESET. To do this, push a small fine point such as a paper clip into the RESET hole at the back of the timer.
2) SETTING UP
To turn the timer on or off, press the ON/OFF button briefly. The timer saves the last selected options as well as the time elapsed before it was switched off and will show these when switched on again. To reset the timer to zero, press and hold the ON/OFF button for about 3 seconds.
3) THE SCREEN
The screen displays the following information:
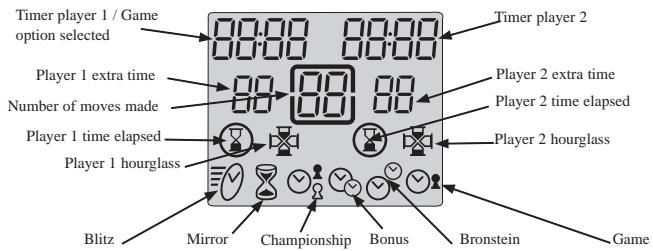
9
At the top of the screen you will find the game time elapsed or remaining for players 1 and 2. These times are displayed in hours and minutes if they are more than one hour, or in minutes and seconds if they are less than one hour.
At the bottom you will find each player's extra time awarded in some game options.
In the middle is displayed the number of moves made by each player.
The penultimate line displays the hourglasses showing which player's turn it is. On the same line you will see the end of game icons. The end of game icon is displayed when the corresponding player's time has run out.
The bottom line displays the selected game mode.
4) THE KEYS
[SET]
To enter game selection or game programming option.
[PAUSE / SAVE]
To pause the timer or restart it.
To enter a game option or game programme.
[<>]
To select a game option.
[UP/DOWN]
Timer stop buttons. Each player presses this button after having made their move on the chessboard to stop their timer and start their opponent's timer.
To select a game mode.
To increase or decrease the programming possibilities in a game option.
5) STARTING A GAME
You can use the timer either connected to or disconnected from the chess computer. To start a game while disconnected, place the timer on the right hand side of the chessboard.
6) MODES AND GAME OPTIONS
The timer allows you to select 6 different game modes. Each mode includes a number of pre-programmed and programmable options, which give a total of 30 game options.
6.1) Blitz
Option 01, displayed by default the first time the timer is used, shows each player's game time. The other blitz options offer each player a limited time to win the game. The game time used by the player between each move is deducted from the total time allowed for the game. 3 times are pre-programmed. Two others are programmable.
Option 02: 5 minutes per game. Each player has 5 minutes for the whole of the game.
Option 03: 15 minutes per game.
Option 04: 30 minutes per game.
Option U1: Programmable game time. To play a blitz to a different time limit from Options 02, 03 or 04.
Option U2: Programmable game time, other than U1. The times programmed in U1 and U2 are saved as long as the game is powered.
6.2) Mirror
When this mode is selected, your opponent's thinking time increases the time you are allowed for the game while decreasing his own time. Two options are pre-programmed; the player can program two others.
Option 01: 1 minute per game
Option 02: 10 minutes per game
Option U1: Game time programmable
Option U2: Game time programmable
Example: with option 1, if you use 15 seconds to make your first move, your clock will show 45 seconds left for the game and your opponent's clock will show 1 minute 15 seconds remaining.
6.3) Championship
In this mode, the players must make a certain number of moves in a given time to gain extra time for the remaining moves.
Option 01: 40 moves in 120 minutes and then the rest of the game in 60 minutes.
Option 02: 40 moves in 120 minutes, then 20 moves in 60 minutes and then the rest of the game is in 30 minutes.
Option 03: 30 moves in 90 minutes and the rest of the game in 60 minutes. the end of the game.
Option 05: 30 minutes for every 30 moves.
Option U1: The player can programme the time and the number of moves to be made in this time. 3 stages are possible.
Option U2: Second programmable option in championship mode.
When a player has made all their moves, the unused time in one stage is added to the time of the next.
6.4) Bonus
In this mode, each player has a certain amount of time for the whole game and bonus time for each move. If the player uses less than the bonus to make his move, the unused time is added to the time allowed for the whole game. If the player uses more than the bonus time to make his move, the time allowed for the game is reduced accordingly. In this mode, the bonus can be added before or after the move. When the bonus is added after the move, the time allowed for the game is first reduced, and then the bonus is added.
Option 01: 3 minutes for the whole of the game plus 2 bonus seconds per move. The bonus is added before the move.
Option 02: 50 minutes for the whole of the game plus 2 bonus seconds per move.
The bonus is added before the move.
Option 03: 1 minute for the whole of the game plus 1 bonus minute per move.
The bonus is added before the move.
Option 04: The same as option 03 except that the bonus is added after the move.
Option U1: The player can programme the number of minutes for the whole of the game as well as the bonus time in seconds. The bonus time is added after the move.
6.5) Bronstein
This mode works in the same way as the bonus mode, but the unused bonus time is not added to the time allowed for the whole game.
Option 01: 5 minutes for the whole of the game plus 3 extra seconds. The extra time is added before the move.
Option 02: 10 minutes for the whole of the game plus 10 extra seconds. The extra time is added before the move.
Option U1: The player can programme the time for the game as well as the extra time. The extra time is added before the move.
6.6) Game
In this mode, each player has a certain amount of time allowed for each move. The unused time is lost and the clock displays the time allowed for each move again.
Option 01: 5 seconds per move.
Option 02: 10 seconds per move.
Option 03: 1 minute per move.
Option U1: The player can programme the time allowed for each move.
7) SELECTING MODES AND GAME OPTIONS
Press and hold the ON/OFF button for about 3 seconds to restart the timer.
Press [SET] to enter selection mode. The current game mode will flash.
Use the timer stop buttons to select the game mode you want.
Use [< > ] to select the option you want (option 01, 02, U1..).
Player 1's timer will show the option number. Player 2's timer will show the corresponding time.
If you select a pre-programmed option, (option 01 or 04) press the [PAUSE / SAVE] key to enter the option.
If you select a programmable option that you want to change, press [SET] to select the first programmable field. This field will flash. Use the timer stop button [UP / DOWN] to choose the time you want programmed and the [< >] to move to the next field to programme. In championship mode, use [SET] again to display the fields of the next stages to programme. Save the programme by pressing [PAUSE / SAVE] once, then again if you have exited the programming mode before the last field.
The mode selected as well as the time each player is allowed is displayed. The game can now begin.
8) CHANGING THE DISPLAY TIME AND THE NUMBER OF MOVES
During the game, it is possible to change the data shown by the timer. Press [PAUSE / SAVE] to stop the timer. You can then modify the different times as well as the number of moves displayed. Press [SET]. The first timer field for Player 1 will flash. Use the timer stop buttons [UP / DOWN] to change the figure displayed then the [< >] keys to go to the next field. Press [SET] again to enter then [PAUSE / SAVE] to restart the timer.
9) CONNECTING TO THE CHESS COMPUTER
If you want to play with the timer connected to the chess computer, turn both the chess computer and the timer off. Connect the cable to the Link point on the timer and to the Timer point on the chess computer. Turn the timer on first [ON / OFF], then the chess computer. A specific jingle will announce that the chess computer has detected the timer. In connected mode you can select one of the 30 game options for the timer, 9 game levels for the chess computer as well as 6 game settings with the timer.
9.1) Starting a new game with the chess computer and timer connected.
Select the mode and game option on the timer by following the instructions under 'Selecting modes and game options'.
Select the level and game setting on the chess computer. See 'Selecting level and game setting'.
Press [NEW GAME] to start a new game. This initialises the timer.
Press the timer stop button [UP] to start the game. Now you can make your move on the chessboard. Until the timer is running, the chess computer will not recognise the moves and an error message will appear. The rest of the game depends on the game setting selected.
9.2) Different game settings with the clock.
Settings L1 and L2.
These game settings allow two people to play against each other while the chess computer acts as referee by verifying that the moves are legal and that the timer counts each player's elapsed time. Press the timer stop button to start the game.
Setting L1. On this setting, the player makes his move on the chessboard then presses the timer stop button to stop his timer and start that of his opponent. The timer stop button is only recognised if the move made is verified by the computer.
Setting L2. On this setting, one player presses the timer stop button to start the game. Then each player's time is counted from the moment the move is validated by the chess computer, without you needing to press the timer stop button.
Setting L3.
On this setting you can play against the computer with the timer connected. Levels 1 to 8 determine the level of the computer and its response time. Therefore you need to choose a mode and game option with the timer, which is compatible with the level, selected. To start a game on setting L3, press the opponent's timer stop button to start the time then make your move on the chessboard by pressing the square of the piece you want to move and then the square you want to move it to. Then wait for the chess computer's response. The timer will recognise moves as soon as the square you're moving to is pressed, without you having to press the timer stop button.
Setting L4.
This setting works on the same principle as setting L3 but the player must stop the timer after each of his moves by pressing their timer stop button to hand over to the computer. The computer's moves are recognised in the same way as on setting L3.
Setting L5.
This setting works in the same way as setting L4 but the timer recognises the computer's moves from the moment the square vacated by it's move is pressed by the player.
Setting L6.
This setting works in the same way as setting L3 but the display of the computer's move stops the timer to allow the player the time to move the piece without being penalised.
9.3) Selecting levels and settings.
| SETTING | |||||
| LEVEL | RESPONSE TIME/MOVE | L3 | L4 | L5 | L6 |
| 1 | 5 seconds | A6 | C6 | E6 | G6 |
| 2 | 10 seconds | A7 | C7 | E7 | G7 |
| 3 | 30 seconds | A8 | C8 | E8 | G8 |
| 4 | 1 minute | B1 | D1 | F1 | H1 |
| 5 | 3 minutes | B2 | D2 | F2 | H2 |
| 6 | 10 minutes | B3 | D3 | F3 | H3 |
| 7 | 30 minutes | B4 | D4 | F4 | H4 |
| 8 | 2 hours | B5 | D5 | F5 | H5 |
| SETTING | |||
| LEVEL | RESPONSE TIME/MOVE | L1 | L2 |
| 0 | MULTI MOVE | B8 | D8 |
When you turn the chess computer on for the first time with the timer connected, the game automatically starts on level 1 and in game setting L3. After that, it will save the level and setting when you turn it off and when you press NEW GAME.
To change the level or setting, follow these instructions:
- Press the LEVEL key on the computer to go to level selection. The computer will illuminate the light corresponding to the current level (for example, square A6 corresponds to level 1, setting L3, square G6 corresponds to level 1, setting L6).
- Consult the table above to find out the square corresponding to the level and setting you want. Press this square.
- Press the LEVEL key again to exit level selection. Then begin playing with your first move, or press MOVE to let the computer go first.
If you want to check which level and setting is selected without changing them, follow this procedure:
- Press the LEVEL key. The computer will show the current level by illuminating the lights of the square corresponding to the level and the timer shows the game setting.
- Press LEVEL a second time to return to the game.
You can change or verify the level at any moment of the game when it's your turn to move.
XX. MAINTENANCE
Your chess computer needs very little maintenance. These instructions will help you keep it in good condition for many years:
Keep away from damp. If the computer gets wet, wipe dry immediately. Do not leave in direct sunlight, do not expose to heat. Handle with care. Do not drop. Do not try to dismantle. To clean, unplug the adapter, use a damp cloth. Do not use detergent. In case of malfunction, first replace the batteries. If the problem persists, re-read instructions carefully to ensure you have not overlooked anything.
XXI. GUARANTEE
Please keep these instructions safe, they contain important information.
This product is covered by our two-years guarantee.
To make use of the guarantee, or for after-sales service, return the product to place of purchase together with proof of purchase. Our guarantee covers material defects and assembly and manufacturing faults excluding all damage caused by disregard of the instructions or irresponsible use (such as dismantling, exposure to heat or damp, etc.)
It is recommended that all packaging is kept for future reference.
In our constant concern for improvement, the colours and detail of the product shown on the packaging may be modified.
Deutsch
1) STROMVERSORGUNG
Unit 9 Highview, High Street
Bordor
Hampshire, GE OAX
United Kingdom
Tel: +44 1420 477922
Fax: +44 1420 477929
Technical support: 0808 100 3015
www.lexibookjunior.com
Ref: Z1=400IMO112 - ©2002 LEXIBOOK®