
Junior Tablet MFC270EN - Tablet LEXIBOOK - Free user manual and instructions
Find the device manual for free Junior Tablet MFC270EN LEXIBOOK in PDF.


| Product Type | Children's Tablet |
| Brand | Lexibook |
| Model | Junior Tablet MFC270EN |
| Display Size | 7 inches |
| Dimensions | 188 mm x 112 mm x 10 mm |
| Weight | 300 g |
| Battery Capacity | 2000 mAh |
| Power Supply | Rechargeable lithium battery via micro USB |
| Operating System | Android (customized for kids) |
| Age Range | 3-8 years |
| Main Functions | Preloaded educational apps, e-books, games, camera, video player, Wi-Fi, parental controls |
| Connectivity | Wi-Fi 802.11 b/g/n, micro USB 2.0, 3.5 mm headphone jack |
| Storage | 8 GB internal, expandable via microSD up to 32 GB |
| Camera | Front camera 0.3 MP, rear camera 2 MP |
| Parental Control | Time limits, content filtering, app blocking |
| Care and Cleaning | Wipe with a soft dry cloth; do not use liquids or abrasive cleaners |
| Safety Warnings | Adult supervision required; not suitable for children under 3 years due to small parts |
| Spare Parts and Repairability | Battery replacement by authorized service; no user-serviceable parts |
| Included Accessories | USB cable, user manual, stylus (if applicable) |
Frequently Asked Questions - Junior Tablet MFC270EN LEXIBOOK
User questions about Junior Tablet MFC270EN LEXIBOOK
0 question about this device. Answer the ones you know or ask your own.
Ask a new question about this device
Download the instructions for your Tablet in PDF format for free! Find your manual Junior Tablet MFC270EN - LEXIBOOK and take your electronic device back in hand. On this page are published all the documents necessary for the use of your device. Junior Tablet MFC270EN by LEXIBOOK.
USER MANUAL Junior Tablet MFC270EN LEXIBOOK
LEXIBOOK® 2 Tablet Junior
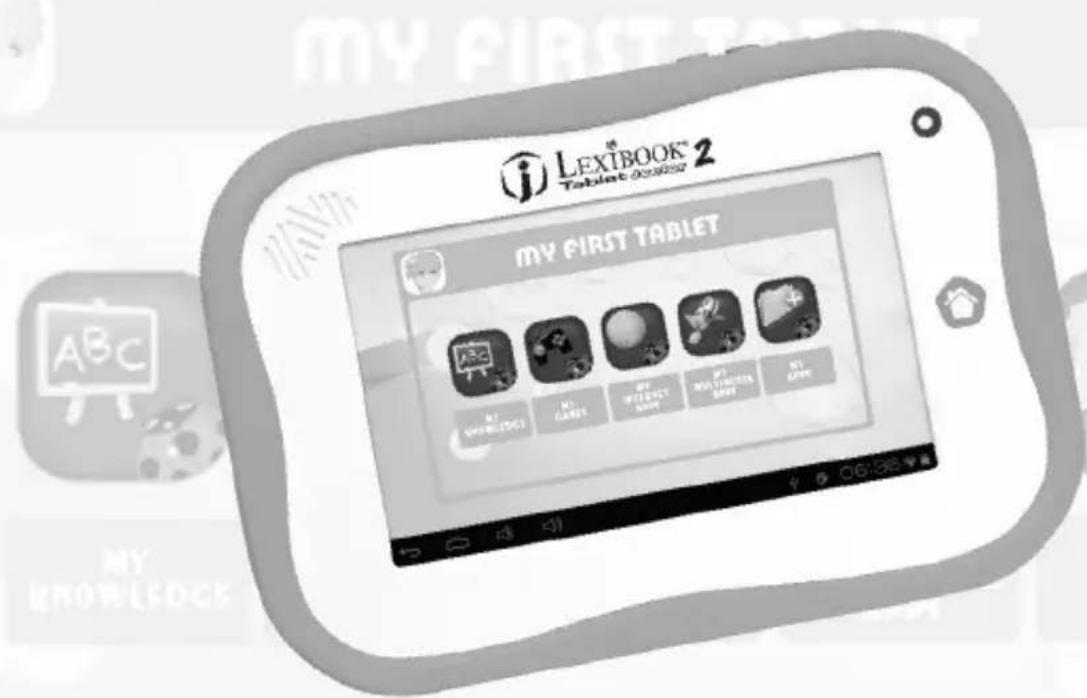
Congratulations! You just bought the new Lexibook® tablet. We invite you to read this manual to take full advantage of all the features offered by your Lexibook® tablet as well as detailed instructions and safety tips.
One tablet, thousands of possibilities
With the Wi-Fi and touch screen functions, you can use your tablet with ease wherever you want, whenever you want!
Reading digital books, watching videos, sending emails, playing music, browsing the Internet, playing video games, enriching your knowledge are only some of the numerous opportunities offered by your tablet.
Your tablet can be updated automatically with the integrated OTA feature ("Over The Air", live Wi-Fi update) with only a few clicks and no stress at all.
Learn, play, relax
The tablet is preinstalled with applications ready to use! With your Lexibook® tablet you will have access to free digital books, games and videos already installed.
And with the Lexibook® Market application on your tablet, you can download and install thousands of new applications designed for the whole family.


Note: Since the products are updated regularly, the illustrations and content of this manual are for reference only and may be different from the actual product.
Table of Contents
Welcome! 2
Table of Contents....3
Safety Instructions 4
IMPORTANT SAFETY INSTRUCTIONS 5
Epilepsy Warning 6
Packaging Contents....6
1. Discover your Lexibook® tablet ....7
Presentation of your Lexibook® tablet 7
Turning your tablet on and off 7
Configuring the Lexibook® Parent mode 8
How to activate the Wi-Fi on your Lexibook® tablet.... 10
The Settings menu of your Lexibook® tablet 13
Headphones Connection 14
How to activate the Bluetooth® on your Lexibook® tablet 15
Using a Memory Card 20
Navigation....22
Rotating the Screen 23
Using the Virtual Keyboard 23
Inserting the micro USB 24
Charging the Battery 24
Using the Battery 25
2. The Home Screen of your Lexibook® Tablet 26
The Taskbar 26
Profile Selection Screen....27
The Applications of your Lexibook® tablet.... 32
3. Applications Preinstalled on your Lexibook® tablet.... 37
The Lexibook® Market Premium....50
E-Book 62
4. Technical Information....76
Tablet Specifications....76
Maintenance and Warranty 76
Conformity Declaration 78


Safety Instructions

CAUTION
RISK OF ELECTRIC SHOCK
DO NOT OPEN

CAUTION: TO REDUCE THE RISK OF ELECTRIC SHOCK. DO NOT REMOVE COVER (OR BACK). NO USER SERVICEABLE PARTS INSIDE. REFER SERVICING TO QUALIFIED SERVICE PERSONNEL.
The graphic symbols on the back cover of the product mean the following:

DANGEROUS VOLTAGE:
The lightning flash with arrowhead symbol within an equilateral triangle is intended to alert the user to the presence of uninsulated “dangerous voltage” within the product’s enclosure that may be of sufficient magnitude to constitute a risk of electric shock to persons.

ATTENTION:
The exclamation point within an equilateral triangle is intended to alert the user to the presence of important operating and maintenance (servicing) instructions in the literature accompanying the appliance.
WARNING:
• To reduce the risk of fire or electric shock, do not expose this appliance to rain or moisture.
- The apparatus shall not be exposed to dripping or splashing and that no objects filled with liquids, such as vases, shall be placed on the apparatus.
- The mains plug is used as the disconnect device, the disconnect device shall remain readily operable.
- In order to disconnect the apparatus from the mains completely, the mains plug should be disconnected from the mains socket outlet completely.
IMPORTANT SAFETY INSTRUCTIONS
WARNING: THIS PRODUCT IS NOT A TOY, ADULT SUPERVISION IS
REQUIRED.
- Read these instructions.
- Keep these instructions.
- Heed all warnings.
- Follow all instructions.
- Do not use the product on your lap for more than 30 minutes, without a 5-minute break at least.
- Do not use this unit near water.
- Clean only with a dry cloth.
- Do not block any ventilation openings. Install in accordance with manufacturer's instructions.
- To avoid overheating, do not leave the product in a non-ventilated space (e.g. a schoolbag) when it is turned on.
- Do not install near any heat sources such as radiators, heat registers, stoves or other apparatus (including amplifiers) that produce heat.
- Do not defeat the safety purpose of the polarized or grounding-type plug. A polarized plug has two blades with one wider than the other. A grounding-type plug has two blades and a third grounding prong. The wide blade or the third prong is provided for your safety. If the provided plug does not fit into your outlet, consult an electrician for replacement of the obsolete outlet.
- Protect the power cord from being walked on or pinched particularly at plugs, convenience receptacles, and the point where they exit from the unit.
- Only use attachments/accessories specified by the manufacturer.
- Unplug this unit during lightning storms or when unused for long periods of time.
- Refer all servicing to qualified service personnel. Servicing is required when the unit has been damaged in any way, such as the following: the power-supply cord or plug has been damaged; liquid has been spilled or objects have fallen into the unit; and/or the unit has been exposed to rain or moisture, does not operate normally, has changed its performance or has been dropped.
- Do not overload wall outlet. Use only power source as indicated.
- Use replacement parts as specified by the manufacturer.
- Upon completion of any service or repairs to this product, ask the service technician to perform safety checks.
- Keep the device away from metallic objects (coins, keys...). Do not leave it near magnetic fields that could cause data loss or damage the device.
- Do not drop the device. Do not expose it to mechanical shock, friction or impact. When transporting the device, put it in a protective cover.
- Protect the device from humidity and rain. If it gets wet, wipe it immediately.
- Do not touch the power cord when your hand are wet and do not pull on the charger to unplug it.
- In order to prevent data loss, remember to keep a backup (data or paper) of the information recorded on the device.
-
To prevent interference, do not use the device next to other electronic devices, artificial pacemaker or near medical equipment.
-
Shut off the device in locations that are susceptible to explosions and when travelling by airplane.
- Do not use the product near inflammable or explosive sources.
- Keep the device out of direct sunlight and away from other sources of extreme heat or cold.
- Do not attempt to disassemble the device; it would no longer be covered by the warranty.
- Do not place sharp objects directly in contact with the surface and do not spray cleaning products directly on the screen.
- Do not push hard on the screen and do not place objects on top of it. This can cause tears in the screen.
- The socket-outlet shall be installed near the equipment and must be easily accessible.
Epilepsy Warning
Please read prior to any use of a video game by yourself or by your child.
Some people are susceptible to epileptic seizures or loss of consciousness when exposed to certain kinds of flashing lights or elements common in our everyday environment. These individuals may suffer a seizure when they watch certain televised images or when they play certain video games. These phenomena can occur even if the person has no previous medical history or has never suffered an epileptic seizure. If you or a family member has ever displayed symptoms related to epilepsy (seizure or loss of consciousness) in the presence of stimulation in the form of light, please consult your physician before using. We advise parents to be attentive to their children while they play video games. If you or your child experience the following symptoms: dizziness, altered vision, eye or muscle twitches, loss of consciousness,
disorientation, involuntary movements or convulsions, immediately stop playing and consult a physician.
General Precautions When Using Video Games
- Do not stand too close to the screen. Play at a safe distance from the television screen and as far as the connecting cord allows.
- It is preferable to play video games on a small screen. Avoid playing when tired or when needing sleep.
- Make sure to play in a well lit room.
- When in use, take breaks of 10 to 15 minutes every hour.
Packaging Contents
When unpacking, ensure that the following elements are included:
1 x Lexibook® Tablet Junior 2
1 x USB cable
1 x AC adaptor
1 x Instruction manual
WARNING: All packaging materials, such as tape, plastic sheets, wire ties and tags are not part of this product and should be discarded for your child's safety.
1. Discover your Lexibook® tablet
Presentation of your Lexibook® tablet


- Reset Button
- Micro USB Port 9. Home Button
- DC Input
- 2x Headphone Input (3.5mm)
- Micro SD Card Reader
- Speaker 13. Back Button
-
Touch Screen
-
Camera
-
On/Off Button
-
Volume - Button
-
Volume + Button
Turning your tablet on and off
- To turn your Lexibook® tablet on, press the On/Off button (10) for 3 seconds. The button is located on the upper side of the unit.
- Please wait while the Android operating system is loading.
- The Home screen appears.
- To turn your Lexibook ® tablet off, close all running applications and press the On/Off button (10) for 3 seconds.
- Click "OK" when prompted for power down.
Note: The tablet automatically locks after a few minutes of inactivity. To unlock the tablet, press the On/Off button (10) briefly. A padlock appears on the screen. Drag it to the right on the open padlock in order to unlock the tablet.
Note: You can briefly press the On/Off button (10) to put your tablet in standby mode.
Configuring the Lexibook® Parent mode
The first time you use your tablet, it is recommended to set a password in order to restrict access to the advanced settings (Wi-Fi, Sound, Display...). By default, there is no password.
- Select the ladybug icon in the top right side of the Home screen to set a password.

- Leave the "Old Password" box empty. Enter your password with the keyboard in the "New Password" box, then confirm it and click "OK".

- To change an existing password, enter your old password in the "Old Password" box, then enter a new password in the "New Password" box, confirm it and click "OK".

- To access the advanced settings of the tablet, select the "Settings" icon in the top right side of the Home screen, then enter your password and click "OK".

How to activate the Wi-Fi on your Lexibook® tablet
- On the Home screen, select the "Settings" icon in the top right side of the Home screen, enter your password and click "OK".

- Touch the "OFF" switch to turn on the Wi-Fi.
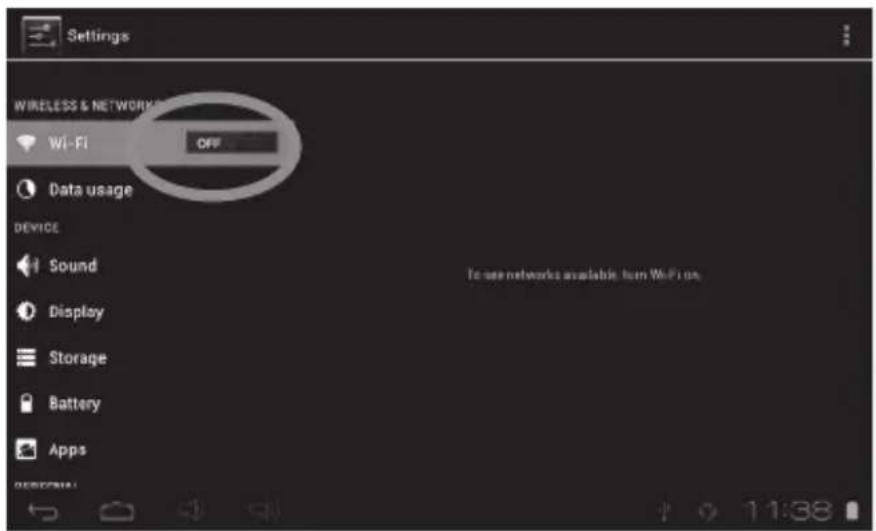
- Please wait while the Wi-Fi turns on. This operation may require 5-10 seconds.

- The list of available Wi-Fi networks appears on the right side of the screen. Touch the Wi-Fi network that you want to connect to. The name of the network depends on your Wi-Fi modem or router. If unsure, please check the relevant instruction manuals or contact your network provider.
Note: The network list updates automatically every few seconds.
Note: The wave symbol 📋 on the right side of each network indicates the Wi-Fi signal strength (more white bars indicate a stronger signal).
Note: The small padlock symbol 📞 on the right side of each network indicates that the Wi-Fi network is password-protected.

- Enter the password of the Wi-Fi network. The password depends on your Wi-Fi modem or router. If unsure, please check the relevant instruction manuals or contact your network provider.
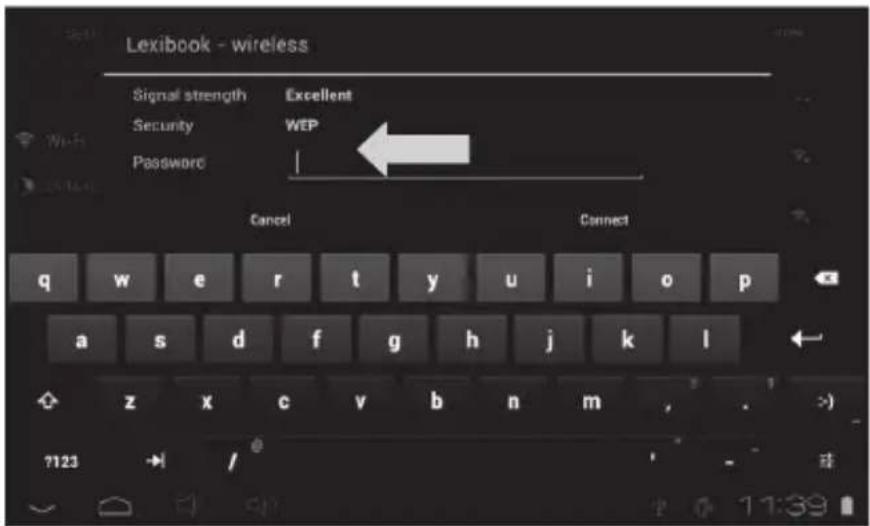
- Click on the "Connect" button to connect to the Wi-Fi network. This operation may require 5-20 seconds. If you cannot connect, please make sure that the password is correct and that you are inside the range of the Wi-Fi network.

- Once connected, the "Connected" message is displayed under the Wi-Fi network.

The Settings menu of your Lexibook® tablet
- Access the "Settings" menu of the tablet
On the Home screen, click the password and click "OK".

button in the top right side, then enter your
• The main settings of the tablet
| WIRELESS & NETWORKS | |
| Wi-Fi To setup a Wi-Fi network. | |
| Bluetooth® | To setup a Bluetooth® connection and access to its advanced settings. |
| Data usage | To check and modify the data usage of the tablet. |
| DEVICE | |
| Sound | To adjust the volume and the notification sounds. |
| Display | To adjust the brightness of the touch screen, set the desktop wallpaper and adjust other display settings. |
| Screenshot settings | To access the screenshot settings (take pictures of your tablet's screen with a single click). |
| Storage | To access the settings of the MicroSD card, the internal memory of the tablet and other storage settings. |
| Battery | To check the battery information (consumption...) |
| Apps | To manage the applications of the tablet (uninstall...) |
| PERSONAL | |
| Security | To set the security options of the tablet (passwords...)Warning: Be careful to remember/write down your passwords to avoid blocking your tablet in case you forget them. |
| Language & input | To set the regional options including the language of the tablet and the keyboard. |
| Backup & reset | To back up the data of the tablet and restore all the settings to factory default.Warning: “Factory data reset” permanently deletes all the files on the tablet. Please backup all your data prior to doing a “Factory data reset”. |
| ACCOUNTS | |
| Add account | To create and manage email accounts on your tablet. |
| SYSTEM | |
| Date and time | To set up the date and time. |
| Accessibility | To configure the accessibility tools aimed at people with specific needs. |
| About tablet | To view the information about the tablet software. |
Headphones Connection
A headphone connector (4), suitable for any headphones or earphones fitted with a 3.5mm jack plug, is located on the right side of this device. When the headphones are in use, the speakers turn off automatically.
CAUTION: Too high volume, especially when using headphones, can damage your hearing. For this reason, please turn the volume down before connecting headphones.
How to activate the Bluetooth® on your Lexibook® tablet
The Bluetooth® word mark and logos are registered trademarks owned by Bluetooth SIG, Inc. and any use of such marks by Lexibook® is under license. Other trademarks and trade names are those of their respective owners.
© 2013 Bluetooth SIG, Inc.
- On the Home screen, select the "Settings" icon in the top right side of the Home screen, enter your password and select "OK".

- Slide the "OFF" switch to the right to turn the Bluetooth® on.

- Please wait while the Bluetooth ^® turns on. This operation may require 5-10 seconds.

- Turn your Bluetooth ^® device on. Make sure to activate the search/pair mode. For more information, please refer to the instruction manual of your Bluetooth ^® device.
- Once the Bluetooth ^® is activated, an icon appears in the top-right corner of the screen. The list of available Bluetooth ^® devices appears on the right side of the screen. Touch the Bluetooth ^® device that you want to connect to. This operation may require 5-20 seconds.
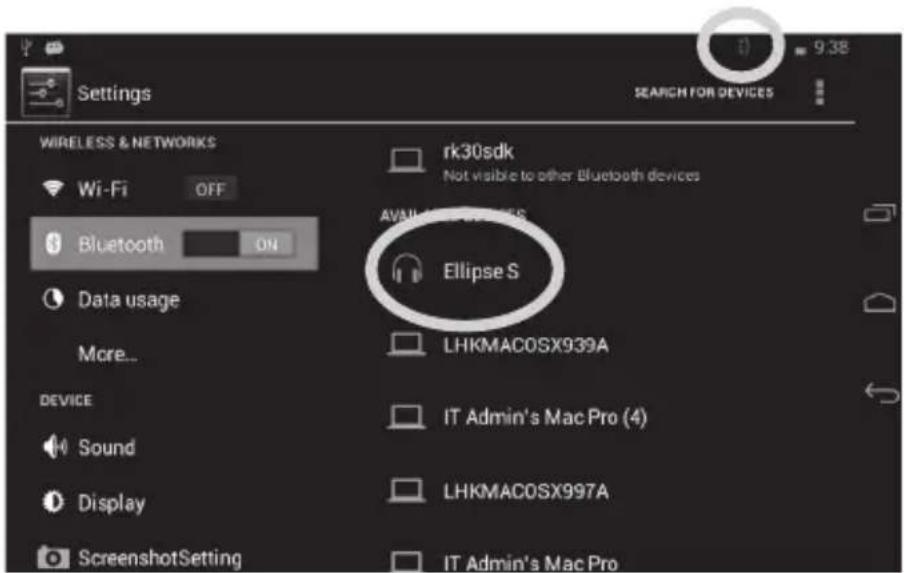
- If pairing to your Bluetooth ^® device fails, a message indicating communication issues appears on the screen. Make sure that your Bluetooth ^® device is turned on and is in search/pair mode.

- The tablet first pairs with the Bluetooth ^® device and then automatically connects to the device.

- Once connected, the "Connected" message is displayed in the Bluetooth® device list, under "Paired Devices". To disconnect your Bluetooth® device from the tablet (but keep it paired), press on the Bluetooth® device again.
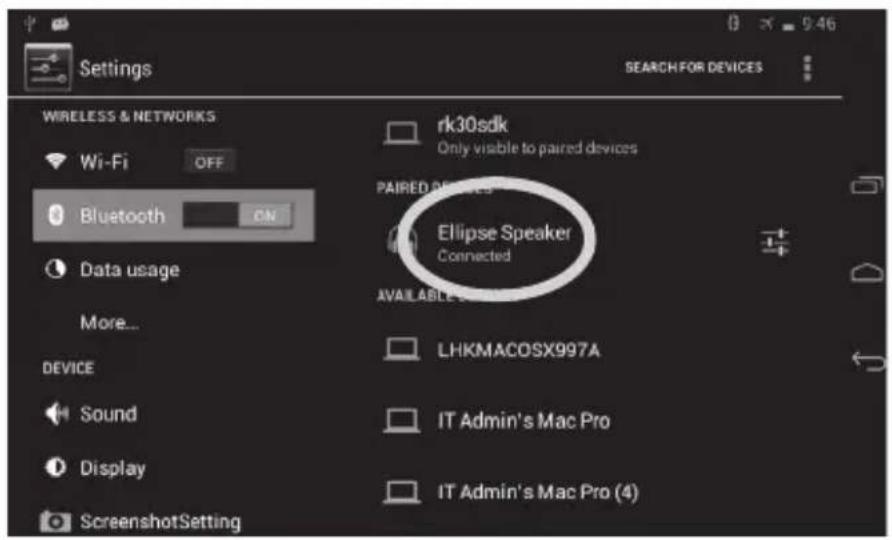
- To modify the Bluetooth ^® settings for this particular device, press the “Settings” icon on the right.

- Press on the "Rename" option to edit the name of your Bluetooth® device.

- Press the "Unpair" button to disconnect and unpair your Bluetooth® device from the tablet. To reconnect it to the tablet, the device has to be paired again.

- The "Profiles" options display additional settings of the Bluetooth® device (if available).
Using a Memory Card
In order to store additional files or to have more storage space on your tablet, you can buy a Micro SD/TransFlash card (sold separately), and then insert it in the tablet. You may also delete the included files in your tablet such as videos, songs and electronic books. Warning: once the files included with your tablet are erased, you cannot recover them. Please make a backup copy before erasing them.
• Memory card compatibility
The device is compatible with Micro SD/TransFlash (TF) memory cards up to 32GB of capacity.

- Insert a memory card
- Insert a Micro SD/TransFlash (TF) memory card in the Micro SD card slot (5) on the right side of your tablet. Make sure that the metal connectors of the card are facing down.
- Gently push the card inside the card slot until it "clicks".
- Remove a memory card
Note: Always disable the memory card BEFORE removing it.
- From the Settings menu, select "Storage" and then click on "Unmount SD card."

- Press "OK" to confirm and wait for the card to be unmounted.
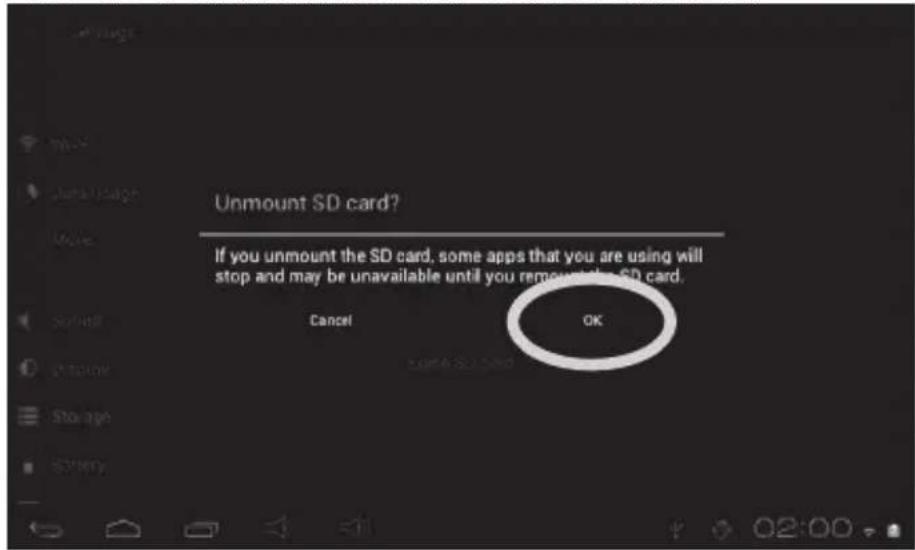
- You can now remove the memory card. Press the card into the card slot to release it.
Notes:
Never remove the memory card without disabling it first.
Never remove the memory card while the tablet is reading from or writing to the memory card. This may result in data loss and/or damage to the memory card.
- Format the memory card
- From the Settings menu, select "Storage" and then click on "Erase SD card."
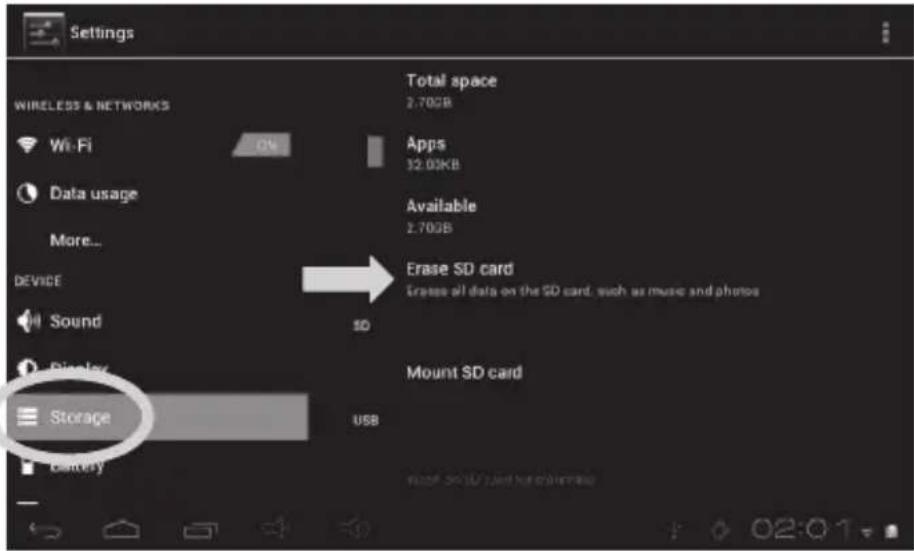
- Confirm by clicking on "Erase SD card" and then "Clear All".
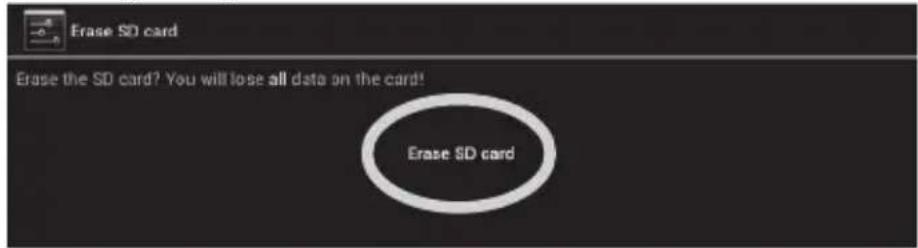
Warning: "Erase SD card" permanently erases all the content of the memory card.
Navigation
The touch screen makes navigation fast and fluid. Move your finger or a stylus (not included) on the surface of the touch screen to select different menus or applications and navigate through your Lexibook® tablet.
- To select a menu or launch an application, press once on the touch screen with your finger or a stylus (not included).
- To move an item, keep your finger or a stylus (not included) pressed on the item and drag it to the desired location.
• Navigation with the Explone
You can use the "Explorer" application to navigate through your files. You may access the selected file directly. You may also scroll through your image files, browse your photos...
• Navigation with the Gallery
You can use the "Gallery" application to browse your pictures. Images imported to your Lexibook® tablet via USB or Micro SD card are automatically added to the Gallery.
• Precautions when using the touch screen
- Ensure that the touch screen is not brought into contact with dirt, liquids or grease.
- Do not touch the touch screen with dirty hands or sharp objects/edges.
• Do not place heavy objects on the touch screen. - In the event that the touch screen does not respond anymore, reboot the tablet or reset it by pressing the "Reset" button.
Note: In order to protect the touch screen, the device comes with a transparent plastic film preinstalled on the screen. This protective film must be removed before you start using the tablet.
Rotating the Screen
The tablet is equipped with a motion sensor that will automatically switch the display vertically or horizontally.
To change the display orientation, simply rotate your tablet. The size and direction of the current display will be automatically adjusted.
Notes:
To allow the screen to rotate automatically, you must first enable the "Auto-rotate screen" function in the "Display" settings of the "Settings" menu. This setting is already enabled by default. Screen rotation only applies to certain applications which support this function. The Home screen, quick access screen and homepages of the tablet can only be displayed in landscape mode (horizontally).
Using the Virtual Keyboard
Your tablet is equipped with a virtual keyboard that allows you to type text, numbers, e-mails, Internet searches...
• Display the virtual keyboard
- To make the keyboard appear on the screen, click on any text input field. Note: A "text input field" is where you want to type your text, such as a search bar or a form.
- The virtual keyboard pops up from the bottom of the screen.

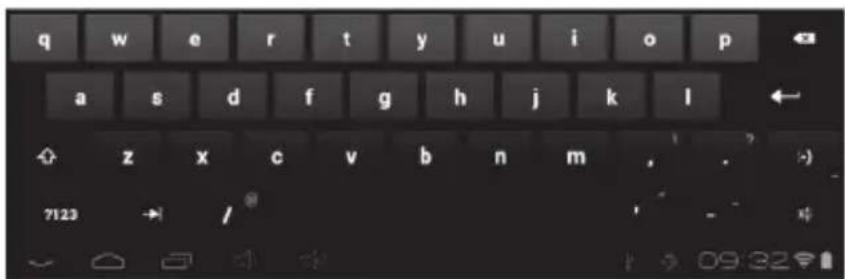
- Type your text using the virtual keyboard.
-
Press the "Enter" key of the keyboard to validate your text and launch the query.
-
Press the HIDE KEYBOARD key 📋 or anywhere outside the keyboard area to hide the keyboard.
Note: You may also connect an external Lexibook® keyboard to your Lexibook® tablet.
- Typing numbers
To type numbers, press the NUMBERS key 1123 to display the keypad of the virtual keyboard.
Inserting the Micro USB
WARNING: Before connecting the cable's micro USB side to your tablet, please ask your parents' or an adult's help. Do not install the cable on your own. Do not force entry as you might damage the fragile micro USB plug.
Insert the micro USB plug into the micro USB port of the tablet. Make sure the pins (longer side) are facing up just as illustrated below.

natural_image
Two black connectors with internal pinouts, one external and one close-up (no text or symbols visible)Note: Please make sure to insert the plug the right way in order to avoid damages on the micro USB and/or on the tablet's micro USB port.
Charging the Battery
IMPORTANT: The battery must be charged for at least 8 to 12 hours before the first use.
Your tablet is equipped with an internal rechargeable battery. You can recharge the battery using the AC adapter (included).
• Charging the tablet with the AC adapter
- Plug the connector of the AC adapter (included) into the DC jack connector of your Lexibook® tablet and plug the adapter into a power outlet.
- The battery charging icon indicates the level of charge.
Note: You can use the tablet while it is charging. It might then take more time to fully recharge the battery.
3. When the battery is fully charged (battery icon completely blue) you can unplug the AC adapter from the DC jack and then from the wall plug.
Note: The battery can be recharged while the tablet is turned on, in standby mode or turned off. When turned off, a battery indicator is displayed on the screen for 5 seconds to indicate that the battery is charging. Press the On/Off button for 3 seconds to turn the tablet on.
Using the Battery
Notes:
- Only use the unit in combination with the adapter supplied. Do not use a different adapter to power the tablet.
- Whenever possible, keep the AC adapter plugged into the tablet and an electrical outlet to recharge the battery.
• Always wait at least 5 seconds after having turned off the device before restarting it. Shutting off and immediately turning on the device can damage the electrical circuits.
- The power outlet to which the device is plugged in must be installed near the equipment and must always be readily accessible.
The battery life may vary based on usage patterns of the device.
The lithium battery is intended for use only with this tablet. Do not disassemble the battery. Do not dispose of the battery in fire or water. To avoid risk of fire, burns or damage to your battery, do not allow a metal object to touch the battery contacts. Handle a damaged or leaking battery with extreme care. If you come in contact with the electrolyte, wash the exposed area with soap and water. If it contacts the eye, flush the eye with water for 15 minutes and seek medical attention. Do not charge the lithium battery pack if the ambient temperature exceeds 45^ C ( 113^ F). When discarding a battery pack, contact your local waste disposal provider regarding local restrictions on the disposal or recycling of batteries. Only use the supplied AC Adapter for charging.
WARNING: Malfunction or loss of memory may be caused by strong frequency interference or electrostatic discharge. Should any abnormal function occur, reset the unit or unplug the AC/DC adapter from the mains socket and plug it in again.
2. The Home Screen of your Lexibook® Tablet
The Taskbar
The taskbar is located at the bottom of the screen. It includes the following:

- Status icons: These icons provide information on the tablet and its statuses (battery level, Wi-Fi...)
- Touch screen keys: These keys provide direct access to specific menus or functions of the tablet.
- Touch screen keys of the Home screen
- "Back" button ← to return to the previous screen.
- "Home" button to exit the current application and return to the Home screen.
• "Volume—" button to decrease the sound volume of the tablet.
• "Volume +" button to increase the sound volume of the tablet. - "Options" button ■ to access the options of the current application (if available).
- "Settings" button 9:07 to access the taskbar messages and the following quick settings: Auto-rotate screen, Brightness and Notifications.


Profile Selection Screen
You can create up to three profiles on your tablet.
To Create a New Profile
- Click on the white square located on the left of "PROFILE".

- Click on the "Your Name" text input field to enter your name with the keyboard.


- If you want, you can click on the "Add your note here" text input field to enter a personal message.
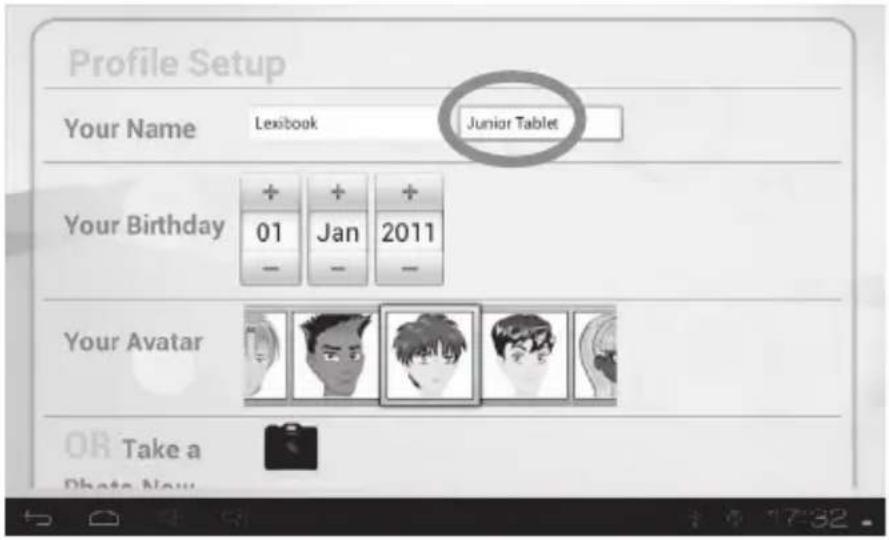
- Enter your date of birth using the "+" and "-" icons.


- Choose an avatar by scrolling the pictures to the left or right, then confirm by clicking on the avatar you wish to use.
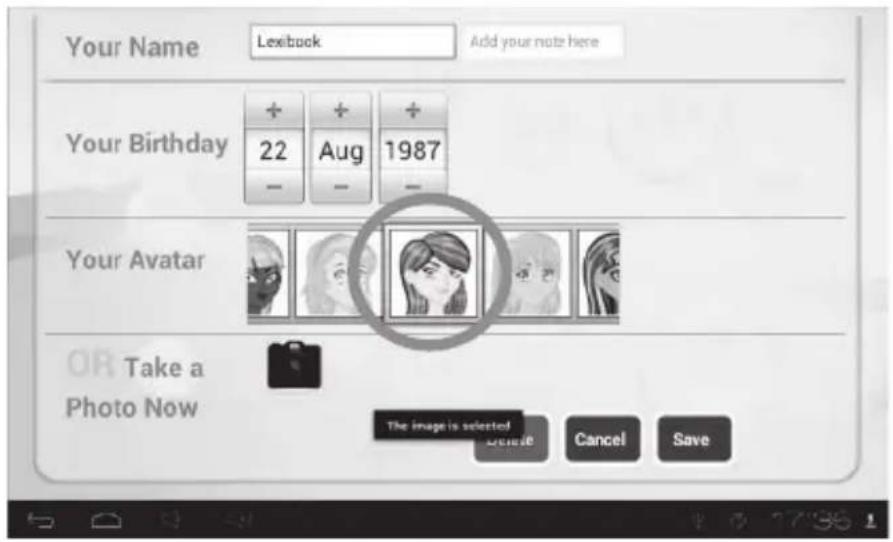
- Alternatively, you can take your own picture with the integrated camera by
selecting the camera icon 📄. Take a picture with the blue button 📄, then click on "DONE" at the top of the screen to save your picture. Finally, crop the picture as needed and click on "CROP" at the top of the screen to save it.

natural_image
Black-and-white photo of a plush toy character with large eyes and a mouth, next to a circular loading control panel (no readable text or symbols)
natural_image
Grayscale image of a cartoon character face with large eyes and wavy mouth, displayed within a photo editing interface (no readable text or symbols on the character itself)- Once you are done, press the "Save" button to save your information and create your profile or press the "Cancel" button to abort and go back to the profile selection screen.
To Edit an Existing Profile
- Click on the profile name of an existing profile for 2 seconds, then select "Edit". Alternatively, simply click on the profile picture of an existing profile.


- Update the information that you want to edit, then press the "Save" button to confirm.

To Delete an Existing Profile
- Click on the profile picture of an existing profile.

- Press the "Delete" button at the bottom of the page and confirm by clicking "OK".

The Applications of your Lexibook® tablet
• The applications are located on the five homepages of your tablet:
- MY KNOWLEDGE
On this homepage, you will find all the education apps of your tablet.
- MY GAMES
On this homepage, you will find all the games of your tablet.
- MY INTERNET APPS
On this homepage, you will find all the Internet apps of your tablet.
- MY MULTIMEDIA APPS
On this homepage, you will find all the multimedia apps of your tablet.
- MY APPS
On this homepage, you can add your own apps.
After you have selected your profile, the quick access screen is displayed. Click on any of the 5 icons to access the selected homepage. To access another homepage, simply slide your finger left or right, or press the back button and select another homepage from the quick access screen.

natural_image
Color palette bar with grayscale shades and a central crosshair symbol (no text or labels)
For more information about the applications, please refer to the section "Applications preinstalled on your Lexibook® tablet".
- Running applications from the Home screen
-
Select an application by clicking on its icon.
-
Click on the Home button or to return to the Home screen. Click
on the Back button or to return to the previous screen.
Add one or more apps to the "My Apps" homepage of the tablet
You can add your own apps to the "My Apps" homepage of the tablet.
- Enter your profile, and then select "MY APPS" from the Quick access screen.

- Click on the "+" icon located in the top-right corner of the screen.

- Scroll the menu up and down and select the apps that you want to add by clicking on them, so that a green tick mark appears on the left. When done, click the confirm button.

Note: When you install an app with the "Explorer", it will automatically be added to the list of available apps.
- Remove one or more apps from the "My Apps" homepage of the tablet. You can remove apps from the "My Apps" homepage of the tablet.
- Enter your profile, and then select "MY APPS" from the Quick access screen.

- Click on the "+" icon located in the top-right corner of the screen.

- Scroll the menu up and down and de-select the apps that you want to remove by clicking on them, so that the green tick mark disappears on the left. When done, click the confirm button.

Note: Only the "My Apps" homepage can be edited. The other four homepages ("My Knowledge", "My Games", "My Internet Apps" and "My Multimedia Apps") cannot be edited.
3. Applications Preinstalled on your Lexibook® tablet
Note: Lexibook cannot guarantee the content or services accessible through the Lexibook® tablet. In addition, Lexibook® cannot be held responsible for any data loss, damage or alteration of the unit linked to downloading or updating applications or software on the tablet. Moreover, it cannot be held liable for any expense, cost or financial loss caused by purchases made on the Internet using this tablet.
Note: Most of the applications listed below require an Internet connection. Before you launch an application, check that your tablet is connected to a wireless Internet network (see "Activate the Wi-Fi on your Lexibook® tablet").
 | Lexibook® Power AcademyClick on this icon to launch the Lexibook® Power Academy application and discover educational cards that will allow you to enrich your knowledge in maths, history, sciences, geography and more. The application also includes many quizzes to test your knowledge! You can create a profile and save your favourite cards and best scores. |
 | Lexibook® My HobbiesPress this icon to launch the Lexibook® My Hobbies application and access 52 interactive activities that you can play with your friends, family or even on your own! |
 | Lexibook® My TranslatorPress this icon to launch the Lexibook® My Translator application and access a 15-language translator with a database of 10,000 words! |
 | I LearnClick on this icon to access 13 exclusive Lexibook® educational applications! |

 | School Zone®Discover three exclusive educational applications from School Zone®, the specialist for educational games! Learn while having fun with the puzzle game “Jigsaw Jumble Jr.”, the interactive book “Jog Frog Jog” and the action game “Train Defender”. |
 | CalculatorClick on this icon to launch the Calculator application. This calculator allows you to perform basic and advanced mathematical operations. |
 | ClockClick on this icon to access the Clock app of your tablet. This is where you can set sound alarms and view the current time in full screen. |
 | HelpPress this icon to access the complete instruction manual of your Lexibook ® tablet. |
My Games Homepage


My Games
This homepage contains 25 fun games already preinstalled on your Lexibook® tablet!
Note: You can scroll down with your finger to access all the 25 different games of this homepage.
 | Lexibook® ProtectClick on this icon to launch the Lexibook® Protect application and surf the Internet safely. This browser includes a built-in parental filter that blocks up to nine categories of websites. For more information, please refer to the section "The Lexibook® Protect Internet browser". |
 | Lexibook® Market PremiumClick on this icon to launch the Lexibook® Market Premium application. With this downloading platform, you can easily find and install thousands of applications on your Lexibook® tablet. Including educational games, puzzles, action games, photo apps -- each application is carefully selected by Lexibook®. The Lexibook® Market is a secure platform, suitable for the whole family! For more information, please refer to the section "The Lexibook® Market Premium". |
 | E-mailClick on this icon to launch the E-mail application and access your personal e-mails. This application is compatible with most existing e-mail providers. |
 | Weather FasterPress this icon to check the daily and hourly weather forecasts of your location. You can add several locations and switch between them quickly, and also check a temperature graph! |
 | Lexibook UpdateClick on this icon to download the latest version of the Lexibook® Market and get the latest updates for your Lexibook® tablet. |
Gallery: This application allows you to view pictures stored on your Lexibook® tablet.
eBook: Click on this icon to launch the eBook application. This application allows you to access your personal library of digital books.
Music: Click on this icon to launch the music player and listen to music.

EXCLUSIVE! You will find 20 songs from Susie Tallman: this will delight and inspire little ones as well as their parents. Listeners re-discover favourites, and uncover beloved forgotten tunes, in clever new arrangements. From playful to educational – this music is pure magic!

Video: Click on this icon to launch the application "Video Player" and play video files.

EXCLUSIVE! You will find 5 videos from Susie Tallman: discover the musical brilliance and charm of Susie Tallman with lots of new faces and wonderful, imaginative places. Join Susie and her friends on a farm horsin' around, quack like ducks on a lake, jump on the bed with monkeys and eat cupcakes at a tea party.

You will find some LEGO® videos in your tablet.
Note: Once you add music files, image files and video files to your Lexibook® tablet, they will be automatically available in the corresponding application.
Camera
Click on this icon to open the Camera application of the tablet and take pictures and videos with the integrated camera.
Note: Pictures and videos done with the Camera application are automatically saved in the folder "DCIM\Camera" of the internal memory, accessible via the Explorer application.
 | ExplorerClick on this icon to open the Explorer of your Lexibook® tablet and access the files stored inside the internal memory of the tablet and the Micro SD card (not included). |
 | AviaryClick on this icon to launch the photo editing application of your Lexibook® tablet. Edit your pictures, change colours and add funny effects with this simple, yet powerful editor! |
 | Sound RecorderClick on this icon to launch the application "Recorder" and record audio messages. Press [IMAGE] to start recording, then [IMAGE] to stop and then [IMAGE] to listen. The file is automatically saved in the RECORD folder inside the internal memory.Note: The microphone is located on the right side of the tablet, inside the hole of the Reset button. |
My Apps Homepage

This homepage allows you to display the icons of the apps that you want. Please refer to the section "The applications of your Lexibook® tablet" to see how to add and remove icons from this homepage.
The Lexibook® Protect Internet Browser
The Lexibook® Protect browser is an Internet browser that allows you to block up to nine website categories, with regularly updated filters. In addition, the Lexibook® Protect browser includes a feature that allows you to block all websites except those that have been approved manually. Please use this guide to configure the Lexibook® Protect browser.
It is the responsibility of parents to ensure the safety of their children. The Lexibook® Protect browser cannot under any circumstances replace adult monitoring and assistance during Internet use by children. The Lexibook® Protect browser ensures that access to content that may offend the sensibilities of younger users is limited. Lexibook® cannot however guarantee the exclusion of all websites containing inappropriate content.
- When first using the Lexibook® Protect browser, a window opens automatically. Please create and confirm the master password that will allow access to browser settings, and then select "OK".
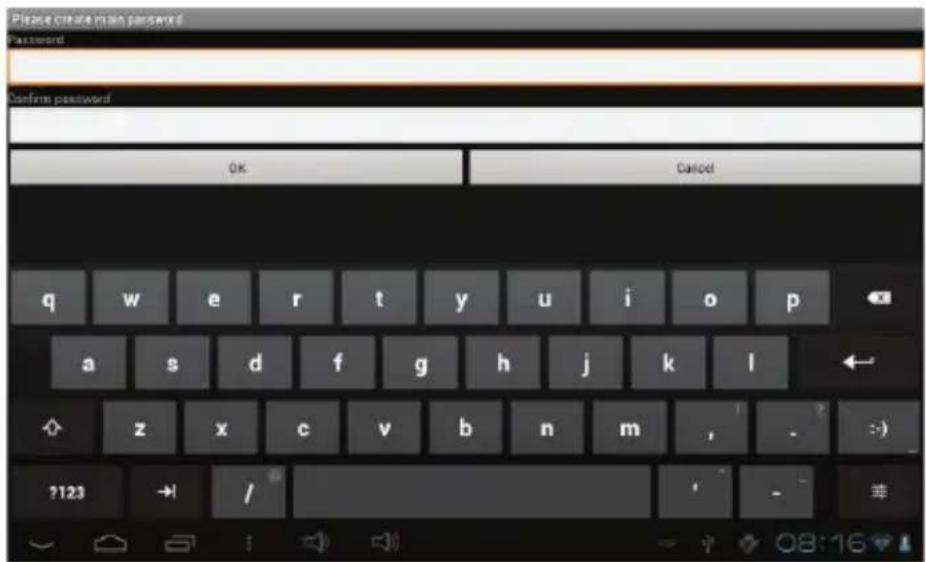
- The settings screen is displayed. Check the desired options and then select "Back" to return to the browser. For more information on the browser settings, follow steps 9 to 11.

- The browser settings are also accessible via the browser's address bar. Select the "Settings" button in the upper right-hand part of the screen.

- Enter the master password created at step 1 and then select "OK".

- The settings screen is displayed. Check the desired options and then select "Back" to return to the browser. For more information on the browser settings, follow steps 9 to 11.

- Once the master password has been created (step 1), it is also possible to access settings from the options bar. Select "Options" at the bottom of the screen and then "Admin. mode".

- Enter the master password and then select "OK".

- The "Settings", "More options" and "Exit admin. mode" buttons are displayed on the screen. The "Exit admin. mode" button enables you to return to the browser.

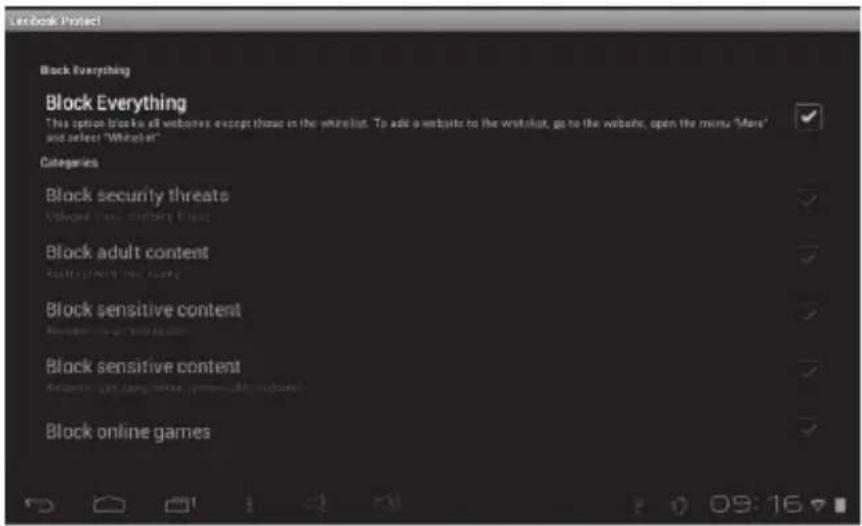
- In the "Settings" menu, the "Block Everything" option enables you to block all websites with the exception of those that have been manually added to the whitelist (list of allowed websites). When this option is activated, the "Categories" section and the "Blacklist" option are not available. To add websites to the whitelist, please follow step 14.
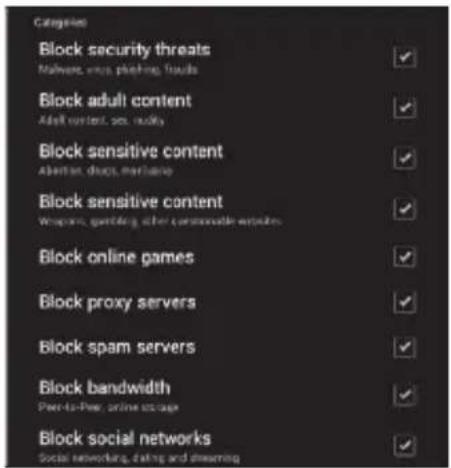
- Still in the "Settings" menu, the "Categories" section enables you to block up to nine website categories. Check the desired categories.
- Still in the "Settings" menu, the "Blacklist and Whitelist" section enables you to remove websites from the blacklist or from the whitelist added previously. To add websites to the blacklist or to the whitelist, please follow steps 13 and 14. The "Other" section enables you to modify the browser home page, to modify the master password and to activate or disable the Google SafeSearch filter. For even more effective filtering, it is recommended not to disable the Google SafeSearch filter.
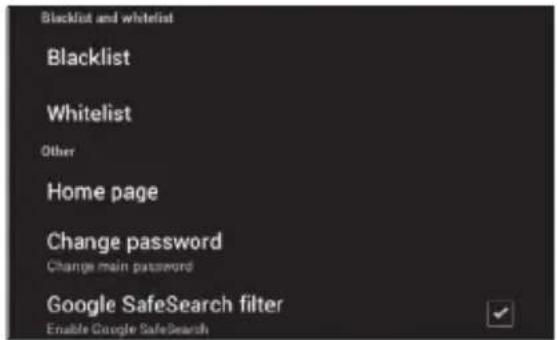
- The "More options" menu enables you to add websites to the blacklist or to the whitelist and to erase the browser history. To add websites to the blacklist or to the whitelist, please follow steps 13 and 14.

- To add a website to the blacklist, go to the website in question (for example, "www.google.co.uk") and select "Blacklist" in the "More Options" menu (step 12). The website is immediately blocked. To remove the website from the blacklist, select it in "Blacklist" option of the "Settings" menu (step 11).

- To add a website to the whitelist, it must first be in the blacklist. Go to the website in question (for example, "www.google.co.uk") and select "Whitelist" in the "More options" menu. The website is immediately unblocked. To remove the website from the whitelist, select it in the "Whitelist" option of the "Settings" menu (step 11).

- To add a website to bookmarks, click the grey star in the upper right-hand part of the screen, in the browser address bar. The star lights up ( ) and the website is automatically added to the "Bookmarks" menu. To remove a website from the favourites, click the star again.

- In the "Bookmarks" menu, a short click on a favourite enables you to open it. A long click on a favourite gives you access to a sub-menu that enables you to open it and to change its name and web address, as well as to erase it.


The Lexibook® Market Premium
Embark on a whole new journey with the Lexibook® Market Premium for android apps.
- Create an account on the Lexibook® Market Premium
- On the Home screen, click on the Lexibook® Market Premium icon to launch the application.
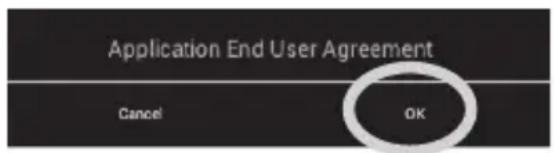
- A terms and conditions window will appear on the screen. Read the terms and click on "OK" when you are done.

natural_image
Color palette bar with grayscale gradient and a central crosshair symbol (no text or labels)- Click on the "Register" button.

- Enter your email address and click on "Quick registration" or "Normal registration".

- Connect to the Lexibook® Market Premium
-
On the Home screen, click on the Lexibook® Market Premium icon to launch the application.
-
Enter your username and password. The option "Save username and password" is selected by default. If you wish to login every time you access the Lexibook® Market Premium, simply deselect this option.

- Search for applications on the Lexibook® Market Premium
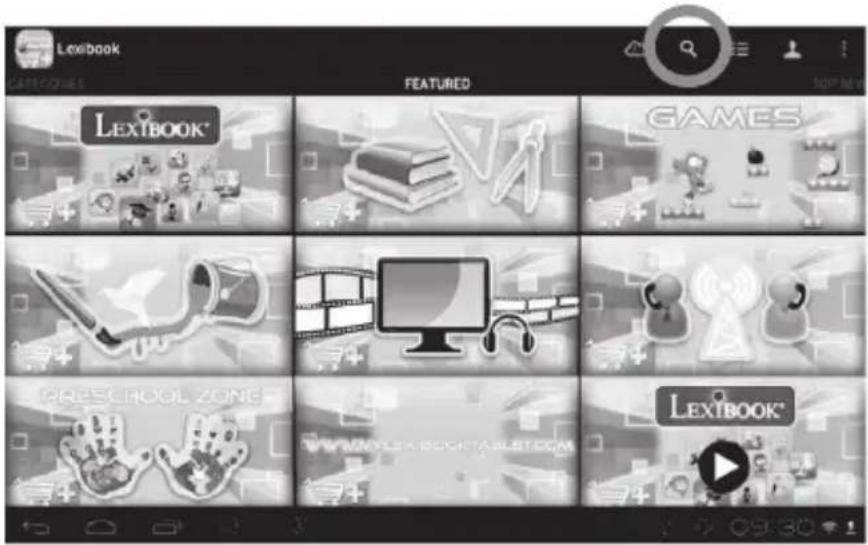
- Slide your finger to the right to access the "CATEGORIES" page or simply click on
this icon ☐. Click on the arrow facing down to access the different sub-categories available.

You can also look for applications on the Lexibook® Market Premium using the search engine:
- Click on the "Search" button at the top.
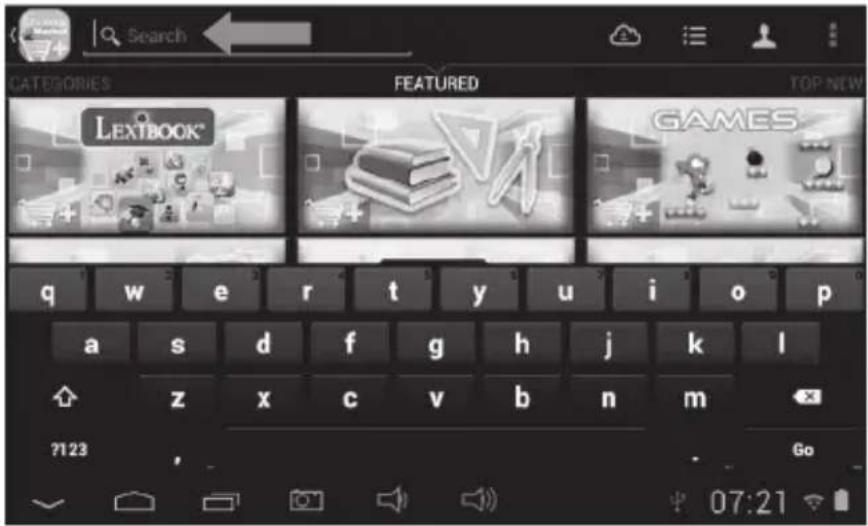
- Type in the keyword(s) for your search and then press the "Enter" key of the keyboard.
• Install an application on the tablet
- Inside the Lexibook® Market Premium, click on the application you want to download.
- Please be patient while your application is being downloaded.
- Click on "Install" to begin the installation.

- A confirmation window appears. Select "Open" to immediately use the application or "OK" to confirm and close the window.
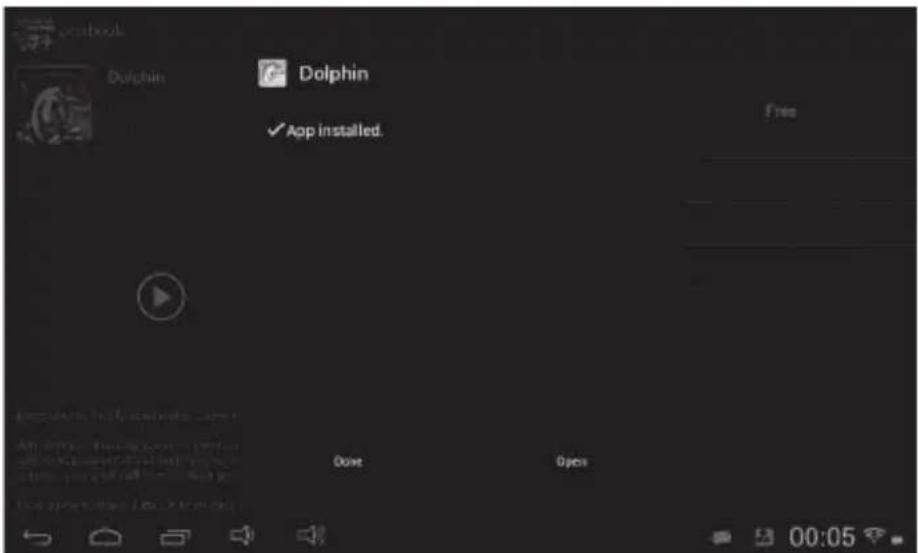
- The application is then available in the applications menu.

- Add credit to your account
- Click on the "Account statement" button, located at the top of the screen.
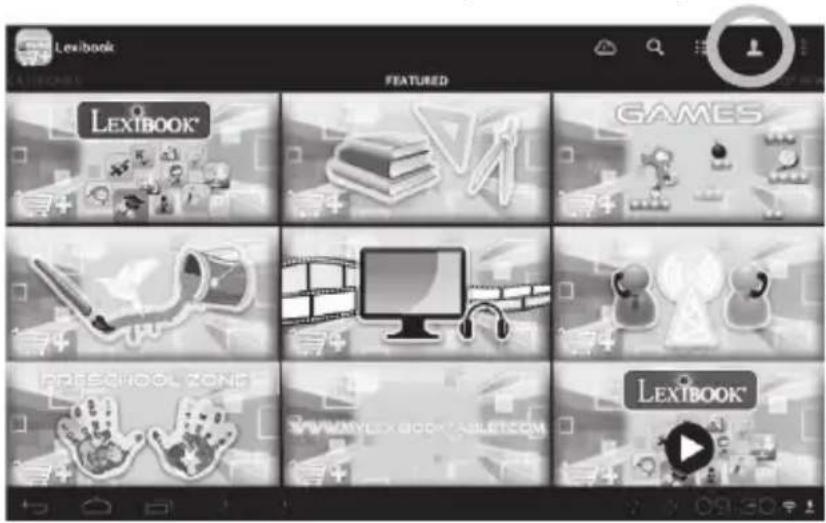
- Next, click on the "Add funds to your wallet" button and wait for the page to load.

- Type in the amount that you wish to add in your wallet and choose a payment method.

- Click on the "Add funds" button to access the payment process page. Choose your country and type your credit card information and email address. If you reside in the US, you will be prompted to insert your ZIP code.

- Click on "Continue" to proceed.

• Purchase an application
- First, you need to connect to your account. Please follow the steps described in the "Connect to the Lexibook® Market Premium" section above.
- On the page of the application you want to purchase, click on "Purchase" after checking the application's price.

- Enter your credit card information and your email address. Press "Continue" to proceed.

- After you have entered your billing information, press on "Continue".

- Once you obtain your receipt, you can download the application you have just bought.
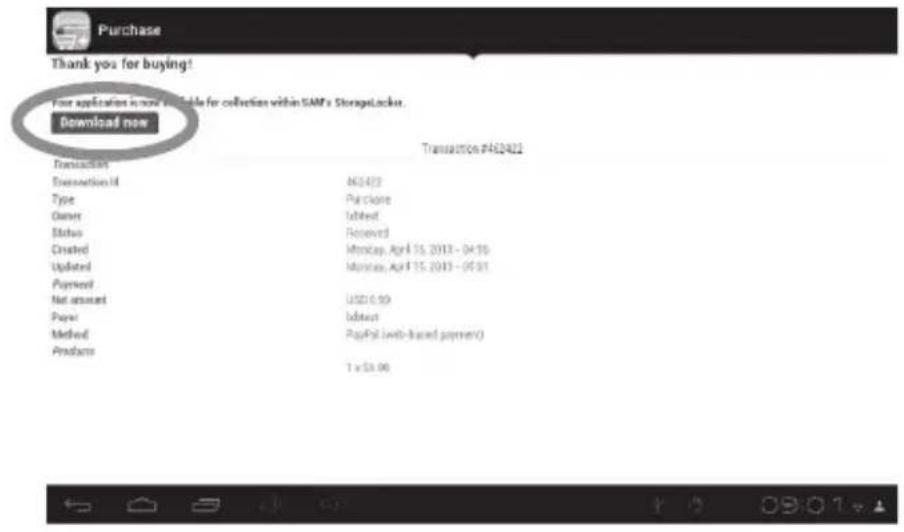
• Find purchased applications
If you have uninstalled a previously purchased application, you can reinstall it without having to purchase it a second time.
- Connect to the Lexibook® Market Premium by identifying yourself (see "Connect to the Lexibook® Market Premium").
- On the search screen (see "Find purchased applications"), type the name of the previously downloaded application.
- If you have previously purchased the application, "You already own this application" will be displayed on the screen.

- To reinstall the application, click on "Download".
- Changing the Lexibook® Market Premium Language
By default, the Lexibook® Market Premium is displayed in the language of your tablet. Should this not be the case, or should you wish to display the Lexibook® Market Premium in a different language, please follow the steps below.
- From the Home screen of the Lexibook® Market Premium, press the "Options" button, and then select the "Preferences" option that pops up.

- Select the "Target language" option to set the language of your choice.

- In the drop-down list that shows up, select the language required. To do so, slide a finger toward the bottom or the top of the screen.

- To display the Lexibook® Market Premium in a different language, repeat step 1 to 4 and select the required language at step 3.

Note: Lexibook® are continually improving their products. To obtain the latest version of the Lexibook® Market and download the latest updates, please visit the following link: http://www.lexibook.com/lexibook-market-app.html.
This link is also accessible directly from the "LXB Update" shortcut, located on the Home screen of your tablet.
Help us improve the Lexibook® Market! Feel free to contact Lexibook Customer Service if you notice inappropriate applications.
E-Book
- Click on the E-Book application.
Note 1: No e-books are pre-loaded in the tablet. The e-books shown below are for reference only.
Note 2: The E-Book application is compatible with EPUB1, EPUB2 and PDF files.

- By default, the e-books are displayed on a bookshelf. Click on the icon to show the available books on a numbered list.

- To go back to the bookshelf display, click on the icon.

- The E-Book application can be viewed horizontally or vertically. To change the tablet orientation, simply rotate the tablet 90° towards the left or the right.
- Click on a desired book to start reading.

- Slide your finger to the left to go to the next page and slide your finger to the right to go back to the previous page.
- To activate the page turning function, click on the "Options" button. Then, choose "Auto Flip".

- Scroll up and down the list to view more options. Select a desired time, then press "OK". To deactivate automatic page turning, select "Manual".
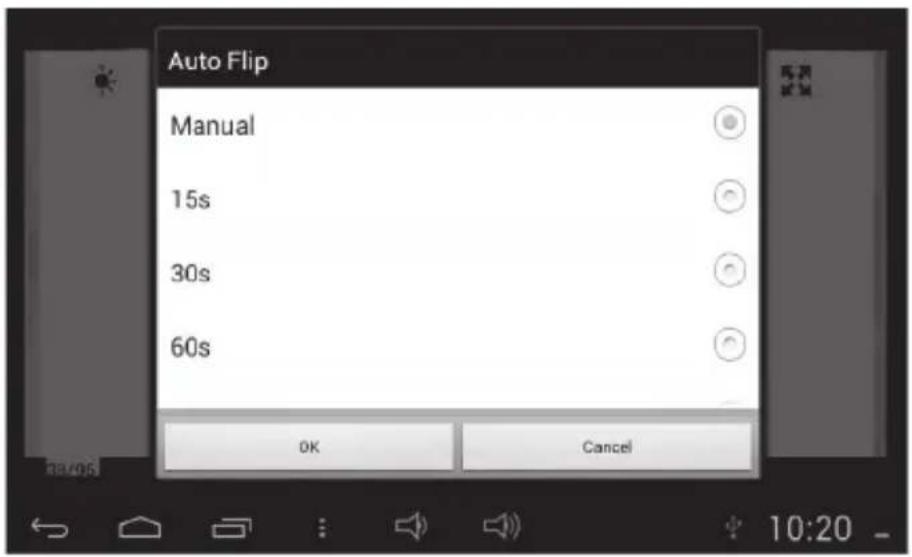
- Click on the text.

icon to adjust the brightness – the more lines, the brighter the

- To display the e-book in full view, click on the ↕ ↗ icon.
- Click on "AA" on the top-right corner of the screen to adjust the size of the text. The first 'A' indicates the current text size. Alternatively, select the "Options" button, then "Font Size".


- Scroll the list up and down to view more size options. Then, choose a desired size and press "OK".
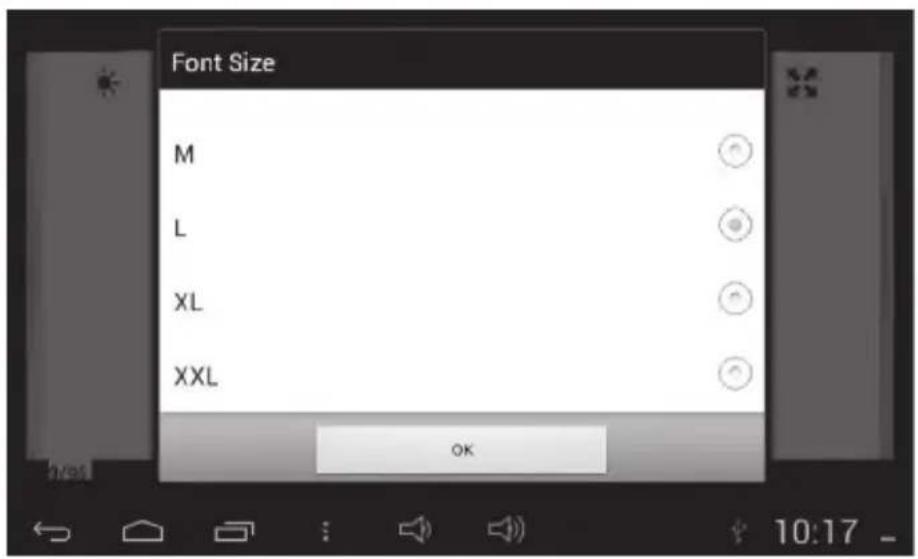
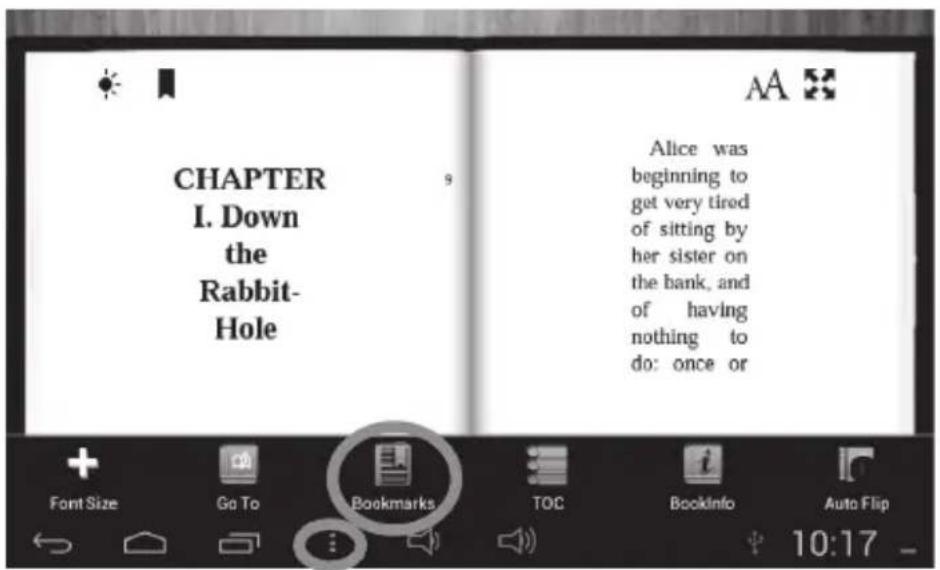
- To jump to a certain page, click on the "Options" button then on "Go To".


natural_image
Color palette bar with grayscale gradient and a central crosshair symbol (no text or labels)- Click on the text input field.

- Enter a desired page number and press "Done".
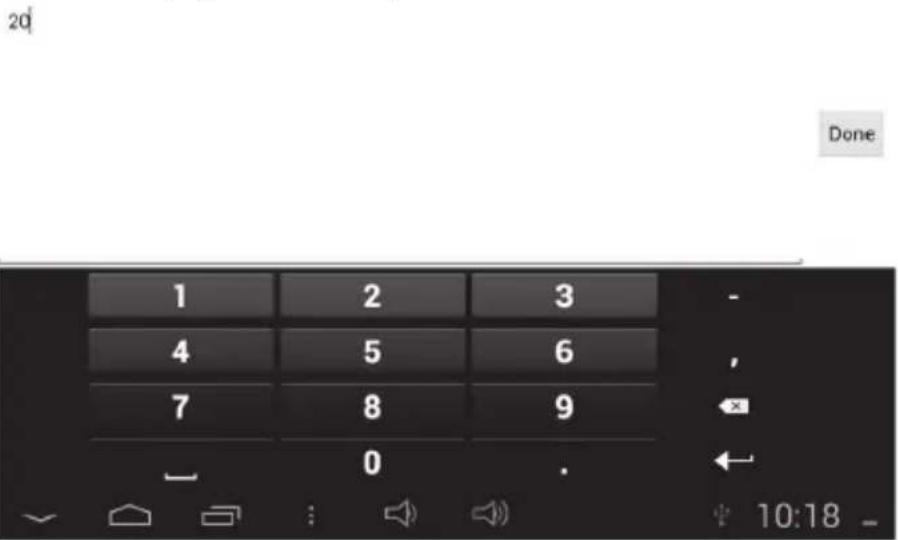
- Press "OK". The selected page will be displayed on the screen.

- To go to the beginning of a chapter, click on the "Options" button, then on "TOC" (if available).


- Select a desired chapter, and then press "OK" to display the chosen chapter on the screen (if available).

- To create a bookmark, click on the "Options" button. Select the "Bookmarks" option.

natural_image
Color palette bar with grayscale gradient and a central crosshair symbol (no text or labels)- Click on "Add Bookmarks".
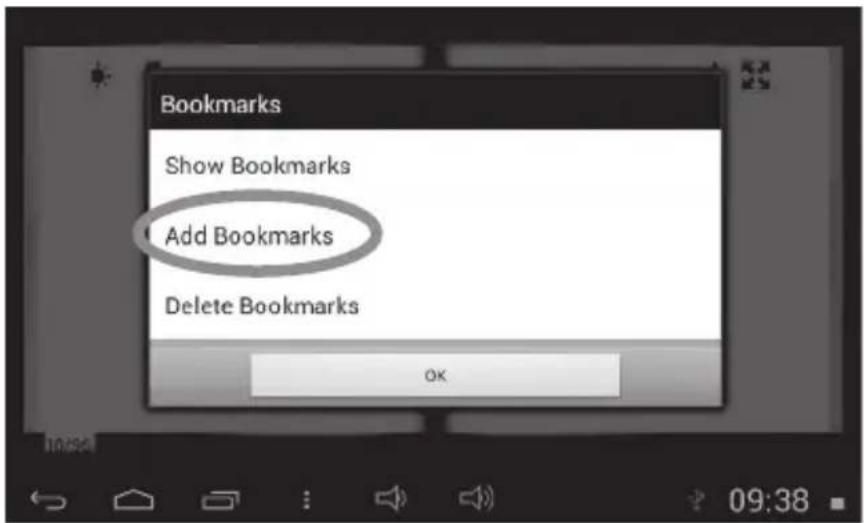
- Enter a title for the bookmark and click on "OK".
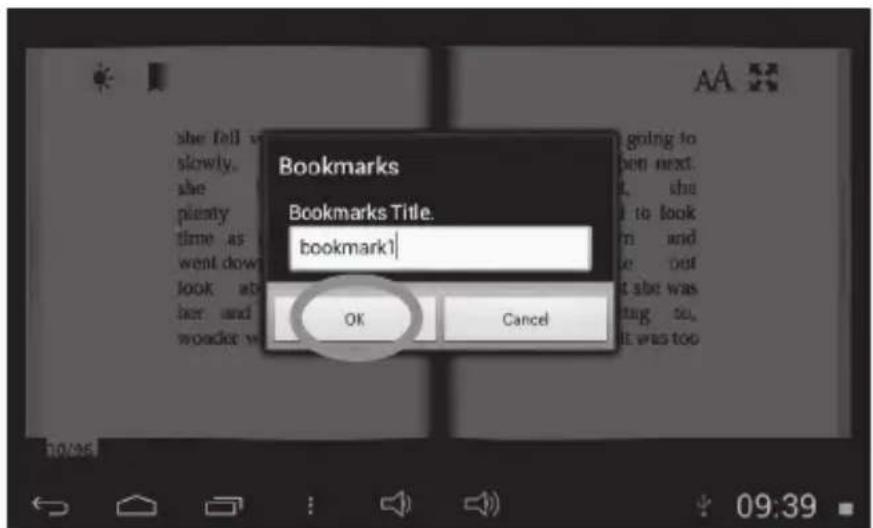

- In the bookmarks option, select "Show Bookmarks" to show pages that have been bookmarked.

- Select the bookmarked page you would like to display on the screen.


natural_image
Color palette bar with grayscale gradient and a central crosshair symbol (no text or labels)- In the bookmarks option, select "Delete Bookmarks" to delete a bookmark.

- Select a desired bookmark to remove.


- Click on "OK" or on "Cancel".

- You can also access the bookmark shortcut by clicking on the icon located on the top-left corner of the screen.

- To view information about the book, click on "Options", then "Book Info" (if available).

- The title and author of the book are displayed on the screen.

- To delete a book, click on the

icon located at the bottom right.
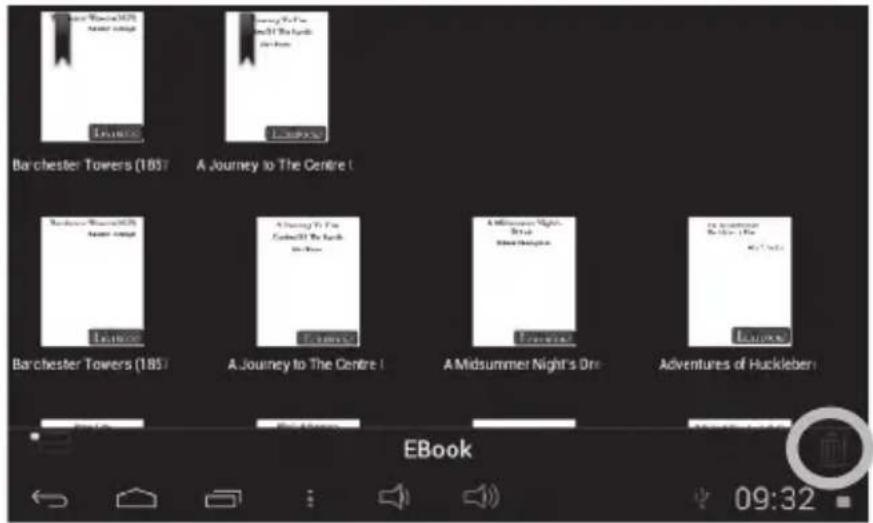
- Red circles with a cross inside appear on the screen. Click on the cross of a desired book to delete it.
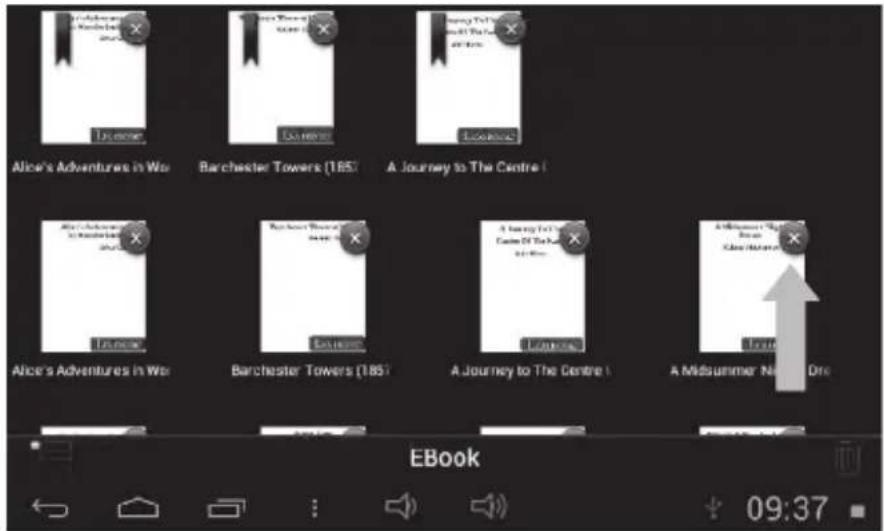
4. Technical Information
Tablet Specifications
| Screen | TFT LCD 7 inches capacitive |
| Screen Resolution | 800 x 480 pixels |
| O.S. Google Android 4.1 | |
| CPU 1GHz | |
| Storage | 8GB – Micro SD cards compatible up to 32GB |
| RAM DDR3 1GB | |
| Wi-Fi | 802.11 b/g/n (built-in) |
| Audio | Built-in mono speaker |
| Connectors | 1 micro USB 2.0 port, 1 Micro SD card slot,1 headphone jack, 1 DC jack, Bluetooth® |
| Supported image format | JPEG, BMP, GIF |
| Supported music format MP3 | |
| Battery | Lithium battery (included) – 4000mAh, 3.7V____ |
| Adapter specifications | Input: 100V - 240V ~ 50 / 60Hz 0.4AOutput: 5V ____ 2A |
| Battery life 4 hours (average) | |
| Dimensions 237 x 155 x 20 mm | |
| Weight 650g | |
| Language English |
Maintenance and Warranty
To prevent fire or shock hazard, disconnect your unit from the AC power source when cleaning. The finish on your unit may be cleaned with a dust cloth and cared for as other furniture. Use a soft, clean cloth moistened with plain, lukewarm water to clean the exterior of the unit. Use caution when cleaning and wiping the plastic parts. Mild soap and a damp cloth may be used on the front panel.
This product is covered by our 1-year warranty.
For any claim under the warranty or after sale service, please contact your distributor and present a valid proof of purchase. Our warranty covers any manufacturing material and workmanship defect, with the exception of any deterioration arising from the non-observance of the instruction manual or from any careless action implemented on this item (such as dismantling, exposition to heat and humidity, etc.). A broken screen as well as any damage caused by using an adapter other than the one provided is not covered by our warranty. It is recommended to keep the packaging for any further reference.
In a bid to keep improving our services, we could implement modification on the colours and the details of the product shown on the packaging.
Warning! These instructions should be kept as they contain important information for using all the functions of your tablet such as, for some of our models, activating certain product functions by code. If you create a system or password for protecting access to your tablet, it is your responsibility to note it down accurately and keep it in a secure, accessible place that you will remember. If you forget it, our technicians will have to restore access to your
tablet. This service is subject to a quote upon request and an invoice if you choose to accept the quote. Furthermore, in the event that the tablet is reset, the user risks losing all the data saved on the tablet. A detailed set of instructions explaining all the functions of your tablet is available and stored in its memory. We recommend that you read this for more information and to respond to your questions.
Reference: MFC270EN
Designed and developed in Europe – Made in China
© 2013 LEXIBOOK®
LEXIBOOK SA
www.mylexibooktablet.com

This product is not a toy.

WARNING: Prolonged use at full power of this product might damage the ear of the user

To prevent possible hearing damage, do not listen at high volume levels for long periods.
Ensure your player at low volume levels or power off before you leaving.
Fully understand user manual before use.
Environmental Protection:
Unwanted electrical appliances can be recycled and should not be discarded along with regular household waste! Please actively support the conservation of resources and help protect the environment by returning this appliance to a collection centre (if available).


Conformity Declaration
We, Lexibook® S.A.
Declare under our sole responsibility that the following product:
Kind of product: Tablet
Type designation: MFC270EN
Is in compliance with the following standards:
EN 55022 : 2010
EN 61000-3-2 : 2006 +A1:2009+A2:2009
EN 61000-3-3 : 2008
EN 55024: 2010
EN 300 328 V1.7.1
EN 301 489-1 V1.9.2
EN 301 489-17 V2.2.1
EN 60950-1:2006+A11:2009+A1:2010+A12:2011
EN 50332-2:2003
EN 62311: 2008
We hereby declare that the above mentioned product is in compliance with the EMC Directive (2004/108/EC), with the Low Voltage Directive (2006/95/EC) and with the R&TTE Directive (1999/5/EC) of the European Commission.

Yiu Wai Man
Product Development Manager
30/08/2013 (Hong Kong)
C€0890 ⚠
IM code: MFC270ENIM1353
- LEXIBOOK® 2 Tablet Junior
- One tablet, thousands of possibilities
- Learn, play, relax
- Table of Contents
- Discover your Lexibook® tablet ....7
- The Home Screen of your Lexibook® Tablet 26
- Applications Preinstalled on your Lexibook® tablet.... 37
- Technical Information....76
- Safety Instructions
- DANGEROUS VOLTAGE:
- ATTENTION:
- WARNING:
- IMPORTANT SAFETY INSTRUCTIONS
- WARNING: THIS PRODUCT IS NOT A TOY, ADULT SUPERVISION IS
- REQUIRED.
- Epilepsy Warning
- Please read prior to any use of a video game by yourself or by your child.
- General Precautions When Using Video Games
- Packaging Contents
- Discover your Lexibook® tablet
- Turning your tablet on and off
- Configuring the Lexibook® Parent mode
- How to activate the Wi-Fi on your Lexibook® tablet
- $ % & * - + ( )
- The Settings menu of your Lexibook® tablet
- Headphones Connection
- How to activate the Bluetooth® on your Lexibook® tablet
- Using a Memory Card
- • Memory card compatibility
- - Insert a memory card
- - Remove a memory card
- - Format the memory card
- Navigation
- • Navigation with the Explone
- • Navigation with the Gallery
- • Precautions when using the touch screen
- Rotating the Screen
- Notes:
- Using the Virtual Keyboard
- • Display the virtual keyboard
- Inserting the Micro USB
- Charging the Battery
- Using the Battery
- The Home Screen of your Lexibook® Tablet
- The Taskbar
- - Touch screen keys of the Home screen
- Profile Selection Screen
- To Create a New Profile
- To Edit an Existing Profile
- To Delete an Existing Profile
- The Applications of your Lexibook® tablet
- - Running applications from the Home screen
- Applications Preinstalled on your Lexibook® tablet
- My Games Homepage
- My Games
- Camera
- My Apps Homepage
- The Lexibook® Protect Internet Browser
- The Lexibook® Market Premium
- - Connect to the Lexibook® Market Premium
- - Search for applications on the Lexibook® Market Premium
- • Install an application on the tablet
- • Purchase an application
- • Find purchased applications
- - Changing the Lexibook® Market Premium Language
- E-Book
- Technical Information
- Maintenance and Warranty
- Conformity Declaration
Brand : LEXIBOOK
Model : Junior Tablet MFC270EN
Category : Tablet