
WB400 - Tablet LEXIBOOK - Free user manual and instructions
Find the device manual for free WB400 LEXIBOOK in PDF.
| Product type | Atmosphere projector weather station |
| Reference | WB400 |
| Brand | LEXIBOOK |
| Main power supply | 230V ~ 50Hz mains adapter (included) |
| Backup power supply (main unit) | 3 LR6/AA 1.5V batteries (not included) |
| Remote sensor power supply | 2 LR03/AAA 1.5V batteries (not included) |
| Indoor temperature | 0°C to 50°C |
| Outdoor temperature | -50°C to 70°C (via sensor) |
| Indoor humidity | 20% to 95% |
| Outdoor humidity | 20% to 95% (via sensor) |
| Temperature accuracy (10-40°C) | ±1°C |
| Sensor transmission frequency | 433.92 MHz |
| Transmission range | Up to 30 m in open space |
| Functions | Temperature/humidity display, weather forecast, comfort zone, alarm, timer, 4 musical themes with lights, backlight |
| Number of supported sensors | Up to 3 (channels 1, 2, 3) |
| Maintenance | Clean with a dry soft cloth. Do not use chemical products. |
| Safety | Do not expose to direct sunlight or heat source. Do not wet. Remove batteries during prolonged non-use. |
| Warranty | 2 years |
| Manufacturing | Made in China |
| Package contents | 1 main unit, 1 remote sensor, 1 mains adapter, 1 instruction manual |
Frequently Asked Questions - WB400 LEXIBOOK
User questions about WB400 LEXIBOOK
0 question about this device. Answer the ones you know or ask your own.
Ask a new question about this device
Download the instructions for your Tablet in PDF format for free! Find your manual WB400 - LEXIBOOK and take your electronic device back in hand. On this page are published all the documents necessary for the use of your device. WB400 by LEXIBOOK.
USER MANUAL WB400 LEXIBOOK
212(H)x200(W)x118(D)mm
Type de piles:
3 piles alcalines de type 1,5V = = LR06/AA.
Alimentation :
CA 230V~50HZ.
112(H)x48(W)x20(D)mm
Type de piles:
2 piles alcalines de type 1,5V LR03/AAA.
Product Development Manager

Copyright © 2009 LEXIBOOK®
WELL-BEING STATIONS - YOUR SOURCE OF COMFORT
With Lexibook, take care of you and the world around you!
To answer the need for pleasure, harmony and serenity, Lexibook has developed a range of Well-Being stations, designed to improve your well-being, day after day.
Are you in a ideal comfort zone?
The Lexibook Well-being stations are advanced weather stations. They provide essential information on the conditions of the room you are in, interpreting them with stylish and easy icons.
Our weather stations also help to improve your daily comfort thanks to their integrated functions: soothing atmosphere, soft lights, relaxing music and sound effects, humidifier...
Reliable and user-friendly, they will naturally find their place in your home with their pure, harmonious design.
Electronic Candle Clock - WB100
Thanks to its detachable candle, this stylish clock will create a soft and romantic atmosphere in your bedroom.
The indoor temperature display allows you to monitor the room's conditions.
Atmosphere projector Well-Being Station - WB400
This advanced weather station will create a relaxing atmosphere in your home and improve your comfort. Select a theme according to your mood and let your mind wander thanks to the soothing lights and sound effects.
Humidifier Weather Station - SM2000
Take control over your environment with this advanced weather station and its integrated humidifier. The humidity rate in your room is too low? The humidifier is turned on automatically to maintain excellent conditions and keep you inside the ideal comfort zone.
Humidifier Radio Clock - RL2000
Sleep peacefully and wake up fresh and ready to the sound of the radio. The weather station indicates that the room is too dry? Turn on the humidifier before going to bed and fall asleep in a ideal comfort zone.
INSTALLATION
Unpacking the device
When unpacking, ensure that the following elements are included:
1xmainunit
1 x sensor
1 x AC/DC adaptor
1 x instruction manual
WARNING: All packaging materials, such as tape, plastic sheets, wire ties and tags are not part of this product and should be discarded.
PRODUCT DESCRIPTION
Main unit description
Refer to image A
- Light display area
-
LCD screen
-
MODE MODE key
- UP key
- DOWN key
- EARTH key
-
WATER key
-
AIR key
- FIRE key
- SNOOZE / BACKLIGHT rubber feet
Under the unit
- RESET key
Back of the unit
- Speaker
- AC Adapter
Main unit LCD description
Refer to image B
- Comfort zone icons
- Clock (AM/PM)
- DST (Daylight Saving Time) icon
- Snooze icon
- Alarm icon
- Timer icon
- Indoor temperature/humidity indicator
- Indoor temperature ^ C / ^
- Temperature icon
-
Outdoor temperature ^ C / ^
-
Outdoor temperature/humidity indicator
- Animated weather forecast icons
- Music / light display icons
- Month and day
- Indoor humidity (%)
- Humidity icon
- Remote sensor channel number
- Outdoor humidity (%)
Remote sensor description
Refer to image C
- LED indicator
At the back and inside the battery compartment
- Wall mount hole
3.CHANNEL selector switch (channel 1,2 or 3) - TX key: Press this button and the sensor will send the temperature and humidity readings to the main unit
GETTING STARTED
Remote sensor
- Using a screwdriver, open the battery compartment located at the back of the remote sensor.
- Insert 2 × LR03 / AAA, 1.5V = type batteries (not included) according to the polarity.
- Close the battery compartment and tighten the screws.

Main unit
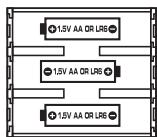
- Open the battery compartment located at the bottom of the main unit.
- Insert 3 × LR06 / AA, 1.5V = = type batteries (not included) observing
the polarity indicated at the bottom of the battery compartment, and as per the diagram shown opposite. The batteries are a back-up power source.
- Close the battery compartment.
- Plug the AC / DC adapter into the socket at the back of the unit and insert the plug into a wall socket.
Note:
- If the main unit's LCD screen becomes dim when you are not plugged into mains power, your batteries are low and need to be changed.
- Only use the adapter supplied with the WB400. Do not use other adapter.
- The socket-outlet shall be installed near the equipment and shall be easily accessible.
Automatic synchronization of the main unit and the remote sensor
- After the batteries have been inserted in the main unit, the synchronization is launched automatically and runs for approximately 3 minutes.
-
Within these 3 minutes, the main unit (receiver) picks up the temperature and humidity signals from the remote sensor and displays the readings.
-
If the main unit does not display the readings after 3 minutes, in normal mode (the full display of all readings), press (MODE) 4 times so that only the outdoor temperature section is displayed. Press and hold (MODE) for 2 or 3 seconds to synchronize manually the remote sensor and the main unit. ① flashes while it is searching for the sensor signal. You can also press the TX switch in the sensor battery compartment to initiate the sensor to send its signal to the main unit.
Note:
- 月 appears next to the temperature display.
- appears next to the humidity display.
Non-rechargeable batteries are not to be recharged. Rechargeable batteries are to be removed from the product before being charged. Rechargeable batteries are only to be charged under adult supervision. Different types of batteries or new and used batteries are not to be mixed. Only batteries of the same or equivalent type as recommended are to be used. Batteries are to be inserted with the correct polarity. Exhausted batteries are to be removed from the product. The supply terminals are not to be short-circuited. Do not throw batteries into a fire. Remove the batteries if you are not going to use the product for a long period of time.
WARNING: Malfunction or loss of memory may be caused by strong frequency interference or electrostatic discharge. Should any abnormal function occur, reset the unit or remove the batteries and insert them again, or unplug the AC / DC adapter from the mains socket and plug it back in.
CHANNEL SELECTION
The WB400 comes with 1 remote sensor. The sensor's default channel is channel 1 and does not need to be changed.
The channel function allows you to use up to 3 additional sensors. The main unit can identify each remote sensor thanks to their assigned channel (channel 1, 2 or 3). If you have 1 or 2 additional sensors, you can place them in a different location in your house such as in a bedroom. Your main unit can collect the temperature and humidity data of up to 3 remote sensors.
Adding a sensor
- Set the sensor to an unused channel by sliding the CHANNEL selector switch in the sensor's battery compartment to the desired number.
-
In normal mode (idle screen) on the main unit, press 4 times to go to the outdoor temperature section.
-
Use or to select the outdoor channel ( 1 , 2 or 3 icons) that matches the sensor you want to receive information from. The data of the corresponding remote sensor will be displayed in idle mode. The selected channel must be the same as the one chosen for the remote sensor with the channel selector. If the channels are different, the main unit will not be able to receive the data sent by the sensor. The weather station will automatically detect the new sensors.
-
Press (mode) to confirm your selection.
Note:
- If the sensor (or the main unit) is too close to other electrical devices, interference may cause malfunction. You can change the channel on the sensor and main unit as described above to improve the reception.
- It may take up to 3 minutes before the main unit displays the readings.
- After a few seconds of inactivity, the main unit will go back to normal mode.
- If the sensor is exposed to very low temperatures for an extended period of time, the batteries may lose power, which may cause the transmission range to be limited. High temperatures also reduce the battery performance.
CLOCK AND DATE SETTING
Clock setting
- In normal mode (idle screen), press (mode) once to go to the clock setting.
- Press and hold (mode) until the hour digit starts flashing.
- Use or to increase or reduce the values, then press MODE to confirm and adjust the next setting.
- The setting sequence is displayed in the following order:
Hours Minutes Year Month Day 24hr/12hr display DM (Day/Month) or MD (Month/Day) display DST function On/Off.
Note: When the DST function is turned on, DST is displayed in normal mode.
- Press (MODE) to confirm your selection and go back to normal mode (idle screen).
ALARM SETTING
You can set the alarm to sound with a beep tone without the light display or 1 of the 4 music themes with a light display.
- In normal mode (idle screen), press mode twice to go the alarm setting.
- Use or to toggle between alarm on or off. appears when the alarm is turned on.
-
Press and hold (mode) until the hour digit starts flashing.
-
Use or to increase or reduce the values, then press MODE to confirm and adjust the next setting.
- The setting sequence is displayed in the following order:
Hours Minutes 5 Alarm Sounds (you can choose a beep sound with no light display or 1 of the 4 music themes with light display).
- Press mode to confirm your selection and go back to idle screen.
- When the alarm rings, press the SNOOZE/LIGHT area to switch on the snooze function. is displayed and the alarm will ring again 10 minutes later. Press any key except the SNOOZE/LIGHT area to stop it. The alarm will ring again the next day at the same time. If you wish to deactivate the alarm completely, select the off option (step 2).
Note: If you do not press any key when the alarm goes off, it will ring for 10 minutes.
TEMPERATURE DISPLAY IN ^ C OR ^ F
- In normal mode (idle screen), press MODE 3 times to go the temperature display setting.
- Use () or () to toggle between ^ C or ^ F temperature display (indoor and outdoor).
- Press (MODE) to confirm your selection and go to the outdoor temperature setting.
Note: After a few seconds of inactivity, the unit will go back to normal mode.
- Press 1 of the 4 music theme keys / / / to play the music and light display.
- During playback, press twice to view the timer icon and timer minutes.
- Press or to turn the timer icon on or off. appears when the timer is on. If you select off, press MODE to exit.
- Press and hold to enter the timer minute setting and use or to change the timer's time (1-60 minutes).
- Press (mo) to confirm and return to the normal display.
- To change the volume, press (▲) or (▼) when the music is playing. You cannot change the volume when you are setting the timer.
- To turn the music theme and light display off at any time, press the music theme key that is currently playing.
COMFORT ZONE
The unit indicates if the conditions inside the room are comfortable. The 'flower' icons are easy to read and understand: they indicate when the optimal comfort zone has been reached. The ideal comfort zone for the human body ranges from 35 to 65% hygrometry for a given temperature between 18^ and 24^ (the temperature and hygrometry conditions are ideal for your well-being and a refreshing sleep).
| Excellent conditions Temperature: 20.0 to 22.0 °C. Humidity: 45% to 55%. | |
| Good conditions A) Temperature: 18.0 to 19.9°C or 22.1 to 24.0 °C. Humidity: 45% to 55%. B) Temperature: 20.0 to 22.0°C. Humidity: 35% to 44% or 56% to 65%. | |
| Acceptable conditions Temperature: 18.0 to 19.9°C or 22.1 to 24.0°C. Humidity: 35% to 44% or 56% to 65%. | |
| Not acceptable conditions Temperature: Not between 18.0 and 24.0 °C. AND/OR Humidity: Not between 35% and 65%. |
WEATHER FORECAST DISPLAY
Animated Weather Forecast Icons
This weather station collects the outdoor temperature and humidity data and predicts the weather forecast for the next 8 to 24 hours. There are 5 different weather forecast icons.
| Clear | Partly Cloudy | Cloudy | Rainy | Stormy |
Note: Absolute accuracy cannot be guaranteed regarding weather forecasting. The weather forecasting feature is estimated to have an accuracy level of about 75% due to the varying areas the Weather Station has been designed to be used in.
TROUBLESHOOTING
Problem:
- Temperature reading of outdoor remote sensor seems too high.
- Main unit is no longer receiving remote sensor signals or display.
- An abnormal operation has been observed and certain functions do not work.
Solution:
-
Ensure the remote sensor is out of direct sunlight, and away from sources of heat.
-
In normal mode, press MODE 4 times so only the outdoor temperature section is displayed. Press and hold for 2 or 3 seconds to synchronize manually the remote sensor and the main unit. ① flashes while it is searching for the sensor signal. You can also press the TX switch in the sensor battery compartment to initiate the sensor to send its signal to the main unit.
- There may be some interference caused by electrical devices: change the sensor's channel.
- Temperature may be below -30^ .
- Batteries in remote sensor may need to be replaced.
- Move the remote sensor closer to the main unit.
-
Make sure the remote sensor is away from sources of electrical disturbance.
-
Reset the unit. If this proves to be ineffective, remove and replace the batteries in both the remote sensor and main unit.
SPECIFICATIONS
WB400 main unit
Dimensions: 212(H)x200(W)x118(D)mm
Battery type: 3 x LR06/AA 1.5V = batteries
Adapter: 230V, 50Hz
Temperature range: 0 to 50^ (Indoor)
Measurement accuracy: 10 to 40^ ( + / - 1^ )
0 to 10^(+/-1.8^) & 40.1 to 50^(+/-1.8^)
Humidity range: 20% to 95% (Indoor)
20% to 95% (Outdoor)
Resolution: 0.1^
Remote sensor
Dimensions: 112(H)x48(W)x20(D)mm
Battery type: 2 x LR03/1.5V = AAA batteries
Temperature range: -50 to 70^ (Outdoor)
Transmission frequency: 433.92MHz
Transmission Range: 30 metres (Open area)
MAINTENANCE
To prevent fire or shock hazard, disconnect your unit from the AC power source when cleaning. The finish on your unit may be cleaned with a dust cloth and cared for as other furniture. Use a soft, clean cloth moistened with plain, lukewarm water to clean the exterior of the unit. Use caution when cleaning and wiping the plastic parts. Mild soap and a damp cloth may be used on the front panel.
Do not dismantle or drop the unit. Remove the batteries if the unit is not going to be used for an extended period of time.
WARRANTY
This product is covered by our 2-year warranty.
For any claim under the warranty or after sale service, please contact your distributor and present a valid proof of purchase. Our warranty covers any manufacturing material and workmanship defect, with the exception of any deterioration arising from the non-observance of the instruction manual or from any careless action implemented on this item (such as dismantling, exposition to heat and humidity, etc.). It is recommended to keep the packaging for any further reference.
In a bid to keep improving our services, we could implement modification on the colours and the details of the product shown on the packaging.
NOTE: Please keep this instruction manual, it contains important information.
Reference: WB400
Designed and developed in Europe - Made in China
©2009 LEXIBOOK®
LEXIBOOK UK Ltd,
Wimbledon Village Business Centre,
Thornton House, Thornton Road,
Wimbledon, London SW19 4NG
United Kingdom
Helpline: 0808 100 3015
www.lexibook.com
Environmental Protection:
Unwanted electrical appliances can be recycled and should not be discarded along with regular household waste! Please actively support the conservation of resources and help protect the environment by returning this appliance to a collection centre (if available).
DECLARATION OF CONFORMITY
We, Lexibook® S.A.
hereby declare under our full and sole responsibility, that the product:
Name: Atmosphere Station
Reference / type: WB400
Maker: Lexibook®
to which this declaration refers, complies with the essential requirements and any other provisions stated in R&TTE Directive (1995/5/EC).
Additional information:
Certified laboratory being consulted: ITS
Technical report available from:
Lexibook, 2 avenue de Scandinavie, 91953 Courtaboeuf cedex
is suitable for use within the European Union member states.

Yiu Wai Man
Product Development Manager

Copyright © 2009 LEXIBOOK®
Lexibook Ibérica S.L.
Product Development Manager

Copyright © 2009 LEXIBOOK®
Nome: Atmosphere Station
Product Development Manager

Copyright © 2009 LEXIBOOK®
Copyright © Lexibook 2009
Nome: Atmosphere Station
Product Development Manager

Copyright © 2009 LEXIBOOK®
Copyright © Lexibook 2009
Name: Atmosphere Station
Referenznummer / Typ: WB400
Hersteller: Lexibook®
Product Development Manager

Copyright © 2009 LEXIBOOK®
WELZIJNSTATIONS - UW BRON VAN COMFORT
Copyright © Lexibook 2009
Product Development Manager

Copyright © 2009 LEXIBOOK®