 — Mode d'emploi PDF")
NSA310 - Network Attached Storage (NAS) ZYXEL - Free user manual and instructions
Find the device manual for free NSA310 ZYXEL in PDF.
| Product Type | Network Storage Server (NAS) |
| Brand | ZYXEL |
| Model | NSA310 |
| Storage Capacity | Up to 2 SATA hard drives (2.5" or 3.5") |
| Network Interfaces | 1 Gigabit Ethernet port |
| Storage Interfaces | 2 internal SATA bays, 1 eSATA port (optional), 1 USB 2.0 port |
| Main Functions | File sharing, backup, media server, direct copy via COPY/SYNC button |
| Power Supply | External power adapter (included) |
| Power Consumption | Approximately 15 W (operating) |
| Dimensions (W x D x H) | 170 x 110 x 65 mm |
| Weight | Approximately 0.8 kg (without disks) |
| Supported File Systems | EXT3, EXT4, FAT32, NTFS (for external disks) |
| Network Protocols | TCP/IP, SMB/CIFS, AFP, NFS, FTP |
| Security | User name and password authentication, firewall recommended |
| Maintenance and Cleaning | Unplug before cleaning; use a soft dry cloth; avoid liquids |
| Spare Parts and Repairability | Hard drives, power adapter, Ethernet cable, fan (replaceable) |
| General Information | Manufacturer warranty; online support; firmware update via web interface |
Frequently Asked Questions - NSA310 ZYXEL
User questions about NSA310 ZYXEL
0 question about this device. Answer the ones you know or ask your own.
Ask a new question about this device
Download the instructions for your Network Attached Storage (NAS) in PDF format for free! Find your manual NSA310 - ZYXEL and take your electronic device back in hand. On this page are published all the documents necessary for the use of your device. NSA310 by ZYXEL.
USER MANUAL NSA310 ZYXEL
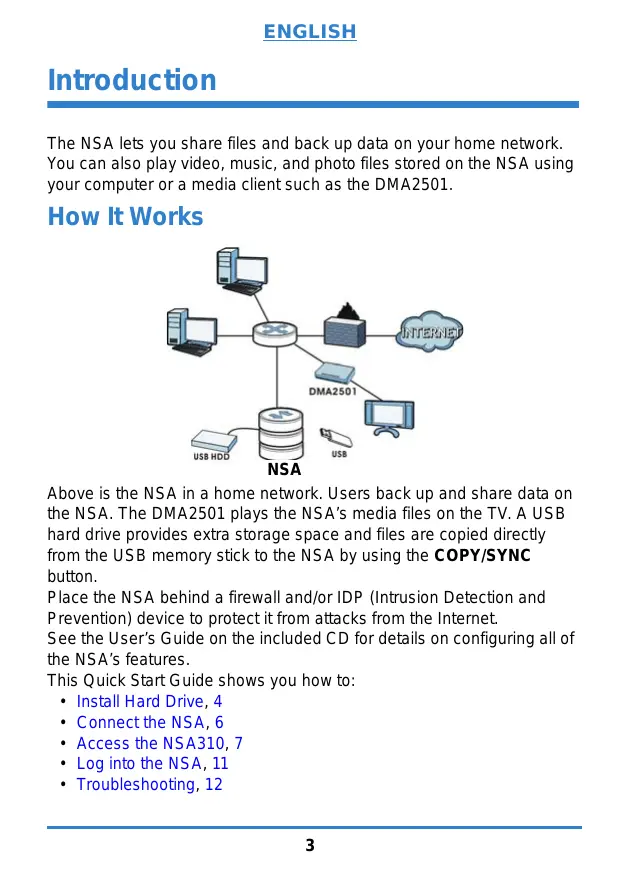
The NSA lets you share files and back up data on your home network. You can also play video, music, and photo files stored on the NSA using your computer or a media client such as the DMA2501.
How It Works
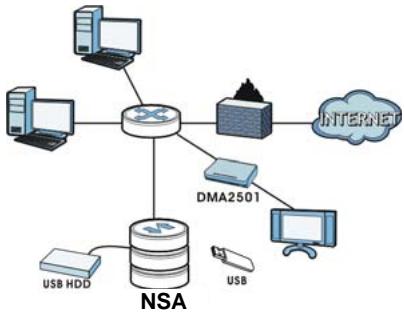
Above is the NSA in a home network. Users back up and share data on the NSA. The DMA2501 plays the NSA's media files on the TV. A USB hard drive provides extra storage space and files are copied directly from the USB memory stick to the NSA by using the COPY/SYNC button.
Place the NSA behind a firewall and/or IDP (Intrusion Detection and Prevention) device to protect it from attacks from the Internet.
See the User's Guide on the included CD for details on configuring all of the NSA's features.
This Quick Start Guide shows you how to:
Install Hard Drive, 4
- Connect the NSA, 6
- Access the NSA310, 7
Log into the NSA, 11
Troubleshooting, 12
Before You Begin
You need the following before you start:
- NSA
- Included CD containing the NAS Starter Utility and User's Guide
Power adapter - Included Ethernet cable
- One SATA II or SATA III compatible hard disk
- eSATA hard disk and cable (optional)
- USB cable (optional: you only need this if you want to expand storage capacity by connecting USB drives). Make sure that the USB device use it's own external power adapter if it has one.
Computer with an Ethernet port
Network device such as a switch, router, or hub (optional)
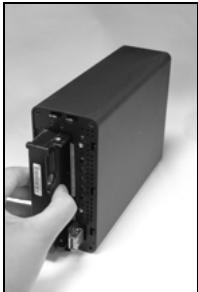
Install Hard Drive
Once you install a hard drive on the NSA and create a volume, all existing data on the disk will be erased.
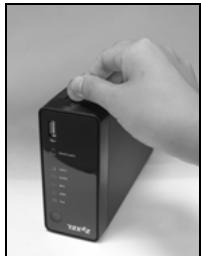
The NSA must be turned off before you remove or install hard drive.
Creating a volume formats the hard drive. All data will be lost. Back up any files on the disk to another location before you install the disk in the NSA.
-
Make sure the power and Ethernet cords are disconnected from the NSA.
-
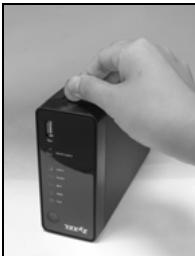
Place the NSA on a flat surface with the bottom panel facing up. This exposes the bottom panel where the thumbscrew is located. Loosen the thumbscrew using a flat head screwdriver or a coin.
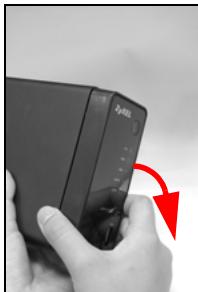
- Bring the NSA to an upright position and take off the front lid to open the hard disk tray as shown in the following:
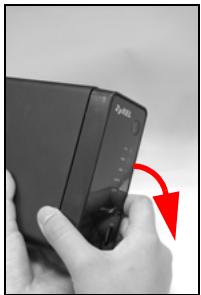
- Slide in the hard disk into the tray until the hard disk is fitted snugly inside the NSA.
- Attach the front panel to cover the hard disk tray. Place the NSA on a flat surface with the bottom panel facing up and tighten the screw.
If you want to use two hard drives and configure them as RAID volumes, you should have: 1) a SATA hard disk installed inside the NSA; and 2) an eSATA hard disk with its cable. It is also recommended to use the same disk size and model for best performance. Refer to the User's Guide for the steps to create volumes on your NSA.
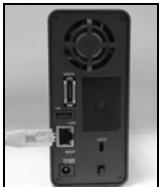
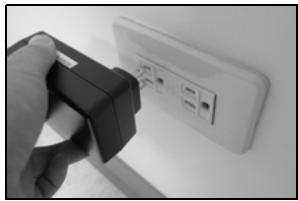
- Use the included Ethernet cable to connect the LAN port on the rear of the NSA to a computer, switch, or router on your network.
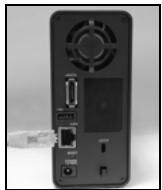
- Connect one end of the power cord to the POWER socket on the rear of the NSA and the other end to the external power supply. Connect the external power supply to a power outlet.
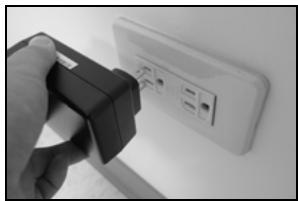
Use ONLY the included power adapter.
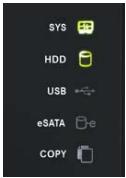
- Press the power button on the front of the NSA to turn it on. Look at the front panel lights.

If no lights turn on, make sure the power cord is not loose and that the power source is turned on.
- The power button light turns steady blue.
- The SYS light turns steady green after a successful startup (it takes about 50 seconds).
- The HDD lights come on if the NSA detects hard drives in the disk bays.
- The rear panel LAN port has a light that turns on if the Ethernet port is properly connected to your network. It blinks while sending or receiving traffic.
To turn off the NSA, press the power button in and hold it until you hear a beep. Then release the button.
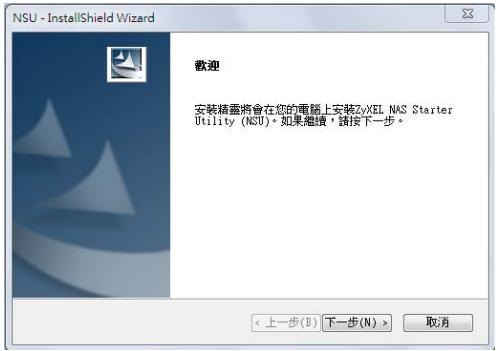
Use the NAS Starter Utility to access the NSA. Follow these steps:
- Insert the included CD into your CD-ROM drive. Click Setup in the screen that displays. Then click the NAS Starter Utility link.

If this screen does not display, use Windows Explorer (My Computer) to go to the CD-ROM. Double-click setup.exe.
- The installation wizard begins. Follow the installer instructions. Click Finish to complete the installation.

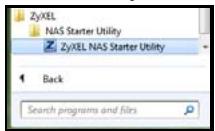
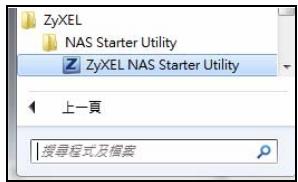
- In Windows, click Start > All Programs > ZyXEL > NAS Starter Utility > ZyXEL NAS Starter Utility to run the NAS Starter Utility.
NSA Initialization
Make sure you have installed the hard drive before following these steps.
1. Click NSA310.
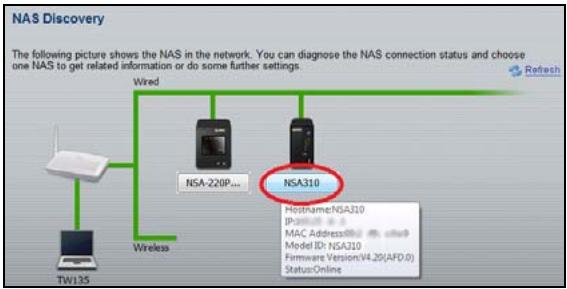
2. Click Run the Initialization Wizard.
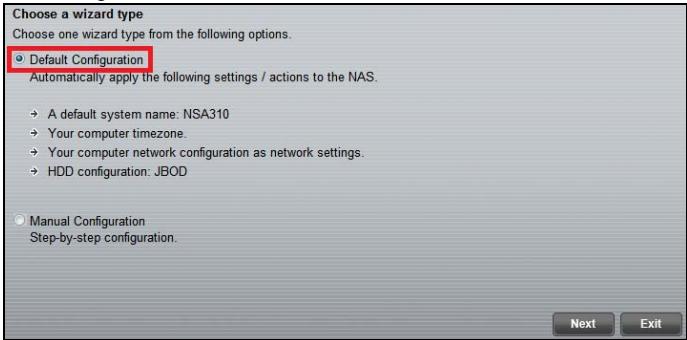
- Enter the default username 'admin' and password '1234' and click Next.
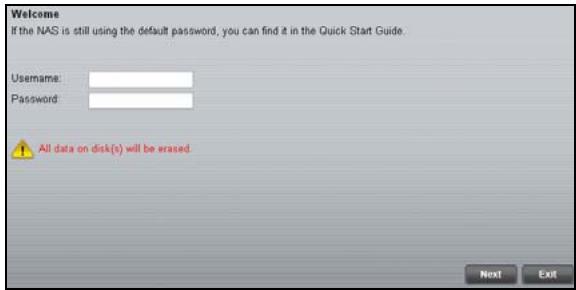

The username and password are case sensitive. You may need to make sure you don't have the caps lock on.
- Choose Default Configuration (recommended) or manual configuration. For the manual option, refer to the help or the User's Guide for more information. Then click Next and follow the screens to configure the NSA.
-
You can now use your NSA and do the following:
-
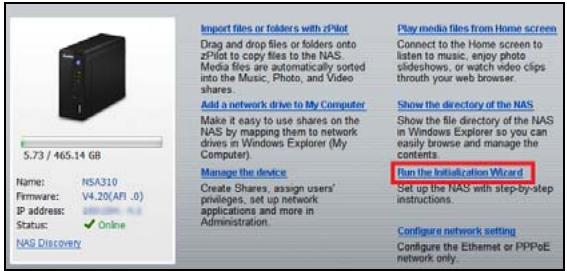
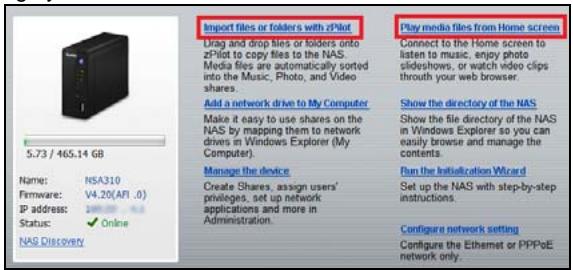
Click Import files or folders with zPilot to launch zPilot. Drag files onto the zPilot icon to move them to the NSA. Media files are automatically sorted into the Music, Photo, and Video folders. Other types of files go to the Public folder. For folders of files you are prompted to choose the target destination.
- Click Play media files from Home screen to enjoy your media files though your web browser.
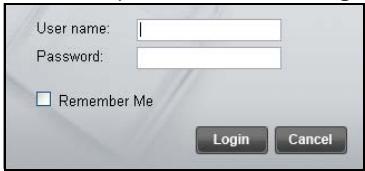
- Enter your username and password and click Login.
This section shows you how to log into the NSA from your web browser.

If you cannot get to the login screen, see the troubleshooting section at the end of this guide.
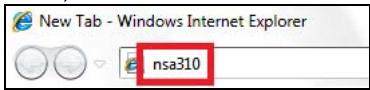
- Open your web browser and type in the server name of the NSA ("nsa310" by default).
- Select your language.

- Enter your username and password and click User Login.
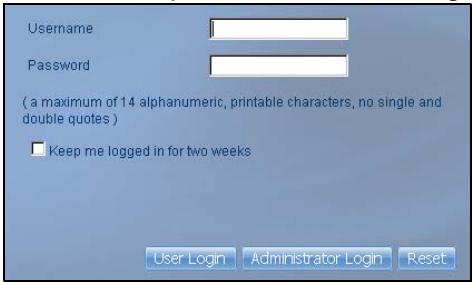
- The Home screen displays. Use the menus to play your media files.
Try the following if you cannot get to the NSA login screen.
Make sure the NSA is turned on.
- Check the NSA's cable connections. Make sure the NSA's LAN LED (located on the LAN port) is on or flashing.
- If you were trying to login directly by typing the server name (default nsa310) into your web browsers address field, make sure you typed it correctly. If it still doesn't work, try using the NAS Starter Utility.
- Make sure your computer's IP address is in the same subnet as the NSA's IP address. You can use the NAS Starter Utility to find the NSA's IP address. See the User's Guide appendix on setting up your computer's IP address for how to change your computer's IP address. Skip this if you know that there are routers between your computer and the NSA (like if you are connecting through the Internet).
- Ping the NSA from your computer. Make sure your computer's Ethernet adapter is installed and functioning properly. In a (Windows) computer, click Start, (All) Programs, Accessories and then Command Prompt. In the Command Prompt window, type "ping" followed by the NSA's IP address and press [ENTER]. Use the NAS Starter Utility to find the NSA's IP address if you don't know it.
- Use Internet Explorer 7, Mozilla Firefox 3.6, or later versions of these with JavaScript enabled.
Einführung
IDP Intrusion Detection and Prevention
NSA
78
NSA 80
NSA 81
NSA 85
- NSA
NSA
SATA II SATA III (
eSATA
USB USB2.0
USB
(NIC) TCP/IP
NSA
NSA
NSA
-
NSA
-
NSA
-
NSA
-
NSA
- NSA
1) eSATA
SATA
RAID NSA 2)
NSA

1.
NSA
LAN
2.
POWER
NSA
3.
NSA


LAN
NSA
(
50
SYS
HDD
SYS

HDD

USB

eSATA

COPY

- CD-ROM Setup ( ) NAS Starter Utility (NAS ) "Setup.exe"
2.
- Windows > ZyXEL > NSU (NAS Starter Utility) NAS
1.
NSA310
NSA310
NAS搜寻
NAS Starter Utility (NAS NSA)
- IP NSA IP
NAS NSA IP IP
User's Guide
IP NSA
(
NSA
(Windows
1 1
" ping NSA
IP (ping 192.168.1.33) Enter
- Explorer 7.0 Mozilla Firefox 3.6
JavaScript
| ENGLISH | DEUTSCH | ESPÁÑOL |
| Viewing a Product's Certifications • Go to www.zyxel.com. • Select your product from the drop-down list box on the ZyXEL home page to go to that product's page. • Select the certification you wish to view from this page. | Vorgehensweise zum Aufrufen einer Produktzertifizierung • Gehen Sie auf www.zyxel.com. • Wahlen Sie Ihr Produkt aus der Auswahlhiste auf der ZyXEL Homepage aus, um die Seite des entsprichenden Produkts aufzurufen. • Wahren Sie die Zertifizierung, die Sie von dieser Seite aus aufruften können. | Procedimiento para ver las certifications de un producto • Vaya a www.zyxel.com. • Selección el producto que deseña en el cuadro de lista desplegable que se encontrar en la頁a principal de ZyXEL para Obtener acces a la頁a deicho producto. • Selección la certificación que deseña ver en esta頁a. |
| FRANÇAIS | ITALIANO | NEDERLANDS |
| Procedure permittant de consulter une(les) Certification(s) du Produit • Connectez vous sur www.zyxel.com. • Sélectionnez votre produit dans la liste déroulante se trouvant sur la page d'accueil ZyXEL pour acceder à la page du produit concerné. • Sélectionnez sur cette page la certification que vous poulez consulter. | Procedura per visualizzare le certificazioni di un prodotto • Andare alla pagagna www.zyxel.com. • Nel sito ZyXEL, selezione il proprio prodotto dall'élenco a discesa per andare alla pagagna di quel prodotto. • Da questa pagina selezione la certificazione che si vuole vedere. | Procedure voor het opvragen en het inizien van product certificering(en) • U gaat met uw browseraar ne de website: www.zyxel.com • U kunt nu de product pagina opvragen door op de ZyXEL thuispagina het product te selecteren uit de lijst • Nu selecteer u de certificering die u wilt inizien |
| SVENSKA | ||
| Procedur für att visa en produits certifikat • Gà till www.zyxel.com • Vãlj din produit.fran rullgårdinsilistrutan på ZyXEL:s hemsida für att gà tillenna produits sida. • Vãlj det certifikat du vill titta på.frànenna sida. | www.zyxel.com • ZyXEL |
Declaration of Conformity
Product information
Product Name 1-bay Media Server
Model Number : NSA310
Produced
Company Name : ZyXEL Communications Corporation
Company Add. : No. 2, Gongye E. 9th Rd., East Dist., Hsinchu City 300, Taiwan
to which this declaration relates, is in conformity with the following standards or other normative documents:
EMC:
EN 55022: 2006+A1: 2007
EN 61000-3-2: 2006
EN 61000-3-3:2008
EN 55024:1998+A1:2001+A2:2003
Safety:
EN 60950-1:2006 + A11:2009 +
A1:2010 + A12:2011
Erp:
COMMISSION REGULATION (EC)
No 1275/2008
COMMISSION REGULATION (EC)
No 278/2009
RoHS 2.0:2011/65/EU
The Product herewith complies with requirements of the following Directive :
The Low Voltage Directive 2006/95/EC, The EMC Directive 2004/108/EC,
The R& TTE Directive 99/5/EEC, The ErP Directive 2009/125/EC,
The RoHS Directive 2011/65/EU and carries the CE -marking accordingly.
The TCF-File is located at:
Local contact for regulatory topics only :
Company Name : ZyXEL Communications Corporation
Company Address : Hsinchu Office : No. 2, Gongye E. 9th Rd., East Dist., Hsinchu City 300,Taiwan
: No. 6, Innovation Road II, Science-Park,Hsin-Chu,300, Taiwan
TAIPEI Office :11F., NO.223, SEC. 3, BEIXIN RD., XINDIAN DIST., NEW
TAIPEI CITY 23143, TAIWAN (R.O.C.)
Person is responsible for marking this declaration:
Thomas Wei
Name (Full Name)
2012-07-12
Senior Director
Quality Management Department
Position/ Title
| ENGLISH | DEUTSCH |
| Green Product DeclarationRoHS Directive 2011/65/EURoHS VERIFIEDWEEE Directive 2002/96/EC(WEEE: Waste Electrical and Electronic Equipment)2003/108/ECDeclaration Signature:Thomas UderName/Title: Thomas Wei / Quality ManagementDepartment/ Senior Director.Date (yyyy/mm/dd): 2012/07/09 | Grünes Produkt ErklärungRoHS Richtlinie 2011/65/EUElektroG Richtlinie 2002/96/EG(WEEE: Uber Elektrö- undElektronik-Alteräge)2003/108/ECUnterschrift des Erklärenden:Thomas UderName/Title: Thomas Wei / Quality ManagementDepartment/ Senior Director.Date (yyyy/mm/dd): 2012/07/09 |
| ESPÁÑOL | FRANÇAIS |
| Déclaración de Producto EcológicoDirectiva RoHS 2011/65/UERoHSVERIFIEDDirectiva RAEE 2002/96/CE(RAEE : Residuos de Aparatos Eléctricos y Eléctrúnicos)2003/108/CEFirma de declaración:Nombre/Titulo: Thomas Wei / Quality ManagementDepartment/ Senior Director.Fecha (aaaa/mm/dd): 2012/07/09 | Déclaration de Produkt VertDirective RoHS 2011/65/UEElektro DEEE 2002/96/CE(DEEE : déchets d'équipements électriques et électroniques)2003/108/CESignature de la déclaration:Nom/Titre: Thomas Wei / Quality ManagementDepartment/ Senior Director.Date (aaaa/mm/jj) : 2012/07/09 |
| ITALIANO | NEDERLANDS |
| Produotto dichiarazione di verde Direttiva RoHS 2011/65/UE RoHS VERIFIED | Productmilieuverklaring RoHS Richtlijn 2011/65/EU RoHS VERIFIED |
| Direttiva RAAEE 2002/96/CE (RAEE: Rifiuti di Apparecchiature Elettriche ed Elettroniche) 2003/108/CE Thomas Wer | AEEA-Richtlijn 2002/96/EG (AEEA: Alfedankte Elektrische en Elektronische apparatuur) 2003/108/EG Thomas Wer |
| Firma dichiarazione: Nome/titolo: Thomas Wei / Quality Management Department/ Senior Director. Data (aaaa/mm/gg): 2012/07/09 | Verklaringshandlekening: Naam/titel: Thomas Wei / Quality Management Department/ Senior Director. Datum(yyyy/mm/dd): 2012/07/09 |
| SVENSKA | |
| Miljödeklaration RoHS Direktiv 2011/65/EU RoHS VERIFIED | |
| WEEE Direktiv 2002/96/EG (WEEE: om avfall som utgörns av aller innehäller elektriska eller elektroniska produkter) 2003/108/EG Thomas Wer | |
| Deklaration underteknad av: Namm/Titel: Thomas Wei / Quality Management Department/ Senior Director. Datum (aaaa/mm/dd): 2012/07/09 |
Brand : ZYXEL
Model : NSA310
Category : Network Attached Storage (NAS)