
4131 - Reciprocating saw MAKITA - Free user manual and instructions
Find the device manual for free 4131 MAKITA in PDF.

| Product type | Circular saw |
| Brand | MAKITA |
| Model | 4131 |
| Blade diameter | 185 mm |
| Max. cutting capacity | 63 mm |
| No-load speed | 3,500 min⁻¹ |
| Overall length | 358 mm |
| Net weight | 4.8 kg |
| Power supply | Single-phase mains, voltage according to nameplate |
| Double insulation | Yes |
| Safety class | Class II |
| Cut materials | Mild steel |
| Main functions | Straight cut, bevel cut, adjustable depth |
| Safety | Safety button, lower guard, arbor lock |
| Maintenance | Regular blade inspection, brush replacement |
| Spare parts | Use only MAKITA parts |
| Repairability | MAKITA authorized service center |
| Included accessories | Rip fence (parallel guide), hex wrench |
| Sound pressure level | 98 dB(A) |
| Sound power level | 111 dB(A) |
| Vibrations | ≤ 2.5 m/s² |
Frequently Asked Questions - 4131 MAKITA
User questions about 4131 MAKITA
0 question about this device. Answer the ones you know or ask your own.
Ask a new question about this device
Download the instructions for your Reciprocating saw in PDF format for free! Find your manual 4131 - MAKITA and take your electronic device back in hand. On this page are published all the documents necessary for the use of your device. 4131 by MAKITA.
USER MANUAL 4131 MAKITA
The followings show the symbols used for the tool. Be sure that you understand their meaning before use.
Symboles
Explanation of general view
| 1 | Lever | 9 | Shaft lock | 17 | Screw |
| 2 | Depth guide | 10 | Hex socket head bolt | 18 | Workpiece |
| 3 | Cutting line | 11 | Outer flange | 19 | Sight window |
| 4 | Switch trigger | 12 | Carbide-tipped saw blade | 20 | Retracting lever |
| 5 | Lock-off button | 13 | Inner flange | 21 | Limit mark |
| 6 | Dust cover | 14 | Slot | 22 | Screwdriver |
| 7 | Knob | 15 | Rib | 23 | Brush holder cap |
| 8 | Hex wrench | 16 | Rip fence (Guide rule) |
SPECIFICATION
| Model | 4131 |
| Balde diameter | 185 mm |
| Max. cutting capacity | 63 mm |
| No load speed (min-1) | 3,500 |
| Overall length | 358 mm |
| Net weight | 4.8 kg |
| Safety class | ☐/II |
- Due to our continuing program of research and development, the specifications herein are subject to change without notice.
- Note: Specifications may differ from country to country.
Intended use
The tool is intended for cutting in mild steel.
Power supply
The tool should be connected only to a power supply of the same voltage as indicated on the nameplate, and can only be operated on single-phase AC supply. They are double-insulated in accordance with European Standard and can, therefore, also be used from sockets without earth wire.
Safety hints
For your own safety, please refer to the enclosed safety instructions.
ADDITIONAL SAFETY RULES FOR TOOL
ENB082-3
DANGER:
- Keep hands away from cutting area and the blade. Keep your second hand on auxiliary handle, or motor housing. If both hands are holding the tool, they cannot be cut by blade.
- Do not reach underneath the workpiece. The guard cannot protect you from the blade below the workpiece.
-
Adjust the cutting depth to the thickness of the workpiece. Less than a full tooth of the blade teeth should be visible below the workpiece.
-
Never hold piece being cut in your hands or across your leg. Secure the workpiece to a stable platform. It is important to support the work properly to minimize body exposure, blade binding, or loss of control.
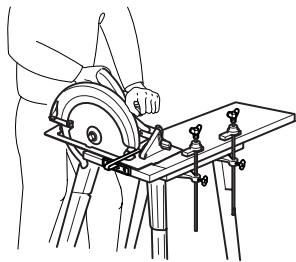
A typical illustration of proper hand support, workpiece support, and supply cord routing (if applicable).
- Hold power tool by insulated gripping surfaces when performing an operation where the cutting tool may contact hidden wiring or its own cord. Contact with a "live" wire will also make exposed metal parts of the power tool "live" and shock the operator.
- When ripping always use a rip fence or straight edge guide. This improves the accuracy of cut and reduces the chance of blade binding.
- Always use blades with correct size and shape (diamond versus round) of arbour holes. Blades that do not match the mounting hardware of the tool will run eccentrically, causing loss of control.
- Never use damaged or incorrect blade washers or bolt. The blade washers and bolt were specially designed for your tool, for optimum performance and safety of operation.
-
Causes and operator prevention of kickback;
-
Kickback is a sudden reaction to a pinched, bound or misaligned saw blade, causing an uncontrolled tool to lift up and out of the workpiece toward the operator.
- When the blade is pinched or bound tightly by the kerf closing down, the blade stalls and the motor reaction drives the unit rapidly back toward the operator.
- If the blade becomes twisted or misaligned in the cut, the teeth at the back edge of the blade can dig into the top surface of the workpiece causing the blade to climb out of the kerf and jump back toward the operator.
Kickback is the result of tool misuse and/or incorrect operating procedures or conditions and can be avoided by taking proper precautions as given below.
a. Maintain a firm grip with both hands on the tool and position your arms to resist kickback forces. Position your body to either side of the blade, but not in line with the blade. Kickback could cause the tool to jump backwards, but kickback forces can be controlled by the operator, if proper precautions are taken.
b. When blade is binding, or when interrupting a cut for any reason, release the trigger and hold the tool motionless in the material until the blade comes to a complete stop. Never attempt to remove the tool from the work or pull the tool backward while the blade is in motion or kickback may occur. Investigate and take corrective actions to eliminate the cause of blade binding.
c. When restarting a tool in the workpiece, centre the saw blade in the kerf and check that saw teeth are not engaged into the material. If saw blade is binding, it may walk up or kickback from the workpiece as the tool is restarted.
d. Support large panels to minimise the risk of blade pinching and kickback. Large panels tend to sag under their own weight. Supports must be placed under the panel on both sides, near the line of cut and near the edge of the panel.
To avoid kickback, do support board or panel near the cut.
Do not support board or panel away from the cut.
e. Do not use dull or damaged blades. Unsharpened or improperly set blades produce narrow kerf causing excessive friction, blade binding and kickback.
f. Blade depth and bevel adjusting locking levers must be tight and secure before making cut. If blade adjustment shifts while cutting, it may cause binding and kickback.
- Check lower guard for proper closing before each use. Do not operate the tool if lower guard does not move freely and close instantly. Never clamp or tie the lower guard into the open position. If tool is accidentally dropped, lower guard may be bent. Raise the lower guard with the retracting lever and make sure it moves freely and does not touch the blade or any other part, in all angles and depths of cut.
- Check the operation of the lower guard spring. If the guard and the spring are not operating properly, they must be serviced before use. Lower guard may operate sluggishly due to damaged parts, gummy deposits, or a build-up of debris.
- Always observe that the lower guard is covering the blade before placing tool down on bench or floor. An unprotected, coasting blade will cause the tool to walk backwards, cutting whatever is in its path. Be aware of the time it takes for the blade to stop after switch is released.
- Do not stop the blades by lateral pressure on the saw blade.
- DANGER: Don't attempt to remove cut material when blade is moving.
CAUTION: Blades coast after turn off.
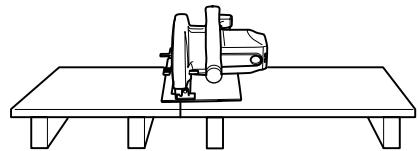
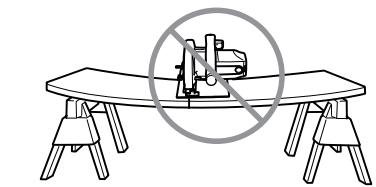
- Place the wider portion of the saw base on that part of the workpiece which is solidly supported, not on the section that will fall off when the cut is made.
As example, Fig. A illustrates the RIGHT way to cut off the end of a board, and Fig. B the WRONG way. If the workpiece is short or small, clamp it down. DON'T TRY TO HOLD SHORT PIECES BY HAND! (Fig. B)
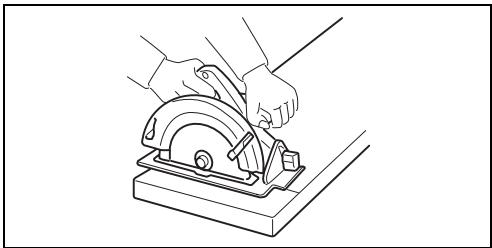
Fig. A
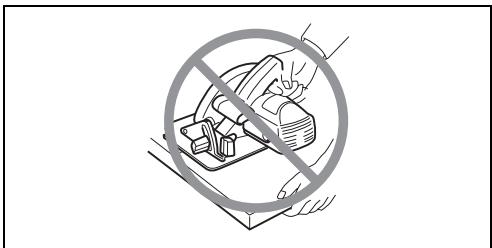
Fig.B
- Never attempt to saw with the tool held upside down in a vise. This is extremely dangerous and can lead to serious accidents.
- Wear safety goggles and hearing protection during operation.
SAVE THESE INSTRUCTION.
FUNCTIONAL DESCRIPTION
CAUTION:
Always be sure that the tool is switched off and unplugged before adjusting or checking function on the tool.
Adjusting the depth of cut (Fig. 1)
Loosen the lever on the depth guide and move the base up or down. At the desired depth of cut, secure the base by tightening the lever.
CAUTION:
- After adjusting the depth of cut, always tighten the lever securely.
Sightng (Fig. 2)
When cutting, align the A position on the front of the base with your cutting line on the workpiece.
Switch action (Fig. 3)
CAUTION:
- Before plugging in the tool, always check to see that the switch trigger actuates properly and returns to the "OFF" position when released.
To prevent the switch trigger from being accidentally pulled, a lock-off button is provided.
To start the tool, push in the lock-off button and pull the switch trigger. Release the switch trigger to stop.
ASSEMBLY
CAUTION:
Always be sure that the tool is switched off and unplugged before carrying out any work on the tool.
Installing or removing saw blade
CAUTION:
- Use only the Makita wrench provided to install or remove the blade. Failure to do so may result in overtightening or insufficient tightening of the hex bolt. This could cause serious injury to the operator.
- Do not touch the blade with your bare hand immediately after cutting, it may be extremely hot and could burn your skin. Put on pair of gloves when removing a hot blade.
To remove the blade, first push and turn the knob which secures the dust cover clockwise to the symbol and remove the dust cover. Press the shaft lock so that the blade cannot revolve and use the hex wrench to loosen the hex bolt counterclockwise. Then remove the outer flange and blade. (Fig. 4 & 5)
To install the blade, follow the removal procedure in reverse. Always install the blade so that the arrow on the blade points in the same direction as the arrow on the blade case.
BE SURE TO TIGHTEN THE HEX BOLT SECURELY. (Fig. 6)
After installing the blade, replace the dust cover. Slide the dust cover carefully so that the slot of its front fits the rib of the blade case. Make sure the dust cover fits properly then push and turn the knob counterclockwise to the symbol. (Fig. 7)
Rip fence (guide rule) (Accessory) (Fig. 8)
The handy rip fence (guide rule) allows you to do extra-accurate straight cuts. Simply slide the rip fence up snugly against the side of the workpiece and secure it in position with the clamp screw on the front of the base. It also makes repeated cuts of uniform width possible.
OPERATION
CAUTION:
- Never twist or force the tool in the cut. This may cause motor overload and/or a dangerous kickback, resulting in serious injury to the operator.
Hold the tool firmly with both hand. Set the base plate on the workpiece to be cut without the blade making any contact. Then turn the tool on and wait until the blade attains full speed. Move the tool forward over the workpiece surface, keeping it flat and advancing smoothly until the cutting is completed. Keep your cutting line straight and your speed of advance uniform. (Fig. 9)
The sight window in the base makes it easy to check the distance between the front edge of the saw blade and the workpiece whenever the blade is set to the maximum depth of cut. (Fig. 10)
NOTE:
- When making a miter cuts etc., sometimes the lower guard does not move easily. At that time, use the retracting lever to raise the lower guard for starting cut and as soon as blade enters the material, release the retracting lever. (Fig. 11)
CAUTION:
- Do not use a deformed or cracked blade. Replace it with a new one.
- Do not stack materials when cutting them.
- Do not cut hardened steel, stainless steel, aluminum, wood, plastics, concrete, tile, etc. Cut only mild steel.
- Do not touch the saw blade, workpiece or cutting chips with your bare hand immediately after cutting, they may be extremely hot and could burn your skin.
Always use the carbide-tipped saw blades appropriate for your job. The use of inappropriate saw blades may cause a poor cutting performance and/or present a risk of personal injury.
Chip disposal
CAUTION:
Always be sure that the tool is switched off and unplugged before removing or installing the dust cover.
- The dust cover may become hot due to hot chips. Do not touch the cutting chips or dust cover with your bare hand.
When the cutting chips are visible through the sight window, dispose of them. (Fig. 12)
Push and turn the knob clockwise to the symbol and remove the dust cover. Dispose of the cutting chips accumulated inside the dust cover. (Fig. 13)
CAUTION:
- Do not turn the tool upside down. The cutting chips accumulated inside the dust cover may fall out of the dust cover.
- Handle the dust cover carefully so that it will not be deformed or damaged.
MAINTENANCE
CAUTION:
Always be sure that the tool is switched off and unplugged before attempting to perform inspection or maintenance.
Inspecting saw blade
- Check the blade carefully for cracks or damage before and after each use. Replace a cracked or damaged blade immediately.
Continuing to use a dull blade may cause a dangerous kickback and/or motor overload. Replace with a new blade as soon as it no longer cuts effectively. - Carbide-tipped saw blades for metal cutter cannot be re-sharpened.
Replacing carbon brushes (Fig. 14 & 15)
Remove and check the carbon brushes regularly. Replace when they wear down to the limit mark. Keep the carbon brushes clean and free to slip in the holders. Both carbon brushes should be replaced at the same time. Use only identical carbon brushes.
Use a screwdriver to remove the brush holder caps. Take out the worn carbon brushes, insert the new ones and secure the brush holder caps.
To maintain product SAFETY and RELIABILITY, repairs, any other maintenance or adjustment should be performed by Makita Authorized Service Centers, always using Makita replacement parts.
ACCESSORIES
CAUTION:
- These accessories or attachments are recommended for use with your Makita tool specified in this manual. The use of any other accessories or attachments might present a risk of injury to persons. Only use accessory or attachment for its stated purpose.
If you need any assistance for more details regarding these accessories, ask your local Makita service center.
Rip fence (Guide rule)
- Safety goggle
- Recommended Carbide-tipped saw blades & workpiece ranges
| Diameter & number of teeth | Application | Applicable workpiece & thickness range | |||||
| Angle | Metal pipes | Channels | Sheet metal | Metal studs | Corrugated steel sheets | ||
| 185/38 | Mild steel | 4 mm or more | 2 – 5 mm | 4 mm or more | 2 – 7 mm | N/A | N/A |
| 185/48 | Thin mild steel | 3 – 6 mm | 1.2 – 5 mm | 2 mm or more | 2 – 7 mm | 2 – 4 mm | N/A |
| 185/70 | Corrugated steel sheets | N/A | 1.2 – 2 mm | N/A | Thinner than 4 mm | Thinner than 2 mm | Thinner than 2 mm |
(N/A...Not applicable)
CAUTION:
- Always use carbide-tipped saw blades appropriate for your job. Do not cut aluminum, wood, plastics, concrete, tiles, etc.
- Carbide-tipped saw blades for metal cutting saw are not to be resharpened.
Descriptif
(N/A...Non applicable)
ATTENZIONE:
(N/A...No applicable)
PRECAUCION:
EC-DECLARATION OF CONFORMITY
We declare under our sole responsibility that this product is in compliance with the following standards or standardized documents,
HD400, EN50144, EN55014, EN61000
in accordance with Council Directives, 73/23/EEC, 89/336/EEC and 98/37/EC.
FRANÇAISE
DECLARATION DE CONFORMITE CE
HD400, EN50144, EN55014, EN61000.
ITALIANO
de accordo com as directivas 73/23/CEE, 89/336/CEE e 98/37/CE do Conselho.
DANSK
EU-DEKLARATION OM KONFORMITET
Michigan Drive, Tongwell, Milton Keynes,
Bucks MK15 8JD, ENGLAND
ENGLISH
Noise and Vibration
The typical A-weighted noise levels are
sound pressure level: 98 dB (A)
sound power level: 111 dB (A)
- Wear ear protection. -
The typical weighted root mean square acceleration value is not more than 2.5m / s^2
FRANÇAISE
Bruit et vibrations
- Symboles
- Explanation of general view
- SPECIFICATION
- Intended use
- Power supply
- Safety hints
- ADDITIONAL SAFETY RULES FOR TOOL
- DANGER:
- SAVE THESE INSTRUCTION.
- FUNCTIONAL DESCRIPTION
- CAUTION:
- Adjusting the depth of cut (Fig. 1)
- Sightng (Fig. 2)
- Switch action (Fig. 3)
- ASSEMBLY
- Installing or removing saw blade
- Rip fence (guide rule) (Accessory) (Fig. 8)
- OPERATION
- NOTE:
- Chip disposal
- MAINTENANCE
- Inspecting saw blade
- Replacing carbon brushes (Fig. 14 & 15)
- ACCESSORIES
- Descriptif
- ATTENZIONE:
- PRECAUCION:
- EC-DECLARATION OF CONFORMITY
- FRANÇAISE
- DECLARATION DE CONFORMITE CE
- ITALIANO
- DANSK
- EU-DEKLARATION OM KONFORMITET
- ENGLISH
- Noise and Vibration
- Bruit et vibrations
Brand : MAKITA
Model : 4131
Category : Reciprocating saw