
FMA 654 I F KL BK - Cooker FRANKE - Free user manual and instructions
Find the device manual for free FMA 654 I F KL BK FRANKE in PDF.


| Product type | Built-in cooker |
| Brand | Franke |
| Model | FMA 654 I F KL BK |
| Colour | Black |
| Dimensions (H x W x D) | 59.5 x 59.5 x 54.8 cm |
| Net weight | Approximately 38 kg |
| Power supply | 230 V / 50 Hz / 16 A |
| Cooking type | Multifunction electric oven + induction hob (depending on variant) |
| Oven functions | Fan-assisted, natural convection, grill, defrost, pulsated heat |
| Oven capacity | Approximately 65 litres |
| Cleaning | Pyrolytic (self-cleaning) |
| Safety | Child lock, automatic shut-off, cool glass safety |
| Repairability index | 7.8/10 |
| Spare parts available | Heating elements, inner glass, door seal, controls |
| Warranty | 2 years (parts and labour) |
| Certifications | CE, NF |
| Energy consumption | Class A+ |
Frequently Asked Questions - FMA 654 I F KL BK FRANKE
User questions about FMA 654 I F KL BK FRANKE
0 question about this device. Answer the ones you know or ask your own.
Ask a new question about this device
Download the instructions for your Cooker in PDF format for free! Find your manual FMA 654 I F KL BK - FRANKE and take your electronic device back in hand. On this page are published all the documents necessary for the use of your device. FMA 654 I F KL BK by FRANKE.
USER MANUAL FMA 654 I F KL BK FRANKE
1. SAFETY INFORMATION
For your own safety and correct operation of the appliance, please read this manual carefully before installation and operation. Always keep these instructions together with the appliance, even if it is sold or transferred to third parties. It is important that users are familiar with all the appliance's operating and safety characteristics. These hobs have induction systems that comply with the requirements of EMC standards and with the EMF directive, and they should not interfere with other electronic devices. Pacemaker wearers and those using other electronic implants must consult their doctor or the manufacturer of the implanted device to assess whether or not it is sufficiently resistant to interference.
Electrical connections must be performed by a trained technician. Before making the electrical connection, please read the section on ELECTRICAL CONNECTION.
For appliances with a power supply cable, the terminals or section of wire between the cable anchor point and the terminals must be laid out so that they allow the live wire to be extracted before the earth wire if it comes loose.
- The manufacturer cannot be held responsible for any damage resulting from incorrect or inadequate installation.
- Check that the mains power supply corresponds to the one indicated on the rating plate affixed to the inside of the product.
- The cut-out devices must be installed in the fixed system according to the wiring system regulations.
- For Class I appliances, check that the domestic power supply has a suitable earthing connection.
- If the power cable is damaged, it must be replaced by the manufacturer, an authorised service centre or a qualified technician, to avoid any risk of danger.
WARNING: Remove the protective films before installing the appliance.
- Only use the screws and other hardware elements supplied with the appliance.
WARNING: Failure to install the screws or fixing devices as described in these instructions may lead to a risk of electric shocks.
- Cleaning and maintenance must not be carried out by children, unless they are supervised by an adult.
Children must be supervised to ensure that they do not play with the appliance.
This appliance must not be used by persons (including children) with reduced physical, sensory, or mental capabilities, or by inexperienced or untrained persons, unless they are closely supervised and instructed on the safe use of the appliance by a person responsible for their safety.
This appliance may be used by children aged 8 years and above and by persons with reduced physical, sensory, or mental capabilities or with a lack of experience and knowledge, provided they are closely supervised and have been given instruction on the safe use of the appliance and understand the hazards involved. Children must not play with the appliance.

WARNING: The appliance and its accessible parts become extremely hot during use.
Be very careful not to touch the surface of the cooking areas.
Keep children under 8 years of age away from the appliance unless they are under constant supervision.
WARNING: If the surface shows any signs of cracking, turn off the appliance to prevent the risk of electric shock.
Do not touch the appliance if your hands or body are wet.
Do not use steam cleaners to clean the product.
Do not place metal objects such as knives, forks, spoons, and pan lids on the hob surface, as they may overheat. Use the appropriate control to switch off the hob after use; do not rely on the pan detection indicators.
WARNING: Unattended cooking on a hob with oil or fat can be dangerous and may cause a fire. NEVER attempt to extinguish a fire with water. Turn off the appliance and smother the flames with a pan lid or a fire blanket, for example.
WARNING: The cooking process must be supervised. A short cooking process must be monitored continuously.
The appliance is not intended to be operated by means of an external timer or a separate remote-control system.
WARNING: Fire hazard: do not place objects on the cooking surfaces.
The appliance must be installed so that it can be disconnected from the electrical supply with a contact separation of at least 3 mm, ensuring complete disconnection under overvoltage category III conditions.
- The appliance must never be exposed to the elements (rain, sun).
- Keep the packaging away from children and animals.
- Make sure the device is connected directly to the power outlet.
- Do not use adapters, multiple sockets or extension cables to connect the device.
- Never use the appliance for purposes other than those for which it has been designed.
- Fryers must be monitored at all times during cooking; overheated oil could catch fire.
- Do not operate the appliance using an external timer or separate remote-controlled system.
- Do not use the hob as a work or support surface.
- Do not bring fabrics or other flammable materials near the appliance until all the components have completely cooled down to avoid the risk of fire.
- Do not rest metal objects such as knives, forks, spoons and pan lids on the surface of the hob, as they might overheat.
- The appliance must never be installed behind a decorative door, to prevent it from overheating.
- Do not stand on the appliance, as this may damage it.
- Do not rest hot pots and pans on the edge, as this may damage the silicone seals.
Declaration of Conformity
The manufacturer declares that this appliance with radio functionality complies with Directive 2014/53/EU.
The complete text of the EU declaration of conformity is available at the following link by searching for the product code:
https://www.franke.com/
This code can be found on the label located inside the product.
| Fre-quency bands | Maximum transmit-ted power |
| 2.4 GHz | 2 mW max. |
2. INSTALLATION
The installation process must comply with the laws, ordinances, directives and standards (electrical safety rules and regulations, proper recycling in accordance with the regulations, etc.) in force in the country of use!
- For further information on the installation, please refer to the Assembly Instructions.
- Do not use silicon sealant between the appliance and the worktop.
- Make sure that there is a sufficient gap underneath the hob for air circulation. Please refer to the assembly instructions.
- The underside of the appliance can get hot. If the appliance is installed over drawers, install a non-combustible separation panel under the appliance to prevent access to the underside. Please refer to the assembly instructions.
- Ventilation of the appliance must comply with the manufacturer's instructions.
- Create a front opening of at least 28 cm² in the kitchen unit which houses the hob to allow correct air circulation.
Requirements for kitchen units
- If the appliance is installed on flammable materials, the guidelines and regulations relating to low voltage installations and fire prevention must be strictly observed.
- For built-in units, the components (in plastic and veneered wood) must be applied with heat-resistant adhesives (85°C min.): the use of unsuitable materials and adhesives may cause the components to deform or detach.
- The use of decorative hardwood borders around the worktop behind the appliance is permitted, provided the minimum distance always complies with the indications indicated in the installation drawings.
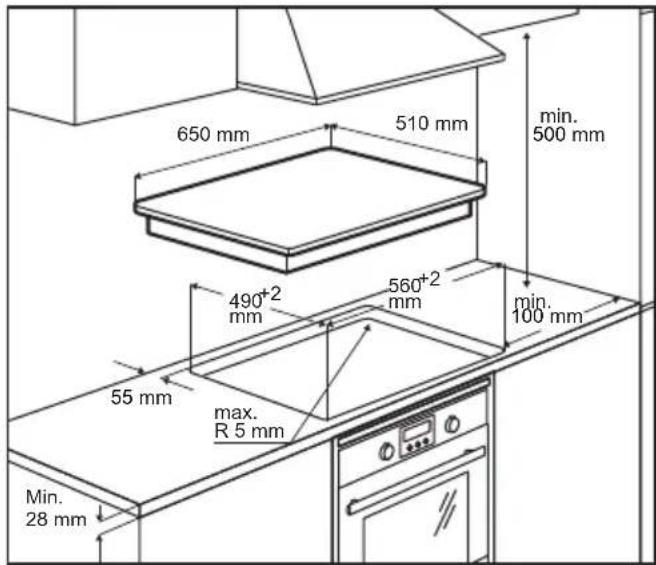
- For further information on the installation, please refer to the Assembly Instructions.
- If there is no oven beneath the hob, install a separation panel under the appliance according to the Assembly Instructions.
3. ELECTRICAL CONNECTIONS
WARNING: All electrical connections must be carried out by an authorised installer. - Before making the connections, check that the rated voltage of the appliance indicated on the relevant rating plate corresponds to the power supply voltage. The rating plate is affixed to the underside of the hob.
- Follow the connection diagram (located on the underside of the hob).
- Only use original components supplied by the spare parts service. • The appliance is supplied with a power cable.
- If damaged, replace the power supply cables with original spare cables. Contact the After Sales Service.

Warning! Do not weld any of the cables!
Electrical connection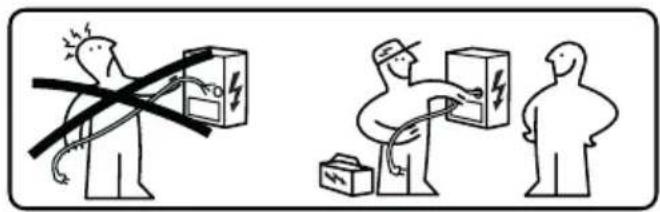
- The electrical connection must be performed by a specialised technician.
- This device has a Y-shaped connection with an H05V2V2-F cable. Min. wire section: 5x2.5 mm².
- The connection terminals can be accessed by removing the junction box cover. • Make sure the specifications of the household electrical system (voltage, maximum power and current) are compatible with those of the appliance.
- Connect the appliance as shown in the diagram (in accordance with the mains voltage and country standard reference).
Connection diagram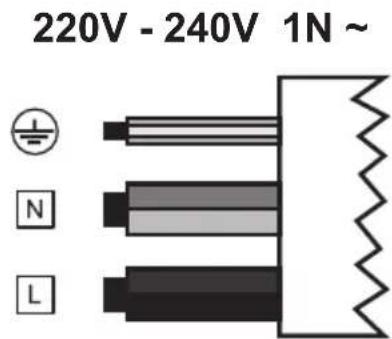
| L Black | |
| L Brown | |
| N | Blue |
| N Grey | |
| Yellow / Green |

| L1 Brown | |
| L2 Black | |
| N Blue | |
| N Grey | |
| Yellow / Green | |
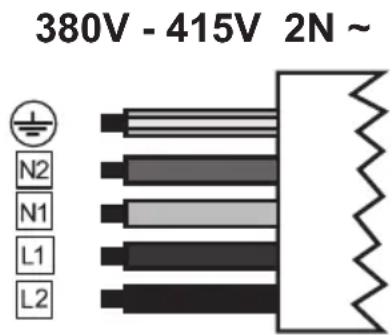
| L1 Brown | |
| L2 Black | |
| N1 Blue | |
| N2 Grey | |
| Yellow / Green | |
4. CLEANING AND MAINTENANCE
- Never use abrasive sponges, wire wool, hydrochloric acid or other products that might scratch or mark the surface.
- Do not consume any food that falls accidentally or builds up on the surface and the functional or aesthetic elements of the hob.
- Switch off or unplug the appliance from the mains supply before carrying out any maintenance work.
- Clean the appliance after every use to prevent any residual food from burning on to it. It is much harder work to remove encrusted and burned-on dirt.
ing on to it. It is much harder work to remove encrusted and burned-on dirt.
- Remove all traces of encrusted dirt, e.g. milk that has boiled over, using a scraper suitable for ceramic glass, while the hob is still hot. Follow the manufacturer's recommendations regarding the type of scraper to be used.
- Remove food containing sugar, e.g. jam that has spilled during cooking, using a scraper suitable for ceramic glass, while the hob is still hot. If this residue is not removed, it may damage the ceramic glass surface.
- Remove any melted plastic using a scraper suitable for ceramic glass while the hob is still hot. If this residue is not removed, it may damage the ceramic glass surface.
- Remove any melted plastic using a scraper suitable for ceramic glass while the hob is still hot. If this residue is not removed, it may damage the ceramic glass surface.
- Remove limescale using a small amount of descaler, e.g., vinegar or lemon juice, once the hob has cooled down. Then, clean again with a damp cloth.
- Do not cut or prepare foodstuffs on the surface and do not drop hard objects onto it. Do not drag pans or plates over the surface.
- Maintenance and repairs
Maintenance and repairs
- Make sure that any maintenance on the electrical components is only carried out by the manufacturer or by the service technicians.
- Make sure that damaged cables are only replaced by the manufacturer or by the service technicians.
If there is a fault, try to resolve it by following the troubleshooting guidelines. If the problem cannot be resolved, contact the After Sales Service.
When contacting the After Sales Service, please provide the following information:
- type of fault
- appliance model (Art./Code)
- serial number (S.N.)
This information can be found on the rating plate. The rating plate is affixed to the underside of the appliance.
In the event of incorrect use of the appliance or if the installation has not been performed by an authorised installer, the intervention by the After Sales Service technician or dealer may not be free of charge, even during the warranty period.
5. PRODUCT DESCRIPTION
Cooking surface layout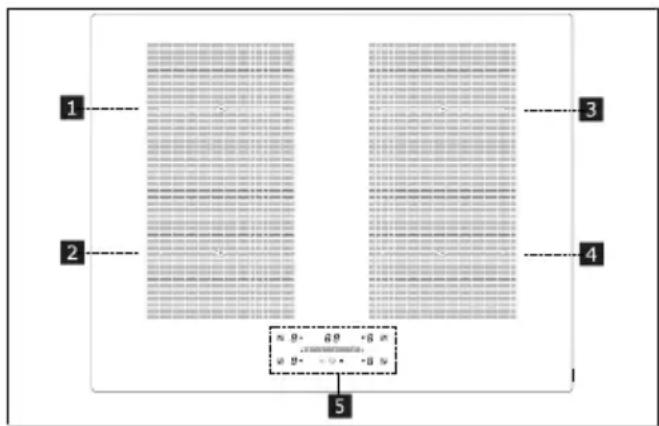
| 1 | Single cooking zone (197x220 mm) 2100 W, with 3000 W Booster function |
| 2 | Single cooking zone (197x220 mm) 2100 W, with 3000 W Booster function |
| 3 | Single cooking zone (197x220 mm) 2100 W, with 3000 W Booster function |
| 4 | Single cooking zone (197x220 mm) 2100 W, with 3000 W Booster function |
| 5 | Control panel |
| 1 + 2 | Bridge cooking area (395 x 220 mm) 3000 W, with 3700 W Booster function. |
| 3 + 4 | Bridge cooking area (395 x 220 mm) 3000 W, with 3700 W Booster function. |
INDICATORS
Pan detection
Each cooking zone is equipped with a system that detects the presence of a pan on the hob.
The detection system is able to recognise pans with a magnetisable bottom of a type suitable for use on induction hobs. If the pan is removed during operation or an unsuitable pan is used, the symbol appears on the display.
Residual heat indicator
The residual heat indicator is a safety feature, indicating that the surface of the cooking area is still at a temperature of 50°C or above, which may cause burns if touched with bare hands. The digit for the corresponding cooking area indicates H.
- CONTROL PANEL
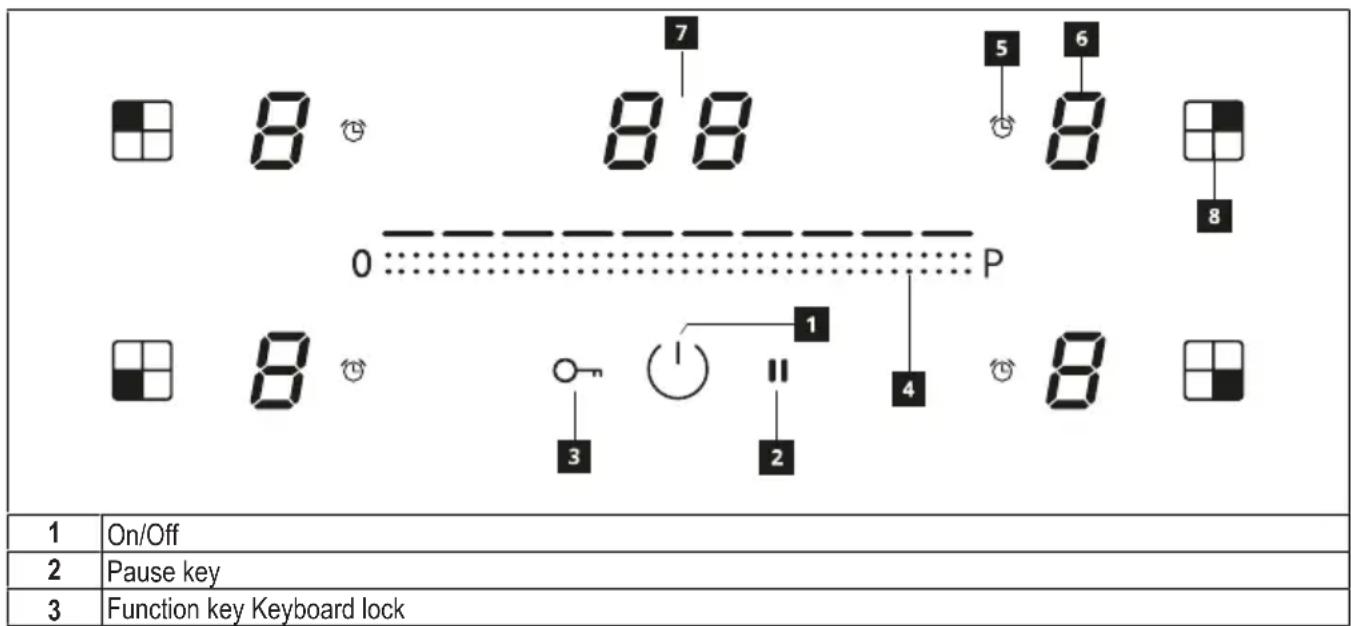
| 4 | Scroll keypad |
| 5 | Timer symbol |
| 6 | Power level indicator |
| 7 | Timer control and cooking time indicator |
| 8 | Cooking area indicator |
The cooking zones can be activated by pressing the reference digit. The digit becomes brighter to confirm the operation.
When a pan is placed on one of the 4 cooking areas, the hob automatically detects its presence and lights up the corresponding digit to activate it.
If there are no pans or other objects on the hob, the digits are not visible.
The functions which can be selected are always visible on the control panel, but with a dimmed light. Select the functions by touching the corresponding symbol.
7. POWER LIMITATION
When connecting to the household power supply for the first time, the installer must set the power of the cooking zones based on the actual capacity of the household power supply.
If this is not necessary, the hob can be turned on directly using ⏻, otherwise, follow the operations below to access the menu.
Before carrying out the procedure, it is advisable to read the entire paragraph. Connect the hob to the domestic mains power.
- Press .
- Press again.
- Holding I, start pressing the cooking zone digit, proceeding anti-clockwise starting from the one in front on the right.
![graph TD A["3"] --> B["8"] B --> C["8"] C --> D["2"] D --> E["8"] E --> F["8"] F --> G["1"]](/content/2026/06/1392574/images/772b72408b1f17e7e7835bf668c4b5bf3918fc71adbc259e710cfc2b20494839.jpg)
The rear left digit indicates a number indicating the type of menu. The front left digit indicates a number which depends on the parameters indicated in the selection.
Select the digit with and press "8" in the power bar.
Select the front left digit and select the correct setting.
See the following table for the specifications:
| Value on swipe key-board | KW | Notes |
| 0 7.4 | Standard initial setting | |
| 1 | 4 | |
| 2 | 2.5 | |
| 3 | 6 |
Once the correct value has been entered, confirm by touching and holding ⏻ for 2 seconds.
8. DEMO FUNCTION
The DEMO function is designed to use all functions of the product without it actually working.
Connect the hob to the domestic mains power.
- Press .
- Press again.
- Holding start pressing the cooking zone digit, proceeding anti-clockwise starting from the one in front on the right.
![graph TD A["3"] --> B["8"] B --> C["8"] C --> D["2"] D --> E["4"] E --> F["8"] F --> G["8"] G --> H["1"]](/content/2026/06/1392574/images/2ce35c1284d8d3e9b53731f3fcc843fb930261704c2329d4903fe34cda353858.jpg)
The rear left digit indicates and a number indicating the type of menu. The front left digit indicates a number which depends on the parameters indicated in the selection.
Select the digit with and press "6" in the power bar.
Select the front left digit and select the correct setting.
See the following table for the specifications:
| Value on swipe keyboard | Notes |
| 0 | DEMO function disabled |
| 1 | DEMO function activated |
Once the correct value has been entered, confirm by touching and holding ⏻ for 2 seconds.
9. HOB FUNCTIONS
 |  |  | [8BAZ] |  |
 |  |  |  |  |
| Lock | It is possible to lock the hob functions during use, e.g. to clean the hob. | |||
| To enable/disable: press | ||||
| Child lock | This function prevents accidental use of the appliance. This cannot be used during a cooking operation | |||
| To enable: turn on the hob and press any cooking area for 3 seconds and then scroll the power bar slowly from 0 to 9.All the digits that indicateThe operations described must be completed within 10 seconds. | ||||
| To disable: turn on the hob and press any cooking area for 3 seconds and then scroll the power bar slowly from 9 to 0.All the digits that indicate disappear.The operations described must be completed within 10 seconds. | ||||
| Boost function | Every cooking area can be set to an additional power level for a maximum of 5 minutes. | |||
| To enable: select one of the 4 cooking areas and select “Boost” on the swipe keyboard. The corresponding digit indicates. | ||||
| To disable: select one of the other possible values on the swipe keyboard. | ||||
| Cooking area timer | The timer allows a specific cooking area to be switched off when the set time expires.The cooking areas can be programmed individually because each one has its own timer. | |||
| To enable: turn on the hob and select one of the 4 cooking zones by setting a value on the swipe keyboard, then press the zone digits to control the timer and set a value again using the swipe keyboard. The symbol of the cooking area lights up. Do not touch anything for 5 seconds to confirm the set time. The display in the timer management controls area shows the countdown which ends with an acoustic warning. Press the digits of the time control zone to silence the alarm. | ||||
| To disable: wait until the countdown ends or reset the timer values. | ||||
| Timer (generic) | Timer with alarm for generic use. | |||
| To enable: turn on the hob, press the digits of the timer control zone and set a value using the swipe keyboard. The countdown ends with an audible warning. Press the digits of the time control zone to silence the alarm. | ||||
| To disable: wait until the countdown ends or reset the timer values. | ||||
| Pause function | This function allows you to pause/restart any active function on the hob, by reducing the power available in the cooking zone and resetting all the functions.During the pause, all the digits indicate to inform the user that:- No energy is produced in any of the cooking areas.- All functions and the timer are disabled. | |||
| To enable: with the hob on, press and hold for at least 1 second. | ||||
| To disable: press and hold for at least 1 second and slide your finger from minimum to maximum along the swipe keyboard which shows an animation. | ||||
| Recall function | This function is used to recall the function settings of the hob if it is switched off by mistake using . | |||
| With the hob off, to recover the settings press within 6 seconds, then press within 6 seconds. A beep is emitted to confirm the operation. | ||||
| When the hob is off, if it is not turned back on within 6 seconds, the settings of the previous functions are lost. | ||||
| Heating function | This function is used to heat a pan to the maximum power before continuing to cook at a selected level. The time interval for which the cooking zone is held at maximum power depends on the final cooking level that has been set. See the table: | |||
| Power level Timer (seconds) | ||||
| 1 | 48 | |||
| 2 144 | ||||
| 3 230 | ||||
| 4 312 | ||||
| 5 408 | ||||
| 6 120 | ||||
| 7 168 | ||||
| 8 216 | ||||
| 9 Not available | ||||
| Boost Not available | ||||
| Select one of the 4 cooking areas and press and hold the selected value (from 1 to 8) on the swipe keyboard for 3 seconds. The hob will have a maximum power peak for a period of time that varies according to the previously set cooking power, then it will go back to the value set at the beginning.The corresponding digit indicates and the set value. | ||||
| Combo mode (“bridge function”) | This function allows 2 cooking areas to be combined to use and control them as if they were one and have a bigger cooking area at your disposal. This function allows you to use pans with a wider base.The cooking zones that can be selected for this function are both those on the left and those on the right. | |||
| To enable: press both cooking zones simultaneously until a digit indicates To set the power of the zone that can be used in combined mode, use the swipe keyboard. | ||||
| To disable: simultaneously press the keys used to enable the “bridge” function until the symbols disappear. | ||||
| Important! The hob automatically recognises the presence of a larger pan that occupies two cooking areas, but it will manage the areas separately unless the “bridge” function is enabled. | ||||
| Heating function | This function is used to keep cooked foods warm.To enable/disable: select a cooking zone and select 0 or 1 on the scroll bar displaying on the corresponding digit. | |||
| AUTO function | This function allows you to enable AUTO mode so that operation of the hob and hood are coordinated. When the hob is switched on, the lights are also switched on. The hood speed is automatically set using the highest power level present on the hob. | |||
| Hob-Hood CouplingBefore starting the procedure follow the specific instructions of the manuals of the devices to be coupled.With the hob off, simultaneously press “” and “” and the coupling procedure will be enabled and an animation will appear on the display.WARNING: once the procedure has been activated, refer to the hood manual and check that the K-Link Coupling procedure has been activated.The coupling procedure takes 2 minutes. If no devices are recognised within this time check that you have previously activated the procedure for the devices to be coupled. The maximum number of linkable devices may have been reached.Press the “” and “” keys again to confirm. | ||||
10. COOKING TABLE
| Power level C | Cooking method To be used for | |
| 1 | Melting, heating gently Butter, chocolate, gelatine, sauces | |
| 2 | Melting, heating gently Butter, chocolate, gelatine, sauces | |
| 3 | Warming up Rice | |
| 4 | Prolonged cooking, thickening, stewing Vegetables, potatoes, sauces, fruit, fish | |
| 5 | Prolonged cooking, thickening, stewing Vegetables, potatoes, sauces, fruit, fish | |
| 6 | Prolonged cooking, braising Pasta, soups, braised meat | |
| 7 | Light frying Rösti (potato fry-ups), omelettes, breaded and fried foods, sausages | |
| 8 | Frying, deep fat frying | Meat, chips |
| 9 | Quick frying at high temperature | Steak |
| P | Quick heating | Boiling water |
11. USER MENU CUSTOMISATION
Before carrying out the procedure, it is advisable to read the entire paragraph.
- Press
- Press ⏻ again.
- Hold ○ and start pressing the digit of the cooking areas in clockwise order starting from the left front one.
![graph TD A["2"] --> B["8"] B --> C["8"] C --> D["3"] D --> E["4"] E --> F["1"]](/content/2026/06/1392574/images/6adcec5f32d1bbb8dfa04e1103f11a9d4ca74a92f9e78b2dbc5e28de8c25b10b.jpg)
The rear left digit alternately indicates U and a number from 0 to 9 indicating the menu code.
The front left digit indicates a number which depends on the parameters indicated in the selection.
- Press the rear left digit and select a number on the power bar to access the menu code.
- Press the front left digit and select a number on the power bar to select a value.
- Once the correct value has been entered, confirm by touching and holding ⏻ for 2 seconds.
- To exit the menu without saving, press
If no operation is carried out the user menu will close after 1 minute.
See the following table for the specifications:
| Menu code | Description Value | |
| U0 Max | mum power management menu. | It is possible to decrease the maximum absorption selected in steps of 0.1Kw up to the minimum declared power. |
| U2 Key | sound volume control menu. 0 - Sound | 1 - Min.3 - Max. |
| U3 Count | down beeper volume control menu. | 0 - Sound disabled1 - Min.3 - Max. |
| U4 Dis | ay brightness level control menu. | 0 - Max.9 - Min. |
| U5 Count | down display control menu. 0 - Count | down display disabled1 - Countdown display enabled |
| U6 Pan | detection menu. 0 - Disabled | 1 - Enabled |
| U7 Count | down end management menu. | 0 - Continuous flashing and shut-down1 - Ten flashes and shut-down2 - One flash and shut-down |
12. POWER MANAGEMENT FUNCTION
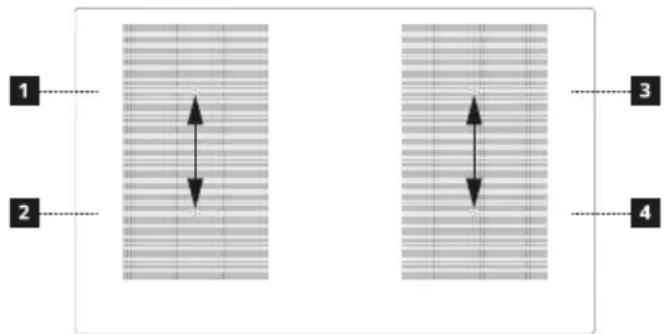
This product is equipped with electronically controlled power management. See the illustration.
This function controls the maximum power delivery of 3700 W between the cooking zones used in combined mode (1+2 and 3+4), optimising power distribution and avoiding system overload situations.
Hob in full power setting - the function divides the power between cooking areas and automatically decreases the power of the other cooking area, if necessary (the last command has highest priority). Hob in power limitation setting - the function divides the power between cooking areas and does not allow you to set the power for the other cooking area above the limit (to increase the power of a particular cooking area, the power setting for the other one must be decreased manually).
Example:
If boost level (P) is selected for hob 1, hob 2 cannot exceed level 9 at the same time and will be automatically limited.
13. GUIDE TO PAN USE
Which pans to use
Only use pots and pans with the bottom made from ferromagnetic material which are suitable for use with induction hobs:
- cast iron
- enamelled steel
- carbon steel • stainless steel (including partial)
- aluminium with ferromagnetic coating or ferromagnetic plate
To determine if a pot or pan is suitable, check for the symbol (usually stamped on the bottom). You can also hold a magnet to the bottom. If it clings to the underside, the pan can be used on an induction hob.
To ensure optimum efficiency, always use pots and pans with a flat bottom that distributes the heat evenly. If the bottom is not perfectly flat, this will affect power and heat conduction.
How to use the pans
Minimum diameter of the pot/pan for the various cooking zones.
To ensure that the hob functions properly, the pan must cover one or more of the reference points indicated on the surface of the hob, and must be of a suitable minimum diameter.
Always use the hob that best corresponds to the diameter of the bottom of the pan.
| Cooking areas | Pan base diameter | |
| ∅ min.(recommended) | ∅ max (recommended) | |
| Combined left/right | 190 mm 230 mm | |
| Singles 110 mm | 190 mm | |
Empty or thin-bottomed pots/pans
Do not use empty or thin-bottomed pots/pans on the hob as this would prevent controlling of the temperature or would automatically switch off the cooking zone if the temperature is too high, with the risk of damaging the pan or the surface of the hob.
If this occurs, do not touch anything and wait for all components to cool down. If an error message appears, refer to "Troubleshooting".
Hint/tips
Noise during cooking
When a cooking area is active, it may hum briefly. This is a characteristic of all ceramic glass hobs and does not impair the function or life of the appliance. The noise depends on the pan used. If it causes considerable disturbance, it may help to change the pan.
14. TROUBLESHOOTING
| Error code | Description | Possible causes of the error | Solution |
| Hob switches off after 10 sec. | Continuous key activation detected.Water or pan placed on the control panel. | Remove water or pan from the ceramic glass surface and control panel. | |
| ER21 | Hob switches off. | The internal temperature of electronic parts is too high. | Let the hob cool down.Please check if the hob has sufficient ventilation.If the error persists, please contact the After-Sales Service. |
| E2 | Corresponding cooking area switches off. | Empty or unsuitable pan.Pan or ceramic glass surface temperature too high.Electronic component temperature too high. | Let the hob cool down.Use a suitable pan.Do not heat empty pans. |
| E3 | Corresponding cooking area switches off. | Unsuitable pan.The pan is losing its magnetic properties and may damage the induction hob. | Use a suitable pan.The error is automatically cancelled after 8 seconds and the cooking area can be used again.If any other errors occur, the pan must be changed.If the error persists, please contact the After-Sales Service. |
| E6 | Hob does not switch on. | Power supply voltage and/or frequency is out of range. | Check mains voltage and/or frequency.If necessary, contact the After-Sales Service. |
| E8 | Cooking areas are turned off. | Fan fault.Fan blocked by dust or fibres. | Clean and remove foreign bodies from the fan.If the error persists, please contact the After-Sales Service. |
| EH | Corresponding cooking area switches off. | Temperature sensor blocked for cooking area.Insufficient temperature variation detected after switching on the hob. | Switch off the hob and switch it on again after cooling down.If the error persists, please contact the After-Sales Service. |
| U400 | Overvoltage due to an incorrect electrical connection. | Disconnect the hob from the power supply.Reconnect the hob based on the diagram provided.If the error persists, please contact the After-Sales Service. |
| E4/E5/E7/E9/ER20/ER22/ER31/ER36/ER40/ER47/EA | Disconnect the hob from the power supply.Wait a few seconds, then reconnect the hob to the power supply.If the problem persists, call the After Sales Service and specify the error code that appears on the display. | |
15. TECHNICAL DATA
| Unit | Value | ||
| Type of product | Built-in Hob | ||
| Dimensions Width mm | 650 | ||
| Depth mm | 510 | ||
| Min./max. height mm | 53 | ||
| Total power W | 7400 | ||
| Parameter Value | |
| Power supply voltage/frequency | 220-240 V, 50 Hz; 220 V; 60 Hz;2N~380-415 V, 50 Hz; 2N~380 V, 60 Hz; |
| Weight of the appliance | 12 kg |
16. ENERGY EFFICIENCY OF HOB
| Number of cooking areas | 4 |
| Number of combinable cooking areas | 1- Left |
| 1- Right | |
| Cooking technology | Induction |
| Dimensions of combinable cooking area | Left 395 x 220 mm |
| Dimensions of combinable cooking area | Right 395 x 220 mm |
| Energy consumption of combinable cooking area | Left 192 Wh/kg |
| Energy consumption of combinable cooking area | Right 192 Wh/kg |
| Energy consumption of the hob (electric cooking) | 189.7 Wh/kg |
17. ENVIRONMENTAL ASPECTS
Disposal of household appliances
The symbol on the product or packaging indicates that the product must not be disposed of with normal domestic waste. The product must be disposed of at a specialist recycling centre for electrical and electronic components. By ensuring that this product is disposed of correctly, you will help prevent possible negative consequences for the environment and health that might result from its improper disposal. For more detailed information on how to recycle this product,
please contact your local municipal offices, local waste disposal service or the shop from which the product was purchased.
Disposal of packaging materials
Materials with the symbol 📊 are recyclable. Dispose of the packaging in special recycling collection bins.
Energy saving
You can save energy during cooking every day by following the suggestions below.
- When you heat water, only use the quantity you require.
- If it is possible, always put the lids on the cookware.
- Place the pan on the hob before you switch it on.
- Put smaller pans on the smaller cooking areas.
- Put the pans directly in the centre of the cooking area.
- Use residual heat to keep the food warm or melt it.
18. CONFORMITY
Information on the product pursuant to EU regulation no. 66/2014
Reference standards:
EN/IEC 60350-2
EN/IEC 50564

This appliance has been designed, manufactured and sold in compliance with EEC Directives.
The technical data is provided on the rating plate affixed to the underside of the product.
7. POWER LIMITATION
How to use the pans
- SAFETY INFORMATION
- DECLARATION OF CONFORMITY
- INSTALLATION
- REQUIREMENTS FOR KITCHEN UNITS
- ELECTRICAL CONNECTIONS
- CLEANING AND MAINTENANCE
- MAINTENANCE AND REPAIRS
- PRODUCT DESCRIPTION
- INDICATORS
- PAN DETECTION
- RESIDUAL HEAT INDICATOR
- POWER LIMITATION
- DEMO FUNCTION
- HOB FUNCTIONS
- COOKING TABLE
- USER MENU CUSTOMISATION
- POWER MANAGEMENT FUNCTION
- GUIDE TO PAN USE
- WHICH PANS TO USE
- HOW TO USE THE PANS
- EMPTY OR THIN-BOTTOMED POTS/PANS
- HINT/TIPS
- NOISE DURING COOKING
- TROUBLESHOOTING
- TECHNICAL DATA
- ENERGY EFFICIENCY OF HOB
- ENVIRONMENTAL ASPECTS
- DISPOSAL OF HOUSEHOLD APPLIANCES
- DISPOSAL OF PACKAGING MATERIALS
- ENERGY SAVING
- CONFORMITY
- INFORMATION ON THE PRODUCT PURSUANT TO EU REGULATION NO
- REFERENCE STANDARDS
Brand : FRANKE
Model : FMA 654 I F KL BK
Category : Cooker