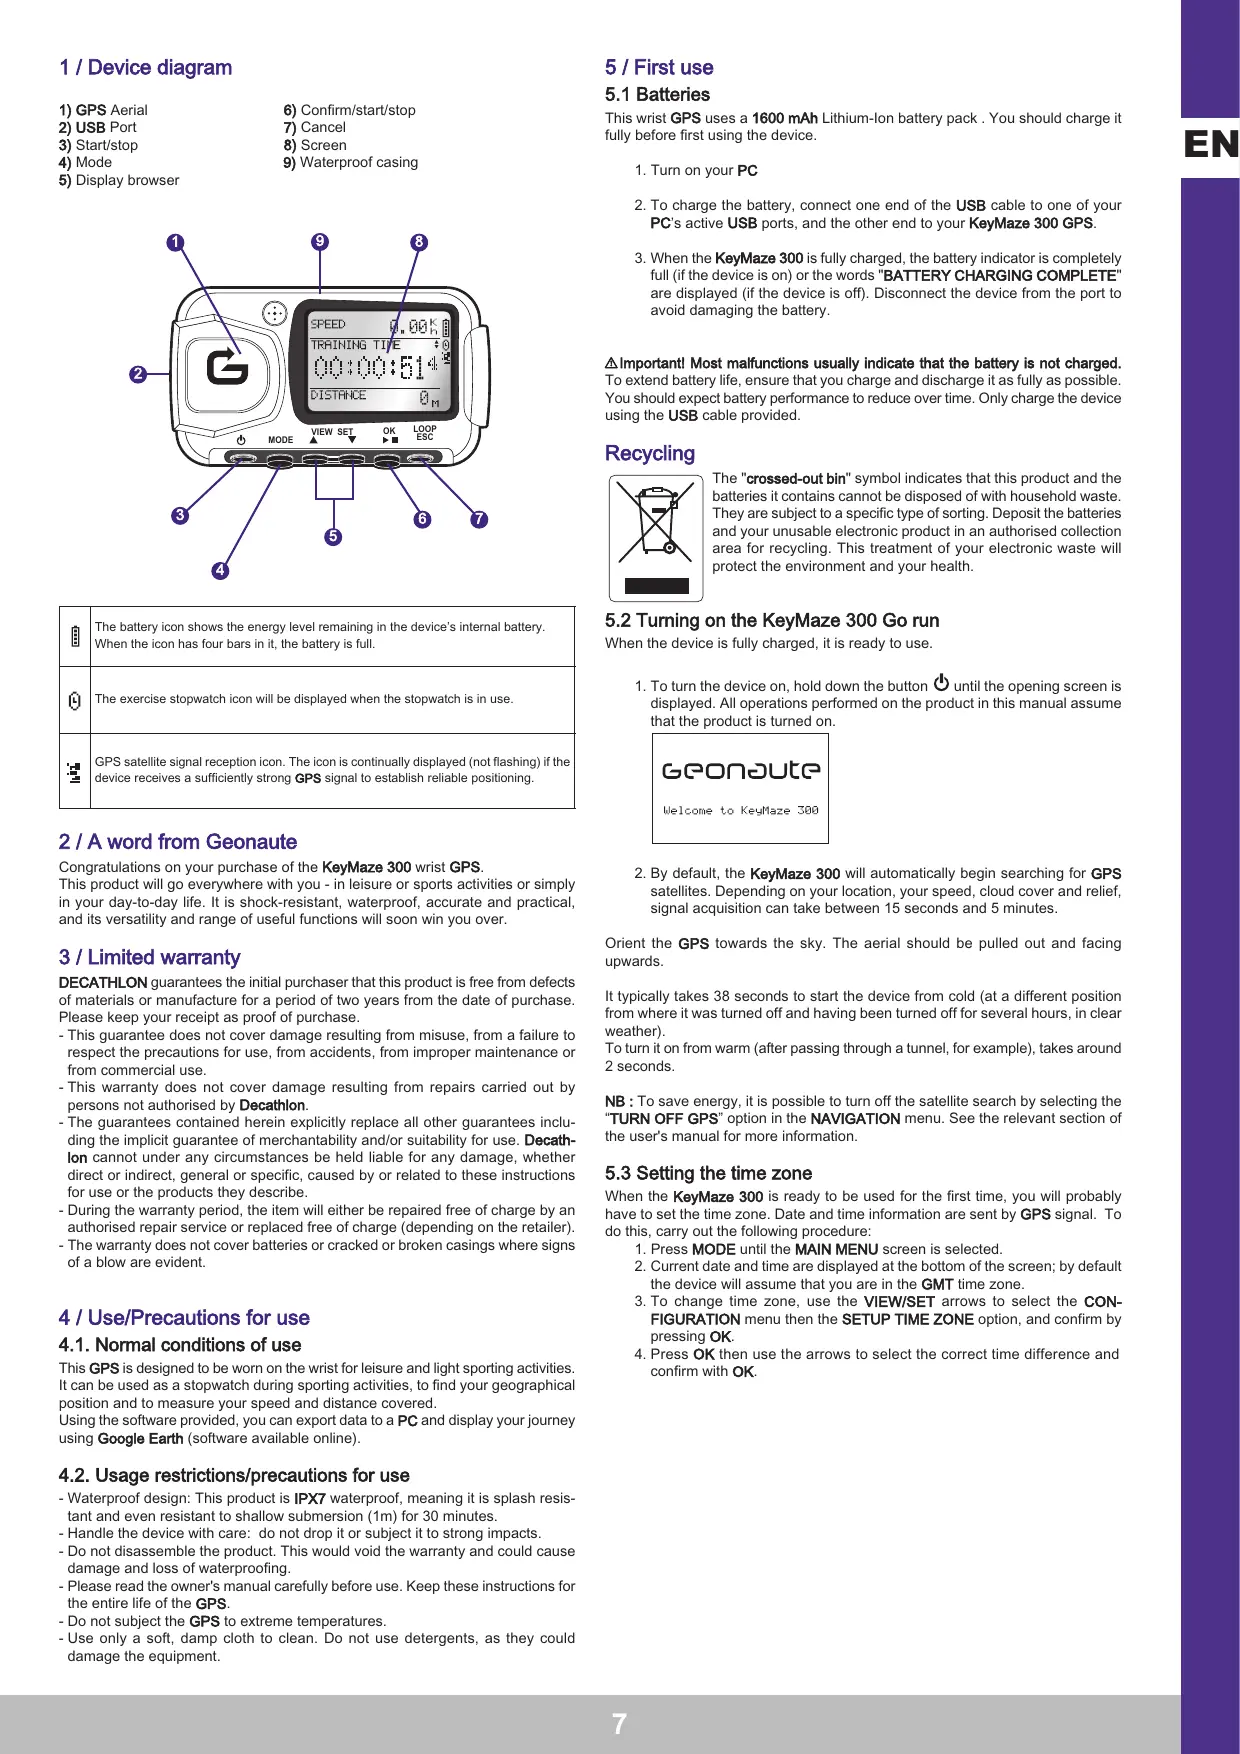
USER MANUAL GPS KEYMAZE 300 GEONAUTE
7.1.3.9 ABOUT PRODUCT
| The battery icon shows the energy level remaining in the device's internal battery. When the icon has four bars in it, the battery is full. |
| The exercise stopwatch icon will be displayed when the stopwatch is in use. |
| GPS satellite signal reception icon. The icon is continually displayed (not flashing) if the device receives a sufficiently strong GPS signal to establish reliable positioning. |
2 / A word from Geonaute
Congratulations on your purchase of the KeyMaze 300 wrist GPS.
This product will go everywhere with you - in leisure or sports activities or simply in your day-to-day life. It is shock-resistant, waterproof, accurate and practical, and its versatility and range of useful functions will soon win you over.
3 / Limited warranty
DECATHLON guarantees the initial purchaser that this product is free from defects of materials or manufacture for a period of two years from the date of purchase. Please keep your receipt as proof of purchase.
- This guarantee does not cover damage resulting from misuse, from a failure to respect the precautions for use, from accidents, from improper maintenance or from commercial use.
- This warranty does not cover damage resulting from repairs carried out by persons not authorised by Decathlon.
- The guarantees contained herein explicitly replace all other guarantees including the implicit guarantee of merchantability and/or suitability for use. Decathlon cannot under any circumstances be held liable for any damage, whether direct or indirect, general or specific, caused by or related to these instructions for use or the products they describe.
- During the warranty period, the item will either be repaired free of charge by an authorised repair service or replaced free of charge (depending on the retailer).
- The warranty does not cover batteries or cracked or broken casings where signs of a blow are evident.
4 / Use/Precautions for use
4.1. Normal conditions of use
This GPS is designed to be worn on the wrist for leisure and light sporting activities. It can be used as a stopwatch during sporting activities, to find your geographical position and to measure your speed and distance covered.
Using the software provided, you can export data to a PC and display your journey using Google Earth (software available online).
4.2. Usage restrictions/precautions for use
- Waterproof design: This product is IPX7 waterproof, meaning it is splash resistant and even resistant to shallow submersion (1m) for 30 minutes.
- Handle the device with care: do not drop it or subject it to strong impacts.
- Do not disassemble the product. This would void the warranty and could cause damage and loss of waterproofing.
- Please read the owner's manual carefully before use. Keep these instructions for the entire life of the GPS.
- Do not subject the GPS to extreme temperatures.
- Use only a soft, damp cloth to clean. Do not use detergents, as they could damage the equipment.
5 / First use
5.1 Batteries
This wrist GPS uses a 1600 mAh Lithium-Ion battery pack. You should charge it fully before first using the device.
- Turn on your PC
- To charge the battery, connect one end of the USB cable to one of your PC's active USB ports, and the other end to your KeyMaze 300 GPS.
- When the KeyMaze 300 is fully charged, the battery indicator is completely full (if the device is on) or the words "BATTERY CHARGING COMPLETE" are displayed (if the device is off). Disconnect the device from the port to avoid damaging the battery.
Important! Most malfunctions usually indicate that the battery is not charged. To extend battery life, ensure that you charge and discharge it as fully as possible. You should expect battery performance to reduce over time. Only charge the device using the USB cable provided.
Recycling
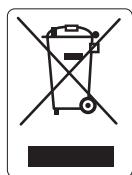
The "crossed-out bin" symbol indicates that this product and the batteries it contains cannot be disposed of with household waste. They are subject to a specific type of sorting. Deposit the batteries and your unusable electronic product in an authorised collection area for recycling. This treatment of your electronic waste will protect the environment and your health.
5.2 Turning on the KeyMaze 300 Go run
When the device is fully charged, it is ready to use.
- To turn the device on, hold down the button until the opening screen is displayed. All operations performed on the product in this manual assume that the product is turned on.

- By default, the KeyMaze 300 will automatically begin searching for GPS satellites. Depending on your location, your speed, cloud cover and relief, signal acquisition can take between 15 seconds and 5 minutes.
Orient the GPS towards the sky. The aerial should be pulled out and facing upwards.
It typically takes 38 seconds to start the device from cold (at a different position from where it was turned off and having been turned off for several hours, in clear weather).
To turn it on from warm (after passing through a tunnel, for example), takes around 2 seconds.
NB: To save energy, it is possible to turn off the satellite search by selecting the "TURN OFF GPS" option in the NAVIGATION menu. See the relevant section of the user's manual for more information.
5.3 Setting the time zone
When the KeyMaze 300 is ready to be used for the first time, you will probably have to set the time zone. Date and time information are sent by GPS signal. To do this, carry out the following procedure:
- Press MODE until the MAIN MENU screen is selected.
- Current date and time are displayed at the bottom of the screen; by default the device will assume that you are in the GMT time zone.
- To change time zone, use the VIEW/SET arrows to select the CONFIGURATION menu then the SETUP TIME ZONE option, and confirm by pressing OK.
- Press OK then use the arrows to select the correct time difference and confirm with OK.
| Time zone | Town(s)/Country |
| GMT – 12 | Eniwetok, Kwajalein |
| GMT – 11 | Midway Islands, Samoa |
| GMT – 10 | Hawaii |
| GMT – 09 | Alaska |
| GMT – 08 | Pacific (USA and Canada), Tijuana |
| GMT – 07 | Arizona |
| GMT – 06 | Mountain (USA and Canada), Central (USA and Canada); Mexico, Tegucigalpa, Saskatchewan, |
| GMT – 05 | Bogota, Lima, Quito, East (USA and Canada), Indiana (East) |
| GMT – 04 | Caracas, La Paz, Atlantic Time; Santiago |
| GMT – 03 | Buenos Aires, Georgetown |
| GMT – 02 | Central America |
| GMT – 01 | Azores, Cape Verde Islands |
| GMT | Greenwich, Casablanca, Monrovia, Dublin, Edinburgh, Lisbon, London |
| GMT + 01 | Amsterdam, Berlin, Berne, Rome, Stockholm, Vienna, Belgrade, Bratislava, Budapest, Ljubljana, Prague, Brussels, Copenhagen, Madrid, Paris |
| GMT + 02 | Athens, Istanbul, Minsk, Bucharest, Harare, Pretoria, Jerusalem, Cairo |
| GMT + 03 | Baghdad, Kuwait, Riyadh, Moscow, St Petersburg, Volgograd, Nairobi |
| GMT + 04 | Abu Dhabi, Muscat, Bakou, Tbilisi |
| GMT + 05 | Yekaterinburg, Islamabad, Karachi, Tashkent, Bombay, Calcutta, Madras, New Delhi |
| GMT + 06 | Astana, Almaty, Dhaka, Colombo |
| GMT + 07 | Bangkok, Hanoi, Jakarta |
| GMT + 08 | Beijing, Chongqing, Hong Kong, Urumki, Pert, Singapore, Taipei |
| GMT + 09 | Osaka, Sapporo, Tokyo, Seoul, Yakutsk |
| GMT + 10 | Brisbane, Canberra, Melbourne, Sydney, Guam, Port Moresby, Hobart, Vladivostok |
| GMT + 11 | Magadan, Solomon Islands, New Caledonia |
| GMT + 12 | Auckland, Wellington, Fidji, Kamchatka, Marsha Islands. |
5.4 Positioning the KeyMaze 300 during sporting activites
The KeyMaze 300 is designed to be worn on the wrist, outside clothing. It fastens to your forearm using a Velcro strap system.
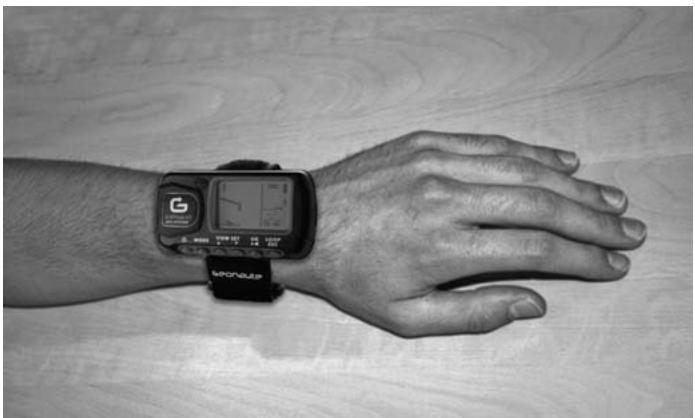
The aerial is under the plastic cover, near the screen. For optimum performance, the top of the device should be facing the sky. The more it is oriented towards the sky, the better the reception will be.
The GPS KeyMaze 300 features a high-precision SiRFstarIII receiver. Even if satellite signal reception is currently excellent, you need to take the following precautions:
GPS signal reception is not available inside buildings. Reception will be greatly reduced in cloudy conditions, in wooded areas, in tunnels or if the GPS is worn
under clothing. GPS reception is also impaired by electromagnetic interference (power lines, mobile telephones, walkie talkies, etc).
- Keep pressing MODE to scroll through the various operating modes.

-
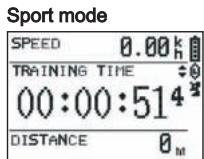
Sport mode: Sport mode allows you to measure your sporting activities and to record data. It has two screens (press VIEW/SET to go from one to the next):
-
The clock screen shows the time (TIME OF DAY), your average speed since exercise started (AVG SPEED) and instant altitude (ELEVATION).
-
The exercise stopwatch screen displays time since exercise started (TRAINING TIME), distance covered (DISTANCE) and instant speed (SPEED).
-
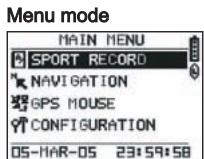
Menu mode: MENU MODE gives access to the device's various functions and settings.
- Positioning mode: Positioning mode (LOCATION) displays the geodesic coordinates of your current location (latitude and longitude).
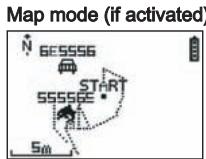
- Map mode: When activated, map mode (MAP) displays your route and your waypoints on a graphical diagram.
7 / How each mode works
7.0. Sport mode
In Sport mode, two views are possible. Press VIEW/SET to go from one to the other: The exercise stopwatch screen displays time since exercise started (TRAINING TIME), your instant speed (SPEED) and distance covered since departure (DISTANCE).
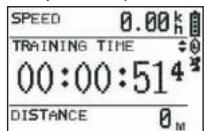
- The clock screen displays time since exercise started (TRAINING TIME), distance covered (DISTANCE) and average speed since exercise started.
- The clock screen shows the time (TIME OF DAY), your average speed since exercise started (AVG SPEED) and instant altitude (ELEVATION).
The stopwatch mode calculates and records your training data (location, speed and distance)
Important: remember to check that the device is receiving the GPS signal (satellite symbol displayed continually, not flashing) at the start of your training. If not, the data recorded may be incorrect.
Press OK to start or stop the exercise stopwatch (the ESC button is also used to stop the stopwatch when in use).
When the stopwatch is stopped, press ESC/LOOP to reset it to zero. The device then gives you the option of saving your journey (SAVE THIS TRAINING DATA YES/NO).
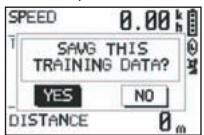
Select your response using the arrows (VIEW/SET).
Save the file so you can upload it to your PC later, display it on Google Earth or display it immediately on the device (SPORT RECORD). This resets the exercise stopwatch to zero.
7.1.1 SPORT RECORD
This mode allows the user to display the routes and training sessions recorded on the device.
Keep pressing MODE to enter menu mode.
Select the SPORT RECORD option using the VIEW/SET arrows.
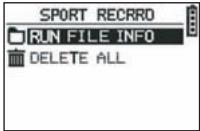
Select RUN FILE INFO to choose a route or a session which you have already recorded.
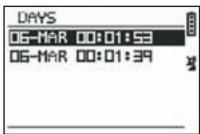
Select one of the routes (archived by date and time) to display the content.
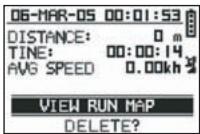
This session summary lists:
The distance covered (DISTANCE)
Your overall route time (TIME)
Your average speed (AVG SPEED)
You can also choose the VIEW RUN MAP option to display the outline of your route.
You can exit map mode by pressing the MODE button.
You can remove the route from the device's memory using the DELETE option.
You can delete all routes stored in the memory using the DELETE ALL option.
7.1.2 NAVIGATION
This option gives you access to various waypoint marking functions and the return to initial location function.
Keep pressing MODE to enter menu mode.
Select the NAVIGATION option using the VIEW/SET arrows.
You then have access to a 7-point menu.
7.1.2.1 ADD/REMOVE MAP MODE
If the mode is deactivated, the map will no longer be visible when the user scrolls through the different modes by pressing the MODE button.
Press OK to activate or deactivate MAP mode.
7.1.2.2 TURN ON/OFF GPS
This option activates or deactivates detection of the GPS signal.
Use this option to disable detection of the signal when it cannot be received correctly or to save the battery.
Make sure you activate GPS signal reception when you want to record a route.
7.1.2.3 SAVE WAYPOINT
Select this option then press OK to record a WAYPOINT.
The following data will be recorded for the waypoint:
- The Waypoint number.
- The latitude and longitude of the waypoint.
- The altitude of the waypoint.
Press OK to confirm waypoint recording.
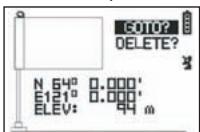
7.1.2.4 FIND WAYPOINT
Select this option to find a waypoint you have already recorded in order to return there.
Select LIST ALL to choose the waypoint from the list of all waypoints recorded on the device.
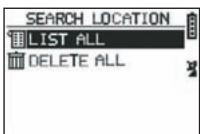
Select the waypoint from the list and display its data.
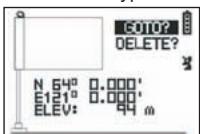
The device then displays the GOTO option in order to head towards this Waypoint.
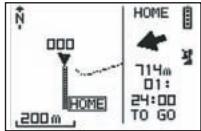
The route to take is clearly indicated on the map and with an arrow indicating the direction to follow.
Important: This arrow needs you to move to function correctly. If the user is static, the information given by the arrow will be incorrect.
On the right of the screen, the time remaining before reaching the target, assuming progression at the present average speed, is also displayed.
If the GOTO Waypoint option has been activated, there is one menu option: STOP GOTO appears, to stop guiding the user to this point.
7.1.2.5 RETURN TO ORIGIN
Select this option to return to your departure point (the point where you started the stopwatch provided the GPS signal was detected at that time).
The direction to follow and the time needed to return to that point are continually displayed in this mode.
Important: If the stopwatch was started when GPS signal reception was not strong enough (GPS aerial flashing), the route to take will be incorrect and will indicate geodesic coordinates (0^, 0^) which do not match the real starting point of your route.
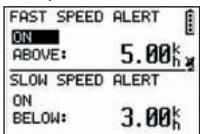
7.1.2.6 ALERTS
This option enables you to set alarms which are activated if a time, distance or speed requirement is fulfilled. For example, you can set the alarm to beep every kilometre or every five minutes of a marathon.
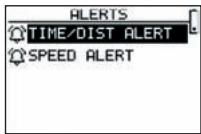
Select the alarm mode you want using the VIEW/SET arrows and then OK. After pressing OK again, a window appears giving you the choice between:
No alarm: OFF.
A one-off alarm: ONCE
Recurring alarms: REPEAT
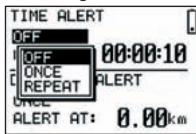
Next, select the alarm settings using the VIEW/SET arrows to move the cursor to the figures to be modified. Next use OK to open a window with the values to be modified.
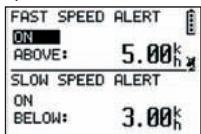
With the SPEED ALERT option you can programme upper and lower movement speed limits. The device will beep if you go over one or the other.
7.1.2.7 GPS INFO
This option displays the state of the different satellites' signal reception.
If the signal is detected correctly (at least 4 satellites), the words 3D FIXED appear next to the satellite icon, which will be continually displayed (not flashing). The numbers of the satellites detected are displayed in reverse video. If the signal is weak (3 satellites) the words 2D FIXED appear vertically. This means that only the latitude and longitude coordinates are reliable, and not altitude.
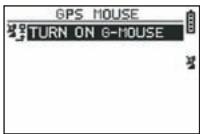
7.1.3 GPS MOUSE
This menu allows you to use the KeyMaze 300 as a portable GPS aerial for your laptop computer.
This requires the prior installation of the USB drivers and PC software on the installation CD (see chapter on PC software instructions).
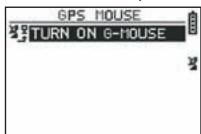
After selecting the GPS MOUSE option from the main menu, activate or deactivate it as a GPS aerial: Select TURN ON GPS MOUSE or TURN OFF GPS MOUSE.
Install the USB driver on your PC if you have not done so already.
Connect the KeyMaze300 to your PC using the USB cable provided
To install the PC software, see the relevant section in the PC software instructions.
You can then use the KeyMaze 300 as a GPS aerial in conjunction with navigation software.
7.1.3 CONFIGURATION
7.1.3.1 SETUP TIME ZONE
This option allows you to configure the time difference between GPS time (taken to be GMT) and the time zone which you are in, to bring the display time in line with actual time.
Select the difference suggested and modify it using the VIEW/SET arrows then confirm using OK. For more information, see paragraph 5.3 in this manual.
7.1.3.2 SETUP GPS
This option configures GPS in WAAS/EGNOS mode.
This allows the GPS to take measurements from a number of terrestrial relay stations to improve reception and therefore recording accuracy.
This system does not function in Europe and uses more energy than simple reception.
You are therefore advised to deactivate this option unless you need a particularly high level of accuracy.
Select the value suggested and modify it using the VIEW/SET arrows then confirm using OK.
7.1.3.3 SET UNITS
This option gives you the choice between the metric system (m, km/h) used in Europe and the imperial system (ft and mph) used in most Anglo-Saxon countries.
7.1.3.4 USER NAME
With this option you can personalise your KeyMaze 300 by entering your name and sex.
Select the first character with OK then scroll through the letters in the list using the VIEW/SET arrows. Confirm your chosen letter with OK.
Then select the other letters of your name by choosing them from the list (with the VIEW/SET arrows) before pressing OK. When all letters have been entered, press ESC.
Then use one of the VIEW/SET arrows to set your sex. Press OK, VIEW/SET then OK again to complete the operation
7.1.3.5 LCD CONTRAST
This option modifies the display contrast
7.1.3.6 SET BEEPER
This sets the key tones.
7.1.3.7 DOWNLOAD TO PC
With this option you can put the device into PC data transfer mode.
The KeyMaze 300 confirms that this mode has been selected with the message "waiting for PC command".
You then need to connect the device to your PC using the USB cable provided according to the procedure set out in the "export your data" chapter.
7.1.3.8 FACTORY RESET
With this option you can restore the device's original settings.
Select the option then confirm using OK or press ESC to exit the mode without resetting.
7.1.3.9 ABOUT THE PRODUCT
This option displays the version of the device's internal software (Firmware).
7.1.3.10 UPDATE FROM PC
This option allows you to update the Firmware (the KeyMaze 300's internal software) from your PC.
Click YES to confirm your choice then connect the device to your PC using the USB cable provided.
Then refer to the PC software manual for the exact updating procedure.
Until you start the procedure on your PC, you can exit this mode by pressing ON/OFF and ESC at the same time. The Firmware will not be updated.
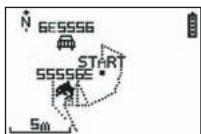
7.2 Map mode
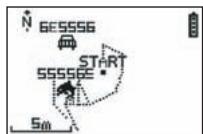
If map mode is activated, this screen displays the outline summary of your route and the recorded waypoints.
The map is automatically oriented towards north (see diagram).
The scale is shown in the bottom-left of the screen. You can zoom in and out using the VIEW/SET arrows (down arrow to zoom in, up arrow to zoom out).
The figure in the middle of the screen represents your current location or your last known location. This flashes if the GPS signal is not correctly detected. In this case, the figure will be located in the last location measured before the signal was lost. The satellite symbol, as above, represents the quality of the positioning satellite signal. If it flashes, the signal is not detected, and positioning on the map is not reliable.
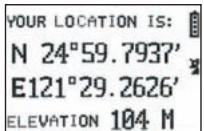
7.2 Positioning mode
YOUR LOCATION IS: N 24°59.7937' E121°29.2626' ELEVATION 104 M
This mode displays the numerical value of the geographical coordinates of your current location.
The first line corresponds to latitude (north-south position in relation to the equator). The second line is longitude (east-west position in relation to the Greenwich Meridian).
These coordinates are made up of a letter which corresponds to a cardinal point and an angle between 0 and 90^ .
The third line corresponds to altitude (ELEVATION) in relation to sea level.
If GPS signal reception is not correct (< 3 satellites):
The coordinates will be zero (0^, 0^) .
If the signal is weak (3 satellites) the 2D coordinates will be reliable but not elevation (in the navigation menu/GPS info, the words 2D FIXED are displayed). If the signal is full (aerial symbol displayed continually and 3D FIXED shown in the GPS INFO menu), the coordinates and the elevation reading will all be reliable.
8. Useful functions
8.1. Measuring a sporting session and recording position data
-
At the beginning of your training session, check that:
-
The KeyMaze 300 is correctly turned on and the battery is sufficiently charged for the duration of your activity.
-
The GPS signal is correctly detected (aerial icon continually displayed). If necessary change location to get a clear view of the sky (avoid tree cover, tunnels and high buildings) then stay as still as possible to reduce start-up time (usually around 30 seconds).
-
The device is positioned so that the aerial (under the plastic part to the left of the screen) is oriented skywards as directly as possible.
-
Keep pressing the MODE button to go to SPORT mode. You can change the initial view by pressing the VIEW/SET keys in order to change the information displayed on the screen.
-
When you are ready to go, press OK to start the exercise stopwatch and to start recording data.
-
During exercise you can stop and restart the stopwatch by pressing OK (GPS positions will not be recorded while the stopwatch is stopped, but the distance covered (in a straight line) will still be recorded).
-
At the end of your training session, stop the stopwatch by pressing OK.
-
Save the training file by pressing ESC and confirming by pressing OK. The file is then ready to be transferred to PC or can be viewed immediately using the SPORT RECORD option.
7.You can now turn off GPS or record a new sports session.
8.2. Transferring your data to PC or exporting them to Google Earth.
See paragraphs 4 and 5 of the PC software manual (after reading paragraphs 1 and 2 of the same manual).
This product conforms to section 15 of the FCC rules. It functions according to the following two conditions:
1 - This device will not produce harmful interference.
2 - This device must accept any interference received, including interference that may cause undesired operations.
This equipment has been tested and certified as complying with the restrictions on class B digital devices, in accordance with section 15 of the FCC rules. These restrictions are designed to ensure reasonable protection against harmful interference in a residential environment. This equipment generates, uses and emits radio frequency energy and, if it is not installed in accordance with the instructions, may cause interference which is harmful to radio communication. However, there is no guarantee that it will not produce interference in a particular environment. If this equipment causes interference which is harmful to radio or television reception, bearing in mind that interference can be controlled by turning the device off and then on again, the user is advised to guard against this interference by taking one or more of the following actions:
-
Reorienting or moving the reception aerial.
-
Increasing the distance between the device and the receiver.
-
Connecting the device to a socket on a different circuit to that to which the receiver is connected.
- Seeking the advice of the retailer or a technician specialising in radio/television.
IMPORTANT: ANY CHANGE OR MODIFICATION NOT EXPLICITLY APPROVED BY DÉCATHLON MAY VOID THE AUTHORISATION GRANTED TO THE USER TO USE THE EQUIPMENT.
So that we continue to develop improved products which meet your needs, we are pleased to receive your feedback with regard to the quality, functionality and usage of our products.
- In France, you can contact the customer relations centre on: 0810 080808 (price of a local call)
- In other countries, you can leave a message on the appropriate section of our website at www.decathlon.com
We will reply as soon as possible.
10 / Miscellaneous
Copyright 2007. Google™ and Google Earth are trading brands of Google™ Inc. All other names of companies and products are trading brands of the companies with which they are associated.
For further information regarding your KeyMaze 300, refer to the FAQ section of our website: www.geonaute.com
7.1.3.9 ABOUT PRODUCT
Esta option permite visualizar la version del software interno del aparato (Firmware).
7.1.3.10 UPDATE FROM PC
7.1.3.9 ABOUT PRODUCT
7.1.3.7 upload TO PC
7.1.3.9 ABOUT PRODUCT
7.1.3.9 ABOUT PRODUCT
7.1.3.9 ABOUT PRODUCT
7.1.3.9 ABOUT PRODUCT
IcnoB3yIte TaKke OK, yTo6bI OTKpbITb OKHO Bbl6opa cHpbl, KOTOpHIO HADo N3MeHHTb.
Hacroka SPEED ALERT (CNHAI CKOPOCTN) No3BOJAE3anporpammmpoBaTb HxHne N BepxHne npedeJIbCKOPoCTn nepeBnxKeHna.
Annapat noact cngn B cnuyae bixo3a oin nnn npeden.
7.1.2.7 GPS INFO (GPS INHΦOPMALI)
3TaФункциЯпзвоггтВамоьбразиьнахкраhecoctянe npemeCnghanOBcpa3nHbIXcnyTHNKOB.
Ecni CmHnAn NoIyUeH npaBunbHo (He MeHee 4 cnyTHNKOB), NO BepTnKanPi pRdOM C mCBMOAn aHTHeHb, KOtOpB yDeT OToBpaXaTbcN oTOcTOnHHo (HE MItra), nOBAJTeC TcNOBO 3D FIXED.
Homepa 3aФИССИРОВАнБИХ CNYTHNIOK 6уДТ OTOБРЖATCB R INHBEPCINBOM 3IO6DAPXEHIN.
Ecnn CnHn 60nee cna6b (3 cnTyNka), nO BepTKaJI NIOBnTcra CNOBO 2D FIXED.
3To 3HaHT, YTO TOUHbIM NABJIaOTcT OJbKO DaHHbIe O DOJIrOte I UINPOTe, HO He O BbICOTE.
7.1.3 GPS MOUSE (GPS MblUb)
3TOT NHTMENIO NO3BOJREt Bam IcnoJIb3OBAtB KeyMaze 300 KaK GPS aHTeHny DnI Bauero nopTaTHBoro KOMNbHOpepa.
Heo6xodnmo 3apaanhe yctaHOBntb dpaiBepb USB nporpaMMy dnn KOMNtboTepa, DCyTcHOBCHCM CD-dnCKe (cm. COOTBCTBtuCi nn PHTKCHPuknnporpaMMHOrO oBceNeueHHom KOMNbBoTepa).
Iocne TORO, kak Bby Bb6paJINB rnaBHOM MeHIO cyHKUIO GPS MousE, MoXHO Naatb nn 3aBePHT pa60Ty HABnRaTopa B KaeeCTbe GPS aHTehhbl:
TURON GPS MOUSE (BKJIIOUHTb GPS MbIUb) (BKNIOUHTb) nIN TURN OFF GPS MOUSE (BbIKIIOUHTb GPS MbIUb) (BbIKIIOUHTb).
UcTaHOBHTb H a KOMIbIepe dpaIbep USB,ecn Bbl 3toro eue He cdeJaan.
IoiKIOUHTe KeyMaze 300 K KOMNbHOtepy c NOMOuIIO npuiIarAemoro USBKa6eJIa.
IpyonpeJeHnnaPametpoN porpammblI py KOMbIOTepa o6paTntecbK COOTBETCTBHyOSeMy pa3dEny B INCHtpkunn porpammmoro o6ecneHn.
Tenepb Bb moKeTe nCIOB3OBaTb KeyMaze 300 B KaueCTBe GPS aHTeHHbI nporpamme Habnrau.
7.1.3 CONFIGURATION (KOHΦιΓΥΡΑLΙΑ)
7.1.3.1 SETUP TIME ZONE (YCTAHOBKA YACOBORI NORA)
3Ta 4yHKnIgno3B0IaReT OcyIeCTBnTb CmEHy Yacoboro NOra CBpeMeHN GPS (COOTBETCTBHyOJIe TpyNHUcKOMy MEPiHaNHy) Ha BpEMr TORO Yacoboro NOraCa, B KOTOpOM Bbl HaxoINTeCb, yTOb6 bOtKorpeKtIpoBaT bOTobpaXaEmoe BpeM r COOTBETBNI CΦaKTInueckIMBpeMeHM.
BbIepnTe npednoKHHbI qacOBIOI NOcI IN3MeHNTe daHHbIe C nOMOUbO CTpeNOK VIEW/SET, 3aTEM NODTBepdnte BbIbOp, HaxKaB Ha OK. IJra NpOlyeHnA donoONHTeJIbHO INHOpMaunO6paTteCb KnaparpaCy 5.3ToI INHCTpyKcIM.
7.1.3.2 SETUP GPS (YCTAHOBKA GPS)
3TaФунклЯ NO3BOJLЯТИЗМЕHAITb GPS B peKIMe WAAS/EGNOS (amepinkahckay/EBPoneiCKaCnCTema reoctaHApHOro nokpbTna)
3To PO3B0JAEt GPS HABINATOPY NOnyAtb DaHbHe C HeKOTOpBX DOnONHATEbHbX CTaHcN Ha 3eMNe, YTO6bIyUHyWHTb KaucTeBO CMrHana I, cIeDOnHATEbHO, O6eCneHTb 6beOuMoOvHocT Bawei 3aIcnI.
3Ta CnCTema DeIcTByeT TOIbKO B Ebpone I NOTpe6JIaET 6OJIbSe 3HepreTtuecknx pecypcoB, Yem npocTo npimc ciHaJa.
Takim o6pa30m, peKOMeHdyeTc8 OTKIIOHTb 3Ty OIIuIO, ecIN HET Heo6xOIMOCtN B daHHbIX NCKJIIOHTeJIbHO BbICOKOI TOHOCtN.
BbIbePte npEIOJKeHHoe 3NaueHHe N I3MeHTe erO c NOMOJIbIO CTpeNOK VIEW/SET, 3aTeM NOITBePHTe CBOI BbIbOp, HAKAB Ha OK.
7.1.3.3 SET UNITS (3ADAIOUINE YCTPOICTBA)
3Ta onu nno3BOJRE Bb6paB MeTpneckyUcCTeMy eHNHcN3MepeHn (M, KM/4), DeIcTByIOUy B Ebpone, INN CNTeMy STATUTE (fTybl, MInn/Yac), DeIcTByIOUy B 60JIbUnHCTBe aHrIocAcoKCHKx CTpaH.
7.1.3.4 USER NAME (IMR IIOJIb3OBATEJIR)
3TaФункци ПОЗВОЯТ CBECTN CBOE IMR I NON, YTO6bl INHINBUNyAJIIN3MPOBAbKeyMaze 300.
BbIepe nepBcNMBOc NOMOIO OK,3aTeM npocMOPTne ppeIOXeHHbIE 6yKbB B CnscE C NOMOIOCTpeNOK VIEW/SET.
IoTBePnTe Bb6paHHoe 3NaueHne C nOmoBIO OK.
3aTe M Bb6epnte Dpyrne 6yKbB BaIero IMeHn, Bbl6paB nx n3 cNcKa (C NOMOJIbO CTpeJOK VIEW/SET), HaxBa3aTeM Ha OK.
Korda BCE 6yKBbl BBeDeHbI, HaxMnTe Ha KhONky ESC.
3aTeM haxmTe Ha OndHy n3 CTpeIok VIEW/SET, TTo6bI BBecTn npaMeTpbl Bawero nona.
3To DeiCTBnE PpOu3BOUHTCn C NOMOuKHOIOK OK, VIEW/SET, 3aTEM CHOBa OK.
7.1.3.5 LCD CONTRAST
(KOHTPACTHOCTb N3OEBPAKHEHNAKKN-3KPAHA)
3aФyHKUINo3BOJIeT N3MeHHTb KOHTpactHOCTb N3O6paKeHn.
7.1.3.6 SET BEEPER (YCTAHOBKA 3BYKOBOTO CINHJAIA)
3Ta onuIy 03BOJrEYcTaHOBnTb 3ByKOBoCnHAn Ha HaxaTne KHOJOK.
7.1.3.7 DOWNLOAD TO PC (3AΓPY3KA B KOMΠBIOTEP)
3TaФункци ПОЗВOLЯТНACТРОТь apnapatВ pexIMпepedaHданhhix Ha KOMПьЮТер.
KeyMaze 300 noTbEpXJaet BxOJ B 3OTPeXMM COo6JeHnEM «waiting for PC command» «OxuJaTe KOMaHy KOMNbItepa».
3aTeM He6xOJIMo NOKJIIOUHTb annapat K KOMbIOTepy C NOMOuBHO npInpaAeMOr USB-Ka6JIa, corNaCHO DeiCTBnM, ONNCAHHbIM B NyHKTE «NepeDaua BaWxD daHbX.
7.1.3.8 FACTORY RESET (BO3BPAT K CTAHДAPTHbIM HACTPOIkAM)
3Ta OIzna IIO3BOJnE T BOCCTaHOBnTb NepBOHauJIbHbIe HAcTpoKn Annapata.
BbIbepnTe 3Ty fynKcHIO, 3aTeM NOITBepnTe (OK) nJIN haxmTe ESC nJIy BbIXOda n3 pexima, He BbIbnpar 3T0T Bo3BpAT.
7.1.3.9 ABOUT PRODUCT (O ПОДУКLIN)
3Ta HactpoKa P03B0JrE OTO6pa3NtB BepCnH BHyTpENHe NpOprPamMbI annapata (Firmware).
7.1.3.10 UPDATE FROM PC (OBHOBJIENIE C KOMIbIOTEPA)
3Ta NaCTPOJa Ka N03BONaT EOBnITb Fimwae (nporpaMMHoe o6ecneueHne KeyMaze 300) C NOMOUsbKO KOMNbHTepa.
Haxmnte Ha YES, yTO6bI NOITBepnITb BaW bIb6Op, 3aTeM NOkNIOUHTe annapat K KOMTbOtepy C NMOUbIO npINrAemoro USB-ka6EJa.
ObpaTnTeScb K INHcTpyKcUIN npOrpamMbI dIy KOMlbIOTepa dIy nOlyeHnra TOnhbx DeiCTBn dIy O6HOBJIeHnI.
До того кak за ореташие He 6bla 3anyuca ha Baшero kommbotepa, moхно Bытпи n3ТOTO pекima, habimma odnoBpeMeHNo Ha KhoNkn ON/OFF et sur ESC.В takOM cnyuae Firmware He 6ydet BKJIOUyeHa.
7.2 Pekm KapTa
Ecn pekim kapta Bknioyen, kpan oTobpaKaet o6n qeTeK BaWero Mappyta, a TaKke coXpaHeHHbIe nyTeBbIe TOnKn.
Kapta abTomatnueckn opneHTnpoBaHa Ha ceBep (cm. pncyHOK).
Macwta6 o6o3Haayetc CneBa BHN3y 3kpaHa.
YBelenuHbI yMehbIbN3o6paXeHMe MOxHO C NOMOcIbIO CTpeNOK VIEW/SET (CTpeNka BnH3 dIy yBeIyuChEHN I3o6paXeHn, CTpeNka BBepx dIy yMeHbSeHn I3o6paXeHn),
YeIOBcB u cHTpe KapTbO o6o3Naaet BaWe MeCTOnONoXeHne B daHbI MOMeHT nJI B aWe nocJeDHe e N3BeCTHOe MeCTOnONoXeHne.
Ecn GPS cnHa 3aФнксрван He npabnIbH, TO 3TO T CmBOJ MURAET.
B 3TOM cnyae cheNoBek 6ydt HaxoDntbCra Ha MeCTe NocIeHrero 3aMepeHHoro MeCTOIOJoxHeNna nepei notepei cnHaJa.
CmB0n cnTyHnka o6o3Naaet, kaK oblyHo, KaYeCTBO cnTyTHNKOBOrO CnHaJa O MeCTOnIOJoxeHN.
Ecln 3OT CMBON Mnaet, CnHaJI He npHnMaetcN MeCTOnONOxHne Ha TpaekTopNIpyTN HETOHyoe.
7.2 Pekim MecToIOnIOKeHn
3TOT pexkIM nO3BONJeY3HaTb YmCnEHNHe 3NaYeHne reOrpaNuecknx KoOpDnHAT, COOTBeTCTByUOnx BaWemy MeCTOHAXOJEnIO B DaHHb MOMeHT.
Перраз CTpoKa COOTBETCTBYET SHPOTE (MECTONOJOXEHNE CEBEP-10I NO OTHOSEHNO K 3KBATOpy). BTopar CTpoKa COOTBETCTBYeT DOnJIrOte (MECTONOJOXEHNE BOCTOK-3anaD NO OTHOSEHNO K MePdNAnHy PRINHBUva).
3Tn daHHbIe coCToR n3 6yKBbl, COOTBETCTBYIOUeJ OdHoi n3 CTOPOH CBeta, n yTNOBOrO 3NaueHnI rO 0 do 90^
Tpety cTPOKa COOTBcTcByet BbICote (ELEVATION) OTHOCHTeHbO ypOBnMOPa.
Ecln npneem GPS cnHaHa He npaBnIbHb (MeHee 3 cTyTHNKOB):
KoOpDnHaTbI 6yDyTH HnyeBbIMN (0^,0^)
Ecnn cnHnAn cna6bI (3 cnTyTHnKa) daHHbIe2D 6yDt ToCHbIM, KpOME BbcOTbl
(3NaueHHe 2D FIXED B MeHIO NyeTeBOoNTeB/ GPS- info).
EcnIcRHaJI noJIHbI (CIMBOJ cnYTHNka OTObpaXaETc NOCTOARHO, 3DFIXED MeHIO GPS- info), TOrJa Bce DaHHbIe, BKJIouyA BbICOTy HAD yPOBHE MOpR, 6yDyt TOHbIM.
8.Полезныеcfyнкшn
8.1.Измерениpe3yЛьТаTOB cNoPTnBbIX 3aHЯТии 3aIINcB daHHbIX O MecToNOLOKeHIn
-
B naujale Baawero cnpTnBHoro 3aHHTy y6eDntEcB, YTO:
-
KeyMaze 300 npabnIbHO BKJIOueH, 6aTape 3apXeHa DoCTaTOHNO dIy BpemHei BaWero 3aHTYn.
-CirHan GPS npabunbHo fKcnpyetc (CNMBOJ aHTehHbI rOpNT nocToHnO).Pn Heo6xodmIoCTe NpeMeCTntCe, YTO6bl HauTn cHtoe Te Heo (N36aerTe NCTBt, TyHHeJe, BByCOTbX 3aHn) 3aTeM octAHOBInTeCB DnE COKpaueHn BPEMeH3aYcKa (OsbHIO 30 cekyHd).
-
Annapat pa3meuen TaK, yTo aHTeHHa (IOnI pIaTKeBOB YacbIO BJeBOY CaCTN 3KpaHa) HapabJIeHa MAKCIMaJIbHO BO3MOXHO K He6y.
2.Посnéобателно нахимауte на Конky MODEДпгсяразда в ржимSPORT.Бы можениянмс悔иь нахьhoe ИЗбрахене,нав?
VIEW/SET,дпг позmedениинфорmaиини?
<|im_start|>assistant
3. Korda Bby 6ydeTe rOToBb HaayTb, HaxMnTe Ha OK, YTObI 3aNyCTNb CeKYHdOmeynpaxHeHnHaayTb 3aINCb DaHHbIX.
4. Bo Bpemra 3aHnTb Bbl MoKeTe octaHOBt b 3aHOBO 3aNyCTntb cekyHdomepe, haxab HA OK (TOCHN GPS MeToOnIOXeHne H he 6dyT 3aNcBbTaBcY, noka cekyHdomep OCTaOHnEH, npoiJeHHoe pAcToTHNe (Ha npaBoV cTpOke), HapotOB, 6yDet N3MepeHo, HeCMOTPr Ha BpemHeHyIO octaHOBky GPS).
5.B KOHcE BaUeO ynpaxHeHnO octaHOBITE cekyHdOMep, Hxab Ha OK.
6. CoxpaHnTe BaW fain ynpaxHeHn, haxab Ha ESC, 3aTEM noTbepdnte KOMaHny, haxab Ha OK. Tenepb fain rotOB K nepeDaue DaHHbx Ha KOMIbTOEr INI MOnKet HeNOCpeDCTBEHNO OToBpaXaTbCn IOMOuBo FOHyHKUIN SPORT RECORD.
7. CeYac Bbl MOKeTe BbIKIIOHTb GPS HABINrATOp INN 3aIINCaTb HOBOe 3aHrTne CNOPTOM.
CnpaBka AmepnKaHcKoI FeepaJIbHoN KOMnCCnI NO KOMMyHnKaZmF (FCC)
Danhoe n3deJine COOTBETCTByeT nyHKTy 15 perIamEnTa FCC.
Oo TepaoTope yivea aetoc autc o paaatoiao, too kautepn th eivai kai n hwn.
7.1.3.7 upload TO PC
Autn n etiioy n tiptpeTt npoepion ts oukeunc otn leitoupyia eetadoons PC.
7.1.3.9 ABOUT PRODUCT
Autn n etiioy n ttpettei tvv eapavion tnc ekooqns tou oawtepiokou loviikou tns oukeuns (Firmware).
7.1.3.10 UPDATE FROM PC
Autn n ETTIaoyn EITITpeTTEI TIV avaβaθμiσn Tou Firmware (εωτeρικό λογισμικό Tou KeyMaze 300) αΤΟ TO PC.
Kavte klik oTO YES via etiBéaiow nTg eTIIOyng oac kai otuVexia ouvodte Tn oukeun oTo PC me To kalwio USB tou npextai.
TIA TIV aKPIB iAdiKaia avaBaeMianS, OuBouLeuteTe Tc odnyieC tou loyioikou yia PC.