
HCA-200 - Audio accessory SONY ERICSSON - Free user manual and instructions
Find the device manual for free HCA-200 SONY ERICSSON in PDF.
User questions about HCA-200 SONY ERICSSON
0 question about this device. Answer the ones you know or ask your own.
Ask a new question about this device
Download the instructions for your Audio accessory in PDF format for free! Find your manual HCA-200 - SONY ERICSSON and take your electronic device back in hand. On this page are published all the documents necessary for the use of your device. HCA-200 by SONY ERICSSON.
USER MANUAL HCA-200 SONY ERICSSON
Installing the car handsfree 4
Sony Ericsson HCA-200
First edition (January 2004)
This manual is published by Sony Ericsson Mobile Communications AB, without any warranty. Improvements and changes to this manual necessitated by typographical errors, inaccuracies of current information, or improvements to programs and/or equipment, may be made by Sony Ericsson Mobile Communications AB at any time and without notice. Such changes will, however, be incorporated into new editions of this manual.
All rights reserved.
©Sony Ericsson Mobile Communications AB, 2003
Publication number: LZT 108 6885 R1A
Some of the services in this manual are not supported by all networks. This also applies to the GSM International Emergency Number 112. Contact your network operator or service provider if you are in doubt whether you can use a particular service or not.
Introduction
The Car Handsfree HCA-200 offers improved traffic safety by providing handsfree functionality and maintained sound quality with echo and noise cancellation. Fast battery charging is also provided.
Please read the text in the "Additional information" section of the HCA-200 User guide before using your car handsfree.
What products can I use with my car handsfree?
With the Car Handsfree HCA-200, you can use any Sony Ericsson phone that includes the In Car profile. Refer to the User guide for your phone.
Accessories
To further enhance your experience of the Car Handsfree HCA-200, we recommend the following accessories:
- Advanced Music Mute HCE-16 – for enhanced sound experience in the car. You hear the caller in the car stereo loudspeakers instead of in the loudspeaker of the Car Handsfree HCA-200.
- Goosenck Microphone HCE-14 – for enhanced sound experience for the person you are talking to.
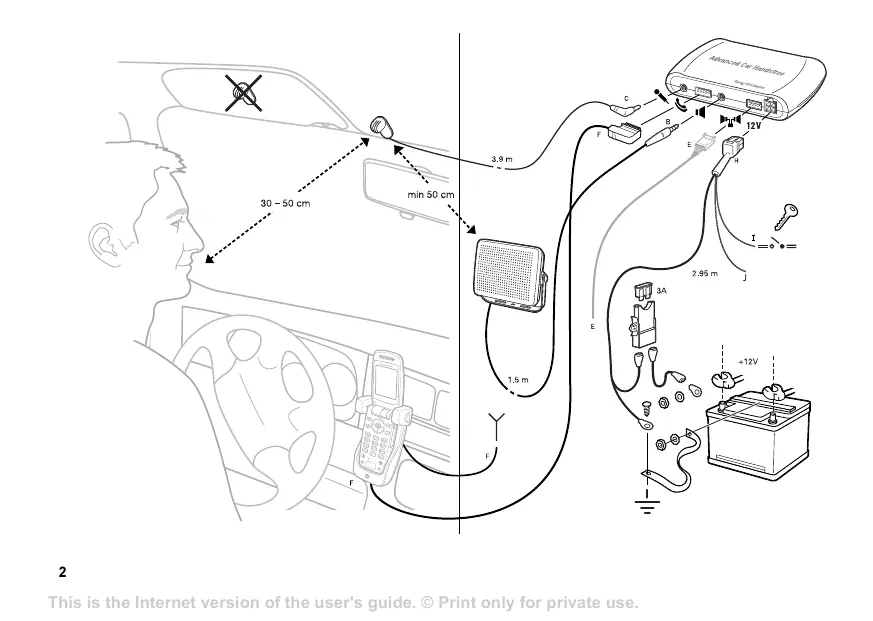
Installing the car handsfree
The Car Handsfree HCA-200 kit includes:
- electronic box
loudspeaker - microphone
system cable - antenna cable (in some kits)
- fuse kit
- cables (power cables, ignition sense, music mute)
- User guide and Installation guide
To be able to use your Car Handsfree HCA-200, you need to buy a Sony Ericsson Car Holder, if not included in your HCA-200 kit.
Please make sure that all car handsfree equipment is installed in a safe location. If the car is equipped with an air bag, make sure that the handsfree equipment does not interfere with its function.
To install the car handsfree
Note: The car handsfree should be installed by authorized personnel.
- Disconnect the car battery.
- Place the electronic box under the dashboard of the car, for example. See the illustration on page 2. Use the velcro to fasten the electronic box.
- Connect the bundle of power cables (red and black), the music mute cable (yellow) and the ignition sense cable (blue) to the electronic box (socket H).
- Connect the black power cable to negative ground. Connect the red power cable via the fuse kit to the car battery, 12 volts.
Note: Please note that supply voltages other than 12 volts may cause damage to the equipment.
- Connect the blue ignition sense cable to the ignition of the car. See I in the illustration on page 2.
- Connect the yellow music mute cable to the car stereo. See J in the illustration on page 2.
- Place the microphone on a fixed part of the car interior, directed towards the driver. Connect the microphone to the electronic box (socket C).
-
Place the loudspeaker at least 50~cm (20 inches) from the microphone. Connect the loudspeaker to the electronic box (socket B).
-
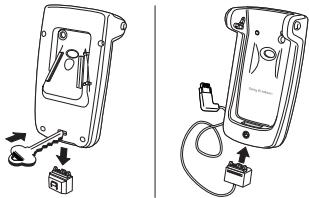
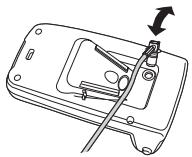
Replace the connector in the car holder with the connector attached to the system cable. See the pictures below.
10.If an external antenna is to be used with the car handsfree, see To attach an external antenna to the car holder, before you continue with step 11.
11. Choose a suitable location on the dashboard of the car for the car holder. The driver must be able to reach the phone keypad from the normal driving position. Fasten the car holder to the location you have chosen.
12. Connect the system cable to the electronic box (socket F).
13. Connect the car battery.
- Switch on your phone and car radio. If noise occurs, try another position for the car holder. Please see the User guide for the car holder.
To attach an external antenna to the car holder
- Follow steps 1-9 in To install the car handsfree.
- Attach the antenna connector to the car holder. Press until you hear a click.
- Place the antenna cable in the cutting.
- Connect the antenna cable to the car antenna. Continue with step 11 in To install the car handsfree.
Using the car handsfree
When the installation of the car handsfree has been completed, we recommend that you test the communication between your phone and the car handsfree by turning on the phone, placing it in the car holder, and then by making a call.
For Troubleshooting issues, see the HCA-200 User guide.
For information about support and for User guides for Sony Ericsson products, see www.sonyericsson.com.
Espanol
Introducción 8
©Sony Ericsson Mobile Communications AB, 2003
出版号:LZT1086885R1A
©Sony Ericsson Mobile Communications AB, 2003
© Sony Ericsson Mobile Communications AB, 2003
印刷品編號:LZT1086885R1A