
Xperia X10 Mini Pro - Mobile Phone SONY ERICSSON - Free user manual and instructions
Find the device manual for free Xperia X10 Mini Pro SONY ERICSSON in PDF.


| Product Type | Mobile Phone |
| Brand | Sony Ericsson |
| Model | Xperia X10 Mini Pro (U20i) |
| Dimensions | 90 x 52 x 17 mm |
| Weight | 120 g |
| Battery Type | Li-Ion 1500 mAh (BST-41) |
| Standby Time | Up to 440 h |
| Talk Time | Up to 6 h |
| Operating System | Android 1.6 (Eclair), upgradable to 2.1 |
| Processor | Qualcomm Snapdragon S1 MSM7227, 600 MHz |
| RAM | 256 MB |
| Internal Storage | 512 MB ROM (up to 128 MB user available) |
| Display | 2.55 inch TFT, 240 x 320 pixels |
| Camera | 5 MP, autofocus, LED flash |
| Connectivity | Wi-Fi 802.11 b/g, Bluetooth 2.1, GPS, microUSB 2.0 |
| Keyboard | Slide-out QWERTY |
| Memory Card | microSD (up to 16 GB) |
| Maintenance | Clean with soft, dry cloth; avoid moisture and extreme temperatures |
| Safety | Do not disassemble, use only approved chargers and batteries |
| Spare Parts Availability | Batteries, chargers, and accessories available online |
| Repairability | Limited service support; user-replaceable battery |
Frequently Asked Questions - Xperia X10 Mini Pro SONY ERICSSON
User questions about Xperia X10 Mini Pro SONY ERICSSON
0 question about this device. Answer the ones you know or ask your own.
Ask a new question about this device
Download the instructions for your Mobile Phone in PDF format for free! Find your manual Xperia X10 Mini Pro - SONY ERICSSON and take your electronic device back in hand. On this page are published all the documents necessary for the use of your device. Xperia X10 Mini Pro by SONY ERICSSON.
USER MANUAL Xperia X10 Mini Pro SONY ERICSSON
natural_image
Stylized blue and white abstract sphere with glossy highlights (no text or symbols)XPERIA™
X10 mini pro
Extended User guide
Contents
User support....6
Important information....7
Getting started....8
Assembly....8
Turning the phone on and off....9
Screen lock....9
Setup guide....9
Getting to know your phone....11
Phone overview....11
Battery....11
Using the hardware keys....13
Using the touch screen....13
Home screen....15
Managing applications....17
Status bar....20
Notification panel....22
Notification LED....23
Entering text....23
SIM card....24
Memory....24
Stereo portable handsfree....25
Adjusting the volume....25
Phone settings overview....26
Internet and messaging settings....28
Data traffic....29
Network settings....29
Calling....31
Emergency calls....31
Call handling....31
Voicemail....32
Multiple calls....32
Conference calls....33
Call settings....33
Phonebook 35
Getting contacts into your phone....35
Managing your contacts....36
Communicating with your contacts....38
Favourites ....39
Sharing your contacts....39
Messaging....40
Using text and multimedia messaging....40
Text and multimedia message options....41
Email....42
Using email....42
Using email accounts....44
Gmail™ and other Google services ....44
Google Talk™ 45
Sony Ericsson Timescape™ 46
Timescape™ main view....46
Timescape™ widget....46
Using Timescape™ 47
Timescape™ settings....48
Android Market™....50
Payment options....50
Downloading from Android Market™....50
PlayNow™ service....52
Before you download applications and content....52
Registering for a PlayNow™ account....52
Payment options....52
Downloading from the PlayNow™ service....53
Getting organised....54
Calendar....54
Calendar month view....55
Calendar reminders....55
Synchronising your calendar....56
Notes....56
Alarm clock....56
NeoReader™ application....57
Synchronising....59
Sony Ericsson Sync....59
Google Sync™ synchronisation service....60
Synchronising with a Microsoft® Exchange Server using the
RoadSync™ application....61
Connecting to wireless networks....62
Wi-Fi®....62
Virtual private networks (VPNs)....64
Web browser....65
Toolbar....65
Browsing the web....65
Navigating web pages....66
Managing web pages....66
Managing bookmarks....66
Managing text and images....67
Multiple windows....67
Downloading from the web....68
Browser settings....68
Connecting your phone to a computer....69
Transferring and handling content using a USB cable....69
PC Companion....69
Media Go™ 70
Bluetooth™ wireless technology....71
Phone name....71
Pairing with another Bluetooth™ device....71
Sending and receiving items using Bluetooth™ technology....72
Backing up and restoring....74
Types of content you can back up....74
Music....76
Copying media files to your memory card....76
Using the music player....76
Podcasts....79
TrackID™ technology....79
FM radio....81
FM radio overview....81
Moving between radio channels....81
Using your favourite radio channels....81
Making a new search for radio channels....82
Switching between the speaker and the handsfree....82
Videos 83
Copying media files to your memory card....76
Using the video player....83
YouTube™ 84
Taking photos and recording videos....85
Viewfinder and camera controls....85
Using the still camera....86
Using the video camera....88
Camera album....89
Sharing photos and videos....90
Location services....91
Using GPS technology....91
Google Maps™ 91
Getting driving directions....92
Locking and protecting your phone....93
IMEI number....93
SIM card protection....93
Screen unlock pattern....94
Updating your phone....95
Updating your phone wirelessly....95
Updating your phone using a USB cable....95
Troubleshooting....96
My phone is not working as expected....96
Resetting the phone....96
I cannot charge the phone....96
No battery charging icon appears when I start charging the phone...96
The battery performance is low....96
I cannot transfer content between my phone and the computer, when using a USB cable....96
I cannot use Internet-based services....97
Error messages....97
Legal information....98
Index......99
User support
Access user support directly in your phone through the Support application. For example, you can open a User guide with instructions on how to use your phone. You can also get troubleshooting and other help from the Sony Ericsson support zone, and from our contact centres.
• Support application features:
- User guide in the phone – read and search an extended User guide.
- Phone optimizer – enhance battery and software performance, and improve connectivity.
- Educate yourself – read tips and tricks, get the latest news, and watch how-to-videos.
- Email support – send an email to our support team.
- Software updates – download the latest software.
- Support zone – visit www.sonyericsson.com/support from your computer to get the most from your phone.
- Troubleshooting – find common problems and error messages at the end of our User guides and on the support zone.
- Call centre – if all else fails. The relevant number is listed in the supplied Important information leaflet.
! The extended User guide is also available at www.sonyericsson.com/support.
To use the support application
1 From the Home screen, flick through the horizontal list of widgets and tap
Support
2 Find and tap the required support item.
Important information
Please read the Important information leaflet before you use your mobile phone.
Some of the services and features described in this User guide are not supported in all countries/regions or by all networks and/or service providers in all areas. Without limitation, this applies to the GSM International Emergency Number 112. Please contact your network operator or service provider to determine availability of any specific service or feature and whether additional access or usage fees apply.
Getting started
Assembly
To remove the battery cover

natural_image
Close-up of a black T-SEA smartphone with a blue circular arrow pointing to its side panel (no text or symbols visible)- Insert the tip of your finger or a thin object firmly into the opening on the side of the phone, between the phone and the battery cover. Then lift up the cover slowly.
! Do not use sharp objects that may damage parts of the phone.
To insert the SIM card and the memory card
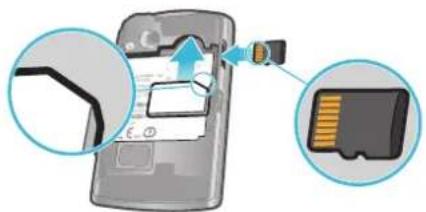
- Remove the battery cover, then insert the SIM card and the memory card in the relevant slots.
To insert the battery and attach the cover

1 Insert the battery with the connectors facing each other.
2 Place the cover over the back of the phone so that the camera lens hole in the cover is aligned with the camera lens.
3 Press down gently on all edges of the battery cover to make sure it gets attached on both sides.
To remove the SIM card

1 Remove the battery cover.
2 Place your finger tip or nail on the orange release catch and slide it outwards to remove the SIM card.
To remove the memory card

natural_image
Diagram showing two views of a mechanical component before and after assembly, with no visible text or symbols.- Remove the battery cover, then press the edge of the memory card and draw it outwards. Release and remove.
Turning the phone on and off
To turn on the phone
1 Press and hold down the 🔊key-on the top of the phone.
2 If your screen goes dark, press □ or press ◎ before to activate the screen.
3 Drag the screen lock icon across the screen to unlock it.
4 Enter your SIM card PIN, when requested, and select OK.
5 At first startup, follow the instructions in the setup guide.
Your SIM card PIN is initially supplied by your network operator, but you can change it later from the Settings menu. To correct a mistake made while entering your SIM card PIN, press ☐
To turn off the phone
1 Press and hold down ①/π-0 until the options menu opens.
2 In the options menu, tap Power off.
3 Tap OK.
Screen lock
When your phone is on and left idle for a set period of time, the screen darkens to save battery power, and locks automatically. This lock prevents unwanted actions on the touch screen when you are not using it.
To activate the screen
- Press or press briefly
To unlock the screen
1 Press no activate the screen.
2 Drag the icon along the screen lock path to the other side.
To lock the screen manually
- When the screen is active, briefly press the Ⓡkey.0
Setup guide
The first time you start your phone, a setup guide explains basic phone functions and helps you enter essential settings. Set up your phone so that it works to your needs. Import your old contacts, select your phone language, optimise your wireless network connection settings, and much more.
The setup guide covers the following:
• Basic phone settings such as language, Internet, time and date.
- Wi-Fi® settings – speed up your connection and decrease data transfer costs.
- Application settings – helps you with email setup, online service accounts, and contact transfers. You can also refer to the respective chapters in the in-phone User guide, also available at www.sonyericsson.com/support, for more help with the following:
- Info on your phone's hard keys
- Entering text
Wi-Fi® - Sony Ericsson Sync
Before you can import contacts via a synchronisation account, you first need to set up the synchronisation account and back up your old contacts to it. If you do not want existing contacts saved on your memory card or SIM card to be synchronised, then you should import these contacts from the memory card or SIM card to your new phone before you set up the synchronisation account.
If you prefer, you can skip some steps and access the setup guide later from the applications panes or change the settings from the Settings menu.
Getting to know your phone
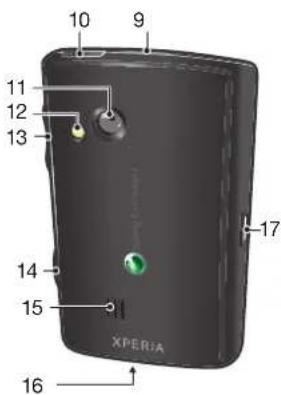
Phone overview
1 Sensors
2 Ear speaker
3 Notification LED (Battery status)
4 Touch screen
5 Back key
6 Home key
7 Menu key
8 Keyboard
9 Power key/Screen lock
10 3.5 mm headset connector
11 Camera lens
12 Camera light
13 Volume key
14 Camera key
15 Speaker
16 Strap hole
17 Connector for charger/USB cable

Battery
Your Android™ phone keeps you connected and updated wherever you are. This affects the battery life of your phone. Below are some tips on how to prolong battery life while still staying connected and up to date.
Battery performance
Standby time is the amount of time the battery can power your phone when calls are not being received or made. The more time your phone is in standby, the longer the battery lasts.
The following tips can help you improve battery performance:
• Charge your phone often.
- Downloading data from the Internet is power consuming. Turn off all data connections by disabling the Data traffic option from the status bar when you're not using the Internet.
- Set synchronisation applications (used to synchronise your email, calendar and contacts), to synchronise manually. You can also synchronise automatically but increase the intervals.
- Check the battery usage menu in the phone to see which applications use the most power. Your battery consumes more power when you use video and music streaming applications such as YouTube™. Some Android Market™ applications also consume more power. Limit your use of such applications if your battery is running low.
- Increase the interval between updates or set the interval to manual for Facebook™ and Twitter™ updates.
- Turn off GPS, Bluetooth™ and Wi-Fi® when you don't need these features. You can turn them on and off more easily by adding the Power control widget to your Home screen. You do not need to turn off 3G.
• Lower the screen display brightness level.
- Turn off your phone or use Flight mode if you are in an area with no network coverage. Otherwise, your phone repeatedly scans for available networks, and this consumes power.
- Use a handsfree device to listen to music. This consumes less battery than when you listen through the phone's loudspeakers.
- Visit www.sonyericsson.com/support or go to the Sony Ericsson Support application in your phone for an extended User guide. Here you can also find a video on how to maximise the battery performance.
! Lowering the screen display brightness and keeping the Bluetooth™ and Wi-Fi® enabled even though not in use, have a minor impact on the available battery life.
To turn off all data connections
1 From the Home screen, drag the status bar downwards to open the Notification panel.
2 Tap Data traffic, then uncheck the Data traffic checkbox to turn off all data connections.
Data connections are active when the Data traffic icon appears in the status bar.
To access the battery usage menu
1 From the Home screen, drag towards.
2 Find and tap Settings > About phone > Battery use to see which installed applications consume the most battery power.
To add the Data traffic widget to your Home screen
1 From the Home screen, press 📄
2 Tap Arrange widgets > Add widget.
3 Select the Data traffic widget. You can now turn on and off all data connections more easily.
To add the Power control widget to your Home screen
1 From the Home screen, press 📄
2 Tap Arrange widgets > Add widget.
3 Select the Power Control widget. You can now turn on and off Wi-Fi™, Bluetooth and GPS more easily.
Charging the battery
The phone battery is partly charged when you buy the phone. It may take a few minutes before the battery icon appears on the screen when you connect the phone to a power source. You can still use your phone while it is charging.
The battery will start to discharge a little after it is fully charged and then charges again after a certain time. This is to extend battery life and may result in the charge status showing a level below 100 percent.
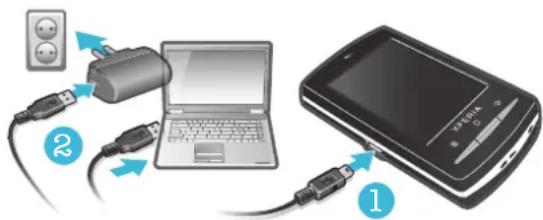
To charge the phone using the power adapter
- Connect the phone to a power outlet using the USB cable and the power adapter.
To charge the phone using a computer
1 Connect the phone to a USB port on a computer using the USB cable included in the phone kit.
2 Tap Charge phone.
Battery LED status
Green The battery is fully charged
Flashing red The battery level is low
Orange The battery is charging. The battery level is between low and full
To check the battery level
1 From the Home screen, drag towards.
2 Find and tap Settings > About phone > Status.
Using the hardware keys


Menu • Open a list of options available in the current screen or application

Home Go to the Home screen or to the applications panes from any application or screen Open the recently used applications window

Back Go back to the previous screen Close the on-screen keypad, a dialog box, an options menu, or the Notification panel
Using the touch screen
When your phone is on and left idle for a set period of time, the screen darkens to save battery power, and locks automatically. This lock prevents unwanted actions on the touch screen when you are not using it. You can also set personal locks to protect your subscription and make sure only you can access your phone content.
To open or highlight an item
- Tap the item.
To mark or unmark options
- Tap the relevant checkbox or in some cases the right side of the list option, to mark or unmark an option.

Marked checkbox

Unmarked checkbox

Marked list option

Unmarked list option
To pan
- When this option is available, drag the screen to pan.
Zooming
There are two ways to zoom. The zoom alternative depends on the application you are using. For example, the Web browser uses and , while the Camera album uses the touch, hold and drag alternative.
To zoom
- When available, tap or to zoom in or out.
- Touch, hold and drag upwards or downwards to zoom in or out.
You may have to drag your finger on the screen (in any direction) to make the zoom icons appear.
Scrolling
You can scroll up or down, and on some webpages you can also scroll to the sides.
! Dragging or flicking will not activate anything on the screen.
To scroll

natural_image
Illustration of a hand holding a smartphone displaying X-axis and battery, with no visible text or symbols on the device itself.- Drag your finger up or down on the screen to scroll.
To flick

- To scroll more quickly, flick your finger up or down on the screen. You can wait for the scrolling movement to stop by itself, or you can stop it immediately by tapping the screen.
Lists
You can browse through alphabetical lists by using the index icon.
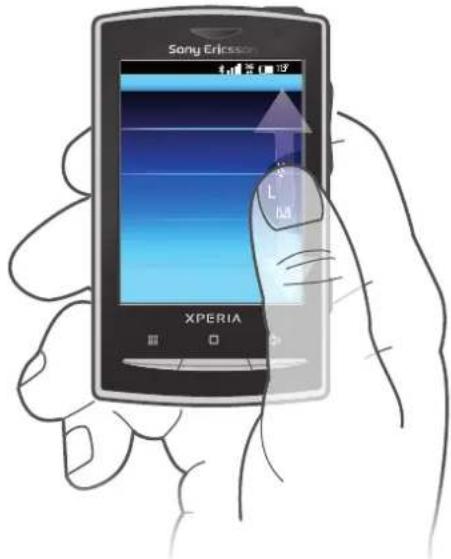
To use the index icon
1 From any alphabetical list, flick up or down to make appear.
2 Touch, hold and drag up or down to browse to an index letter.
Sensors
Your phone includes a light sensor and a proximity sensor. The light sensor detects the ambient light level and adjusts the brightness of the screen accordingly. The proximity sensor turns the touch screen off when your face touches the screen. This prevents you from unintentionally activating phone functions when you are engaged in a call.
Home screen
The Home screen is the starting point of your phone. You can personalise the Home screen by adding widgets, or by changing the wallpaper and the applications in the corners.
When you add more than one widget, the Home screen extends beyond the screen width. The corners on the Home screen are used to access applications or bookmarks quickly. You can add any application or bookmark to the corners.
When you go to the Home screen, some applications may continue to run in the background. If you do not want applications to run in the background, you should exit each application you have opened before going to the Home screen.
A widget is a part of an application on the Home screen. It displays important information from a particular application. For example, the Sony Ericsson Timescape™ widget displays incoming messages and the Media widget allows you to start playing music directly.

To view the extended Home screen
- Drag your finger to the sides of the screen.
To add widgets to the Home screen
1 Press ☐.
2 Tap Arrange widgets > Add widget.
3 Select a widget from the list.
4 Press ←to exit edit mode.
You can also go directly to edit mode by touching and holding a widget for a few seconds.
To delete a widget from the Home screen
1 Press
2 Tap Arrange widgets.
3 Flick horizontally across the screen and tap the widget you want to delete.
4 Tap ✗.
5 Tap Yes.
6 Press to exit edit mode.
You can also go directly to edit mode by touching and holding a widget for a few seconds.
To rearrange the corners of your Home screen
! The icons in the corners of your Home screen are actual applications, not shortcuts to applications.
1 From the Home screen, press 📄
2 Tap Arrange icons.
3 Touch and hold an item in one of the applications panes, then drag it to one of the corners. You can also interchange an item between different application panes and any corner.
4 Press to exit edit mode.
You can go directly to edit mode by touching and holding the relevant corner icon.
You can also add your favourite bookmarks as corner items or drag them away from the corners to the applications panes.
Wallpapers
Brighten up your Home screen with animated wallpapers. You can go to Android Market™ and other sources to download, for example, live wallpapers that change with the changing hours of the day.
To add a wallpaper
1 From the Home screen, press
2 Tap Wallpaper, then select a wallpaper.
Managing applications
Applications panes
Access applications in your phone from the applications panes. An applications pane is a screen containing icons that are shortcuts to different applications. These panes extend beyond the regular screen width, so you might have to flick left or right to find what you are looking for. You can create new panes and arrange the applications according to your own preferences.


Shows which applications pane you are in
To browse the applications panes
• From the applications panes, flick right or left.
To create a new applications pane
1 From the Home screen, press
2 Tap Arrange icons.
3 Touch and hold an item in the last pane until it vibrates and then drag it to the right.
4 Press to exit the edit mode.
To move an application
1 From the Home screen, press 📄
2 Tap Arrange icons.
3 Touch and hold an item until it vibrates and drag it to one of the corners or to another applications pane.
4 Press to exit edit mode.

You can go directly to edit mode by touching and holding any application icon.

The items in the applications panes are not shortcuts to applications but the actual applications themselves. When you move an application from the applications panes to a corner of your screen, or vice versa, the actual application gets moved, not the shortcut. There are no shortcuts to the applications.
To delete an applications pane
1 From the Home screen, press
2 Tap Arrange icons.
3 Touch and hold each item until it vibrates, and drag one by one to the left pane until the last pane to the right is empty.
4 Press to exit the edit mode.

Before you move items to the left make sure that the pane to the left has enough space.
Applications overview
| Alarm Clock | Set an alarm | |
| Album | View your pictures and photos | |
| Browser | Browse the web and download new programs and files | |
| Calculator | Perform basic calculations | |
| Calendar | Keep track of your appointments | |
| Camera | Take photos and record video clips | |
| Data monitor | Keep track of the amount of data your phone sends and receives | |
| Dataviz® RoadSync | Reach your corporate email, calendar and contacts (if on a Microsoft® Exchange server) | |
| Phone | Make and receive calls, switch between calls, set up conference calling and view your call history | |
| Send and receive emails | ||
| FM radio | Listen to the radio in your phone | |
| GmailTM | An email application that supports GmailTM | |
| Talk | Chat online | |
| Market | Go to Android MarketTM to download free and paid applications for your phone | |
| Messaging | Send and receive text and multimedia messages | |
| Music player | Play music and playlists | |
| Notes | Take notes | |
| [TA@C] | TrackID^TM | A music recognition service |
| [W7BW] | Video | View videos saved in your phone |
| [T3T0] | PlayNow^TM | Download a variety of exciting content to your phone |
 | YouTube | Share and view videos from around the world |
| [STKH] | Maps | View your current location, find other locations and calculate routes |
 | Timer | Count down time |
| [H8XC] | Settings | Tailor phone settings to your own liking |
| [ZZV8] | Stopwatch | Keep track of time |
| [OSD0] | Sony Ericsson Sync | Synchronise your contacts, calendar and more |
| [YTDV] | Touchnote | Send printed postcards to your family and friends |
| [WY40] | Support | Find out more on how to use your phone |
! Some applications are not supported by all networks and/or service providers in all areas.
Applications you download appear in the applications panes.
Recently used applications window
You can view and access recently used applications from this window.
To open the recently used applications window
- From any application, press and hold down □
Application menu
You can open a menu at any time when you are using an application by pressing the ____ key on your phone. The menu will look different depending on which application you are using.

To open a menu in an application
• While using the application, press 📄.
A menu is not available in all applications.
Clearing your application data
You may sometimes need to clear data for an application. This might happen if, for example, the application memory becomes full, or you want to clear high scores for a game. You might also want to erase incoming email, text and multimedia messages in some applications.
To clear all cache for an application
1 From the Home screen, drag towards.
2 Find and tap Settings.
3 Tap Applications > Manage applications.
4 Tap the desired application.
5 Tap Clear cache.
It is not possible to clear the cache for some applications.
To delete an installed application
1 From the Home screen, drag upwards.
2 Find and tap Settings.
3 Tap Applications > Manage applications.
4 Tap the desired application.
5 Tap Uninstall.
It is not possible to delete some preinstalled applications.
Permissions
Some applications need to access parts of your phone to be able to work properly. For example, a navigation application needs permissions to send and receive data traffic, and access your location. Some applications might misuse their permissions by stealing or deleting data, or reporting your location. Make sure you only install and give permissions to applications you trust.
To view permissions of an application
1 From the Home screen, drag towards.
2 Find and tap Settings.
3 Tap Applications > Manage applications.
4 Tap the desired application.
5 Scroll down to view Permissions.
Installing applications from unknown sources
Installing applications of unknown or unreliable origin can damage your phone. By default, your phone is set to block such installations. However, you can change this setting and allow installations from unknown sources.
To allow the installation of applications from unknown sources
1 From the Home screen, drag upwards.
2 Find and tap Settings > Applications.
3 Mark the Unknown sources checkbox.
Status bar
A status bar at the top of the screen displays phone status information and notifications. Notification icons appear on the left side of the status bar. Phone status icons appear on the right side. From the status bar you can access the notification panel.

Phone status icons
The following status icons may appear on your screen:
Signal strength
No signal
Roaming
GPRS is available
EDGE is available
3G is available
Sending and downloading GPRS data
Sending and downloading EDGE data
Sending and downloading 3G data
Battery status
The battery is charging
GPS is activated
Flight mode is activated
A headset is connected
The Bluetooth function is activated
Connected to another Bluetooth device
The SIM card is locked
The microphone is muted
The speakerphone is on
The phone speaker is muted
Vibrate mode
An alarm is set
Data traffic notification is on
Notification icons
The following notification icons may appear on your screen:
New email message
New text message or multimedia message
Problem with text message or multimedia message delivery
New instant message
New voicemail
30 An upcoming calendar event
A song is playing
Problem with sign-in or synchronisation
The memory card is full
The Wi-Fi® connection is enabled and wireless networks are available
The phone is connected to a computer with a USB cable
Error message
Missed call
Call on hold
Call forwarding on
Downloading data
Uploading data
More (undisplayed) notifications
Notification panel
In the Notification panel, notification icons are displayed in a detailed view. You can open notifications, such as messages, reminders, or event notifications directly from the Notification panel. You can also open running applications such as the music player or the radio.
To open the Notification panel
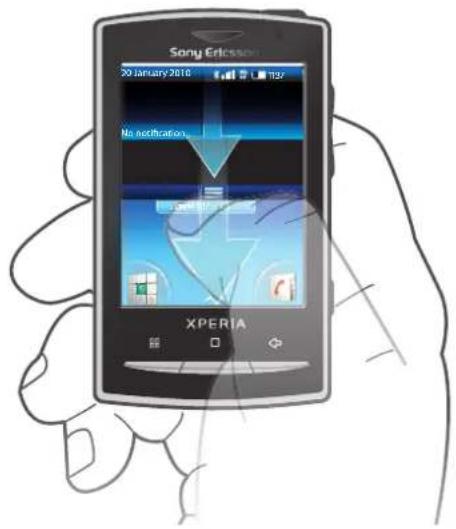
• Drag the status bar downwards.
To close the Notification panel
- Press
• Drag the Notification panel upwards.
To open a running application from the Notification panel
• From the Notification panel, tap the icon for the running application to open it.
To clear the Notification panel
• From the Notification panel, tap Clear.
Notification LED
The Notification LED (Light-emitting diode) is located at the top of the phone. It provides information on the phone status and on pending notifications. If it is flashing green, there is a pending message for you, or a missed call.
! If the phone battery level is low, pending notifications are not indicated by the LED.
Entering text
To enter letters, numbers and other characters, you can use either the slideout keyboard or the on-screen keypad. When you are using the slideout keyboard, you cannot enter text using the on-screen keypad.
Using the slideout keyboard
• To type lower-case letters, press the relevant letter keys.
• To type a single upper-case letter, press and then press the relevant letter key.
- To use all upper-case letters, press twice. To change back to all lower-case letters, press again.
- To type special characters, press and hold , and then press the letter key until the required character appears.
• To enter a character printed in blue, press and then press the relevant key.
• To use all the characters printed in blue, press twice and enter the relevant characters.
To change writing language using the slideout keyboard
1 When you enter text, tap the language icon in the lower left corner of the screen.
2 Select a language.
Using the on-screen keypad
When you start a program or select a field that requires text or numbers, the default on-screen keypad appears.
You can close the keypad at any time by pressing ↩.
To display the on-screen keypad and enter text
- Tap the text field and the keypad appears.
To shift between upper-case and lower-case letters
- Before you enter a letter, tap ↑ to switch to upper-case ↑ or vice versa.
To turn on the caps lock
- Before you type a word, tap ↑ or ↓ until appears.
To enter numbers using the keypad
- When you enter text, drag 1 2 3 left. A keypad with numbers appears.
To insert symbols
- When you enter text, drag 📄 & at.
To delete characters
- Tap to place the cursor after the character you want to delete, then tap ✗.
To use the landscape keyboard
- When you enter text, turn the phone sideways.

For the keyboard to support this feature, landscape mode must be supported by the application you are using, and your screen orientation settings must be set to automatic.
To change writing language using the on-screen keypad
1 When you enter text, tap the language icon in the upper right corner.
2 Select an option.
To enter text using multitap text input
1 When you enter text, tap the language icon in the upper right corner.
2 Tap Multitap to change to the multitap input method.
3 To begin writing, tap the on-screen key for the character you want to enter. Keep pressing this key until the desired character is selected. Then do the same for the next character you want to enter, and so on.
To enter text using quick text input
1 When you enter text, tap the language icon in the upper right corner.
2 Tap Quick text to change to quick text input.
3 To write a word, tap each character key only once, even if the letter you want is not the first letter on the key.
4 Tap the word that appears or tap to select a word from the list.
5 If the word you want is not in the list, tap Spell, make any necessary changes and tap Save.
To edit text
1 When you enter text, touch and hold the text field until the Edit text menu appears.
2 Select an option.
SIM card
The SIM (Subscriber Identity Module) card, which you get from your network operator, contains information about your subscription. Always turn off your phone and detach the charger before you insert or remove the SIM card.
PIN
You may need a PIN (Personal Identification Number) to activate the services and functions in your phone. Each PIN digit appears as *, unless it starts with emergency number digits, for example, 112 or 911. You can call an emergency number without entering a PIN.
Memory
You can save content on a memory card and in the phone memory. Music, video clips and photos are saved on the memory card while applications, contacts and messages are saved in the phone memory.
Memory card
You may have to purchase a memory card separately.
Your phone supports a microSD ^™ memory card, which is used for media content. This type of card can also be used as a portable memory card with other compatible devices.
Without a memory card you cannot use the camera, nor can you play or download music files and video clips.
Formatting the memory card
The memory card in your phone may be formatted in order to, for example, free memory.
All content on the memory card will be lost. Make sure you have made backups of everything you want to save before formatting the memory card. To backup your content you can copy it to your computer. For more information, refer to the chapter Connecting your phone to a computeron page 69.
To format the memory card
1 From the Home screen, drag towards.
2 Find and tap Settings > SD card & phone storage settings > Unmount SD card.
3 After you have unmounted the memory card, tap Format SD card > Erase everything.
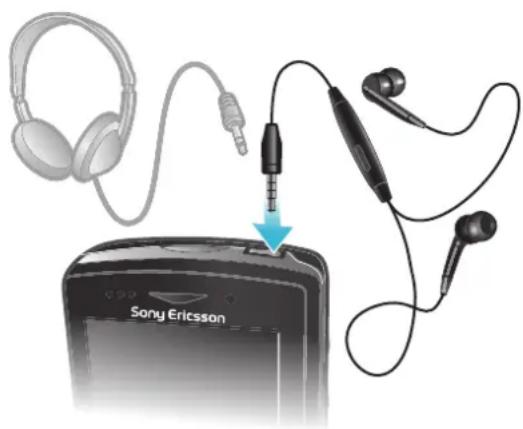
Stereo portable handsfree
natural_image
Illustration of Sony Ericsson headphones connected to an audio jack (no text or symbols on devices)To use a handsfree
1 Connect a portable handsfree.
2 To answer a call, press the call handling key. If you listen to music, it stops when you receive a call and resumes when the call has ended.
3 To end a call, press the call handling key.
! If a portable handsfree is not included with the phone, you may purchase it separately.
Adjusting the volume
You can adjust the ringtone volume for phone calls and notifications as well as for music and video playback.
To adjust the ring volume with the volume key
- Press the volume key up or down.
To adjust the media playing volume with the volume key
- When playing music or watching video, press the volume key up or down.
To set the phone to silent and vibrating mode
1 Press the volume key down to minimum. The phone, even though silent, is in vibrating mode. The icon ☐ appears in the status bar.
2 Press the volume key further one step down to turn off the vibrating mode. The icon appears in the status bar.
Phone settings overview
You can set up the phone to suit your requirements, for example, Date & time, Wireless & networks and Accounts & sync.
To access the phone settings
1 From the Home screen, drag towards.
2 Tap Settings.
To access the setup guide
1 From the Home screen, drag towards.
2 Tap Setup guide.
Time and date
You can change the time and date in your phone.
To set the date manually
1 From the Home screen, drag upwards.
2 Find and tap Settings > Date & time.
3 Unmark the Automatic checkbox, if it is marked.
4 Tap Set date.
5 Tap + or to adjust the date.
6 Tap Set.
To set the time manually
1 From the Home screen, drag upwards.
2 Find and tap Settings > Date & time.
3 Unmark the Automatic checkbox, if it is marked.
4 Tap Set time.
5 Tap + or -to adjust the hour and minute.
6 Tap AM to change to PM or vice versa.
7 Tap Set.
! If you want to use AM and PM, you have to unmark Use 24-hour format.
To set the time zone
1 From the Home screen, drag upwards.
2 Find and tap Settings > Date & time.
3 Unmark the Automatic checkbox, if it is marked.
4 Tap Select time zone.
5 Select an option.
To set the hour format
1 From the Home screen, drag upwards.
2 Find and tap Settings > Date & time > Use 24-hour format.
3 Mark the checkbox to shift between 12 hour and 24 hour format.
To set the date format
1 From the Home screen, drag towards.
2 Find and tap Settings > Date & time > Select date format.
3 Select an option.
Ringtone settings
To set a phone ringtone
1 From the Home screen, drag upwards.
2 Find and tap Settings > Sound & display > Phone ringtone.
3 Select a ringtone.
If the phone is in Silent mode, unmark the Silent mode checkbox before you set the ringtone.
To enable touch tones
1 From the Home screen, drag upwards.
2 Find and tap Settings > Sound & display
3 Select the Audible touch tones or Audible selection.
To select a notification ringtone
1 From the Home screen, drag upwards.
2 Find and tap Settings > Sound & display > Notification ringtone.
3 Select a ringtone and tap OK.
To set the vibrating alert
1 From the Home screen, drag upwards.
2 Find and tap Settings > Sound & display.
3 Mark the Phone vibrate checkbox.
Screen settings
To adjust the screen brightness
1 From the Home screen, drag upwards.
2 Find and tap Settings > Sound & display > Brightness.
3 To decrease the screen brightness, drag the slider to the left. To increase the screen brightness, drag the slider to the right.
4 Tap OK.
To set the screen to vibrate
1 From the Home screen, drag upwards.
2 Find and tap Settings > Sound & display > Haptic feedback. In some applications, the screen vibrates when you tap it.
To adjust the idle time before the screen turns off
1 From the Home screen, drag towards.
2 Find and tap Settings > Sound & display > Screen timeout.
3 Select an option.
To turn off the screen quickly, briefly press the power key ①/r-0.
To keep the screen on while charging the phone
1 From the Home screen, drag upwards.
2 Find and tap Settings > Applications > Development.
3 Mark the Stay awake check box.
Orientation
To prevent the screen orientation from changing automatically
1 From the Home screen, tap the applications bar.
2 Tap Settings > Sound & display.
3 Unmark the Orientation check box.
Preventing the screen orientation from changing automatically means that the phone stays in portrait orientation.
Phone language
You can select a language to use in your phone.
To change the phone language
1 From the Home screen, drag towards.
2 Find and tap Settings > Language & keyboard > Select locale.
3 Select an option.
! If you choose the wrong language and cannot read the menu texts, go to www.sonyericsson.com/support for help.
Flight mode
In Flight mode, no radio transmissions are made by the phone. You will not be able to turn on Bluetooth™ or Wi-Fi®.
To turn on Flight mode
1 From the Home screen, drag upwards.
2 Find and tap Settings > Wireless & networks.
3 Mark the Flight mode checkbox.
You can also press and hold ①/π0 to turn on Flight mode.
Internet and messaging settings
To send text and multimedia messages and to access the Internet, you must have a 2G/3G mobile data connection and the correct settings. There are different ways to get these settings:
- For most mobile phone networks and operators, Internet and messaging settings come preinstalled on your phone. You can then start using the Internet and send messages right away.
- In some cases you will get the option to download Internet and messaging settings the first time you turn on your phone. It is also possible to download these settings later from the Settings menu.
- You can manually add and change Internet and network settings in your phone at any time. Contact your network operator for detailed information on your Internet and messaging settings.
To download Internet and messaging settings
1 From the Home screen, drag towards.
2 Find and tap Settings > Sony Ericsson > Settings download.
To view the current Access Point Name (APN)
1 From the Home screen, drag towards.
2 Find and tap Settings > Wireless & networks > Mobile networks.
3 Tap Access Point Names.
! If you have several available connections, the active network connection will be indicated by a marked button to the right.
To configure Internet settings manually
1 From the Home screen, drag towards.
2 Find and tap Settings > Wireless & networks > Mobile networks > Access Point Names.
3 Press
4 Tap New APN +.
5 Tap Name and enter the name of the network profile you want to create.
6 Tap APN and enter the access point name.
7 Tap and enter all other information required by your network operator.
8 Press and tap Save .
Contact your network operator for detailed information about your network settings.
To reset the default Internet settings
1 From the Home screen, drag towards.
2 Tap Settings > Wireless & networks > Mobile networks > Access Point Names.
3 Press
4 Tap Reset to default
Data traffic
Turning off data traffic
You can disable all data connections over 2G/3G networks with your phone to avoid any unwanted data downloads and synchronisations. Contact your network operator if you need detailed information about your subscription plan and data traffic costs.
When data traffic is turned off, you can still use Wi-Fi® and Bluetooth™ connections. You can also send and receive multimedia messages.
To turn off all data traffic
1 From the Home screen, drag upwards.
2 Find and tap Settings > Wireless & networks > Mobile networks.
3 Unmark the Data traffic checkbox.
Data roaming
Depending on your network operator, it might be possible to allow mobile data connections via 2G/3G outside of your home network (roaming). Please note that data transmission charges may apply. Contact your network operator for more information.
Applications may sometimes use the Internet connection in your home network without any notification, for example, when sending search and synchronisation requests. Additional charges may apply for data roaming. Consult your service provider.
To activate data roaming
1 From the Home screen, drag upwards.
2 Find and tap Settings > Wireless & networks > Mobile networks.
3 Mark the Data roaming checkbox.
! You can't activate data roaming when data traffic is turned off.
Network settings
Your phone automatically switches between networks depending on availability. Some network operators allow you to switch networks manually, for example, if you are travelling abroad and want to use a particular network.
To save battery, you can limit your phone to only use GSM networks. Data downloads and uploads will however be slower. If you are going to download or upload large amounts of data, we recommend that you change to another network mode or connect to the Internet through a Wi-Fi® network.
To use GSM networks only
1 From the Home screen, drag towards.
2 Find and tap Settings > Wireless & networks > Mobile networks.
3 Tap Network Mode.
4 Select GSM only.
To select another network manually
1 From the Home screen, drag upwards.
2 Find and tap Settings > Wireless & networks > Mobile networks > Network operators.
3 Tap Search mode.
4 When a popup window appears, tap Select manually.
5 Select a network.
! If you select a network manually, your phone will not search for other network, even if you move out of range of the manually selected network.
To activate automatic network selection
1 From the Home screen, drag upwards.
2 Find and tap Settings > Wireless & networks > Mobile networks > Network operators.
3 Tap Search mode.
4 Tap Select automatically.
Calling
Emergency calls
Your phone supports international emergency numbers, for example, 112 or 911. You can normally use these numbers to make emergency calls in any country, with or without the SIM card inserted, if you are within range of a network.
To make an emergency call
1 From the Home screen, tap
2 Enter the emergency number and tap 📋 to delete a number, tap . ✗
You can make an emergency call without a SIM card inserted.
To make an emergency call while the SIM card is locked
1 Tap Emergency call.
2 Enter the emergency number and tap 📋 To delete a number, tap . ✗
Call handling
To make a call
1 From the Home screen, tap
2 If the call log is shown, tap to enter the dial pad view.
3 Enter the number of the recipient and tap 📄. To delete a number, tap ✗
To end a call
Tap
To make an international call
1 From Home screen, tap
2 Touch and hold down 0 until a “+” sign appears.
3 Enter the country code, area code (without the first 0) and phone number, then tap

To answer a call

- Drag to the right across the screen.
To decline a call
- Drag 🎨 to the left across the screen.
To mute the ringtone for an incoming call
- When you receive the call, tap

To change the ear speaker volume during a call
- Press the volume key up or down.
To turn on the loudspeaker during a call
Tap
To mute the microphone during a call
Tap
To enter numbers during a call
1 During a call, tap . A keypad appears.
2 Enter numbers.
Recent calls
In the call log, you can view missed received and dialled calls
To view missed calls
1 When you have missed a call, opears in the status bar. Drag the status bar downwards.
2 Tap the notifications for missed calls to open them in the call log.
To call a number from the call log
1 From the Home screen, tap
2 If the dial pad is shown, tap ☐ enter the call log view.
3 Tap the number you want to call.
To add a number from the call log to your contacts
1 From the Home screen, tap
2 If the dial pad is shown, tap enter the call log.
3 Tap + next to the number you want to add.
4 Tap an existing contact to add the number to that contact, or tap for a new contact.
5 Edit the contact details and tap Save.
Voicemail
If your subscription includes an answering service, callers can leave a voicemail message when you cannot answer a call. Usually, the voicemail number is saved on the SIM card. If not, contact your service provider to get your voicemail number. You can then enter the number manually.
To enter your voicemail number
1 From the Home screen, drag upwards.
2 Find and tap Settings > Call settings > Voicemail settings.
3 Enter your voicemail number.
4 Tap OK.
To call your voicemail service
1 From the Home screen, tap
2 Touch and hold down 1.
Multiple calls
If you have activated call waiting, you can handle multiple calls at the same time. When it is activated, you will be notified by a beep if you receive another call.
To activate or deactivate call waiting
1 From the Home screen, drag upwards.
2 Find and tap Settings > Call settings > Additional settings.
3 To activate or deactivate call waiting, tap Call waiting.
To reject a second call
- When you hear repeated beeps during a call, tap Busy.
To answer a second call and end the ongoing call
- When you hear repeated beeps during a call, tap Replace.
To answer a second call and put the ongoing call on hold
- When you hear repeated beeps during a call, tap Answer.
To make a second call
1 During an ongoing call, tap
2 Enter the number of the recipient and tap
3 If the recipient answers, the first call is put on hold.

The same procedure applies to subsequent calls.
To switch between multiple calls
- To switch to another call and put the current call on hold, tap the desired number or contact.
To end the ongoing call and return to the next call on hold
Tap
Conference calls
With a conference or multiparty call, you can have a joint conversation with two or more persons.
To make a conference call
1 During an ongoing call, tap 📄.
2 Dial the number of your second participant and tap
3 If the second participant answers, the first call is put on hold.
4 Tap.

To add more participants, repeat steps 1 to 4.
To end a conference call
- During the call, tap 🍒.
Call settings
Forwarding calls
You can forward calls, for example, to another phone number, or to an answering service.
To forward calls
1 From the Home screen, drag upwards.
2 Find and tap Settings > Call settings > Call forwarding.
3 Select an option.
4 Enter the number you want to forward the calls to and tap Enable.
To turn off call forwarding
1 From the Home screen, drag upwards.
2 Find and tap Settings > Call settings > Call forwarding.
3 Select an option.
4 Tap Disable.
Showing or hiding your phone number
You can select to show or hide your phone number on call recipients' devices when you call them.
To show or hide your phone number
1 From the Home screen, drag towards.
2 Find and tap Settings > Call settings > Additional settings > Caller ID.
3 Select an option.
Fixed Dialling Numbers
If you have received a PIN2 code from your service provider, you can use a list of Fixed Dialling Numbers (FDN) to restrict outgoing and incoming calls.
To enable or disable fixed dialling
1 From the Home screen, drag towards.
2 Find and tap Settings > Call settings > Fixed dialling numbers.
3 Tap Activate fixed dialling or Deactivate fixed dialling.
4 Enter your PIN2 and tap OK.
To access the list of accepted call recipients
1 From the Home screen, drag upwards.
2 Find and tap Settings > Call settings > Fixed dialling numbers > Fixed dialling numbers.
Telephone Typewriter (TTY)
Telephone Typewriter (TTY) is a telecommunications device for a deaf or speech impaired person which allows text communication on a standard phone call to be transmitted to another phone. If you use a TTY (Telephone Typewriter) device, you can enable your phone to communicate with it.
To enable a TTY mode
1 From the Home screen, drag upwards.
2 Find and tap Settings > Call settings >TTY mode.
3 Select an option.
Phonebook
In the Phonebook application, you can enter information for your personal contacts, for example, phone numbers and email addresses. When you view a contact, you get quick access to all communication with that contact.

If you have set up your phone for use with a synchronisation service account, you can synchronise your phone contacts with the account contacts. When you create or import contacts, you are asked to select if you want to synchronise the newly created or imported contacts with the account, or if you only want to use them in the phone (Phone contact). See Synchronising on page 59.
To view your contacts
- From the Home screen, tap to open the Phonebook application.

If you have not set up your phone for synchronisation with a web service, or imported SIM contacts, you can choose to do so the first time you open the Phonebook application. If you want to use the contacts you import from your SIM/memory card with a synchronisation service, you need to set up the synchronisation with the service before you import the contacts from the SIM/memory card.
Getting contacts into your phone

If you want to transfer contacts from your old phone to your new phone using any of the methods described below you should first refer to the User guide of your old phone. Also, remember that you need to back up your old contacts first before you can import them to your new phone. You can do this either by synchronising your old phone contacts with a synchronisation account, or by exporting the contacts to your SIM card or to a memory card.
You can get existing contact information into your phone using several methods:
- Use a synchronisation service, such as Sony Ericsson Sync or Google Sync™. This way, you can manage your contacts both directly in the phone and from a computer.
- Import contacts from a SIM card. You may not be able to transfer all information from one phone to another using this method because of limited memory on the SIM card. Also, some phones do not support the export of contacts to a SIM card.
- Import contacts from a memory card. Please note that it is not always possible to transfer contacts from one phone to another using this method, since some phones do not support the import or export of contacts from/to a memory card.
- Use a Bluetooth™ connection to transfer contacts from one phone to another. Both phones need to be switched on. In some phones, Bluetooth™ only works when a SIM card is inserted.
- You can send contacts via messaging services such as SMS, MMS or email. Not all phones support the sending of contacts via messaging services.
To synchronise your phone contacts with a synchronisation account
1 From the Home screen, tap
2 Press □□ then tap Accounts & sync.
3 To set up a synchronisation account, tap Add account and follow the on-screen instructions. To synchronise with an account you have already set up, tap the account name.
To import contacts from a SIM card
1 Insert the SIM card containing the contacts you want to import, then start the phone.
2 From the Home screen, tap 📋.
3 Press □□ then tap Import/export > Import SIM contacts.
4 Tap OK.
To import contacts from a memory card
1 Insert the memory card and start your phone.
2 From the Home screen, tap
3 Press ☐hen tap Import/export > Import from memory card.
4 Select an option and tap OK.
To receive contact data sent using Bluetooth™ technology
1 Make sure you have the Bluetooth™ function turned on and your phone set to visible. If not, then you cannot receive data from other devices.
2 When you are asked to allow a Bluetooth™ connection to your phone from the device sending the contact data, tap OK.
3 When you are asked to save the contact data, tap OK
To receive contacts sent using a messaging service
1 When you receive a new text message, multimedia message, or email message, open the message.
2 The received contact data appears as a vCard attachment. Tap, or touch and hold the vCard file to open a menu so you can save the contact data.
Managing your contacts
Create, edit and synchronise your contacts in a few simple steps. Select to display only the contacts you want to use in the phone. If you synchronise your contacts with more than one account, you can join contacts in your phone to avoid duplicates.
! Some synchronisation services, for example some social networking services, do not allow you to edit contact details.
To select which contacts to display
1 From the Home screen, tap
2 Press □□hen tap Contacts to view.
3 In the list that appears, mark and unmark the desired options. If you have synchronised the contacts with an account, that account appears in the list. You can tap the account to expand the list of options further. When you are finished, tap OK.
To add a contact
1 From the Home screen, tap
2 Tap
3 If you have synchronised your contacts with an account, select if you want to use this contact for the account, or if you want to use it only in the phone.
4 Tap Name, enter the name and tap Next.
5 Enter the phone number and tap Done.
6 To add an additional information field, such as an email adress or another phone number, tap Add more and select the desired address type.
7 To add a contact picture, tap 📷 and select a picture or take a photo.
8 To select a contact ringtone, scroll down, tap Add more > Ringtone, select a ringtone and tap Done.
9 When you are finished, scroll up and tap Save.
The phone number type is selected automatically when you enter the number. You can tap the number type field to change it, for example, from Mobile to Home.
If you add a plus sign and the country code before a contact phone number, you can use the number when you make calls from other countries.
Contact details screen
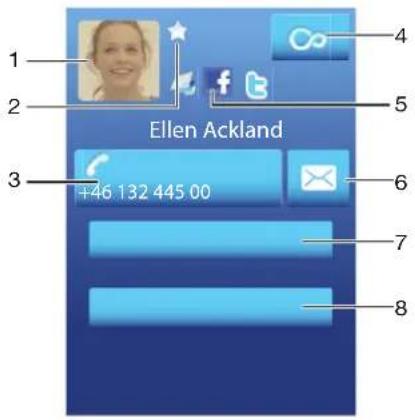
1 Contact picture
2 Indicates the contact is a favourite
3 Phone number of the contact
4 Infinite button for access to all communication with the displayed contact in Timescape™
5 Indicates web services the contact is linked to
6 Send a text or multimedia message to the contact
7 Edit contact information
8 Send contact's details and choose transfer method
To edit a contact
1 From the Home screen, tap
2 Tap the contact you want to edit.
3 Scroll down and tap Edit.
4 Edit the desired information. When you are finished, scroll up and tap Save.
To delete a contact
1 From the Home screen, tap
2 Tap the contact you want to delete.
3 Scroll down and tap Edit.
4 Scroll down and tap Delete contact > Delete.
To delete all contacts
1 From the Home screen, drag upwards.
2 Find and tap Settings.
3 Tap Applications > Manage applications.
4 Tap Contacts Storage.
5 Tap Clear data.
To export contacts to the SIM card
1 From the Home screen, tap
2 Press ☐hen tap Import/export > Export to SIM card.
3 Tap OK.
When you export contacts to your SIM card, the amount and the type of information you can transfer for each contact is limited. This is due to limited memory on SIM cards.
To export all contacts to the memory card
1 From the Home screen, tap
2 Press ☐hen tap Import/export > Export to memory card.
3 Tap OK.
Avoiding duplicate entries in your Phonebook
If you synchronise your contacts with a new account or import contact information in other ways, you could end up with duplicate entries in your Phonebook. If this happens, you can join such duplicates to create a single entry. And if you join entries by mistake, you can separate them again later.
To join contacts
1 From the Home screen, tap
2 Tap the contact you want to join with another contact, then tap Edit.
3 Press 📁hen tap Join contacts.
4 Select the contact you want to join with from the list of suggestions, or tap All contacts and select from all contacts.
5 Tap OK.
To separate joined contacts
1 From the Home screen, tap
2 Touch and hold the joined contact you want to edit, then tap Edit contact.
3 Press ☐, then tap Separate.
4 Tap OK.
Communicating with your contacts
To search for a contact
1 From the Home screen, tap
2 Tap Search.
3 Enter the first letters of the contact name you are searching for.
4 The hits appear in a list. If you get more than one hit, tap the down arrow to see the full list of hits.
5 Scroll to and tap the desired contact.
To call a contact
1 From the Home screen, tap 📞.
2 Tap the contact.
3 Tap the desired phone number of the contact.
To send a text or multimedia message to a contact
1 From the Home screen, tap
2 Tap the contact.
3 Tap next to the desired phone number of the contact.
4 Edit the message and tap Send.
You can only send text messages and multimedia messages to mobile phone numbers.
To send an email message to a contact
1 From the Home screen, tap 📞.
2 Tap the contact.
3 Tap the desired email address for the contact.
4 Edit the message and tap Send.
To view all communication with a contact in Timescape
1 From the Home screen, tap
2 Tap the contact you want to view the communication for.
3 Tap ∞ if you have never used Timescape before, tap Continue.
4 All missed calls, text and multimedia messages, Facebook and Twitter updates from the contact are displayed in Timescape.
Favourites
You can mark a contact as a favourite for quick access. In the favourites view, a contact is represented by its picture. If one of your favourite contacts does not have a picture, that contact is given a default picture.
To mark or unmark a contact as a favourite
1 From the Home screen, tap
2 Tap the contact you want to add to or remove from your favourites.
3 Tap Edit > Favourite > Save.
To access your favourite contacts
1 From the Home screen, tap
2 Tap the tab. The favourites appear as thumbnails.
To add a contact picture
1 From the Home screen, tap 📞.
2 Tap the contact you want to add a picture to.
3 Scroll down and tap Edit.
4 Tap
5 If you want to select a picture from the camera album, tap Photos and select a photo. If you want to take a photo with the camera, tap Take new photo and take the picture.
6 Crop the picture by using the frame and tap Save.
7 Scroll up and tap Save.
You can also add a picture to a contact from Album.
Sharing your contacts
To send a contact
1 From the Home screen, tap
2 Tap the contact you want to send, then tap Send contact.
3 Select an available transfer method, and follow the on-screen instructions.
To send all contacts
1 From the Home screen, tap 📞.
2 Press □ then tap Send all contacts.
3 Select an available transfer method, and follow the on-screen instructions.
Messaging
Using text and multimedia messaging
You can send and receive text messages from your phone using SMS (Short Message Service). If your subscription includes MMS (Multimedia Messaging Service), you can also send and receive messages that contain media files, for example, pictures and videos. A single text message may contain up to 160 characters. If you exceed 160 characters, then all your single messages are linked and sent together. You are charged for each 160-character message sent. When you view your messages, they appear as conversations, which means that all messages to and from a particular person are grouped together.
To send multimedia messages, you need the correct MMS settings in your phone. See Internet and messaging settings on page 28.
To create and send a message
1 From your Home screen, tap
2 Tap New message.
3 Tap Write message, enter your message text and tap Next.
4 To add a recipient, you need to select a contact or enter the full number manually in the text input field, and then tap Done.
5 If you want to add a media file, tap 📋 and select an option.
6 If you want to add or remove recipients before sending the message, press 📄 to add a recipient, tap Add recipient. To remove a recipient, tap Edit recipients and tap next to a recipient field. When you are finished, tap Done.
7 To send the message, tap Send.

If you exit a message before sending, it gets saved as a draft. The conversation gets tagged with the word Draft.
To read a received message
1 From your Home screen, tap
2 Tap the desired conversation.
3 If the message is not yet downloaded, tap the message, then tap Download message.

When you receive a text or multimedia message, 📧 appears in the status bar. To read the message, you can also drag the status bar downwards and tap the received message when the status bar is open.
To reply to a message
1 From your Home screen, tap
2 Tap the desired conversation.
3 Enter your reply and tap Send.

To forward a message
1 From your Home screen, tap
2 Tap the desired conversation.
3 Touch and hold the message you want to forward, then tap Forward message.
4 Select a recipient from the list, or tap New conversation to add a recipient who is not in the list.
5 Edit the message and tap Send.

To delete a message
1 From your Home screen, tap
2 Tap the desired conversation.
3 Touch and hold the message you want to delete, then tap Delete message > Yes.

To delete conversations
1 From your Home screen, tap.
2 Press □□hen tap Delete several.
3 Mark the checkboxes for the conversations you want to delete, then tap Delete.
To save a sender's number to a contact
1 From your Home screen, tap ✅.
2 Tap a conversation.
3 Tap the sender's number at the top of the screen.
4 Tap
5 Select an existing contact, or tap New contact if you want to create a new contact.
6 Edit the contact information and tap Save.
To call a message sender
1 From your Home screen, tap
2 Tap a conversation.
3 Tap the recipient at the top of the screen.
4 If the recipient is saved in your contacts, tap the phone number you want to call. If you have not saved the recipient in your contacts, tap 📋
To save a file contained in a message you receive
1 From your Home screen, tap
2 Tap the desired conversation.
3 If the message has not been downloaded yet, tap the message, then tap Download message.
4 Touch and hold the file you want to save, then select the desired option.
Text and multimedia message options
To change the notification settings for messages
1 From your Home screen, tap ✅.
2 Press 📁 then tap Settings.
3 If desired, tap Notification tone and select a notification sound.
4 If desired, tap Notification vibration and mark the checkbox to activate.
To change the delivery report settings for outgoing messages
1 From your Home screen, tap ✅.
2 Press □ then tap Settings.
3 Tap Delivery report to activate or deactivate the delivery report.
When a message has been delivered to the recipient, √ appears in the message.
To view messages saved on the SIM card
1 From your Home screen, tap ✅.
2 Press □ then tap Settings > SIM messages.
You can use your phone to send and receive emails through your regular email account.

You can set up synchronisation with a Microsoft® Exchange Server by using the Dataviz® RoadSync™ application in your phone. You can then use the RoadSync Mail application in your phone with your Microsoft® Exchange Server email account. Go to www.dataviz.com for more information.
To set up an email account in your phone
1 From your Home screen, drag upwards.
2 Find and tap Email.
3 Enter your email address and password, then tap Continue.
4 If the settings for the email account cannot be downloaded automatically, you can complete the setup manually.
! If you need to enter the settings manually, contact your email service provider for the correct email account settings. For example, you need to know if the server type is POP3 or IMAP.

To set up more than one email account, see To add an extra email account in your phone on page 44.
Using email
To create and send an email message
1 From your Home screen, drag upwards.
2 Find and tap Email.
3 If you are using several email accounts, tap the account you want to send the message from.
4 Tap Write new.
5 Tap To: and enter the recipient's address, then tap Done. You can add more recipients by repeating this step, or you can delete a recipient by tapping ✗.
6 Tap Subject, enter the email subject and tap Done.
7 Tap Write email, enter the message text and tap Done.
8 To attach a file, tap 📄. Tap the type of file to attach, then tap the file you want to attach from the list of files that appears.
9 Tap Send.
To receive and read email messages
1 From your Home screen, drag upwards.
2 Find and tap Email.
3 If you are using several email accounts, tap the account that you want to check for new messages, then tap Inbox.
4 To download new messages, tap 📋.
5 Tap the message you want to read.

If you press 📊 when you are viewing your list of email accounts in step 3, you will update the inboxes for all email accounts.
To view an email message attachment
1 From your Home screen, drag upwards.
2 Find and tap Email.
3 Find and tap the desired message.
4 If necessary, tap the attachment to download it. Then tap the attachment to open it.

If you want to edit a picture attachment, tap the icon in the left corner and select an option.
To save a sender's email address to your contacts
1 From the Home screen, drag towards.
2 Find and tap Email.
3 Find and tap the desired message.
4 Tap the sender's field at the top of the screen.
5 Tap the email address under From:, then tap Save contact.
6 Select an existing contact, or tap New contact if you want to create a new contact.
7 Edit the contact information and tap Save.
To reply to an email message
1 From the Home screen, drag towards.
2 Find and tap Email.
3 Find and tap the message you want to reply to.
4 Scroll down the message and tap Reply or, if there are many recipients, Reply all.
5 Tap the message text field, enter the message text and tap Done.
6 Tap Send.
To forward an email message
1 From the Home screen, drag upwards.
2 Find and tap Email.
3 Find and tap the message you want to forward.
4 Scroll down the message and tap Forward.
5 Tap To:, enter the recipient's address and tap Done.
6 Tap the message text field, enter the message text and tap Done.
7 Tap Send.
To delete email messages
1 From the Home screen, drag upwards.
2 Find and tap Email.
3 Find and tap the folder containing the messages you want to delete.
4 Press ☐, then tap Delete several.
5 Mark the checkboxes for the messages you want to delete, then tap Delete.
To change the email checking frequency
1 From your Home screen, drag upwards.
2 Find and tap Email.
3 If you have set up more than one email account, tap the account you want to adjust.
4 Press ☐, then tap Account settings > Email check freq. and select an option.
To change the inbox size of a phone email account
1 From your Home screen, drag upwards.
2 Find and tap Email.
3 If you have several email accounts, tap the account you want to edit.
4 Press 📄, then tap Account settings > Inbox size and select an option.
The number of messages that can be displayed in an email inbox in your phone is limited. Only the most recently received messages appear.
Using email accounts
To add an extra email account in your phone
1 From your Home screen, drag towards.
2 Find and tap Email.
3 Press □□hen tap Add account.
4 Enter your email address and password, then tap Continue.
5 If the settings for the email account cannot be downloaded automatically, you need to complete the setup manually.
To set an email account as your default account
1 From your Home screen, drag towards.
2 Find and tap Email.
3 Tap the account you want to set as the default account for composing and sending email.
4 Press □□ then tap Account settings.
5 Mark the Default account checkbox.
If you only have one email account, then this account is automatically the default account.
To remove an email account from your phone
1 From your Home screen, drag upwards.
2 Find and tap Email.
3 If you have several email accounts, tap the account you want to delete.
4 Press □□ then tap Account settings.
5 Press □ then tap Delete account > OK.
Gmail™ and other Google services
If you have a Google™ account, you can use the Gmail™ application in your phone to read, write and organise email messages. After you set up your Google™ account to work in your phone, you can also chat to friends using the Google Talk™ application, synchronise your phone calendar application with your Google Calendar™, and download applications and games from Android Market™.
To set up a Google™ account in your phone
1 From the Home screen, drag towards.
2 Find and tap Settings > Accounts & sync > Add account > Google™.
3 Follow the registration wizard to create a Google™ account, or sign in if you already have an account.
4 Your phone is now ready to use with Gmail™, Google Talk™ and Google Calendar™.
It is also possible to set up, or create, a Google™ account from the setup wizard the first time you start your phone. You can also create a Google™ account by going to www.google.com/accounts in the web browser of your computer.
To open the Gmail™ application
1 From the Home screen, drag upwards.
2 Find and tap Gmail™.
Google Talk™
You can use Google Talk™ instant messaging in your phone to chat with friends who also use this application.
To start Google Talk™
1 From the Home screen, drag towards.
2 Find and tap Talk.
To reply to an instant message with Talk
1 When someone contacts you on Talk, appears in the status bar.
2 Drag the status bar downwards, then tap the message and begin to chat.
Sony Ericsson Timescape™
Sony Ericsson Timescape™ changes the way you interact with others by collecting all your communications into one view. Every event – Facebook or Twitter updates, text and multimedia messages, missed calls – appears as a tile in a chronological flow on the screen. You can see a snack-size preview of an event before choosing to view the full content. You can also filter by event type to view all communications with a particular contact.
The services and features described in this chapter may not be supported in all countries or regions, or by all networks and/or service providers in all areas.
To start Timescape™
1 From the Home screen, drag upwards.
2 Find and tap Timescape™.
3 The first time you start Timescape, you can tap Log in and log in to your Facebook or Twitter account to receive Facebook and Twitter updates in Timescape. If you do not want to log in, tap Skip.
If you are already logged in to Facebook, Twitter, or another online service while setting up the phone for the first time, when you start Timescape™, the welcome screen will not be displayed and you are not required to log in again.
If you are not logged in and you tap Skip, then you can always log in from the Home screen by tapping Settings > Sony Ericsson > Timescape™ settings > Services.
Timescape™ main view

1 Filter icon
2 Status update icon
3 Contact icon
4 Refresh icon (only visible if you are logged in to a web service account)
5 Timescape ^TM tiles (in chronological order)
6 Tile content icon (displays the content you are currently viewing)
Timescape™ widget
For quick access, the Timescape™ widget can be added on the Home screen. See Home screen on page 15.
Using Timescape™
To scroll through tiles in Timescape™
- Touch and hold a tile, then drag it up or down.
Tile icons
The following icons on a tile indicate types of events. When you are previewing a tile, you can tap the icon or the tile to view the related event.

A missed call

A text or multimedia message

Updates from your Twitter contacts

Updates from your Facebook contacts
To log in to Facebook™ or Twitter™ from Timescape™
1 From the Home screen, drag upwards.
2 Find and tap Timescape™.
3 Press ☐, then tap Settings > Services.
4 Tap the service you want to log in to.
5 Enter your login details.

When you have logged in to a web service, you can update your status or view updates from the web service in Timescape™.
To update your Facebook™ or Twitter™ status in Timescape™
1 From your Home screen, drag towards.
2 Find and tap Timescape™.
3 Tap □.
4 Tap Select services.
5 Tap the service for which you want to update your status. If you not are logged in to the service, you need to enter your login details. When you have selected the desired service, tap Done.
6 Tap Edit status, enter your new status, and tap Send.
To log out of Facebook™ or Twitter™ from Timescape™
1 From the Home screen, drag upwards.
2 Find and tap Timescape™.
3 Press 📄, then tap Settings > Services.
4 Tap the service you want to log out of, then tap Log out.
To view an event in Timescape™
1 From your Home screen, drag towards.
2 Find and tap Timescape™.
3 Scroll to the tile for the desired event.
To call back from Timescape ^TM when you have a missed call
1 From the Home screen, drag upwards.
2 Find and tap Timescape™.
3 Scroll to the tile representing the missed call, then tap the tile.
4 In the list of calls, tap the desired number.
To reply to a text or multimedia message in Timescape™
1 From the Home screen, drag towards.
2 Find and tap Timescape™.
3 Scroll to a text or multimedia message tile, then tap the tile.
4 Edit the message and tap Send.
To add a number from a Timescape tile to a contact
1 From the Home screen, drag upwards.
2 Find and tap Timescape™.
3 Scroll to the tile containing the number you want to add to your contact.
4 Tap
5 Select the contact to which you want to add the number, or tap Create new contact to create a new contact.
6 Edit the contact details and tap Save.
To link a web service contact to a phone contact in Timescape™
1 From the Home screen, drag upwards.
2 Find and tap Timescape™.
3 Scroll to a tile representing an update from the web service contact.
4 Tap when tap OK.
5 Tap the phone contact which you want to link to the web service contact, then tap OK.
To refresh the Timescape ^TM main view
1 From your Home screen, drag towards.
2 Find and tap Timescape™.
3 Tap
When you refresh the main view, your phone connects to the Internet to update information from the email and web service accounts you have linked to Timescape™.
To filter the events displayed in Timescape ^TM
1 From the Home screen, drag upwards.
2 Find and tap Timescape™.
3 Tap the tile filter icon on the top left corner.
4 Select the types of events you want to view. You can filter on web services, Messages, Missed calls, or view all communications with a contact.
To view all communication with a contact
1 From the Home screen, drag upwards.
2 Find and tap Timescape™.
3 Scroll to the tile for the contact you want to view.
4 Tap
5 Tap the contact name.
You can only view all communication with a contact if the contact is saved in Contacts.
Timescape™ settings
To access Timescape™ settings
1 From the Home screen, drag towards.
2 Find and tap Timescape™.
3 Press □□, then tap Settings.
To change the events displayed in Timescape™
1 From the Home screen, drag towards.
2 Find and tap Timescape™.
3 Press □ then tap Settings > Select content.
4 Tap the desired checkboxes, then tap Done. If you are not logged in to a web service you want to select, tap the service and enter your login details.
To clear Timescape™ content
1 From the Home screen, drag upwards.
2 Find and tap Timescape™.
3 Press □□hen tap Settings > Clear content.
4 Tap the content you want to clear, then tap OK.
To schedule web service content updates in Timescape™
1 From the Home screen, drag upwards.
2 Find and tap Timescape™.
3 Press □□hen tap Settings > Schedule updates.
4 Tap the desired option. If you select Manual, no automatic updates will be made.
Android Market™
Open Android Market ^™ and enter a world of applications and games. You can browse these applications and games through "top downloads" and other categories. You can also rate an application or game and send feedback on it.
To use Android Market ^™ , you need to have a Google ^™ account. See To set up a Google ^™ account in your phone on page 44.
! Android Market™ may not be available in all countries or regions
To open Android Market™
1 From the Home screen, drag upwards.
2 Find and tap Market.
Payment options
When you download paid applications from Android Market ^™ , your purchase is handled through Google Checkout ^™ . In some cases, you can download free trial versions of applications through Android Market ^™ , but if you want to continue using the application, the download and payment of the full version must be made through the manufacturer's website.
- Google Checkout™ – Google Checkout is an online payment processing service. It offers, for example, information about your purchase history and gives you protection from credit card fraud by not giving your full credit card number to the vendor. You can use your Google email account to log in to Google Checkout from your phone. If you do not have a Google Checkout account, you can sign up for a new account from your phone. Payment can be made with a credit, debit, or gift card. Some vendors may also accept payment through your phone billing account.
It may not be possible to buy applications through Android Market™ in all countries or regions.
Downloading from Android Market™
You can download all kinds of applications from Android Market™, including free applications. If you pay for an application through Google Checkout, the application is tied to your Google account so that it can be installed an unlimited amount of times on any device.
Before you download applications
Before you start downloading from Android Market™, make sure that you have a working Internet connection.
Also, remember that you might incur data traffic charges when you download content to your phone. Contact your operator for more information.
To download a free application
1 In Android Market™, find an item you wish to download by browsing categories, or by using the search function.
2 Tap the item to view its details.
3 Tap Install.
4 If the application you want to download requires access to your data or control of any functions on your phone, an additional screen appears telling you what the application can access. Read this screen carefully because the functionality of your phone may be seriously affected if you proceed. Tap OK if you agree, or Cancel if you wish to cancel the download.
To download a paid application
1 In Android Market™, find an item you wish to download by browsing categories, or by using the search function.
2 Tap the item to view its details.
3 Tap Buy.
4 Enter your username and password to log in to Google Checkout. You can use your Google email account, or create a new Google Checkout account.
5 Once you are logged in, follow the instructions in your phone to complete your purchase.
To open a downloaded application
1 In Android Market™, press 📁hen tap Downloads.
2 Tap the downloaded application.

You can also access downloaded applications from the applications panes.
PlayNow™ service
You can use the PlayNow™ service to download applications, games and music. The PlayNow™ service offers both free and non-free downloads. You can download items from your phone, or from your computer.

The PlayNow ^™ service is not available in all countries.
Before you download applications and content
Before you download, make sure that you have an Internet connection. Also, you may need to have a memory card inserted in your phone to download content, such as music, ringtones and themes.
When you download content to your phone, you might be charged for the amount of data transferred. Contact your operator for information about data transfer rates in your country.
To start PlayNow™
1 From the Home screen, drag towards.
2 Find and tap
Registering for a PlayNow™ account
You can download content from the PlayNow™ service without registering for an account, but registration will give you some benefits. You will be able to pay using your credit card, and review your purchase and download history. You can also download all your music twice; once to your mobile and once in high-quality MP3 format to your computer. By registering, you will be able to redeem vouchers.
To register a PlayNow™ account
1 Tap, then press.
2 In the menu, tap Login > Sign up.
3 Enter your personal information, and then tap Sign up.
Payment options
There are two ways to pay for applications and other content you purchase from the PlayNow™ service:
- Credit card – pay with your credit card. You need to be logged in to your PlayNow™ account to be able to pay with your credit card. If you pay by credit card, the price will be lower than if you pay using Premium SMS. All your personal data is securely transferred using Secure Sockets Layer (SSL) encryption. When your purchase has been validated, the download will start automatically.
- Premium SMS – pay using SMS when you are in your home country. You do not have to be a registered user to pay for content using the Premium SMS method. Your purchased items will be automatically downloaded to your phone.
Both payment options are not always available in all countries, or with all service providers.
Vouchers
Vouchers are codes to access content such as music, applications and games offered in a campaign.
You can access the vouchers option, when you register for PlayNow. Ask your network operator for more information on voucher offerings and their codes in a specific campaign.
! Vouchers and campaigns are not available in all countries and on all networks. The vouchers option will still be visible in your phone, even if the voucher service is not available in your country.
To redeem a voucher
1 From the PlayNow™ screen, press
2 Tap Voucher.
3 Enter the voucher code.
4 Tap Redeem voucher.
! Vouchers are not offered in all countries or on all networks.
Downloading from the PlayNow™ service
You can download content from the PlayNow™ service both from your phone and from your desktop browser. Choose from a variety of applications, games and music.
To download an item from your phone
1 Open the PlayNow™ service and find an item you want to download by browsing categories, or by using the search function.
2 Tap the item to view its details.
3 Select to buy the item using your credit card or premium SMS. The item will start to download automatically.
To access a downloaded item
1 In the PlayNow™ service, press 📄, then tap Downloads.
2 Tap the downloaded item.
Getting organised
Calendar
Your phone has a calendar for managing your time schedule. If you have a Sony Ericsson account or a Google™ account, you can also synchronise your phone calendar with your web calendar. See Synchronising on page 59.

You can set up synchronisation with a Microsoft® Exchange Server by using the Dataviz® RoadSync™ application in your phone. You can then use the RoadSync Calendar application in your phone with your Microsoft® Exchange Server calendar. Go to www.dataviz.com for more information.
To open the Calendar application
1 From the Home screen, drag towards.
2 Find and tap Calendar.

When you open the Calendar application for the first time, it opens in month view.
To create a calendar event
1 From the Home screen, drag upwards.
2 Find and tap Calendar.
3 Tap +.
4 Tap Subject, enter a subject and tap Done.
5 Tap Time. Tap a number field and scroll up or down to select the desired hour or minute. Tap Done.
6 Tap Date. Tap a number field, then scroll up or down and tap the desired date. Tap Done.
7 If you synchronise your phone calendar with multiple calendars, tap Calendar, then tap the desired calendar for the appointment and tap Done.
8 Tap Reminder. Tap a number field, then scroll up or down and tap the desired number. Tap Done.
9 Tap Location and Description if you want to enter such details.
10 If you want to set a recurring appointment, tap Recurrence, mark the desired option and tap Done.
11 Tap Save.

When the appointment time approaches, your phone plays a short sound to remind you. Also, 30 appears in the status bar.
To view a calendar event
1 From the Home screen, drag towards.
2 Find and tap Calendar.
3 Navigate to the desired day, then tap the event.
To edit a calendar event
1 From the Home screen, drag upwards.
2 Find and tap Calendar.
3 Navigate to the desired day, then tap the event.
4 Tap Edit, edit the information and tap Save.
To delete a calendar event
1 From the Home screen, drag upwards.
2 Find and tap Calendar.
3 Navigate to the desired day, then tap the event.
4 Tap Edit.
5 Scroll down and tap Delete appointment at the bottom of the screen.
Calendar month view

1 View current month (only available when viewing another month than the current)
2 Select a month
3 Current day
4 Meetings indicator. A completely white bar indicates meetings throughout the day
5 Add appointment
To switch between day and month view
1 To switch from month view to day view, tap the desired day.
2 To switch from day view to month view, press
To view other days and months
- In the month view and day view, flick left to view the previous day or month, or flick right to view the next day or month.
In the month view, you can also tap the month selector at the top of the screen to change the month.
Calendar reminders
To view an event reminder
- When the reminder icon 📄 appears in the status bar, drag the status bar downwards, then tap the event reminder.
To dismiss an event reminder
1 When the reminder icon appears in the status bar, drag the status bar downwards. The Notification panel opens.
2 Tap the desired event.
3 Press
To disable an event reminder
1 When the reminder icon 30 appears in the status bar, drag the status bar downwards. The Notification panel opens.
2 Tap the desired event.
3 Tap Edit.
4 Scroll down and tap Reminder.
5 Tap (No reminder) > Done > Save.
Synchronising your calendar
If you have a Sony Ericsson account or a Google™ account, you can also synchronise your phone calendar with your web calendar. See Synchronising on page 59.

If you synchronise with Google Calendar™ and have access to multiple shared calendars in Google Calendar™, all appointments from all of the shared calendars will appear in the calendar view of your phone.
Notes
You can use the Notes application to write short messages and lists. You can also set reminders for notes you enter.
To add a note
1 From the Home screen, drag towards.
2 Find and tap Notes.
3 Tap Add note, enter some text by using the slideout keypad or the on-screen keypad and then tap ✗.
4 If you want to set a reminder, tap ▶ to change a number, tap the number, then scroll to and tap the desired number. When you are finished, tap Done.
5 If you want the note to appear on the Home screen, tap
6 When you are finished, press
To view and edit a note
1 From the Home screen, drag towards.
2 Find and tap Notes.
3 Scroll to and tap the note you want to edit.
4 Tap the note again and edit the relevant text.
5 Tap ✗
6 When you are finished, press
To view a note reminder
- When the reminder icon 📋 appears in the status bar, drag the status bar downwards, then tap the note reminder.
To delete a note
1 From the Home screen, drag towards.
2 Find and tap Notes.
3 Scroll through the notes and tap the note you want to delete.
4 Tap 📄 then tap Delete.
Alarm clock
You can use your phone as an alarm clock. You can use any sound in your phone as an alarm signal. If the phone is set to silent mode, the alarm signal will still sound.
To open the alarm clock
1 From the Home screen, drag towards.
2 Find and press Alarm.
To set a new alarm
1 From the Home screen, drag upwards.
2 Find and tap Alarm.
3 Tap Add new.
4 Set the time and tap Done.
To edit an existing alarm
1 From the Home screen, drag upwards.
2 Find and tap Alarm.
3 To adjust an existing time, tap it, scroll the bar up or down, and tap the desired time.
4 If you use 12-hour format, tap am or pm and select an option.
5 Tap Done.

The phone's general time settings determine whether a 12- or 24-hour format is displayed for the alarm.
To deactivate an alarm
1 From the Home screen, drag upwards.
2 Find and tap Alarm.
3 Drag the slider button to the left to grey out the alarm clock icon. The alarm is now deactivated.
To activate an existing alarm
1 From the Home screen, drag towards.
2 Find and tap Alarm.
3 Drag the slider button to the right to turn on the alarm.
To delete an alarm
1 From the Home screen, drag towards.
2 Find and tap Alarm.
3 Tap the desired alarm.
4 Tap Delete.
To set the alarm signal
1 From the Home screen, drag upwards.
2 Find and tap Alarm.
3 Tap the desired alarm.
4 Tap Alarm signal.
5 Select an option.
6 Tap Done.
To set a recurring alarm
1 From the Home screen, drag upwards.
2 Find and tap Alarm.
3 Tap the desired alarm.
4 Tap Recurrence.
5 Mark the checkboxes for the desired days, then tap Done.
To set a title for an alarm
1 From the Home screen, drag upwards.
2 Find and tap Alarm.
3 Tap the desired alarm.
4 Tap Alarm text and write something in the text field.
5 Tap Done.
To turn off or snooze an alarm when it sounds
- When the alarm signal is ringing, drag the slider to the right to turn it off, or tap Snooze to snooze it.
NeoReader™ application
Use the NeoReader™ application in your phone, to scan bar codes from print ads, publications, packaging, billboards, retail displays, broadcast media, and other media.
Depending on what types of codes you scan, you will be directly linked to, for example, a web page, a location on a map, or a web page with information about a product. By
scanning bar codes you do not have to enter long web addresses manually, or use search engines, to access the information you want.
The NeoReader™ application scans standard code types, such as Data Matrix, QR codes, Aztec Codes, and Code 128.
To start the NeoReader ^TM application
1 From the Home screen, drag towards.
2 Find and tap NeoReader™.
To scan a bar code
1 In the NeoReader™ application, hold the phone camera over the bar code until the complete bar code is visible in the viewfinder.
2 The phone automatically scans the bar code, and vibrates when the bar code is recognised. If the bar code is not recognised, tap to scan the code manually.
3 When the bar code is recognised, tap Continue to display the bar code information, or tap Back to cancel the operation.
To enter bar code numbers manually
1 In the NeoReader™ application, tap
2 Tap the text field, then enter the bar code numbers.
3 Tap OK.
NeoReader™ application menu overview
The following menu options are available in the NeoReader ^™ application:

Click to scan the bar code manually, using a higher image resolution

Enter the bar code numbers manually. This option can be used if your camera has difficulty reading the bar code

View a list of previously scanned bar codes

Set your preferences:
- Mute or enable the sound
- Enable or disable the message confirmation function. If enabled, you will receive a confirmation message asking if you want to continue to view bar code mobile web content after a successful scan
- Choose if you want to go back to the NeoReader™ application, or to the applications panes, after you have viewed the bar code content
- Select how many bar codes to keep in the history list

View information about the NeoReader™ application

Read more about different bar code types, and about how to use NeoReader ^TM

Select your personal settings. This information will be used to personalise the bar code content

Send a text message to invite a friend to download the NeoReader™ application

Exit the NeoReader™ application
Synchronising
Synchronising information between your phone and a computer is an easy and practical way to share the same contacts, messages or calendar events on both devices. You can use the applications in your phone to synchronise different information:
- Sony Ericsson Sync – synchronise your phone contacts with your personalised Sony Ericsson website. The contacts are safely stored in one place and you can use them with several phones.
- Google Sync™ – synchronise your phone with your Gmail™, Google Calendar™ and Google™ contacts.
- RoadSync™ – synchronise your phone with your corporate Microsoft® Exchange email, contacts and calendar to keep them with you all the time.
Sony Ericsson Sync
Use Sony Ericsson Sync to synchronise your phone contacts with a personalised Sony Ericsson website at www.sonyericsson.com/user.
At this website you can safely store and edit your contacts in one place. With Sony Ericsson Sync you can synchronise the contacts with several phones or a new phone. You need to have a Sony Ericsson account to use the website. See To set up a Sony Ericsson account in your phone on page 59.
To set up a Sony Ericsson account in your phone
1 From the Home screen, drag upwards.
2 Tap Settings > Accounts & sync.
3 Tap Add account > Sony Ericsson Sync.
4 Follow the registration wizard to create a Sony Ericsson account, or sign in if you already have one.
5 Tap Sync interval and select how often you want the phone to synchronise automatically.
6 Tap Done.
7 Tap your newly created Sony Ericsson Sync account and mark the checkboxes for the items you want to synchronise.
To synchronise manually using Sony Ericsson Sync
1 From the Home screen, drag upwards.
2 Tap Settings > Accounts & sync.
3 Tap Sony Ericsson Sync.
4 Press ☐, then tap Sync now.
To edit your Sony Ericsson account
1 From the Home screen, drag towards.
2 Tap Settings > Accounts & sync.
3 Tap Sony Ericsson Sync.
4 Mark or unmark the checkboxes for the items you want to synchronise.
5 If you need to change your account settings, tap Account settings, edit the desired information and tap Done.
To set a synchronisation interval
1 From the Home screen, drag upwards.
2 Tap Settings > Accounts & sync.
3 Tap Sony Ericsson Sync.
4 Tap Account settings.
5 Tap Sync interval and select an interval option that suits you.
To remove a Sony Ericsson account from your phone
1 From the Home screen, drag towards.
2 Tap Settings > Accounts & sync.
3 Tap Sony Ericsson Sync.
4 Tap Remove account.
5 Tap Remove account again to confirm.
The account is removed from your phone, but it still exists on the Sony Ericsson server. You can use it to log in to the Sony Ericsson website at www.sonyericsson.com/user.
Google Sync™ synchronisation service
You can use the Google Sync ^™ synchronisation service to synchronise your phone with your Gmail ^™ , Google Calendar ^™ and Google ^™ contacts.
To synchronise with your Google™ account, the account needs to be set up in your phone. See To set up a Google™ account in your phone for synchronisation on page 60.
To set up a Google™ account in your phone for synchronisation
1 From the Home screen, drag towards.
2 Tap Settings > Accounts & sync.
3 Tap Add account > Google™.
4 Follow the registration wizard to create a Google™ account, or sign in if you already have an account.
5 If you want the phone to synchronise automatically with your Google™ account, make sure Auto-sync is selected.
6 Tap your newly created Google™ account and mark the checkboxes for the items you want to synchronise.
! What items you can synchronise depend on which Google™ services you have activated in your phone.
To synchronise manually with your Google™ account
1 From the Home screen, drag upwards.
2 Tap Settings > Accounts & sync.
3 Tap the Google™ account you want to synchronise.
4 Press □□ then tap Sync now.
To change your Google™ synchronisation settings
1 From the Home screen, drag towards.
2 Tap Settings > Accounts & sync.
3 Tap the Google™ account you want to edit.
4 Mark or unmark the checkboxes for the items you want to synchronise.
To remove a Google™ account from your phone
1 From the Home screen, drag ▲ upwards.
2 Tap Settings > Accounts & sync.
3 Tap the Google™ account you want to remove from the accounts list.
4 Tap Remove account.
5 Tap Remove account again to confirm.
You can remove all your Google™ accounts from the accounts list, except for the first one. To remove the first account, you have to make a complete reset of the phone. See Resetting the phone on page 96.
Synchronising with a Microsoft® Exchange Server using the RoadSync™ application
You can use the RoadSync™ application in your phone to synchronise phone content with a Microsoft® Exchange Server. This way you can access all of your corporate emails, calendar events and contacts from your phone.
Once you set up the service, your emails, calendar events and contacts will be wirelessly synchronised with the RoadSync™ application in your phone. You can then set up new emails to be automatically pushed to your phone. It is also possible to set up automatic synchronisation schedules for peak hours and off peak hours.
For more information on the RoadSync™ application, go to www.dataviz.com.
To set up RoadSync ^TM synchronisation
! Contact your Microsoft® Exchange Server administrator for the correct account settings.
1 From the Home screen, drag towards.
2 Find and tap RoadSync.
3 Follow the on-screen instructions to set up a Microsoft® Exchange Server synchronisation.
4 Once you have entered your account settings, you can change the account preferences. When finished, press 📄, then tap Done.
To read emails in Roadsync
1 From the Home screen, drag upwards.
2 Find and tap RoadSync > E-mail.
3 Tap a message to read it.
To view calendar events in RoadSync Calendar
1 From the Home screen, drag upwards.
2 Find and tap RoadSync > Calendar.
3 Press
4 Select whether you want to display your agenda, the current day, the current week or the current month.
To manually synchronise RoadSync Mail
1 From the Home screen, drag upwards.
2 Find and tap RoadSync > E-mail.
3 Press □□.
4 Tap Sync.
To change the synchronisation schedule for the RoadSync™ applications
1 From the Home screen, drag towards.
2 Find and tap RoadSync > Settings > Sync Schedule.
3 Tap any setting to change it.
4 When finished, tap Set.
Connecting to wireless networks
You can access the Internet wirelessly from your phone using Wi-Fi® technology. This way you can browse the web and access cheaper call and data rates.
If your company or organisation has a virtual private network (VPN) you can connect to this network with your phone. This way you can, for example, access intranets and other internal services at your company.
Wi-Fi®
Using Wi-Fi® technology you can access the Internet wirelessly with your phone. To access the Internet using a Wi-Fi® connection, you first need to search for and connect to an available Wi-Fi® network. The signal strength of the Wi-Fi® network may differ depending on your phone's location. Moving closer to the Wi-Fi® access point may increase the signal strength.
To turn on Wi-Fi®
1 From the Home screen, drag towards.
2 Find and tap Settings > Wireless & networks.
3 Mark the Wi-Fi checkbox. The phone will now scan for available Wi-Fi® networks.
! It may take a few seconds before Wi-Fi® gets enabled.
To connect to a Wi-Fi® network
1 From the Home screen, drag upwards.
2 Find and tap Settings > Wireless & networks > Wi-Fi settings.
3 Available Wi-Fi® networks are displayed under Wi-Fi networks. The available networks may be open or secured. Open networks are indicated by 📞 and secured networks are indicated by 📌 next to the Wi-Fi® network name.
4 Tap a Wi-Fi® network to connect to it. If you are trying to connect to a secure Wi-Fi® network, you are asked to enter the password. is displayed in the status bar once you are connected.
Your phone remembers Wi-Fi® networks you connect to. The next time you come within reach of a previously connected Wi-Fi® network, your phone automatically connects to it.
In some locations, open Wi-Fi® networks require you to log in to a web page before you can get access to the network. Contact the relevant Wi-Fi® network administrator for more information.
To connect to another Wi-Fi® network
1 From the Home screen, drag upwards.
2 Find and tap Settings > Wireless & networks > Wi-Fi settings. Detected Wi-Fi® networks are displayed in the Wi-Fi networks section.
3 Tap another Wi-Fi® network to connect to it.
Wi-Fi® network status
When you are connected to a Wi-Fi® network or when there are Wi-Fi® networks available in your vicinity, it is possible to see the status of these Wi-Fi® networks. You can also enable the phone to notify you whenever an open Wi-Fi® network is detected.
To enable Wi-Fi® network notification
1 Make sure Wi-Fi® is turned on.
2 From the Home screen, drag upwards.
3 Find and tap Settings > Wireless & networks > Wi-Fi settings.
4 Mark the Network notification checkbox.
To scan for Wi-Fi® networks manually
1 From the Home screen, drag towards.
2 Find and tap Settings > Wireless & networks > Wi-Fi settings.
3 Press
4 Tap Scan 🔒. The phone scans for Wi-Fi® networks and displays them in the Wi-Fi networks section.
5 Tap a Wi-Fi® network in the list to connect to the network.
Advanced Wi-Fi® settings
Before you add a Wi-Fi® network manually, you need to turn on the Wi-Fi® setting in your phone.
To add a Wi-Fi® network manually
1 From the Home screen, drag upwards.
2 Find and tap Settings > Wireless & networks > Wi-Fi settings.
3 Tap Add Wi-Fi network.
4 Enter the Network SSID for the network.
5 Tap the Security field to select a security type.
6 If required, enter a password.
7 Tap Save.
! Contact your Wi-Fi® network administrator to get the Network SSID name and Wireless password.
To view detailed information on a connected Wi-Fi® network
1 From the Home screen, drag towards.
2 Find and tap Settings > Wireless & networks > Wi-Fi settings.
3 Tap the Wi-Fi® network that you are currently connected to. The detailed network information will be displayed.
Wi-Fi® sleep policy
By adding a Wi-Fi® sleep policy, you can disable the Wi-Fi® functionality in your phone when the screen turns off. This will maximise your phone's battery performance. You can also set the phone to never turn off the Wi-Fi® functionality, or to never turn it off when you are charging your phone.
! If you are not connected to a Wi-Fi® network, the phone uses a 2G/3G mobile data connection to access the Internet (if you have set up and enabled a mobile data connection in your phone).
To add a Wi-Fi® sleep policy
1 From the Home screen, drag upwards.
2 Find and tap Settings > Wireless & networks > Wi-Fi settings.
3 Press
4 Tap Advanced ✗
5 Tap Wi-Fi sleep policy.
6 Select a Wi-Fi sleep policy to use.
Using a static IP address
You can set up the phone to connect to a Wi-Fi® network using a static IP address.
To set up a static IP address
1 From the Home screen, drag towards.
2 Find and tap Settings > Wireless & networks > Wi-Fi settings.
3 Press
4 Tap Advanced ✗
5 Mark the Use static IP checkbox.
6 Tap and enter the information needed for your Wi-Fi® network:
- IP address
- Gateway
- Netmask
• DNS 1
• DNS 2
7 Press and tap Save

Virtual private networks (VPNs)
Use your phone to connect to virtual private networks (VPNs), which allow you to access resources inside a secured local network from outside the actual network. For example, VPN connections are commonly used by corporations and educational institutions for users who need to access intranets and other internal services when they are outside of the internal network, for example, when they are traveling.
VPN connections can be set up in many ways, depending on the network. Some networks may require you to transfer and install a security certificate in your phone. See Connecting your phone to a computer on page 69 for more information on how to transfer content to your phone. For detailed information on how to set up a connection to your virtual private network, please contact the network administrator of your company or organisation.
To add a virtual private network
1 From the Home screen, drag upwards.
2 Find and tap Settings > Wireless & networks > VPN settings.
3 Tap Add VPN.
4 Select the type of VPN to add.
5 Enter your VPN settings.
6 Press □□ and tap Save.
To connect to a virtual private network
1 From the Home screen, drag towards.
2 Find and tap Settings > Wireless & networks > VPN settings.
3 In the list of available networks, tap the VPN you want to connect to.
4 Enter the required information.
5 Tap Connect.
To disconnect from a virtual private network
1 Drag the status bar downwards.
2 Tap the notification for the VPN connection to turn it off.
Web browser
Use your web browser to view and navigate web pages, add pages as bookmarks, and create shortcuts to them from the applications panes. You can open several browser windows at the same time and use the zoom function when navigating a web page.
To open the web browser
1 From the Home screen, drag towards.
2 Find and tap Browser
Toolbar
The toolbar options make browsing easy:

Open a new browser window

Add, open or edit a bookmark. View your most visited web pages or open web pages from the browser history

View open windows

Refresh the current web page. This option is only visible in landscape mode

Go forward one page in the browsing history

Open a menu to see more options
To open the toolbar
• From the browser, press 📄.
Browsing the web
Search and address bar
Use the search and address bar to browse the web:

1 View the download progress of the current web page
2 Enter a search word to search for a web page, or enter a web page address to load a web page
3 Cancel the download of the current web page

When a page has finished downloading, you can bookmark it by tapping the bookmark icon
next to the search and address bar.
To go to a web page
1 Tap the search and address text field to activate the keypad.
2 Enter a web address.
3 Tap Go.
To search a web page
1 Tap the search and address text field to activate the keypad.
2 Enter a search word.
3 Tap Go.
To exit the web browser
• While browsing, press □
When you open the browser again, the browser appears exactly as it did before you exited, that is, with the same number of windows, position and zoom levels.
Navigating web pages
To select a link
- To select a link in a web page, tap the link. The selected link is highlighted in orange, and the web page is loaded when you release your finger.
If you select a link by mistake before releasing your finger, you can deselect it by dragging your finger away until the link is no longer highlighted.
To go to the previous page while browsing
- Press
To zoom in or out on a web page
1 Drag your finger in any direction on the screen to activate the zoom controls on the web page.
2 Tap the 📊 icon to zoom out, or tap to zoom in.
Double-tap anywhere on the web page to quickly zoom in or out.
To reload the current web page
1 Press
2 Tap Refresh
Managing web pages
To create a shortcut to the current web page
1 When viewing a web page, press 📄.
2 Tap More > Add shortcut to Home
3 Edit the predefined shortcut name, if desired.
4 Tap Add to add the shortcut to the applications panes.
To share a link to the current web page
1 While browsing, press 📄.
2 Tap More > Share page.
3 Select an available transfer method, and follow the on-screen instructions.
Managing bookmarks
Bookmarks let you access your favourite and frequently visited web pages quickly. Depending on your network operator, some bookmarks may be pre-installed on your phone.
To bookmark a web page
1 While you are viewing a web page, press 📄
2 Tap Bookmarks > Add.
3 If desired, you can edit the name and the web address.
4 When you are done, tap OK.
To quickly bookmark a web page you can also tap the 📄 icon to the right of the search and address field.
To open a bookmark
1 From the Browser screen, press 📄
2 Tap Bookmarks.
3 Tap the bookmark you want to open.
To edit a bookmark
1 From the Browser screen, press 📄
2 Tap Bookmarks.
3 Tap and hold your finger on a bookmark to open a menu.
4 Tap Edit bookmark.
5 Edit name and web address, as desired.
6 Tap OK.
To delete a bookmark
1 From the Browser screen, press 📄
2 Tap Bookmarks.
3 Tap and hold your finger on a bookmark to open a menu.
4 Tap Delete bookmark to delete the selected bookmark.
To bookmark a previously visited web page
1 From the Browser screen, press 📄.
2 Tap Bookmarks.
3 Tap the History tab, or the Most visited tab, to view a list of previously visited web pages.
4 Tap the ★ icon to the right of the web page you want to add as a bookmark.
Managing text and images
To find text within a web page
1 When you are viewing a web page, press 📄.
2 Tap More > Find on page
3 Enter the search word and press Done.
4 Matching characters will be highlighted in green. Tap the left or right arrow to go to the previous or next matching item.
5 Tap ✗ to close the search bar.
To save an image
1 Tap and hold your finger on the desired image until a menu appears.
2 Tap Save image.
Multiple windows
Your browser can run in up to eight different windows at the same time. You can, for example, log in to your webmail in one window and read today's news in another. You can easily switch from one window to another.
To open a new browser window
1 From the Browser screen, press 📄.
2 Tap New window.
To open a link in a new browser window
1 Tap and hold your finger on a link until a menu appears.
2 Tap Open in new window.
To switch between browser windows
1 From the Browser screen, press 📄.
2 Tap Windows to see a list of all open windows.
3 Tap the window you want to switch to.
Downloading from the web
You can download applications and content when you browse the web using the web browser in your phone. Usually you have to touch a download link for the desired file and the download then starts automatically.
To view your downloaded files
1 From the Browser screen, press 📄
2 Tap More > Downloads.
To cancel an ongoing download
1 From the Browser screen, press 📄.
2 Tap More > Downloads.
3 Tap and hold your finger on a file download to open a menu.
4 Tap Cancel download.
Browser settings
To change your browser settings
1 From the Browser screen, press 📄.
2 Tap More > Settings.
Auto-fitting web pages
The auto-fit option makes it easier for you to read large websites with text and images, such as news sites. For example, if you zoom in on a web page when auto-fit is enabled, the text automatically adjusts to the new screen size. If auto-fit is disabled, you might need to scroll sideways to read a full sentence.
To auto-fit web pages
1 From the Browser screen, press 📄
2 Tap More > Settings > Auto-fit pages.
Connecting your phone to a computer
By connecting your phone to a computer you can transfer and handle files such as pictures and music. You may not be allowed to exchange some copyright-protected material.
You can connect your phone to a computer with a USB cable or by using Bluetooth™ wireless technology. When connecting your phone to a computer with a USB cable you will be able to install and use the PC Companion application on your computer. With the PC Companion application you can access additional applications to transfer and organise media files, update your phone and more.
Transferring and handling content using a USB cable
You can connect your phone to a computer with a USB cable in order to manage files on your phone. From your computer's file explorer, you can then drag and drop content between your phone and the computer. Use the Media Go™ application on your computer when you transfer music, video and pictures or any other media files, to make sure they get adapted and transferred to your phone in a correct and convenient way.
! If you are running an application on your phone and the application is using the memory card, you may need to close the application in order to access the memory card.
To drag and drop content between your phone and a computer
1 Connect your phone to a computer using a USB cable.
2 Phone: Tap Connect your phone.
3 Computer: Open Windows Explorer from the desktop and wait until your phone's memory card appears as an external disk in Windows Explorer.
4 Computer: Drag and drop the desired files between your phone and the computer.
Your phone cannot access the memory card while the card is being accessed by the computer. During this time, some applications in the phone, such as the camera, may not be accessible.
The above transfer method works with most devices and operating systems supporting a USB Mass Storage interface.
To disconnect the USB cable safely
! Do not disconnect the USB cable when transferring content as this may corrupt the content.
1 Computer: Make sure that the hardware is safely removed.
2 Disconnect the USB cable.
Computer instructions may vary depending on your operating system. See the documentation of your computer's operating system for more information.
PC Companion
PC Companion enables you to access and use additional features and services connected to your phone, for example, the Media Go™ application, to transfer music, video and pictures. You can also update your phone to get the latest software available.
You need one of these operating systems to use the PC Companion application:
• Microsoft® Windows 7
• Microsoft® Windows Vista®
• Microsoft® Windows® XP, Service Pack 3 or higher
Connect your phone and computer with a USB cable to install and use PC Companion.
To install PC Companion
1 Connect your phone to a computer using a USB cable.
2 Tap Install PC Companion.
3 Computer: PC Companion automatically starts on your computer after a few seconds. Follow the on-screen instructions to install PC Companion.
To use PC Companion
1 Connect your phone to a computer using a USB cable.
2 Phone: Tap Connect your phone.
3 Computer: PC Companion automatically starts on your computer after a few seconds.
! If PC Companion does not start automatically, you can start it from the start menu of your computer.
Media Go™
The Media Go ^™ computer application helps you transfer and manage media content in your phone and computer. Install the Media Go ^™ application from the PC Companion application. See PC Companion on page 69 for more information.
You need one of these operating systems to use the Media Go™ application:
• Microsoft® Windows 7
• Microsoft® Windows Vista®
• Microsoft® Windows® XP, Service Pack 3 or higher
To be able to transfer files between Media Go™ and your phone, you must first connect a USB cable between your phone and a computer. You must also enable your phone to connect to the computer. See To drag and drop content between your phone and a computer on page 69 for more information.
To learn more about how to use the Media Go™ application, see the help section in the main menu of the Media Go™ application.
To transfer content using the Media Go™ application
1 Connect your phone to a computer using a USB cable.
2 Tap Connect your phone.
3 Computer: In PC Companion, click to start Media Go™. If it is the first time you start Media Go™ it may need to install before you move on to the next step.
4 Move files between your phone and the computer in the Media Go™ application.
! Media Go™ can also be downloaded from www.sonyericsson.com/support.
Bluetooth™ wireless technology
Turn on the Bluetooth™ function in your phone and create wireless connections to other Bluetooth™ compatible devices such as computers, handsfree accessories, and phones. Bluetooth™ connections work better within a 10 meter (33 feet) range, with no solid objects in between. In some cases you have to manually pair your phone with other Bluetooth™ devices. Remember to set your phone to discoverable if you want other Bluetooth™ devices to detect it. Alternatively, you can send files to other devices by email, or transfer them to your computer using a USB cable connection.
! Interoperability and compatibility among Bluetooth® devices vary.
To turn on the Bluetooth™ function and make your phone visible
1 From the Home screen, drag towards.
2 Find and tap Settings > Wireless & networks.
3 Mark the Bluetooth checkbox. Appears in the status bar.
4 Tap Bluetooth settings.
5 Mark the Discoverable checkbox. The phone will now be visible to other devices for 120 seconds.
Phone name
You can give your phone a name. This name is shown to other devices after you have turned on the Bluetooth ^™ function and your phone is set to visible.
To enter a phone name
1 Make sure the Bluetooth ^TM function is turned on.
2 From the Home screen, drag upwards.
3 Find and tap Settings > Wireless & networks > Bluetooth settings > Device name.
4 Enter a phone name of your choice.
5 Tap OK.
Pairing with another Bluetooth™ device
When you pair your phone with another device, you can, for example, connect your phone to a Bluetooth ^™ handsfree or a Bluetooth ^™ car kit and use these devices to make and receive calls.
Once you have paired your phone with a Bluetooth™ device the phone will remember this pairing. When pairing the phone with a Bluetooth™ device, you may need to enter a passcode. Your phone will automatically try the generic passcode 0000. If this does not work, refer to your Bluetooth™ device documentation for the device passcode. You do not need to re-enter the passcode the next time you connect to a paired Bluetooth™ device.
Some Bluetooth ^™ devices, for example, most Bluetooth ^™ headsets, require you to both pair and connect with the other device.
You can pair your phone with several Bluetooth ^™ devices, but you can only connect to one Bluetooth ^™ profile at the same time.
To pair your phone with another Bluetooth™ device
1 From the Home screen, drag towards.
2 Find and tap Settings > Wireless & networks > Bluetooth settings.
3 Tap Scan for devices. The Bluetooth™ devices found will be listed under Bluetooth devices.
4 Tap the Bluetooth™ device that you want to pair with your phone.
5 Enter a passcode, if required.
6 The phone and the Bluetooth™ device are now paired. With some devices you also need to connect before you can start using them. The status of the pairing and connection is shown below the name of the Bluetooth™ device in the Bluetooth devices list.
Make sure that the device you want to pair your phone with has the Bluetooth™ function activated and Bluetooth™ visibility turned on.
To connect your phone to another Bluetooth™ device
! Some Bluetooth™ devices, for example, most Bluetooth™ headsets, require you to first pair and then connect with other Bluetooth™ devices before a successful connection can be established.
1 From the Home screen, drag towards.
2 Find and tap Settings > Wireless & networks > Bluetooth settings.
3 In the Bluetooth devices list, touch and hold the Bluetooth™ device that you want to connect to your phone.
4 Tap Connect.
To disconnect a Bluetooth™ device
1 From the Home screen, drag upwards.
2 Find and tap Settings > Wireless & networks > Bluetooth settings.
3 In the Bluetooth devices list, touch and hold the name of the connected Bluetooth device.
4 Tap Disconnect.
Even if you disconnect a Bluetooth™ device, the device is still paired with your phone. To remove the pairing, you need to tap Disconnect & unpair.
To unpair a Bluetooth™ device
1 From the Home screen, drag towards.
2 Find and tap Settings > Wireless & networks > Bluetooth settings.
3 In the Bluetooth devices list, touch and hold the name of the connected Bluetooth™ device.
4 Tap Unpair.
Sending and receiving items using Bluetooth™ technology
Share items with other Bluetooth™ compatible devices such as phones or computers. You can send and receive several kinds of items using the Bluetooth™ function, such as:
• Photos and videos
• Music and other audio files
- Contacts
- Web pages
To send items using Bluetooth™
1 Receiving device: Make sure the Bluetooth™ device you want to send the item to has Bluetooth™ turned on and is in discoverable mode.
2 In your phone, open the application which contains the item you want to send and scroll to the item.
3 Depending on the application and the item you want to send, you may need to, for example, touch and hold the item, open the item or press Other ways to send an item may exist.
4 Select a share or send menu item.
5 In the menu that appears, select Bluetooth.
6 Turn on Bluetooth™, if you are asked to do so.
7 Under Bluetooth devices, tap the name of the receiving device.
8 Receiving device: If asked, accept the connection.
9 If asked, enter the same passcode on both devices, or confirm the suggested passcode.
10 Receiving device: Accept the incoming item.
To receive items using Bluetooth™
1 From the Home screen, drag towards.
2 Find and tap Settings > Wireless & networks.
3 Mark the Bluetooth checkbox. Appears in the status bar.
4 Tap Bluetooth settings.
5 Mark the Discoverable checkbox. The phone will now be visible to other devices for 120 seconds.
6 Sending device: Send one or more items to your phone using Bluetooth™.
7 If asked, enter the same passcode on both devices, or confirm the suggested passcode.
8 When you are notified of an incoming file to your phone, drag the status bar downwards and tap the notification to accept the file transfer.
9 Tap Accept to start the file transfer.
10 To view the progress of the transfer, drag the status bar downwards.
11 To open a received item straight away, drag the status bar downwards and tap the relevant notification.
Your phone must have a memory card inserted to be able to receive items using Bluetooth™ wireless technology.
Backing up and restoring
Use the Backup and restore application to make backups of phone content to your memory card. Such backups can be used to restore your content and some phone settings in cases where your data gets lost or deleted.
! If your phone is running Android version 1.6, you need to back up your data before updating to a higher version.
Types of content you can back up
The following types of data can be backed up using the Backup and restore application:
- Bookmarks
- Call log
- Contacts
• Market applications
• Multimedia messages
• System settings (such as alarms, ringer volume)
- Text messages
! Music files, and photos or videos taken with the phone camera are automatically saved on the memory card and do not need to be backed up.
You may incur additional data transmission charges when you restore Market applications.
To back up phone content manually
1 From your Home screen, drag towards.
2 Find and tap Backup and restore.
3 Tap Back up.
4 If you want to create a new backup file, tap Add new, enter a name for the backup file and tap Continue. If you want to replace the content of a previous backup file, tap the desired backup file, then tap Replace.
5 Mark the checkboxes for the content you want to back up, then tap Continue.
To schedule the automatic backup of phone content
1 From your Home screen, drag upwards.
2 Find and tap Backup and restore.
3 Tap Schedule.
4 Select the desired recurrence frequency and start time for the backup, then tap Continue.
5 Mark the checkboxes for the content you want to back up, then tap Continue.
Every time a scheduled automatic backup file is created, the previous version of the backup file is overwritten.
To disable the scheduled backup of phone content
1 From your Home screen, drag upwards.
2 Find and tap Backup and restore.
3 Tap Schedule > Never > Continue.
To restore phone content
! Remember that any changes you make to your data and settings after you create a backup will get deleted during a restore procedure.
1 From your Home screen, drag upwards.
2 Find and tap Backup and restore.
3 Tap Restore.
4 Tap the backup file you want to restore from.
5 Mark the checkboxes for the content you want to restore, then tap Continue.
You may be asked to restart your phone for the restore procedure to take effect.
To delete a backup file from the memory card
1 From your Home screen, drag towards.
2 Find and tap Backup and restore.
3 Tap Back up.
4 Touch and hold the backup file you want to delete, then tap Delete.
Music
Get the most out of your music player. Listen to music, audio books and podcasts, or use the infinite button and explore more media content about an artist you're listening to.

Install the Media Go™ application on your computer and transfer content to and from the memory card in your phone. Media Go™ can be downloaded from www.sonyericsson.com/support. For more information, see Connecting your phone to a computer on page 69.
Copying media files to your memory card
Copy all your favourite media content from computer to phone and start using your phone's entertainment features to the full. It's easy to transfer music, photos, videos and other files. Just connect your phone to a computer with a USB cable and use one of the following methods:
- Use a file manager application, for example, Windows Explorer. See To drag and drop content between your phone and a computer on page 69
- Use the Media Go™ computer application. See Media Go™ on page 70
See Connecting your phone to a computer on page 69 for more general information about connecting your phone and transferring files.
Using the music player
To play audio content
1 From the Home screen screen, tap 🎯. If 🎯 does not appear on the Home screen, drag 🎯 onwards, then find and tap Music player . 🎯
2 Tap
3 Tap 📄 to browse audio by artist. Tap 📋 use playlists. Tap to browse audio by track.
4 Scroll up or down and browse to a track.
5 Tap a track to play it.
Music player overview
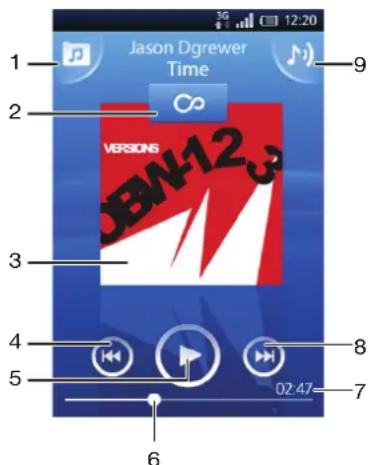
1 Browse the music on the memory card
2 Infinite button: find related material online
3 Cover art (if available)
4 Go to the previous track in the current play queue, or rewind
5 Play/Pause button
6 Progress indicator: fast forward or rewind by dragging or tapping
7 Time remaining of current track
8 Go to the next track in the current play queue, or fast forward
9 View the current play queue
To browse your audio content
1 From the Home screen, tap 🎨If does not appear on the Home screen, drag upwards, then find and tap Music player 🎨

2 Tap
3 Tap 📋 to browse audio by artist. Tap 📋 to lose playlists. Tap to browse audio by track.
4 Scroll up or down and browse to a track.
To change tracks
• In the music player, tap 📋 or .
To pause a track
• In the music player, tap 📄
To fast forward and rewind music
• In the music player, touch and hold 📋r . 📋
You can also drag the progress indicator marker right or left.
To adjust the audio volume
- Press the volume key.
To view a current play queue
• In the music player, tap 🎨
To listen to the music player while using other applications
1 Press on to leave the music player.
2 Open and use other applications while the music player is playing in the background.
Alternatively, you can press and hold down □ to access the most recently used applications.
To return to the music player when it is playing in the background
1 Drag the status bar downwards to open the Notification panel.
2 Tap the track title to open the music player.
Alternatively, if you have recently used the music player, you can press and hold down □ and then tap Music player to open it.
To delete a track
1 When browsing your tracks in the music player library, touch and hold a track title.
2 Tap Delete.
You can also delete albums and playlists this way.
To delete one or more tracks at the same time
1 In the music player, tap 📞.
2 Press
3 Tap Delete several.
4 Tap one or more tracks that you want to delete.
5 Tap Delete.
To share a track
1 When browsing your tracks in the music player library, touch and hold a track title.
2 Tap Send.
3 Select an available transfer method, and follow the on-screen instructions.

You can also share albums and playlists this way.

You might not be able to copy, send or transfer copyright-protected items.
To share one or more tracks at the same time
1 When browsing your tracks in the music player library, press 📄
2 Tap Send several.
3 Tap one or more tracks that you want to share.
4 Tap Send.
5 Select an available transfer method, and follow the on-screen instructions.
You might not be able to copy, send or transfer copyright-protected items.
Playing music in random order
You can play tracks in playlists in random order. A playlist can be, for example, a playlist you have created yourself or an album.
To play tracks in random order
1 In the music player, tap 📞.
2 Tap and navigate to an album, or tap and browse to a playlist.
3 Open the album or playlist by tapping its name.
4 Tap
Playlists
The music player automatically creates smart playlists on the playlist tab 📂 the audio library. The music player also creates a playlist (called Top tracks) of the most played songs of each artist in your audio library. You can use the Media Go™ application to maintain your music library, and to create playlists on your computer. For more information, see Connecting your phone to a computer on page 69.
Playlists that you create yourself have to be copied to the memory card in your phone. When you connect the phone to your computer using the USB cable, the memory card appears in the Media Go™ application.
To play smart playlists
1 In the music player, tap 📞.
2 Tap
3 Under Smart playlists, tap a playlist.
4 Tap a track to play it.
To play the most played songs of an artist
1 In the music player, tap 📌
2 Tap and tap an artist.
3 Tap Top tracks. Up to ten tracks by the artist are displayed.
4 Tap a track to play it.
To play your own playlists
1 In the music player, tap 📞.
2 Tap
3 Under My playlists, tap a playlist.
4 Tap a track to play it.
To copy playlists to your memory card
1 Computer: Start the Media Go™ application on your computer.
2 Phone: Connect your phone to a computer using a USB cable. If you are asked to install PC Companion, press
4 Computer: Locate the memory card in the Media Go™ application.
5 Computer: Copy existing playlists from your computer to the memory card by dragging and dropping the playlists between the phone and the computer.
Exploring related music content
When using the music player, you can find and explore online media content related to an artist you are listening to by tapping the Infinite button ∞.
To explore related audio content
1 In the music player, tap ∞
2 Flick left or right to view results on available online services (operator-dependent).
3 To return to the music player, press ↩.
Podcasts
Podcasts consist of media content, for example, radio programs, which you can subscribe to using web feeds (RSS). You can download such content to your computer using the podcast feature in the Media Go™ application. You can then copy the podcast to the memory card in your phone using the Media Go™ application on your computer. If you install an RSS reader in your phone, you can also start a subscription to a site which has audio feeds. For more information, see Connecting your phone to a computer on page 69.
To play podcasts in your phone
1 Files you have downloaded via audio podcasts, for example, radio programs, can be found in the music player audio library. In the music player, tap 📞.
2 Tap or .
3 Scroll up or down and browse to a title.
4 Tap a title to play it.
TrackID™ technology
Use the TrackID™ music recognition service to identify a music track you hear playing in your surroundings. Just record a short sample of the song and you'll get artist, title and album info within seconds. You can also purchase tracks identified by TrackID™. For best results, use TrackID™ technology in a quiet area. If you have problems using this application, see I cannot use Internet-based services on page 97.
The TrackID™ application and the TrackID™ service are not supported in all countries/ regions, or by all networks and/or service providers in all areas.
To open the TrackID™ application
1 From the Home screen, drag towards.
2 Find and tap TrackID™
To search for track information
1 When the TrackID™ application is open, tap Record.
2 Hold the phone towards the music source. The results are shown in the result screen.
Using TrackID™ technology results
Track information appears when a track is recognised after a search and also in a history list. When a track has been recognised by TrackID™ technology, you can purchase the track, mark it as your favorite, recommend it, or find related content for the track on the YouTube™ service.
To buy a track using TrackID™ technology
1 Tap one of the keys in the track information screen to purchase, recommend, or view the track on the YouTube™ service.
2 To open the track information screen from the history list, tap a track. To open the track information screen from any of the charts, tap Charts.

The displayed list and chart is set to your own region. Tap ☐ see the popular search by people in other countries.
The track purchase feature may not be supported in all countries/ regions, or by all networks and/or service providers in all areas.
FM radio
You can browse and listen to FM radio stations, and save them as favourites. You can listen to the radio either through a portable handsfree or headphones, or through the speaker in the phone. You have to connect a portable handsfree or headphones, as they work as the antenna for the FM radio. When you open the FM radio, available channels appear automatically. If a channel has RDS information, it appears a few seconds after you start listening.
To open the FM radio
1 Connect a portable handsfree or headphones to the phone.
2 From the Home screen, drag towards.
3 Find and tap FM radio 📄. The available channels appear as you scroll through the frequency band.
You have to connect a portable handsfree or headphones, which work as the antenna.
FM radio overview

1 Scan for new channels
2 The tuned frequency
3 Radio on/off key
4 Move downwards to the next favourite (available when favourites are saved)
5 RDS (Radio Data System) information – not available in all countries/regions
6 Assign or unassign a channel as a favourite
7 Move upwards to the next favourite (available when favourites are saved)
Moving between radio channels
You can move between radio channels along a frequency band by:
- Flicking up and down.
- Dragging.
- Tapping a channel or, if available, the RDS information (station identification).
Using your favourite radio channels
You can save the radio channels you most frequently listen to as favourites. By using favourites you can quickly return to a radio channel.
To save a channel as a favourite
1 When the radio is open, navigate to the channel that you want to save as a favourite.
2 Tap
To remove a channel as a favourite
1 When the radio is open, navigate to the channel that you want to remove as a favourite.
2 Tap
To move between favourite channels
- When the radio is open, tap 🖼️.
! To move between favourites, you need to save at least two channels as favourites.
Making a new search for radio channels
If you have moved to a new location or the reception has improved in your current location, you can start a new scan for radio channels.
! Any favourites you have saved are not affected by a new scan.
To start a new search for channels
- When the radio is open, tap 📋. The radio scans the whole frequency band, and all available channels are displayed.
Switching between the speaker and the handsfree
You can choose to listen to the radio either through the portable handsfree or headphones, or through the speaker in the phone.
To switch between the speaker and handsfree
1 When the radio is open, press
2 Tap Play in speaker.
3 To play the sound through the portable handsfree or headphones again, press and tap Play in handsfree.
Videos
Use the video player to browse and view your favourite videos, including streaming videos. You'll also find video in the camera album, which stores material you've recorded yourself using the phone camera. Streaming videos can be started by tapping a link on an active web page in your web browser. You can also view streaming videos using the YouTube™ application.
Copying media files to your memory card
Copy all your favourite media content from computer to phone and start using your phone's entertainment features to the full. It's easy to transfer music, photos, videos and other files. Just connect your phone to a computer with a USB cable and use one of the following methods:
- Use a file manager application, for example, Windows Explorer. See To drag and drop content between your phone and a computer on page 69
• Use the Media Go™ computer application. See Media Go™ on page 70
See Connecting your phone to a computer on page 69 for more general information about connecting your phone and transferring files.
Using the video player
To browse videos
1 From the Home screen, drag upwards.
2 Find and tap Video
3 Scroll up or down to browse your videos.
You can find videos you recorded using the camera in Album
To play a video
1 From the Home screen, drag upwards.
2 Find and tap Video
3 Scroll up or down to browse your videos.
4 Tap a video to play it. The controls disappear after a few seconds. You can tap the screen to make them reappear.
To pause a video
1 When a video is playing, tap the screen to display the controls.
2 Tap .11
To fast forward and rewind a video
- Drag the progress bar marker right or left.
To exit the video player
- Press ← on . □
To resume playing a video
1 If you have recently used the video player, press and hold down.
2 Tap Video
3 Browse to the video and tap it. The video resumes playing from where you previously stopped the video.
To adjust the volume of a video
- Press the volume key.
To delete a video
1 When browsing your videos in the video player library, touch and hold a video title.
2 Tap Delete.
To delete one or more videos at the same time
1 When browsing your videos in the video player library, press 📄
2 Tap Delete several.
3 Tap one or more videos that you want to delete.
4 Tap Delete.
To share a video
1 When browsing your videos in the video player library, touch and hold a video title.
2 Tap Send.
3 Select an available transfer method, and follow the on-screen instructions.
You might not be able to copy, send or transfer copyright-protected items.
To share one or more videos at the same time
1 When browsing your videos in the video player library, press 📄
2 Tap Send several.
3 Tap one or more videos that you want to share.
4 Tap Send.
5 Select an available transfer method, and follow the on-screen instructions.
You might not be able to copy, send or transfer copyright-protected items.
YouTube™
You can watch videos in your phone by using the YouTube™ application. You can search for videos or upload your own videos.
The YouTube™ application and the YouTube™ service are not supported in all countries/regions, or by all networks and/or service providers in all areas.
To view streaming content in the YouTube™ application
1 From the Home screen, drag upwards.
2 Find and tap YouTube
3 Press to view a menu where you can search for videos, handle your account, and upload your own videos.
Taking photos and recording videos
Start taking photos and recording videos with a simple press of the camera key. Improve your chances of getting a better shot: use Scenes feature before you take a photo. Also, you can use the flash or the light when shooting or recording. Share what you capture with friends, or upload your photos and videos to a web service. From the viewfinder, you can view an album containing all photos and videos you have taken using the camera.
Viewfinder and camera controls
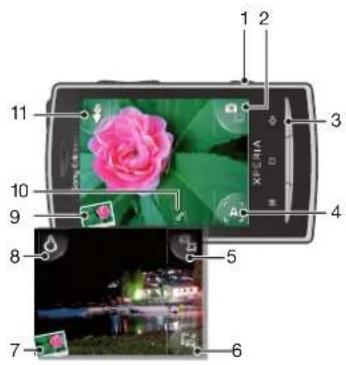
1 Camera key: Activate the camera/Take photos/Record video
2 Switch between still and video camera
3 Go back one step or exit the camera
4 Select a scene (still camera)
5 Switch between still and video camera
6 Select video format (video camera)
7 View photos and videos
8 Tum on/off the light (video camera)
9 View photos and videos
10 Geotag icon: Indicates whether geotagging is only turned on, or whether your location also has been determined. No icon indicates that geotagging is turned off
11 Turn on/off the flash (still camera)
To activate the camera
- Press the camera key.
To switch between the still and video cameras
• In the camera viewfinder, tap

To close the camera
- Press

Using the still camera
To take a photo
1 Activate the camera.
2 If the still camera is not selected, tap
3 Point the camera towards the subject and press the camera key halfway down to use auto-focus.
4 When the focus frame turns green, press the camera key fully down. The photo is automatically saved on the memory card. The photo appears in review mode.
5 Press the camera key to return to the viewfinder to take another photo.
To view previously taken photos
1 In the camera viewfinder, tap the photo thumbnails at the bottom left.
2 Flick left or right to browse the photos and videos. Videos are identified by
To delete a photo
1 When you are viewing a photo, tap the screen if no controls are displayed.
2 Tap
To share a photo
1 When you are viewing a photo, tap the screen if no controls are displayed.
2 Tap
3 Select one of the available transfer methods.
Adding the geographical position to your photos
Turn on geotagging to add the approximate geographical location (a geotag) to photos when you take them. The geographical location is determined either by wireless networks (mobile or Wi-Fi® networks) or GPS technology. When 📋 appears in the viewfinder, geotagging is turned on but the geographical position has not been found. When 🌐 appears, geotagging is turned on and the geographical location is available, so your photo can get geotagged. When neither of these two symbols appears, geotagging is turned off.
To turn geotagging on or off
1 From the Home screen, drag towards.
2 Find and tap Settings > Sony Ericsson > Camera > Geotagging.
3 Tap the checkbox to turn geotagging on or off.
To use geotagging you must also enable location features in Settings. See Location services on page 91 for information on how to enable the location features for GPS and wireless networks.
Viewing your photos on a map
If a geotag was added to your photo, you can view the photo on a map. Show friends and family where you were, or find your way back to the location another time.
To view a photo taken by the camera on a map, you must turn on geotagging in the camera settings before you take the photo. You must also enable location features in Settings.
To view your photos on a map
1 From the Home screen, drag towards.
2 Find and tap Geotags.
3 Drag the map in any direction to locate your photos.
4 Tap 🔒 to zoom in.
5 Tap a thumbnail to view photos. If more photos are at the same location, they are grouped under a thumbnail.
6 To close a group of photos, tap
7 Tap a photo to view it in a larger size.
To switch between map and satellite views
1 From the Home screen, drag upwards.
2 Find and tap Geotags.
3 Press
4 Tap Map mode and select an option.
Improving photos with Scenes
Before you take a photo, you can set up the camera for common situations using pre-programmed scenes. The Scenes feature determines a number of settings for you to fit the selected scene, ensuring the best possible photo.
Scenes settings

Auto
The camera uses settings that fit most conditions

Macro
Use for situations when you want to use auto focus for extreme close-up photos

Sports
Use for photos of fast-moving objects. Short exposure time minimises motion blurring
To select scenes
1 Activate the camera.
2 If the still camera is not selected, tap
3 Tap the active scene key at the bottom right in the viewfinder, for example,
4 Tap a scene and take the photo.
Tips when using the camera
Rule of thirds
Don't place your subject in the middle of the frame. By placing it a third of the way in, you achieve a better result.
Hold it steady
Avoid blurry photos by holding the camera steady. Try to steady your hand by leaning it against a solid object.
Get closer
By getting as close as possible to your subject, you can fill the viewfinder with your subject.
Stay within the flash range
Photos taken beyond the maximum flash range will be too dark. The maximum flash range is about four steps from the subject.
Consider variety
Think about different angles, and move towards the subject. Take some vertical photos. Try different positions.
Use a plain background
A plain background helps highlight your subject.
Keep your lens clean
Mobile phones are used in all kinds of weather and places, and carried in pockets and bags. This results in the camera lens becoming dirty and covered with fingerprints. Use a soft cloth to clean the lens.
Using the video camera
To record a video
1 Activate the camera.
2 If the video camera is not selected, tap
3 Press the camera key to start recording.
4 Press the camera key to stop recording. The video appears in review mode.
5 To view the video, tap
6 To record another video, press the camera key.
To view previously recorded videos
1 In the camera viewfinder, tap the thumbnails at the bottom left.
2 Flick left or right to browse the photos and videos. Videos are identified by
To record a video suitable for multimedia messages (MMS)
1 Activate the camera.
2 If the video camera is not selected, tap
3 Tap the video format icon at the bottom right of the viewfinder.
4 Tap For MMS
5 Press the camera key to start recording. The recording time of this video format is limited and is most suited for sending in multimedia messages. You can monitor the recording time limit in a progress bar in the upper part of the viewfinder.
Camera album
In Album you'll find all the photos and videos you shot using your phone camera. From here, you can share your favourite content with friends, and save photos as wallpaper and contact pictures. Use the Media Go™ application on your computer if you want to transfer photo and video content to and from the memory card in your phone. For more information, see Media Go™ on page 70.
To browse your photos and videos
1 From the Home screen, drag towards.
2 Find and tap Album
3 Scroll up or down to browse your photos and videos. Photos and videos are shown in chronological order. Videos are indicated by 1.
! Videos that were not shot using your camera are saved in Video ■.
To view photos
1 From the Home screen, drag towards.
2 Find and tap Album
3 Scroll up or down to browse your photos and videos. Videos are indicated by .
4 To view a photo in a larger size, tap the thumbnail.
5 In the photo viewer, flick left to view the next photo or video. Flick right to view the previous photo or video.
To view the photo viewer controls
• In the photo viewer, tap the screen.
To zoom a photo
1 When you are viewing a photo in the photo viewer, touch and hold an area on the screen until the magnifying symbols appear.
2 Drag upwards to zoom in and drag downwards to zoom out.
You can also double-tap a photo to zoom it in or out. Then drag the photo to view different parts of it.
To play videos recorded using the camera
1 From the Home screen, drag towards.
2 Find and tap Album
3 Scroll up or down to browse your videos and photos. Videos are indicated by .
4 To play a video, tap a video thumbnail.
5 Tap
6 In the viewer, flick left to view the next video or photo. Flick right to view the previous video or photo.
To delete your photos or videos
1 When browsing your photos and videos in Album , press .
2 Tap Delete several.
3 Tap one or more photos or videos that you want to delete.
4 Tap Delete.
To use a photo as a contact picture
1 When you are viewing a photo in the photo viewer, tap the screen to display the controls.
2 Tap.
3 Tap Contact picture.
4 Resize the photo if needed.
5 Tap Save.
6 Tap the contact you want to assign the photo to.
To crop a photo
1 When the crop frame appears, touch and hold the edge of the frame to adjust it. When crop arrows appear, drag inward to or outward from the centre of the crop frame to resize it.
2 To move the crop frame to another area of the photo, touch and hold inside the frame, then drag it to the desired position.
3 To save the cropped photo, tap Save.
To use a photo as wallpaper
1 When you are viewing a photo in the photo viewer, tap the screen to display the controls.
2 Tap
3 Tap Wallpaper.
4 Resize the photo if needed.
5 Tap Save.
Sharing photos and videos
You can send photos and videos you have shot using the camera via Bluetooth ^™ wireless technology, email or MMS (Multimedia Messaging Service), or upload them to web services, for example, Picasa ^™ or YouTube ^™ .
The YouTube™ application and the YouTube™ service are not supported in all countries/regions, or by all networks and/or service providers in all areas.
To share your photos or videos
1 From the Home screen, drag towards.
2 Find and tap Album
3 Tap a photo or video thumbnail.
4 Tap the screen to display the controls, if needed.
5 Tap
6 Select an available transfer method, and follow the on-screen instructions.
To upload a photo to a web album
1 From the Home screen, drag towards.
2 Find and tap Album
3 Tap a photo thumbnail.
4 Tap the screen to display the controls, if needed.
5 Tap
6 Select a photo sharing service and follow the on-screen instructions.
Location services
You can get your location determined either by using wireless networks or GPS technology. Wireless networks technology determines your position fast but accuracy may vary. If you use GPS technology it may take a little longer, but it will find your exact position. You can enable both wireless networks and GPS to benefit from both technologies when trying to find your position.
Using GPS technology
Your phone has a GPS receiver that uses satellite signals to calculate your location. Some GPS features use the Internet. Data rates and charges may apply.
When you use features that require the GPS receiver to find your location, make sure you have a clear view of the sky. If the GPS receiver does not find your location after a few minutes, you should move to another location. To help the search, stand still and do not cover the GPS antenna. The position of the GPS antenna is shown in the image below. The first time you use the GPS receiver it may take up to 10 minutes before your location is found.

natural_image
Illustration of a hand holding a smartphone with a screen displaying 'XPERIA' and a small logo, no text or symbols on the device itself.
If you cannot use some GPS features, see I cannot use Internet-based services on page 97.

Sony Ericsson does not warrant the accuracy of any location services including but not limited to navigational services.
To enable the GPS receiver
1 From the Home screen, drag upwards.
2 Tap Settings > Location & security.
3 Mark the Use GPS satellites checkbox.
To use wireless networks to find your position
1 From the Home screen, drag upwards.
2 Tap Settings > Location & security.
3 Mark the Use wireless networks checkbox.
Google Maps™
The Google Maps™ application lets you view your current location, find other locations and calculate routes. When you start the Google Maps™ application, your approximate location
is shown using information from mobile networks in your vicinity. Your location is updated with a more precise position when the GPS receiver finds your location.
! Make sure you enable the location settings before trying to get your position.
If the screen orientation does not change automatically when you turn the phone sideways, you can change this in the display settings of your phone.
To use Google Maps™
1 From the Home screen, drag towards.
2 Find and tap Maps.
The Google Maps™ application may not be available in every market, country or region.
Getting driving directions
The Wisepilot™ application gives you turn-by-turn voice instructions on how to get places. It also helps you manage trips and share routes and locations with friends via SMS, Twitter™ or Facebook™.
You can download and save maps to your memory card before taking trips. This way you can avoid high roaming costs when you travel outside your network.
Sony Ericsson does not warrant the accuracy of any directional services, including Wisepilot™. Also, Wisepilot may not be available in every market. For more information, including a Wisepilot User manual, go to www.sonyericsson.wisepilot.com.
To start Wisepilot™
1 From the Home screen, drag towards.
2 Find and tap Wisepilot.
Locking and protecting your phone
IMEI number
Every phone has a unique IMEI (International Mobile Equipment Identity) number. You should keep a copy of this number. If your phone is stolen, your network provider can use your IMEI number to stop the phone from accessing the network in your country.
To view your IMEI number
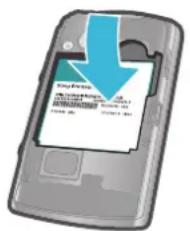
• You can find the IMEI number under the battery.
To view your IMEI number in the phone
1 From the Home screen, drag upwards.
2 Find and tap Settings > About phone > Status.
3 Scroll to IMEI to view the IMEI number.
SIM card protection
The SIM card lock only protects your subscription. Your phone will still work with a new SIM card. If the SIM card lock is on, you have to enter a PIN (Personal Identity Number). If you enter your PIN incorrectly more times than the maximum number of attempts allowed, your SIM card will become blocked. You need to enter your PUK (Personal Unblocking Key) and then a new PIN. Your PIN, PIN2 and PUK are supplied by your network operator.
To enable the SIM card PIN lock
1 From the Home screen, drag towards.
2 Find and tap Settings > Location & security > Set up SIM card lock > Lock SIM card.
3 Enter the SIM card PIN and tap OK.
To change the SIM card PIN
1 From the Home screen, drag upwards.
2 Find and tap Settings > Location & security > Set up SIM card lock > Change SIM PIN.
3 Enter the old SIM card PIN and tap OK.
4 Enter the new SIM card PIN and tap OK.
5 Re-type the new SIM card PIN and tap OK.
To change the SIM card PIN2
1 From the Home screen, drag upwards.
2 Find and tap Settings > Call settings > Fixed dialling numbers > Change PIN2.
3 Enter the old SIM card PIN2 and tap OK.
4 Enter the new SIM card PIN2 and tap OK.
5 Confirm the new PIN2 and tap OK.
To unblock a locked SIM card
1 When SIM card locked. Enter the PUK code provided by your operator appears, enter the PUK code and tap OK.
2 Enter a new PIN code and tap OK.
3 Repeat the new PIN code and tap OK.
Screen unlock pattern
You can secure data in your phone with a screen unlock pattern that only you know how to draw. Your phone stores this pattern, and when you start your phone or activate the screen, you are asked to draw it.
It is very important that you remember your screen unlock pattern. If you forget it, it may not be possible to restore important data such as contacts and messages. Please refer to your Sony Ericsson contact centre.
To create a screen unlock pattern
1 From the Home screen, drag towards.
2 Find and tap Settings > Location & security > Set unlock pattern.
3 Follow the instructions in your phone. You will be asked to select a security question that will be used to unlock the phone if you forget your screen unlock pattern.
To unlock the screen using a screen unlock pattern
1 Press or to activate the phone.
2 Drag your finger along the path and then draw your screen unlock pattern.
To change the screen unlock pattern
1 From the Home screen, drag towards.
2 Find and tap Settings > Location & security > Change unlock pattern.
3 Follow the instructions in your phone.
To disable the screen unlock pattern
1 From the Home screen, drag towards.
2 Find and tap Settings > Location & security.
3 Unmark the Require pattern checkbox.
4 Draw your screen lock pattern.
Updating your phone
You can update your phone to the most recent software for optimal performance and to get the latest enhancements. Updates can be downloaded wirelessly directly from your phone via the Internet by using a 2G/3G mobile data connection, or by using a Wi-Fi® network connection. By connecting your phone to a computer with a USB cable, you can also download updates from the PC Companion application.
When you are using a 2G/3G mobile data connection to connect to Internet from your phone, data transmission charges may apply. Contact your network operator for more information.
! Make sure you back up and save all data contained in your phone before you start updating the phone.
Updating your phone wirelessly
To download software updates wirelessly
1 From the Home screen, drag towards.
2 Find and tap Settings > About phone > Software update.
3 Tap Update now. Follow the on-screen instructions to update your phone.
Select the Auto search option if you want your phone to automatically inform you about software updates.
Updating your phone using a USB cable
You can update your phone using a USB cable with the PC Companion application. The PC Companion application is available when you connect your phone to a computer with a USB cable. See PC Companion on page 69 for more information on how to start PC Companion.
To download software updates using a USB cable
Do not disconnect the USB cable when updating your phone as this may corrupt the content. Make sure that the hardware is safely removed from your computer when you are finished.
Before you can carry out the instructions below, you need to have PC Companion installed on your computer. To install PC Companion, connect your phone to the computer using a USB cable and follow the on-screen instructions in your phone.
1 Connect your phone to a computer using a USB cable. If you have just installed PC Companion, make sure you disconnect your phone from the computer and reconnect it again before trying to download software updates.
2 Tap Connect your phone.
3 Computer: Wait a few seconds for PC Companion to start. If PC Companion does not start automatically, you can start it from the start menu of your computer.
4 Click Support Zone > Software Update and follow the on-screen instructions to update your phone.
While using PC Companion, you will also get notifications whenever there are available software updates for your phone.
Troubleshooting
My phone is not working as expected
If you experience problems with your phone, check these tips before you try anything else:
- Restart your phone.
- Remove and re-insert the battery and SIM card. Then restart your phone.
- Update your phone. Updating your phone ensures optimal performance and provides the latest enhancements. See Updating your phone on page 95 for more information.
- Reset your phone.
Be patient while resetting your phone. Restarting the phone during a reset procedure may damage the phone permanently.
To force close an application
- When a popup window tells you that an application is not responding, tap Force close.
If you do not want to force stop an application, you can wait for it to respond by tapping Wait.
Resetting the phone
You can reset your phone to its original settings, with or without deleting all your personal data and downloaded applications. It is possible to reset the phone to the state it was in before you first turned it on. But before you perform a reset, make sure to back up any important data saved on your phone.
To reset the phone
1 From the Home screen, drag upwards.
2 Find and tap Settings > Privacy.
3 Tap Settings reset to reset applications such as email to their default values without changing your personal data and accounts.
4 Tap Factory data reset > Reset phone > Erase everything to erase all personal data from your phone, including your Google™ account and downloaded applications.
I cannot charge the phone
The charger is not properly connected or the battery connection is poor. Remove the battery and clean the connectors.
No battery charging icon appears when I start charging the phone
It may take a few minutes before the battery icon appears on the screen.
The battery performance is low
Follow our smart tips on how to get more out of your battery. See Battery performance on page 11.
I cannot transfer content between my phone and the computer, when using a USB cable
The software or the USB drivers have not been properly installed. Go to www.sonyericsson.com/support for more detailed installation instructions and troubleshooting sections.
I cannot use Internet-based services
Make sure your subscription covers data downloads and that the Internet settings in your phone are correct. See Internet and messaging settings on page 28 for more information on how to enable data traffic, data roaming, and download Internet settings. Contact your network operator for more information about your subscription settings.
Error messages
No network coverage
- Your phone is in flight mode. Make sure flight mode is off.
- Your phone is not receiving any network signal, or the received signal is too weak. Contact your network operator and make sure that the network has coverage where you are.
- The SIM card is not working properly. Insert your SIM card in another phone. If this works, it is probably your phone that is causing the problem. In this case, contact the nearest Sony Ericsson service center.
Emergency calls only
You are within range of a network, but you are not allowed to use it. However, in an emergency, some network operators allow you to call the international emergency number 112. See Emergency calls on page 31 for more information.
SIM card is locked.
You have entered your PIN incorrectly 3 times in a row. To unlock the phone, you need the PUK provided by your operator.
SIM card is PUK-locked.
You have entered your PUK (Personal Unblocking Key) incorrectly 10 times in a row. Please contact your service provider.
Legal information
Sony Ericsson U20i/U20a
This User guide is published by Sony Ericsson Mobile Communications AB or its local affiliated company, without any warranty. Improvements and changes to this User guide necessitated by typographical errors, inaccuracies of current information, or improvements to programs and/or equipment, may be made by Sony Ericsson Mobile Communications AB at any time and without notice. Such changes will, however, be incorporated into new editions of this User guide. All rights reserved.
©Sony Ericsson Mobile Communications AB, 2010
Publication number: 1238-6569.4
Your mobile phone has the capability to download, store and forward additional content, e.g. ringtones. The use of such content may be restricted or prohibited by rights of third parties, including but not limited to restriction under applicable copyright laws. You, and not Sony Ericsson, are entirely responsible for additional content that you download to or forward from your mobile phone. Prior to your use of any additional content, please verify that your intended use is properly licensed or is otherwise authorized. Sony Ericsson does not guarantee the accuracy, integrity or quality of any additional content or any other third party content. Under no circumstances will Sony Ericsson be liable in any way for your improper use of additional content or other third party content.
This User guide may reference services or applications provided by third parties. Use of such programming or services may require separate registration with the third party provider and may be subject to additional terms of use. For applications accessed on or through a third-party website, please review such websites' terms of use and applicable privacy policy in advance. Sony Ericsson does not warrant or guarantee the availability or performance of any third-party websites or offered services.
Remove the battery to see regulatory information such as the CE mark.
All product and company names mentioned herein are the trademarks or registered trademarks of their respective owners. Any rights not expressly granted herein are reserved. All other trademarks are property of their respective owners.
All illustrations are for illustration only and may not accurately depict the actual phone.
This product is protected by certain intellectual property rights of Microsoft. Use or distribution of such technology outside of this product is prohibited without a license from Microsoft.
Content owners use Windows Media digital rights management technology (WMDRM) to protect their intellectual property, including copyrights. This device uses WMDRM software to access WMDRM-protected content. If the WMDRM software fails to protect the content, content owners may ask Microsoft to revoke the software's ability to use WMDRM to play or copy protected content. Revocation does not affect unprotected content. When you download licenses for protected content, you agree that Microsoft may include a revocation list with the licenses. Content owners may require you to upgrade WMDRM to access their content. If you decline an upgrade, you will not be able to access content that requires the upgrade.
This product is licensed under the MPEG-4 visual and AVC patent portfolio licenses for the personal and non-commercial use of a consumer for (i) encoding video in compliance with the MPEG-4 visual standard ("MPEG-4 video") or the AVC standard ("AVC video") and/or (ii) decoding MPEG-4 or AVC video that was encoded by a consumer engaged in a personal and non-commercial activity and/or was obtained from a video provider licensed by MPEG LA to provide MPEG-4 and/or AVC video. No license is granted or shall be implied for any other use. Additional information including that relating to promotional, internal and commercial uses and licensing may be obtained from MPEG LA, L.L.C. See http://www.mpegla.com. MPEG Layer-3 audio decoding technology licensed from Fraunhofer IIS and Thomson.
End-user license agreement for Sun Java Platform, Micro Edition.
- Restrictions: Software is confidential copyrighted information of Sun and title to all copies is retained by Sun and/or its licensors. Customer shall not modify, decompile, disassemble, decrypt, extract, or otherwise reverse engineer Software. Software may not be leased, assigned, or sublicensed, in whole or in part.
Index
A
adjusting volume 77
alarm 56
album
for photos and videos 89
Android Market ....50
animated wallpaper 17
answering service ....32
applications
managing 17
overview 18
audio
adjusting volume 77
playing 76
playing music in random order 78
podcasts 79
audio books 76
B
backing up content 74
battery 12
cover 8
remove 8
Bluetooth™ wireless technology .....71
brightness 27
browsing - see web browser
C
calendar 54
create an event 54
synchronising ....56
calling 25
calls 31,34
diverting 33
emergency 31
forwarding 33
log 32
missed 32
multiple 32
settings 33
waiting 32
camera 85, 86
album 89
closing 85
geotagging 86
keys 85
recording videos 88
scenes 87
taking photos 86
video 88
viewfinder 85
viewing photos 86
viewing videos 88
caps lock 23
changing tracks 77
charging 12
chat 45
conference calls 33
contacts 35
exporting to SIM card 37
favourite 39
importing from SIM card 35
join contact information 38
linking to web service contacts ....48
picture 39,89
sending 39
sharing 39
cropping
photos 90
D
data protection 94
data traffic 29
date
format 26
deleting
an alarm 56
tracks 77
videos 84
widget 15
download
Internet settings 28
driving directions 92
E
email 42
more than one account 44
emergency numbers ....31
events
calendar 54
exporting contacts to SIM card ....37
F
Facebook™ 46
logging in to 47
status update ....47
favourites
moving between in the radio 82
removing radio channels as 82
saving radio channels as 82
films 83
fixed dialling ....34
FM radio
favourites 82
G
geotagging
of photos 86
geotags 86
Gmail™ 44
Google Maps™ 91
Google Sync™ synchronisation service ....60
Google Talk™ 45
Google™ account setup ....44
GPS 91
H
handsfree 25
using 25
hardware keys 13
Home screen 15
|
importing SIM contacts ....35
infinite button 79
music 79
input method ......23
instant messaging 45
Internet
settings 28
web browser 65
K
keyboard 23
keypad 23
L
language 28
LCD backlight control 27
location services 91
locks
activating the screen 9
locking the screen 9
pattern 94
screen lock 9
screen unlock pattern 94
M
mail See email
Media Go™ 70
messages
in Timescape™ 46
settings 28
Microsoft® Exchange Server synchronisation .....61
MMS
recording videos suitable for 88
settings 28
music 25,76,81
adjusting volume 77
audio books 76
browsing 77
changing tracks 77
deleting 77
exploring related content 79
infinite button 79
my playlists 78
pausing a track 77
player overview 76
playing 76
playing in random order 78
podcasts 76, 79
related media content 79
sharing 78
using handsfree 25
music player 76, 77
deleting tracks 77
infinite button 79
minimising 77
playlists 78
playlists made by you 78
podcasts 79
smart playlists 78
top tracks 78
using in the background .....77
N
navigation 13
NeoReader™ application ....57
notification
panel 22
ringtone 27
0
orientation 28
overview
music player 76
P
pausing a track 77
personal information 35
phone
battery 11
performance 11
update 95
phonebook 35
photo sharing services
uploading to 90
photos 86, 89, 90
add to contact 39
adding the geographical position .....86
cropping 90
deleting 89
sharing 86, 90
taking 85, 86
taking using Scenes 87
uploading to a web album 90
using as a contact picture 89
using as wallpaper 90
viewing 86, 89
viewing on a map 86
zooming in photo viewer 89
PIN 24,93
playing
music 76
videos recorded using the camera 89
playlists
copying to memory card 79
creating 78
playing your own 78
smart (auto-generated) 78
top tracks 78
podcasts 79
playing 79
power 9
presets
removing radio channels as 82
saving radio channels as 82
protecting data 94
PUK 93
purchasing
music 80
R
radio 81
favourites 82
listening through the speaker 82
moving between channels 81
navigating 81
opening 81
overview 81
searching for channels 82
selecting channel 81
receiving items using Bluetooth™ 72
recently used applications window .....19
recording videos 88
reset 96
restoring content 74
ringtone 56
S
scenes
in camera 87
settings 87
screen 27
lock 93
lock pattern 93
searching
music using TrackID™ technology .....79
track information 79
sending 86,90
contacts 39
photos and videos 90
sending items using Bluetooth™ 72
settings 9
call 33
Internet 28
messaging 28
MMS 28
Timescape™ 48
setup guide 9
sharing
music 78
photos 86
photos and videos 90
videos 84
shuffle music 78
silent mode 25
SIM card 93
exporting contacts to 37
importing contacts from 35
inserting 8
smart playlists
playing 78
social networking services ....46
social web services
link phone contact to 48
Sony Ericsson Sync ....59
SOS See emergency numbers
status bar 20
still camera 85, 86
scenes 87
streaming
using YouTube™ 84
switching
cameras 85
symbols 23
synchronising ....59
Google Sync ^TM 60
Microsoft® Exchange Server 61
Sony Ericsson Sync ....59
T
telephony See calls
tiles 46, 47
time 26
time management ....54
Timescape ^TM 46
screen overview 46
settings 48
tile icons 47
widget 46
top tracks
playing 78
TrackID™ technology 79
buying a track 80
opening 79
searching for track information .....79
using results 80
troubleshooting 96
turning off 9
turning on 9
Twitter ^TM 46
logging in to 47
status update ....47
U
update
status 47
updating phone 95
USB connection 69
V
vibration 27,56
video camera 85, 88
video player
browsing videos 83, 89
exiting 83
pausing a video 83
playing videos 83
videos 83,90
adjusting volume 83
browsing 83, 89
deleting 84, 89
fast forward and rewind 83
pausing 83
playing 83, 89
recorded by the camera 89
recording 85, 88
recording for MMS 88
sending 84
sharing 84, 90
viewing 88
watching on YouTube™ 84
viewfinder 85
viewing
photos 86
videos recorded using the camera 88
voicemail 32
volume
adjusting video 83
key 25
W
wallpaper
using a photo as 90
web browser 65
managing bookmarks 66
settings 68
toolbar 65
Wi-Fi® 62
widget
Timescape™ 46
Wisepilot™ 92
Y
YouTube™ 84
Z
zooming
photos in photo viewer 89

- XPERIA™
- X10 mini pro
- Extended User guide
- Contents
- User support....6
- Important information....7
- Getting started....8
- Getting to know your phone....11
- Calling....31
- Phonebook 35
- Messaging....40
- Email....42
- Google Talk™ 45
- Sony Ericsson Timescape™ 46
- Android Market™....50
- PlayNow™ service....52
- Getting organised....54
- Synchronising....59
- Connecting to wireless networks....62
- Web browser....65
- Connecting your phone to a computer....69
- Bluetooth™ wireless technology....71
- Backing up and restoring....74
- Music....76
- FM radio....81
- Videos 83
- Taking photos and recording videos....85
- Camera album....89
- Location services....91
- Locking and protecting your phone....93
- Updating your phone....95
- Troubleshooting....96
- Legal information....98
- Index......99
- User support
- • Support application features:
- To use the support application
- Important information
- Getting started
- Assembly
- Turning the phone on and off
- To turn on the phone
- To turn off the phone
- Screen lock
- To activate the screen
- To unlock the screen
- To lock the screen manually
- Setup guide
- Getting to know your phone
- Phone overview
- Battery
- Battery performance
- To turn off all data connections
- To access the battery usage menu
- To add the Data traffic widget to your Home screen
- To add the Power control widget to your Home screen
- Charging the battery
- To charge the phone using the power adapter
- To charge the phone using a computer
- Battery LED status
- To check the battery level
- Using the hardware keys
- Using the touch screen
- To open or highlight an item
- To mark or unmark options
- To pan
- Zooming
- To zoom
- Scrolling
- To scroll
- Lists
- To use the index icon
- Sensors
- Home screen
- To view the extended Home screen
- To add widgets to the Home screen
- To delete a widget from the Home screen
- To rearrange the corners of your Home screen
- Wallpapers
- To add a wallpaper
- Managing applications
- Applications panes
- To browse the applications panes
- To create a new applications pane
- To move an application
- To delete an applications pane
- Recently used applications window
- To open the recently used applications window
- Application menu
- Clearing your application data
- To clear all cache for an application
- To delete an installed application
- Permissions
- To view permissions of an application
- Installing applications from unknown sources
- To allow the installation of applications from unknown sources
- Status bar
- Phone status icons
- Notification icons
- Notification panel
- To open a running application from the Notification panel
- To clear the Notification panel
- Notification LED
- Entering text
- Using the slideout keyboard
- To change writing language using the slideout keyboard
- Using the on-screen keypad
- To display the on-screen keypad and enter text
- To shift between upper-case and lower-case letters
- To turn on the caps lock
- To enter numbers using the keypad
- To insert symbols
- To delete characters
- To use the landscape keyboard
- To change writing language using the on-screen keypad
- To enter text using multitap text input
- To enter text using quick text input
- To edit text
- SIM card
- PIN
- Memory
- Memory card
- Formatting the memory card
- To format the memory card
- Stereo portable handsfree
- To use a handsfree
- Adjusting the volume
- To adjust the ring volume with the volume key
- To adjust the media playing volume with the volume key
- To set the phone to silent and vibrating mode
- Phone settings overview
- To access the phone settings
- To access the setup guide
- Time and date
- To set the date manually
- To set the time manually
- To set the time zone
- To set the hour format
- To set the date format
- Ringtone settings
- To set a phone ringtone
- To enable touch tones
- To select a notification ringtone
- To set the vibrating alert
- Screen settings
- To adjust the screen brightness
- To set the screen to vibrate
- To adjust the idle time before the screen turns off
- To keep the screen on while charging the phone
- Orientation
- To prevent the screen orientation from changing automatically
- Phone language
- To change the phone language
- Flight mode
- To turn on Flight mode
- Internet and messaging settings
- To download Internet and messaging settings
- To view the current Access Point Name (APN)
- To configure Internet settings manually
- To reset the default Internet settings
- Data traffic
- Turning off data traffic
- To turn off all data traffic
- Data roaming
- To activate data roaming
- Network settings
- To use GSM networks only
- To select another network manually
- To activate automatic network selection
- Calling
- Emergency calls
- To make an emergency call
- To make an emergency call while the SIM card is locked
- Call handling
- To make a call
- To end a call
- To make an international call
- To answer a call
- To decline a call
- To mute the ringtone for an incoming call
- To change the ear speaker volume during a call
- To turn on the loudspeaker during a call
- To mute the microphone during a call
- To enter numbers during a call
- Recent calls
- To view missed calls
- To call a number from the call log
- To add a number from the call log to your contacts
- Voicemail
- To enter your voicemail number
- To call your voicemail service
- Multiple calls
- To activate or deactivate call waiting
- To reject a second call
- To answer a second call and end the ongoing call
- To make a second call
- To switch between multiple calls
- To end the ongoing call and return to the next call on hold
- Conference calls
- To make a conference call
- To end a conference call
- Call settings
- Forwarding calls
- To forward calls
- To turn off call forwarding
- Showing or hiding your phone number
- To show or hide your phone number
- Fixed Dialling Numbers
- To enable or disable fixed dialling
- To access the list of accepted call recipients
- Telephone Typewriter (TTY)
- To enable a TTY mode
- Phonebook
- To view your contacts
- Getting contacts into your phone
- To synchronise your phone contacts with a synchronisation account
- To import contacts from a SIM card
- To import contacts from a memory card
- To receive contact data sent using Bluetooth™ technology
- To receive contacts sent using a messaging service
- Managing your contacts
- To select which contacts to display
- To add a contact
- Contact details screen
- To edit a contact
- To delete a contact
- To delete all contacts
- To export contacts to the SIM card
- To export all contacts to the memory card
- Avoiding duplicate entries in your Phonebook
- To join contacts
- To separate joined contacts
- Communicating with your contacts
- To search for a contact
- To call a contact
- To send a text or multimedia message to a contact
- To send an email message to a contact
- To view all communication with a contact in Timescape
- Favourites
- To mark or unmark a contact as a favourite
- To access your favourite contacts
- To add a contact picture
- Sharing your contacts
- To send a contact
- To send all contacts
- Messaging
- Using text and multimedia messaging
- To create and send a message
- To read a received message
- To reply to a message
- To forward a message
- To delete a message
- To delete conversations
- To save a sender's number to a contact
- To call a message sender
- To save a file contained in a message you receive
- Text and multimedia message options
- To change the notification settings for messages
- To change the delivery report settings for outgoing messages
- To view messages saved on the SIM card
- To set up an email account in your phone
- Using email
- To create and send an email message
- To receive and read email messages
- To view an email message attachment
- To save a sender's email address to your contacts
- To reply to an email message
- To forward an email message
- To delete email messages
- To change the email checking frequency
- To change the inbox size of a phone email account
- Using email accounts
- To add an extra email account in your phone
- To set an email account as your default account
- To remove an email account from your phone
- Gmail™ and other Google services
- To set up a Google™ account in your phone
- To open the Gmail™ application
- Google Talk™
- To start Google Talk™
- To reply to an instant message with Talk
- Sony Ericsson Timescape™
- To start Timescape™
- Timescape™ main view
- Timescape™ widget
- Using Timescape™
- Tile icons
- To log in to Facebook™ or Twitter™ from Timescape™
- To update your Facebook™ or Twitter™ status in Timescape™
- To log out of Facebook™ or Twitter™ from Timescape™
- To view an event in Timescape™
- To call back from Timescape TM when you have a missed call
- To reply to a text or multimedia message in Timescape™
- To add a number from a Timescape tile to a contact
- To link a web service contact to a phone contact in Timescape™
- To refresh the Timescape TM main view
- To filter the events displayed in Timescape TM
- To view all communication with a contact
- Timescape™ settings
- To access Timescape™ settings
- To change the events displayed in Timescape™
- To clear Timescape™ content
- To schedule web service content updates in Timescape™
- Android Market™
- To open Android Market™
- Payment options
- Downloading from Android Market™
- Before you download applications
- To download a free application
- To download a paid application
- To open a downloaded application
- PlayNow™ service
- Before you download applications and content
- To start PlayNow™
- Registering for a PlayNow™ account
- To register a PlayNow™ account
- Vouchers
- To redeem a voucher
- Downloading from the PlayNow™ service
- To download an item from your phone
- To access a downloaded item
- Getting organised
- Calendar
- To open the Calendar application
- To create a calendar event
- To view a calendar event
- To edit a calendar event
- To delete a calendar event
- Calendar month view
- To switch between day and month view
- To view other days and months
- Calendar reminders
- To view an event reminder
- To dismiss an event reminder
- To disable an event reminder
- Synchronising your calendar
- Notes
- To add a note
- To view and edit a note
- To view a note reminder
- To delete a note
- Alarm clock
- To open the alarm clock
- To set a new alarm
- To edit an existing alarm
- To deactivate an alarm
- To activate an existing alarm
- To delete an alarm
- To set the alarm signal
- To set a recurring alarm
- To set a title for an alarm
- To turn off or snooze an alarm when it sounds
- NeoReader™ application
- To start the NeoReader TM application
- To scan a bar code
- To enter bar code numbers manually
- NeoReader™ application menu overview
- Synchronising
- Sony Ericsson Sync
- To set up a Sony Ericsson account in your phone
- To synchronise manually using Sony Ericsson Sync
- To edit your Sony Ericsson account
- To set a synchronisation interval
- To remove a Sony Ericsson account from your phone
- Google Sync™ synchronisation service
- To set up a Google™ account in your phone for synchronisation
- To synchronise manually with your Google™ account
- To change your Google™ synchronisation settings
- To remove a Google™ account from your phone
- Synchronising with a Microsoft® Exchange Server using the RoadSync™ application
- To set up RoadSync TM synchronisation
- To read emails in Roadsync
- To view calendar events in RoadSync Calendar
- To manually synchronise RoadSync Mail
- To change the synchronisation schedule for the RoadSync™ applications
- Connecting to wireless networks
- Wi-Fi®
- To turn on Wi-Fi®
- To connect to a Wi-Fi® network
- To connect to another Wi-Fi® network
- Wi-Fi® network status
- To enable Wi-Fi® network notification
- To scan for Wi-Fi® networks manually
- Advanced Wi-Fi® settings
- To add a Wi-Fi® network manually
- To view detailed information on a connected Wi-Fi® network
- Wi-Fi® sleep policy
- To add a Wi-Fi® sleep policy
- Using a static IP address
- To set up a static IP address
- Virtual private networks (VPNs)
- To add a virtual private network
- To connect to a virtual private network
- To disconnect from a virtual private network
- Web browser
- To open the web browser
- Toolbar
- To open the toolbar
- Browsing the web
- Search and address bar
- To go to a web page
- To search a web page
- To exit the web browser
- Navigating web pages
- To select a link
- To go to the previous page while browsing
- To zoom in or out on a web page
- To reload the current web page
- Managing web pages
- To create a shortcut to the current web page
- To share a link to the current web page
- Managing bookmarks
- To bookmark a web page
- To open a bookmark
- To edit a bookmark
- To delete a bookmark
- To bookmark a previously visited web page
- Managing text and images
- To find text within a web page
- To save an image
- Multiple windows
- To open a new browser window
- To open a link in a new browser window
- To switch between browser windows
- Downloading from the web
- To view your downloaded files
- To cancel an ongoing download
- Browser settings
- To change your browser settings
- Auto-fitting web pages
- To auto-fit web pages
- Connecting your phone to a computer
- Transferring and handling content using a USB cable
- To drag and drop content between your phone and a computer
- To disconnect the USB cable safely
- PC Companion
- To install PC Companion
- To use PC Companion
- Media Go™
- To transfer content using the Media Go™ application
- Bluetooth™ wireless technology
- To turn on the Bluetooth™ function and make your phone visible
- Phone name
- To enter a phone name
- Pairing with another Bluetooth™ device
- To pair your phone with another Bluetooth™ device
- To connect your phone to another Bluetooth™ device
- To disconnect a Bluetooth™ device
- To unpair a Bluetooth™ device
- Sending and receiving items using Bluetooth™ technology
- To send items using Bluetooth™
- To receive items using Bluetooth™
- Backing up and restoring
- Types of content you can back up
- To back up phone content manually
- To schedule the automatic backup of phone content
- To disable the scheduled backup of phone content
- To restore phone content
- To delete a backup file from the memory card
- Music
- Copying media files to your memory card
- Using the music player
- To play audio content
- Music player overview
- To browse your audio content
- To change tracks
- To pause a track
- To fast forward and rewind music
- To adjust the audio volume
- To view a current play queue
- To listen to the music player while using other applications
- To return to the music player when it is playing in the background
- To delete a track
- To delete one or more tracks at the same time
- To share a track
- To share one or more tracks at the same time
- Playing music in random order
- To play tracks in random order
- Playlists
- To play smart playlists
- To play the most played songs of an artist
- To play your own playlists
- To copy playlists to your memory card
- Exploring related music content
- To explore related audio content
- Podcasts
- To play podcasts in your phone
- TrackID™ technology
- To open the TrackID™ application
- To search for track information
- Using TrackID™ technology results
- To buy a track using TrackID™ technology
- FM radio
- To open the FM radio
- FM radio overview
- Moving between radio channels
- Using your favourite radio channels
- To save a channel as a favourite
- To remove a channel as a favourite
- To move between favourite channels
- Making a new search for radio channels
- To start a new search for channels
- Switching between the speaker and the handsfree
- To switch between the speaker and handsfree
- Videos
- Using the video player
- To browse videos
- To play a video
- To pause a video
- To fast forward and rewind a video
- To exit the video player
- To resume playing a video
- To adjust the volume of a video
- To delete a video
- To delete one or more videos at the same time
- To share a video
- To share one or more videos at the same time
- YouTube™
- To view streaming content in the YouTube™ application
- Taking photos and recording videos
- Viewfinder and camera controls
- To activate the camera
- To switch between the still and video cameras
- To close the camera
- Using the still camera
- To take a photo
- To view previously taken photos
- To delete a photo
- To share a photo
- Adding the geographical position to your photos
- To turn geotagging on or off
- Viewing your photos on a map
- To view your photos on a map
- To switch between map and satellite views
- Improving photos with Scenes
- Scenes settings
- Auto
- Macro
- Sports
- To select scenes
- Tips when using the camera
- Rule of thirds
- Hold it steady
- Get closer
- Stay within the flash range
- Consider variety
- Use a plain background
- Keep your lens clean
- Using the video camera
- To record a video
- To view previously recorded videos
- To record a video suitable for multimedia messages (MMS)
- Camera album
- To browse your photos and videos
- To view photos
- To view the photo viewer controls
- To zoom a photo
- To play videos recorded using the camera
- To delete your photos or videos
- To use a photo as a contact picture
- To crop a photo
- To use a photo as wallpaper
- Sharing photos and videos
- To share your photos or videos
- To upload a photo to a web album
- Location services
- Using GPS technology
- To enable the GPS receiver
- To use wireless networks to find your position
- Google Maps™
- To use Google Maps™
- Getting driving directions
- To start Wisepilot™
- Locking and protecting your phone
- IMEI number
- To view your IMEI number in the phone
- SIM card protection
- To enable the SIM card PIN lock
- To change the SIM card PIN
- To change the SIM card PIN2
- To unblock a locked SIM card
- Screen unlock pattern
- To create a screen unlock pattern
- To unlock the screen using a screen unlock pattern
- To change the screen unlock pattern
- To disable the screen unlock pattern
- Updating your phone
- Updating your phone wirelessly
- To download software updates wirelessly
- Updating your phone using a USB cable
- To download software updates using a USB cable
- Troubleshooting
- My phone is not working as expected
- To force close an application
- Resetting the phone
- To reset the phone
- I cannot charge the phone
- No battery charging icon appears when I start charging the phone
- The battery performance is low
- I cannot transfer content between my phone and the computer, when using a USB cable
- I cannot use Internet-based services
- Error messages
- No network coverage
- Emergency calls only
- SIM card is locked.
- SIM card is PUK-locked.
- Legal information
- Sony Ericsson U20i/U20a
- ©Sony Ericsson Mobile Communications AB, 2010
- Index
- A
- B
- C
- D
- E
- F
- G
- H
- |
- K
- L
- locks
- M
- messages
- MMS
- N
- notification
- 0
- overview
- P
- phone
- photo sharing services
- playing
- presets
- purchasing
- R
- S
- scenes
- searching
- T
- U
- V
- W
- Y
- Z
Brand : SONY ERICSSON
Model : Xperia X10 Mini Pro
Category : Mobile Phone