
T600 - Mobile Phone SONY ERICSSON - Free user manual and instructions
Find the device manual for free T600 SONY ERICSSON in PDF.


| Product Type | Mobile Phone |
| Brand | Sony Ericsson |
| Model | T600 |
| Network | GSM 900 / GSM 1800 / GSM 1900 |
| Dimensions | 92 x 41 x 19.5 mm |
| Weight (with standard battery) | 60 g |
| Battery | Standard Battery BSL-14 (Li-Ion) |
| Charger | Travel Charger CTR-10 or Micro Travel Charger CMT-10 |
| SAR Value (head) | 0.8 W/kg (10g) |
| Operating Temperature | -10°C to +55°C |
| Key Features | WAP Browser, Calendar, Code Memo, SMS & Chat, Phone Book (250 entries), Conference Calls, Profiles, Vibrating Alert, Keypad Lock, Infrared Port |
| Security | SIM Card Lock, Phone Lock, Fixed Dialling, Restrict Calls, Accept Calls |
| Warranty | 1 Year Limited Warranty |
| Antenna | Internal antenna |
| Display | Monochrome graphic display with icons |
| SIM Card | Small plug-in card (3V) |
Frequently Asked Questions - T600 SONY ERICSSON
User questions about T600 SONY ERICSSON
0 question about this device. Answer the ones you know or ask your own.
Ask a new question about this device
Download the instructions for your Mobile Phone in PDF format for free! Find your manual T600 - SONY ERICSSON and take your electronic device back in hand. On this page are published all the documents necessary for the use of your device. T600 by SONY ERICSSON.
USER MANUAL T600 SONY ERICSSON
Getting started 3 Using the WAP browser 50
Making and receiving calls 6 Calendar 53
Key functions.... 10 Code memo.... 56
Using the menus.... 11 Two voice lines .... 57
Entering letters 15 Calling card calls 58
Your personal phone book 18 Extras 59
Using the call list 23 Online services 61
Your voice mail service 24 Sony Ericsson Mobile Internet 61
Personalising your phone.... 25 Troubleshooting.... 62
Text and chat messages 32 Display icons 64
Profiles 38 Quick keys 66
Diverting incoming calls 39 Technical data 67
Security for your phone and Safe and Efficient Use 68
subscription 40 Limited Warranty 72
More than one call 44 Regulatory Information 75
Setting network preferences 47 index 77
Call time and call cost.... 48
Sony Ericsson T600
First edition (May 2002)
This manual is published by Sony Ericsson Mobile Communications AP without any warranty.
Communications AS, without any warranty improvements and changes to this manual
improvements and changes to this manual gesorrelated by typographical marks, inaccuracies
notestimates by typographical errors, indirectness of current information, or improvements to
programs and/or equipment, may be made by Sony
Ericsson Mobile Communications AB at any time
and without notice. Such changes will, however, be
incorporated into new editions of this manual.
All rights reserved.
©Sony Ericsson Mobile Communications AB,
2002
Publication number: EN/LZT 108 5866 R1A
Please note:
Some of the services in this manual are not
supported by all networks. This also applies to the
GSM International Emergency Number 112.
Please contact your network operator or service
Please contact your network operator by service provider if you are in doubt whether you can use a
particular service or not.
Please read the Guidelines for safe and efficient
use and the Limited warranty chapters before you
use your mobile phone
T9 ^iv Text Input is a registered trademark of Tegio
Communications
T9 ^™ Text Input is licensed under one or more of
the following: U.S. Pat. Nos. 5,818,437, 5,953,541,
5,187,480, 5,945,928, and 6,011,554; Canadian
Pat. No. 1,331,057, United Kingdom Pat. No. 202041/Pullers/Keep Standard Pat. No.
22.304145, Hong Kong Standard Pal, No. HK0840329, Republic of Singapore Pal, No
51383: Euro. Pat. No. D 842 463 (96927260
DEIDK, FI, FR, IT, NL, PT, ES, SE, GB; and
additional patents are pending world-wide.
Getting started
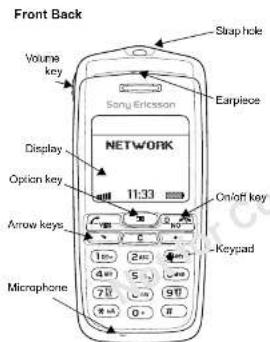

Getting started 3
About this User's guide
Some services and functions described in this User's guide are service provider- and subscription-dependent. Because of this, all menus may not be available in your phone and the shortcut numbers to menus and functions may vary between phones.
This symbol indicates that a service of function is network- or service provider dependent.
Please refer to the information provided by your service provider for more information about your subscription.
We recommend that you read the chapter "Using the menus" on page 11 for information about how to move through the menus.
The SIM card
When you register as a subscriber with a network operator, you get a SIM (Subscriber Identity Module) card. The SIM card contains a computer chip that keeps track of your phone number, the services included in your subscription, and your Phone book information, among other things.
SIM cards come in two sizes. One is the size of a credit card and the other is smaller. Your phone uses the smaller card. Many credit card-sized SIM cards have a perforated smaller card that you can take out easily.
Assembly
Before you can use your phone you need to insert the SIM card.
Note: Always insert the SIM card into the phone before attaching the battery.
attach and charge the battery.
Note: Always turn off the phone and detach the charger before you insert or remove a SIM card.
SIM card and battery information
It may take up to 30 minutes before an icon
appears in the display when charging.
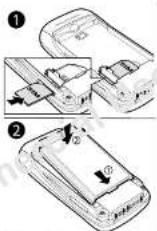
- Slide the SIM card into the slot, under the silvery holder, with the golden connectors facing down and the cut corner to the left. (To remove the SIM card, just slide it out the same way.)
- Place the battery on the back into the back of the phone, with the golden connectors facing down, and push down until it clicks into place.
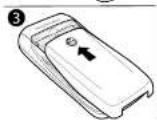
- Slide the battery cover upwards from the bottom of the phone into place as shown in the picture.
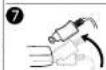
- Connect the charger to the phone at the flash symbol. The flash symbol on the charger plug must face upwards.
- It may take up to 30 minutes before the battery charging icon appears in the display.
- Wait approximately 4 hours or until the icon indicates that the battery is fully charged.
- Remove the charger by tilting the plug upwards.
Note: To remove the battery cover, press the top
centre of the cover and slide downwards


Getting started 5
Making and receiving calls
Turning your phone on
- Press and hold no until you hear a tone.
- Enter your PIN (Personal Identity Number), if you have one for your SIM card. Your PIN is provided by your network operator.
If you make a mistake while entering your PIN, delete the wrong number by pressing ☐ - Press YES.

If you enter your PIN incorrectly 3 times in a row then the SIM card is blocked. See "The SIM card lock" on page 42.
Network search
After you have turned on the phone (and entered your PIN), the phone searches for a network. When a network is found, the phone keeps three times. This is called "standby mode". You can now make and receive calls.
Turning your phone off
In standby mode, press and hold no until you hear
Making a call
. Enter the area circle and phone number.
If you make a mistake while entering the number, delete the wrong number by pressing ⓒ
Press YES.
Press no to end the call.
Note: The Ongoing call menu is displayed when
② is pressed during a coll.
6 Making and receiving calls
Changing the earpiece volume
During a call you can change the carpiece volume by sliding the volume key on the side of the phone.
- Slide the key upwards to increase the volume.
• Slide the key downwards to decrease the volume.
Turning off the microphone
During a call you can turn off the microphone.
- Press and hold (c)
• Press (if)sume the conversation.
Re-dialling a previously called number
The Call list contains numbers that you have dialled, answered or missed.
To re-dial a previously called number
-
Press YES from standby mode to enter the Call list.
-
Press ▶ to scroll through
-
When the number you want to call is highlighted.
press YES to make the call
Automatic re-dialling
If a connection failed, and the display shows Retry?, you can re-dial the number by pressing YES. Your phone automatically re-chials (up to 10 times):
- until the call is answered.
- until you press a key or receive a call.
Note: Automatic re-dialling is not available for
data calls
Making international calls
- Press and hold the 0y until a + sign appears.
The + replaces the international prefix number of the
country from which you are calling.
- Enter the country code, area code (without the
leading zero and phone number. Press YES.
Making emergency calls
-
Enter 112 (the international emergency number)
-
Press YES
Your Sony Ericsson phone supports the international
emergency numbers, 112, 911 and 08. This means
that it can normally be used to initiate an emergency
call in any country, with or without a SIM card
inserted, if a GSM network is within range.
Note: Some service providers may require that a SIM card is inserted, and in some cases that the PIN has been entered as well.
Emergency numbers
Some countries may not promote the international emergency number, 112. Your operator may therefore have stored additional local emergency numbers on the SIM card.
To use another emergency number
-
Press ⚙ to go to the Phone book menu.
-
Press YES to select the menu.
3.
PRESS YES.
4.
press YES.
- Press or to go to the number you want, then press yes to make the call.
Receiving calls
When you receive a call, the phone rings and the display shows Answer?
Tip: Press when the phone rings to enable signal.

If your subscription includes the Calling Line Identification (C.I.D.) service and the caller's network sends the number, the caller's number is shown in the display. If you have saved the caller's name and number in the phone book, the caller's name is displayed. If the network does not send the number, the display shows Withheld.
Answering a call
Press yes to answer a call.
Rejecting a call
Press no. of
the volume key on the side of the phone either upwards or downwards twice.
The caller hears a busy tone if this is supported by the caller's network. If "Divert calls when busy" is on, the call is diverted to the number you have specified. See "Diverting incoming calls" on page 41.
The notepad
You can use the phone to make a note of a phone number during a call. Use the number keys to enter the number. When you end the call, the number remains in the display.
8 Making and receiving calls
When you enter the number, the person at the other end can hear the tones. You can turn the tones off (can only be done during a call).
To turn the tone signals off during a call 1. Press 2. Scroll to Turn off tones and press YES
Showing and hiding your phone number
You can choose to show or hide your number for a particular call, if this service is supported by your subscription.
To hide or show your phone number
- Enter the phone number you wish to call.
-
Kress
-
Scroll to Hide My Number or Show My Number and press YES to make the call.
Sending touch tone signals
To use telephone banking or to control an answering machine, you need to use codes. These codes are sent as touch tone signals (also known as DTMF - Dual
Tone Multiple Frequency tones). If you pre 9, and during a call, these numbers
and characters are sent as tone signals. You can save codes in your phone book and during a call, go to the phone book by passing. And the entry in the
phone book by pressing 📂 that the entry of the phone book and press 📋 and Send as OTMF. See also "Touch tone services" on page 22.
Key functions
The table below shows some examples of the key functions. See also "Quick keys" on page 68.
Key Use
| YES | To make calls and answer calls.To select a menu or setting |
| NO | To turn the phone on or off, press and hold the key.To end a call.To reject a call.To go back one level in the menus, to leave a selling unchanged.To go back to standby mode, press and hold no. |
| and | To move (scroll) through menus, lists and text. |
| C | (Clear) To delete numbers and letters from the display.To delete an item from a list.To turn off the microphone during a call, press and hold the key. |
Key Use
| 1 | -9d enter the digits 0-9. |
| 0 | |
| Press and hold 0 to enter the international prefix + To enter letters.To move through menus using shortcuts |
a/04
To shift between upper-and lower-case letters.
# (Hash) To enter #
Volume key To increase or decrease the volume of
| the earpiece during a call. |
| To reject an incoming call, side either upwards or downwards twice. |
| To scroll through menus, lists and text. |
| To enter the Status menu. |
Option key
The option key. Gives you the most common options for the function you are using. You can also select Exit to standby and the Help function for menus.
Using the menus
There are seven main menus. Each menu has several sub-menus, where you find the different functions.
Moving through the menus
There are two ways of moving through the menus: - Scrolling with the 📂 and 🏠
Press... to...
scroll left or up through the menus.
scroll right or down through the menus
YES select a menu, sub-menu or a setting.
NO go back one level in the menus, leave a setting unchanged. press and hold no to go back to standby. enter optional menus
Using shortcuts
A quicker way to move through the menus is to use shortcuts. Enter the menus by pressing 📄 and then simply enter the number of the menu to which you want to go.
How to interpret the instructions
In this example we are going to set the key sound to the tone option.
To set the key sound
- Scroll to Settings, YES, Sounds & alerts, YES, Key sound, YES.
- Select Tone and press YES.
Interpret the instructions as follows:
1. From standby, press or to scroll to the
Settings menu
2. Press yes to select the Settings menu. The name of
the menu that you have chosen is shown at the top of the display (Settings).
3. Press YES to select the Sounds & alerts sub-menu.
4. Press ☐ to scroll to the Key sound
sub-menu and press YES to select it.
5. Press ☑ to send to the Tone option and press yes to select it. You have now set the key sound to tones.
6. Press and hold no to go back to standby.
Shortcuts
This is how to interpret the instructions above by using shortcuts:
Using the menus 11
To set the key sound
- Press ☑ to order the main menu.
- Press 10 Select the Settings menu.
- Press 10 select the Sounds & alerts sub-menu.
- Press 10 select the Key sound
- Press 📂 to scroll to Tone.
- Press yes to select the tone option.
- To go back to standby, press and hold no.
Tip: To check a setting without changing it: scroll to the setting and leave it unchanged by pressing NO.
Display text
• Text at the top indicates the menu you have chosen.
• A text that is highlighted shows your position in the menu. If you press YES, you enter this menu or select this option.
- Grey text indicates a function that is temporarily unavailable, for example due to your subscription or due to a certain setting which has not been turned on.
- A filled button indicates that this option is selected.
- A tick indicates that this item is selected.
Help texts
Your phone has pop-up help texts that explain the
sub-meaus.
To turn the help texts on or off
Scroll to Settings, YES, Display, YES, Menu help.
Select On or Off and press Yes
Menu language
Most SIM cards automatically set the display language to the language of the country where you bought your SIM card. Automatic. If this is not the case, the pre-set language is English.
To change the display language
Scroll to Settings, YES, Language, YES, Menus, YES.
. Select a language and press YES.
Note: You can always choose Automatic by pressing
888S standby, and English by pressing
0000 standby.
My shortcuts
You can place your favourite functions in the menu. My shortcuts to quickly and easily reach the function you use most.
To add a function to My shortcuts
- Scroll to My shortcuts, YES, Edit shortcuts, YES.
- Select a function from the list by pressing aA
- Press YES to confirm.
To change the position of the shortcut item.
- Select a function from My shortcuts list.
- Press ☐ and scroll to Move up or Move down.
Press YES. - Repeat steps 1 & 2 until the item is in the desired position.

flowchart
graph TD
    A["Phone book Messages Call Info Settings"] --> B["Send new Inbox Chat, Untent Send Items Call voice mail Templates Options"]
    A --> C["Nissed calls Call list Call code Call timers Options"]
    A --> D["Sounds & alerts Profiles Call options Networks Display Language Time and date Locks Handbags Master reset"]
    A --> E["Calendar Time Picture Code memo Calculator Games"]
    A --> F["Mobile Internet Bookmarks Enter address Resume Select profile Clear cache WAP settings Certificates"]
    A --> G["Mobile Internet Turn on keylock Send new New chat Picture My numbers Edit shortcuts"]
    A --> H["Ongoing call"]
    I["Network"] --> J["12:18 AM"]
    J --> K["Turn off tones' Hold call' Sell-off calls' Release active' Retrieve call' Join calls' Transfer call' Partners in con' Muta mix' Store number?' Release at 'Out of the Home'"]
Please note that this overview shows all the possible menu alternatives in your phone. Many of the alternatives are network and subscription dependent.
The Ongoing call menu is activated by pressing during a call. * Only available during a call.
14 Using the menus
Entering letters
You can enter letters when you add names to the phone book, write text messages (SMS) or enter WAP addresses.
Your phone also has a function called T9™ Text Input (predictive text input) for long texts such as text messages, if the input language you select supports this. T9™ Text Input is a quicker way to write texts. See "Writing using T9™ Text Input" on page 17.
Input modes
You can select the input mode that you want to use when writing.
To select input modes
- Scroll to Settings, YES. Language, YES. Input, YES.
- Scroll to the alphabets (input modes) that you want to use for catering letters and press Repeat step 2 if you want to use another input mode.
- Press YES to leave the menu.
When writing you can switch to another input mode by pressing and then select input. See "The list of options" on page 16.
T9™ Text Input
T9TM Text Input is on by default. If you wish, you can turn off the T9TM Text Input.
To turn the T9™ Text Input on or off
- Scroll to Settings, YES, Language, YES, T9 options,
YES, 19th place, YE - Select On or Off.
See the table of the Latin alphabet below for key functions when writing without T9 ^™ Text Input.
Press... to get.
Space 1
2 ABCAAAEAC21
3 DEFéÉ3AΦ
4 GH114
5 JKL5A
6 MNONO06
7 PQRSB7ΠΣc
B TUVU08
Press... to get...
9 WXYZ9
0 + 0 Ξ Τ Ω
# !?::"{}+-"/#
C to delete a letter or number
to shift between capital, initial upper-case,
lower-case, case letters and no
(6) - press and hold to enter numbers
# press and hold to Add symbol menu
move cursor back
move cursor forward
Volume + go up one line
Volume - go down one line
Example:
• To enter an 'A', press once.
• To enter a 'B', quickly press divide.
• To enter lower-case letters, press [while times and then enter the letter, for example an 'a'.
The list of options
If you press when writing text messages, you
• Ins. picture - for SMS only
This option allows you to insert a picture.
- Insert melody - for SMS only
This option allows you to insert a melody. • Edit award, for TRIM Text Input only.
If you want to delete the complete word, press and hold (if you do not want to delete the complete word, but edit it letter by letter, move the cursor by union) or defined delete letters by opening.
c. Enter letters by pressing the appropriate key the number of times needed until you get the letter you want. When you are finished, press yes.
- Add symbol Symbol with _1 and _2 means
Symbols such as 1 and 2 are shown. Move between the symbols by using the keys
• Volume + or = Number up
- = m × 4 left
• or - more right
•Volume - or □Above down
Press yes to select a symbol.
- Input
If you want to change the input mode for the text you are writing, scroll to an input mode and press YES.
• Candidates (0) - for T9™ Text Input only
A list of alternative words is shown. Scroll to a word and press YES.
- Dictionary - for T9^TM Text Input only If you want to change the language for the text you
are writing, scroll to a language and press YES. Reply written for SMS only.
You can turn on the reply request option. When you send a message, you are asked whether you want the recipient to reply or not.
- Message type - for SMS only You can select how you want your text message to be interpreted by the receiver.
- Status request
Check if a message has been delivered.
- Send - for SMS only
This option will send the message.
• Help - for T9™ Text Input only
Explains T9™ Text: Input
- Exit to standby
Exit to standby.
Writing using T9 ^™ Text Input
The 19 ^TM Text Input method uses a built-in dictionary to recognise the most commonly used word for a sequence of key presses. This way, you can press each key only once, even if the letter you want is not the first letter on the key.
Note: Keys -1 have the same function
as when writing without 19 ^th Text Input.
To enter letters using T9™ Text Input
Scroll to Messages, YES. Send new, YES.
- Pies 2, 6, 3
The word "Jane" appears.
If the word shown is the one you want:
- press To accept and add a space.
If the word shown is not the one you want: •press 10 view alternative words. Accept a word and add a space by pressing 1
If you do not find the word you want by pressing [0]
*press to view the options menu. Select Edit
word. Edit the word and press yes. The word is
added to the dictionary
- Continue writing your message. See also "Text and chat messages" on page 33.
Tip: Press ☐ enter a full stop. To enter other punctuation marks, press and hold ☐ 0 checks the next candidate for the suggested word. Accept by pressing Press and hold to select TV™ Text Input on/off.
Your personal phone book
Your phone has a phone book in which you can save numbers and accompanying names (an entry).
To save a number together with a name
- Scroll to Phone book, YES, Add number, YES.
-
Select Add new? or any of the numbers from the list by positive YES.
-
Enter the phone number that you want to save and press YES.
-
Enter a name that you want to associate with the phone number and press YES.
-
Press yes again to save the entry in the suggested position.
To call a number saved in the phone book
- Press and hold Ctrl the Find menu appears.
-
Enter the name (or the first few letters of the name) associated with the number that you want to call and press YES. If the name displayed is not the one you want, press ▶ or Ctrl you find the correct name and number.
-
Press YES to make the call.
Shortcuts to phone book entries
You can call the phone numbers that you have saved in positions 1–9 by entering the position number in standby, and then pressing YES.
When in standby, you can find an entry by pressing and holding one of the keys 2 to find an entry beginning with the first letter on that key, or the closest following. For example, press and hold 4 to get to the first entry beginning with the letter "G" (or the closest following). Press again to get to the first entry beginning with "H" and so on. When you find the entry you want, press yes to make the call.
Ask to save
If Ask to save is on, you are asked if you want to save any called or answered number that is not already saved in your phone book.
To turn the Ask to save function on or off
-
Scroll to Phone Book, YES, Options, YES, Ask to save,
-
Select On or Off and press Yes.
Note: Your subscription must support the Calling
Line Identification Service, if you want to save
answered numbers.
Keeping the phone book up to date
You can change and delete names and numbers from
the phone book
To edit an entry
-
Scroll to Phone book, YES, Final, YES.
-
Enter the name (or the first few letters) for the entry
that you wish to edit and press YES.
-
Plcns
-
Select Edit and pressYES.
-
When you have finished editing, press YES to save
your changes.
To delete an entry from the phone book
-
Scroll to Phone book, YES, Find, YES.
-
Enter the name (or the first few letters) for the entry
that you wish to edit and press YES.
- When the entry you want to delete is highlighted,
press ©
- Press YES to confirm.
Sort order
Your phone book entries can be sorted according to their position number or the name.
To choose a sort order
- Scroll to Phone book, YES, Options, YES, Sort order,
- Select a sort order and press YES.
Phone book memories
Your phone book entries are saved in the memory on your SIM card.
You can also save your entries in the phone memory. The phone memory holds 250 positions in which your entries are saved when all SIM positions are occupied.
You can check how many memory positions you have in your memories and how many of them you have used.
To check the status of the memories
- Scroll to Phone book, YES, Memory status, YES.
Choosing where to save an entry
When you save an entry and are asked to enter the position number, you can do the following:
• To save the number in the first empty position suggested, press YES.
• To save the number in another position, press to delete the position number, enter a new position number and press YES.
• To save the number in the phone memory, you first need to know how many positions you have got on your SIM card. You can check this in the Memory-status menu. If, for example, you have 250 positions on your SIM card, you can enter position number 251 to save a number in the first position of the phone memory.
Tip: Press ☑ move a selected contact to another position, or to select "Card memory" or "Phone memory".
Overwrite protection
If you try to save a phone number in a position which already contains a phone number, the message Overwrite? appears together with the name saved in that position. You now have two options:
- Press YES to replace the number with the new one.
- Press NO if you do not want to replace the old number. Enter a new position and pressyes.
You can delete entries saved in the phone memory.
To delete all entries from the phone memory
-
Scroll to Phone book, YES, Options, YES, Delete all, YES.
-
Press YES again.
-
Enter the phone lock code (0000 or another one that you have chosen yourself, see "The phone lock" on page 43), and press YES.
Note: The entries on your SIM card are not deleted.
Groups
You can create a group of phone book entries. You can then send a text message to all members of that group at the same time. See "Text and chat messages" on page 33.
To create a new group
- Scroll to Phone book, YES, Groups, YES. Add new?,
YES - Enter a name for the group and press YES.
- Scroll to Add new? and press YES.
- Select an entry in your phone book and press YES.
- To add the next member, repeat steps 3 and 4
- Draw up to leave the means
- Press MD to leave the menu.
To add a member to an existing group.
- Select a group and press YES.
- Select Add new? and press YES
- Select an entry in your phone book and press YES.
Business cards
You can add your own business card as an entry in
the phone book. You can then exchange business
cards via SMS.
To send your own business card
- Scroll to Phone book, YES, Business cards, YES.
- Select Send my own and press YES.
- Enter the recipient's phone number and pressures.
Press to recall a number from the phone book. - Press YES to send.
To edit your own business card
- Scroll to Phone book, YES, Business cards, YES, Edit my card, YES.
- Edit your own phone number, press YES, edit your name and press YES again.
To save a received business card
- When you have received a business card the display shows Save received business card?
- Press YES to accept the number, name and position and it will be stored in the phone book.
1ip: You can edit the number, name and position in the phone book of the business card.
Touch tone services
In your phone book, you can save a phone number together with tone signals and codes. When you call this entry, the phone number and all the tone signal codes are then dialled automatically.
Note: Saving personal codes in the phone book involves a risk if your phone is stolen. It is safer to save personal codes in the Code memo. See "Code memo" on page 57.
To save a phone number together with tone signals and codes
- Scroll to Phone book, YES. Add number, YES.
-
After entering the phone number, press and hold a/A until the pause character p appears in the display. Enter the code, then if needed, enter another pause,
-
Enter the name that you want to associate with the phone number and code and press YES.
-
Press YES to save
Copying from one SIM card to another
You can copy your phone book entries on one SIM card to another, via the phone's memory.
If your phone memory contains phone book entries that you wish to keep, you first need to copy these entries from the phone memory to a SIM card, otherwise they will be deleted.
Note: You can only copy 250 items at a time. Check your phone memory and your SIM card memory before you start copying, to make sure that you do not delete entries you want to keep.
To copy from a SIM card to the phone memory [next a SIM card]
- Insert a third card.
- Scroll to Phone book, YES, Options, YES, Copy, YES, Copy from card, YES.
- Enter from which position number on the SIM card you want to start copying and press yes.
- Press YES again to start copying. Wait until the display shows Phone book entries copied:
To copy from the phone memory to a SIM card
1. Insert a SIM card.
2. Scroll to Phone book YES (Options YES, Cany YES
2. Screen to 2 Whole Door, YES, Options, YES, Copy, YES, Copy to cord, YES.
3. Enter the position number of your SIM card where
you want to start saving your entries and press YES.
4. Press YES again to start copying.
Wait until the display shows Phone book entries copied:
Using the call list
The Call list saves the last 30 incoming, outgoing and missed calls.
The calls are saved in chronological order, except for the last dialled number, which is always displayed in the first position. If you check a call within 24 hours, the time of the call is displayed. Otherwise, the time is replaced by the date.
If the incoming call is a restricted number, the display shows Unknown.
To call a number from the call list
- Press yes when the phone is in standby mode.
- Select the number you want to call and pressres.
- press #undSelect Edit bef. cdo to edit the number before calling.
Tip: You can also select the Call list from the Call info menu.
To clear the call list, scroll to Call info, YES. Options,
YES, Clear call list, YES.
To turn the call list on or off
-
Scroll to Call info, YES, Options, YES, Set call list, YES.
-
Select On or Off and press YES.
If you turn off the list, it is cleared.
Missed calls
If you have missed a call, the message Missed calls: I appears in standby mode. (The number indicates the number of missed calls.)
To check your missed calls
-
Press YES to display the missed calls.
-
Select a number and press YES to call the number.
Press no if you do not want to check your missed calls now.
Your voice mail service
The answering service of your service provider allows callers to leave a voice message when you cannot answer your calls. You are informed about the voice message via a text message or by a specific voice mail indication.
Using your voice mail service
You can save the number to your voice mail service.
To save your voice mail number
-
Scroll to Messages, YES, Options, YES, Voice mail no., YES.
-
Enter your voice mail number and pressures.
To call your voice mail service
- Press and hold (from standby.
Receiving a voice mail
When you receive a voice mail, your phone beeps and the message New voice mail appears in the display. Press YES to listen to the voice mail. If you want to listen to it later, press NO.
Personalising your phone
You can adjust the phone settings to suit your own requirements.
Ring signals
You can specify the ring signal volume, choose among different ring signals or compose your own.
Dipsonian structure
Ring signal volume The ring signal volume can be set to six levels. You can also turn the ring signal off (0).
To set the ring signal volume
-
Scroll to Settings, YES, Sounds & alerts, YES, Ring volume, YES.
-
Press to decrease or increase the volume.
-
Press YES to save the setting.
Tip: Use the volume key on the side of the phone to change the volume silently.
To turn the ring signal on or off
-
From standby, press and hold Ⓔ
-
Press YES.
All signals except the alarm and timer signals are
turned off.
To cancel, repeat step1 and press YES.
Increasing ring
You can choose a ring signal that rises in steps from
the lowest volume to the highest
- Scroll to Settings, YES, Sounds & alerts, YES,
Increasing ring, YES. Select On and press YES.
Ring signal type
You can choose a ring signal from a list of different
sounds and melodies.
To choose a ring signal
- Scroll to Settings, YES, Sounds & alerts, YES, Ring
signals, YES. Calls, YES.
- Select a ring signal and press YES.
Tip: Use the volume key on the side of the phone to scroll silently.
Specific ring signals for personal calls
If your subscription includes the Calling Line Identification (CLI) service, you can assign a personal ring signal to up to ten callers, or to a group of callers.
If the last seven digits of a caller's number correspond to a number you have specified, then that caller's ring signal is used.
You can include question marks in a phone number. For example, 012345??? means that calls from phone numbers between 012345000 and 012345999 will have the same personal ring signal. Press and hold # to insert a question mark.
To set a specific ring signal for a caller
-
Scroll to Settings, YES, Sounds & alerts, YES, Ring signals, YES, Personal rings, YES, Add new?, YES.
-
Enter the caller's number and press YES. Press in recall a number from the phone book.
-
Select a ring signal and press YES.
To set a specific ring signal for a defined group of callers
-
Scroll to Settings, YES, Sounds & alerts, YES, Ring signals, YES, Personal rings, YES, Add new?, YES.
-
Press 18 recall a defined group from the phone book.
-
Select a ring signal and press YES.
Composing your own ring signal
The melody editor enables you to compose your own ring signals.
To edit or compose a ring signal
-
Scroll to Settings, YES. Sounds & alerts. YES, My
-
Select one of the melodies and pressyes.
-
Select Edit and press YES.
-
Use the button to press
-
Use the keypad in enter a hole.
cursor using In the dotted
frame and press the keypad
- When a note is entered you can change the note in the
change the note in the following ways:
•press to change up
one note. •press 14 change down one note.

•press (to increase the pelave.
•press 15 decrease the octave.
•press to change to a longer note.
•press (to change to a shorter note.
•press to change to a flat or sharp note.
-press 10 barn the vibration on or off.
- press 18 change the duration specifier.
*press 📄add a new note above the current
note
•press to increase or decrease the volume.
*press 16 delete the selected note.
- Scroll using or IronLo note to the next.
The highlighted line on the display shows which note is selected.
-
Press YES to listen to the melody.
-
Press YES again to save the melody or NO to continue editing the melody.
Tip: You can play a melody from the (man).
To create a repeat block of notes
-
Select the starting note of the repeat and press #
-
Select the ending note of the repeat and press #
-
Press C to change the repeat count 1-9 times, or to continually repeat.
Tip: You can add repeat blocks from the 📄.
To set the volume, beat and style for a melody
- Scroll to Settings, YES, Sounds & alerts, YES, My
melodies, YES.
-
Select a melody and pressyes.
-
Select a setting and press YES.
- Set volume, to decrease or increase the volume.
- Set heat, to decrease or increase the beats per minute.
- Set style, to select a style.
- Enter your setting and press YES to save the setting
Note: The volume of the melody is dependent upon
the main volume settings.
To edit the melody name and composer
- Select the melody to edit from the Settings/Sounds &
alerts/My melodies menu and press YES.
- Scroll and select Melody info and press YES.
- Press yes once to edit the melody name
• Press yes twice to edit the composer name
- Enter a new name and press, x55
Tip: Press 📣 in the Melody info menu in
edit the melody name and composer name.
Vibrating alert
You can choose to be notified of an incoming call by the buzzing of the Vibrating alert. You can set the phone's Vibrating alert to one of the following:
• On (all the time)
- On if silent (on when the ringing volume is turned
- Off (all the time)
Note: When your phone is attached to a charger, the Vibrating alert is turned off automatically.
To set the Vibrating alert
- Scroll to Settings, YES, Sounds & alerts, YES, Vibrating alert, YES.
- Select the setting you want, and then press YES
Message signal
You can set the message signal.
- Scroll to Settings, YES, Sounds & alerts, YES.
Message alert, YES and select the signal you want.
You can also set a personal message signal for a defined group in your phone book.
- Scrall to Yes signals & alerts, YES, Message alert. YES. Personal rings, YES and select the signal you want.
- Press to select a defined group from the phone book.
Pictures
Your phone contains pictures which can be edited and saved as new pictures in My pictures. The pictures can be inserted in a text message, see "To insert a picture in a text message" on page 33.
You can delete pictures from My pictures and My favourites, but you cannot delete the original pictures that were in the phone when you bought it.
To edit and save a picture in your phone
- Scroll to Extras, YES, Pictures, YES.
- Select a picture group and press YES.
- Press 📂 to scroll through the pictures.
Select a picture and pressyes to view the editing
tools. You can now start to edit the picture. - Press ☑ View the Options menu.
- Select Save and preserves. The picture is saved in My pictures.
How to use the keys when editing a picture.
Key Use
① Move the cursor up and left.
2 Move the cursor up.
3 Move the cursor up and right
4 Move the cursor left.
5 Lift up, or put down the pen. Press and hold to switch between zoom and full size view.
6 Move the cursor right.
7 Move the cursor down and left
8 Move the cursor down
9 Move the cursor down and right.
0 Switch line thickness
YES Save the picture
NO Quit the picture editor.
6 Clear the
s/A Move the cursor 1, 5 or 10 spaces.
Key Use
Switch between black and white pen colour.
Brings up the Options menu.
To save a picture in My favourites
- Scroll to Extras, YES, Pictures, YES.
- Select a picture group and press YES.
- Select a picture and press
- Select My favourites and press YES.
To delete a picture from My favourites
- Select a picture from My favourites and press (c)
- Press yes to delete the picture.
To install a background picture
- Scroll to Extras, YES. Pictures, YES.
- Select a picture group and press YES.
- Select a picture and press
- Select Just, picture and press YES.
You can turn the background picture on or off.
- Select Background from the Settings/Display menu
and select On or Off.
Key sound
- You can set the key sound to clicks, tones or silent. - Select Key sound from the Settings/Sounds & alerts menu and then select the key sound you want.
Minute minder
If you turn on the minute minder, you hear a beep once every minute during a call.
- Select Minute minder from the Call info/Call timers menu and then select On or Off.
Display light
The display light can be set to automatic, off or on. In automatic mode, the display light is turned off 25 seconds after you press the last key.
- Select Light from the Settings/Display menu, and then select the alternative you want.
The keypad lock
The keypad lock feature helps you to avoid accidental dialling. The keypad remains locked until you:
• answer an incoming call
- unlock the keypad
- receive an SMS.
Note: You can call the international emergency number 112 even if the keypad is locked.
To lock the keypad manually
-
PIRS in standby.
-
Select Turn on keylock and press YES.
To unlock the keypad
-
Press
-
Select Turn off keylock? and pressYES.
Automatic keylock means that if no keys are pressed after 25 seconds, the keypad will be locked.
To turn the automatic keylock on or off
-
Scroll to Settings, YES, Locks, YES, Auto keylock, YES.
-
Select On or Off and press YES.
Time and date
The time is always displayed in standby mode.
To set the time
-
Scroll to Settings, YES, Time and date, YES, Set time, YES.
-
Enter the time and press YES.
To choose a 12-hour or a 24 hour clock, scroll to Settings. YES, Time and date. YES, Time settings. YES and then select the time format you want. If you select the 12-hour clock, you can alternate between am and pm by pressing #
Date
When the phone is in standby mode, you can slide the volume key to see today's date.
To set the date
-
Scroll to Settings, YES. Time and date, YES, Set date, YES.
-
Enter the date (two digits), month and year and then press yes.
To select another date format, scroll to Settings, YES, Time and date, YES, Date format, YES, and then select the date format you want.
Answering mode
When using a portable handstree, you can choose to answer a call by pressing any key (except no) or set the phone to answer the call automatically.
To select answering mode
-
Scroll to Settings, YES. Handsfree, YES, Answering mode, YES.
-
Select an answering mode and press YES.
Greeting text
When you turn your phone on or off, a greeting appears in the display. If you want to interrupt the greeting, you can press the NO key.
To select a greeting
-
Scroll to Settings, YES, Display, YES, User greeting, YES
-
Select a greeting and press YES. You can also turn off the greeting by selecting Off.
Phone number display
To check your own phone number, scroll to Settings, YES, Display: YES, My numbers. YES. If your number is not stored on your SIM card, you can enter it yourself.
Master reset
You can reset the phone settings to the way they were when you bought your phone.
To reset the phone
- Scroll to Settings, YES, Master reset, YES.
- Enter the phone lock code (0000 or the new code if you have changed it) and press YES.
Text and chat messages
You can use the Short Message Service (SMS) to send and receive text messages. If the number to your service centre is not stored on your SIM card, you must specify the number yourself. This also applies to chat messages. See "Mobile chat" on page 35.
Note: The number to your service centre is provided by your service provider.
To check the number to your service centre 1. Scroll to Messages, YES, Options, YES, Service centres, YES. If no number is found, select Add new? and press YES. 2. Enter the number, including the international – sign and country code, and press YES.
Sending a text message
You can send a text message and insert pictures and melodies in it. When you send messages containing pictures and melodies, you use the Long Messages function. See "Long messages" on page 37.
To send a text message
- Scroll to Messages, YES, Send new, YES.
- Enter your message and press YES.
See "Entering letters" on page 15. - Enter the recipient's phone number or recall it from the phone book by pressing
- Press YES to send the message.
Tip: You can also press (a) recall a number
from the phone book.
If you want to send the message later, press NO when
you are asked to enter the phone number. The message
is saved in the Unsent list.
To insert a picture in a text message
- Scroll to Messages, YES, Send new, YES.
- While entering your message, press
- Select Ins. picture and press YES.
- Select one of the picture groups and pressures.
- Select the picture you want to insert and press yes.
- 2017, the private, and public sector data provided by
To insert a melody in a text message
- Scroll to Messages, YES. Send new, YES.
- While entering your message, press
- Select Insert melody and press YES.
- Select the melody you want to insert and pressYES.
Sending a text message to a group
You can send text messages to a group that you have
specified and saved in your phone book, see "Groups"
on page 21.
To send a text message to a group
1. Follow steps 1 & 2 of "To send a text message".
2. Press, select Gnergs and press
3. Select a group and press YES.
Note: You will be charged for each group member.
Receiving a message
When you receive a message, the phone beeps, and
the message New message Read now? appears in
the display.
To read the message
- Press YES.
Press no if you want to read the message later. The message is saved in your Inbox in the Message menu. - Press (or) to scroll through the message.
An arrow in the bottom right corner of the display
indicates that there is more text in the message. - When you have read the message, press YES. A menu with different options appears. Select
- Refuse to apply to a message
• Forward to forward a message.
• Debits to delete the message.
• Delete to delete the message - Save to save the message.
- Call to call the sender of the message.
• Can to call the sender of the message.
• Chat to chat with the sender of the message. - Numbers to call or save a phone number found in the message.
- Read next to read the next message.
Tip: If you select a message in the inbox and press (2), you can see the list of options.
If the sender of the message wants you to reply, the message "Reply request Reply?" appears in the display. Press YES again to reply. If you do not want to reply, press NO.
To save a picture found in a message
- When the picture is highlighted, press
- Select Save picture and pressYES.
The picture is saved in My pictures in the Pictures
meni
To save a melody found in a message
- When the melody icon is highlighted, press
- Select Save melody and press YES.
- Scroll to the position where you want to save the melody within My melodies and press YES.
Note: To set the saved melody as a ring signal,
see "To choose a ring signal" on page 25.
Saving incoming messages
Incoming messages are saved in the phone memory.
The phone memory can hold up to 20 messages.
When the phone memory is full, the oldest read
message is deleted when a new message is received.
If the phone memory becomes full of unread
messages, new messages are automatically saved on
the SIM card. Messages that are saved on the SIM
card remain there until you delete them.
To save a message on the SIM card
-
When you have read the message, press YES.
-
Select Save and press YES.
Mobile chat
You can use the chat function to send and receive chat messages. The chat function works in the same way as a chat on the Internet.
To start a chat session
-
Scroll to Messages, YES, Chat, YES. Start new. YES.
-
Enter the recipient's phone number or recall it from the phone book by pressing
-
Write your chat message and pressYES.
If you receive a new message while another chat session is ongoing, the new message is saved in the labus in the Messages menu.
To suspend and resume a chat session
You can suspend an ongoing chat session by pressing no twice and 200 ears in the display. While a session is suspended you can use any of the other functions in your phone. When a session is
suspended you can scroll to Messages, YES, Chat YES.
In the chat menu you can choose to:
- Start a new session with another person
•Resume the suspended session
•Save the session
•End the suspended session
Tip: You can also press (when in the chat
session to see a list of options.
When you receive a new chat message from the person you were chatting with, the chat session is automatically reactivated if in standby. If you are using another function of the phone then your phone beeps.
To end a chat session
-
During a chat session, pressNO.
-
End session? appears in the display. To end the
session. press YES.
You can choose to enter a nickname which will appear in the recipient's display each time you send a chat message.
To enter a chat nickname
- Scroll to Messages, YES, Chat, YES, Options, YES.
- Select Nickname and press YES.
- Enter your nickname, with a maximum of 6
characters, and pressives.
You can choose to hide your own message from your phones display when you are in a chat session.
- 本说明仅供参考。
To show or hide your own chat message - Scroll to Messages, YES, Chat, YES, Options, YES.
- Select Hide my lines and press YES.
- Select On or Off and press YES.
Customising your text messages
You can set a default value for the message options below, or you can turn on the Set on send option which means that you choose the setting you want each time you send a message.
Message type
You can send different types of messages. Your service provider may offer the facility of converting a text message into a format (lux, etc.) that suits the equipment that is going to receive the message.
Validity period
If your message cannot be delivered, for example if the recipient has turned off the phone, your service centre can save the message to send it later.
Reply request
If you want the recipient of your message to reply, you can turn on the Reply request option.
Status request
If you want to see the status of the message you have sent, you can turn on the Status request option.
To set a default message option
- Scroll to Messages, YES, Options, YES.
- Select an option. YES
- Select Set default, YES.
- Select an option. YES.
To turn Set on send on or off
- Scroll to Messages, YES, Options, YES.
- Select an option, YES
- Select Set on send way
- Select On or Off and press YES
Long messages
A short text message can consist of up to 160 characters. You can send a longer message, but it is automatically divided into several shorter messages (up to three messages) and depending on your service provider, you can be charged for each message.
To turn long messages on or off
- Scroll to Messages, YES, Options, YES, Long
messages, YES. 2. Select On or Off and press YES.
Note: If the recipient's phone does not support long messages, the messages are received one at a time.
Templates
If you have one or more standard messages that you use often, you can save these as templates in your phone. You can save 10 templates consisting of up to 160 characters each.
To create a template
-
Scroll to Messages, YES, Templates, YES, Add new?, YES.
-
Enter the message and press YES.
-
To send the template now, press YES when Send message now? appears and proceed as described in "To send a text message" on page 33. Press no if you do not want to send the template now.
To use a template
-
Scroll to Messages, YES, Templates, YES.
-
Select the template and pressYES. You may edit the message before sending it.
-
When you have completed the message, press YES.
-
Enter the recipient's phone number.
-
Press YES to send the template.
Tip: If you select a template in Templates and press ②, you can see a list of options.
Area information
Area Information is a type of text message that is sent to all subscribers in a certain network area, for example, a local traffic report. The message automatically appears in the display. You cannot save area messages. When you have read the message and press YES or NO, it is deleted.
Please consult your operator for more information about the area information codes.
Text and chat messages 37
To turn Area information on or off
- Scroll to Messages, YES, Options, YES, Area info, YES,
Reception. - Select On or Off and press YES.
To insert an Area information code
- Scroll to Messages, YES, Options, YES, Area info, YES,
Edit list, YES, Add new?, YES. - Enter the new code and press YES.
Cell information
The "Cell information channel" is used by
some network operators for sending
messages to their subscribers within a
certain network area.
To turn on the channel, select Cell information from
the Messages/Options menu and then select Or.

Profiles
A profile is a group of settings which are set to suit a certain environment. For example, when you go to a meeting, you can choose the Meeting profile and a number of settings are set – the ring signal is turned off etc.
The profiles
Your phone has a number of pre-set profiles that you can add accessories to, rename or change. You cannot change the name of or add any accessories to the Normal profile.
Message alerts, ring signals and key sound are profile dependant, which means that they are different in each profile, and can be edited in the Profiles menu.
To choose a profile manually
Scroll to Settings, YES, Profiles, YES and select a
profile.
To change a profile setting
- Scroll to Settings, YES, Profiles, YES, Edit current, YES.
- Select a setting and pressyes.
- Change the profile settings and press YES.
To change the name of a profile
- Scroll to Settings, YES, Profiles, YES, Edit current, YES, Profile name, YES and enter a new name.
You can reset all profile settings to the way they were set when you bought your phone.
- Select Reset profiles from the Settings/Profiles menu.
Automatic activation
The Port h-free profile, is automatically activated when you use the portable hands-free accessory. When you disconnect your phone from the accessory, the profile is changed back to the one which was active before, if the current profile was activated automatically.
When you buy your phone, the automatic activation is set on the Portable handsfree profile.
To turn automatic activation on or off
-
Scroll to Settings, YES, Profiles, YES, Auto activation, YES.
-
Select On or Off and press Yes.
Note: A profile with no associated accessories, such as Meeting or Normal, must be chosen manually.
Diverting incoming calls
If you cannot answer an incoming voice or data call, you can divert it to another number.
For voice calls, (not data) you can choose between the following divert alternatives:
- All voice calls – divert all voice calls.
- When busy – divert calls if you are already on the
- Not reachable – divert calls if your phone is turned off or if you are unreachable.
- No reply – divert calls that you do not answer within a specified time limit (operator service).
To turn on a call divert
-
Scroll to Settings, YES, Call options, YES, Divert calls, YES.
-
Select a divert option and press YES.
-
Select Activate and pressYES.
-
Enter the phone number to which you want your calls to be diverted and press YES, or retrieve it from the phone book by pressing
Note: When the Restricted Calls function is on, some
Divert Calls options cannot be activated. See
"Restrict calls" on page 42.
To turn off a call divert
- Scroll to Settings, YES, Call options, YES, Divert
calls, YES - Scroll to a divert option and press YES.
- Select Cancel and press YES.
- Select Get status to check if a divert option is on or off.
You can check the status of all divert options.
- Select Check all from the Settings/Call options/
Divert calls menu.
Security for your phone and
subscription
The SIM card lock
The SIM card lock protects your subscription, but not your phone itself, from unauthorised use. If you change SIM cards, the phone still works with the new SIM card.
Most SIM cards are locked at the time of purchase.
If the SIM card lock is on, you have to enter a "PIN"
(Personal Identity Number) every time you turn on
your phone.
If you enter your PIN incorrectly three times in a row, the SIM card is blocked. This is indicated by the message PIN blocked. To unblock it you need to enter your "PUK" (Personal Unblocking Key). Your PIN and PUK are supplied by your service provider.
To unblock your SIM card
- PIN blocked appears in the display.
- Enter your PUK and press YES.
- Enter a new four- to eight-digit PIN and press yes.
- Re-enter the new PIN to confirm and press YES.
To change your PIN
- Scroll to Settings, YES. Locks, YES, Card lock, YES.
Change PIN, YES. - Enter your old (current) PIN and press YES.
- Enter your new PIN and press YES.
- Re-enter the new PIN to confirm and press YES.
Note: If the message "Codes do not match" appears,
you entered the new PIN incorrectly. If the message
"Wrong PIN" appears, followed by "Old PIN", you entered your old PIN incorrectly.
To change your PIN 2
- Scroll to Settings, YES, Locks, YES, Card lock, YES,
Change PIN2, YES - Proceed as described in "To change your PIN".
To turn the SIM card lock on or off
- Scroll to Settings, YES. Locks, YES. Card lock, YES.
Protection, YES. - Select On or Off and press Yes.
- Enter your PIN and press YES.
3.2.10.17, 1985, 469-470
The phone lock
The phone lock protects the phone against unauthorised
use if it is stolen and the SIM card is exchanged. It is
not on when you buy the phone. You can change the
phone lock code (0000) to any four- to eight-digit
personal code. The phone lock can be set to on,
Phone lock on
If the phone lock is on, the message Phone locked
Phone lock code: appears each time you turn on the
phone. You have to enter your code followed by YES
to use your phone.
Automatic
If the phone lock is set to automatic, you do not need
to enter your phone lock code until a different SIM
card is inserted in the phone.
Changing the phone lock code
- Scroll to Settings, YES, Locks, YES, Phone lock, YES.
Change code. YES - Follow the steps described in "To change your PIN"
on page 41.
Security for your phone and subscription 41
Note: It is important that you remember your new code. If you should forget it, you have to hand in your phone to your local Sony Ericsson retailer.
To set the phone lock
- Scroll to Settings, YES, Locks, YES, Phone lock, YES, Protection, YES.
- Select an alternative and press YES.
- Enter the phone lock code and press YES.
Restrict calls
The Restriet Calls service allows you to restrict certain types of calls being made and received.
You need a password, which comes with your subscription, to activate or cancel a call restriction.
The following calls can be restricted:
- all outgoing calls, All outgoing
- all outgoing international calls, Outgoing intl
• all outgoing international calls except to your home country. Outgr incl room
• all incoming calls, All incoming - all incoming calls when you are abroad (when roaming). Inc: when roam
To turn a call restriction on or off
- Scroll to Settings, YES. Call options, YES, Restrict calls, YES.
- Select an option and pressives.
- Select Activate or Cancel and press YES.
-
Enter your password and press YES.
-
To check the status of a call restriction, select the call restriction and then Get status.
• To turn off all call restrictions, select Cancel all.
• To change the password, select Change password.
Note: If you divert incoming calls, you cannot activate some Restrict calls options. Likewise, if you restrict calls, you cannot activate some Divert calls options.
Fixed dialling
The Fixed Dialling function allows calls to be made only to certain numbers saved on the SIM card. If an attempt is made to call other numbers, the message Number not permitted appears in the display. Fixed dialling requires a SIM card that allows fixed numbers to be saved. The fixed numbers are protected by your PIN2.
- Partial numbers can be saved. For example, saving 0123456 allows calls to be made to all numbers starting with 0123456.
- Numbers that include question marks can be saved. For example, saving 0123456770, allows calls to be made to numbers from 0123456700 to 0123456790. To enter a question mark, press and hold #
Note: Calls to the international emergency number 112 can still be made, even when Fixed dialling is on
To turn Fixed dialling on or off
- Scroll to Phone Book, YES, Options, YES, Fixed
dioling, YES.
-
Enter your PIN2 and press YES
-
Select On or Off and press YES.
To save a fixed number
- Select Add new? from the Phonebook/Special numbers/Fixed numbers menu, then enter the number.
Closed user groups
The Closed user group function is a way of lowering call costs. On some networks it is cheaper to make calls within a call group. You can have a maximum of 10 groups.

To add a group
- Scroll to Settings, YES. Call options, YES. Closed
groups, YES, Edit list, YES.
-
Scroll to Add new? and press YES.
-
Enter the name of the user group and presses
-
Enter the index number and press YES.
You get the index number from your operator.
To activate a group
-
Scroll to Settings, YES, Call options, YES, Closed groups, YES, Edit list, YES.
-
Select a group and press YES.
-
Select Activate and press YES
Calls can only be made within the selected group.
To call outside Closed user groups
-
Scroll to Settings, YES, Call options, YES, Closed groups, YES, Open calls, YES.
-
Select On and press Yes.
Accept calls
With the Accept calls service, you can choose to receive calls only from certain numbers. Other calls are rejected by a busy tone. You have to save the numbers that you want to receive in an Accepted callers list. The numbers must first be saved in your phone book. The rejected calls are saved in the Call list.
Security for your phone and subscription 43
To add numbers to the Accepted callers list
- Scroll to Settings, YES. Call options, YES, Accept
calls, YES, Accepted list, YES. - Scroll to Add new?, YES.
This takes you to the phone book. - Select an entry and press YES.
To set the accept calls option
- Scroll to Settings, YES, Call options, YES, Accept
calls, YES, Accept options, YES. - Select an option and press YES.
More than one call
Your phone can handle more than one call simultaneously. You can, for example, put an ongoing call on hold while you make or answer a second call, and then switch between the two calls. You can set up a conference call to have a joint conversation with up to four people.
You can also reach the different options described
below by pressing
The Call waiting service
If the Call waiting service is on, you hear a beep if
you receive a second call during an ongoing call.
To turn the call waiting service on or off
- Scroll to Settings, YES, Call options, YES, Call
waiting, YES. - Select Activate or Cancel and press YES.
Select Get status to check if call waiting is on or off.
Note: If you are engaged in data call, incoming calls
are rejected.
Making a second call
- Put the ongoing call on hold by pressing YES.
-
Enter the number you wish to call and write X
-
Enter the number you wish to call and press YES
Note: You can only put one call on hold.
Receiving a second call
If the Call waiting service is on, you hear a beep in the carriage if you arrive at second call.
- Press YES to answer the second call and put the ongoing call on hold (Answer).
- Select Busy to reject the second call and continue the ongoing call.
- Select Release&answer to answer the second call and to end the ongoing call.
One ongoing call and one call on hold
When you have one active call and one call on hold, you can do one of the following:
• Press YES to switch between the two calls.
- Press 📄, then select Join calls to join the two calls into a conference call.
- Press ☐, then select Transfer call to connect the two calls. You are disconnected from both calls. This service is operator dependent.
- Press NO to end the ongoing call and, then press YES to retrieve the held call.
- Press then select Release all, to end both calls.
Receiving a third call
You cannot answer a third call without ending one of
the first two calls.
• S. 1.6.2.1. Release answers to and the current call and
- I can't call a release letter to end the current call and answer the waiting call. The call on hold remains on hold.
- Select Busy to reject the waiting call.
Conference calls
You can include up to four participants in a
conference call. To create a conference call,
you must have one active call and one call
on hold.
To join the two calls into a conference call
- Press
- Select Join calls, YES.
To add a new participant
- Press YES to put the conference group on hold.
- Call the next person you wish to include in the conference group.
- P(185)
- Select Join calls, YES.
Repeat steps 1 to 3 to include more participants.
To check the participants
- Select Parties in conf, YES.
You can have a private conversation with one participant and put the other participants on hold
To extract a participant
行函
- Scroll to Parties in conf, YES.
- Select a participant and press
- Scroll to Extract part. Press YES.
To rejoin the participant
- 打印
- Scroll to Join calls, YES.
46 More than one call
To release a participant
- Scroll to Parties in conf, YES.
- Select a participant and press
- Scroll to Release part, YES.
You can put a conference on hold and make a new
call. You can switch between the calls in the same
way as when switching between two normal calls.
To end the conference call
Press NO.
Setting network preferences
When you turn on the phone, it automatically searches for the last accessed network. If this is not within range, you may use another network, provided your network operator has an agreement that allows you to do so. This is called roaring.
To select a network
- Scroll to Settings, YES. Networks, YES, Select
network, YES - Select a network and press YES.
To start an automatic network search
- Scroll to Settings, YES, Networks, YES, New search, YES.

List of preferred networks
You can edit the list that defines in which order your phone will select a network during automatic network selection. The list is set by your operator and stored on the SIM card.
To review the list of networks
- Scroll to Settings, YES. Networks, YES. Preferred nets. YES.
- To see a network's full name, select the network and press ☐.
- Scroll to Full name and press Yes.
To add a network to the list
- Scroll to Settings, YES, Networks, YES, Preferred nets, YES, Add new?, YES.
- Select the network you want and press YES.
- If the network you want does not appear in the list, scroll to Other and press YES.
- Enter the three-digit country number and the two-digit network number and press yes.
- Enter a position number and press YES.
To rearrange the list
- Scroll to Settings, YES. Networks, YES. Preferred nets.
YES. - Select the network you want to move and press
- Select New priority and press yes.
- Enter the new position number and press yes.
Search modes
• Automatic search mode means that your phone first searches for the last accessed network. If this is not available, it automatically searches for another available network within range.
- Manual search mode means that your phone first searches for the last accessed network, but if this is not available, the question Select net? appears. You then need to choose a network as described in "To select a network" on page 47.
To select automatic or manual search mode
- Select Automatic or Manual from the Settings/Networks/Search mode menu and press YES.
Call time and call cost
During a call, the duration of the call is shown in the display. If you subscribe to cost information, the call cost (or the number of call units) is displayed instead.
Call time
You can check the duration of your Last call, Outgoing time, and the Total time.
To check the call time
-
Scroll to Call info.YES, Call timers, YES.
-
Select a call time and pressyes.
- Select Reset timers if you want to reset the call time counter.
Call cost
You can check the cost of your Last call and the Total cost of your calls.

To check the call cost
-
Scroll to Call info, YES, Call costs, YES.
-
Select a call cost and pressures
- Select Clear total cost to reset the counter.
Note: If you subscribe to cost information, you must enter your PIN2 to clear the cost or time counter.
Setting the call cost
You can use the "tariff" function to specify the price per call unit. If you do not specify a price per call unit, the number of call units is displayed instead.
To enter the price per call unit
-
Scroll to Call info, YES, Call costs, YES, Set tariff, YES.
-
Enter your PIN2 and press yes
-
Select Change tariff and press YES.
-
Enter the code for the currency you want, (for example GBP for Pounds Sterling), and press yes
-
Enter the price per call unit and pr To enter a decimal point, press
Credit limit for calls
If supported by your network and your subscription, you can enter a total amount of money that can be used for making calls. When the amount reaches zero, no more calls can be made. Please note that the credit limit is only an estimated value.
To set a specific credit limit
- Scroll to Call info, YES, Call costs. YES, Set credit,
YES
-
Enter your PIN2 and press YES.
-
Select Change credit and press YES.
- Enter an amount and press yes.
To set an unlimited credit, select Unlimited.
Using the WAP browser
Your phone has a WAP (Wireless Application Protocol) browser which is designed to bring a modified Internet to your mobile phone, a mobile Internet. A wide range of services are available, for example, news, entertainment, timetables, reservations, banking, e-mail.
Preparing your phone for WAP
Before you can start using the WAP browser, you have to enter settings for a WAP profile. You can have different WAP profiles depending on how you connect to the Mobile Internet. You could, for example, have one WAP profile for mobile e-commerce and another one for general WAP browsing.
Note: The settings may already be entered when you buy the phone, or you can receive the settings from your network operator or your service provider. You can also receive settings from http://wap.sonverlesson.com
To enter the WAP settings manually
- Scroll to WAP services, YES, WAP settings, YES.
- Select a WAP profile and pressYES.
- Scroll to Gateway, YES, User id, YES.
- Enter the User id to your gateway and pressyes.
- Select Password and press YES.
- Enter the password to your gateway and press YES.
- Select Data mode and pressYES.
-
Select the data mode conn.less / conn.oriented and
press YES. -
Select Data address and pressYES.
-
Enter the IP address to your gateway and press YES.
-
Press no to go back one level in the menus.
-
Scroll to GSM data, YES, Phone number, YES.
-
Enter the phone number you use with your GSM data
connection and pressYES.
-
Scroll to Dial type and press YES.
-
Select Analogue or ISDN connection and press YES.
You have now entered the settings you need to start browsing the Internet. You may also need to enter the following information.
-
Scroll to User id and press yes.
-
Enter the User id for your GSM data connection and press YES.
-
Scroll to Password and press YES.
-
Enter the Password for your GSM data connection and press YES.
To start browsing
-
First select the WAP profile you want to use. Scroll to WAP services yes. Select profile yes.
-
Then do one of the following:
•Open your homepage (Sony Ericsson Mobile
Internet is default).
- Enter the address of a WAP site. Select Enter
address and press YES. Enter the WAP address.
•Go to one of your bookmarks.
Tip: If the WAP address starts with http://, you do not need to enter this prefix. You only need to enter the prefix if it starts with something else, for example, ftp://.
To change homepage
-
Scroll to WAP services, YES, WAP settings, YES.
-
Select the WAP profile you want and press YES.
-
Select Edit homepage and press YES.
-
Enter a name for this homepage and press YES.
-
Enter the address to the WAP page you want to set as your homepage and press YES.
Options while you are browsing
You can reach different options while browsing, by
pressing R's content may vary depending on
which WAP site you are visiting.
- Go to menu. Go back to the WAP services menu in order to access other phone menus. When you want to start browsing again, scroll to WAP services, YES, Resume, YES.
- Reload page. Get the latest version of the WAP page you are browsing.
- Enter address. Enter the WAP address of a page you want to visit.
- Add bookmark. Add the page you are currently browsing to your list of bookmarks. When you save a bookmark, it is associated with the WAP profile that you are currently using
- Send as link. Send a text message with a link to the current WAP page to another page.
- New homepage. Set the current WAP page as your homepage.
- Exit WAP. End your browsing.
To open a bookmark while browsing
- When you are browsing, press 📄 the
Options menu appears. - Scroll to Go to menu, YES, Bookmarks, YES.
- Select the bookmark you want and press YES.
- Select Go to and press Yes.
Images
You can choose whether you want to see images or not when you are browsing. If you turn off the Show images function, the images appear as icons in the display.
If an image contains a link, you can access the link by highlighting the image, then press yes.
To turn the show images function on or off
- Scroll to WAP services, YES, WAP settings, YES.
- Select a WAP profile and press YES.
- Scroll to Show images and press YES.
- Select On or Off and press YES.
To change the data speed
- Scroll to WAP services, yes, WAP settings,
YES. -
Select a WAP profile and press YES.
-
Scroll to GSM data, YES, Speed, YES.
- Select a speed and pressYES.
Download timeout
You can specify the time that should pass before the download attempt of a WAP page is stopped.
To set the download timeout
- Scroll to WAP services, YES, WAP settings, YES,
- Scroll to WAP services, YES, WAP settings, YES,
- Select a WAP profile and press YES.
- Select Response timer and press YES.
- Enter how many seconds you want the download to continue before it stops, and press YES.
To switch WAP profiles
- Scroll to WAP services, YES, Select profile, YES.
- Select a WAP profile and press YES.
This WAP profile is active until you switch again.
To change the name of a WAP profile
- Scroll to WAP services, YES, WAP settings, YES.
- Select a WAP profile and press YES.
- Select Rename and pressyes.
- Enter a new name and press YES.
Clearing cache
You can clear the cache memory which contains previously visited WAP pages. You may, for example, want to clear the information on your transactions.
To clear the cache memory
-
Scroll to WAP services, YES, Clear cache, YES.
-
Empty cache? appears. Press YES.
Security
To establish secure connections when using certain WAP services, you need to have certificates saved in your phone.
To check the certificates in your phone
- Scroll to WAP services, YES, Certificates, YES.
You can see a list of the available certificates.
To set a secure connection to a profile
-
Scroll to WAP services, YES, WAP settings, YES.
-
Select a profile.
-
Select Security, YES.
-
Select On, YES.
Calendar
The calendar makes it possible for you to keep track of important meetings that you need to attend, phone calls that you need to make or tasks you need to do. In the calendar you can save:
- Meetings, including date and time, priority, duration,
subject, location, recurrence and a reminder
• Phone calls, including date and time, priority.
duration, what phone number to call, subject and a
reminder. • Remindays, including data and time, priority - Reminders, including time and time, priority, recurrence and subject
• Tasks, including subject, priority and due date.
To add an event in the calendar
-
Scroll to Extras, YES. Calendar, YES
-
In Month view, use Ⓞ to select the week
of the event you wish to add.
-
Press yes to enter Week view.
-
Use or to select a day and press YES.
-
Select Add new event? Press YES.
-
Select an event and press YES
-
Enter settings for the event and proceed at each stage by pressing YES.
-
The event is saved, when the display shows New entry added.
Tip: You can also press GoWeek view to add an event.
Note: If due date is left as the current date then the item will be shown in the calendar until you remove it or mark it as done. Overdue items have an asterisk in front of them.
To delete an event in the calendar
-
In the Calendar, scroll to the day of the event.
-
Use 10 to select the event.
- Press 10 delete. Press YES to confirm.
1tp: When the event is selected in the day view, you can also delete the event from the
To edit an event in the calendar
-
In the Calendar, scroll to the day of the event.
-
Use to select the event.
3.
- Select Edit and press YES.
54 Calendar
-
Enter the correct date, time etc. and press YES after each one. If you do not want to change a part of the entry, press YES and it remains the same.
-
The changed event is saved, when the display shows Saved.
To call a phone number saved in a phone call event
-
In the Calendar, scroll to the day in which the phone call event is saved.
-
Select the phone call event and press.
-
Select Call and pressyes.
Viewing your calendar
To view your Calendar content, scroll to Extras, YES.
Calendar, YES and then select one of the following:
- Month View. Move from one week to the next by using the keys Press YES to enter a certain week. Press YES again to enter a certain day.
- Week View. Events are shown as blocks on an hourly scale. If a day has todo items assigned to it, then the day name is marked in bold. You can enter a certain day by pressing YES when a day is highlighted. - Day View. All the events for a certain day.
Tip: You can also press 📄Month view to select a certain day.
Viewing the storage status
You can see how many percent of the storage entries that are free or used, and the interval between your first and last appointment.
- Scroll to Extras, YES, Calendar, YES.
- Scroll to Status and pressYES.
Exchanging calendar entries
You can send and receive calendar events using a text message.
To send a calendar event
- Select the event you wish to send from the calendar.
- Select Send and press YES.
- Enter the recipient's phone number or recall it from
the phone book by pressing - Press YES to send
Code memo
Instead of having to remember all the different security codes for credit cards and so on, you can save them encrypted in Code memo in your phone. Then all you need to remember is the password to open Code memo.
Using the check word function
To confirm that you have entered the correct password in Code memo you must enter a Checkword. When you enter your password the checkword is shown for a short time. If the password is correct, the correct codes are shown. If you enter the incorrect password, the checkword and the codes that are shown are also incorrect.
Using code memo
To open the code memo for the first time
1. Scroll to Extras, YES, Code memo, YES. A message appears
2. Press YES and enter a 4 digit password to start the code memo and press YES.
3. Confirm the new password by entering it again.
Enter a checkword and press YES.
The checkword can consist of both letters and digits.
To add a new code
- Scroll to Extras, YES. Code memo, YES.
- Enter your password to open the code memo.
- Select Add new code?, YES.
- Enter a name associated with the code, for example the name of the credit card company, and press yes.
- Enter the code and press yes.
To delete a single code
- Open the code memo as described above.
- Select the code you want to delete and press ☐
- Delete? appears. Press YES.
To change a code
- Open the code memo as described above.
- Select the code you want to change and press ☐
- Select Edit.
- Enter the name and press YES, enter the code and press YES.
Tip: When a code is selected you can press call or delete it.
To change the code memo password
- Open the code memo as described above.
- Scroll to Options and press YES.
- Scroll to Chg password and press YES.
- Enter your new password and press yes.
- Repeat the new password and press YES.
- Enter a checkword and press YES
Forgot your password?
If you forget your password, just enter any password to access the Code memo function. The checkword and codes that are then shown are incorrect. You must now reset the Code memo.
To reset code memo
- Scroll to Options, YES, Reset, YES.
- Reset code memo? appears. Press YES.
The Code memo is reset and all entries are cleared. The next time you enter the Code memo, you must start at "To open the code memo for the first time" on page 56.
Two voice lines
Your phone may have to voice lines with different phone numbers. This may be useful if, for example, you want to keep business calls and private calls on different
• To select a line, scroll to Call info/Switch to line 1/2.
All outgoing calls are made on this line until you change it. Incoming calls can still be received on either line.
You can change the names of the lines, and have different settings for each line, for example, different ring signals.
• To change the name of a line, scroll to Settings/Display/Edit line tags.
Calling card calls
The Calling card service lets you redirect the charges to either a credit card account or to a calling card account, instead of your normal account. To be able to make calling card calls, you need to turn on the service. You can save two separate calling card numbers in your phone. The numbers are protected by the phone lock code. See "The phone lock" on page 41.
Note: You cannot use the Calling card service for data calls.
To turn on the calling card service
- Scroll to Phone book, YES, Options, YES, Set calling cards, YES.
- Enter your phone lock code and press YES.
- Select On and press YES.
To save a card number
- Scroll to Phone book, YES, Calling cards, YES.
- Enter your phone lock code and press YES.
-
Select Add new? and press YES.
-
Enter the access number of the calling card server and press YES.
- Enter a name and press YES.
- Enter the verification code of the calling card server
and pressYES. - Select which you want to send first – the number you
want to call or the verification – and press YES
To select a card
- Scroll to Phone book, YES. Calling cards, YES.
- Enter your phone lock code and press YES.
- Select the card you want and press YES.
Making a calling card call
- Enter the phone number of the person you want to call.
- Press and hold YES.
The access number of the calling card server is called. During the connecting phase, you are asked to send the phone number you want to call and the verification code, in the order chosen earlier. - Presses when the display shows Send or wait a few seconds and the number and code are sent automatically.
Extras
Alarm clock
The phone has an alarm clock which rings at the time set, even if the phone is turned off. You can also set a recurrent alarm to ring at a specific time on several days, for example, to ring every Monday at a set time
To set the alarm
- Scroll to Extrav. YES, Time, YES. Alarm clock, YES.
- Enter the time and press YES.
To turn the alarm signal off
- Press any key to turn the alarm off when it rings. If you do not want the alarm to be repeated, press yes.
To turn the alarm function off
- Scroll to Extrav. YES. Time, YES. Alarm clock, YES.
- Select Cancel and press YES.
To change the alarm signal
- Scroll to Settings, YES, Sounds & alerts, YES, Alarm
signal YES. - Select a signal and press YES.
To set the recurrent alarm
- Scroll to Extras, YES. Time, YES. Recurrent alarm,
YES - Enter the time and press YES.
- Select the day or days you want and press YES.
Tip: By pressing when in the recurrence rule
menu, you can make multiple selections and also
clear all selections.
To cancel a recurrent alarm
- Scroll to Extras, YES. Time, YES. Recurrent alarm.
YES - Select Cancel and press YES
Calculator
The phone has a built-in calculator which can add.
subtract, divide and multiply. Scroll to Extras, YES
Calculator, YES.
Press target +, -, x, i.
Press to erase
Press to-enter a decimal point, %, or brackets.
Stopwatch
Scroll to Extras. YES. Time, YES. Stopwatch. YES.
• To start, stop or re-start the stopwatch, press YES
• To save up to 9 lap times, press #
• To check saved lap times, press
• To reset the stopwatch, press ©
Note: The stormwatch is turned off if you receive a
call or text message, or if you exit the stopwatch
DEUTIVE.
Timer
The phone has a built-in 24-hour timer.
To set the timer
- Scroll to Extras, YES, Time, YES, Timer, YES.
- Enter the time and press YES to start the timer.
- When the alert sounds, press any key to turn it off.
To set a new time when the timer is running
- Scroll to Extras, YES, TIME, YES, Timer, YES, Set new
time. YES. - Enter the time and pressures. The countdown begins.
The timer is shown in standby mode. When the alert
sounds, press any key to turn it off.
Games
Your phone features a number of games. When in the
list of games, help texts are available for each game.
To start a game
- Scroll to Extras, YES, Games, YES.
- Select a game, YES.
- Select New (or Resume if the previous game was
paused) and pressYES.
To control the games
·_2=dc^2
- 40 - rich
- 100, 100, 100
- 100% = CAD M50
(1) , ,
Online services
Online services are customised services offered by a service provider, independently of mobile phones and mobile phone manufacturers.

New menu
A SIM card which supports the Online services works in the same way as a normal SIM card.
When you have inserted your SIM card and turned on your phone, your service provider can, at any time, download data over the air to your SIM card. After the first data download and after restarting your phone, a new menu appears in your phone as the first sub-menu under the forteas menu.
To enter your new menu system.
- Scroll to Extras, YES. Online services, YES.
Note: This menu only appears if your SIM card supports this service. Some service providers may not use the name "Online services". Your phone may not support all of the services offered.
Sony Ericsson Mobile
Internet
The Mobile Internet is a service supplied by Sony Ericsson to make it easier for you to communicate and receive information quickly, wherever you are. It gives you access to various messaging services, on-line customer services, user manuals and other useful information. With the Mobile Internet you can also download communications software to ensure you get the best out of your Sony Ericsson products. The Sony Ericsson Mobile Internet address is: http://wap.sonyricsson.com
Troubleshooting
Here are some problems that you might encounter while using your phone. Some problems require that you call your service provider, but most of the problems you can easily correct yourself.
The phone cannot be switched on
Recharge or replace the battery. See "Important battery information" on page 5.
No indication of charging
When you start charging a battery that is empty or a battery that has not been used for a long time, it makes take a while before the battery meter appears in the display.
Display language
If the display shows a language that you do not understand, you can always choose Automatic (determined by your SIM card) by pressing 8888 in standby. You can always choose English by pressing D000 in standby.
Error messages
Insert card
There is no SIM card in the phone or you may have inserted it incorrectly. Insert a SIM card. See "The SIM card" on page 4.
Insert correct SIM card
The phone is set to work only with certain SIM cards. Insert the correct SIM card.
SOS calls only
You are within range of a network, but you are not allowed to use it. However, in an emergency, some operators allow you to call the international emergency number 112. See “Making emergency calls” on page 7.
No network
There is no network within range or the received signal is too weak. You have to move to get a signal that is strong enough.
Wrong PIN. wrong PIN2
You have entered your PIN or PIN2 incorrectly.
Enter the correct PIN or PIN2, and press YES. See "The SIM card lock" on page 40.
Codes do not match
When you want to change a security code (for example your PIN) you have to confirm the new code by entering it again. The two codes that you have entered do not match. See "The SIM card lock" on page 40.
PIN/PIN2 blocked
You have entered your PIN or PIN2 incorrectly three times in a row. To unblock, see "The SIM card lack" on page 40.
PUK blocked - contact operator
You entered your personal unblocking key code (PUK) incorrectly 10 times in a row. Contact your network operator or service provider.
Phone locked
The phone is locked. To unlock the phone, see "The phone lock" on page 41.
Phone lock code
Your phone comes with the phone lock code, 0000.
You can change it to any four- to eight-digit code.
See "The phone lock" on page 41
Number not permitted
The Fixed dialling function is on and the number you have dialled is not on your fixed numbers list. See "Fixed dialling" on page 42.
Charging, alien battery
The battery you are using is not an Sony Ericsson-approved battery and is charging slowly for safety reasons.
Display icons
Icon Description

Network signal indicator.

Battery status indicator.

All Line 1 incoming calls will be diverted to a defined number. No calls or only certain calls from numbers in a list are received.

All Line 2 incoming calls will be diverted to a defined number. No calls or only certain calls from numbers in a list are received.

All Line 1 and 2 incoming calls will be diverted to a defined number. No calls or only certain calls from numbers in a list are received.

The ring signal is turned off.

The alarm clock has been set and is on.

The recurrent alarm has been set and is on.
Icon Description

All audible signals are turned off, except
the alarm and timer.

You have received a text message.

You have received a voice message

Line 1 is in use for outgoing calls.

Line 2 is in use for outgoing calls.

Indicates that the keypad is locked.

You have an ongoing call.

Indicates a missed call in the call list.

indicates an answered call in the call list.

Indicates a dialled number in the call list.

A text message or phone book entry is
Icon Description
A text message or phone book entry with restrictions (e.g ring tones, icons) is saved in the phone memory.
A text message or phone book entry with restrictions is saved in the SIM card memory.
Only part of a message is saved in the phone memory.
The phone book entry is a group.
Unread text message (in inbox list).
Unread text message with restrictions.
Unchecked voice message (in inbox list).
You can enter the phone book by pressing
The text message is saved in the SIM card memory.
Indicates that you have an ongoing session.
Icon Description
Incoming chat message.
Outgoing chat message.
Melody inserted in a text message.
Indicates a meeting in your calendar.
Indicates an event to make a phone call.
? Indicates a reminder is set in your calendar.
□ Indicates a task in your calendar.
The task has been marked as done in the calendar.
Preferred network.
Forbidden network.
Your home network is within range.
Icon Description
A Indicates a help text.
Ciphering is currently not being provided by the network.
A secure WAP connection has been established.
Quick keys
To... Do this:
enter the Call list press YES from standby
enter My shortcuts press
图
:
enter the Find menu press and hold from standby
call your voice mail service press and hold 1
enter the + sign to make an press and hold 0
international phone call from standby
set the phone to silent press and hold from standby
turn on key/ack press from
图
and select
keylock.
turn off keylock press and the
C
ES
speed dial (phone book press any of the
positions 1–9) number keys 1 9 and yes from
number keys
- SING YES FROM
state
66 Quick keys
To... Do this:
find a phone book entry press and hold any of
beginning with the first letter the keys 2 9 (or the closest following) on from standby
(or the closest following) on - from standby a key
find a phone book entry enter the position
number and press
from standby
put a call on hold press
switch between two calls press YES
Technical data
General
Product name T600
System GSM 900/GSM 1800/
CSM 1900
SIM card Small plug in card 3V
Dimensions
Size 92 x 41 x 19.5 mm
Weight with standard battery 60 g
Ambient temperatures
Max +55°C
Mio
-10°C
Safe and Efficient Use
Note: Please read this information before using your mobile phone.

Recommendations
• Always treat your product with care and keep it in a clean and dust-free place.
- Do not expose your product to liquid or moisture or humidity.
- Do not expose your product to extreme high or low temperatures.
• Do not expose your product to open flames or lit tobacco products.
- Do not drop, throw or try to bend your product.
- Do not paint your product.
- Turn your product off in places where posted notices instruct you to do so and in places where mobile phones are prohibited including aircraft and hospitals.
- Do not place your product or install wireless equipment in the area above your car's air bag.
- Do not attempt to disassemble your product. Only Sony Ericsson authorised personnel should perform service.
- If your mobile phone is equipped with infrared, never direct the infrared ray at anyone's eye and make sure that it does not disturb any other infrared units.
Antenna
Only use an antenna that has been specifically designed by Sony Ericsson for your mobile phone. Use of unauthorised or modified antennas could damage your mobile phone and may violate regulations, causing loss of performance and SAR levels above the recommended limits (see below).
Efficient Use
Hold your mobile phone as you would any other phone. Do not cover the top of the phone when in use, as this affects call quality and may cause the phone to operate at a higher power level than needed, thus shortening talk and standby times.
Radio Frequency (RF) Exposure and SAR
Your mobile phone is a low-power radio transmitter and receiver. When it is turned on, it emits low levels of radio frequency energy (also known as radio waves or radio frequency fields).
Governments around the world have adopted comprehensive international safety guidelines, developed by scientific organisations, e.g. ICNIRP (International Commission on Non-Ionising Radiation Protection) and IEEE (The Institute of Electrical and Electronics Engineers Inc.), through periodic and thorough evaluation of scientific studies. These guidelines establish permitted levels of radio wave exposure for the general population. The levels include a safety margin designed to assure the safety of all persons, regardless of age and health, and to account for any variations in measurements. The radio wave exposure guidelines employ a unit of measurement known as the Specific Absorption Rate, or SAR. Tests for SAR are conducted using standardised methods with the phone transmitting at its highest certified power level in all useful frequency bands. The actual SAR level of the mobile phone while operating can be well below the value stated below. This is because the mobile phone is designed to use the minimum power required to reach the network. Therefore, the closer you are to a base station, the more likely it is that the actual SAR level will decrease.
Variations in SAR below the radio frequency exposure guidelines do not mean that there are variations in safety. While there may be differences in SAR levels among various mobile phones, all Sony Ericsson mobile phone models are designed to meet the relevant guidelines for radio frequency exposure.
- SAR data information for residents in countries/regions that have adopted the SAR limit recommended by the International Commission on Non-Ionising Radiation Protection (ICNIRP), which is 2 W/kg averaged over ten (10) gram of tissue (for example European Union, Japan, Brazil and New Zealand). The highest SAR value for this model phone when tested by Sony Ericsson for use at the ear is 0.8 W/kg (10g).
Driving
Please check if local laws/regulations restrict the use of mobile phones while driving or require drivers to use handsfree solutions. We recommend that you use only Ericsson or Sony Ericsson handstree solutions intended for use with your product.
Safe and Efficient Use 69
Always give full attention to driving and pull off the road and park before making or answering a call if driving conditions so require.
Please note that because of possible interference to electronic equipment, some vehicle manufacturers forbid the use of mobile phones in their vehicles unless a handsfree kit with an external antenna supports the installation.
Personal Medical Devices
Mobile phones may affect the operation of cardiac pacemakers and other implanted equipment. Please avoid placing the mobile phone over the pacemaker, e.g. in your breast pocket. When using the mobile phone, place it at the ear opposite the pacemaker. If a minimum distance of 15 cm (6 inches) is kept between the mobile phone and the pacemaker, the risk of interference is limited. If you have any reason to suspect that interference is taking place, immediately turn off your mobile phone.
Contact your cardiologist for more information. For other medical devices, please consult the manufacturer of the device.
Children
DO NOT ALLOW CHILDREN TO PLAY WITH YOUR MOBILE PHONE OR ITS ACCESSORIES. THEY COULD HURT THEMSELVES OR OTHERS, OR COULD ACCIDENTALLY DAMAGE THE MOBILE PHONE OR ACCESSORY. YOUR MOBILE PHONE OR ITS ACCESSORY MAY CONTAIN SMALL PARTS THAT COULD BE DETACHED AND CREATE A CHOKING HAZARD.
Disposing of the Product
Your mobile phone should not be placed in municipal waste. Please check local regulations for disposal of electronic products.
Power Supply
Connect the AC power adapter only to designated power sources as marked on the product. Make sure the cord is positioned so that it will not be subjected to damage or stress. To reduce risk of electric shock, unplug the unit from any power source before attempting to clean it. The AC power adapter must not be used outdoors or in damp areas. Never alter the cord or plug. If the plug will not fit into the outlet, have a proper outlet installed by a qualified electrician.
Emergency Calls
Mobile phones operate using radio signals, which cannot guarantee connection under all conditions. Therefore you should never rely solely upon any mobile phone for essential communications (e.g. medical emergencies).
Emergency calls may not be possible on all cellular networks or when certain network services and/or mobile phone features are in use. Check with your local service provider.
Battery Information
We recommend that you charge the battery for 4 hours before you use your mobile phone for the first time. The battery can only be charged in temperatures between +5°C (+41°F) and +45°C (+113°F).
A new battery or one that has not been used for a long time could have reduced capacity the first few times it is used.
The talk and standby times depend on usage conditions and network configurations when using the mobile phone. If the mobile phone is used near a base station, less power is required and talk and standby times are prolonged.
- Warning! May explode if disposed of in fire.
- Do not expose the battery to liquid.
- Do not let the metal contacts on the battery touch another metal object. This could about circuit and device the battery
short-circuit and damage the battery. • Use only Ericsson or Sony Ericsson
- Use only Ericsson of Sony Ericsson branded original batteries and chargers intended for use with your mobile phone. Other chargers may not charge sufficiently or may produce excessive heat. Using other batteries and chargers could be dangerous.
- Do not disassemble or modify the battery.
- Do not expose the battery to extreme temperatures, never above +60°C (-140°F). For maximum battery capacity, use the battery in room temperature.
• Turn off your mobile phone before removing
the battery.
- Keep out of children's reach.
- Do not allow the battery to be put into the mouth. Battery electrolytes may be toxic if swallowed.
- Use the battery for the intended purpose only.


Disposing of the Battery
The battery should never be placed in municipal waste. Please check local regulations for disposal of batteries or call your local Sony Ericsson Customer Care Centre for information.

Limited Warranty
Sony Ericsson Mobile Communications AB, S-221 88 Lund, Sweden. (Sony Ericsson), provides this Limited Warranty for your mobile phone and original accessory delivered with your mobile phone (hereinafter referred to as "Product"). Should your Product read warranty service, please return it to the dealer from whom it was purchased, or contact your local Sony Ericsson Customer Care Centre (national rates may apply) or visit www.SonyEricsson.com to get further information.
Our Warranty
Subject to the conditions of this Limited Warranty, Sony Ericsson warrants this Product to be free from defects in design, material and workmanship at the time of its original purchase by a consumer, and for a subsequent period of one (1) year.
What We Will Do
If, during the warranty period, this Product fails to operate under normal use and service, due to defects in design, materials or workmanship, Sony Ericsson authorised distributors or service partners, in the
country/region* where you purchased the Product, will, at their option, either repair or replace the Product in accordance with the terms and conditions stipulated herein.
Sony Ericsson and its service partners reserve the right to charge a handling fee if a returned Product is found not to be under warranty according to the conditions below.
Conditions
-
The warranty is valid only if the original proof of purchase issued to the original purchaser by the dealer specifying the date of purchase and serial number ^4,5 , is presented with the Product to be repaired or replaced. Sony Ericsson reserves the right to refuse warranty service if this information has been removed or changed after the original purchase of the Product from the dealer.
-
If Sony Ericsson repairs or replaces the Product, the repaired or replaced Product shall be warranted for the remaining time of the original warranty period or for ninety (90) days from the date of repair, whichever is longer. Repair or replacement may involve the use of functionally equivalent reconditioned units. Replaced parts or components will become the property of Sony Ericsson.
-
This warranty does not cover any failure of the Product due to normal wear and tear, or due to misuse, including but not limited to use in other than the normal and customary manner, in accordance with the Sony Ericsson instructions for use and maintenance of the Product. Nor does this warranty cover any failure of the Product due to accident, modification or adjustment, acts of God or damage resulting from liquid.
-
Since the cellular system on which the Product is to operate is provided by a carrier independent from Sony Ericsson, Sony Ericsson will not be responsible for the operation, availability, coverage, services or range of that system.
-
This warranty does not cover Product failures caused by installations, modifications, or repair or opening of the Product performed by a non-Sony Ericsson authorised person.
-
The warranty does not cover Product failures which have been caused by use of accessories or other peripheral devices which are not listed under "Accessories" in this year's guide.
-
Tampering with any of the seals on the Product will void the warranty.
-
THERE ARE NO EXPRESS WARRANTIES, WHETHER WRITTEN OR ORAL, OTHER THAN THIS PRINTED LIMITED WARRANTY. ALL IMPLIED WARRANTIES, INCLUDING WITHOUT LIMITATION THE IMPLIED WARRANTIES OF MERCHANTABILITY OR FITNESS FOR A PARTICULAR PURPOSE, ARE LIMITED TO THE DURATION OF THIS LIMITED WARRANTY. IN NO EVENT SHALL SONY FRICCSSON OR ITS LICENSORS BE LIABLE FOR INCIDENTAL OR CONSEQUENTIAL DAMAGES OF ANY NATURE WHATSOEVER, INCLUDING BUT NOT LIMITED TO LOST PROFITS OR COMMERCIAL LOSS, TO THE FULL EXTENT THOSE DAMAGES CAN BE DISCLAIMED BY LAW.
Some countries/states do not allow the exclusion or limitation of incidental or consequential damages, or limitation of the duration of implied warranties, so the preceding limitations or exclusions may not apply to you.
The warranty provided does not affect the consumer's statutory rights under applicable legislation in force, nor the consumer's rights against the dealer arising from their sales/purchase contract.
\* European Union (EU)
If you have purchased your Product in an EU country, you can have your Product serviced, under the conditions set out above, within the warranty period in any EU country where an identical Product is sold by an authorized Sony Ericsson distributor. To find out if your Product is sold in the EU country you are in, please call the local Sony Ericsson Customer Care Centre. Please observe that certain services may not be possible elsewhere than in the country of original purchase, for example due to the fact that your Product may have an interior or exterior which is different from equivalent models sold in other EU countries. It may not be possible to repair SIM-locked Products. ** In some countries/regions additional information is requested. If so, this is clearly shown on the valid proof of purchase.
Accessory Information
Your product supports the following accessories:
• Standard Battery BSL-14
• Travel Charger CTR-10
• Micro Travel Charger CMT-10
• Cigarette Lighter Adapter CLA-11
- Desk Stand CDS-11
- Portable Handstree with answering button HPB-10
- Portable Hands(few: HPB-1d)
• Car Holder HCH-30
The full range of accessories may not be available in every market.
Subject to change without priornotice.
Regulatory Information
Declaration of Conformity
We, Sony Ericsson Mobile Communications AB of
Nya Vattentornet
S-221 88 Lund, Sweden
declare under our sole responsibility that our product
Sony Ericsson type 1130402-BV
and in combination with our accessories, to which this
declaration relates is in conformity with the appropriate
standards 3GPP TS 51.010-1, EN 301 489-7 and EN
6/09/21, following the provisions of, Radio Equipment
and Telecommunication Terminal Equipment Directive
99/3/EC with requirements covering EMC directive 89/336/EEC and Low voltage directive 73/23/EEC
19/230 TAC, and 1.5W voltage directive 73/23/TAC
Lund May, 2002
Place & Date of time

Konzern Oklohe, Band at Product Network Unit (SWE140A)
CE 0682
We fulfil the requirements of the R&TTF: Directive (99/5/EC).
Regulatory Information 75
FCC Statement
This device complies with Part 15 of the
FCC rules. Operation is subject to the
following two conditions: (1) This device may not
cause harmful interference, and (2) This device must
accept any interference received, including
interference that may cause undesired operation.

76 Regulatory Information
Index
A
Accept calls 43
Alarm clock 59
set time 59
turn off 39
Answering a call 8
Answering mode 31
Answering service. See Voice mail
service
Area information 37
Ask to save 19
Assembling the phone 4
B
Background picture 29
Barring calls. See Restrict calls
Battery 5
Battery indicator 04 Bookmarks 51
adding a bookmark 51
Business cards 21
editing 22
receiving 22
sending 21
C
Calculator 59
Calendar 53
add an event 53
deleting an event 54
editing an event 54
receiving an entry 53
schedule a meeting 53 schedule a phone call 62
schedule a phone call 25
sending an entry 5
see table 53
Call burring. See Restrict calls
Call part 48
setting a credit limit 49
setting a price per call unit 49
Call divert
turning off 40
turning on 39
Call forwarding. See Call divert
Call list 23
call number 23
missed calls 24
Call restrictions. See Restrict calls
Call time 48
Call waiting service
turning off 44
turning on 44
Calling Line Identification (CLI)
ervice
calls
answering 8
conference 45
emergency 7
ending 6
hiding your number 9
internatic
making 6
putting on hold 45, 46
receiving S
rejecting 8
showing your number 9
switching between calls
cell information 38
Charging 5
That 35
ending a chat session 35
nicknames 35
resurping a chat session 35
snippets 36
starting a chat session 35
suspending a chat session 35
Choosing a carin Clock, Six Time
CLOCK. See TIME Closed year groups 43
Code Memo 56
Conference calls 45
adding a participant 46
extracting a participant 46
releasing a participant 4h
setting up 4.
credit card calls making a call 58
saving a number 58
D
Date 31
Karing 3
display kola toots 12
light 30
Divert calls
turning off 40
turning on 39
E
Earpiece volume 7
Emergency calls 7
Emergency Numbers 3 Ending a call 6
Entering letters 15
F
Fixed dialling 42
turning on 43
Fixed input
Forwarding calls. See Call divert
C
Gutves 60
Groups. See phone book
H
Handsfree 31
Help texts 12
Hiding your number 9
|
International calls 7
International emergency number 7
K
Key functions 11
quick keys 66
Key sound 30
Keypad 3
Keypad Iek 3D
JAPANAL 30
unlock 30
L
Letters
entering 15
input modes 15
19 impact 17
M
Making a call 6
Master reset 32
MENALIEN
compose of call 26 insert in mortgage 32
Figure 10: Message 7
Save from Message 24 Many language 12
Metha Bungloge 12
Metrus 11
display text 12
leave a menu 1
moving (scrolling) through 11
select a menu 1
shortcuts 11
message signal 28
Messages. See Text messages
/ microphone
muting 7
turning off?
efinite minder 30
fissed calls 24
moving through menus 11
luting the microphone 7
fly shortcuts 13
adding function 13
panovizing function 13
- 本公司及子公司
1
Network
preferred 47
search modes 48
selecting 47
Iotepad 8
0
Online Services 61
Opening a homepage 51
Opening a WAP page 51
D
Personal zinc signal 26
PERSON Riogry
Figure 1.0.6
turning off is turning on 6
Phone book 18
I note book to ask to save 19
ask to save 19 card memory 20
care memory 20 delete a phone re
delete a phone number 15
editing a name I editing a pharma
editing a phone number 19
groups 21
memory 20
overwrite protection 20
phone memory 20
save a number 18
shortcuts 19
sort order 20
Phone lock
activating/cancelling 42
auto lock 41
changing the security code 41
on 41
ictures 28
edit 28
insert in message 33
save from message 34
IN
changing 41
IN2
changing 41
lus sign (1) 7
refiles
selecting 38
Selecting 5c UK 40
OK 40
1
Quick Keys 66
。
:
cading a message 34
ceIVING a call 8
ecurrent alarm 59
c-dialling
automatic 7
ejecting a call 8
request reply (SMS) 36
Restrict calls 42
changing password 42
changing status 42 ing signal
choosin 25
compose own melody 26
increasing ring 25
message signal 28
personal 26
volume 30
S
Having a number 18 Scrolling 10
Sending a message 33
Sending Touch Tone Signals 9
Service centre 32
Shortcuts 11 Showing one number 0
Silent ring signal 25
SIM card 5
unblocking 40
IM card lock
activating/cancelling 41
SMS. See Text messages
SOS calls
SOS numbers 8
Special Alarm
turn off 59
Statutory mode 6 Switching between two cells (5
Switching between 100 calls 4
Text messages 32
calling phone number in 34
delching .14
forwarding 54
long manager 37 marriage types 36
reading 34
reply requested 36
replying 34
saving 34
sending 33
Time 30
Jornat 31
setting the time 30
Tone signals
turning off 9
Turn off microphone?
Turning phone on the
1.2.3.1.
V
Vibrating alert 28
Voice mail 24
voice mail service
calling 24
saving Volume
•
Volume key 8, 10
2.5
W
bookways 51
entering WAP settings 50
opening a homepage 51
opening a WAP page 51
preparing the phone 50
security 53
WAP profiles 52

- Sony Ericsson T600
- About this User's guide
- The SIM card
- Assembly
- SIM card and battery information
- Making and receiving calls
- Changing the earpiece volume
- Turning off the microphone
- Re-dialling a previously called number
- Automatic re-dialling
- Making international calls
- Making emergency calls
- Emergency numbers
- Receiving calls
- Answering a call
- Rejecting a call
- The notepad
- Showing and hiding your phone number
- Sending touch tone signals
- Key functions
- Key Use
- a/04
- Option key
- Using the menus
- Moving through the menus
- Press... to...
- Using shortcuts
- How to interpret the instructions
- To set the key sound
- Shortcuts
- Display text
- Help texts
- Menu language
- My shortcuts
- To add a function to My shortcuts
- Entering letters
- Input modes
- T9™ Text Input
- Press... to get.
- Press... to get...
- Example:
- The list of options
- Writing using T9 ™ Text Input
- Your personal phone book
- Shortcuts to phone book entries
- Ask to save
- Keeping the phone book up to date
- To delete an entry from the phone book
- Sort order
- Choosing where to save an entry
- Overwrite protection
- To delete all entries from the phone memory
- Groups
- To create a new group
- Business cards
- To edit your own business card
- To save a received business card
- Touch tone services
- To save a phone number together with tone signals and codes
- Copying from one SIM card to another
- Using the call list
- To call a number from the call list
- Missed calls
- Your voice mail service
- Using your voice mail service
- Receiving a voice mail
- Personalising your phone
- Ring signals
- To set the ring signal volume
- To turn the ring signal on or off
- Increasing ring
- Ring signal type
- To choose a ring signal
- Vibrating alert
- Message signal
- Pictures
- Switch between black and white pen colour.
- Key sound
- Minute minder
- Display light
- The keypad lock
- Time and date
- Date
- To set the date
- Answering mode
- To select answering mode
- Greeting text
- To select a greeting
- Phone number display
- Master reset
- Text and chat messages
- Sending a text message
- To send a text message
- To insert a picture in a text message
- To insert a melody in a text message
- Sending a text message to a group
- Receiving a message
- To read the message
- To save a picture found in a message
- Saving incoming messages
- Mobile chat
- To enter a chat nickname
- Customising your text messages
- Message type
- Validity period
- Reply request
- Status request
- Long messages
- Templates
- To use a template
- Area information
- Profiles
- The profiles
- To change the name of a profile
- Automatic activation
- Diverting incoming calls
- To turn on a call divert
- Security for your phone and
- subscription
- The SIM card lock
- To change your PIN
- To change your PIN 2
- To turn the SIM card lock on or off
- The phone lock
- Phone lock on
- Automatic
- Changing the phone lock code
- Restrict calls
- Fixed dialling
- Closed user groups
- To add a group
- To activate a group
- Accept calls
- More than one call
- Making a second call
- Receiving a second call
- One ongoing call and one call on hold
- Receiving a third call
- Conference calls
- To add a new participant
- To check the participants
- To extract a participant
- 行函
- To rejoin the participant
- To release a participant
- Setting network preferences
- List of preferred networks
- To review the list of networks
- To rearrange the list
- Search modes
- Call time and call cost
- Call time
- Call cost
- Setting the call cost
- To enter the price per call unit
- Credit limit for calls
- To set a specific credit limit
- Using the WAP browser
- Preparing your phone for WAP
- To enter the WAP settings manually
- To start browsing
- To change homepage
- Options while you are browsing
- To open a bookmark while browsing
- Images
- To turn the show images function on or off
- To change the data speed
- Download timeout
- To set the download timeout
- To switch WAP profiles
- To change the name of a WAP profile
- Clearing cache
- To clear the cache memory
- Security
- To check the certificates in your phone
- To set a secure connection to a profile
- Calendar
- To add an event in the calendar
- To delete an event in the calendar
- To edit an event in the calendar
- To call a phone number saved in a phone call event
- Viewing your calendar
- Viewing the storage status
- Exchanging calendar entries
- To send a calendar event
- Code memo
- Using the check word function
- Using code memo
- To add a new code
- To delete a single code
- To change a code
- Forgot your password?
- To reset code memo
- Two voice lines
- Calling card calls
- Making a calling card call
- Extras
- Alarm clock
- To set the alarm
- To turn the alarm function off
- To set the recurrent alarm
- To cancel a recurrent alarm
- Calculator
- Stopwatch
- Timer
- Games
- Online services
- New menu
- To enter your new menu system.
- Sony Ericsson Mobile
- Internet
- Troubleshooting
- The phone cannot be switched on
- No indication of charging
- Display language
- Error messages
- Codes do not match
- PIN/PIN2 blocked
- PUK blocked - contact operator
- Phone locked
- Phone lock code
- Number not permitted
- Charging, alien battery
- Display icons
- Icon Description
- Quick keys
- To... Do this:
- Technical data
- General
- Dimensions
- Ambient temperatures
- Safe and Efficient Use
- Recommendations
- Antenna
- Efficient Use
- Radio Frequency (RF) Exposure and SAR
- Driving
- Personal Medical Devices
- Children
- Disposing of the Product
- Power Supply
- Emergency Calls
- Battery Information
- Disposing of the Battery
- Limited Warranty
- Our Warranty
- What We Will Do
- Conditions
- \* European Union (EU)
- Accessory Information
- Regulatory Information
- FCC Statement
- Index
- A
- B
- C
Brand : SONY ERICSSON
Model : T600
Category : Mobile Phone