
FERRARI WIRELESS F430 COCKPIT - Racing wheel THRUSTMASTER - Free user manual and instructions
Find the device manual for free FERRARI WIRELESS F430 COCKPIT THRUSTMASTER in PDF.
| Product type | Wireless racing wheel with pedal set |
| Brand | Thrustmaster |
| Model | Ferrari Wireless F430 Cockpit |
| Compatibility | PlayStation 3 and PC (Windows XP, Vista, 7) |
| Power supply | 4 LR6/AA batteries (1.5V) not included |
| Connectivity | Wireless via USB receiver |
| Steering wheel rim | Removable, tab fixing, electronic connection via cable |
| Pedals | Accelerator and brake, separate or combined programmable mode |
| Sequential paddles | Up & Down, programmable |
| Manettino | 5-position rotary switch with push button |
| Buttons | Select, Start, multidirectional D-Pad, 4 action buttons, PS button (PS3) |
| Programming | Automatic or manual presetting, save in EEPROM memory |
| Wheel sensitivity | Normal or High, adjustable via Manettino |
| Calibration | Automatic at startup, manual possible (Select+Start+Engine Start) |
| LED indicators | Indicate connection, mode, battery status |
| Standby mode | Automatic after 5 minutes of inactivity or 5 seconds without connection |
| Position adjustment | Tilt and length adjustable via clamping screws |
| Dimensions | Not specified in the manual |
| Weight | Not specified |
| Maintenance and cleaning | Clean with a soft, dry cloth. Do not use solvents. |
| Safety | Use recommended battery type, observe polarity, do not recharge non-rechargeable batteries. Keep out of reach of children. |
| Warranty | 2 years against material and manufacturing defects |
| Made in | China |
Frequently Asked Questions - FERRARI WIRELESS F430 COCKPIT THRUSTMASTER
User questions about FERRARI WIRELESS F430 COCKPIT THRUSTMASTER
0 question about this device. Answer the ones you know or ask your own.
Ask a new question about this device
Download the instructions for your Racing wheel in PDF format for free! Find your manual FERRARI WIRELESS F430 COCKPIT - THRUSTMASTER and take your electronic device back in hand. On this page are published all the documents necessary for the use of your device. FERRARI WIRELESS F430 COCKPIT by THRUSTMASTER.
USER MANUAL FERRARI WIRELESS F430 COCKPIT THRUSTMASTER
- USER MANUAL
- MANUEL DE L'UTILISATEUR
-BENUTZERHANDBUCH - HANDLEIDING
- MANUALE D'USO
- MANUAL DEL USUARIO
- MANUAL DO UTILIZADOR
- PYKOBODCTBO NOJIb3OBATEJIA
THrustmaster®
Ferrari Wireless
GT Cockpit
430 scuderia Edition
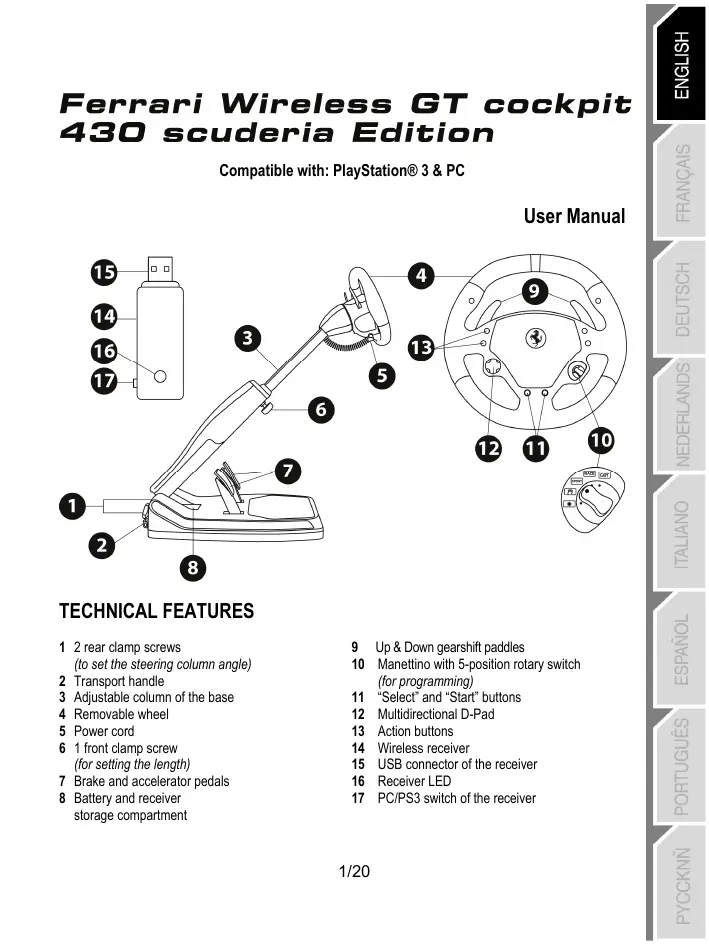
Ferrari Wireless GT cockpit 430 scuderia Edition
Compatible with:PlayStation ⑧ 3&PC
User Manual

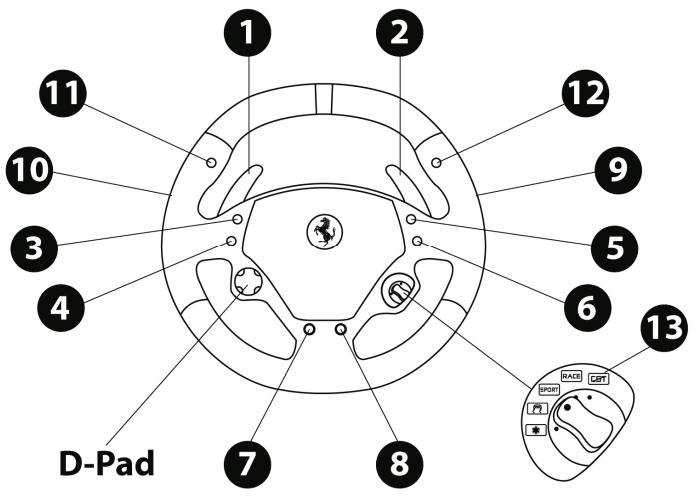
TECHNICAL FEATURES
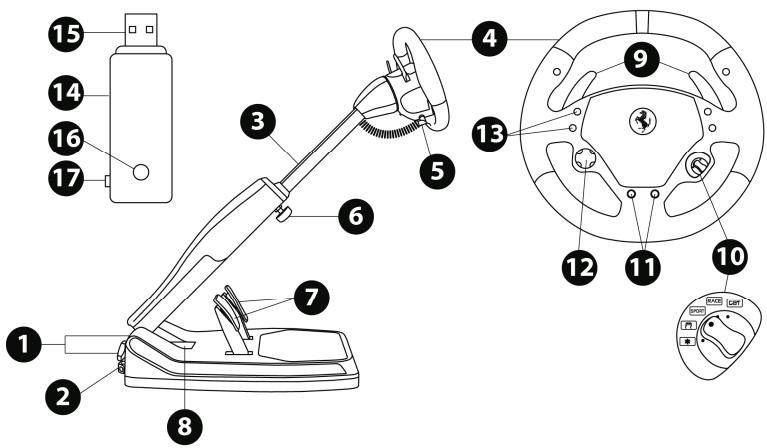
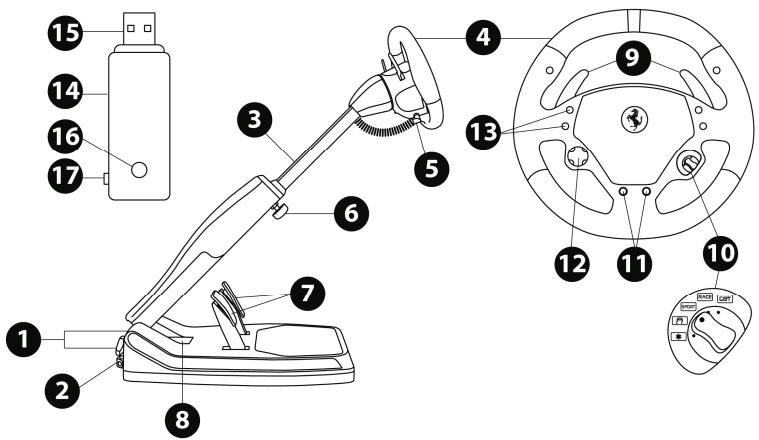
1 2 rear clamp screws
(to set the steering column angle)
2 Transport handle
3 Adjustable column of the base
4 Removable wheel
5 Power cord
6 1 front clamp screw
(for setting the length)
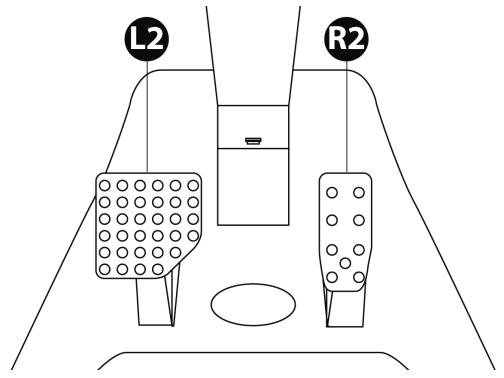
7 Brake and accelerator pedals
8 Battery and receiver
storage compartment
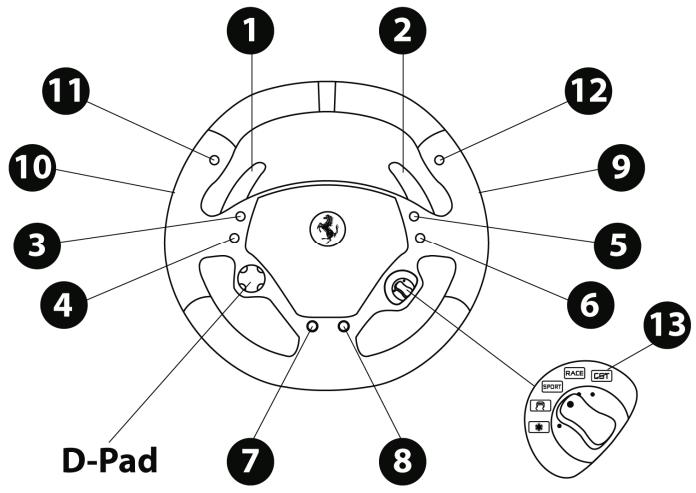
9 Up & Down gearshift paddles
10 Manettino with 5-position rotary switch (for programming)
11 "Select" and "Start" buttons
12 Multidirectional D-Pad
13 Action buttons
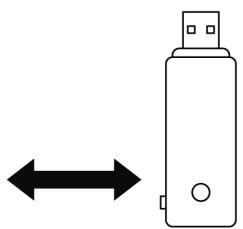
14 Wireless receiver
15 USB connector of the receiver
16 Receiver LED
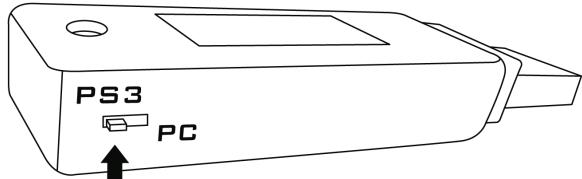
17 PC/PS3 switch of the receiver
INSTALLING THE WHEEL
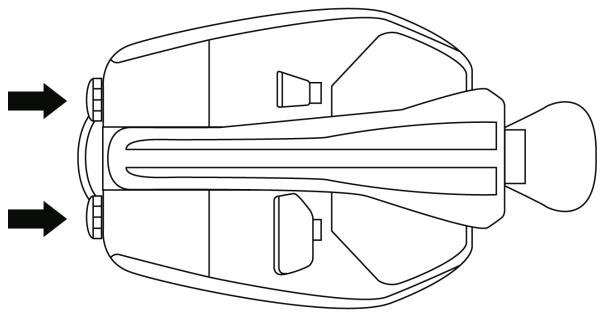
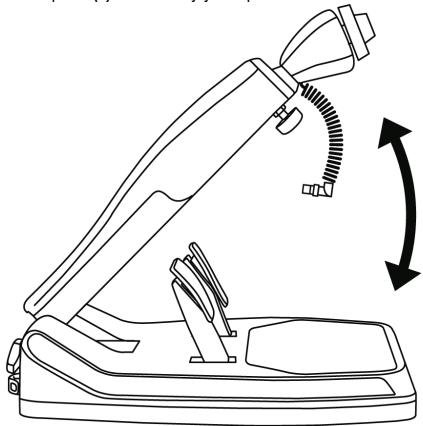
ADJUSTING THE TILT AND LENGTH OF THE DRIVING POSITION
- Slightly unscrew (anticlockwise) the 2 clamp screws (1) at the back of the base.
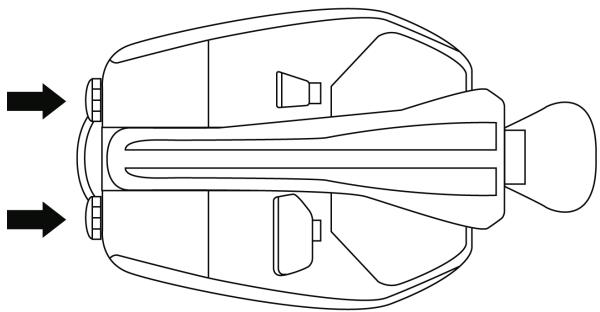
- Adjust the angle of the base's column (3) so that is suitable to you.
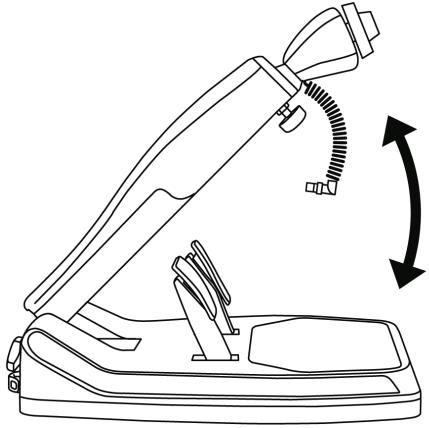
-
Then tighten (clockwise) the 2 clamp screws (1).
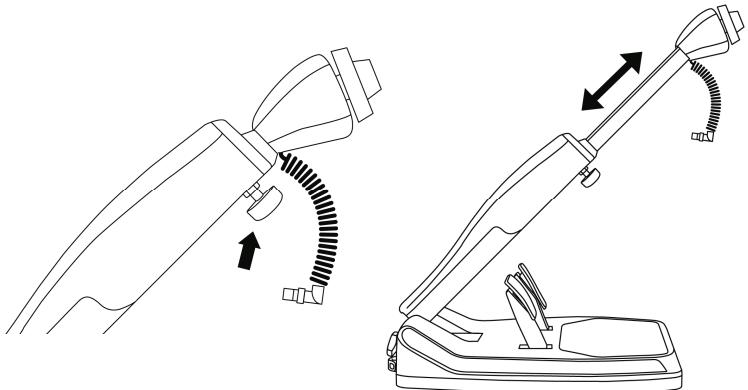
-
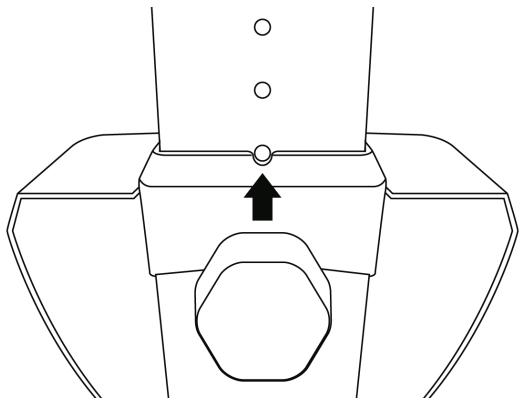
Slightly unscrew (anticlockwise) the clamp screw (6) located at the front of the base's column. Then draw out the column to the length you require.

- Then tighten (clockwise) the clamp screw (6), taking care that it is correctly inserted into one of the holes provided for this purpose. You can do this simply by positioning the upper hole by the locating mark provided for this purpose.
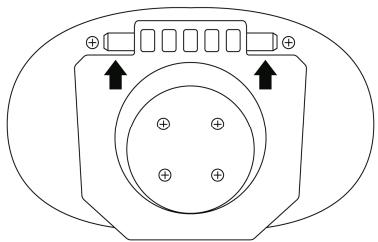
FITTING THE WHEEL TO THE BASE
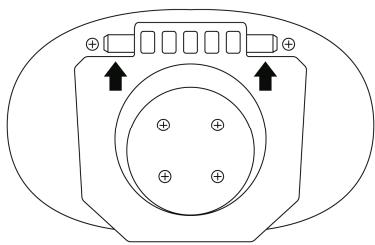
Lugs (front of the base)
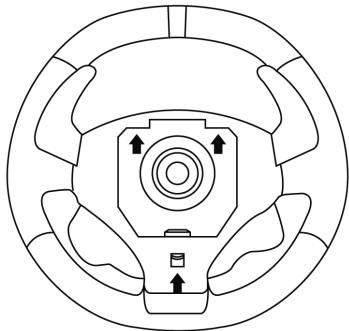
Lug notches (back of the wheel)
+ Locking tab (back of the wheel)
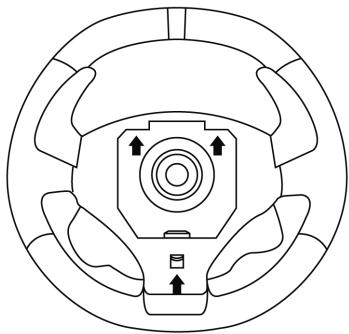
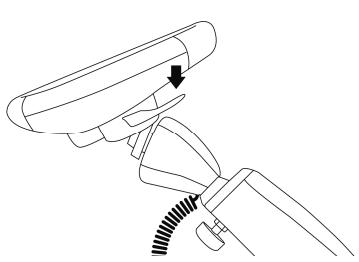
- Position the removable wheel (4) horizontally, and then insert the 2 lugs (on the front of the base) into the 2 lug notches (on the back of the wheel).
- Let the wheel down vertically, and then lock the wheel into position by pressing the locking tab (on the back of the wheel) then releasing it until you hear a gentle "click".
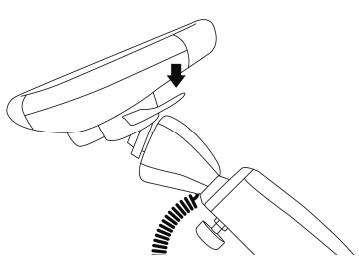
-
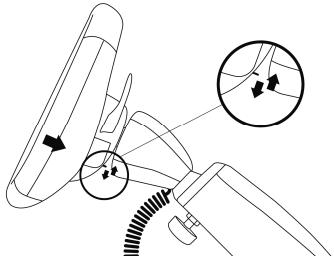
Check that the steering wheel is correctly secured to the base.
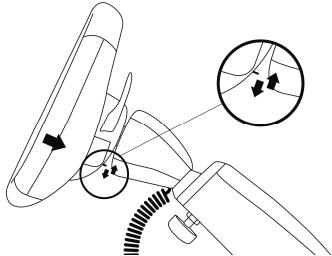
-
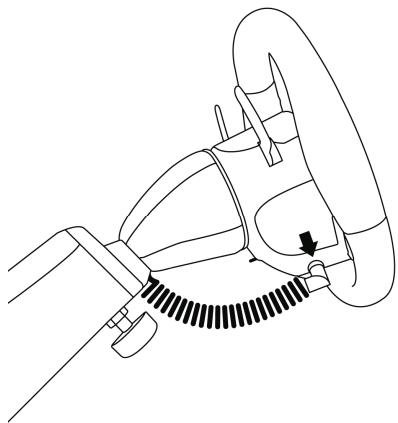
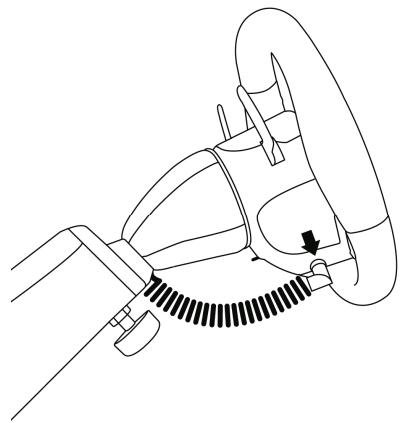
Electronically connect the steering wheel to its base by connecting the elbow-shaped male connector (on the end of the power cord (5)) to the female connector (to the left of the wheel).
- Rotate the nut (on the end of the connector) clockwise to secure the connection.
PERFORM THE OPERATION IN REVERSE TO TAKE OFF THE REMOVABLE WHEEL FROM THE BASE
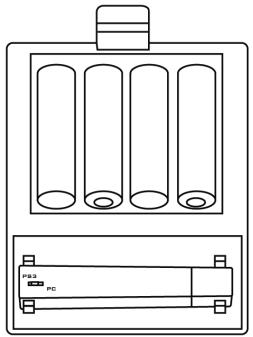
FITTING BATTERIES AND RECOVERING THE RECEIVER
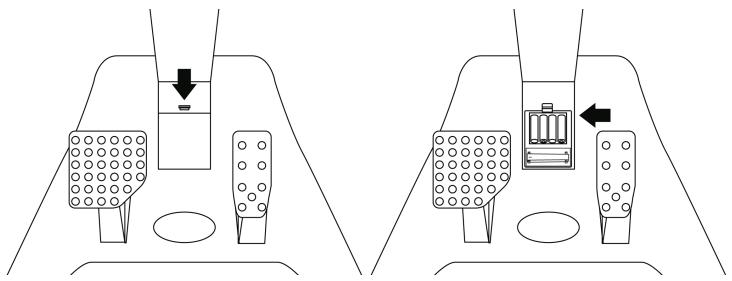
- Remove cover from the battery compartment (8) (located between the 2 pedals) and fit 4 LR6 / AA batteries, ensuring that the polarities are in the right position.
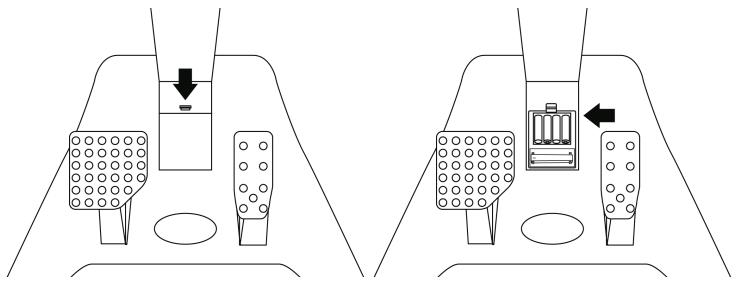
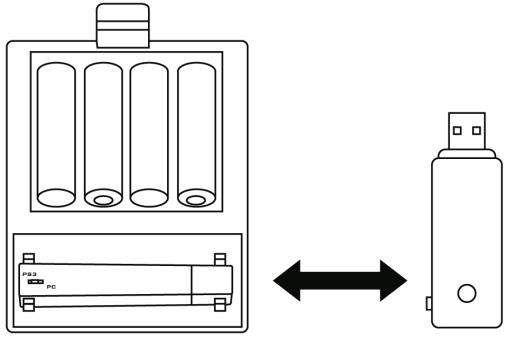
- Recover the wireless receiver (14) found in the lower section of the battery compartment.
- Fit back the battery compartment's cover.
SWITCHING THE WHEEL ON OR OFF
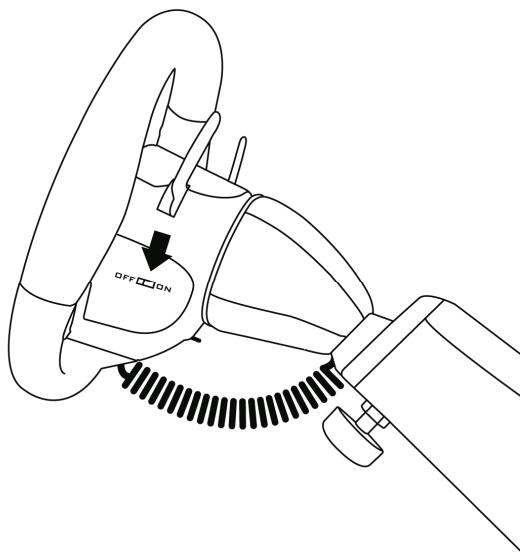
- Position the switch (located on the right-hand side of the wheel):
- To ON for switching on the wheel.
- To OFF for switching off the wheel.
Important note:
When you switch on your wheel, it must always be perfectly centred physically (to prevent any misalignment).
PLAYSTATION® 3
INSTALLATION ON PLAYSTATION® 3
- Set the PC/PS3 switch (17) of the receiver (14) to the "PS3" position.
- Connect the USB connector (15) of the receiver to the USB port 1 of the console.
- Turn on your console.
- Turn on your wheel by using the ON/OFF switch.
- When the connection is set up, launch the game.
You are now ready to play!
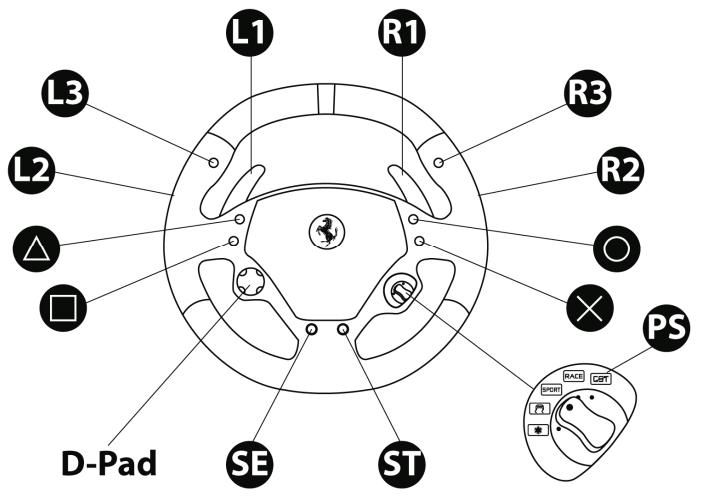
USING THE "PS" BUTTON CBT
The "PS" button of your wheel allows you to exit your games, access the menus and directly switch off your PlayStation® 3 system.
Procedure:
Set the Manettino (10) switch to the relevant icon, and then press the push button.
Important notes on PlayStation® 3:
- The PC/PS3 switch (17) of the receiver must always be set to "PS3" before connecting it.
- In "1-player" mode: If your official gamepad is turned on, you will have to switch it to "controller port 2" in order for your wheel to be functional.
- On PlayStation® 3, the wheel simulates the official gameplay (which makes it compatible with all racing games).
- In most games, the "Normal Sensitivity" mode (just as on the gamepad) has a slight dead zone that can be felt in the middle of the wheel axis (and therefore the centre of the wheel).
The wheel's "High Sensitivity" mode is set to remove this dead zone.
However, some games allow you to remove or reduce this dead zone by changing the settings of the steering wheel axis in the game's "Options/Commands".
"High Sensitivity" mode is recommended for most PS3 games (where it is not possible to change the central dead zone of the steering wheel axis).
"Normal Sensitivity" mode is recommended only for PS3 games where the central dead zone of the steering wheel axis can be changed.
CONFIGURING THE "AUTOMATIC PRESET" - PLAYSTATION® 3 (in "Separate pedal set" mode)
PC
INSTALLATION ON PC
Required configuration: PC (Windows® Xp, Windows® Vista, Windows® 7) equipped with a USB port
The CD-ROM included with this product allows you to install the drivers.
- Insert the installation CD-ROM into your CD-ROM drive. The install wizard is displayed automatically (if the installation menu does not run automatically, double-click "Workstation", then the icon of the CD-ROM and, "Setup.exe" if necessary).
- Click on the "DRIVERS" to start installing the drivers.
- Once the installation is complete, click Finish and restart your computer.
- Set the PC/PS3 switch (17) of the receiver (14) to the "PC" position.
- Once your computer has restarted, connect the USB connector (15) of the receiver to one of the USB ports of your central unit. Windows® will automatically detect the new device.
- Drivers are installed automatically.
Follow the on-screen instructions to complete the installation. - Select Start/Programs/Thrustmaster/Control Panel to access the Control Panel. The Game controllers dialogue box will display the name of the wheel with the OK status.
- In the Control Panel, click Properties to test and view the buttons, D-pad and axes of the wheel and the pedal set.
You are now ready to play!
Important notes on PC:
- The PC/PS3 (17) switch of the receiver must always be set to "PC" before connecting the wheel.
- The wheel name declared on PC (in the Control Panel and in the games) is "F430 Cockpit Wireless".
CONFIGURING THE "AUTOMATIC PRESET" - PC (in "Separate pedal set" mode)

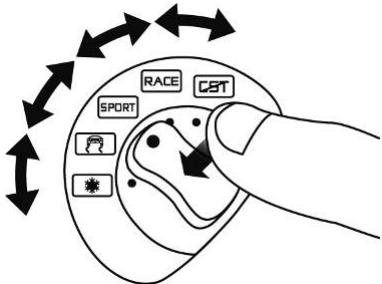
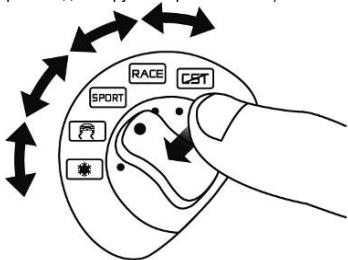
USING THE 5-POSITION MANETTINO
The Manettino (10) system comprises:
- a rotary switch that you can turn to go from one function to another
- a push button located under the switch (to confirm your choices)
The required function will start as soon as you press the push button (not when you turn the switch) with the switch positioned opposite the relevant icon.
| Manettino | Button functions and correspondence with the LEDs |
| CST | "PS" on PS3 button and "13" on PC - On = connection set up between the wheel and the receiver. - Flashes quickly = no connection between the wheel and the receiver. - Flashes slowly and continuously = you must change the batteries. - Off = the wheel is in standby mode or off. |
| RACE | "Normal Sensitivity" mode - On = "Normal Sensitivity" with "Separate pedal set" modes enabled - Flashes quickly = mode "Combined pedal set" enabled |
| SPORT | "High Sensitivity" mode - On = "High Sensitivity" with "Separate pedal set" modes enabled - Flashes quickly = "Combined pedal set" mode enabled |
| "Mapping" - On = "Mapping" mode enabled (pending programming) | |
| "Manual Preset" - On = "Manual Preset" mode enabled | |
| - Set the Manettino switch to the relevant icon. - Press the push button to confirm the function. |
GENERAL
WHEEL POWER BUTTON
-
OFF position = the wheel is off (and does not use the batteries).
-
ON position = the wheel is on.
The wheel and receiver are automatically connected.
If the connection fails, you can force the connection by pressing the LED button of the receiver (16), then the SELECT + START + CBT buttons simultaneously on the wheel.
STANDBY MODE
The wheel automatically switches off:
- After 5 minutes of inactivity.
- After 5 seconds if the connection fails or is lost.
The wheel can be activated by pressing one of its action buttons (13) or operating the wheel's ON/OFF switch.
"PC / PS3" SWITCH (17) OF THE RECEIVER
This switch must always be set to the correct position before you connect your receiver to the USB port of your PlayStation® 3 or PC.
C8T LED AND RECEIVER LED (16)
- Both LEDs are on = connection set up between the wheel and the receiver.
-
Both LEDs flash quickly = no connection between the wheel and the receiver.
-All the LEDs on the Manettino are off = the wheel is in standby mode or off. -
The CBT LED flashes slowly and continuously = you must change the batteries.
AUTOMATIC CALIBRATION OF THE WHEEL AND PEDALS
- The centre of the wheel is preset as soon as you turn it on: it is therefore vital for the wheel to be perfectly aligned on its axis when you switch it on.
- Nevertheless, you can manually adjust the centre of the wheel. To do this, position the wheel in perfect alignment with the centre, and then simultaneously press "SELECT + START + ENGINE START" (this operation must be carried out each time the wheel is switched on).
- The steering of the wheel and the pedals automatically self-calibrate.
ADVANCED FUNCTIONS
ADJUSTING THE WHEEL'S SENSITIVITY
Your wheel's steering has 2 sensitivity modes:
- "Normal Sensitivity" (default mode and recommended on PC - requires setting on PS3)
- "High Sensitivity" (default mode and recommended on PS3 - requires setting on PC)
Setting "Normal Sensitivity" mode (default mode and recommended on PC)
| Action | RACE |
| - Set the Manettino switch to the relevant icon. | ON |
| - Press the push button to confirm the function. |
Your wheel's steering is now at Normal Sensitivity
Setting "High Sensitivity" mode (default mode and recommended on PS3)
| Action | SPORT |
| - Set the Manettino switch to the relevant icon. | ON |
| - Press the push button to confirm the function. |
Your wheel's steering is now more sensitive, especially at the centre
CONFIGURING THE PEDALS
Your wheel's accelerator and brake controls are in "separate" mode by default, meaning that the pedals function on independent axes.
This mode lets you considerably improve the precision of your steering.
If you game does not support the "separate" mode, the pedal set of the wheel will not work correctly. You must therefore activate the "Combined" mode.
SETTING
Simultaneously press and release both pedals (accelerator and brake) + the CBT button.
| PEDAL SET MODE | RACE or SPORT |
| SEPARATE (recommended mode for most games) | DOES NOT FLASH |
| COMBINED | FLASHERS |
CONFIGURING THE PEDALS ON PLAYSTATION® 3
| Separate pedal set (default mode) | Combined pedal set (must be set) |
| - Accelerator = R2 trigger of the PS3 gamepad - Brake = L2 trigger of the PS3 gamepad | - Accelerator = Up direction of the "right mini-stick" of the PS3 gamepad - Brake = Down direction of the "right mini-stick" of the PS3 gamepad |
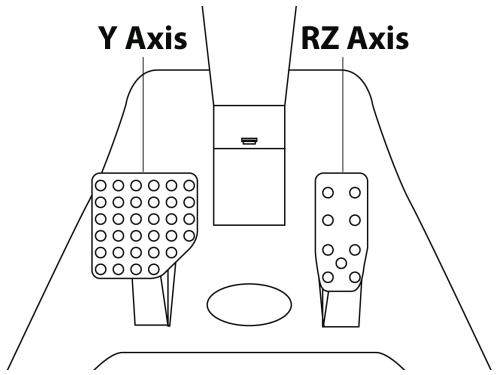
CONFIGURING THE PEDALS ON PC
| Separate pedal set (default mode) | Combined pedal set (must be set) |
| Y Axis RZ Axis - Accelerator = RZ axis - Brake = Y axis | Y Axis (-) Y Axis (+) - Accelerator = Up direction of the Y axis - Brake = Down direction of the Y axis |
PROGRAMMING THE WHEEL AND PEDALS
Your wheel is fully programmable:
- All the action buttons can be switched between themselves.
- All the action buttons can be programmed onto the pedals or gearshift paddles.
TWO PROGRAMMING MODES
The button and the PRESET LED allow you to view the programming type chosen: AUTOMATIC (pre-programmed) or MANUAL (programmed by yourself). Simply pressing this button allows you to switch from one programming mode to another (even during a game).
"AUTOMATIC PRESET"(PRESET BUTTON OFF)
This is the default programming.
For more information, refer to the diagrams in CONFIGURING "AUTOMATIC PRESET" - PLAYSTATION® 3 / PC.
"MANUAL PRESET"(PRESET BUTTON ON)
This is your personal programming. The buttons can either be:
- programmed onto the pedals or gearshift paddles
-
or switched between each other.
-
You can change your programming whenever you want.
- The programming is automatically saved in the wheel (even when it is disconnected or switched off).
- When your "MANUAL PRESET" is blank, it is identical to "AUTOMATIC PRESET".
PROGRAMMING PROCEDURE
| Steps | Action | LED status |
| 1 | Activate "MANUAL PRESET" by pressing the button. | On |
| 2 | Press and release the MAPPING button | On |
| 3 | Press and release the button to programme. | Flashing |
| 4 | Press and release the button, the gearshift paddle or pedal you want to assign to this function. | Off On |
Your "MANUAL PRESET" programming is now enabled and updated (with your programming applied).
EXAMPLES OF POSSIBLE USES:
- On PS3, programme L2/R2 or L3/R3 onto the Up and Down gearshift paddles (L1/R1 by default).
- On PS3, programme the Cross/Square buttons onto the pedals (L2/R2 by default).
- Switch different buttons for better access.
Note: The CBT button cannot be programmed or moved.
EEPROM MEMORY
Your wheel has an internal chip that stores all your "MANUAL PRESET" programmes in memory (even when the wheel is off or disconnected for a long period of time).
You can save a different "MANUAL PRESET" on each support used (PC and PS3).
DELETING A "MANUAL PRESET"
| Steps | Action | LED status |
| 1 | Activate your "MANUAL PRESET" | On |
| 2 | Press and hold the MAPPING button for 2 seconds. | Flashes for 2 seconds |
Your "MANUAL PRESET" is now blank (and becomes identical to the "AUTOMATIC PRESET").
RETURN TO "FACTORY SETTINGS"
The aim here is to remove all of your programming or settings in one go.
| Steps | Action | LED status |
| 1 | Simultaneously press the following buttons MAPPING + SELECT + START | CST Flashes for 5 seconds |
All your "MANUAL PRESETS" (PC + PS3) or settings are now blank.
Note: The result of this action is to fully restart your wheel. On a PC, you should therefore carry out this operation only when no game is currently playing.
TROUBLESHOOTING
The wheel is not perfectly centred in the games:
- Switch off the wheel (by setting the switch to OFF). Physically centre the wheel. Next, switch the wheel back on (by setting the switch to ON).
- If the problem persists, you can manually centre the wheel. To do this, position the wheel in perfect alignment with the centre, and then simultaneously press "SELECT + START + ENGINE START" (this operation must be carried out each time the wheel is switched on).
- On the PC, if the wheel or pedals are not properly calibrated, download the "Thrustmaster Calibration Tool v 1.03" manual calibration software available at the following address: http://ts.thrustmaster.com.
My wheel or pedals do not work correctly:
- Switch the wheel off and back on again (making sure the wheel is centred on start-up).
- Check the condition of the 4 LR6 / AA batteries and that their polarities are correctly positioned.
- If the problem persists, switch off your computer or your console, disconnect the USB receiver as well as the power cord, reconnect all of them again, then restart and launch your game again.
On PC, my wheel is detected but does not work with my game:
Open the interface for managing your game's "Options" to configure your wheel. Refer to your game's user manual or online help for more information.
On PS3, my wheel is not detected:
- In "1 player" mode: If your official gamepad is turned on, you will have to switch it to "controller port 2" (using the "PS" button) for your wheel to be functional.
- If the problem persists, switch off your gamepad while leaving only the wheel connected.
My pedals do not work correctly in "Separate Mode":
(E.g. when the game is running, the selection cursor moves all by itself)
Exit the game and switch the pedals to "combined" mode. Then return to your game to reconfigure the wheel in your game's option management interface.
My wheel cannot connect itself to the receiver:
The connection between the wheel and the receiver is made automatically.
In the event of a connection failure, you can force the connection by pressing the LED button of the
receiver (16), then simultaneously on your wheel's SELECT + START + CBT buttons.
The CBT LED flashes continuously:
You must change the batteries.
SAFETY RECOMMENDATIONS AND INFORMATION
During extended periods of non-use, switch off the wheel (by setting the switch to OFF), remove the wheel from its base and remove the 4 batteries from the battery compartment.
TECHNICAL SUPPORT
If you encounter a problem with your product, please go to http://ts.thrustmaster.com and click Technical Support. From there you will be able to access various utilities (Frequently Asked Questions (FAQ), the latest versions of drivers and software) that may help to resolve your problem. If the problem persists, you can contact the Thrustmaster products technical support service ("Technical Support"):
By email:
In order to take advantage of technical support by email, you must first register online. The information you provide will help the agents to resolve your problem more quickly. Click Registration on the left-hand side of the Technical Support page and follow the on-screen instructions. If you have already registered, fill in theUsername and Password fields and then click Login.
By telephone:
| United Kingdom | 08450800942Chargesat local rate | Monday to Friday from Noon to 4pm and 5pm to 10pmSaturday from 9am to Noon and 1pm to 7pmSunday from 9am to Noon and 1pm to 4pm |
| United States | 1-866-889-5036Free | Monday to Friday from 7am to 11am and from Noon to 5pmSaturday and Sunday from 7am to Noon(Eastern Standard Time) |
| Canada | 1-866-889-2181 Gratisuit / Free | Monday to Friday from 7am to 11am and from Noon to 5pmSaturday and Sunday from 7am to Noon(Eastern Standard Time) |
| Denmark | 80887690Free | Monday to Friday from 1pm to 5pm and 6pm to 11pm(English)Saturday from 9am to 1pm and 2pm to 8pmSunday from 10am to 1pm and 2pm to 5pm |
| Sweden | 0200884567Free | Monday to Friday from 1pm to 5pm and 6pm to 11pm(English)Saturday from 9am to 1pm and 2pm to 8pmSunday from 10am to 1pm and 2pm to 5pm |
| Finland | 0800 913060Free | Monday to Friday from 2pm to 6pm and 7pm to Midnight(English)Saturday from 10am to 2pm and 3pm to 9pmSunday from 11am to 2pm and 3pm to 6pm |
WARRANTY INFORMATION
Worldwide, Guillemot Corporation S.A. ("Guillemot") warrants to the consumer that this Thrustmaster product will be free from material defects and manufacturing flaws for a period of two (2) years from the original date of purchase. Should the product appear to be defective during the warranty period, immediately contact Technical Support, who will indicate the procedure to follow. If the defect is confirmed, the product must be returned to its place of purchase (or any other location indicated by Technical Support).
Within the context of this warranty, the consumer's defective product will, at Technical Support's option, be either repaired or replaced. Where authorized by applicable law, the full liability of Guillemot and its subsidiaries (including for indirect damages) is limited to the repair or replacement of the Thrustmaster product. The consumer's legal rights with respect to legislation applicable to the sale of consumer goods are not affected by this warranty.
This warranty shall not apply: (1) if the product has been modified, opened, altered, or has suffered damage as a result of inappropriate or abusive use, negligence, an accident, normal wear, or any other cause not related to a material defect or manufacturing flaw; (2) in the event of failure to comply with the instructions provided by Technical Support; (3) to software not published by Guillemot, said software being subject to a specific warranty provided by its publisher.
Additional warranty provisions
In the United States of America and in Canada, this warranty is limited to the product's internal mechanism and external housing. Any applicable implied warranties, including warranties of merchantability and fitness for a particular purpose, are hereby limited to two (2) years from the date of purchase and are subject to the conditions set forth in this limited warranty. In no event shall Guillemot Corporation S.A. or its affiliates be liable for consequential or incidental damage resulting from the breach of any express or implied warranties. Some States/Provinces do not allow limitation on how long an implied warranty lasts or exclusion or limitation of incidental/consequential damages, so the above limitation may not apply to you. This warranty gives you specific legal rights, and you may also have other legal rights which vary from State to State or Province to Province.
COPYRIGHT
© 2010 Guillemot Corporation S.A. All rights reserved. Thrustmaster® is a registered trademark of Guillemot Corporation S.A. Ferrari® is a registered trademark of Ferrari Idea S.p.A. PlayStation® is a registered trademark of Sony Computer Entertainment Inc. Microsoft® Windows® is a registered trademark of Microsoft Corporation in the United States and/or other countries. All other trademarks and brand names are hereby acknowledged and are property of their respective owners. Illustrations not binding. Contents, designs and specifications are subject to change without notice and may vary from one country to another. Made in China.
ENVIRONMENTAL PROTECTION RECOMMENDATION


At the end of its working life, this product should not be disposed of with standard household waste, but rather dropped off at a collection point for the disposal of Waste Electrical and Electronic Equipment (WEEE) for recycling.
This is confirmed by the symbol found on the product, user manual or packaging.
Depending on their characteristics, the materials may be recycled. Through recycling and other forms of processing Waste Electrical and Electronic Equipment, you can make a significant contribution towards helping to protect the environment.
Please contact your local authorities for information on the collection point nearest you.
Operates with 4 batteries LR6 / AA (1.5V), not included. Do not recharge non-rechargeable batteries. Used batteries must be removed from the toy. Different types of batteries or new and used batteries must not be mixed. Only batteries of the recommended type or similar type must be used. Batteries must be inserted with the correct polarity. The terminals of a battery must not be short-circuited.
Ferrari Wireless GT cockpit 430 scuderia Edition
Compatible : PlayStation® 3 & PC
INFORMATIONS RELATIVES À LA GARANTIE
www.thrustmaster.com


Ferrari Wireless GT cockpit 430 scuderia Edition
Compatible:PlayStation®3&PC
INFORMATIE MET BETREKKING TOT DE GARANTIE
www.thrustmaster.com

Ferrari Wireless GT cockpit 430 scuderia Edition
Compatible:PlayStation ⑧ 3e PC
Manuale d'uso

CARATTERISTICHE TECNICHE
www.thrustmaster.com

Ferrari Wireless GT cockpit 430 scuderia Edition
USO DEL BOTON "PS" CBT
www.thrustmaster.com


Ferrari Wireless GT cockpit 430 scuderia Edition
Compativel:PlayStation ⑧ 3&PC
Manual do Utilizador
CHARACTERISTICAS TECNICAS
LED CBT E LED DO RECEPTOR (16)
www.thrustmaster.com

C E
Ferrari Wireless GT cockpit 430 scuderia Edition
CoBmecTHMOCTb:PlayStation ⑧ 3nIJK
PykoBoDCTBO nonb3ObaTeNa
TEXHNUCKNEXAPAKTEPUCTUKN
1 23aHnX 3aXIMMbIb X BnHTa (dJIpeyeuIupo6ku HakoHa)
2 Pучka Дяп посяа
3 Perynipyembl CTepeXeHb
4 CbemHoe Koneco pyra
5 IpoBOD 3JIeKTKpOITaHINr
6 1 NepeHn3aXmHbI BnHT (DJI peZyUnpO6Ku dNluBcmePxHJ)
7 PekaJIN r3a n TopMo3a
8 OTeJIeHHe 6aTaapeE K yCTaHOBKn npINHMaUoIero yCTpoIcTBA
9 Pbyaacknn nporpammmopobanha knckopctn Bbeepx n BHN3
10pekeKnoaTeBn Manettino c BpaauoUeIeCnyuO (5 no3uui dna npoePammuOepaH)
11 KhoNkn «Select» (BbI6Op) n «Start» (Ctapt)
12 KhoIkpYnpaBneHn
13 KhoNkN DeIcTBn
14 BecepnoBdoHoe npnHmMaIOoee yctpoNCTBO
15 USB-KOHNHEKTOP pINHIMAOUeero yctpoiCTBa
16 INdkaTOp npHmMaIOUeRo yCTpoNCTBa
17 PepeKIOUoATEIb pInHMmaIOUeO yCtpoIcTBa PC/PS3 (PK/PS3)
YCTAHOBKA PYJIA
PEYIINPOBKA HAKIOHA I JINHbI CTEPXHry PUYI
- CnErka ocna6bTe (npOTMB YacOBoI CTpeJIKN) 2 3aKIMHbIX BnHTa (1), paCIOJIOKeHHbIX Ha TbJIbHOu CaTIN OCHOBAHIA.
- OtpernynnpyTe NaKIOH CTepKJH3 (3) no BaUeMy yCmTopeHIO.
-
3aTaNHTe (no Yacobov CTpeIke) 2 3axmmHbX BNHTa (1).
-
Cnterka ocnaabe Te (npoTMB Yacoboi CTpeKN) 3axmmHO BnHT (6), paonoloxeHHbHa nepeHne CTOpOHe cTeKxHr. 3aTeM bblBnHbTe cTeKxHb Ha dInHy PO BaUeMy yCMOTpeHIO.
- 3aTnHte (no yacoboi cTpeJIke) 3axMMHO BVHT (6) Tak, YTObI OH POBOH BOWII B ONO H3 npedymOTpeHHbIX dIner HeO OTBepCTMI. IJIg 3tOrO pAcNoJoxNITE BepxHee OTBepCTME B npedymOTpeHHbI dIner 3tO ueJI 6nOKIPAtop.

BbIcTynI (pepeHnra nobepxHOCTb oCHOBaHna)
BbIeMkn (3aHnna Yactb Koneca pyra) +
3aüeIka(3aɪnɪy aɪctb kɒneca pyə
-PacnoJIOKHTe CbEMHbI pyIb (4) TOpIN3OHTaJIbHO, 3aTeM BCTaBbTe 2 BbICTyNa (paCNOJoxHeHa NapeDneH NoBepxHocTH OCHOBAHN) BHyTb2 BbIeMOK (paCNOJoxHeH Ha 3aJeH Yeactn Koneca pyIa).
- HadBnHbTe Koneco pyIa BepTikalbHO, 3aTe 3aФKcpyTe pyIb, haxab Ha 3aUeKy (paCnoJoxHa ha 3aHne Yactn Koneca pyIa), a3aTe OTynCTb eE. BbldoNkhby cIbIbIaTb JeJIyOc.
- y6eDntecb, yTO KOleco pyJn XOpOo 3aKpeIneHo Ha OCHOBAHm.
-Плбоевинтейпатане колеса OT OCHOBANIA,Всtabи Вглоби utkeр (pacnoLOXeH Na KOHue npoOda питаня (5))В рабем (pacnoLOXeH сева OT kOLeA pyЯ).
-Повернite raKy (pacnoLoXeHa Na KOHc ue StKepe) no Yacobov cTpeIke dIЯФКcaUIM.
BbIIOJIHNTE DAHHYU IPOUeIUPY B OBPATHOM IOPRJKE DJIa CHRTN KOIEGA PYN C OCHOBAHIN
YCTAHOBKA BATAPEEKИ N3BLEUHNE IPNHIMAIIOJIEGO YCTPOICTBA
- CnMMITE KpbIuKy OTdEeHIna IIN 6bTaapeek (8) (paCIOIOXeHa IIOaADI 2 PeaJIeN) uYcTAHOBITE 4 6BaTaeIKn Tnla LR6 / AA, co6IIOJaI IOJrPHocTB.
- V3BnEKeTbe 6ecpnoBoDioHe pnpHmHaIOoIe yCTpoIcTBO (14),KOTOpoe HaxOJITcB HmKHe qactn OTepeHnIa6batapeek.
- YctaHOBHTe KpbIshky OTeJIeHnHa nIpeJHHe MeCTO.
BKJIIOUChEHN I BbIKIIOUChEHN PUYA
-Перевдente Вьклочаел (pacnoLOXeH cnpaBa Na KOnece pyna):
BnoIOxHneON(BKn)IyBKnIOUeyHnyA
B NOJXeHne OFF (BbIKI) nJIy BbIKIoueHn pyJI.
Baxhoe 3ameaHne:
Teneb Bby roTOBbK urpe!
Baxhblte 3ameyannr o nK:
-пеклочать PC/PS3 (17) npHmHaIoIeYo yCtpoIcTb BceIgdoДоJIKEN 6bITb nepeBeIeH B noLOKHeHNE «PC» nepeI ernoNoDCoeINHeHEm.
- HataBaanHe pyna, otobpaKaemoe Pk (B PanaHn ynpabNeHn n Irpax) - «БecpnoBoHoe MeTo nItofa430» («F430 Cockpit Wireless»).
KOHΦIγPALIЯ «ПЕДВAPITEЛБΗΟΑBOMATUÇECKΟΥCTAHOBΚΙ» - ΠΚ (В решиме «Педалу паздelloн»)
NCIOJIb3OBAHNE 5 I03IcIM MANETTINO
CnCTema Manettino (10) coctoNT n3 cneDyOuxx 3JeMeHToB:
- nepekniouateIb c bpaauouecra yko, c nmoiIO nobopoT aKOTORO Bby moKTe nepexoHITb OT oNHOfynkuin Kdpuroi
- KhONka nepekIIOUaTeNa, pacnOIOxEHHa Ha pyuKe nepeKlIOUaTeNa (ДЯп NOIITbEPrXeHЯ NByIbOpa)
Bb6paHnHa Bamn PnykUna (pyka HapnpaBHeHa HoCoTBeCTByuOu3n 3auok) akTmBpUyETc npn Haxatm Ha KhoNky nepeKluOateTe (a He npn HabeDenm pyKn pekeKluOateTe).
DanbpyjIyabIaTcNOHIOCTbIO npOrpaMMpyEmbIM:
- BCE KHOPIKIN DeIeCTBnA MOrTy 6bITb NOMeHnHb IyHKUaMm MeJx Co6o;
- BCE KHOKNI DeiCTBnA MOrTy 6bIt 3aPpOprpaMMNPOBaHbI Ha neJaIN Nn pbluaKKn IpOprpAMMnPOBaHn.
ДBAPEKIMAPORPAMMIOBAHAHA
Khonka HndkaTopa PPEBBAVPITbHOYCTAHOBKN (PRESET) n03BOJAE T BmTe bbl6paHHbTIN pnprrpMMPOBaHnA:
ABOTMATUHECKMn (npedBaipertelbHO 3anporpammpnoabHbI) mN PYCHOI (nporpammpnyeMbI Bam). IpoctbIM haoataHem a 3Ty KhoNky Bbl moKeTe (daXe Bo BPemrIrpbI) 3aMeHNtB oINm TnI nporpammpnoabHa H daPyro.
«ПЕДВAPITEЛьНА АВТOMATUCEСКА YCTAHOBKA» (KHONKA PRESET HE FOPNT)
PpimmehaTc nporpaMMPOBaHne no yMOJuaHIO.
Ha PIK moy pynb o6hapyKeH, Ho he pa60taeT c moe n irpoi:
Otrope nntepcnc ynpabnenea Ounm B Bauei nprn hacptpkn pyia. Obpatntecb k pykoBocCTBy nbo30ateia onn OH-nain mnooun Bauei nprn noptyenai 6ooe noipno6hix cbehen.
HaПК моу рун He obnapужн:
- B pexime « 1IrpoK», ecnB BaW oФицальн的大кошстКВлочeH, NeobxOДмОpekeNCHIb eroВположене (с поюшь кноги«PS») «Порт джошостКИаUNaUNpyJ.
- Ecn npobIema coxpaHareTcB, bIKIOUHTe IXKOHTN, OCTaNB IOKIIIOHHeHHbIM ToJIbKO pyIb.
MOn neJaHn HnpeBaHnIbHo pa6OtaHOT B «PexIme pa3dIbHo»:
www.thrustmaster.com

C E

Thrustmaster is a division of the Guillemot Corporation group

- THrustmaster®
- Ferrari Wireless
- GT Cockpit
- scuderia Edition
- Ferrari Wireless GT cockpit 430 scuderia Edition
- TECHNICAL FEATURES
- INSTALLING THE WHEEL
- ADJUSTING THE TILT AND LENGTH OF THE DRIVING POSITION
- FITTING THE WHEEL TO THE BASE
- FITTING BATTERIES AND RECOVERING THE RECEIVER
- SWITCHING THE WHEEL ON OR OFF
- Important note:
- PLAYSTATION® 3
- INSTALLATION ON PLAYSTATION® 3
- USING THE "PS" BUTTON CBT
- Important notes on PlayStation® 3:
- PC
- INSTALLATION ON PC
- Important notes on PC:
- USING THE 5-POSITION MANETTINO
- GENERAL
- WHEEL POWER BUTTON
- STANDBY MODE
- "PC / PS3" SWITCH (17) OF THE RECEIVER
- C8T LED AND RECEIVER LED (16)
- AUTOMATIC CALIBRATION OF THE WHEEL AND PEDALS
- ADVANCED FUNCTIONS
- ADJUSTING THE WHEEL'S SENSITIVITY
- CONFIGURING THE PEDALS
- SETTING
- PROGRAMMING THE WHEEL AND PEDALS
- TWO PROGRAMMING MODES
- EXAMPLES OF POSSIBLE USES:
- EEPROM MEMORY
- RETURN TO "FACTORY SETTINGS"
- TROUBLESHOOTING
- The wheel is not perfectly centred in the games:
- My wheel or pedals do not work correctly:
- On PC, my wheel is detected but does not work with my game:
- On PS3, my wheel is not detected:
- My pedals do not work correctly in "Separate Mode":
- (E.g. when the game is running, the selection cursor moves all by itself)
- My wheel cannot connect itself to the receiver:
- SAFETY RECOMMENDATIONS AND INFORMATION
- TECHNICAL SUPPORT
- By email:
- WARRANTY INFORMATION
- Additional warranty provisions
- COPYRIGHT
- ENVIRONMENTAL PROTECTION RECOMMENDATION
- INFORMATIONS RELATIVES À LA GARANTIE
- INFORMATIE MET BETREKKING TOT DE GARANTIE
- CARATTERISTICHE TECNICHE
- USO DEL BOTON "PS" CBT
- CHARACTERISTICAS TECNICAS
- LED CBT E LED DO RECEPTOR (16)
- TEXHNUCKNEXAPAKTEPUCTUKN
- YCTAHOBKA PYJIA
- PEYIINPOBKA HAKIOHA I JINHbI CTEPXHry PUYI
- YCTAHOBKA BATAPEEKИ N3BLEUHNE IPNHIMAIIOJIEGO YCTPOICTBA
- BKJIIOUChEHN I BbIKIIOUChEHN PUYA
- Baxhoe 3ameaHne:
- Baxhblte 3ameyannr o nK:
- NCIOJIb3OBAHNE 5 I03IcIM MANETTINO
- ДBAPEKIMAPORPAMMIOBAHAHA
- Ha PIK moy pynb o6hapyKeH, Ho he pa60taeT c moe n irpoi:
- HaПК моу рун He obnapужн:
- MOn neJaHn HnpeBaHnIbHo pa6OtaHOT B «PexIme pa3dIbHo»:
Brand : THRUSTMASTER
Model : FERRARI WIRELESS F430 COCKPIT
Category : Racing wheel