
RALLY GT PRO FORCE FEEDBACK - Racing wheel THRUSTMASTER - Free user manual and instructions
Find the device manual for free RALLY GT PRO FORCE FEEDBACK THRUSTMASTER in PDF.
| Product type | Racing wheel with force feedback |
| Brand | THRUSTMASTER |
| Model | RALLY GT PRO FORCE FEEDBACK |
| System compatibility | Windows 98 SE, Me, 2000, XP |
| Connectivity | USB (PC), RJ45 for pedal set, power adapter connector, second pedal set connector |
| Force feedback | Yes, Force Feedback with 8 testable effects |
| Selectable axis modes | 2 axes (Orange), 3 axes (Red), 5 axes (Green) |
| Included pedal set | Analog pedal set with 2 pedals (brake and accelerator) |
| Second pedal set optional | Yes, for clutch and handbrake (sold separately) |
| Analog levers | 2 analog levers (left and right) on the wheel |
| Auto-centering | Adjustable, enable/disable via Force button or Control Panel |
| Power supply | Power adapter included |
| Dimensions (approx.) | 30 x 30 x 30 cm |
| Weight (approx.) | 2.5 kg |
| Main functions | Force feedback, auto-centering, 3 axis modes, automatic calibration, gearbox programming, second pedal set compatibility |
| Maintenance | Clean with a soft, dry cloth. Avoid moisture. |
| Safety | Keep out of reach of young children, especially during auto-calibration. Disconnect the adapter during prolonged inactivity. |
| Spare parts | Power adapter, pedal set, cables, second pedal set (optional). Available via technical support. |
| General information | 2-year warranty. Manufactured by Guillemot Corporation. Thrustmaster brand. |
Frequently Asked Questions - RALLY GT PRO FORCE FEEDBACK THRUSTMASTER
User questions about RALLY GT PRO FORCE FEEDBACK THRUSTMASTER
0 question about this device. Answer the ones you know or ask your own.
Ask a new question about this device
Download the instructions for your Racing wheel in PDF format for free! Find your manual RALLY GT PRO FORCE FEEDBACK - THRUSTMASTER and take your electronic device back in hand. On this page are published all the documents necessary for the use of your device. RALLY GT PRO FORCE FEEDBACK by THRUSTMASTER.
USER MANUAL RALLY GT PRO FORCE FEEDBACK THRUSTMASTER
7 Connecter for second pedal set (optional, sold separately)
8 Axis 1: Analog steering wheel
9 Axis 4: Left analog lever
10 Axis 5: Right analog lever
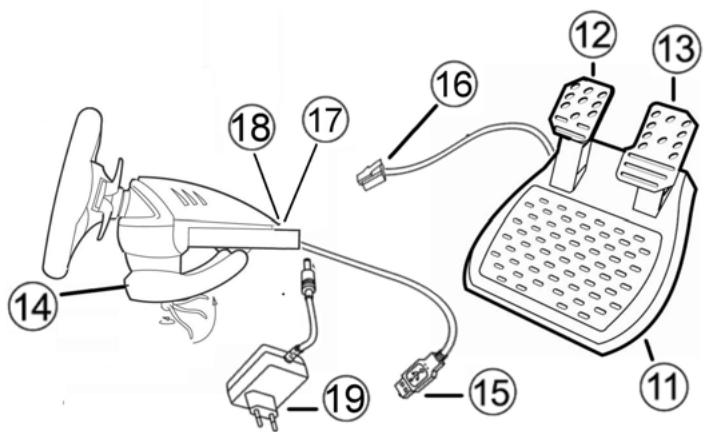
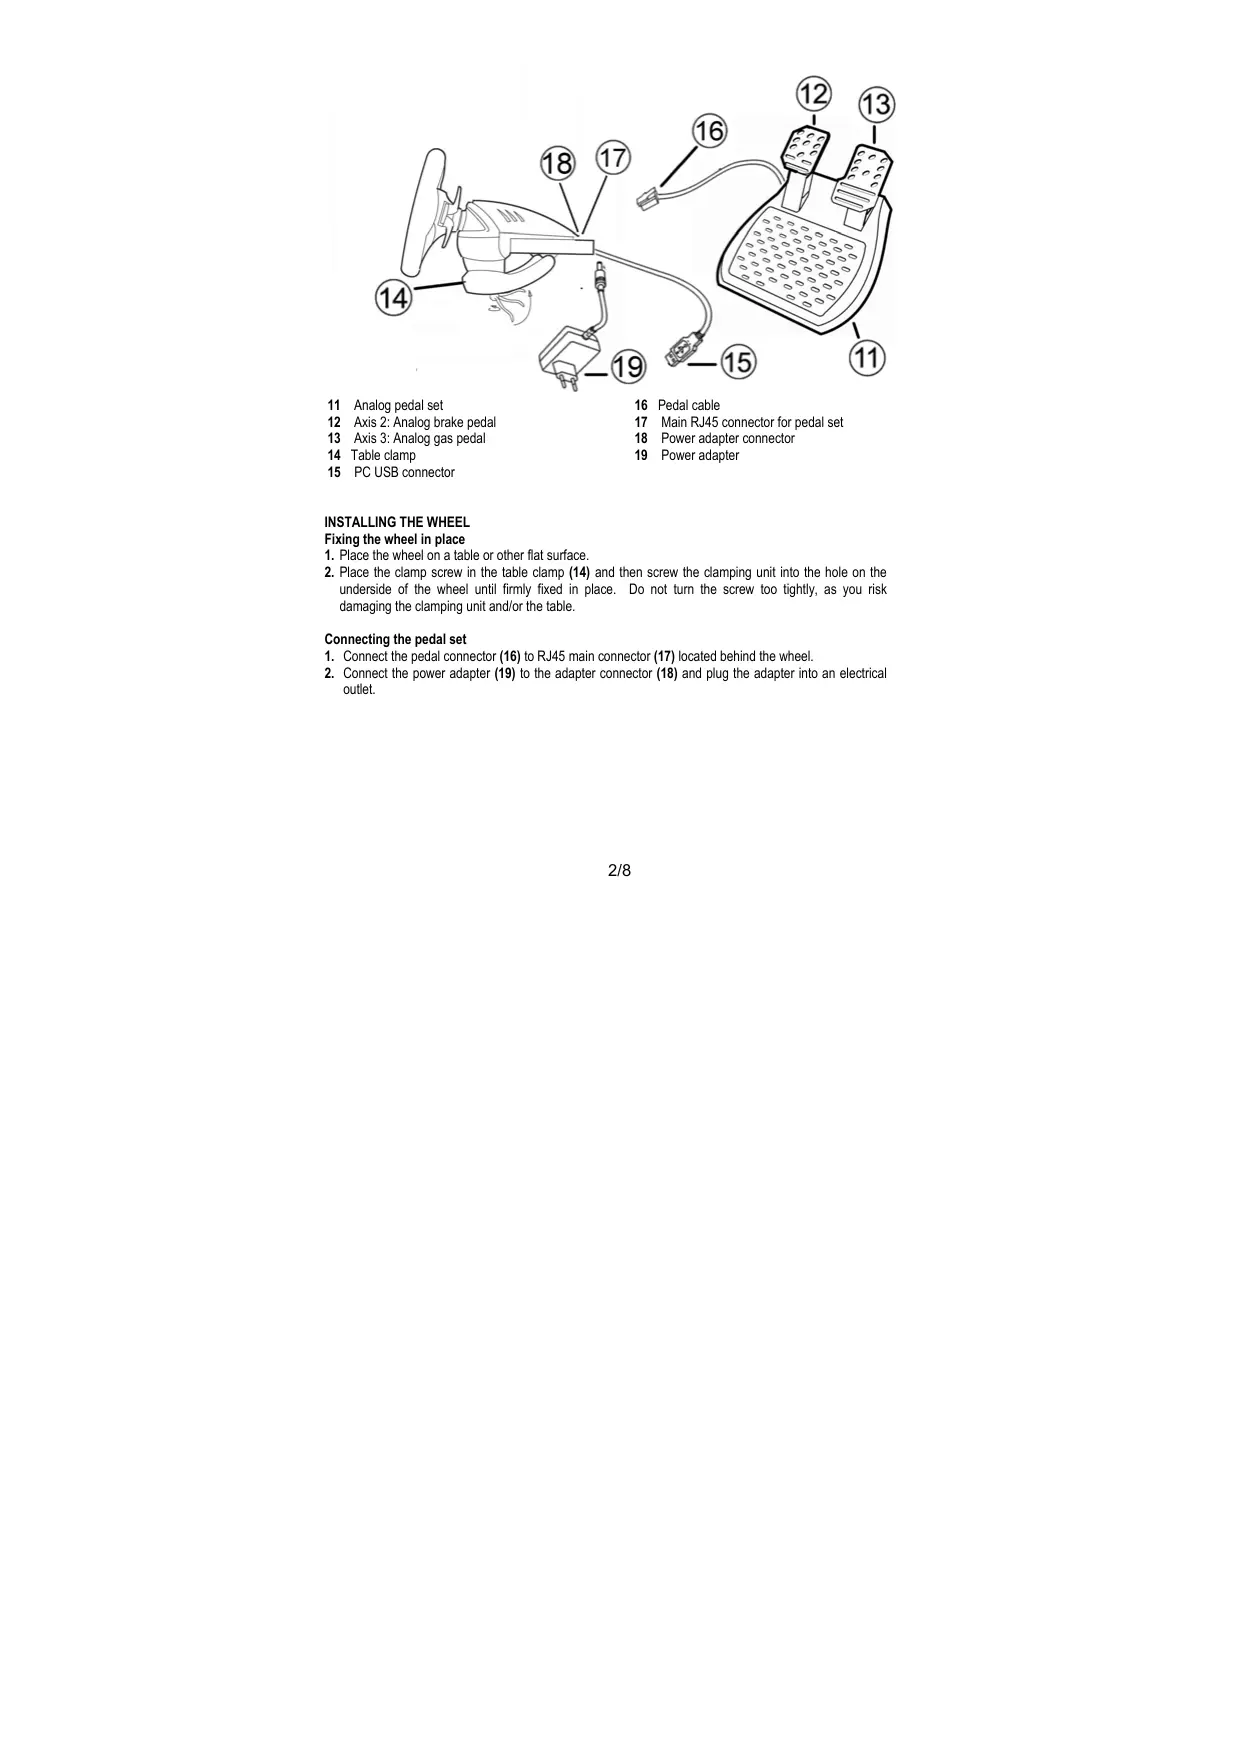
11 Analog pedal set
12 Axis 2: Analog brake pedal
13 Axis 3: Analog gas pedal
14 Table clamp
15 PC USB connector
16 Pedal cable
17 Main RJ45 connector for pedal set
18 Power adapter connector
19 Power adapter
INSTALLING THE WHEEL
Fixing the wheel in place
- Place the wheel on a table or other flat surface.
- Place the clamp screw in the table clamp (14) and then screw the clamping unit into the hole on the underside of the wheel until firmly fixed in place. Do not turn the screw too tightly, as you risk damaging the clamping unit and/or the table.
Connecting the pedal set
- Connect the pedal connector (16) to RJ45 main connector (17) located behind the wheel.
- Connect the power adapter (19) to the adapter connector (18) and plug the adapter into an electrical outlet.
INSTALLATION FOR PC
System requirements: PC (Windows 98 SE, Me, 2000, XP) equipped with USB port.
The CD-ROM included with this product allows you to install the Force Feedback drivers.
- Insert the installation CD-ROM into your CD-ROM drive. Follow the on-screen instructions to install the Force Feedback drivers. Once the installation is complete, click Finish and restart your computer.
- Once your computer has restarted, connect the USB connector (15) to one of your computer's USB ports. Windows 98/Me/2000/XP will automatically detect the new device. (If you are connecting a USB device for the first time, Windows may ask you to insert the Windows CD-ROM during the installation procedure in order to install the required system files.)
- Driver installation:
Windows 98: the Add New Hardware Wizard will search for the appropriate drivers. Click Next. Follow the on-screen instructions to complete the installation.
Windows Me/2000/XP: the drivers are installed automatically.
- Select Start/All Programs/Thrustmaster/Force Feedback driver/Control Panel. The Game Controllers dialog box displays the wheel's name with OK status.
-
In the Control Panel, click Properties to configure your wheel:
-
Page 1 = Test input: to test and visualize the buttons, D-pad and 5 axes (wheel, brake and gas pedals, left and right progressive levers).
- Page 2 = Test forces: to test 8 Force effects and configure the Force Feedback and recentering settings (Auto-center).
WHEEL CALIBRATION
The wheel auto-calibrates independently once the USB connector has been connected (this involves the wheel making movements on its own). The pedals auto-calibrate once they have been pressed a few times.
AXIS SELECTION (2, 3 or 5 AXES)
- Axis selection via "Software" (page 1 of the "Control Panel")
Click the mode you wish to use and then click OK.
- Axis selection via "Hardware"
Press the 2 pedals and the Force button simultaneously (12) + (13) + (6) .
Axis selection via hardware must always be carried out outside of the Control Panel!
This allows you to select your mode directly in your game's "Controls" option.
2AXISmode(LEDisorange)
In this mode, your wheel's gas and brake controls function in "combined" mode (the pedals are therefore combined with the 2 analog levers):
- Axis 1 = X axis = Steering wheel
- Axis 2 = Y axis = 2 pedals + 2 analog levers
3 AXIS mode (LED is red)
In this mode, your wheel's gas and brake controls function in "separate" mode (the pedals are also combined with the 2 analog levers):
- Axis 1 = X axis = Steering wheel
- Axis 2 = Y axis = Left pedal + left analog lever
- Axis 3 = RZ axis = Right pedal + right analog lever
5AXISmode(LEDisgreen)
In this mode, your wheel's gas and brake controls function in "separate" mode, as do the 2 analog levers, which are independent:
- Axis 1 = X axis = Steering wheel
- Axis 2 = Y axis = Left pedal
- Axis 3 = RZ axis = Right pedal
- Axis 4 = Slider 0 axis = Left analog lever
- Axis 5 = Slider 1 axis = Right analog lever
The exclusive 5 axis mode allows you to enjoy all of the advanced options offered in most simulation-type racing games. For the first time ever, you can now manage these new functions "progressively" (as opposed to digitally), providing full immersion for fans of car racing simulations!
Various examples:
- Assignment of the left analog lever to the "clutch" function (in "manual gearshift with clutch" mode)
- Assignment of the right analog lever to the "handbrake" function
- Assignment of the left analog lever to the "left interior view" function
- Assignment of the right analog lever to the "right interior view" function
Note:
- When you select 2 axis mode, the LED is Orange.
- When you select 3 axis mode, the LED is Red
- When you select 5 axis mode, the LED is Green
If your game does not accept all 5 axes, switch your wheel to "3 axis" mode (or "2 axis" mode, if the problem persists).
RECENTERING FUNCTION SETTING
Wheel recentering (Auto-center) is enabled by default.
Most recent games now offer their own recentering mode.
You are strongly advised to disable wheel recentering (in most cases), to allow the game to handle it. The
Force Feedback will then be of greater quality.
When enabled, recentering mode is especially useful in games that do not feature Force Feedback or which use weak recentering.
-
Setting via "Software" (page 2 of the "Control Panel")
-
to disable recentering, click "By the game".
- to enable recentering, click "By the wheel".
In this mode, you can adjust recentering intensity from 0 to 100% .
- Setting via "Hardware"
To enable or disable recentering directly in your game, simply press your wheel's Force button (6). When enabled, the intensity of recentering corresponds to the percentage selected previously in the "Via the wheel" setting of the "Control Panel".
Note :
- When Auto-center is enabled, the LED flashes.
- When Auto-center is disabled, the LED does not flash
FORCE FEEDBACK EFFECTS SETTING (page 2 of the "Control Panel")
3 settings can be set from 0 to 150%
- Master Forces
- Static Forces
- Dynamic Forces
PROGRAMMING THE "GEARBOX" (page 1 of the "Control Panel")
This function allows you to "separate" (default mode) or "combine" the digital gearshift levers (1) and the digital gearshift knob (2).
Note :
Always remember to completely close the "Control Panel" before staring your game!
You are now ready to play!
CONNECTOR FOR A SECOND PEDAL SET
You can connect a second pedal set (7) (in addition to the main pedals) at the back of the digital gearshift knob. Once connected, the second pedal set replaces the 2 analog levers. You can then use the gas, brake, clutch and handbrake functions directly via the 4 pedals for optimal realism.
The second pedal set is sold separately with an exclusive attachment system.
TROUBLESHOOTING
- My wheel doesn't work correctly or appears to be incorrectly calibrated. Switch off your PC or your console, then disconnect your wheel, reconnect all the cables (with power adapter and pedals), switch back on and restart the game.
- My wheel moves by itself during the game. This is normal and is the recentering function featured in some games. To stop these movements, just place your hands on the wheel or reduce the Force Feedback intensity.
- My wheel stays turned to one side (left or right) after auto-calibration. This is normal in some games. The wheel will recenter itself once you have identified it as a wheel in the game's setup options.
- On PC, my wheel is detected by my computer but doesn't work in the game. Access your game's options to configure your wheel. Please refer to your game's manual for further information.
- My game doesn't accept 5 axis mode.
Select 3 axis mode (or 2 axis mode, if the problem persists), then configure your wheel again in your game's options interface.
- My pedals or levers are not functioning properly.
Your game does not accept the axis mode you have selected. Exit the game and select a new axis mode.
Relaunch the game and then configure your wheel again in your game's options interface.
SAFETY RECOMMENDATIONS AND INFORMATION
- When connecting the wheel and during auto-calibration: to prevent any incorrect calibration, never turn the wheel, press the pedals or buttons.
- When not in use for extended periods and to avoid any unwanted power consumption or deterioration, disconnect the wheel's power adapter. Reconnect it before going back to the game.
- Your wheel features Force Feedback: NEVER leave the wheel within the reach of young children, especially during the auto-calibration phases.
TECHNICAL SUPPORT
If you encounter a problem with your product, please go to http://ts.thrustmaster.com and click Technical Support. From there you will be able to access various utilities (Frequently Asked Questions (FAQ), the latest versions of drivers and software) that may help to resolve your problem. If the problem persists, you can contact the Thrustmaster products technical support service ("Technical Support"):
By email:
In order to take advantage of technical support by email, you must first register online. The information you provide will help the agents to resolve your problem more quickly. Click Registration on the left-hand side of the Technical Support page and follow the on-screen instructions. If you have already registered, fill in theUsername and Password fields and then click Login.
By telephone:
| United Kingdom | 020 7216 0047 | price of a national phone call, Monday to Friday, from 12PM to 10PM |
| United States / Canada | 514-279-9911 | price of a long distance phone call, Monday to Friday, from 7AM to 5PM (Eastern time) |
| Australia | 1902 262 514 | $1.98/min, Monday to Friday from 9AM to 6PM |
| Denmark | 82 33 28 58 | price of a national phone call, Monday to Friday from 1PM to 10PM |
| Finland | 09 81 71 01 54 | price of a national phone call, Monday to Friday from 2PM to 11PM |
| Norway | 23 50 01 16 | price of a national phone call, Monday to Friday from 1PM to 10PM |
| Sweden | 08-51992032 | price of a national phone call, Monday to Friday from 1PM to 11PM |
WARRANTY INFORMATION
Worldwide, Guillemot Corporation S.A. ("Guillemot") warrants to the consumer that this Thrustmaster product will be free from material defects and manufacturing flaws for a period of two (2) years from the original date of purchase. Should the product appear to be defective during the warranty period, immediately contact Technical Support, who will indicate the procedure to follow. If the defect is confirmed, the product must be returned to its place of purchase (or any other location indicated by Technical Support).
Within the context of this warranty, the consumer's defective product will, at Technical Support's option, be either repaired or replaced. Where authorized by applicable law, the full liability of Guillemot and its subsidiaries (including for indirect damages) is limited to the repair or replacement of the Thrustmaster product. The consumer's legal rights with respect to legislation applicable to the sale of consumer goods are not affected by this warranty.
This warranty shall not apply: (1) if the product has been modified, opened, altered, or has suffered damage as a result of inappropriate or abusive use, negligence, an accident, normal wear, or any other cause not related to a material defect or manufacturing flaw; (2) in the event of failure to comply with the instructions provided by Technical Support; (3) to software not published by Guillemot, said software being subject to a specific warranty provided by its publisher.
Additional warranty provisions
In the United States of America and in Canada, this warranty is limited to the product's internal mechanism and external housing. Any applicable implied warranties, including warranties of merchantability and fitness for a particular purpose, are hereby limited to two (2) years from the date of purchase and are subject to the conditions set forth in this limited warranty. In no event shall Guillemot Corporation S.A. or its affiliates be liable for consequential or incidental damage resulting from the breach of any express or implied warranties. Some States/Provinces do not allow limitation on how long an implied warranty lasts or exclusion or limitation of incidental/consequential damages, so the above limitation may not apply to you. This warranty gives you specific legal rights, and you may also have other legal rights which vary from State to State or Province to Province.
COPYRIGHT
© 2005 Guillemot Corporation S.A. All rights reserved. Thrustmaster® is a registered trademark of Guillemot Corporation S.A. Microsoft® Windows® is a registered trademark of Microsoft Corporation in the United States and/or other countries. All other trademarks and brand names are hereby acknowledged and are property of their respective owners. Illustrations not binding. Contents, designs and specifications are subject to change without notice and may vary from one country to another.
ENVIRONMENTAL PROTECTION RECOMMENDATION
At the end of its working life, this product should not be disposed of with standard household waste, but rather dropped off

at a collection point for the disposal of Waste Electrical and Electronic Equipment (WEEE) for recycling.
This is confirmed by the symbol found on the product, user manual or packaging.
Depending on their characteristics, the materials may be recycled. Through recycling and other forms of processing Waste Electrical and Electronic Equipment, you can make a significant contribution towards helping to protect the environment.
Please contact your local authorities for information on the collection point nearest you.
FAQs, tips and drivers available at www.thrustmaster.com

- Master Forces
Static Forces - Dynamic Forces
PROGRAMAR A "CAIXA DE VELOCIDADES" (pagina 1 do "Control Panel")
Esta funcao permite "separar" (modo pre-define) ou "combinar" as alavancas digitais de pudanca de velocidades (1) e a alavanca digital de pudanca de velocidades (2).
Nota:
Second pedal set for use with the Thrustmaster RGT Force Feedback Pro Racing Wheel
Connecting the second pedal set:
- Disconnect the wheel's USB plug from your computer's USB port.
- Connect the pedal set to the connector located at the back of the wheel (see point 7 in the RGT Force Feedback Pro manual diagram).
- Reconnect the wheel's USB plug to your computer's USB port.
- Switch the wheel to 5 axis mode in the Control Panel.
Note: Once the second pedal set has been connected, the levers located behind the wheel are disabled.
Pedal configuration example ("Manual transmission with analog clutch" mode):(Drawing)
Pedal set on connector 2: A = Handbrake/ B = Clutch
Pedal set on connector 1: C = Brake / D = Gas
Note: Don't forget to release the gas pedal when shifting gears.
Français
Pedalset an Anschluss 1: C = Bremse / D = Gas
Warranty Information
Worldwide, Guillemot Corporation S.A. ("Guillemot") warrants to the consumer that this Thrustmaster product will be free from material defects and manufacturing flaws for a period of two (2) years from the original date of purchase. Should the product appear to be defective during the warranty period, immediately contact Technical Support, who will indicate the procedure to follow. If the defect is confirmed, the product must be returned to its place of purchase (or any other location indicated by Technical Support).
warranty.
This warranty shall not apply: (1) if the product has been modified, opened, altered, or has suffered damage as a result of inappropriate or abusive use, negligence, an accident, normal wear, or any other cause not related to a material defect or manufacturing flaw; (2) in the event of failure to comply with the instructions provided by Technical Support; (3) to software not published by Guillemot, said software being subject to a specific warranty provided by its publisher.
Additional warranty provisions
In the United States of America and in Canada, this warranty is limited to the product's internal mechanism and external housing. Any applicable implied warranties, including warranties of merchantability and fitness for a particular purpose, are hereby limited to two (2) years from the date of purchase and are subject to the conditions set forth in this limited warranty. In no event shall Guillemot Corporation S.A. or its affiliates be liable for consequential or incidental damage resulting from the breach of any express or implied warranties. Some States/Provinces do not allow limitation on how long an implied warranty lasts or exclusion or limitation of incidental/consequential damages, so the above limitation may not apply to you. This warranty gives you specific legal rights, and you may also have other legal rights which vary from State to State or Province to Province.
COPYRIGHT
© 2005 Guillemot Corporation S.A. All rights reserved. Thrustmaster® is a registered trademark of Guillemot Corporation S.A. Microsoft® Windows® is a registered trademark of Microsoft Corporation in the United States and/or other countries. All other trademarks and brand names are hereby acknowledged and are property of their respective owners. Illustrations not binding. Contents, designs and specifications are subject to change without notice and may vary from one country to another.
ENVIRONMENTAL PROTECTION RECOMMENDATION
At the end of its working life, this product should not be disposed of with standard household waste, but rather dropped off at a collection point for the disposal of Waste Electrical and Electronic Equipment (WEEE) for recycling.
This is confirmed by the symbol found on the product, user manual or packaging.
Depending on their characteristics, the materials may be recycled. Through recycling and other forms of processing Waste Electrical and Electronic Equipment, you can make a significant contribution towards helping to protect the environment.
Please contact your local authorities for information on the collection point nearest you.