
Supremia Condensor AS7 - Deep fryer MOULINEX - Free user manual and instructions
Find the device manual for free Supremia Condensor AS7 MOULINEX in PDF.


| Product type | Electric deep fryer |
| Brand | Moulinex |
| Model | Supremia Condensor AS7 |
| Oil capacity | 2 liters |
| Potato capacity | 1.5 kg |
| Dimensions (L x W x H) | 30 x 40 x 30 cm |
| Weight | 4 kg |
| Power supply | 220-240 V, 50 Hz |
| Power | 2000 W |
| Condensation system | Yes, to reduce odors |
| Adjustable thermostat | Yes, from 150°C to 190°C |
| Heating indicator light | Yes |
| Removable basket | Yes, with insulated handle |
| Non-stick tank | Yes |
| Dishwasher safe | Basket and tank compatible |
| Automatic shut-off | Yes |
| Cool-touch handles | Yes |
| Overheat protection | Yes |
| Odor filter | Yes, replaceable |
| Spare parts available | Basket, tank, lid, filter |
| Repairability | Repairability score: 8.4/10 |
| Warranty | 2 years |
Frequently Asked Questions - Supremia Condensor AS7 MOULINEX
User questions about Supremia Condensor AS7 MOULINEX
0 question about this device. Answer the ones you know or ask your own.
Ask a new question about this device
Download the instructions for your Deep fryer in PDF format for free! Find your manual Supremia Condensor AS7 - MOULINEX and take your electronic device back in hand. On this page are published all the documents necessary for the use of your device. Supremia Condensor AS7 by MOULINEX.
USER MANUAL Supremia Condensor AS7 MOULINEX




- Installation, handling
Your fryer is equipped with an exclusive "Condensor" system.
Thanks to this new system, steam is trapped and condensed into water in the "Condensor" drawer.
In this drawer, two cartridges, frozen prior to use, reduce the escape of steam and smells while the fryer is in use.
Important Notes
1) When the fryer is in use, there will be a slight emission of steam around the handle and at the back of the appliance; this is completely normal. 2) It is vital that the cartridges are frozen for a minimum of 24 hours before use (in a freezer marked ***). Alternatively, if the fryer is used with defrosted cartridges, the fryer lid must be left open during use. 3) The Condensor drawer is equipped with a safety system. To open, pull hard and to close, give a sharp push. 4) The cartridges may lose their shape with use. This is normal. 5) The maximum capacity of your fryer is: 1kg frozen chips 800g fresh chips
Our tip for best results
Quantity
Frozen chips 900g
Fresh chips 800g
6) In order to get the best from your appliance, please read the instructions carefully before using the fryer for the first time.
Thank you for choosing an appliance from the Moulinex range.
Contents
Description page 14
Safety recommendations page 14
Before using your appliance
for the first time. page 15
Using the appliance page 15
- The cartridges page 15
- Introducing the oil or fat page 15
- Frying page 15
- Before putting the fryer away page 16
Practical Hints page 16
Cooking Tables page 17
Cleaning page 17
Maintenance page 18
What to do if your appliance does
not work page 18
Description
The circled numbers refer to the numbers on the diagram, and the letters refer to the different parts.
A One-touch lid release
A1 Window (according to model)
B Oil Filter Basket
B1 Paper filter (according to model)
B2 Paper filter holder (according to model)
C Basket Handle
C1 Handle release button
D Removable non-stick Fryer Body, or Fixed Fryer Body (According to Model)
E Lid release button
F Thermostat indicator light
G Temperature control dial with stop function at «0»
H Electronic timer (according to model)
I Carrying handles
J "Condensor" drawer
K Cartridges
Security recommendations
- Do not leave the fryer unattended when in use, do not let the mains cable hang loose, and always keep children at a safe distance.
- This appliance is for domestic use only.
1. Connection
- Check that the voltage of the appliance matches that of your electric system and that your electric meter can withstand a minimum of 10 amps.
- The appliance must be connected to an earthed socket.
It is essential for your safety that the earthed system corresponds to the electric standards in force in your country.
Any errors in connecting the appliance invalidates the guarantee.
Wiring instructions for U.K and Ireland only:
APPLIANCES WITH FITTED PLUG
Important: For your convenience this appliance is supplied complete with a plug incorporating a 13 amp fuse.
In the event of replacing a fuse in the plug supplied, a 13 amp fuse approved by ASTA to BS1362 must be used.
If the socket outlets are not of the 13A BS 1363 type, and therefore do not accept the plug connected to this appliance, cut off the plug.
When cut off, this plug is a shock hazard if inserted into a socket outlet and must therefore be disposed of safely.
If the fuse cover is detachable, never use the plug with the cover omitted. Replacement covers can be obtained from your service agent.
Fit the appropriate plug according to the instructions in paragraph "Fitting a plug". With alternative plugs a 15 amp fuse must be fitted either in the plug or adaptor or at the main fuse box.
APPLIANCES WITHOUT FITTED PLUG FITTING A PLUG - IMPORTANT
The wires in the mains lead are coloured in accordance with the following code:
GREEN & YELLOW : EARTH
BLUE : NEUTRAL
BROWN : LIVE
As the colours in the mains lead of this appliance may not correspond with the coloured markings identifying the terminals in your plug, proceed as follows:
The wire which is coloured GREEN & YELLOW must be connected to the terminal in the plug which is marked with the letter 'E' or by the earth symbol ⊥ or coloured green or green and yellow. The wire which is coloured BLUE must be connected to the terminal which is marked with the letter 'N' or coloured black. The wire which is coloured
BROWN must be connected to the terminal which is marked with the letter 'L' or coloured red.
This appliance is manufactured to conform to the Low Voltage Electrical Equipment (Safety) Regulations 1989 and is designed to comply with BS 3456. It complies with the requirements of the EEC Directive (89/336/EEC).
2. Installation, handling
- Set up your fryer on a stable work surface away from any heating source and where it cannot be splashed by water.
- Never use the fryer without oil in the fryer body. Observe the minimum / maximum levels indicated on the inside of the fryer body.
- Use the side transportation handles when moving the fryer, never use the basket handle to do this.
- Always wait until the fat is cool before taking out the removable fryer body (according to model) or emptying the fixed fryer body.
- Never move the fryer whilst in use or when the fat is still hot. Hot oil can seriously burn.
- The oil and fat are flammable substances. If the fat catches fire, disconnect the appliance, close the lid if it is open, or cover the appliance with a plate or dish to smother the flames. Never use water.
3. Functioning
- The fryer is protected by a thermostat and a thermal safety device which, in case of accidental overheating, automatically cuts the electric supply.
- A safety system will prevent use of the fryer: . if the removable fryer body (according to model) is not in place . if the "Condensor" drawer (J) is positioned incorrectly . if the cartridges (K) are not in the "Condensor" drawer
For cooking purposes, the cartridges must be in the drawer.
- After each use, you must empty the "Condensor" drawer of any condensation.
Before using the fryer for the first time
- Take the appliance out of the packaging.
- Open the lid by pressing the lid release button.
- Take the basket out by lifting the handle ① - Take out the paper filter support (B2) by removing it from the basket (according to model) ② - Unhook the basket from the handle by pushing the metal tongue towards the basket, then pull the handle towards the bottom.
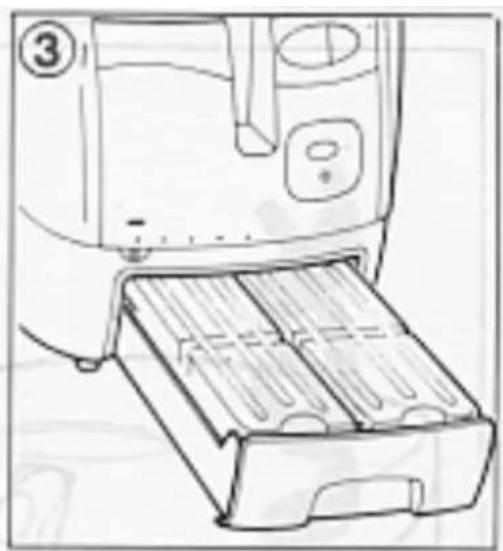
- Wash the basket and the paper filter support (according to model) with hot water and washing-up liquid, rinse and carefully wipe dry. . Models with fixed fryer body: wash the interior of the fryer body with a damp sponge, and wipe dry. . Models with removable fryer body: remove the fryer body by lifting it vertically and wash it. Rinse, wipe and replace. ③ - Open the "Condensor" drawer and remove the two cartridges. Place them in the freezer ( *** ) for at least 24 hours (or in the ice compartment of your refrigerator for a minimum of 48 hours.)
Using the Fryer
1. The cartridges
In cases where the cartridges have been in the freezer for a long period of time, make sure that the opening of the cartridges are not blocked with frost.
If you usually use the fryer several times consecutively, we recommend you obtain a set of spare cartridges (ref. BV7) from your retailer or from a Moulinex approved centre (see list in the "Moulinex Service" booklet)
2. Introducing the oil or fat
. If you are using oil, pour the oil into the fryer body up to the maximum level. . If you are using blocks of fat (4x500g blocks), remove the basket, cut the blocks into small pieces and place them directly into the fryer body without the basket.
Never melt blocks of fat in the basket.
- Close the lid by pressing until it clicks
- Place the two frozen cartridges in the "Condensor" drawer.
- Melt the fat by setting the temperature control dial (G) to 160°C
④ - When the fat has melted, replace the basket / handle in the fryer body by pressing the handle release button (C1).
You may now start to use the fryer.
3. Using the fryer
- Place the two frozen cartridges in the "Condensor" drawer.
⑤- Adjust the temperature control dial (G) to the desired temperature (see cooking table). The thermostat indicator light (F) will come on. When the oil or fat has reached the required temperature the indicator light will go out.
- For the cartridges to remain effective, carry out frying straight away.
- Raise the basket using the handle
- Open the lid and add food
. If your fryer is equipped with paper filter and support, use them when coating food in breadcrumbs (they prevent the breadcrumbs from falling into the oil. Before adding the food, proceed as follows:
①. Remove the basket, leave it to cool, remove
⑥ the support (B2) and attach the paper filter (B1), then replace the support and filter-paper
⑦ into the basket.
. Replace the handle/basket into position.
- Close the lid
④- Lower the basket slowly into the oil or fat by pressing the handle release button (C1). If your fryer is equipped with a timer:
- Press the button, "00" will light up on the display
- Continue to press until desired time is displayed (see cooking tables)
- After releasing the button, the timer will begin to count down (display will flash).
- In case of error, set the timer back to "00" by keeping the button pressed in, and start again. When the cooking time has elapsed, the sound signal will be heard. To stop the signal, press the button.
Please Note: The timer's sound signal indicates the end of cooking time, it will not stop the frying.
The timer display will stop automatically.
- When cooking is completed, lift the basket and leave to drain.
⑤ Do not forget to switch fryer off by turning the temperature control dial (G) back to '0'.
- Open the lid and serve.
Notes:
- If you use filter paper (according to model), always replace after each use. You can obtain new filters (ref. BV9) from your retailer or from a Moulinex approved service centre (see list in the Moulinex Service booklet).
- If you have to use the fryer several times in succession, remove the defrosted cartridges, empty the condensation water, replace with new, frozen cartridges and wait each time until the thermostat indicator light (F) has gone out before introducing more food to the oil or fat.
- If you do not have any frozen cartridges, the "Condensor" system will not be activated.
However, in this particular instance, it is still possible to fry food. But, it is therefore essential that the cartridges are left in the drawer and the drawer is left open in order for the steam to be released.
4. Before putting your fryer away
- Pull out the "Condensor" drawer and remove the two cartridges.
- Empty the contents of the drawer into the sink.
- Wash the drawer and the cartridges with hot water and washing-up liquid.
- Dry the drawer with a cloth.
- Leave the cartridges to drain in an upright position (open end at the bottom) to get rid of cleaning water. Dry them carefully. The cartridges must be at room temperature before being stored in the freezer.
- Place the cartridges in the freezer in a horizontal position.
- To avoid the possibility of nasty smells in your freezer, we recommend that you put your cartridges in a sealed freezer bag.
Practical Hints
1. Oil or Fat
- Never use the fryer without oil or fat.
- Always use oil or fat able to withstand high temperatures.
- Avoid mixing oil or fat of different qualities.
- Change the oil or fat when it becomes brown (every 10 to 20 fries according to cooking types).
Important: Before each use, pierce holes in the solid fat with a non-metallic spatula, as far as the bottom of the fryer body, so that any water trapped under the fat can escape as steam.
2. Preparing food to be fried
- Whatever the recipe, food must always be completely dry: this will avoid overflowing and prolong the use of the oil or fat.
- Where potatoes are being used (chips, crisps, French fries), after cutting them, wash them in cold water to get rid of the starch. They will no longer stick together. Dry them carefully.
- Where frozen food is being used, before cooking, remove any remaining particles of ice by gently shaking the basket over the sink.
3. Cooking
- Avoid overloading the basket, this will cause the oil temperature to be lowered and leave the food too greasy.
- Your fryer has a maximum capacity of:
. 800g fresh chips
. 1kg frozen chips
For best results with frozen chips, we recommend no more than 900g be used.
- To make the most of the Condensor system and prolong the use of the oil, do not heat the fat unnecessarily.
- Turn the temperature control dial to its lowest setting between 2 frying batches.
- Avoid leaving food to drain for too long in the basket, the steam will cause the food to become soft and lose its crunchiness.
Cooking Tables
The cooking times given are for information only. You should adjust them according to taste.
Temperature and Cooking Times
| Maximum Temperature | Type of food Time (min) | |
| 170°C Onions 4-6 | ||
| Mushrooms 4-6 | ||
| Vegetable fritters 4-6 | ||
| Cod slices 5-6 | ||
| Smelt 6-8 | ||
| Prawns 6-8 | ||
| Fish fritters 6-8 | ||
| 180°C Breaded pork chops 7-10 | ||
| Escalopes of Veal 7-10 | ||
| Offal or Meat fritters 7-10 | ||
| Fish filets | ||
| Sardines | ||
| Apple fritter | ||
| 190°C Chips 800g | ||
| (1st fry) | ||
| (2nd fry) | ||
| Crisps | ||
| Chicken pieces | ||
For frozen food, set the temperature control dial (G) to ***. You will also need to adjust cooking times according to quantities and taste.
Weight and Cooking Time Frozen Food
| Type of food Maximum Time | ||
| weight (g) | (min.) | |
| Chips (ready-cooked) | 500 | 6-8 |
| “ “ “ “ | 900 | 11-13 |
| Potato Noisettes | 800 | 6-8 |
| Crispy Fried Potatoes | 300 | 6-8 |
| Breaded Cod | 400 | 6-8 |
| Breaded Hake | 400 | 6-8 |
| Fried Smelt | 400 | 8-10 |
| Fish Fritters | 350 | 6-8 |
| Prawn Fritters | 400 | 4-5 |
| Squid Fritters | 400 | 6-8 |
| Apple Fritters | 300 | 4-5 |
| Breaded Chicken | ||
| Escalopes | 400 | 8-10 |
| Breaded Pork Rissoles | 400 | 6-8 |
| Breaded Veal Rissoles | 400 | 6-8 |
| Meatballs | 400 | 6-8 |
Cleaning
- Unplug your fryer and leave it to cool.
- Clean the "Condensor" drawer and the cartridges (see paragraph 4) before putting away your fryer.
- Clean the outside of the fryer with a damp cloth. Never use a scourer or alcohol.
- Never place the fryer in water and never wash under running water.
- To clean the inside of the lid, use a damp sponge with washing-up liquid, rinse and wipe.
- To clean the basket, separate it from the handle. If you have used the filter paper, remove it. Clean the basket and the filter paper support (according to model) in hot water and washing-up liquid, rinse and wipe.
1. Changing the Fat
If you use vegetable fat:
- Model with removable fryer body: leave the fat to cool and solidify. Once it is hard, switch on the fryer again for a few minutes to remove the fat from the inner walls of the fryer body, then remove it using a fork.
- Model with fixed fryer body: leave the fat to cool for approximately 2 hours. Then transfer it to a metal or ceramic container.
Notes: Never dispose of vegetable fat in the sink. Once it is solid, put it into a dustbin-liner.
If you use oil:
- Model with fixed or removable fryer body: leave the oil to cool, then transfer to a metal or ceramic container.
2. Storing the Fat
- Fat should be kept either in the fryer or in a tightly shut container, away from light, in fresh, dry conditions.
3. Cleaning the Fryer Body after Fat is Removed
- Never use a scourer, scouring powder or any metallic object. You would risk damaging the coating of the fryer body.
- Models with removable fryer body: the fryer body may be cleaned in a dishwasher.
- Models with fixed fryer body: wipe the inside of the fryer body with a paper kitchen towel. Then clean the inside with water and washing-up liquid. Rinse and carefully wipe.
Note: streaks or brown marks may appear naturally on the inside of the fryer body as a result of heavy use.
Maintenance
Different parts necessary for the maintenance of your fryer may be obtained from a Moulinex approved maintenance centre (see list in the Moulinex Service booklet).
1. Replacing the seal of the inner cover
⑨- Open the lid
- Remove the lid by gently pushing backwards and pulling upwards.
- Turn the lid over, take out the fastening screws, and remove the aluminium inner cover, as well as the window.
- Clean the lid and the window with a damp sponge and washing-up liquid. Rinse and wipe.
- Replace the defective seals and put back the elements together.
⑩2. Replacing the seal of the fryer body
- Remove the defective seal from its support and replace with a new seal
3. Replacing the timer battery
Insert a knife edge into the slot situated on top of the timer display panel, and lever it forwards. Remove the screw situated at the back of the timer and replace the battery (ref. AG10) taking care to place the + pointing outward (the side of the screw). Reassemble. - The old battery should be given to any recycling service in operation in your country.
4. Replacing the mains lead
If the mains lead is damaged, requiring specialist tools, it must be replaced at a Moulinex approved maintenance centre (see list in the Moulinex Service booklet). Never use the fryer if the mains lead is damaged.
What to do if your appliance does not work
- Firstly check the connection and the mains lead
- Next, check the following table to find out a possible cause.
Practical Hints
| Problems Causes Solutions | ||
| Strong smell You | may have Clean the forgotten to clean the cartridges draw and the «Condensor” drawer | cartridges and water |
| Fat or oil has Rep gone bad | lace oil or fat | |
| The correct fat / U oil is not quality oil being used Do not | se only high or fat. mix oils or fats of different qualities. | |
| Steam escaping from lid properly | Lid is not Close lid shut correctly | |
| The cartridges have not been frozen | Put cartridges in freezer | |
| Seals are faulty | Wipe or replace seals | |
| Steam escaping from back of lid | Cartridges have thawed or not ge properly frozen | Freeze cartridge for at least 24 hours (***) |
| Recommended amounts or coo-king time have been exceeded | Do not fry more than recommended amount | |
| Too many consecutive frying cartr programmes | Second set of ridges required | |
| Leakage of blue liquid | Cartridges no longer suitable for use | Replace with new set of cartridges |
| Oil overflowing | Fryer is filled above maximum level | Check oil level inside fryer body |
| Wet food placed in hot oil | Dry food | |
| Stated quantities exceeded | Do not fry food above weight indicated | |
| Food not browning | Cooking temper- rature too low the | Adjust the dial to correct cooking temperature |
| Basket over- loaded | Do not fry food above stated quantities and weight | |
| Food not Oil not hot browning enough | hot Faulty thermos tat. Consult | Moulinex approved centre. |
| Chips, crisps Food sticking before placed thoroughly and together into hot oil dry carefully | not washed Wash potatoes | potatoes |
| Oil body will not heat been used next | Appliance has Consult new approved without fat in centre (fuse fryer body. must be changed) | Mouli- |
| Appliance not ‘Condensor’ working | Check drawer not in correct position. No cartridges in In insert cartridges drawer | positioning of drawer |
| Temperature Choose cooking control dial temperature not at correct setting | Insert cartridges | |
| Removable body fryer not in correct position | Check positioning of body | |
Accessories
- cartridges: ref. BV7
- filter paper (according to model) : ref. BV9
G Thermostat knob (0 = off)
H Electronic timer (certain models)
I Carrying handle
J Capacitor box
K Capacitor cassettes



- YOUR FRYER IS EQUIPPED WITH AN EXCLUSIVE "CONDENSOR" SYSTEM
- IMPORTANT NOTES
- OUR TIP FOR BEST RESULTS
- CONTENTS
- DESCRIPTION
- SECURITY RECOMMENDATIONS
- CONNECTION
- APPLIANCES WITH FITTED PLUG
- APPLIANCES WITHOUT FITTED PLUG FITTING A PLUG - IMPORTANT
- INSTALLATION, HANDLING
- FUNCTIONING
- FOR COOKING PURPOSES, THE CARTRIDGES MUST BE IN THE DRAWER
- BEFORE USING THE FRYER FOR THE FIRST TIME
- USING THE FRYER
- THE CARTRIDGES
- INTRODUCING THE OIL OR FAT
- NEVER MELT BLOCKS OF FAT IN THE BASKET
- NOTES
- BEFORE PUTTING YOUR FRYER AWAY
- PRACTICAL HINTS
- OIL OR FAT
- PREPARING FOOD TO BE FRIED
- COOKING
- COOKING TABLES
- CLEANING
- CHANGING THE FAT
- IF YOU USE VEGETABLE FAT
- IF YOU USE OIL
- STORING THE FAT
- CLEANING THE FRYER BODY AFTER FAT IS REMOVED
- MAINTENANCE
- REPLACING THE SEAL OF THE INNER COVER
- ⑩2. REPLACING THE SEAL OF THE FRYER BODY
- REPLACING THE TIMER BATTERY
- REPLACING THE MAINS LEAD
- WHAT TO DO IF YOUR APPLIANCE DOES NOT WORK
- ACCESSORIES
Brand : MOULINEX
Model : Supremia Condensor AS7
Category : Deep fryer