
SKM7489 - Baby monitor PHILIPS - Free user manual and instructions
Find the device manual for free SKM7489 PHILIPS in PDF.
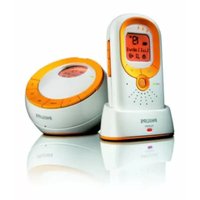


| Product Type | Baby Monitor |
| Brand | Philips |
| Model | SKM7489 |
| Dimensions (Parent Unit) | Approximately 10.5 x 6.0 x 3.5 cm |
| Dimensions (Baby Unit) | Approximately 11.0 x 9.0 x 7.5 cm |
| Weight (Parent Unit) | Approximately 120 g |
| Weight (Baby Unit) | Approximately 180 g |
| Power Supply (Parent Unit) | Rechargeable Li-ion battery (3.7V, 800mAh) or AC adapter |
| Power Supply (Baby Unit) | AC adapter (100-240V) |
| Range (Indoor) | Up to 50 meters |
| Range (Outdoor) | Up to 300 meters |
| Frequency Band | 2.4 GHz |
| Communication Type | Digital, FHSS (Frequency Hopping Spread Spectrum) |
| Audio / Video | Audio-only |
| Sound Activation (VOX) | Yes, with adjustable sensitivity |
| Night Light | Yes, on baby unit (adjustable) |
| Lullabies | Yes, multiple built-in |
| Temperature Sensor | Yes, on baby unit (displays on parent unit) |
| Two-Way Talk | Yes |
| Out-of-Range Alert | Visual and audible |
| Low Battery Alert | Yes, on parent unit |
| Cleaning Instructions | Wipe with a dry or slightly damp cloth. Do not use harsh chemicals. |
| Safety Certifications | CE, FCC, RoHS |
| Spare Parts Available | AC adapters, batteries (contact Philips support) |
| Repairability Index | Not available, but designed for professional repair |
Frequently Asked Questions - SKM7489 PHILIPS
User questions about SKM7489 PHILIPS
0 question about this device. Answer the ones you know or ask your own.
Ask a new question about this device
Download the instructions for your Baby monitor in PDF format for free! Find your manual SKM7489 - PHILIPS and take your electronic device back in hand. On this page are published all the documents necessary for the use of your device. SKM7489 by PHILIPS.
USER MANUAL SKM7489 PHILIPS
PHILIPS

c ①—88°


⑦-High ⑧—Low 9-Not Linked 10-Volume 11—Paused
D
ENGLISH 8
БЪЛГАРСКИ 19
ČEŠTINA 32
EESTI 43
HRVATSKI 54
MAGYAR 65
ҚАЗАҚША 77
LIETUVIŠKAI 90
LATVIEŠU 101
POLSKI 112
ROMÂNĂ 124
RUSSIAN 136
SLOVAK 148
SLOVENIAN 159
SERBIAN 170
UKRAINIAN 181
Introduction
Philips is dedicated to producing caring, reliable products that give parents the reassurance they need. This Philips baby monitor provides round-the-clock support by ensuring you can always hear your baby clearly without any distracting noise. The DECT technology guarantees zero interference from other wireless appliances and a clear signal between the parent unit and baby unit.
Philips Baby Care: taking care together
General description (Fig. 1)
A Baby unit
1 On/off button ⏻
2 Temperature sensor
3 LINK light
4 Volume +/- buttons
5 PAGE button
6 Display
7 Nightlight
8 Adapter
9 Play/stop button ▶■
10 Lullaby button ♪
11 Nightlight button ⚙️
12 Microphone
13 Small plug
14 Battery compartment lid
15 Socket for small plug
16 Battery compartment
B Parent unit
1 Sound level lights
2 Display
3 TALK button
4 MENU button
5 On/off button ⏻
6 LINK light
7 Recess for the belt clip or neck strap
8 Volume +/- buttons
9 OK button
10 Microphone
11 Loudspeaker
12 Battery compartment
13 Belt clip
14 Battery compartment lid
15 Neck strap
16 Adapter
17 Charger
18 POWER light
C Display
1 88° Room temperature indication
2 ⚙ Night light indication
3 ♪ Lullaby symbol
4 Battery symbol
5 Volume indication
6 "9 Microphone sensitivity indication
7 H i9h Room temperature above temperature set in menu
8 Low Room temperature below temperature set in menu 9 Not L inKEd 'No connection between units' message 10 Volume ■ ■ ■ 'Volume level' message 11 Paused Message when lullaby is interrupted D Travel bag
Important
Read these instructions for use carefully before you use the appliance and save them for future reference.
This baby monitor is intended as an aid. It is not a substitute for responsible and proper adult supervision and should not be used as such. Check if the voltage that is indicated on the adapter corresponds to the local mains voltage before you connect the appliance. Use and store the appliance at a temperature between 10°C and 40°C. The appliance is suitable for mains voltages ranging from 220 to 240V. Do not expose the baby monitor to extreme cold or heat or to direct sunlight. Make sure the baby unit and the cord are always out of reach of the baby (at least 1 metre/3 feet away). Never place the baby unit inside the baby's bed or playpen. ▶ Never cover the baby monitor with a towel or blanket. Never immerse any part of the baby monitor in water or any other liquid. Never use the baby monitor in moist places or close to water. Except for the battery compartments, do not open the housing of the baby unit and parent unit in order to prevent electric shock. Only use the adapter supplied to connect the baby unit to the mains. Only use the charger supplied to charge the parent unit. The adapters contain a transformer. Do not cut off the adapters to replace them with other plugs, as this will cause a hazardous situation. If the adapter of the baby unit is damaged, always have it replaced by one of the original type in order to avoid a hazard. If the charger or the adapter of the charger is damaged, always have the charger replaced by one of the original type in order to avoid a hazard. Always place batteries of the correct type in the baby monitor to avoid the risk of explosion. Always use rechargeable batteries of the correct type for the parent unit. Since continuous transmission is prohibited, you only hear your baby when it makes sounds.
Preparing for use
Baby unit
You can use the baby unit from the mains or on batteries. Even if you are going to use the unit from the mains, we advise you to insert batteries. This guarantees automatic back-up in case of mains failure.
Mains operation
1 Put the small plug in the baby unit and put the adapter in a wall socket. (Fig. 2)
Battery operation
The baby unit runs on four 1.5-volt R6 AA batteries (not included). We strongly advise you to use Philips LR6 PowerLife batteries.
Make sure your hands and the unit are dry when you insert the batteries.
1 Turn the battery compartment to the left (◀ OPEN) with the palm of your hand. (Fig. 3)
2 Remove the lid. 3 Insert four 1.5V AA batteries. (Fig. 4)
Place two batteries on top of each other and make sure the + and - poles of the batteries point in the right direction.
4 Put the battery compartment lid back onto the unit and turn it to the right (CLOSE ▶) with the palm of your hand to close it. (Fig. 5)
Note: When the batteries are running low, the LINK light on the baby unit blinks.
Parent unit
Mains operation
1 Put the adapter of the charger in the wall socket and place the parent unit in the charger. (Fig. 6) The POWER light goes on.
Battery operation
The parent unit runs on two rechargeable 1.2-volt AAA NiMh batteries that are supplied with the appliance.
Make sure your hands and the unit are dry when you insert the batteries.
1 Slide the battery compartment lid downwards to remove it. (Fig. 7) 2 Insert the two rechargeable batteries. (Fig. 8) Make sure the + and – poles of the batteries point in the right direction. 3 Slide the battery compartment lid back onto the back of the parent unit until it locks into position ('click'). (Fig. 9) 4 Put the adapter in a wall socket and place the parent unit in the charger. (Fig. 6) The POWER light goes on. 5 Leave the parent unit in the charger until the batteries are fully charged. Charging takes at least 16 hours. Charging takes longer than 16 hours when the parent unit is switched on while charging. To shorten the charging time, switch off the parent unit. The POWER light stays on, even when the batteries are fully charged. When the batteries are fully charged, the parent unit can be used cordlessly for at least 8 hours.
Note: The operating time of 8 hours is based on the assumption that the baby unit will be transmitting 25% of the time and is in standby mode for the rest of the time (when the baby does not make any sound).
Note: When the parent unit batteries are charged for the first time, the operating time will be less than 8 hours. The batteries only reach their full capacity after you have charged and discharged them four times.
Note: When the battery symbol on the display is empty, the LINK light blinks and the parent unit beeps, the batteries are running low. Place the parent unit in the charger.
Note: When the parent unit is not in the charger, the batteries gradually discharge, even when the parent unit is switched off.
Using the appliance
1 Place the parent unit and the baby unit in the same room to test the connection. (Fig. 10)
Make sure the baby unit is at least 1 metre/3 feet away from the parent unit.
2 Press and hold the on/off button on the baby unit for 2 seconds. (Fig. 11)
The nightlight lights up briefly. The display lights up and indicates the current room temperature. 'Not linked' appears on the display and the connection light starts to blink red while the baby unit tries to establish connection with the parent unit. 3 Press and hold the on/off button ⏻ on the parent unit for 2 seconds. (Fig. 12) The sound level lights burn orange briefly. The display lights up and the battery symbol and the temperature indication appear on the display. The LINK light burns red briefly and then starts to blink green while the parent unit tries to establish connection with the baby unit. The LINK light on the parent unit blinks green and the LINK light on the baby unit blinks red until connection has been established. This will take up to 30 seconds. Both LINK lights then burn green continuously and the message 'Not linked' disappears from the baby unit's display. (Fig. 13) 4 Place the baby unit at least 1 metre/3 feet away from your baby. (Fig. 14) 5 Position the parent unit within the operating range of the baby unit. Make sure it is at least 1 metre/3 feet away from the baby unit. (Fig. 15)
For more information on the operating range, see section 'Operating range' below.
Operating range
The operating range of the baby monitor is 300 metres/900 feet in open air. Depending on the surroundings and other disturbing factors, this range may be smaller. Indoors the operating range is up to 50 metres/150 feet.
Dry materials Material thickness Loss of range
Wood, plaster, cardboard, glass < 30cm/12in 0-10% (without metal, wires or lead)
Brick, plywood < 30cm/12in 5-35%
Reinforced concrete < 30cm/12in 30-100%
Metal grilles or bars < 1cm /0.4in 90-100%
Metal or aluminium sheets < 1cm/0.4in 100%
For wet and moist materials, the range loss may be up to 100%.
Features
Adjusting loudspeaker volume
1 Briefly press the volume + and – buttons on the baby unit until the desired loudspeaker volume for the baby unit has been reached. (Fig. 16) 2 Briefly press the volume + and – buttons on the parent unit until the desired loudspeaker volume for the parent unit has been reached. (Fig. 17)
The displays give visual feedback on the volume settings of the units:
- Volume OFF: parent unit volume switched off / monitoring baby silently;
Note: If you press the volume + and - buttons too long, the volume will not be adjusted.
Note: You only have to adjust the baby unit volume when you use the talk function (see below).
Note: If the volume is set to a high level, the units consume more power.
Talk function
You can use the TALK button on the parent unit to talk to your baby (e.g to comfort your baby).
1 Press and hold the TALK button and talk clearly into the microphone. (Fig. 18)
2 Release the TALK button when you have finished talking.
Note: When you press the TALK button, you can no longer hear your baby.
Silent baby monitoring
1 Briefly press the volume – button on the parent unit until the volume is switched off completely. (Fig. 19)
The volume is completely switched off when all sound level lights are out.
As long as the baby unit does not detect a sound, all sound level lights on the parent unit are out. (Fig. 20) When the baby unit picks up a sound, one or more sound level lights on the parent unit go on. The louder the sound, the more lights go on.
Nightlight
1 Briefly press the nightlight button ⚙️ on the baby unit to switch on the nightlight. (Fig. 21)
appears on both displays.
2 Press the nightlight button ⚙ again briefly to switch off the nightlight. (Fig. 21)
The nightlight dims gradually before it goes out completely.
disappears from both displays.
Note: If you press the nightlight button ⚙ too long, the nightlight will not go on or out.
Tip: Switch off the nightlight when you operate the baby unit on batteries. This saves power!
Paging the parent unit
If you have misplaced the parent unit and its volume is switched off, you can use the PAGE button on the baby unit to locate the parent unit.
1 Briefly press the PAGE button on the baby unit (Fig. 22)
Pass in9 appears on both displays.
The parent unit automatically resets to medium volume level and produces a paging alert tone.
2 To stop the paging alert tone, press the PAGE button again briefly or press any button on the parent unit. (Fig. 22)
Note: If you press the PAGE button too long, the parent unit will not produce the paging alert tone.
Lullaby play function
1 Briefly press the lullaby button ♩ on the baby unit to select one of the five lullabies available. (Fig. 23)
2 Briefly press the play/stop button ▶■ to play the selected lullaby. (Fig. 24)
3 Briefly press the OK button on the parent unit to interrupt playing of the lullaby. Press the OK button on the parent unit again to restart playing of the lullaby. (Fig. 25)
If you do not restart the lullaby within 60 seconds, the lullaby function will switch off automatically.
4 Briefly press the play/stop button ▶■ on the baby unit again to stop playing of the lullaby. (Fig. 24)
Note: If you press the lullaby button ♩ too long, no lullaby will be selected.
Belt and neck strap
If the batteries of the parent unit are sufficiently charged, you can take the unit with you inside and outside the house if you attach the unit to your belt or waistband with the belt clip or if you hang it round your neck with the neck strap. This allows you to monitor your baby while you are moving around.
Connecting the belt clip
1 Insert the small pin on the back of the belt clip into the opening on the back of the parent unit (1). Turn the belt clip to the left (2) until it locks into position ('click'). (Fig. 26)
Disconnecting the belt clip
1 Turn the belt clip to the right (in the direction of ▶) and take it out of the opening (2). (Fig. 27)
Connecting the neck strap
1 Insert the small pin at the end of the neck strap into the opening on the back of the parent unit (1). Turn the neck strap to the left (2) until it locks into position ('click'). (Fig. 28)
Disconnecting the neck strap
1 Turn the neck strap to the right (in the direction of ▶) and take it out of the opening (2). (Fig. 29)
Reset function
This function allows you to reset the parent unit and baby unit to the default settings. You can use this function if problems occur that cannot be solved by following the suggestions in chapter 'Frequently asked questions'. You have to reset each unit separately.
1 Press and hold the on/off button ⏻ for 2 seconds to switch on the unit. (Fig. 30)
2 Press and hold the volume – button as soon as the connection light on the unit starts to burn. (Fig. 31)
The unit has now been reset to the default factory settings.
Now do the same for the other unit.
Default settings
Parent unit
- Loudspeaker volume: 1
- Microphone sensitivity: 3
- Sound alert: on
- Temperature alert: on
Baby unit
- Loudspeaker volume: 3
- Nightlight: off
- Lullaby: 1
- 'Temperature low' alert: 14°C
- 'Temperature high' alert: 30°C
Menu options
Most functions can be operated on both the baby unit and the parent unit, but there are some functions that can only be set via the menu options available on the parent unit.
Menu operation - general explanation
1 Press the MENU button to open the menu. (Fig. 32) The first menu option appears on the display. 2 Use the - and + buttons to select the desired menu option. (Fig. 33) 3 Press the OK button to confirm your selection. (Fig. 34) - saved appears on the display. 4 Press the MENU button again to exit the menu. (Fig. 32)
Note: Always press the MENU button, the - and + buttons and the OK button briefly.
Nightlight on/off
1 Select LIGHT ON? or LIGHT OFF? by pressing the - and + buttons and confirm by pressing the OK button.
Playing lullabies
To play or stop a lullaby:
1 Select LULLABY♪ by pressing the - and + buttons and confirm by pressing the OK button.
2 Select PLAY? to play the last played lullaby again or STOP? to stop playing and confirm by pressing the OK button.
To select a different lullaby:
1. Select LULLABY by pressing the – and + buttons and confirm by pressing the OK button.
2. Select 'select new' by pressing the - and + buttons and confirm by pressing the OK button.
3. Select the desired lullaby by pressing the - and + buttons and confirm by pressing the OK button.
Adjusting microphone sensitivity
You can set the microphone sensitivity of the baby unit to the desired level. When the microphone sensitivity is set to maximum level, the baby unit picks up every sound, even the baby's breathing. You can only change the microphone sensitivity when a connection between the baby unit and the parent unit has been established, i.e. when the LINK lights on the baby unit and the parent unit burn green continuously.
1. Select 'sensitivity' by pressing the - and + buttons and confirm by pressing the OK button.
2. Select the desired microphone sensitivity level for the baby unit by pressing the – and + buttons and confirm by pressing the OK button.
▶ Sensitivity ■ = minimum sensitivity level
▶ Sensitivity ■ ■ ■ ■ ■ = maximum sensitivity level
Note: When the microphone sensitivity of the baby unit is set to a high level, it picks up more sounds and therefore transmits more often. As a result, the unit consumes more power.
Sound alert on/off
If the sound alert is switched on, the parent unit beeps as soon as the fifth sound level light starts to burn orange while the volume is switched off.
1. Select 'Sound Alert' by pressing the – and + buttons and confirm by pressing the OK button. 2. Select 'Alert on' or 'Alert off' and confirm by pressing the OK button.
Setting room temperature range
You can set the temperature range (minimum and maximum temperature) for your baby's room.
1. Select TEMPERATURE—° by pressing the – and + buttons and confirm by pressing the OK button. The range appears on the display. 2. Confirm by pressing the OK button. 3. Set the desired minimum temperature by pressing the – and + buttons and confirm by pressing the OK button. 4. Set the desired maximum temperature by pressing the – and + buttons and confirm by pressing the OK button.
Note: When the maximum temperature selected is lower than the room temperature, the unit consumes more power because the display will be on continuously. This is also the case when the minimum temperature set is higher than the room temperature.
Temperature alert on/off
If the temperature alert is switched on, the parent unit beeps if the actual room temperature exceeds the set maximum temperature or drops below the set minimum temperature. If no temperature has been set, the temperature alert will go off when the room temperature drops below 7°C or rises above 33°C.
1. Select TEMPERATURE—° by pressing the – and + buttons and confirm by pressing the OK button. 2. Select Alert on/OFF by pressing the – and + buttons and confirm by pressing the OK button. 3. Select Alert on? or Alert off? and confirm by pressing the OK button.
Cleaning and maintenance
Do not immerse the parent unit and the baby unit in water and do not clean them under the tap.
Do not use liquid cleaners or aerosol cleaners.
1. Unplug the baby unit, if it is connected to the mains, and take the parent unit out of the charger. 2. Clean the parent unit and the baby unit with a damp cloth.
Make sure the parent unit is dry before you place it back in the charger.
3. Clean the charger with a dry cloth.
Storage
When you are not going to use the baby monitor for some time, remove the batteries and store the parent unit, the baby unit, the adapter of the baby unit and the charger in the travel bag supplied. You can also use the travel bag to store the baby monitor while you travel.
Environment
Do not throw away the appliance with the normal household waste at the end of its life, but hand it in at an official collection point for recycling. By doing this, you help to preserve the environment. (Fig. 35) Batteries contain substances that may pollute the environment. Do not throw empty batteries away with the normal household waste, but hand them in at an official collection point. Always remove the batteries before discarding the appliance or handing it in at an official collection point.
Guarantee and service
If you need information or if you have a problem, please visit the Philips website at www.philips.com or contact the Philips Customer Care Centre in your country (you find its phone number in the worldwide guarantee leaflet). If there is no Customer Care Centre in your country, turn to your local Philips dealer or contact the Service Department of Philips Domestic Appliances and Personal Care BV.
Frequently asked questions
This chapter lists the questions most frequently asked about the appliance. If you cannot find the answer to your question, contact the Customer Care Centre in your country.
Question Answer
Why do the LINK lights not blink and do the displays not light up when I press the on/off button of the baby unit and the parent unit?
Place the parent unit in the charger and put the adapter of the charger in a wall socket. Then press the on/off button to check if the parent unit works. Also check if the baby unit works by pressing the on/off button. If it does not work, replace the batteries. Then try to establish connection between the parent unit and baby unit. If the LINK lights are still not on, move the parent unit closer to the baby unit, but not closer than 1 metre/3 feet. If it is still not possible to establish a connection, use the reset function to reset the units to their default settings.
Why does the LINK light on the parent unit blink and why does the unit beep at the same time?
The parent unit and the baby unit may be out of range of each other. Move the parent unit closer to the baby unit.
Why does the LINK light on the baby unit blink red and why is the message (Not L inkEd) shown on the display?
The baby unit and the parent unit are out of range of each other. Move the parent unit closer to the baby unit.
Why does the LINK light on the baby unit blink red?
If the message (Not L inKEd) is not shown on the display, the batteries of the baby unit are running low. Replace the batteries.
| Question Answer | |
| Why does the parent unit beep? | If the parent unit beeps while the LINK light blinks red and the message (Not L inked) is shown on the display, the connection with the baby unit is lost. Move the parent unit closer to the baby unit. |
| If the parent unit beeps, the LINK light blinks red and the battery symbol on the display is empty, the batteries are running low. Recharge the batteries. | |
| If you have switched off the volume while the sound alert is on, the parent unit beeps whenever the fifth sound level light starts to burn orange because the baby unit has picked up a sound. | |
| If you have set the room temperature on the parent unit and the temperature alert is on, the parent unit beeps when the temperature drops below the set level or below 7 °C or when the temperature rises above the set level or above 33 °C. | |
| Why does the appliance produce a high-pitched noise? | The units may be too close to each other. Make sure the parent unit and the baby unit are at least 1 metre/3 feet away from each other. |
| The volume of the parent unit may be set too high. Decrease the volume of the parent unit. | |
| Why don't I hear a sound/ Why can't I hear my baby cry? | The volume of the parent unit may be set too low or may be switched off. Increase the volume of the parent unit. |
| The microphone sensitivity level may be set too. Set the microphone sensitivity level to a higher level on the parent unit. | |
| The baby unit and the parent unit may be out of range of each other. Reduce the distance between the units. | |
| Why does the parent unit react too quickly to other sounds? | The baby unit also picks up other sounds than those of your baby. Move the baby unit closer to the baby (but observe the minimum distance of 1 metre/3 feet). |
| The microphone sensitivity level may be set too high. Decrease the microphone sensitivity level on the parent unit. | |
| Why does the parent unit react to baby's crying slowly? | The microphone sensitivity level on the parent unit may be set too low. Increase the microphone sensitivity level on the parent unit. |
| Why do the batteries of the baby unit run low quickly? | The microphone sensitivity level may be set too high, which causes the baby unit to transmit more often. Decrease the microphone sensitivity level on the parent unit. |
| The volume on the baby unit may be set too high, which causes the baby unit to consume a lot of energy. Decrease the volume on the baby unit. | |
Question Answer
| You may have set a maximum room temperature that is lower than the actual room temperature or a minimum room temperature that is higher than the actual room temperature. This causes the display to be lit all the time, which results in higher power consumption and batteries that run low quickly. | |
| Perhaps you have switched on the nightlight. If you want to use the nightlight, we advise you to run the baby unit on mains power. | |
| Why does the charging time of the parent unit exceed 16 hours? | The parent unit may be switched on during charging. Switch off the parent unit during charging. |
| The speci ed operating range of the baby monitor is 300 metres/900 feet. Why does my baby monitor manage a much smaller distance than that? | The speci ed range is only valid outdoors in open air. Inside your house, the operating range is limited by the number type of walls and/or ceilings in between. Inside the house, the operating range will be up to 50 metres/150 feet. |
| Why is the connection lost every now and then? Why are there sound interruptions? | The baby unit and the parent unit are probably close to the outer limits of the operating range. Try a different location or decrease the distance between the units. Please note that it takes about 30 seconds each time before a connection between the units is established. |
| What happens during a power failure? | If the parent unit is suf ciently charged, it will continue to operate during a power failure, both inside and outside the charger. If there are batteries in the baby unit, it will automatically switch to battery-operated use in case of power failure. |
| Is my baby monitor secure from eavesdropping and interference? | The DECT technology of this baby monitor guarantees no interference from other equipment and no eavesdropping. |
| Some buttons do not seem to work when I press them. What do I do wrong? | You should press all buttons (except the on/off buttons and the TALK button) brie y. If you press them too long, they will not work. |
| The operating time of the parent unit is supposed to be at least 8 hours. Why is the operating time of my parent unit shorter? | When the parent unit batteries have been charged for the rst time, the operating time will be less than 8 hours. The batteries only reach their full capacity after you have charged and discharged them at least four times. |
| The volume of the parent unit may be set too high, which causes the parent unit to consume a lot of energy. Decrease the volume of the parent unit | |
| The microphone sensitivity level on the parent unit may be set too high, which causes the parent unit to consume a lot of energy. Decrease the microphone sensitivity level on the parent unit. |
Note: Press the MENU button, the - and + buttons, and the OK button.
Turning the light on/off
1 Press the - and + buttons to select L IGHT on? or L IGHT OFF? and confirm by pressing the OK button.
Declaration of Conformity
We, PHILIPS DAP B.V.
(manufacturer's name)
P.O. Box 20100, 9200 CA Drachten, The Netherlands
(manufacturer's address)
declare under our responsibility that the radio product
Philips SCD487, SCD488, SCD 489
(type id)
DECT Device (babyphone)
(description of appliance)
to which this declaration relates, is in conformity with the following standards:
ETSI EN 301406 (2003-07)
ETSI EN 301489-1 V 1.4.1
ETSI EN 301489-6 V 1.4.1
EN 50385 (2002-09)
(number and issue-date of standard)
following the provisions of 1999/5/EC (R&TTE Directive)
Drachten, 2006-02-17 H. de Beurs
(place, date)
(signature, name and function)
Product Quality Manager
Identity Declaration
| Basedon:CertificateofConformityE814357S-CCExpertOpinionE814357S-EO | Ref:AMB554-5037 |
| Date:2005-11-02 | |
| ByJanRobijns |
This is to declare that the design of:
DECT babyphone series SCD487, SCD488, SCD489
(type of appliance)
PHILIPS DAP B.V., P.O. Box 20100, 9200 CA Drachten, The Netherlands
(applicant)
is identical in all aspects to
DECT babyphone series (respectively)
SKM7487NC/00, SKM7488NC/00, SKM7489NC/00
(type of appliance)
PHILIPS Consumer Electronics BV
Glaslaan 2, Building SBP 648
5600 JB Eindhoven
The Netherlands
(applicant)
PHILIPS DAP
EMC testlab.
Box 20100
9200 CA Drachten
Netherlands

Name: Jan Robijns


Hereby Philips DAP declares that this product complies with the European directive 1999/5/EC.


- INTRODUCTION
- GENERAL DESCRIPTION (FIG. 1)
- IMPORTANT
- PREPARING FOR USE
- BABY UNIT
- MAINS OPERATION
- BATTERY OPERATION
- PARENT UNIT
- USING THE APPLIANCE
- OPERATING RANGE
- DRY MATERIALS MATERIAL THICKNESS LOSS OF RANGE
- FEATURES
- ADJUSTING LOUDSPEAKER VOLUME
- TALK FUNCTION
- SILENT BABY MONITORING
- NIGHTLIGHT
- PAGING THE PARENT UNIT
- LULLABY PLAY FUNCTION
- BELT AND NECK STRAP
- CONNECTING THE BELT CLIP
- DISCONNECTING THE BELT CLIP
- CONNECTING THE NECK STRAP
- DISCONNECTING THE NECK STRAP
- RESET FUNCTION
- DEFAULT SETTINGS
- MENU OPTIONS
- MENU OPERATION - GENERAL EXPLANATION
- NIGHTLIGHT ON/OFF
- PLAYING LULLABIES
- ADJUSTING MICROPHONE SENSITIVITY
- SOUND ALERT ON/OFF
- SETTING ROOM TEMPERATURE RANGE
- TEMPERATURE ALERT ON/OFF
- CLEANING AND MAINTENANCE
- STORAGE
- ENVIRONMENT
- GUARANTEE AND SERVICE
- FREQUENTLY ASKED QUESTIONS
- QUESTION ANSWER
- TURNING THE LIGHT ON/OFF
- DECLARATION OF CONFORMITY
- IDENTITY DECLARATION
- THIS IS TO DECLARE THAT THE DESIGN OF
- IS IDENTICAL IN ALL ASPECTS TO
Brand : PHILIPS
Model : SKM7489
Category : Baby monitor