
Odyssey 4000 A DZ4 - Iron MOULINEX - Free user manual and instructions
Find the device manual for free Odyssey 4000 A DZ4 MOULINEX in PDF.


| Product type | Steam iron |
| Brand | Moulinex |
| Model | Odyssey 4000 A DZ4 |
| Power | 2000 W |
| Power supply voltage | 220-240 V, 50/60 Hz |
| Soleplate type | Ceramic soleplate |
| Water tank capacity | 250 ml |
| Steam function | Yes, adjustable continuous steam |
| Spray function | Yes |
| Anti-drip | Yes |
| Auto shut-off | Yes (safety) |
| Cleaning | Maintenance: empty after use, descale regularly |
| Dimensions (L x W x H) | 28 x 12 x 15 cm (approx.) |
| Weight | 1.2 kg (approx.) |
| Spare parts | Available; water tank, soleplate, buttons |
| Color | White/silver |
| Repairability index | 8.2 / 10 |
Frequently Asked Questions - Odyssey 4000 A DZ4 MOULINEX
User questions about Odyssey 4000 A DZ4 MOULINEX
0 question about this device. Answer the ones you know or ask your own.
Ask a new question about this device
Download the instructions for your Iron in PDF format for free! Find your manual Odyssey 4000 A DZ4 - MOULINEX and take your electronic device back in hand. On this page are published all the documents necessary for the use of your device. Odyssey 4000 A DZ4 by MOULINEX.
USER MANUAL Odyssey 4000 A DZ4 MOULINEX
natural_image
Illustration of two steam iron machines with no text or symbols on the figures themselves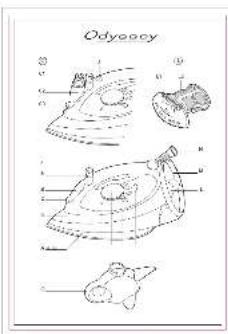


Thank you for choosing an appliance from the Moulinex range, which is intended solely for ironing laundry.
Description
A Soleplate
B Filling hole
C Removable "Master Spray" easy-iron assembly (depending on model)
C1 Button
C2 Tank
C3 Spray
C4 Doser
D Water spray
E Water spray button
F Pressing button
G Steam adjustment control
H Temperature adjustment control
I Temperature adjustment indicator
J "Thermosensor" indicator (depending on model)
K Water tank with maximum fill marking
L "Pro Calc System" Cassette
L1 Lid
L2 Refill
M Non-slip iron rest
N Multi-directional power cable with hanging clip
O Filler jug
P "Use & Store" iron cover (depending on model)
P1 Lever
Safety recommendations
- Read the instructions for use carefully before using your appliance for the first time: any use which does not conform to the instructions will absolve Moulinex from any liability.
- Never leave this appliance within reach of children without supervision. The use of this appliance by young children or by disabled persons must be supervised at all times.
- Check that the power rating of your appliance does in fact match that of your household electrical wiring system.
- Make sure that the amperage indicated on your electricity meter and on your circuit breaker is at least 10 amps.
- It is essential that this appliance is connected to an earthed socket.
- If you use an extension, make sure it is of the bipolar 10 A type, with an earth conductor.
Wiring instructions for U.K and Ireland only :
APPLIANCES WITH FITTED PLUG
Important : For your convenience this appliance is supplied complete with a plug incorporating a 13 amp fuse.
In the event of replacing a fuse in the plug supplied, a 13 amp fuse approved by ASTA to BS1362 must be used.
If the socket outlets are not of the 13A BS 1363 type, and therefore do not accept the plug connected to this appliance, cut off the plug. When cut off, this plug is a shock hazard if inserted into a socket outlet and must therefore be disposed of safely.
If the fuse cover is detachable, never use the plug with the cover omitted. Replacement covers can be obtained from your service agent.
Fit the appropriate plug according to the instructions in paragraph «Fitting a plug». With alternative plugs a 15 amp fuse must be fitted either in the plug or adaptor or at the main fuse box.
APPLIANCES WITHOUT FITTED PLUG FITTING A PLUG - IMPORTANT
The wires in the mains lead are coloured in accordance with the following code:
GREEN & YELLOW : EARTH
BLUE : NEUTRAL
BROWN : LIVE
As the colours in the mains lead of this appliance may not correspond with the coloured markings identifying the terminals in your plug, proceed as follows:
The wire which is coloured GREEN & YELLOW must be connected to the terminal in the plug which is marked with the letter "E" or by the earth symbol or coloured green or green and yellow. The wire which is coloured BLUE must be connected to the terminal which is marked with the letter "N" or coloured black. The wire which is coloured BROWN must be connected to the terminal which is marked with the letter "L" or coloured red.
This appliance is manufactured to conform to the Low Voltage Electrical Equipment (Safety) Regulations 1989 and is designed to comply with BS 3456. It complies with the requirements of the EEC Directive (89/336/EEC).
Any connection error will render the guarantee null and void.
- Your appliance is intended solely for domestic use and within the home.
- Never use your appliance if it is not working correctly, or if it has been damaged. If this happens, you should contact an approved Moulinex service centre (see list in the service booklet).
- Any intervention apart from cleaning and normal maintenance by the customer must be carried out by an approved Moulinex service centre.
- Never place the appliance, the power cable or the plug in water or any other liquid.
- Do not allow the power cable to hang down within reach of children.
- The power cable must never be allowed to come close to or in contact with the hot parts of your appliance, close to a source of heat or rest on sharp edges.
- If the power cable or the plug are damaged, do not use the appliance. In order to prevent any risk to yourself, these must be replaced by an approved Moulinex service centre (see list in the service booklet).
- For your own safety, you should only use Moulinex accessories and spare parts which are suitable for your appliance.
- Your iron is fitted with a thermal safety device, which will cut off the electrical circuit in the event of any anomaly.
- Never leave your iron unattended when it is plugged in.
- Unplug the iron:
. before filling the tank
. when you have finished ironing and for all maintenance.
- Do not unplug the appliance by pulling on the power cable.
- Allow the iron to cool down before putting it away, if you do not have a "Use & Store" iron-cover (depending on model).
Instructions for use
INSERTING THE "PRO CALC SYSTEM" CASSETTE (L):
The "Pro Calc System" cassette is a device which helps prevent build-up of limescale.
On first use:
The iron is unplugged.
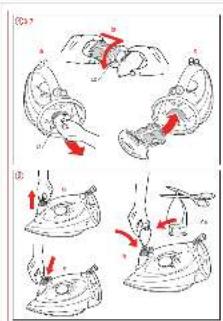
1a - Remove the lid (L1) of the cassette (L) at the back of the tank (K).
①b - Lock the refill (L2) in place on the lid (L1).
- Position the marker to the month for the end of use of the refill.
①c- Replace the cassette (L) on the tank (K) by pressing down fully, the marker is locked.
This refill (L2) must be changed regularly in order to be effective in counteracting the formation of limescale inside your iron.
To replace the refill (L2):
- Unplug the iron and empty the tank.
- Remove the cassette (L) and take out the used refill (L2) from the lid (L1) of the cassette.
- Lock the new refill (L2) onto the lid (L1), position the marker and replace the cassette (L).
We recommend the following intervals for changing the refill (L2):
| Hardness of ironing timewater used 2 hrs | hrs / week 4 hrs | week 6 hrs / week | |
| Normal 9 months | 6 months 3 months | ||
| Hard 6 months | 4 months 2 months | ||
| Very hard 3 months | 2 months 1 month |
Classification table for water hardness
| France | Germany | Great Britain | International | |
| Normal | <15°f | <8.5°d | < 10.5°e | < 1.5 mmol/l or < 3 mEq/l |
| Hard | >15°f and < 30°f | >8.5°d and < 17°d | >10.5°e and < 21°e | 1.5 mmol/l and < 3 mmol/l or >3 mEq/l and < 6 mEq/l |
| Very hard | >30°f | >17°d | >21°e | >3 mmol/l or >6mEq/l |
To find out the exact hardness of your tap water, you should contact your local authority or water company.
"MASTER SPRAY" ASSEMBLY (C) (DEPENDING ON MODEL):
The “Master Spray” assembly sprays a mixture onto the laundry to facilitate ironing, by making the iron glide more smoothly and by removing creases.
The product in the doser (C4) is a concentrate sold exclusively by Moulinex and specific to the “Master Spray”. No other commercially available product is suitable for this assembly.
The "Master Spray" assembly is accessible at all times so that it can be used instantly as required.
This assembly only works if the tank in the iron (K) contains water. In fact, each time it is sprayed, the “Master Spray” diffuses a mixture of water from the tank (K) and of the product from the doser.
2a - Slightly raise the button (C1).
- Cut off the tip of the doser and insert it into the open hole on the top of the button (C1).
2b - Squeeze the doser to empty its contents into the tank of the "Master Spray" (C2).
2c - Press button (C1) again to close the opening and dispose of the doser in accordance with the recycling regulations in force in your area.
To prime the "Master Spray", it is necessary to press a few times on the button (C1) to build up a good spray. It is recommended to test the « MasterSpray » solution onto a cloth before starting using it for the ironing.
The contents of one doser corresponds to the volume of the "Master Spray" tank (C2).
Important:
- If you accidentally spray the undiluted « MasterSpray » solution onto your linen, wash it normally in order to remove the marks.
- The “Master Spray” assembly is a supplement to the cold water spray (D). We would recommend that you only use the “Master Spray” for fabrics which are hard to iron.
- Never spray directly onto the skin and eyes. In case of contact, rinse with fresh water. Do not leave within reach of children.
- Avoid spraying onto the floor: it could become slippery.
- Store the dosers at a temperature of between 4^ and 40^ C.
Using your iron for the first time
. Filling the tank:
- Unplug your iron.
- Make sure that the "Pro Calc System" cassette (L) is in the correct position and that the steam control (G) is set to position ✗.
③- Open the hatch or remove the “Master Spray” easy-iron assembly (C) (depending on model).
- Fill the tank (K) using the jug provided (O), without exceeding the maximum level; the contents of the jug (O) corresponds to the
total capacity of the tank (K) at maximum. Do not add any further water.
- Close the hatch or replace the "Master Spray" assembly (depending on model).
Note: Never fill the tank (K) via the opening in the "Pro Calc System" cassette (L) at the rear of the tank.
. Getting started:
- Plug in the iron.
④ - Select the temperature of the soleplate with the temperature adjustment control (H).
The temperature control indicator (I) will come on; it will go out once the selected temperature has been reached.
On first use, a little smoke may be given off by the soleplate of the iron. This is temporary and does not mean there is anything wrong with the iron. This should not happen again.
⑤. Steam ironing:
You have 2 steam flow positions: 🏠 or 🏠 Steam ironing is only possible in the steam zone (.. to MAX). To obtain steam, position the temperature adjustment control (H) in this zone.
- Before commencing your ironing, wait for the adjustment indicator (I) to go out and check (depending on model) that the “Thermo Sensor” indicator (J) has gone out.
- Select the steam flow rate using the steam control (G).
Important:
To prevent any water dripping onto your laundry, this iron is equipped with an “anti-drip” system which shuts off the flow of water as soon as the soleplate falls below a certain temperature.
. Pressing
One push on the pressing button (F) allows you to obtain a very powerful jet of steam instantly.
- Never exceed 5 pushes in succession, otherwise your iron may drip water from the soleplate.
- Always use this function in the steam zone indicated on the temperature adjustment control (H).
When using the pressing function for the first time, small deposits of limescale may come out of the holes in the soleplate with the jet of steam. So we recommend that you do not carry out the first pushes directly over your laundry.
⑥. Vertical removal of creases (depending on model):
You have the option of using your iron in the vertical position to remove creases from garments on hangers, curtains, etc...
- Set the temperature adjustment control (H) to MAX.
- Hold the iron vertically close to the fabric, without touching it leave at least a 2" gap.
- Push the pressing button (F) at the rate of not more than once per second.
The steam produced is not always visible but it still has the ability to remove creases.
You can push the button up to 5 times in succession.
Important:
- Do not use this function for synthetic fibres.
- Keep the iron at a sufficient distance from the fabric to avoid any risk of scorching.
- The steam produced is very hot, so never remove creases from a garment when a person is wearing it; it must be on a hanger.
. Dry ironing:
- Set the steam control (G) to position

. Spray:
- Push on the spray button (E) in pulses. A spray of cold water allows you to dampen your laundry in both dry and steam position. Very effective for removing creases.
⑦. "Thermo Sensor" indicator (J) (depending on model)
The indicator (J) situated at the front of the handle of the iron informs you if the temperature of the soleplate is too high in comparison with the setting chosen on the temperature adjustment control (H).
Each time you appreciably reduce the temperature adjustment control (H), the "Thermo Sensor" indicator (J) comes on to warn you that the soleplate is too hot and that you risk scorching or damaging the fabric.
- Wait for the indicator (J) to go out before continuing the ironing.
Comment: To cool down the soleplate more quickly, iron directly onto the ironing board, in steam position.
Maintenance
. Self-cleaning (approx. once a month):
To cut down on the formation of limescale, Moulinex has built a self-cleaning system into the iron, which we advise you to use at regular intervals. Follow these steps:
Iron is cold and unplugged;
- Place the steam control (G) to
- Fill the tank (K) and set the temperature adjustment control (H) to MAX.

- Plug in the iron.
- Once the temperature adjustment indicator (I) goes out, unplug the iron and hold it over the sink.
⑧- Push the steam control (G) to the self-cleaning position ⚙️. Hold it in this position for 15 seconds: the mixture of water and steam will take with it the scale residues contained in the soleplate.
- Reset the steam control (G) to 🐘.
- Using slow and deliberate movements, swivel the iron from left to right so as to give the soleplate a good rinse and to get rid of the water remaining in the soleplate.
- Empty the tank (K).
- Plug the iron in again in order to dry the soleplate; this operation should be performed over a cloth (watch out for ejections of water and steam).
- After this operation, again unplug the iron and allow it to cool down before cleaning the soleplate.
- Clean the soleplate (iron cold) on a thick, clean, damp cotton cloth, before putting away the iron or before reusing it.
. Storage
After each use:
- Unplug the iron.
- Empty the tank (K).
- Set the steam control (G) to position ✗.
- Allow your iron to cool down.
- Unwind the power cable around the non-slip iron rest (M) by making a loop of about 10 cm starting from the iron and fix the clip onto the iron rest.
- Store it on its heel.
⑨. If you have the “Use & Store” iron tidy accessory (P) (depending on model), you can put away the iron hot as soon as you have finished using it. Handle the hot iron with care.
- Engage the point of the iron in the iron tidy and lock the heel in place by pressing on the handle; a slight noise will confirm that it is locked into place.
- Put away the whole assembly on its heel or hang it on the wall, using a hook. The fixing system (screws and plugs) should be adapted depending on what type of wall you have (concrete, plaster, etc.) and must support a weight of 10 kg.
. Unlocking the iron:
- Take the assembly (iron and locked iron tidy).
- Unwind the power cable.
- Pull backwards on the lever (P1), at the same time lifting the iron.
Accessories
You can obtain the following accessories from your retailer or from an approved Moulinex service centre:
- Kit of 2 "Master Spray" dossiers: DZ9
- Box of 2 "Pro Cal System" refills: DZ8
- "Use & Store" Iron tidy: A17A01
What to do if your appliance does not work
| Problems Causes Remedies | ||
| The iron does Poor not heat up | connection Check the | plug |
| Temperature Adjust the adjustment temperature control (H) on control (H) min. | the adjustment temperature control (H) | |
| No steam and Steam the iron is hot (G) set to | control Adjust the steam to | control to the desired rate of flow |
| The tank is empty Fill it with water | ||
| Soleplate tem- Set temperature control on too low a setting | the temperature adjustment control (H) to the steam zone, at the same time adjusting the temperature to the type of fabric to be ironed | |
| The spray and the pressing button are not working | The tank is empty Fill tank with water | |
| Significant reduction in the flow of steam | Scale is starting to form in the iron | Perform an “auto clean” |
| Tank almost empty | Fill it with water | |
| The iron is causing brown marks on the laundry | The water used contained or contains organic residues change the | Perform an “auto-clean” operation and water. To find out more, consult the section on “What type of water is best suited to your iron” |
| The “Thermo Temperature of the Wait for the Sensor” indicator soleplate too high temperature comes on with respect to the to fall, and the setting selected on indicator will go out. the temperature To cool the soleplate adjustment control down faster, iron directly on the ironing board with the iron in steam position | ||
| The “Master Spray” assembly does been primed several times not work to obtain a good | The pump has not Press button (C1) spray | |
| The tank (K) is Refill empty | it with water | |
If you have followed all the instructions and your iron still does not work: Contact an approved Moulinex service centre (see list in the “Moulinex Service” booklet).
Ironing guide
USING THE RIGHT TEMPERATURE
Please refer to the labels on your laundry for the composition of the fabrics or the instructions for ironing.
| Ironing instructions | Types of fabric | Thermostat |
 | Synthetic fibresacrylic, polyamide,polyesterArtificial fibres :viscose | ▪ |
 | Natural fibres animal:wool, silk | ▪▪ |
 | Natural fibres vegetable:cotton | ▪▪▪ |
| thick cotton, linen | MAXI | |
 | Warning: Do not iron this article. | |
. If the composition of the fabric consists of several types of textile, set the thermostat control to the lowest advised temperature. If you cannot determine the composition of the fabrics on the label, do a test on a place which is hard to see, starting at the lowest temperature.
. Sort your laundry before ironing, keeping the same types of fabric together. The iron heats up more quickly than it cools down: so start by ironing the laundry requiring the lowest temperature and progress to the items requiring higher temperatures (see table above).
. Woollen materials can be steam ironed. To prevent the soleplate of your iron coming into direct contact with the wool, place a dry cloth on top of the fabric to be ironed. You can also iron these items on the reverse side.
. To prevent shining delicate fabrics (silk, velvet, viscose, etc.) or for fabrics with impressions (transfer, flock printing, etc.), iron on the reverse.
. Certain stains may be fixed by a high temperature, so it is best only to iron your laundry once any stains have been completely removed.
WHAT KIND OF WATER IS BEST SUITED TO YOUR STEAM IRON?
. Tap water if it does not contain any organic products which could leave brown marks on the laundry.
. Demineralised water - commercially available (unscented).
. Distilled water - commercially available (unscented).
We categorically advise you not to use any other kind of water.
PRACTICAL ADVICE
. Caring for the soleplate
- Clean it at regular intervals. The longer you wait to clean the soleplate, the harder it will become to remove any marks.
- Do not scratch the soleplate and do not use products which are aggressive or abrasive to clean it.
. Traces of water, starch or limescale
When the iron is cold, rub with a thick cotton cloth soaked in wine vinegar. Rinse immediately with water and wipe dry.
. Stuck-on fabrics
- Allow your iron to cool down (at least 30 minutes) after unplugging it, then plug it back in and set the thermostat to the position MAXI. Once the iron is hot, place a clean thick cotton cloth on the ironing board and rub the soleplate of your iron energetically. For greater effectiveness, you may also position your cloth on the edge of the ironing board. Don't forget to clean the edges of the soleplate.
- Always use the temperature which is appropriate for the fabrics you are ironing.
. Scratches
To keep the stainless steel, chrome or non-stick soleplate of your iron in good condition and to prevent scratches and dirty marks:
- do not put the soleplate down on a rough or abrasive surface
- do not iron the metallic parts (zips, etc.) of your laundry.
. Descaling
Moulinex strongly recommends that you do not use descaling products (powder or liquid).
. Ironing board
Moulinex recommends that you use a stable ironing board, at least 42 cm wide, fitted with a metallic support, wire type, and with a very thick cover.
. Ironing board cover
Moulinex advises you to use a cover made of thick cotton.
J "Thermosensor" (vissa modeller)
K Vattentank med Max indikation
ATT INSTALLERA "ANTIKALKSYSTEMET" UPPSAMLARE (L):
2a- Kohota painiketta (C1) hieman.
. Silityslaudan peite
- Description
- Safety recommendations
- Wiring instructions for U.K and Ireland only :
- APPLIANCES WITH FITTED PLUG
- APPLIANCES WITHOUT FITTED PLUG FITTING A PLUG - IMPORTANT
- Instructions for use
- INSERTING THE "PRO CALC SYSTEM" CASSETTE (L):
- On first use:
- To replace the refill (L2):
- "MASTER SPRAY" ASSEMBLY (C) (DEPENDING ON MODEL):
- Important:
- Using your iron for the first time
- Getting started:
- ⑤. Steam ironing:
- Pressing
- ⑥. Vertical removal of creases (depending on model):
- Dry ironing:
- Spray:
- ⑦. "Thermo Sensor" indicator (J) (depending on model)
- Maintenance
- Self-cleaning (approx. once a month):
- Storage
- Accessories
- Ironing guide
- USING THE RIGHT TEMPERATURE
- WHAT KIND OF WATER IS BEST SUITED TO YOUR STEAM IRON?
- We categorically advise you not to use any other kind of water.
- PRACTICAL ADVICE
- Traces of water, starch or limescale
- Scratches
- Descaling
- Ironing board
- Ironing board cover
- ATT INSTALLERA "ANTIKALKSYSTEMET" UPPSAMLARE (L):
- Silityslaudan peite
Brand : MOULINEX
Model : Odyssey 4000 A DZ4
Category : Iron