
TVVR11002 - Camcorder ABUS - Free user manual and instructions
Find the device manual for free TVVR11002 ABUS in PDF.


| Product Type | Digital Camcorder |
| Brand | ABUS |
| Model | TVVR11002 |
| Dimensions | Approx 125 x 60 x 50 mm |
| Weight | Approx 250 g (with battery and SD card) |
| Power | Rechargeable lithium-ion battery 3.7 V, 1500 mAh |
| Video Resolution | Full HD 1920 x 1080 pixels |
| Recording Speed | 30 frames per second |
| Storage | microSD memory card up to 128 GB (not included) |
| Lens | Wide angle 120° with auto focus |
| Display | Rotating LCD screen 2.7 inches |
| Image Stabilization | Electronic stabilization |
| Night Vision | Integrated infrared LED, range up to 5 m |
| Connectivity | USB-C port, mini HDMI output, external microphone jack |
| Main Functions | Video recording, photo, motion detection, loop recording |
| Care and Cleaning | Clean the lens with a soft dry cloth. Avoid moisture and dust. |
| Safety | Do not expose to extreme temperatures. Use only the supplied charger. |
| Spare Parts and Repairability | Battery and USB cable replaceable. For repairs, contact ABUS customer service. |
| General Information | 2-year warranty. Made in China. |
Frequently Asked Questions - TVVR11002 ABUS
User questions about TVVR11002 ABUS
0 question about this device. Answer the ones you know or ask your own.
Ask a new question about this device
Download the instructions for your Camcorder in PDF format for free! Find your manual TVVR11002 - ABUS and take your electronic device back in hand. On this page are published all the documents necessary for the use of your device. TVVR11002 by ABUS.
USER MANUAL TVVR11002 ABUS
natural_image
Black USB flash driver with control buttons and display screen (no visible text or symbols)D Bedienungsanleitung
GB User manual
F Manuel utilisateur
NL Gebruikershandleiding
DK Brugerhåndbog
PL Instrukcja
E Dirección
① Manuale
Deutsch
These user manual contains important information for installation and operation. This should be also noted when this product is passed on to a third party. Therefore look after these operating instructions for future reference!
natural_image
Black ABUS mobile phone with control panel and display screen (no readable text or symbols beyond branding)Bedienungsanleitung
Version 07/2012
CE
natural_image
Three electronic components: a transparent case, a black plastic case with screw holes, and a black screwdriver (no text or symbols visible)Tipp:
natural_image
3D mechanical assembly diagram showing a lever and a clamping device with plus sign (no text or symbols)natural_image
3D mechanical component with two views: a black bracket and a black handle (no text or symbols)natural_image
Two black mechanical components: a belt buckle and a mounted bracket with a screw head (no text or symbols visible)natural_image
Two mechanical components: a black plastic housing and a black mechanical lever assembly, both with no visible text or symbols.
Original English user manual.
Keep for future use.
Introduction
Dear Customer,
Thank you for purchasing this product.
This product meets the requirements of the applicable European and national guidelines. The corresponding declarations and documents can be obtained from the manufacturer (www.abus-sc.com).
To maintain this condition and to ensure risk-free operation, you as the user must observe these operation instructions!
Before initial start-up, read through the complete operating instructions observing operating and safety instructions.
All company and product names mentioned in this document are registered trademarks. All rights reserved.
If you have any questions, please contact your installer or your local dealer!

Warnings
Please note: Whosoever unlawfully makes an audio recording of the privately spoken words of another; or uses, or makes a recording thus produced accessible to a third party, could be liable to imprisonment or a fine!
Whosoever unlawfully overhears with an eavesdropping device the privately spoken words of another not intended for his attention; or publicly communicates, verbatim or the essential content of, the privately spoken words of another recorded or overheard above could incur the same penalty.

Disclaimer
This user manual was prepared with greatest care. If you should notice omissions or inaccuracies, please inform us about these on the back of this manual given address. The ABUS Security-Center GmbH assumes no liability for technical and typographical faults and reserves the right to make at any time modifications to the product or user manual without a previous announcement.
The company is not liable or responsible for direct and indirect subsequent damages which are caused in connection with the equipment, the performance and the use of this product.
No guarantee for the content of this document is taken.
Icon explanation

A flash in the triangle is used if there is danger for the health, e.g. by an electric shock.

An exclamation mark in the triangle points to an important note in this user manual which must be minded.

This symbol can be found when you are to be given tips and information on operation.
Important safety advice

The warranty will expire for damage due to non-compliance with these operating instructions. ABUS will not be liable for any consequential loss!

ABUS will not accept liability for damage to property or personal injury caused by incorrect handling or non-compliance with the safety-instructions.
In such cases the warranty will expire.
The device has been manufactured in compliance with international safety standards.
Please read these safety advices carefully.
Safety advice
- Mains supply
90 - 250V AC 50/60Hz
Operate this product only from the type of power supply indicated on the marking label. If you are not sure of the type of power supplied to your home, consult your local power company. Disconnect the product from the mains before you start any maintenance or installation procedures.
- Overloading
Do not overload a wall outlet, extension cord or adapter as this may result in electric fire or shock.
- Liquids
Setup the device only in dry and dust-protected rooms. Protect the device from any kind of liquids entering.
- Cleaning
Disconnect the product from the wall outlet before cleaning. Use a light damp cloth (no solvents) to dust the product.
-
ABUS Security-Center assumes no liability regarding accidents, cases of death, loss or other demands in connection with or as a consequence of the use of this product. Under no circumstances does ABUS Security-Center assume liability for subsequent damage or collateral damage when using this product and/or parts thereof.
-
Accessories
Do not use any unsupported accessories as these may be hazardous or cause damage the product.
7. Location
Setup the device only in dry and dust-protected rooms. Protect the device from any kind of liquids entering. Do not place the device near a radiator or heat register. Setup the device only in areas with the advised operating temperatures of -10^ 60^ .
Warnings
Follow all safety and operating advises before starting-up the device!
-
Follow these directions in order to avoid damage of the power cord or plug:
-
Do not modify or process the power cord or plug arbitrarily.
- Do not bend or twist the power cord.
- Make sure to disconnect the power cord holding the plug.
-
Keep heating appliances as far as possible from the power cord in order to prevent the cover vinyl from melting.
-
Follow these directions. Failure to follow any of them may cause electrical shock:
-
Do not open the main body.
Disconnect the product from the mains before you start. - Do not insert metal or inflammable objects inside the product.
-
In order to avoid any damage during lighting use a surge protection.
-
Do not use the product when it is out of order. If you continue to use the product when defective, serious damage can be caused to it. Make sure to contact your local product distributor if the product is out of order.

During the installation into an existing video surveillance system make sure that all devices are disconnected from the low and supply voltage circuit.

If in doubt allow a professional electrician to mount, install and wire-up your device. Improper electrical connection to the mains does not only represent at threat to you but also to other persons.
Wire-up the entire system making sure that the mains and low voltage circuit remain separated and cannot come into contact with each other in normal use or due to any malfunctioning.
Unpacking
While you are unpacking the device please handle it with utmost care.

If you notice any damage of the original packaging, please check at first the device. If the device shows damages, please contact your local dealer.
Table of contents
- Intended use 25
- Scope of delivery....25
- Features and functions 25
- Charging the battery 26
- Product overview....26
5.1 LED evaluation....27
5.2 Manual video recording....27
5.3 Recording with noise detection 27
5.4 Audio recording....27
5.5 Key lock....28
5.6 Zoom function 28
5.7 Resetting the hardware 28
- Remote control 28
- Using accessories....29
7.1 Clip used with the waterproof housing 29
7.2 Suction pad 29
7.3 Pipe clamp mount 30
7.4 Helmet mount....30
7.5 Using the adhesive plates 31
- OSD menu settings ....31
8.1 Inserting the micro SD card and switching on the camcorder 31
8.2 Basic settings....31
8.3 Photo camera settings 32
8.4 Video camera settings....32
-
Transferring data to media 32
-
Displaying films and photos on playback devices 33
- Tips and tricks for successful recording....34
- Technical specifications .... 35
- Disposal 35
1. Intended use
Thanks to its 3 hour battery operation, the ABUS camcorder can be used for mobile surveillance as well as for recording sport and leisure activities. Moreover, the camcorder can also be used in water with the waterproof housing supplied. This compact housing contains a full HD camera with a wide-angle lens and a recorder for real-time recording in full resolution (1080p @ 30 fps). The recording runs permanently or begins when noise is detected. The picture data is stored on a normal micro SD card and can be played on any PC due to the standard MOV format.
A detailed function description can be found in chapter 3 on “Features and functions”.

Data storage is subject to national data protection guidelines. During installation, inform your customers of the existence of these guidelines.
2. Scope of delivery
| 1x | Camcorder |
| 1x | Waterproof housing |
| 1x | Remote control |
| 1x | Suction pad |
| 1x | Pipe mount |
| 1x | Helmet mount |
| 1x | Adhesive plate, straight |
| 1x | Clip for waterproof housing |
| 1x | Clip for remote control |
| 1x | Slide for adhesive plate |
| 1x | Hand strap |
| 1x | Rotating accessories |
| 1x | Hook-and-loop fastener for the remote control |
| 1x | Allen key for clip |
| 1x | USB cable |
| 1x | User guide |
3. Features and functions
- Integrated high resolution 1080p camera
• Real-time recording with 1920x1080 pixels @ 30 fps - Up to 3 hours permanent recording
- Recording in various resolutions with or without sound
- Easy playback on the PC or television due to HDMI and AV output
• Supports micro SD cards (max. 32GB) - Display with OSD menu
- Includes remote control for starting the recording or taking a photo up to 5 metres
• Waterproof up to 20 metres thanks to housing - 170^ wide-angle lens
• 3.0, 5.0 or 8.0 megapixel photo function
4. Charging the battery
To charge the built-in battery, connect the camcorder to a PC or notebook with the USB cable supplied. You can also use other standard 5 V DC USB charging devices. When the battery is completely discharged, the charging time will take approx. 4 hours.

The camcorder can record for approx. 3 hours once it is fully charged.
5. Product overview


| 1 | Video status indicator* (green) |
| 2 | Power status indicator* (red) |
| 3 | Display |
| 4 | To navigate up / zoom in / to increase sound |
| 5 | Menu button |
| 6 | OK/photo trigger / key lock |
| 7 | To navigate to the left |
| 8 | To navigate up / zoom out / to decrease sound |
| 9 | Thread for stand |
| 10 | To start / stop video recording |
| 11 | VOX active / deactive |
| 12 | To navigate back / archive |
| 13 | Reset |
| 14 | To navigate to the right |
| 15 | Micro SD card slot |
| 16 | Camera trigger status |
| 17 | Camera lens |
| 18 | AV output |
| 19 | Microphone |
| 20 | On / Off switch |
| 21 | Mini USB connection |
| 22 | HDMI output |
| 23 | Eyelet for hand strap |
Note:
- Throughout the manual, the buttons are given a number* (such as *4, *5, *14) which serve to assist you and refer to the key (5. Product overview).
5.1 LED evaluation
The different colours of the LED*1*2 have the following meanings:
| LED colour | Status | Description |
| Red | Red -> off | Off or standby mode |
| Permanently on | Camcorder is ready | |
| Flashes | Camcorder is charging | |
| Green | Green -> off | Camcorder is not recording |
| Flashes | Camcorder is recording |
5.2 Manual video recording
Once the camcorder has been switched on, press the video recording button *10 to start recording. The green status LED now begins to flash. Press button *10 once again to stop recording.
Note:
- Never remove the micro SD card while recording. The current recording will be damaged and then cannot be played.
- Depending on the setting, once the micro SD card's recording capacity has been reached, the ring buffer begins or the recording stops. The camcorder also shows the "Memory Full" message and a SD card symbol appears at the bottom right of your display.
5.3 Recording with noise detection
After switching on the camcorder, activate the noise detection by pushing the VOX*11 switch from OFF to ON.
The camcorder records automatically for 2 minutes after detecting a single noise above 65dB. If the noise level of a minimum of 65dB is exceeded again while recording, the length of the recording is extended. If the recording is not triggered again within 2 minutes, the camcorder switches to standby mode and starts the next recording automatically as soon as the noise detection is triggered again.
5.4 Audio recording
To be able to start pure audio recording, you must change the recording mode ("Capture Mode") in the OSD menu and follow the steps as for the manual recording. To familiarize yourself with the OSD menu, read through chapter 8 on "OSD menu settings".
5.5 Key lock
To activate the key lock, press and hold down button *6 "Key Lock / OK" for 4 seconds. After a short signal (touch key lights up), the key lock for *4*5*7*8*12*14 is activated. To deactivate this again, repeat the procedure.
5.6 Zoom function
Before using the zoom function, you must set the video-solution to 720p/60, 720p/30 or WVGA. Only if you done this you could use the 4x digital zoom with the buttons *4 for "Zoom In" and *8 for "Zoom out".
5.7 Resetting the hardware
If the product you have purchased has frozen and no longer responds to the commands, then press the reset button *13. To press this, use a thin, but not pointed object such as a paper clip, to get to the reset button *13. This is located at the side of the device and marked Reset. Press this for about 5 seconds.
6. Remote control

To train a remote control for a camcorder, follow the following steps:
- Switch off the TVVR11002 camcorder and hold down the OK button *6. Switch on the device by
holding down the button. Once the device has started, release the OK button.
- On the remote control, press the Start recording and Stop recording buttons at the same time for 4
seconds to finish the training.
Note:
- The distance between the remote control and camcorder can be approx. 5 metres depending on the surroundings.
7. Using accessories
The camcorder can be attached to a person or an object using various clips or holders.
7.1 Clip used with the waterproof housing

natural_image
Three electronic components: a transparent case, a black plastic device with screwdriver, and a plus sign (no text or symbols)Tipp:
- The clip can be rotated for mounting. You need to do this to get at the screws.
7.2 Suction pad

natural_image
3D mechanical assembly diagram showing a lever and a bracket component (no text or symbols)The suction pad enables removable mounting on smooth surfaces such as glass or marble. This mount is intended for cars, boats, and motorcycles.
Note:
- NOT recommended for snowboards or other sport types with high shock loads.
7.3 Pipe clamp mount
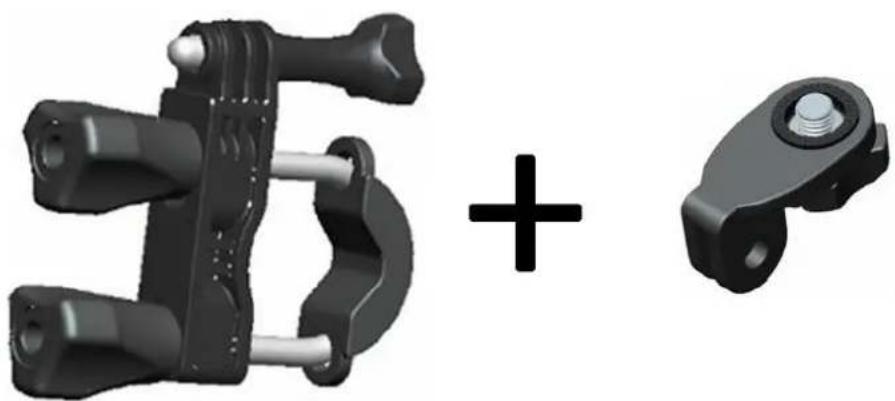
natural_image
3D mechanical component with two views: one showing a bracket and the other a handle (no text or symbols)The pipe mount works with all rods and pipes with a diameter of at least 17 mm and at most 33 mm. This enables flexible mounting on handlebars, bicycle forks, rollbars, and windsurfing/kitesurfing control rods
7.4 Helmet mount

natural_image
Two black mechanical components: a belt buckle and a rail-mounted bracket, both with a plus sign (no text or symbols visible)This helmet mount is flexible and reusable with ventilated bicycle, ski, kayaking, or similar sport helmets.
7.5 Using the adhesive plates
Attachment of an adhesive plate:
When you are attaching an adhesive plate, it is necessary to take the following into account. The surface on which the straight or curved adhesive plate is to be attached needs to be solid, even, and thoroughly cleaned. In order to bring about the optimal adhesive effect, attach the plates to the required surface at room temperature. In order to ensure optimal support for the accessory, you need to wait 24 hours after attachment of the plate.

natural_image
Two mechanical components: a black plastic housing and a black mechanical lever mechanism (no text or symbols visible)
Please note that these adhesive plates can only be attached once. These 3M adhesive plates adhere very tightly and will damage sensitive surfaces (such as automotive paint) upon removal.
8. OSD menu settings
8.1 Inserting the micro SD card and switching on the camcorder
Insert your micro SD card in slot *15 intended for this purpose.
To switch on the camcorder, push POWER switch *20 from OFF to ON. After a short time you hear a signal tone and the red status LED lights up.
Note:
- You can navigate using the *4*7*8*14 buttons. Confirm with button *6 and exit by pressing button *5.
8.2 Basic settings

To make basic settings, use the Menu button *5. If you press this you will find all the settings for the camcorder. Press the navigation button Right *14 to get to the camera settings. Press the navigation button Right *14 once again to reach the setup settings. There is another sign to indicate that you are in the setup settings in the top right corner of the screen.
Example for setting the time and date:
- To set this correctly, press the navigation button Down *8 until you see the Date/Time marked in blue. Press button *6 to confirm. Use the navigation buttons *4*7*8*14 and button *6 to confirm for setting the time and date. Press menu button *5 twice to exit the menu.
Note:
- All OSD menu explanations refer to the factory settings of the device. The OSD menu default language is English.
You can change the following menu items here:
| Menu item | Explanation |
| Beep | Button sound on or off. |
| Time Display | Select whether the time/date appears in the recordings. |
| Loop Record | Ring buffer on or off (i.e. when the SD card is full, the device overwrites the oldest data). |
| AutoStandby | Automatic standby function between 2.5 and 10 minutes or no automatic standby. |
| TV standard | TV standard the recording should be in. (PAL is used in Europe / NTSC in USA). |
| Format | To format your micro SD card. |
| Default | The device is restored to the factory settings or delivery status. |
| Language | The menu can be set in 8 different languages here. |
| Frequency | To decide between 50 and 60 Hz to prevent flickering in the preview. |
| Date / Time | To set the data and the time. |
8.3 Photo camera settings

| Menu item | Explanation |
| Single Shot | If this option is activated, the device takes a single photo. |
| Tripple Shot | If this option is activated, the camera takes 3 photos when triggered once. |
| Continuous | Here the device takes a photo every x seconds. The number of seconds is also set here. |
| Self Shot | Only one photo is taken after the set seconds have elapsed. |
| Resolution | The resolution is set: 3M = 2048 x 1536, 5M = 2592 x 1944, 8M = 3200 x 2400. |
8.4 Video camera settings

| Menu item | Explanation |
| Resolution | Here you can decide between various recording resolutions. |
| Bitrate | Here you can decide between a 6 or 12 Mbit-rate. However, to achieve higher quality you should select the 12M option. |
| Capture Mode | You can select the recording type at this item. You have the option of audio recording only or video and audio recording. |
9. Transferring data to media
To do this, connect the product to your notebook or computer using the USB cable supplied. Then switch on the device with switch *20. After a few seconds, your computer/laptop detects the camcorder and declares it as its own drive.
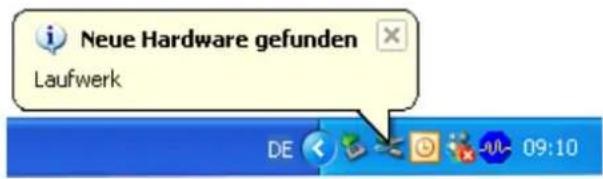
SD card (2GB in example) Internal camcorder-memory
Films and photos are located in this example at MEDIA (E:)/DCIM/100MEDIA.
10. Displaying films and photos on playback devices
You have several options for presenting the videos and images you have made. You should be aware that the image that can be seen on the camcorder will be transmitted to this respective video output in use on a one-to-one basis. To go to playback, press *12 and choose between “Video” or “Photo” playback.
Video
| Function | Keys | Explanation |
| Navigation | *7 / *14 / *6 | *7 Browse forwards / *14 Browse backwards / *6 Start and stop |
| Playback speed | *4 / *8 | During playback, press *7 for faster / *14 for slower |
| Delete | *5 | This allows you to delete an individual image or all images |
| Protection | *5 | Protects images from being deleted through the camera |
Photo
| Function | Keys | Explanation |
| Navigation | *7 / *14 / *6 | *7 Browse forwards / *14 Browse backwards / *6 Rotate photo |
| Zoom | *4 / *8 | Zoom in / out. With *7 and *14, you can navigate within the zoomed image in the vertical axis or switch to horizontal navigation by pressing *6 |
| Delete | *5 | This allows you to delete an individual image or all images |
| Protection | *5 | Protects images from being deleted through the camera |
| Slideshow | *5 | Shows all images with a switching interval of 5 seconds |
- Mini HDMI cable
You can use the mini HDMI cable to view videos and images in "full HD" resolution on a television or on a similar device that supports this resolution.
- AV cable
You can also use the AV cable to view videos and images. The AV cable can be connected to a variety of devices. AV inputs are quite common, making the AV cable very flexible in use, i.e., even with older televisions.
Note:
- To change the volume while watching a video, you can use the keys *4 to increase the volume and *8 to decrease the volume.
- The mini HDMI cable is not included with this product.
11. Tips and tricks for successful recording
- Resolution
For action recordings with fast movements and desired slow-motion sequences, we recommend that you select 720p HD resolution with 60 frames per second (720/60).
- Waterproof housing
When a waterproof housing is used, you should always be aware of the humidity and the risk that the pane will fog up during the recording. Anytime there are large temperature differences in conjunction with humidity, it is recommended that you pay attention to the lens.
• Recording from several perspectives
The remote control allows you to operate several devices, enabling parallel use of several cameras. For example, a “big air” jump can be recorded in many variants and angles of view in this way.
- Attaching the adhesive plate
When attaching the adhesive plates, we recommend that you keep the following in mind: The surface to which the plate is to be attached should be clean and dry. Attach the adhesive plate to the desired surface at room temperature 24 hours before it is to be subjected to loads.
12. Technical specifications
| TVVR11002 camcorder | |
| Operating mode | Standalone |
| Recording resolution | 1080p/960p/720p/WVGA @ 30/60fps |
| Video / picture format | MOV / JPG |
| Storage medium | Micro SD card (max. 32 GB) |
| Recording modes | Photos, permanent, noise detection (from 65 dB) |
| Audio | integrated microphone / loudspeaker |
| Image sensor | CMOS |
| Camera type | Colour camera |
| Resolution | 3/5/8 MPx |
| Pixels (total) | 3200 x 1900 |
| Pixels (effective) | 2592 x 1944 |
| Lens | F2.8 |
| White balance | Automatic |
| Gain control | Automatic |
| Backlight compensation | Automatic |
| Battery operation | 3 hours permanent recording |
| Power supply | 5 V DC |
| Power consumption | 850 mA |
| Operating temperature | -10°C to 60°C |
| Humidity | 15% to 85% |
| Dimensions (W x H x D) | 85 x 50 x 23 mm |
| Weight | 81 g |
| TVVR11002 remote control | |
| Wireless frequency | 433 MHz |
| Protection class | IP 64 |
| Operating temperature | -10°C to 60°C |
| Humidity | 15% to 80% |
| Dimensions (W x H x D) | 25 x 31 x 16 mm |
| Weight | 26.5 g |
13. Disposal

Devices displaying this symbol may not be disposed of as domestic waste. At the end of its service life, dispose of the product according to the applicable legal requirements. Please contact your dealer or dispose of the products at the local collection point for electronic waste.
TVVR11002

Manuel utilisateur
Version 07/2012
CE
Introduction
Chère cliente, cher client,
natural_image
Three electronic components: a transparent plastic case, a black plastic case with screw holes, and a black screwdriver (no text or symbols visible)Recommendation :
natural_image
3D mechanical assembly diagram showing a lever and a clamping device with plus sign (no text or symbols)natural_image
3D mechanical component with two views: one showing a bracket and the other a handle (no text or symbols)natural_image
Two black mechanical components: a belt buckle and a rail-mounted bracket, both with a plus sign (no text or symbols visible)natural_image
Two mechanical components: a black plastic housing and a black lever mechanism with a bolt (no text or symbols visible)
natural_image
Diagram showing a laptop connected to a USB device via a cable (no text or symbols present)natural_image
Three electronic components: a transparent case, a black plastic device with screwdriver, and a plus sign (no text or symbols)Tip:
natural_image
3D mechanical assembly diagram showing a lever and a separate bracket component (no text or symbols)natural_image
3D mechanical component with two views: one showing a bracket and the other a handle (no text or symbols)natural_image
Two black mechanical components: a belt buckle and a rail-mounted bracket, both with a plus sign (no text or symbols visible)natural_image
Two mechanical components: a black plastic housing and a black mechanical lever assembly, both with no visible text or symbols.
natural_image
Three electronic components: a transparent plastic case, a black plastic case with screwdriver, and a black plastic tool (no text or symbols visible)Tipp:
natural_image
3D mechanical assembly diagram showing a lever and a clamping device with plus sign (no text or symbols)natural_image
3D mechanical component with two views: one showing a bracket and the other a handle (no text or symbols)natural_image
Two black mechanical components: a belt buckle and a pin-like bracket, both with a plus sign (no text or symbols visible)natural_image
Two mechanical components: a black plastic housing and a black mechanical lever assembly (no text or symbols visible)
natural_image
Black ABUS mobile phone with control buttons and display screen (no visible text or symbols on device body)Instrukcja obsługi
Wersja 07/2012
CE
natural_image
Three electronic components: a transparent case, a black plastic case with screwdriver, and a plus sign (no text or symbols)Wskazówka!
natural_image
3D mechanical assembly diagram showing a lever and a separate bracket component (no text or symbols)natural_image
3D mechanical component with two views: a black bracket and a black clamp-like bracket, both without any text or symbols.natural_image
Two black mechanical components: a belt buckle and a triangular bracket, both with a plus sign (no text or symbols present)natural_image
Two mechanical components: a black plastic housing and a black mechanical lever assembly (no text or symbols visible)
natural_image
Three electronic components: a transparent case, a black plastic case with screwdriver, and a plus sign (no text or symbols)Consejo:
natural_image
3D mechanical assembly diagram showing a lever and a clamping device with a plus sign (no text or symbols)natural_image
3D mechanical component with two views: one showing a bracket and the other a handle (no text or symbols)natural_image
Two black mechanical components: a belt buckle and a trolley-mounted bracket, both with a plus sign (no text or symbols visible)natural_image
Two mechanical components: a black plastic housing and a black mechanical lever assembly (no text or symbols visible)
Manuale d'uso
Version 07/2012
CE
Please note: Whosoever unlawfully makes an audio recording of the privately spoken words of another; or uses, or makes a recording thus produced accessible to a third party, could be liable to imprisonment or a fine!
Whosoever unlawfully overhears with an eavesdropping device the privately spoken words of another not intended for his attention; or publicly communicates, verbatim or the essential content of, the privately spoken words of another recorded or overheard above could incur the same penalty.

90–250 V AC, 50–60 Hz.
natural_image
Three electronic components: a transparent case, a black plastic case with screwdriver, and a plus sign (no text or symbols)Suggerimento:
natural_image
3D mechanical assembly diagram showing a lever and a clamping device with plus sign (no text or symbols)natural_image
3D mechanical component with two views: one showing a bracket and the other a handle (no text or symbols)natural_image
Two black mechanical components: a belt buckle and a mounted bracket with a plus sign (no text or symbols)natural_image
Two mechanical components: a black plastic housing and a black lever mechanism with a bolt (no text or symbols visible)
These operating instructions are published by ABUS Security-Center GmbH & Co.KG, Linker Kreuthweg 5, 86444 Affing, Germany. No reproduction (including translation) is permitted in whole or part e.g. photocopy, microfilming or storage in electronic data processing equipment, without the express written consent of the publisher. The operating instructions reflect the current technical specifications at the time of print. We reserve the right to change the technical or physical specifications.
F Note de l'éditeur
© Copyright 07/2012 by ABUS Security-Center
PL Odcisk
© Copyright 07/2012 by ABUS Security-Center
- Deutsch
- Bedienungsanleitung
- Tipp:
- Introduction
- Warnings
- Disclaimer
- Icon explanation
- Important safety advice
- Safety advice
- Location
- Unpacking
- Table of contents
- Intended use
- Scope of delivery
- Features and functions
- Charging the battery
- Product overview
- Note:
- LED evaluation
- Manual video recording
- Recording with noise detection
- Audio recording
- Key lock
- Zoom function
- Resetting the hardware
- Remote control
- Using accessories
- Clip used with the waterproof housing
- Suction pad
- Pipe clamp mount
- Helmet mount
- Using the adhesive plates
- OSD menu settings
- Inserting the micro SD card and switching on the camcorder
- Basic settings
- Example for setting the time and date:
- Photo camera settings
- Video camera settings
- Transferring data to media
- Displaying films and photos on playback devices
- Tips and tricks for successful recording
- - Resolution
- - Waterproof housing
- • Recording from several perspectives
- - Attaching the adhesive plate
- Technical specifications
- Disposal
- TVVR11002
- Manuel utilisateur
- Recommendation :
- Tip:
- Instrukcja obsługi
- Wskazówka!
- Consejo:
- Manuale d'uso
- Suggerimento:
- F Note de l'éditeur
- PL Odcisk
Brand : ABUS
Model : TVVR11002
Category : Camcorder