WA 2942 - Waffle Maker CLATRONIC - Free user manual and instructions
Find the device manual for free WA 2942 CLATRONIC in PDF.
| Product type | Waffle maker with interchangeable plates |
| Brand | CLATRONIC |
| Model | WA 2942 |
| Power supply | 230 V, 50 Hz |
| Indicator lights | Red (power connection), green (cooking temperature reached) |
| Plate material | Non-stick coating |
| Handles | Cool Touch insulated |
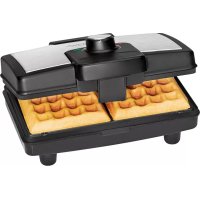
| Functions | Preparation of waffles, sandwiches, grilling (barbecue) |
| Locking system | Yes, with release button |
| Spacer | Included for vertical lid position (grilling) |
| Included plates | For sandwiches (B), waffles (C), barbecue (D) |
| Maintenance | Clean with a damp cloth; do not immerse in water |
| Warranty | 24 months |
| Safety precautions | Hot plates; do not use near flammable materials; heat-resistant surface |
| Additional accessories | None (replacement plates not supplied) |
Frequently Asked Questions - WA 2942 CLATRONIC
User questions about WA 2942 CLATRONIC
0 question about this device. Answer the ones you know or ask your own.
Ask a new question about this device
Download the instructions for your Waffle Maker in PDF format for free! Find your manual WA 2942 - CLATRONIC and take your electronic device back in hand. On this page are published all the documents necessary for the use of your device. WA 2942 by CLATRONIC.
USER MANUAL WA 2942 CLATRONIC
Colocar/substituir as formas
A ficha tera de estar fora da tomada, durante a colocacao/substituicao das formas.
General Safety Instructions
GB
- Read the operating instructions carefully before putting the appliance into operation and keep the instructions including the warranty, the receipt and, if possible, the box with the internal packing.
- The appliance is designed exclusively for private use and for the envisaged purpose. This appliance is not fit for commercial use. Do not use it outdoors (except if it is designed to be used outdoors). Keep it away from sources of heat, direct sunlight, humidity (never dip it into any liquid) and sharp edges. Do not use the appliance with wet hands. If the appliance is humid or wet, unplug it immediately. Do not put it in water.
- When cleaning or putting it away, switch off the appliance and always pull out the plug from the socket (pull on the plug, not the cable) if the appliance is not being used and remove the attached accessories.
- Do not operate the machine without supervision. If you should leave the workplace, always switch the machine off or remove the plug from the socket (pull the plug itself, not the lead).
- To protect children from the dangers posed by electrical appliances, make sure that the cable is hanging low and that children do not have access to the appliance.
- Check the appliance and the cable for damage on a regular basis. Do not use the appliance if it is damaged.
- Do not try to repair the appliance on your own. Always contact an authorized technician. To avoid the exposure to danger, always have a faulty cable be replaced only by the manufacturer, by our customer service or by a qualified person and with a cable of the same type.
- Use only original spare parts.
- Pay careful attention to the following "Special Safety Instructions".
Special safety notes
- The baking surfaces get very hot. Touch the handles only.
- Put the unit down onto a heat-resistant surface or mat.
- In order to prevent heat from building up, do not put the unit directly underneath a cupboard. Ensure that there is enough space all around.
- Beware of steam coming out when you open the baking section.
- Bread is combustible. Therefore the device should never be used in the vicinity of or below curtains and other combustible materials!
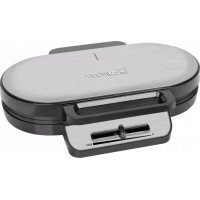
Overview of the Components
1 Lid
2 Control lamps
3 „Cool Touch" (heat-insulated) handles
4 Locking device
5 Distance piece
6 Release button
GB
Starting-up the unit
NON-STICK COATING
Lightly grease the baking surfaces before the unit is used for the first time. Use the appliance for about 10 minutes with the toasting surfaces closed (see Using the unit). Then wipe it down with a damp cloth.
- Please do not eat the first pieces of toast/wafers or the first grilled food.
Using the unit
Inserting/changing of the cooking plates
Make sure that the plug is not inserted when inserting or changing the cooking plates.
Note: The machine and the baking plates must have cooled down completely!
- Release the unlocking system (4) and fold the lid (1) upwards.
- If the baking plates have already been inserted into the device please press down the release buttons (6) on the insides of the handles in order to release the baking plates. Hold the baking plates by the handles and take them out of the device.
- Now insert the desired baking plates until they lock in place. Please note the pins on the edge of the baking plates. The device is supplied with one set of baking plates each for sandwiches (B), wafers (C) and for grilling (D).
- Close the appliance again.
Toasting sandwiches
Our tip: Lightly spread the outside of the bread (the side coming into contact with the toasting surfaces) with butter or margarine. That way your sandwich can be easily removed afterwards from the sandwich toaster.
- Please unwind the lead completely.
- Insert the plug in a duly installed 230V/50Hz protective contact socket. The red mains control lamp (2) lights up.
- eep the baking surfaces closed while heating. When the green control lamp (2) lights up the baking temperature has been reached.
- Open the cover and place each toast. Then close the lid gently. Lock the handle with the hinge.
- The green control lamp (2) switches on and off during baking in order to maintain the baking temperature. The baking time depends on your individual taste. The longer the sandwiches remain in the device, the greater the level of browning.
-
Open the lid and remove the slices of toast with a wooden fork or the like. Do not use pointed or sharp objects to avoid damaging the coating of the baking surfaces.
-
Lightly grease the baking surfaces again as required after each baking process.
- The baking surfaces must always be kept closed during pauses in the baking.
Baking waffles
- Repeat steps 1 and 3, as described under "Toasting Sandwiches".
- Open the lid (1) and place approx. 1 tablespoon of dough in the middle of the lower baking surface. The dough should be filled in quickly as otherwise the wafers will not brown evenly. Please ensure that you measure in the quantity of dough correctly, as excess dough runs over the edges and soils the device. Gently close the cover. Do not press the handles together.
- Please proceed as described under "Toasting Sandwiches", points 4 to 7.
Recipe for waffles
5 egg yolks, 5 dessertspoons of hot water, 100g sugar and 1 grated lemon peel should be mixed together until frothy and then a mixture of 1/2 teaspoon baking powder and 150g flour should be stirred in. Beat the 5 egg whites stiff and fold them into the batter.
You can find further recipes in our recipe books or else you can use a ready-made baking mix.
Grilling
- Insert the grilling plates as described under "Using the unit".
- Continue proceeding as described under points 1 and 3 "Toasting Sandwiches".
- Place the food to be grilled on the lower grilling plate and then close the lid. Please do not press the handles together. It is also possible to use both surfaces (see illustration A). In order to do so please place the distance piece (5) in a vertical position. Open the lid completely, pull it slightly upwards so that the locking device is released and then open the lid through 180^ . Now place the food to be grilled on top.
- The cooking time depends on your individual taste.
- Once the food has been grilled enough, remove it with a wooden fork. Do not use any pointed, sharp or cutting objects.
Cleaning & maintenance
Pull out the mains plug and allow the unit to cool down.
- Brush off the crumbs or residues from the baking surfaces and the edges.
- The entire device should only be cleaned with a slightly damp cloth.
- Do not use abrasive detergents.
The machine must never be immersed in water!
GB
This device has been tested according to all relevant current CE guidelines, such as electromagnetic compatibility and low voltage directives, and has been constructed in accordance with the latest safety regulations.
Subject to technical changes without prior notice!
Guarantee
The device supplied by our Company is covered by a 24 month guarantee starting on the date of purchase (receipt).
During the life of the guarantee any fault of the device or its accessories *) ascribable to material or manufacturing defects will be eliminated free of charge by repairing or, at our discretion, by replacing it. The guarantee services do not entail an extension of the life of the guarantee nor do they give rise to any right to a new guarantee!
Proof of the guarantee is provided by the proof of purchase. Without proof of purchase no free replacement or repair will be carried out.
If you wish to make a claim under the guarantee please return the entire machine in the original packaging to your dealer together with the receipt.
*) Damage to accessories does not mean automatic free replacement of the whole machine. In such cases please contact our hotline. Broken glass or breakage of plastic parts are always subject to a charge.
Defects to consumables or parts subject to wearing (e.g. motor pistons, kneading blades, drive shafts, spare remote control, spare toothbrushes, saw blades, etc.) as well as cleaning, maintenance or the replacement of said parts are not covered by the guarantee and hence are to be paid!
The guarantee lapses in case of unauthorized tampering.
After the expiry of the guarantee
After the expiry of the guarantee repairs can be carried by the competent dealer or repair service against the payment of the ensuing costs.
BHMaHne:JaTe n3JeNIO nIPTKAM NOnHOCTbIO OCTbITb!
- Pa36JIOKpyIte CnCTeMy (4) nOTKINbTe KpbIiKy (1) BBepx.
- EcIиВИЗдELINужehaxoДЯТСФОмБIДЯВИЕЧК,TOHAXMITEBHN3 KHOПКУразблOKИРOBKN(6),HAXOДЯЦYOСHAнВИТРЕНECHСТОРОЕ рчКИ, YTOБыразблOKИРOBaTBФОмБI.BO3bMЛTeФОмБIzaPyKINиВИБteHXИЗ N3DEJIY.
- BCTaBtE Heo6xOdmyO fOpMy IJy BbIeKn, Do oHKcaMn. ObpaTte BHIMAHne Ha BbICTynbI Ha KpOMkax fOpM. N3JeJIe YKoMmNEKTOBAHO paJIHbIMn fOpMaMn IJy BbIeKn: IJy caHDbUeY (B), BaΦeJIb (C) n IJy naJXkapBbAHny h a rIpne (D).
- 3akpoTe np6op.
PnroTOBJeHne cAnDbVey
Cobet: HAMKbTe BHEUHIO CTOPOHy CaHDbNHa (CTOPOHy, KOTOPA BOIaET B KOHTAKT C NOJyFOpMO) CINBOHbIM MACOM NnM aRaprHOM. 3TO I03BOJNT BNOCEJCTBnBe3 Tpya OTbeNtBu CaHDbNt Of pOmbIy.
RUS
- Плноctью размOTаite ceTeBOI shHyp.
- BCTabTe CeTBeYIO BuNky B oPstKy C hAnpJxEHnEM cTeN 230B,50Tc, OCHaIeHNHyIO 3aUINTHbIMn KOHTaKTAmn U yCTaHJeHNHyIO BOoTBcETBmC npEtnCaHnAryMa. 3arOpaETc kpaChA KoHTponbHa JAMNoOJa cTeN (2).
- Bo Bpemra paoorpeBa depxnte npolyoepmbl Baepelbnuclb 3akpbItbIMn. Kogda 3aqrupntc3eneHaa KOHTpoJIbHaJaAMnoUka (2), pa6oohay temepatypa doctnrHyta.
- Otkpoite KpbuKny BLOKte B KaKdoe OTeDJIeHMe NO DBOHOMy TocTy (6byep6oody).ПлавноЗakpoite KpbuKny.PyuKHeO6xoJIMMo 3aCToTOpnBb W shapHnpe.
- 3eIeHai KOnTPolbHaJa lamNoOyKa (2) BkIIOUaTeCn I BbIKIOuAeTCB BO BpEmraPabOtbl, YTO6bl NODepKaaTb yCTAHOBEnHyo TEMnepaty IbIneKm.BpEmBaIIeKn DEIo LInHOrO BKyCa. Yem DOLbIe CaHDbN HaxoDITcB Neu, Tem TEMHeN OH NOJxkapINBaTcN.
- OtkpoiTe KpbIshky N BbHbTe CaDByu npn NOMOUs DepeBraHHoB BNKINnn T.I.N. npeJMeta. Hn B KOEM Cnyae He NOL3yHTeBc OCTPbIMn IINpexyUmm PneMeTAM, 3TO MOxET NOBpeDntB HEnpNIGropaEMOE NOKpBTNe NOBepxHOcteTTOCTepa.
- После кадую похда, по потубовси, сlerka sma3bIaIte polnyформь маслom.
- Μόγφορmbi BaΦeJIbHnIb IɔJXHbI 6bITb B npepepbIbax 3aKpbTbI.
BbineykaBaΦeIb
- Повторе Шаги 1-3, касу StTo 6bIto OngcaHOB rIabe"Пожарьанe caHdBvHey".
- OtkpoTe KpbIbKU (1), HaneIte npIMepHO 1 CTOLOBYIO NOxKY TECTa B cepedHny HnXhKeH noJyΦOpMbI. HanaBtB Heo6xOdImo 6bItPO, HnaYe BaФIn He nOlyuHT paBHomepHyIO, KopyrNeBHy OkpAcy. Do3npyTe TECTO npabNbHO, HnIINbKN TECTa 6byDy BbIaBaNbHb 3 Ka pAa 3aRpa3Hrt N3dJIe. PJIaBHo 3akpoTe KpbIbKU. PyuKn npri 3TOM he CxMmaTe.
- NocTynaTe, KaK 3To 6bINo OnIcHo B NoIpyHKtax 4-7 rnaBbl "NopJxapuBaHne caHdbVuei".
Peuert6nCKBHTbIxBafoelb
CmeaaiTe n B36eIte Do neHb! 5 RnHbX JEJIKOB, 5 CT. IooXeK ropJey BoDbl, 100 r caxapa n npotetpyu shkypky limMOHa, 3aTeM 3aMeCite Tecto co 150 r Mykn i 1/2 aHoiN loKKn oopoJka dIy BIneUeKn. XopoOo B36eIte 5 RnHbX b6JIkoB n 3aMeCite NT B TECTO.
Дугге peцentы Bынайдэт e Bpeцentypьх справочикх пименятeroTOBOBLE cmeCi, npeДnaeraMbte TOproBlei.
MbOCTaBJIeM 3a co6oI npaBO Ha texHnueckne n3MeHeHnIa!
RUS
TapaHTnHoe o63aTeJIbCTBO
TapaHTnHbCpOK Ha TeppntOpm Pocncko Φedepaun yCTaHaBnBaetcnoJIHMOOHbIMn IpeDCTaBNTeJIaMn.
Kaccobby uek yBJIeTcra rapaHTnHbIM TaIOHOM. Be3 HrO HeBO3MOxeh 6ecPNaTHbI peMOHT nII 3aMeHa n3dEInJ.
B CNYae BO3NHNKOBXHn pRNTEH3n NO rapaHTIN, npeIbYBIte N3dJIeNE B NIOHOKOMIIeKTaUN, C OPINHAlbHOy YNAKOBOKm I KACCOBIM YEKOM TROPORO TOUKe, PNODAuBEw ETO N3dJIeNE.
*) Depektb npnHaIeXHcTeH He cnyKAT pnpHInOH Ia ABToMaTHeCKO3aMeHb CBeO rEiIeJIa. B 30m CnJyae No3BOHHTe HAM, NOxAJyIcTa, no TograJeI hNIn! Pa36BtIe CTKeJHbIe NIOJAMbIe NIACTMaccBoIe DetAJIb BO3MeuAOTcT ToJIbKO 3a DOnOpJHntEJIbHyIO nIaTy
IepeKtbln3HaunBaembIX npHnAdnEckHOCTe NmI TpyuXscJ DeTalne (HapnIMep KOHTBHe IeTKeMTOPOB, CMEcTeNbHbe KpIOKn, PnINBOdHbe pEMHN, 3aNaChbIe NyltbI ynpabJIeHnI, 3aNaChbIe 3y6Hbe IeTKn, NmIbHbe NOLOTHa n T.d.), a TaKxue YnCTKa, TexO6CnykJBaHne NmI 3aMeHa TpyuXsc J deTaeJe He NOnaAoiT PoJraHnIO, N No3TOMy npOBoJrTcS 3a OTeJIbHyO onlata!
TapaHTn TepaETc np BCKpbTm n3dJIy NOCTOPOHmMn IuCaMn.
Pocje rapaHTn
Iocne OKOHuaHna Cpoka rapaHTn, peMOHT n3dJIeI pON3BOIDTCra 3a ONlaTy, COOTBETCTByUOUMM MaCTepCKMM NII INyHKtAMN CepBNCHO O6ClyKbBaHna.
Technische Daten
Model: ST/WA 2942