
DG 5552 - Steamer AEG - Free user manual and instructions
Find the device manual for free DG 5552 AEG in PDF.


| Product type | Steam cooker |
| Brand | AEG |
| Model | DG 5552 |
| Dimensions (W x D x H) | 35 x 30 x 25 cm |
| Weight | 3.5 kg |
| Water tank capacity | 1.5 L |
| Steam basket capacity | 10 L |
| Power | 2000 W |
| Power supply | 220-240 V, 50/60 Hz |
| Material | Stainless steel |
| Main functions | Steaming, defrosting, reheating |
| Timer | Yes, up to 60 minutes |
| Automatic shut-off | Yes |
| Visible water level | Yes |
| Maintenance | Clean with a damp cloth; regular descaling recommended |
| Safety | Safety lock, overheat protection |
| Included spare parts | Steam basket, water tank, lid |
| Repairability | Repairability index not communicated |
| Warranty | 2 years |
Frequently Asked Questions - DG 5552 AEG
User questions about DG 5552 AEG
0 question about this device. Answer the ones you know or ask your own.
Ask a new question about this device
Download the instructions for your Steamer in PDF format for free! Find your manual DG 5552 - AEG and take your electronic device back in hand. On this page are published all the documents necessary for the use of your device. DG 5552 by AEG.
USER MANUAL DG 5552 AEG
natural_image
AEG rice cooker with three stacked steers and digital display (no visible text or symbols on the main body)2 Inhalt
DEUTSCH
Inhalt
Location of Controls
4 Deutsch
natural_image
Line drawing of a multi-tiered steamer with digital display and control panel (no text or symbols)Betrieb beenden
natural_image
Line drawing of a multi-tiered steamer with control panel (no text or symbols)natural_image
Line drawing of a multi-tiered steamer with digital display and control panel (no text or symbols)Fonction d'arrêt
natural_image
Line drawing of a multi-tiered steamer with digital display and control panel (no text or symbols)natural_image
Line drawing of a multi-tiered steamer with a digital display and control panel (no text or symbols)natural_image
Line drawing of a steamer with digital display and control panel (no text or symbols)General Safety Guidelines
Before using this device, carefully read this user manual and keep it together with the Warranty Certificate, cashier receipt and if possible, the original package inclusive its interior packing. If you hand on the device to any third person, include the user manual as well.
- Use the device for private and its intended purpose only. The device is not intended for commercial use.
Do not use the device outdoors. Protect it from heat, direct sunlight, humidity (do not immerse into liquids under any circumstances) and sharp edges. Do not use the device with wet hands. If the device gets wet, unplug it immediately. - Always switch off and unplug the device (pull the plug, not the cable) when you do not use the device, or when you attach accessories, during cleaning or malfunctioning.
- Do not leave the device unattended during operation. Always switch off the device when leaving the room. Unplug the device.
- Regularly check the device and cable for signs of damage. Do not continue to operate the device in case of damage.
- Do not repair the device by yourself. Please contact authorized personnel. In order to avoid hazards, a damaged mains cable must be replaced with an equivalent cable by the manufacturer, our customer service or any other qualified specialist.
- Do only use original parts.
- Please observe the following "Special safety instructions".
Children and disabled persons
- For the safety of your children, keep any packing parts (plastic bags, cartilage, Styrofoam etc.) out of their reach.

Warning!
Don't let small children play with foils for danger of suffocation!
- This device is not intended for use by persons (including children) with reduced physical, sensory or mental capabilities, or lack of experience and/or knowledge unless they have been given supervision or instructions concerning the use of the device by a person responsible for their safety.
- Supervise children to ensure they do not play with the device.
Symbols in this user manual
Important notes for your safety are marked distinctively. Pay absolute attention to them to avoid accidents and damage to the device:

Warning:
Warns of dangers for your health and indicates potential risks of injury.

Caution:
Indicates potential dangers for the device or other objects.

Note:
Highlights tips and information for you.
Special safety precautions for this device
- Place the device on a flat surface. Never place the mains cable or device on hot surfaces or near heat sources. Run the cable in such a way that it will not touch any sharp-edged objects.
- Do not bend the cable, and do not wrap it around the device.
- When operating electronic heating devices, high temperatures that may cause burns (e.g. hot water, hot water steam, heating element) are generated. Use the handles for operating the lid and bowls. Inform other users about these dangers!

Warning:
▶ Steams escapes from the steam openings and when opening the lid! Risk of burns!
▶ Always use pot holders or oven mitts when handling or removing hot components!
- Allow the device to cool down completely before cleaning or storing.
- Never switch on the steamer without water!
- Do not use the device for any other purpose than cooking food. We will not be liable for any damage resulting from improper use or operation!
Before first use
- Remove the packaging.
- We recommend you clean the parts as described in chapter "Cleaning".
Components and location of controls Using one steam bowl
1 Lid
2 Biggest steam bowl
3 Medium steam bowl
4 Smallest steam bowl
5 Condensation collection tray
6 Water inlet
7 Heater
8 Base unit
9 Digital display
10 ON / OFF switch
11 Minute button MIN
12 Function button SET
13 Hour button HR
14 LED control lamp
15 Water indicator
Without picture: 1 x rice bowl
Installation and notes on operation
• Install the device near a wall socket. Choose a flat, dry, non-slip and heat-resistant surface with sufficient clearance to the wall or furniture.
- Do not cover the steam openings during operation. Allow the steam to escape unhampered.

Caution:
▶ Do not place the steamer under wall cabinets!
The steamer and accessories are not suitable for use in stoves (microwave, convection or conventional) or on stovetops!
Instant steam function
The special steam pipe will release steam after a few seconds. This component covers the heating element and regulates the subsequent water flow.
Filling with water

Note:
▶ A water level indicator with MIN and MAX markings is located next to the control panel.
▶ Fill the water reservoir with clear and clean water only. Do not put any other liquids or add any salt, pepper, etc. in the water reservoir.
- The water level indicator shows the water level in the water reservoir.
- Fill the reservoir till the maximum level (1 liter).
- When steaming longer than 15 min., always fill the reservoir till the maximum level.
Condensation collection tray
Place the collection tray in the base unit.

Note:
▶ In order to simplify the use, the bowls are marked with 1, 2 and 3.
▶ Only the steam bowl marked "1" fits on the collection tray.
- Place steam bowl "1" on top of the collection tray.
- Place vegetables, fish or other foods without sauce or liquids into the steam bowl. Do not completely cover the steam openings!
- Cover the upper bowl with the lid.
Using two steam bowls
- Place steam bowl "1" on top of the collection tray.
- Place the biggest piece of food with the longest cooking time into the lower steam bowl.
- Place steam bowl "2" on top of the steam bowl "1".
- Cover the upper bowl with the lid.
Using three steam bowls
- Place steam bowl "1" on top of the collection tray.
- Place the biggest piece of food with the longest cooking time into the lower steam bowl.
- Place steam bowl "2" on top of steam bowl "1".
- Place the desired food into bowl "2".
- Place steam bowl "3" on top of steam bowl "2".
- Cover the upper bowl with the lid.
Using the rice bowl
- Put rice or other foods with sauce or liquid in the rice bowl.

Note:
▶ Please continue observing our “cooking instructions”. There you will find suggestions on water quantities for different rice grades.
Initial operation
• After filling with water, first place the collection tray and then the steam bowls and the lid.
- Position the lid with the steam opening on the back.
Mains connection
- Connect the device to a properly installed isolated ground receptacle 230 V, 50 Hz.
- The control lamp lights blue indicating the operating state.
Functions
The steamer features different functions:
- Select the cooking time and the steamer will start operation after approx. 5 seconds automatically.
- You may also set the timer for the food to be ready at a pre-set time.
• After the steamer has cooked for the set amount of time, it will enter a keep-warm mode.
• Overheat protection: If the water is used up, the device will turn off after some time.
Operating instructions
Instant steam function
- Use the ON/OFF switch to turn on the device. The display lights up blue.
- Press SET button once. The display will show the default setting of 5 minutes "00:05".
- If you wish to steam cook longer than 5 minutes, set the cooking time by pressing the minute button MIN repeatedly or the hour button HR for 1 hour setting.
- If the set cooking time is longer than 50 minutes, please refill with water during operation before the 50 minutes have elapsed. Otherwise the device will turn off.

Note:
The maximum time setting is 1 hour and 59 minutes.
▶ During this process the readout "STEAMER" will blink on the upper right of the display.
▶ If you wish to change your input, press and hold the respective button MIN or HR until the desired values are displayed.
If no button is pressed within 5 seconds after input, the device will start heating water automatically. The readout "STEAMER" will then illuminate steadily. The control lamp changes from blue to red.
The timer counts down. When elapsed, 5 signal tones will alert you that the cooking has been finished.
Delayed cooking
- Use the ON/OFF switch to turn on the device. The display lights up blue.
- Press SET button once. The display will show the default setting of 5 minutes "00:05".
- Set the cooking time by pressing minute button MIN repeatedly or hour button HR for 1 hour setting.
- Press SET button a second time.
- Set the time for the device to start cooking, using the MIN and/or HR buttons.

Note:
▶ During this process the readout "TIMER" will flash on the upper right of the display.
▶ You may delay cooking by maximum 12 hours and 59 minutes.

Note:
▶ If you wish to change your input, press and hold the respective button MIN or HR until the desired values are displayed.
If no button is pressed within 5 seconds after input, the timer will automatically start to count down. The readout "TIMER" will then illuminate steadily. When the time of the TIMER has elapsed, the device will automatically turn to "STEAMER" mode and start cooking. The control lamp changes from blue to red.

Warning:
Never operate the device unattended. When setting the timer to delay cooking, set a time that ensures operation with proper supervision.
Keep-warm mode
• After the cooking time has elapsed, a signal tone will sound 5 times.
- The display will show the readout "00:00", and below that "KEEP WARM".
- The control lamp will change from red to blue. The keep-warm mode starts.
- The heater will turn on and off in intervals. During heating the control lamp will light up red.
- The device counts the minutes onwards. The display will show the elapsed time during keep-warm mode.
Terminating operation
Press ON/OFF switch. The display turns off. All settings will be reset.
Overheat protection
When the water is used up, the device will turn off after some time. All settings will be reset. A signal tone will sound. The display backlight and control lamp will turn off.

Warning:
▶ The device is still connected to the mains!
- Terminate operation by disconnecting the plug. Or refill with cold water.

Note:
▶ The device will always switch into standby mode automatically after the heating element has cooled down.
The control lamp lights up blue indicating its operating state.
This procedure might take up to 30 minutes, depending on whether or not you have refilled with water.
ENGLISH
- If you wish to continue operation, press the ON/OFF button to turn on the device again.
- Set the steaming time again.
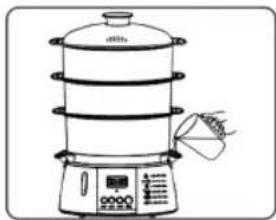
Adding more water
At maximum water level (1 liter) the water will be used up after approx. 50 minutes.
Please observe the water level indicator. We recommend to already refilling with water as soon as the water reaches the MIN marking. It is possible to do so during operation.
- Use a measuring cup.
- Add water through the water inlet.
- Fill the reservoir till the MAX level.
natural_image
Line drawing of a multi-tiered steamer with digital display and control panel (no text or symbols)Stop operation
- Press ON/OFF switch. The display turns off.
- Disconnect the plug from the mains.

Warning:
▶ Always use pot holders or oven mitts when handling or removing hot components in order not to get burned by hot steam!
▶ The liquid in the collection tray is hot!
- Remove the steam bowls first and the collection tray last.
Cleaning

Warning:
▶ Before cleaning, always disconnect the mains plug and wait until the device has cooled down completely.
▶ Do not immerse the base unit of the steamer in water for cleaning. This might otherwise cause electric shock or fire.

Caution:
▶ Do not use wire brushes or other abrasive objects.
▶ Do not use sharp or abrasive cleaning agents.
Surface of base unit
- Wipe the surface of the base unit only with a damp cloth and dry with a soft cloth afterwards.
Reservoir
- Pour the remaining water from the reservoir.
- Use a cloth to wipe the reservoir dry.
Lid, steam bowls, collection tray, rice bowl

Caution:
▶ Do not clean these parts in the dishwasher.
▶ The clear plastic surfaces could otherwise tarnish.
- Clean these parts manually in soapy water.
- Rinse under clear water and dry afterwards.
Descaling
In hard water areas scale might build up on the heating element. This might result in the steam turning off before the food is cooked.
- To avoid that, after 7-10 uses, pour 3 cups of vinegar in the reservoir and fill up with water till the "MAX" level.
- Do not place the lid, steam or rice bowls and collection tray on the steamer.
- Connect the mains plug to a wall socket and set the time to 30 minutes. After the time has elapsed, disconnect the plug from the mains. Let the device cool down completely.
- Only then pour the water from the reservoir. Rinse the water reservoir several times with cold water.
Storage
Place the steam bowls in reverse order into each other in order to save space during storage.
Cooking instructions
General
- The following time settings are for reference only and may vary under different circumstances.
- When using several steam bowls, the total cooking time will be extended by approx. 5 minutes.
• Always place large pieces of food with empirically long cooking time into the lowest bowl.
- Do not cook too big or too many pieces of food in order for the steam to escape through the uncovered steam openings.
• Defrost meat and poultry before cooking.
- You may use liquids collected in the tray for soups or sauces.
Rice:
-
There are different rice grades. Observe the individual cooking instructions of each grade.
-
Put rice and water with the exact measured amounts in the rice bowl. Cover with the lid and switch the steamer on.
-
For each rice grade, check after the given minimum cooking time if the rice has been evenly cooked. Stir the rice.
- When checking/stirring the rice, make sure no condensation water will drop into the rice bowl. This would change the texture and taste of the rice.
- After cooking you may season the rice with salt, pepper or butter.
| Rice grade | Together in the rice bowl | Approximate time (minutes) | |
| Rice | Water | ||
| Brown rice | |||
| - normal | 1/2 cup | 1 cup | 42-45 |
| - half done ("parboiled") | 1 cup | 1 1/2 cups | 45-50 |
| Mixture of long grain and wild rice | |||
| - normal | 1 cup | 1 1/2 cups | 56-58 |
| - fast-cooking | 1 cup | 1 3/4 cups | 18-20 |
| Instant rice | 1 cup | 1 1/2 cups | 12-15 |
| White rice | |||
| - normal | 1 cup | 1 1/2 cups | 45-50 |
| - long grain | 1 cup | 1 2/3 cups | 50-55 |
Vegetables/fruits:
- Thoroughly clean vegetables and cut off the stem. Clean, peel and cut as desired. Smaller pieces cook faster than bigger ones.
- Amount, quality, freshness, size/uniformity and the temperature of frozen food might influence the cooking time. Amount of water and cooking time are variable, depending on the desired result.
- Do not defrost frozen vegetables before cooking.
| Vegetables/fruits | Weight or amount in pieces | Approximate time (minutes) |
| Artichokes, whole 4 whole pieces 30-32 | ||
| Asparagus, heads 500 g 12-14 | ||
| Beans | ||
| - green/waxed 250 g 12-14 | ||
| - cut or whole 500 g 20-22 | ||
| - thick beans 500 g, shucked | 12-13 | |
| Beetroot | 500 g, cut | 25-28 |
| Broccoli, flowers | 500 g 20-22 | |
| Brussels sprouts | 500 g 24-26 | |
| White cabbage | 500 g, cut | 16-18 |
| Celery | 250 g, sliced | 14-16 |
| Carrots | 500 g, sliced | 18-20 |
| Cauliflower, whole 500 g 20-22 | ||
Corn on the cob 3-5 cobs
14-16
| Vegetables/fruits | Weight or amount in pieces | Approximate time (minutes) |
| Eggplant | 500 g 16-18 | |
| Champignons, whole | 500 g 10-12 | |
| Onions 250 g, thinly sliced | 12-14 | |
| Pepper, whole medium, up to 4 | 12-13 | |
| Potatoes (approx.) | 500 g 30-32 | |
| Rutabagas | 1 medium, diced | 28-30 |
| Spinach | 250 g 14-16 | |
| Pumpkin | 500 g 16-18 | |
| Beets | 500 g, sliced | 20-22 |
| Frozen vegetables | 285 g 28-50 | |
| Apples | 500 g, pieces | 10-15 |
| Pears | 500 g, pieces | 10-15 |
Fish and seafood:
- The cooking time settings in the above table refer to fresh, frozen and defrosted seafood and fish. Clean fresh seafood and fish before steaming.
- Most of the fish and seafood cooks fast. Cook smaller servings or the mentioned amounts.
- Big and smaller scallops or oysters open at different times. Check the shell in order to avoid pre-cooking. Do not eat scallops the shell of which did not open after cooking, in order to avoid possible fish poisoning!
- You may cook fish filet in the rice bowl also.
- Set appropriate cooking times.
| Seafood/fish | Weight or amount in pieces | Approximate time (minutes) |
| Big scallops in shells | 500 g | 10-12 |
| Shrimps | 250 g | 20-22 |
| Lobster | ||
| - tail | 2-4 16-18 | |
| - cut | 500-600 g 18-20 | |
| Small scallops(fresh, in shell) | 500 g | 14-16 |
| Oysters (fresh, in shell) | 1500 g | 18-20 |
| Queen scallops (fresh) | 500 g | 16-18 |
| Prawn | ||
| - medium, in shell | 500 g | 10-12 |
| - big/large, in shell | 500 g | 16-18 |
| Fish | ||
| - whole | 250-375 g 10-12 | |
| - filet | 500 g | 10-12 |
| - steak | 500 g, 2.5 cm thick | 16-18 |
Meat:
| Meat Weight or | amount in pieces | Approximate time (minutes) |
Beef
- pieces 500 g 28-30
- hamburger 500 g 16-18
- meatballs 500 g 22-24
Poultry
- pieces / slices 2-4 24-26
Mutton
- pieces / slices 500 g 26-28
Pork
- pieces / slices 500 g 26-28
Hot dogs / sausages 500 g 14-18
Eggs:
You may place up to 6 eggs onto the egg holder on the bottom of a steam bowl.
If you wish to cook more eggs, place them directly on the bottom of a steam bowl.
| Eggs Amount in pieces Approximate | time (min-utes) | |
| Not peeled | ||
| - soft | 1-12 | 15-18 |
| - hard 1-12 | 19-22 | |
| Poached | ||
| 1. step: | ||
| pour 2 cups of water into the rice bowl; | 7-8 | |
| steam to heat water. | ||
| 2. step: | ||
| crack an egg and pour into a bowl; | 7-8 | |
| place the bowl into the steam bowl with hot water until egg is poached. | ||
Egg drop
mix 6 eggs with 2 spoons of milk in the rice bowl; 20-22
season with salt and pepper.
Technical Specifications
Model: DG 5552
Power supply: 220-240V, 50/60Hz
Power input: 700-800W
Protection class:....I
Net weight: 2.10 kg
Subject to change without prior notice!
This device complies with all current CE directives, such as electromagnetic compatibility and low voltage directive and is manufactured according to the latest safety regulations.
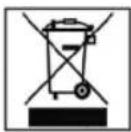
Meaning of the "Wheelie Bin" Symbol
Take care of our environment, do not dispose of electrical appliances via the household waste.
Dispose of obsolete or defective electrical appliances via municipal collection points.
Please help to avoid potential environmental and health impacts through improper waste disposal.
You contribute to recycling and other forms of utilization of old electric and electronic appliances.
Your municipality provides you with information about collecting points.
natural_image
Line drawing of a multi-tiered steamer with control panel and fan (no text or symbols)natural_image
Line drawing of a multi-tiered steamer with a digital display and control panel (no text or symbols)natural_image
Line drawing of a multi-tiered steamer with digital display and control panel (no text or symbols)Зупинка роботи

- Inhalt
- DEUTSCH
- Inhalt
- Deutsch
- Betrieb beenden
- Fonction d'arrêt
- General Safety Guidelines
- Children and disabled persons
- Warning!
- Symbols in this user manual
- Warning:
- Caution:
- Note:
- Special safety precautions for this device
- Before first use
- Components and location of controls Using one steam bowl
- Installation and notes on operation
- Instant steam function
- Filling with water
- Condensation collection tray
- Using two steam bowls
- Using three steam bowls
- Using the rice bowl
- Initial operation
- Mains connection
- Functions
- Operating instructions
- Delayed cooking
- Keep-warm mode
- Terminating operation
- Overheat protection
- ENGLISH
- Adding more water
- Stop operation
- Cleaning
- Surface of base unit
- Reservoir
- Descaling
- Storage
- Cooking instructions
- General
- Rice:
- Vegetables/fruits:
- Fish and seafood:
- Beef
- Poultry
- Mutton
- Pork
- Eggs:
- Egg drop
- Technical Specifications
- Meaning of the "Wheelie Bin" Symbol
- Зупинка роботи
Brand : AEG
Model : DG 5552
Category : Steamer