
508 A Big Wheeler - Lawn mower GUDE - Free user manual and instructions
Find the device manual for free 508 A Big Wheeler GUDE in PDF.


| Product Type | Self-propelled lawn mower |
| Brand | Güde |
| Model | 508 A Big Wheeler |
| Engine | 4-stroke petrol engine |
| Displacement | 150 cm³ |
| Power | 3.0 kW |
| Cutting Width | 51 cm |
| Cutting Height | 25-75 mm, centrally adjustable |
| Grass Collector | 70 litres |
| Wheels | Large wheels (Big Wheeler) |
| Weight | 35 kg |
| Dimensions (L x W x H) | 850 x 580 x 450 mm |
| Fuel | Unleaded petrol |
| Tank Capacity | 1.0 litre |
| Cutting System | Rotary blade |
| Mulching Function | Yes, with plug |
| Handle | Foldable for storage |
| Safety | Automatic engine stop, safety brake |
| Maintenance | Clean after use, regular oil change |
| Spare Parts Available | Blade, spark plug, air filter, cables |
| Warranty | 2 years |
Frequently Asked Questions - 508 A Big Wheeler GUDE
User questions about 508 A Big Wheeler GUDE
0 question about this device. Answer the ones you know or ask your own.
Ask a new question about this device
Download the instructions for your Lawn mower in PDF format for free! Find your manual 508 A Big Wheeler - GUDE and take your electronic device back in hand. On this page are published all the documents necessary for the use of your device. 508 A Big Wheeler by GUDE.
USER MANUAL 508 A Big Wheeler GUDE
natural_image
Icon of an open book inside a black circle (no text or symbols)Deutsch 4
English 11
Français 18
Dansk 26
Čeština 33
Slovenčina 40
Nederlands 47
Italiano 55
Norsk 62
Svenska 69
Magyar 76
Hrvatski 83
Slovenščina 90
Românește 97
Български 104
Bosanski 111
Srpski 118

natural_image
Line drawing of a lawn mower with visible wheels and head cover (no text or symbols)CE
# 94147


natural_image
Two hand-drawn sketch-style objects: a black notebook and a white box with a handle, placed side by side on a plain surface (no text or symbols)
natural_image
Black fabric object with metal frame and circular label '3' (no text or symbols on the object itself)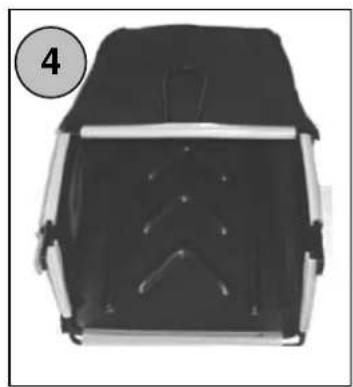
natural_image
Top-down view of a black and silver car hood with visible internal slots and mounting brackets (no text or symbols)

natural_image
Two-step diagram showing a car wheel being adjusted from (5a) to (5b), with no visible text or symbols.

natural_image
Illustration of a lawn mower with motion arrows indicating cycle (no text or symbols)Betrieb
natural_image
Hand placing a component into a control panel (no text or symbols visible)Achtung!!!
natural_image
3D rendering of a spacecraft with attached propeller and tank (no text or symbols visible)natural_image
Close-up of hands using a screwdriver to adjust a mechanical component (no visible text or symbols)Luftfilter
 | Please read carefully these operating instructions before putting the machine into operation. | ||
| A.V. 2Reprints, even partial, are subject to approval. Technical changes reserved. | |||
| GB | Do you have any technical questions? Any claim? Do you need any spare parts or operating instructions?We will quickly help you and without needles bureaucracy at our web pages atwww.guede.comin the Servicing part. Please help us be able to help you. In order to identify your device in case of claim we need the serial No., product No. and year of production. All this data can be found on the type label. Please enter it here for future reference:Serial No._Product No.: Year of production_ | ||
| Tel.: +49 (0) 79 04 / 700-360 | Fax: +49 (0) 79 04 / 700-51999 | E-Mail: support@ts.guede.com | |
Marking:
Product safety, prohibitions:
 |  |
| Product corresponds to appropriate norms of the European Community. | General prohibition (in connection with another icon) |
Prohibitions, warnings:
 |  |
| Keep in safe distance from inflammable sources | Warning / Attention |
Warnings:
 |  | |||
| Warning against dangerous electric voltage | Danger of throwing items away at running engine | |||
Warnings:
 |  | ||
| Keep safe distance | Danger arising from hot surfaces | ||
Warnings:
 |  | |||
| Danger of sniffing up of health-harmful fumes | Danger arising from rotating cutting tools | |||
 | [DFYC] | |||
| Beware of sharp knives | Disconnect the machine from power source before maintenance | |||
Commands:
 |  |
| Use hearing protection | Please read the operating instructions before use |
Environment protection:
 |  | |
| Do not throw waste to environment but dispose it properly. | Packing cardboard material may be delivered to collecting centres designed thereto. | |
 |  | ||
| Any damaged or liquidated electric or electronic devices must be delivered to appropriate collection centre. | Der Grüne Punkt –Duales System Deutschland AG | ||
Package:
 |  | ||
| Protect against humidity This side up | |||
| Technical data to the BIG WHEELER 508 A #94147 Lawn Mower: | |
| Petrol engine / output: 2.7 kW max. at 3,600 min -1 | |
| Engine revolutions: 2,850 per minute | |
| Sound power level: 83.5 dB(A) | |
| Guaranteed sound pressure level: | 98 dB (A) |
| Cut width: 508 mm | |
| Height adjustment: central, 6-level | (25-75 mm) |
| Stroke volume: 140 cm | 3 |
| Wheel size: 200 mm in front; 300 mm at the back | |
| Grass catcher capacity: 60 l | |
| Vibration: 6.90 m/s 2 (EN 1033) | |
| Travel speed: max. of 3.6 km per hour | |
| Weight: | 34 kg |
Device
Big Wheeler 508 A Lawn Mower
High-quality lawn mower with backwheel drive with durable, powerful four-stroke OHV engine corresponding to latest regulations for exhaust gases is very suitable for areas within app. 2,200 m 2 . The lawn mower housing out of quality steel sheet with powdered painting, very good grass catcher capacity. Wheels with double embedding in ball bearings 300 mm at the back, 200 mm in the front. Professional height adjustment in 6 levels, robust light-running cable, metal starting equipment.
Equipment:
3 in 1 function: cutting, collecting, mulching.
High-quality grass catcher, folding mobile handle with textile surface layer, precise metal driving gear.
Scope of delivery
- Extension handle
- Gas lever and starter lever
- Quick-clamping lever
- Air filter
- Spark plug
- Outlet/noise silencer
- Throat for oil adding
- Height adjustment lever
- Grass catcher
- Reverse starter
- Type label
-
Drive lever
-
Operation lever (lever for automatic stopping)

EC Declaration of Conformity
We, Güde GmbH & Co. KG Birkichstraße 6, 74549 Wolpertshausen, Germany, hereby declare the conception and construction of the below-mentioned devices correspond - at the type of construction being launched - to appropriate basic safety and hygienic requirements of EC Directives.
In case of any change to devices not discussed with us the Declaration expires.
Marking of devices: BIG WHEELER 508 A product No.: 94147
Date/producer signature: 17/06/2008
Data on Signatory:

Mr Arnold, executive officer
Appropriate EC Directives:
98/37/EC, 2000/14/EC 2005/88/EC
97/68/EC 2002/88/EC, 2004/108/EC
Harmonised standards used:
EN 836:1997+A1:1997+A2:2001+A3:2004+AC:2006
EN 14982:1998
Certification body:
Guarantee claims as per guarantee card attached.
General Safety Instructions
Caution
IMPORTANT: The lawn mower may amputate toes and fingers and throw away items. Failing to observe the below-mentioned rules may lead to serious injuries.

WARNING: Always disconnect the spark plug cable to vent unintentional device starting at adjustment, transportation or maintenance

WARNING: Exhaust gases and their various components contain or, more precisely, emit chemicals functioning as carcinogenic agents may damage the foetus or bring infertility.

WARNING: The silencer and other engine parts may come very hot in the working condition and remain hot even for engine turning off. Do not touch these parts to prevent a getting burnt.
I. GENERAL OPERATION AND SAFETY REGULATION
- Read these instructions thoroughly. Familiarise with its operating elements and correct using.
- Keep your hands and legs in safe distance from rotating parts. Keep safe distance from the machine exhaust. Caution: do not touch the rotary parts of the machine.
- The device should only be operated by responsible persons that have familiarised themselves with the operating instructions.
- Carefully search the area on which the device is to be used. Remove all items the mower could throw away while working.
- Do not use the mower if any persons (especially children) or animals, are around.
- Wear stable boots and long trousers when cutting. Never operate the device bootless or in sandals.
- If it is not necessary, do not pull the mower backwards. Look down and backwards while moving backwards.
- Do not operate the mower with any damaged safety equipment, e.g. ejection flap or grass catcher.
- Use accessories allowed by the producer only.
- When passing any gravel road or non-solidified road cut off the knife.
- Switch the engine off and disconnect the spark plug, - before releasing any blocked parts or cleaning the clogged ejection channel - before check, cleaning and various works on the mower - after any foreign body has been caught by the mower. Check whether the mower is not damaged and remove any damage before restarting the device. - if there are any extra strong vibrations of the mower (immediate checking)
- Switch off the engine before taking the grass catcher out and wait until the knife fully stops.
- Cut in daylight or with suitable lighting only.
- Do not operate the device when impaired or intoxicated.
- Never operate the device in wet grass. Pay attention to where you put your legs and hold the guide handle firmly. Guide the mower step by step.
- Release the clutch for wheel drive before starting the engine.
- Replace any faulty absorbers.
- Always wear protective glasses when operating the mower.
- Remove all obstacles, e.g. stones and branches.
- Check the terrain for unevenness, there may be obstructions hidden in high grass.
- Do not cut near ditches and slopes. You may lose your stability and balance.
- Do not use the device on a very steep terrain.
- Realise the operator, or, more precisely, the user is responsible for any injuries or threat of persons and things.
- Be watchful and switch the device immediately off if there are children around.
- Be watchful and switch the device immediately off if there are children around.
- Never let persons not familiarised with these instructions work with the mower. The operator's age can be limited by local regulations.
• WARNING — petrol is highly flammable.
- Store the fuel in containers designed for that purpose.
- Add fuel outdoor only, do not smoke when adding fuel.
- Add fuel before device starting. Never take the cover out and do not add fuel when the engine is running or hot.
- If you spill the petrol do not try to start the device. Take the device away and prevent generation of a flammable source around the spilled petrol.
o Secure the petrol tank is closed safely.
- Always check whether the knife, knife bolts and cutting equipment are not damaged or worn before using the mower. Always replace any damaged and worn knives and bolts in the entire set to prevent device unbalance. Do not make any alterations to the safety device. Regularly check their proper functioning.
- Keep the device clean, with no grass, leaves or other impurities. Always wipe any oil or petrol run out. Let the mower cool down before storing to closed spaces.
- Be especially careful when changing direction on a slope.
- Never adjust the height of wheels when the engine is running.
- The grass catching device may lose its functioning any throw away items due to wear or damage. Regularly check the mower parts and, if necessary, replace them with spare parts recommended by the manufacturer.
- The mower knife is very sharp. Risk of injury! Be especially careful at knife maintaining, wear protective gloves or cover the knife-edges.
- Do not change the basic engine adjustment and avoid its overloading.
- Be especially watchful when turning the mower or pulling it towards your body.
- If it is necessary to incline or lift the mower to pass a surface other than grass or when carrying the mower to or from the area to be cut then cut off the knife.
- Release the knives and engine clutches before switching on.
- Start the engine in accordance with the operating instructions and make sure your legs are in safe distance from the knife.
- Do not incline the mower at starting except for cases when it is necessary. Do not incline the mower more than necessary in such a case and always lift the part reversed from you.
- Do not start the engine when standing in front of the ejection outlet.
- Never lift and transfer the mower with engine running.
- Lower the brake adjustment when the engine is off. If the engine is equipped with a stop valve then close the petrol supply after cutting.
- Move slowly if using an auxiliary trail seat.
ASSEMBLY / PREPARATION

All assembly and/or maintenance works may be formed only when the motor is turned off!
Please read the entire operating instructions before assembling or starting your new mower.

IMPORTANT: The mower is supplied without oil and ol.
UNPACK THE MOWER
Take the mower out of the board and check whether there are any free parts left there.
Wheel assembly (Fig. 5 a-f)
Install wheel at the lawn mower according to figures 5 a-f.

Pay attention to proper order of spacer disc at both sites (fig. 5d)

Pay attention to that star-shaped screws are tightened by enough (self-locking.
Assembly of collecting bag (Fig. 2) (Fig. 3) (Fig. 4)
- Take the collecting bag, corresponding frame and plastic insert out of the package. (Fig. 2)
- Put the frame into the collecting bag while paying attention to that the coupling at the frame is outside the collecting bag. (Fig. 3)
- Now fix the collecting bag at the frame. (Fig. 4)
Assembly - Handle
IMPORTANT: Disassemble the handle with care to prevent clamping or damage of the cables.
- Lift the handle until it snaps in the working position.
- Remove the protection sleeve, lift the upper parts of the handle and assemble it with the bottom part. Tighten the safety bolts on both sides of the handle.
- Remove the protection sleeve of the operation grab handle in the upper part.

natural_image
Illustration of a lawn mower with motion arrows indicating cycle (no text or symbols)Operation
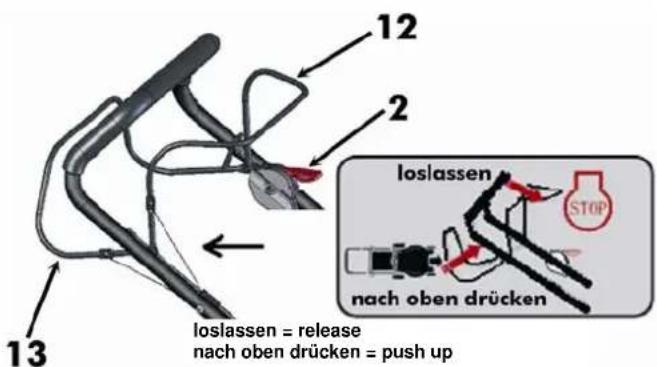
Operation lever (for automatic stopping) (12) – press the lever towards the handle when starting. If you want to switch the engine off release the lever.
Gas lever (2) – used at starting
Drive lever (13) - used when you want the mower to be moving forward.
- Cutting (without grass catcher)
The cut grass is laid in strips.
- Cutting and collecting
The grass is collected to the grass catcher (if the grass is damp or wet it reduces the catcher capacity). If you want to mount the catcher to the mower lift the cover plate and hang the grass catcher.
- Mulching
When the mulching wedge is inserted (see the picture and "Changeover to mulching" article) the grass is not thrown up but ground by the cutting knives and the grass will remain as surface fertilisation on the lawn

- Assembly and disassembly of accessories must always take place when the engine is switched off.
- Remove the grass catcher, insert the mulching wedge to the ejection channel and lock the mulching wedge (1) point it against two outlets (2) in the bottom part and ensure it with a self-securing hook (3).
- Please make sure the mulching wedge is mounted firmly after the changeover.
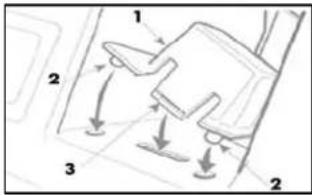
- Attention!!! Use original equipment from the producer only.
5. Disassembly
Press with thumb in the middle (3) then release and deflect the mulching wedge downwards.

natural_image
Hand holding a small electronic device with a handle, no visible text or symbolsAttention!!!
If the mower is blocked during mulching reduce the travelling speed so that the knife could continue in grinding the grass and spread it on the lawn. Never remove the gathered grass with your hands.
DRIVE CONTROL
The self-propelling travel is controlled as follows: Press the operation lever (lever for automatic stopping) (12) towards the handle and simultaneously press the drive lever towards the handle (13).
The forward movement is stopped by releasing the drive lever (13).
CUTTING HEIGHT ADJUSTMENT
Depending on the cutting height required it is necessary to adjust the height of wheels. Adjust the height with the lever (8) as you wish. The middle position is most suitable at most mowers.
ADD OIL BEFORE STARTING
The oil level needs to be checked before each use. Fill up oil as needed (500ml SAE30 engine oil).
OIL FUNNEL CAP - OIL DIPSTICK

The mower is supplied without oil in the engine.
WARNING: Be careful not to overfill the engine with oil, failing which the absorber would smoke when starting.
- Make sure the mower stands on a flat surface.
- Take out the oil tank cover.
- Insert the oil dipstick and fix it.
IMPORTANT:
- The oil level needs to be checked before each use. If necessary, add oil to the marking on the oil dipstick.
- The oil must be changed after 25 hours of operation or each season. At works in a dusty or polluted environment the oil may need to be changed more often. See “OIL CHANGE” in the Maintenance article in these operating instructions (SAE 30).
FUEL ADDING (unleaded petrol)
- The fuel is added through the filling hole in the tank. Pay attention not to spill the petrol. Use common clean unleaded petrol. Do not mix the petrol with oil. Always buy only reasonable volume of petrol so that you could consume it within 30 days.
WARNING: Wipe any spilled oil or petrol. Do not store, pour, use near open fire.
FUEL TANK CAP
natural_image
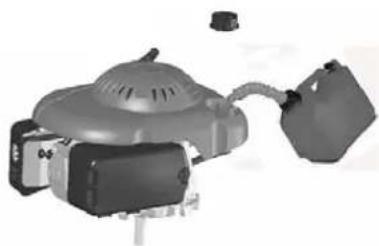
3D rendering of a mechanical device with a dome-shaped top and two connected containers (no visible text or symbols)WARNING: Alcohol-enriched fuels (gasohol) or fuels with ethyl alcohol or methanol mixtures may attract humidity and subsequent acid formation. The clean petrol may as a result of long storage damage the engine fuel system. If you want to prevent engine problems you should empty the fuel system before storing for more than 30 days. Empty the fuel tank, start the engine and let it run until the fuel system and carburettor are empty. Add fresh fuel each season. See the storing instructions, too. Never pour cleaners to the fuel tank to clean the engine or carburettor. By doing so, you could cause irreparable engine damage.

Picture for engine starting
ENGINE STARTING
At starting first make sure the spark plug is in its place and there is sufficient amount of oil and petrol in the device.
CAUTION: The engine may smoke at first starting due to protective oil film on the inner engine surface.
Consider this as normal.
- Press the operation lever (automatic switching off lever) (12) to the mobile handle (1) and shift the gas lever (2) forward up to the stop (to the starting position).
- With the operation lever (automatic switching off lever) (12) pulled in slowly pull out the starting cord (10), when you feel slight resistance strongly pull in the starter until the engine is started.
- Pull the gas lever (2) now down from the starting position until the engine operation is even.
CAUTION: In cold weather or when the machine has not been used for a longer time it may be necessary to repeat the first steps for several times.
ENGINE STOPPING
- If you want to stop the engine release the operation lever (automatic switching off lever) (12).

WARNING! The knife still rotates for a few seconds after the engine is switched off. If you want to leave the mower saying unattended then disconnect the spark plug cap.
Important tips and advice for grass cutting!!!
- Under certain conditions, e.g. when the grass is very high, it may be necessary to adjust bigger cutting height so that effort at pushing the mower was reduced, engine overloading removed and blocking of grass in the mower prevented. It is possible you will also have to reduce the mower travel speed and/or cut the area again.
- If cutting is very difficult it may be suitable to reduce the travel speed and mower gear.
- Vent ports in the grass catcher may get blocked if the catcher is not cleaned regularly. Clean the grass catcher regularly with water and let it dry before use.
- Keep the upper part of the engine in the starter place clean. Air flow will be improved and engine life increased by doing so.
- Cut in dry weather only.
• Always keep the knives sharp.
MAINTENANCE
IMPORTANT – Regular maintenance is unavoidable for constant operational reliability and keeping the original device output.
1) Keep all screws and nuts tightened so that you were sure the device is in an operation-reliable condition. Regular
maintenance is necessary for safety and trouble-free operation.
2) Never store the device with fuel in closed rooms as the evaporating fuel may ignite.
3) It is necessary to let the device cool down and empty fuel from it before storing in closed rooms.
4) In order to minimise the risk of fire keep the engine and muffler and the fuel tank clean and with no grass, leaves and fats. Do not store the grass cut with the mower.
5) For safety reasons, avoid using a device with a worn or damaged parts. Replace any faulty parts with new ones, do not repair them. Use original spare parts and original spare knives only.
Parts with quality different from the one prescribed may damage the device and threaten your safety.
6) If it is necessary to empty the fuel tank do it outside and with cold engine.
7) Wear solid protective gloves at assembly and adjustment of knives.
8) Check correct direction of rotating and balance of knives after sharpening.
9) Regularly check wear and pollution of the self-closing cover and grass catcher.
10) When you must transport the device, carry it in hands or incline it always wear safety gloves.
Always hold the device at places guaranteeing safe holding. Take into account the weight of the device and its distribution.
ČLEANING
Clean the device with water, remove the grass and mud from inside before each use – it will prevent from impurities getting dry and problems at next starting.
The painting inside the housing may wear down in the course of time. In order to prevent later corrosion of the device use anti-corrosive paint for the worn-down spots.
Remove the gearbox cover and clean the space around belt pulleys and drive belts with a brush or compressed air once or twice a year.
You should clean the inside of the drive wheels once per season. Disassemble both wheels. Clean the cog wheels and their edges off the grass and other impurities with compressed air or a brush.
KNIFE DISASSEMBLY
For purpose of cleaning / sharpening / replacement
Attention!!! It is necessary to first disconnect the spark plug before disassembly.
Release the screw at disassembly of the knives.

Re-assemble according to the picture. Tighten the screws. Torsion moment of 40 Nm. You should also replace the screw at replacement of knives.
OIL CHANGE
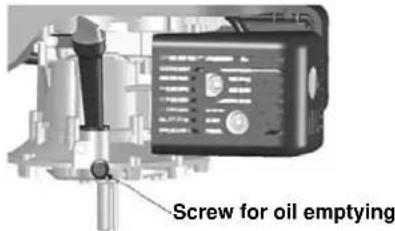
The stopper for oil emptying is placed under the engine. Make sure you have a container for oil catching prepared and disassemble the stopper. As soon as the oil flows out insert a new stopper with a washer and wipe oil remnants.
Add new SAE30 oil to the tank. Measure the oil level with a clean gauge. The oil must reach between min. and max. marking on the gauge. Make sure you do not overfill the tank.
Start the engine and let running for a short time. Then switch it off, wait for a minute and measure the oil level. If necessary, add some oil.
Spark plug
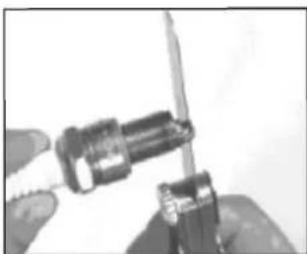
When the engine cools down disassemble the spark plug with the key supplied, clean it with a wire brush and adjust the distance to 0.75 mm (0.030") through a feeler gauge. Then refit the spark plug. Make sure you do not tighten it too firmly. (alternatively: (Bosch WR 7 DC); (NGK BPR 6 ES)


natural_image
Close-up of hands using a screwdriver to adjust a screwdriver (no visible text or symbols)Air filter
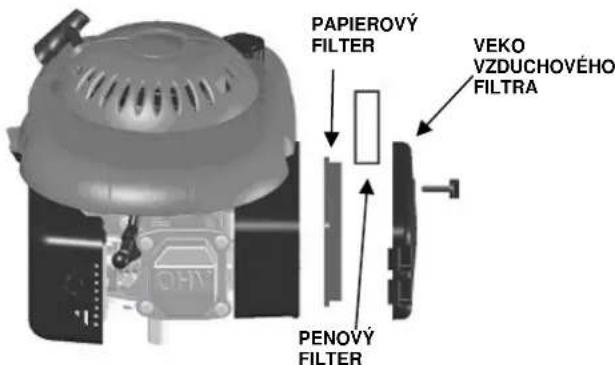
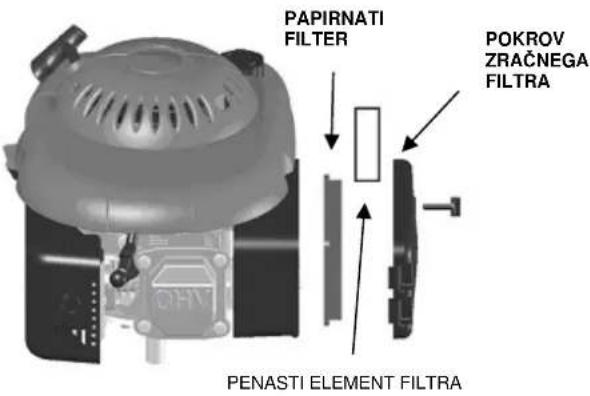
Loosen the filter cap and remove the foam filter element. It is necessary to re-fit the filter cap to prevent entering of foreign bodies to the suction inlet.

FUEL TANK AND CARBURETTOR EMPTYING
Put a container allowing petrol storage under the carburettor. Work with a funnel to prevent petrol spilling. Disassemble the drain screw, then adjust the fuel valve tie rod to the ON position. Re-fit the drain screw with a packing ring after fuel tank emptying. Tighten the screw firmly.
STORAGE
The petrol must not remain in the fuel tank for more than 1 month. Regularly clean the mower and store it to a dry, closed room.
ENVIRONMENT
You should pay special attention to the following points for environment protection:
- Always use clean unleaded petrol.
- Always use a funnel and/or can with level regulation to prevent fuel spilling while refuelling.
- Do not fill the fuel tank up to the edge.
- Do not let the engine oil overflow.
- At changing the oil, make sure the oil used will be disposed in accordance with the regulations. Prevent oil spilling.
- Do not throw the oil filters to the municipal waste but deliver them to appropriate collection centre.
- Replace the absorber if faulty. Use original spare parts at repairs.
• Always have the carburettor adjusted by a specialist.
• Always clean the filter according to appropriate instructions.
• We recommend returning the mower after mower life expiry to the seller to ensure its disposal in accordance with regulations.
Regularly check the level of wear and technical state of the mower.
MAINTENANCE
Original spare parts will be supplied by your seller or our service department. We recommend annual maintenance and check of safety elements being executed at an authorised shop. Please contact your seller for issues of maintenance and acquisition of spare parts.
MAINTENANCE PLAN
| REGULAR MAINTENANCE INTERVAL (4) | Before each use | Each month or | Each 3 months or | Once in 6 months or | Each year or | Each two years or | ||
| Corresponding maintenance in the given month or after expiry of the given operating hours – according to which happens first. | 5 hours | 25 hours | 50 hours | 100 hours | 250 hours | |||
| Engine oil (SAE 30) | to be checked O | |||||||
| to be replaced | O | O(2) | ||||||
| Air filter to be checked O | ||||||||
| to be replaced | O | |||||||
| Spark plug | to be checked to be cleaned | 0 | ||||||
| to be replaced | O | |||||||
FAILURE DIAGNOSTICS
| ENGINE DOES NOT START | Possible reason Correction | |
| 1.Fuel check | Lack of fuel | Fuel to be added |
| Wrong fuel, machine storing without petrol tank emptying, wrong type of petrol. | Fuel tank and carburettor to be emptied.Fresh petrol to be added. | |
| 2. Spark plug check | Wrong, dirty or poorly adjusted spark plug | Spark plug to be replaced (P-8). |
| Spark plug is wet from petrol (blocked engine). | Spark plug to be dried and re-fitted. | |
| 3. Have the engine repaired at the seller or use the operating instructions for reference. | Blocked fuel filter, wrong carburettor or sparking adjustment, sticky valves, etc. | Replace or (if necessary) repair the faulty parts. |
| 4. Faulty forward movement | Stroke too long | Stroke setting to be changed |
| 5. Grass is not collected | Blocked channel, full grass catcher, grass is too wet | Ejection to be cleaned,grass catcher to be emptied,cutting in dry weather. |
Directives CE applicables :
98/37/CE, 2000/14/CE 2005/88/CE
97/68/CE_2002/88/CE, 2004/108/CE
Type Approval No.
eIRL*97/68SA*2004/26*0095*00
natural_image
Illustration of a lawn mower with motion arrows indicating cycle (no text or symbols)Fonctionnement
natural_image
Hand inserting a component into a device (no text or symbols visible)Attention !!!
natural_image
3D rendering of a futuristic vehicle with a dome-shaped top and connected components (no visible text or symbols)natural_image
Close-up of hands using a screwdriver to adjust a mechanical component (no visible text or symbols)Filtre à air
natural_image
Illustration of a lawn mower with a handle and blade, showing motion arrows (no text or symbols)Drift
natural_image
Hand inserting a component into a device (no text or symbols visible)Forsigtig!!!
STYRING AF DRIVKRAFT
OLIEEFTERFYLDNING INDEN START
natural_image
3D rendering of a mechanical device with a cylindrical container and attached tubing (no visible text or symbols)
natural_image
Technical line drawing of a mechanical assembly with no visible text or symbolsnatural_image
Close-up of hands using a screwdriver to adjust a mechanical component (no visible text or symbols)Luftfilter
98/37/ES, 2000/14/ES_2005/88/ES
97/68/ES 2002/88/ES, 2004/108/ES
Type Approval no.:
eIRL*97/68SA*2004/26*0095*00
natural_image
Illustration of a lawn mower with motion arrows indicating cycle (no text or symbols)Provoz
natural_image
Hand using a handheld device to press or install an electronic component (no visible text or symbols)Pozor!!!
natural_image
Exterior view of a futuristic robotic device with labeled parts (no readable text or symbols beyond product name)
natural_image
Technical diagram of a mechanical assembly with labeled parts and a hand gesture icon (no text or symbols present)natural_image
Close-up of hands using a screwdriver to adjust a mechanical component (no visible text or symbols)Vzduchový filtr
98/37/ES, 2000/14/ES_2005/88/ES
97/68/ES 2002/88/ES, 2004/108/ES
Type Approval no.:
eIRL*97/68SA*2004/26*0095*00
natural_image
Illustration of a lawn mower with a handle and blade, showing motion arrows (no text or symbols)Prevádzka
natural_image
Hand holding a small object inside a vehicle's door panel (no visible text or symbols)Pozor!!!
natural_image
Technical line drawing of a mechanical component with exploded view and mounting features (no text or symbols)natural_image
Close-up of hands using a screwdriver to adjust a mechanical component (no visible text or symbols)Vzduchový filter
Povolte veko filtra a vymontujte penový filtračný prvok. Aby ste zabránili vniknutiu cudzích telies do nasávacieho otvoru, je nutné veko filtra opät nasadit.
VYPRÁZDNENIE PALIVOVEJ NÁDRŽE A KARBURÁTORA
Pod karburátor postavte nádobu, v ktorej je povolené skladovat' benzín. Aby ste zabránili rozliatiu benzínu, pracujte s lievikom.
- WAARSCHUWING: Benzine is licht ontylambaar:
natural_image
Hand inserting a plug into a device (no text or symbols visible)Let op!!!
TANKEN VAN BRANDSTOF (loodvrije benzine)
WAARSCHUWING: gemorste olie of benzine
natural_image
3D rendering of a futuristic vehicle with a dome-shaped top and two internal compartments (no visible text or symbols)
natural_image
Close-up of hands using a screwdriver to adjust a mechanical part (no visible text or symbols)Luchtfilter
97/68/CE 2002/88/CE, 2004/108/CE
Type Approval no.:
eIRL*97/68SA*2004/26*0095*00
natural_image
Illustration of a lawn mower with motion arrows indicating cycle (no text or symbols)Esercizio
natural_image
Hand inserting a component into a car's side panel (no text or symbols visible)Attenzione!!!
natural_image
3D rendered object resembling a spacecraft or robotic device with no visible text or symbols
natural_image
Two technical diagrams showing a spark plug being inserted into a screwdriver, with no visible text or symbols.Filtro d'aria
natural_image
Illustration of a lawn mower with a handle and blade, showing motion arrows (no text or symbols)Drift
natural_image
Hand pressing a button on a vehicle's side panel (no text or symbols visible)Advarsel!!!
natural_image
3D rendering of a mechanical device labeled 'LOKK TIL DRIVSTOFFTANKEN' with no visible text or symbols on the device itself.
TENNPLUGG
natural_image
Close-up of hands using a tool to adjust or install a mechanical component (no visible text or symbols)LUFTFILTER
natural_image
Illustration of a lawn mower with motion arrows indicating cycle (no text or symbols)Drift
natural_image
Hand inserting a small electronic component into a device (no text or symbols visible)Observera!!!
natural_image
Exterior view of a modern office building (no signage)natural_image
Close-up of hands using a screwdriver to adjust a mechanical component (no visible text or symbols)Luftfilter
natural_image
Illustration of a lawn mower with a handle and blade, showing motion arrows (no text or symbols)Működés
natural_image
Hand inserting a plug into a socket (no text or symbols visible)Vigyázz!!!
natural_image
Exterior view of a modern office building (no signage)
natural_image
Close-up of hands using a screwdriver to adjust a mechanical component (no visible text or symbols)LÉGSZÚRŐ
98/37/ES, 2000/14/ES 2005/88/ES
97/68/ES_2002/88/ES, 2004/108/ES
Type Approval no.:
eIRL*97/68SA*2004/26*0095*00
natural_image
Illustration of a lawn mower with motion arrows indicating cycle (no text or symbols)Rad
natural_image
Hand inserting a small electronic component into a device (no text or symbols visible)Upozorenje!
natural_image
3D rendering of a mechanical device with no visible text or symbols
Ponovo montirajte po napucima na slici. Zavrnite vijke. Učvrsni moment 40 Nm. Prilikom zamjene noževa zamijenite i vijak.
ZAMJENA ULJA
Poklopac za ispuštanje ulja nalazi se ispod motora. Pripremite posudu za hvatanje ulja te skinite čep. Odmah što je ulje iscurilo, nametnite novi čep sa podmetačem i obrišite ostatke ulja.
U rezervoar naspite ulje tip SAE30. Stanje ulja izmjerite čistim mjerilom. Ulje mora dosezati između oznake min. i maks. na mjerilu. Pazite da rezervoar ne napunite previše.
natural_image
Close-up of hands using a screwdriver to adjust a mechanical component (no visible text or symbols)Zračni filtar
98/37/ES, 2000/14/ES_2005/88/ES
97/68/ES 2002/88/ES, 2004/108/ES
Type Approval no.:
eIRL*97/68SA*2004/26*0095*00
natural_image
Illustration of a lawn mower with a handle and blade, showing motion arrows (no text or symbols)Delovanje
natural_image
Hand inserting a component into a device (no visible text or symbols)Področje uporabe
Pozor !!!
natural_image
3D rendering of a futuristic vehicle with a dome-shaped top and connected components (no visible text or symbols)natural_image
Two technical diagrams showing a spark plug being inserted into a tool, with no visible text or symbols.Zračni filter
Snemite pokrov filtra in odvijte penasti element filtra. Da preprečite vdor tujkov v sesalno odprtino, vedno ponovno namestite pokrov filtra.
PRAZNJENJE REZERVOARJA ZA GORIVO IN UPLINJAČA
97/68/CE 2002/88/CE, 2004/108/CE
Type Approval no.:
eIRL*97/68SA*2004/26*0095*00
Norme armonizate folosite:
EN 836:1997+A1:1997+A2:2001+A3:2004+AC:2006
EN 14982:1998
Autoritatea de certificare:
natural_image
Illustration of a lawn mower with motion arrows indicating cycle (no text or symbols)Functionare
natural_image
Hand inserting a component into a car's seat (no text or symbols visible)Atentie!!!
natural_image
Close-up of hands using a screwdriver to adjust a mechanical component (no visible text or symbols)Filtru de aer
98/37/ES, 2000/14/ES 2005/88/ES
97/68/ES_2002/88/ES, 2004/108/ES
Type Approval no.:
eIRL*97/68SA*2004/26*0095*00
natural_image
Illustration of a lawn mower with motion arrows indicating blade motion (no text or symbols)Работа
natural_image
Hand turning a button into a device (no text or symbols visible)Внимание!!!
natural_image
3D rendering of a futuristic robotic device with a dome-shaped top and connected components (no visible text or symbols)(Bosch WR 7 DC); (NGK BPR 6 ES)

natural_image
Close-up of hands using a screwdriver to adjust a mechanical component (no visible text or symbols)Въздушен филтър
98/37/ES, 2000/14/ES_2005/88/ES
97/68/ES 2002/88/ES, 2004/108/ES
Type Approval no.:
eIRL*97/68SA*2004/26*0095*00
natural_image
Illustration of a lawn mower with a handle and flame, showing mechanical components and motion (no text or symbols)Rad Radna poluga (za samovoljno zaustavljanje) (12) – Prilikom startanja pritiščite polugu u smjeru prema rukohvatu. Ukoliko motor želite isključiti, polugu pustite. Poluga za gas (2) – koristi se prilikom stavljanja u rad. Poluga pogona (13) se koristi ukoliko želite da kosilica ide prema naprijed.

natural_image
Hand inserting a plug into a switch component (no text or symbols visible)Upozorenje!
Ukoliko bi tokom malčiranja došlo do začepljenja kosilice, smanjite brzinu kretanja kako bi nož mogao travu duže usitnjavati i rasprostirati po travnjaku. Nakupljenu travu nikada ne otklanjati rukom.
UPRAVLJANJE POGONOM
Samovoljnim kretanjem se upravlja ovako: Pritisnite radnu polugu (poluga za samovoljno zaustavljanje) (12) u smjeru prema rukohvatu te istovremeno prema rukohvatu pritiščite polugu pogona (13).
Kretanje naprijed se zaustavlja oslobađanjem poluge pogona (13).
PODEŠAVANJE VISINE SJEČENJA
natural_image
3D rendering of a futuristic vehicle with a dome-shaped top and attached fuel tank (no visible text or symbols)
ΔUPOZORENJE: Goriva obogaćena alkoholom (gasohol) ili goriva sa dodatkom etanola ili metanola mogu privlačiti vlagu uz dalje stvaranje kiseline. Čisti benzin na taj način uslijed dugog skladištenja može ošteti sistem dovoda goriva u motoru. Ukoliko želite izbjeći probleme sa motorom, trebali biste prije odlaganja kosilice na vrijeme duže od 30 dana isprazniti sistem goriva. Ispustite iz rezervoara gorivo, startajte motor i ostavite ga raditi sve dok sistem goriva i karburator nisu prazni. Svake sezone dolijte svježe gorivo. Vidite, također, i upute za skladištenje. U rezervoar goriva nikada ne lijevajte sredstva za čišćenje u cilju čišćenja motora ili karburatora. Na taj način možete prouzročiti nepopravljiva oštećenja na motoru.

PUŠTANJE MOTORA
Ponovo montirajte prema uputstvima kao na slici. Zavrnite vijke. Učvrsni moment je 40 Nm. Prilikom zamjene noževa, zamijenite i vijak.
ZAMJENA ULJA
Poklopac za ispuštanje ulja nalazi se ispod motora. Pripremite posudu za hvatanje ulja te skinite čep. Odmah nakon što je ulje iscurilo, postavite novi čep sa podmetačem i obrišite ostatke ulja.
U rezervoar naspite ulje tip SAE30. Stanje ulja izmjerite čistim mjerilom. Ulje mora dosezati između oznake min. i maks. na mjerilu. Pazite da rezervoar ne napunite previše.
natural_image
Close-up of a hand holding a screwdriver with a metallic tool (no visible text or symbols)Zračni filter
98/37/ES, 2000/14/ES_2005/88/ES
97/68/ES 2002/88/ES, 2004/108/ES
Type Approval no.:
eIRL*97/68SA*2004/26*0095*00
Primenjeni harmonizovani standardi :
EN 836:1997+A1:1997+A2:2001+A3:2004+AC:2006 EN 14982:1998
natural_image
Illustration of a lawn mower with a handle and blade, showing motion arrows (no text or symbols)Rad
Radna poluga (za samovoljno zaustavljanje) (12) – Prilikom startovanja pritisnite polugu u smeru prema rukohvatu. Ukoliko motor želite da isključite, polugu pustite.
Poluga za gas (2) – koristi se prilikom stavljanja u rad. Poluga pogona (13) se koristi ako želite da kosilica ide prema napred.

natural_image
Hand inserting a small component into a device (no text or symbols visible)Upozorenje!
Ukoliko bi tokom malčiranja došlo do začepljenja kosilice, smanjite brzinu kretanja kako bi nož mogao travu da duže usitnjava i rasprostire po travnjaku. Nakupljenu travu nikada ne otklanjajte rukom.
UPRAVLJANJE POGONOM
Samovoljnim kretanjem se upravlja ovako: Pritisnite radnu polugu (poluga za samovoljno zaustavljanje) (12) u smeru prema rukohvatu te istovremeno i prema rukohvatu pritisnite polugu pogona (13).
Kretanje napred se zaustavlja oslobađanjem poluge pogona (13).
PODEŠAVANJE VISINE SEČENJA
S obzirom na potrebnu visinu košenja, neophodno je da namestite visinu točka. Pomoću poluge (8) namestite visinu prema svojim potrebama. Kod većine kosilica najprikladnija je srednja pozicija.
PRE PALJENJA MOTORA DOLIJTE ULJE
Pre svake upotrebe, uvek proverite stanje i količinu ulja. U slučaju potrebe, dolijte ulje (Motorno ulje 500ml SAE30).
POKLOPAC ULJNOG LEVKA - ULJNA MERICA
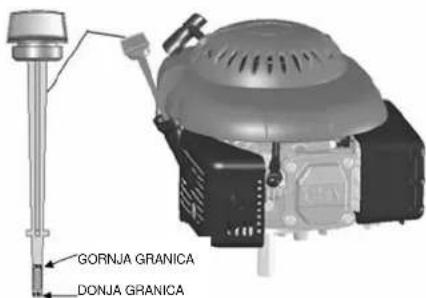
Kosilica se isporučuje bez ulja u motoru.

UPOZORENJE: Vodite računa da motor ne prepunite m, u protivnom, prigušivač bi prilikom startovanja dimio.
- Uverite se da li je kosilica postavljena na ravnu površinu.
- Skinite poklopac sa rezervoara za ulje.
- Stavite mericu za ulje i učvrstite je.
VAŽNO:
• Stanje ulja proveravajte pre svake upotrebe. U slučaju potrebe, dolijte ulje do oznake na merici za ulje.
- Nakon 25 sati rada ili svake sezone, neophodno je da se napravi izmjena ulja. Prilikom rada u prašnjavoj ili u zaprljanoj sredini, može se dogoditi da se ulje mora
izmeniti. Vidi «ZAMENA ULJA», u poglavlju 'Održavanje' ovog priručnika (SAE 30).
DOLIVANJE ULJA (bezolovni benzin)
- Gorivo dolivajte kroz otvor u rezervoaru. Pazite da ulje ne prospete. Upotrebljavajte običan, čist bezolovni benzin. Benzin nemojte mešati sa uljem. Kupujte uvijek dovoljnu količinu benzina tako da ga potrošite u roku od 30 dana.
natural_image
3D rendering of a futuristic vehicle with a dome-shaped top and connected components (no visible text or symbols)⚠UPOZORENJE: Goriva obogaćena alkoholom (gasohol) ili goriva sa dodatkom etanola ili metanola mogu da privlače vlagu uz dalje stvaranje kiseline. Čisti benzin na taj način zbog dugog skladištenja može da ošeteti sistem dovoda goriva u motoru. Ukoliko želite da izbegnete probleme sa motorom, trebali biste pre odlaganja kosilice na vreme duže od 30 dana da ispraznite sistem goriva. Ispustite iz rezervoara gorivo, startujte motor i ostavite ga da radi sve dok sistem goriva i karburator ne budu prazni. Svake sezone dolijte sveže gorivo. Vidite, takođe, i upute za skladištenje. U rezervoar goriva nikada nemojte sipati sredstva za čišćenje u cilju čišćenja motora ili karburatora. Na taj način možete prouzrokovati nepopravljiva oštećenja na motoru.

PUŠTANJE MOTORA
Kod startovanja se najpre uverite da li je svećica za paljenje na svom mestu kao i da je u uređaju dovoljna količina ulja i benzina.
UPOZORENJE: Zbog zaštitnog uljnog filma na unutrašnjoj površini motora, prilikom prvog startovanja motor može da dimi. To možete da smatrate normalnim.
- Radnu polugu (polugu za samovoljno isključenje) (12) pristisnite prema pomičnom rukohvatu (1) a polugu za gas (2) pomičite prema napred, čak do zareza (do startne pozicije).
- Kada je radna poluga uvučena (poluga za samovoljno isključenje) (12), sada polako vucite sajlu za startovanje
(10) dok ne osetite laganiji otpor, onda povucite naglo dok se motor ne upali.
- Polugu gasa (2) sada malo vratite nazad sa startne pozicije, sve dok rad motora ne postane ravnomeran.
UPOZORENJE: Ukoliko je hladno ili kada uređaj duže vreme nije radio, može se dogoditi da ćete prve korake nekoliko puta morati da ponovite.
GAŠENJE MOTORA
- Želite da motor zaustaviti, pustite radnu polugu (polugu za samovoljno isključenje) (12).
⚠UPOZORENJE! Nakon isključenja, noževi se još nekoliko sekundi okreću. Ukoliko kosilicu ostavljate da ostane bez nadzora, odvojite poklopac svećice za paljenje.
Ponovo montirajte prema uputstvima kao na slici. Zavrnite vijke. Zatezni moment je 40 Nm. Prilikom zamene noževa, zamenite i vijak.
ZAMENA ULJA
Poklopac za ispuštanje ulja nalazi se ispod motora. Pripremite posudu za hvatanje ulja i skinite čep. Odmah nakon što je ulje iscurilo, postavite novi čep sa podmetačem i obrišite ostatke ulja.
U rezervoar naspite ulje tip SAE30. Stanje ulja izmerite čistim merilom. Ulje mora da doseže između oznake min. i maks. na merilu. Pazite da rezervoar ne napunite previše.
Upalite motor i ostavite ga da radi nekoliko sekundi. Nakon toga ga ugasite i pričekajte minut; tek onda izmerite stanje ulja. Prema potrebi dolijte ulje.

Vijak za
ispuštanie ulia
Svećica za paljenje
Odmah nakon što se motor ohladi, pomoću isporučenog ključa skinite svećicu za paljenje, očistite ju žičanom četkom i udaljenost namestite pomoću merača na 0.75 mm (0.030"). Svećicu opet vratite na njeno mesto. Pazite da je ne zategnete suviše jako. (alternativno: (Bosch WR 7 DC); (NGK BPR 6 ES)


natural_image
Close-up of hands using a screwdriver to adjust a mechanical component (no visible text or symbols)Zračni filter
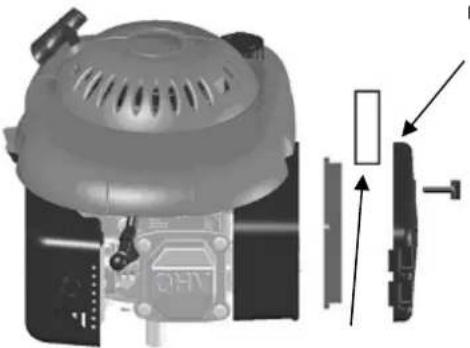
Popustite poklopac filtera i demontirajte penasti element filtera. Kako biste sprečili ulaženje stranih tela u usisni otvor, poklopac filtera se ponovno mora staviti nazad.
POKLOPAC FILTERA
natural_image
Diagram of a grassy engine component with attached parts, showing internal structure and assembly (no text or symbols)PENASTI ELEMENT
PRAŽNJENJE REZERVOARA ZA GORIVO I KARBURATORA

- Betrieb
- Achtung!!!
- Luftfilter
- Marking:
- Device
- Big Wheeler 508 A Lawn Mower
- Equipment:
- Scope of delivery
- EC Declaration of Conformity
- Date/producer signature: 17/06/2008
- Appropriate EC Directives:
- Harmonised standards used:
- Certification body:
- General Safety Instructions
- Caution
- GENERAL OPERATION AND SAFETY REGULATION
- • WARNING — petrol is highly flammable.
- ASSEMBLY / PREPARATION
- UNPACK THE MOWER
- Wheel assembly (Fig. 5 a-f)
- Assembly of collecting bag (Fig. 2) (Fig. 3) (Fig. 4)
- Assembly - Handle
- Operation
- Disassembly
- Attention!!!
- DRIVE CONTROL
- CUTTING HEIGHT ADJUSTMENT
- ADD OIL BEFORE STARTING
- IMPORTANT:
- FUEL ADDING (unleaded petrol)
- ENGINE STARTING
- ENGINE STOPPING
- Important tips and advice for grass cutting!!!
- MAINTENANCE
- ČLEANING
- KNIFE DISASSEMBLY
- OIL CHANGE
- Spark plug
- Air filter
- FUEL TANK AND CARBURETTOR EMPTYING
- STORAGE
- ENVIRONMENT
- MAINTENANCE PLAN
- FAILURE DIAGNOSTICS
- Directives CE applicables :
- Fonctionnement
- Filtre à air
- Drift
- Forsigtig!!!
- STYRING AF DRIVKRAFT
- OLIEEFTERFYLDNING INDEN START
- Provoz
- Pozor!!!
- Vzduchový filtr
- Prevádzka
- Vzduchový filter
- VYPRÁZDNENIE PALIVOVEJ NÁDRŽE A KARBURÁTORA
- - WAARSCHUWING: Benzine is licht ontylambaar:
- Let op!!!
- TANKEN VAN BRANDSTOF (loodvrije benzine)
- Luchtfilter
- Esercizio
- Attenzione!!!
- Filtro d'aria
- Advarsel!!!
- TENNPLUGG
- Observera!!!
- Működés
- Vigyázz!!!
- LÉGSZÚRŐ
- Rad
- ZAMJENA ULJA
- Zračni filtar
- Delovanje
- Področje uporabe
- Zračni filter
- PRAZNJENJE REZERVOARJA ZA GORIVO IN UPLINJAČA
- Functionare
- Atentie!!!
- Filtru de aer
- Работа
- Внимание!!!
- Въздушен филтър
- UPRAVLJANJE POGONOM
- PODEŠAVANJE VISINE SJEČENJA
- PUŠTANJE MOTORA
- Primenjeni harmonizovani standardi :
- PODEŠAVANJE VISINE SEČENJA
- PRE PALJENJA MOTORA DOLIJTE ULJE
- Kosilica se isporučuje bez ulja u motoru.
- VAŽNO:
- DOLIVANJE ULJA (bezolovni benzin)
- UPOZORENJE: Ukoliko je hladno ili kada uređaj duže vreme nije radio, može se dogoditi da ćete prve korake nekoliko puta morati da ponovite.
- GAŠENJE MOTORA
- ZAMENA ULJA
- Svećica za paljenje
- PRAŽNJENJE REZERVOARA ZA GORIVO I KARBURATORA
Brand : GUDE
Model : 508 A Big Wheeler
Category : Lawn mower