VC 6350 - Vacuum Cleaner KARCHER - Free user manual and instructions
Find the device manual for free VC 6350 KARCHER in PDF.

User questions about VC 6350 KARCHER
0 question about this device. Answer the ones you know or ask your own.
Ask a new question about this device
Download the instructions for your Vacuum Cleaner in PDF format for free! Find your manual VC 6350 - KARCHER and take your electronic device back in hand. On this page are published all the documents necessary for the use of your device. VC 6350 by KARCHER.
USER MANUAL VC 6350 KARCHER
natural_image
Yellow and black vacuum cleaner with black hose and control panel (no visible text or symbols)Deutsch 5
English 11
Français 17
Italiano 24
Nederlands 31
Español 38
Português 45
Ελληνικά 52
Dansk 59
Norsk 65
Svenska 71
Suomi 77
Magyar 83
Čeština 89
Slovenščina 95
Polski 101
Românește 108
Türkçe 115
Русский 122
Slovenčina 129
Hrvatski 135
Srpski 141
Български 148
Eesti 155
Lietuviškai 161
Latviešu 168
Українська 175
Register and win! www.karcher.com

flowchart
graph TD
    A["Grid Grid"] --> B["Open Book"]
    B --> C["Grid Grid"]
    C --> D["Open Book"]
    D --> E["Grid Grid"]
    E --> F["Open Book"]
    style A fill:#f9f,stroke:#333
    style B fill:#ccf,stroke:#333
    style C fill:#cfc,stroke:#333
    style D fill:#fcc,stroke:#333
    style E fill:#cff,stroke:#333
    style F fill:#ffc,stroke:#333
text_image
1 B0000
text_image
2
natural_image
Illustration of a hand holding a tool with arrows indicating movement or force direction (no text or symbols)
text_image
4 1. 2.
text_image
5 1. 2.↑
text_image
6
text_image
(A) (B) (C)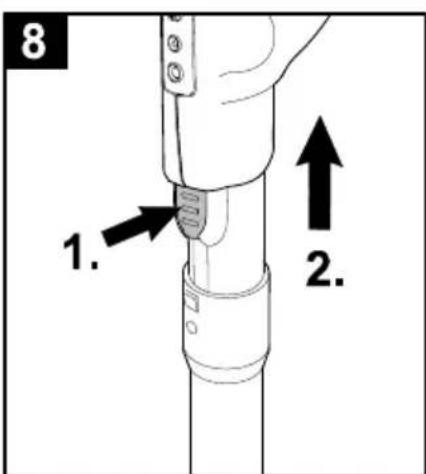
text_image
8 1. 2.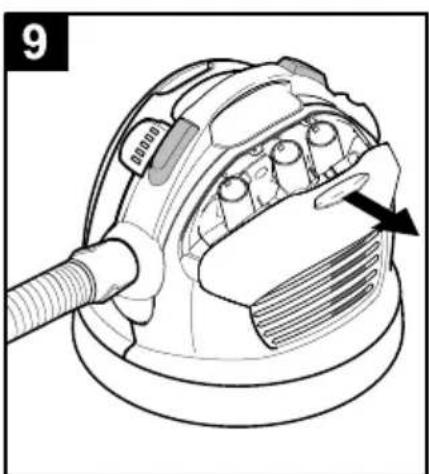
natural_image
Technical illustration of a vacuum cleaner with labeled component (no text or symbols)
text_image
10 1. 2. 3.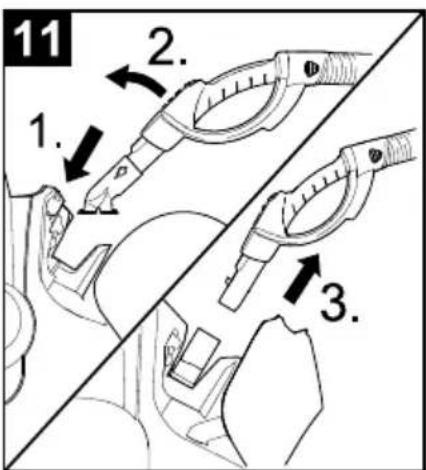
text_image
11 1. 2. 3.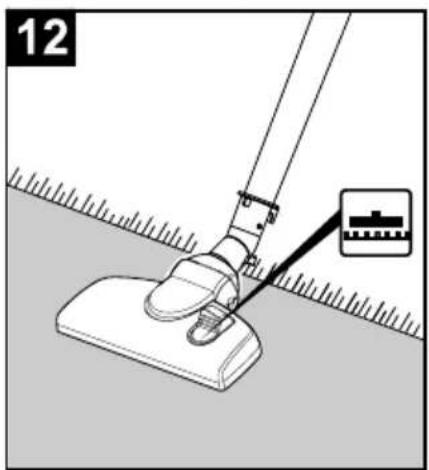
text_image
12
text_image
6 5 6 7 (A) (A) (B) (C) 1 2 12 8 9 4 19 3 17/18 16 14 11 10 13 15 20 VC 6350Inhaltsverzeichnis
Sicherheitshinweise ..... DE ...5
Bedienung ..... DE ...6
text_image
Diagram illustrating the concept of an open book with grid layouts and arrows indicating rotation or transformation.Safety instructions ..... EN ...5
Operation....EN...6
Maintenance and care .... EN ...8
General notes..... EN ...9
Technical specifications . . . EN . .10
Special accessories ..... EN ..10
Dear Customer,

Please read and comply with these original instructions prior to the initial operation of your appliance and store them for later use or subsequent owners.
Proper use
This vacuum cleaner is meant for use in private households and not for commercial purposes.
The manufacturer is not responsible for any damages that may occur on account of improper use or wrong operations.
Use the vacuum cleaner only with:
■ Original filter bags.
■ Original spare parts, accessories and special accessories.
The vacuum cleaner is not suitable for:
■ Sucking in human beings or animals.
■ Suction of:
Small living creatures (for e.g. flies, spiders, etc.).
Substances that are harmful for health, have sharp edges, are hot or burning. Moist or fluid substances.
Mildly inflammable or explosive materials and gases.
Environmental protection

The packaging material can be recycled. Please do not place the package to the ordinary refuse for disposal, but ge for the proper recycling.

Old appliances contain valuable materials that can be recycled. Please arrange for the proper recycling of old appliances. Please dispose your old appliances using appropriate collection systems.
Notes about the ingredients (REACH)
You will find current information about the ingredients at:
www.kaercher.com/REACH
Disposing the filters and filter bags
Filters and filter bags are made from environment-friendly materials.
They can therefore be disposed off through the normal household garbage provided you have not sucked in substances that are not permitted to be thrown into household garbage.
Safety instructions
- This device is not intended for use by persons (including children) with reduced physical, sensory or mental abilities or lacking experience and/or knowledge, unless they are supervised by a person responsible for their safety or are instructed by these persons on the use of the device. Children should be supervised, to ensure that they do not play with the device.
- Keep packaging film away from children - risk of suffocation!
- Switch the appliance off after every use and prior to every cleaning/maintenance procedure.
– Risk of fire. Do not vacuum up any burning or glowing objects. - The appliance may not be used in areas where a risk of explosion is present.
- In case of extended downtimes, switch the appliance off at the main switch / ap-
pliance switch or remove the mains plug.
Electrical connection
- The appliance may only be connected to alternating current. The voltage must correspond with the type plate on the appliance.
⚠️Risk of electric shock
- Never touch the mains plug and the socket with wet hands.
- Do not pull the plug from the socket by pulling on the connecting cable.
- Check the power cord with mains plug for damage before every use. If the power cord is damaged, please arrange immediately for the exchange by an authorized customer service or a skilled electrician.
- Do not use the power cord to carry/ transport the machine.
- Do not scrape the power cord across sharp edges and ensure that it does not get pressed.
- First pull out the plug from the mains before carrying out any tasks on the machine.
Caution
■ Never vacuum clean without the filter bag.
This can cause damage to the appli-
ance.
■ Avoid vacuum cleaning using nozzle or suction tubes close to the head. There is risk of injury!
■ Always pull out the power cord fully during operation.
■ Protect the appliance against external weather, humidity and heat sources.
■ Turn off the appliance while you do not vacuum.
Operation
Description of the Appliance
Please unfold the pages with the diagrams!

text_image
Diagram showing three panels of an open book with grid patterns and arrows indicating rotation or transformation.1 Power cord with plug
2 Push button take-up cable
3 On/Off button
4 LED performance display
5 Suction hose
6 Handle
(A) Battery compartment
7 Suction control
(A) + Key
(B) - Key
(C) Stand-by Function
8 Telescopic suction pipe
9 Adjustable telescopic suction pipe
10 Floor nozzle
11 Cover attachment housing
12 Attachment housing QuickClick: includes upholstery nozzle, telescopic gap nozzle and a furniture brush
13 Change filter indicator
14 Shutter lever, lid filter bag/ motor protection filter
15 Motor protection filter
16 Filter bag holder
17 Cover EPA filter
18 EPA-filter
19 Carrying handle
20 Turbo nozzle for floors
(only in the delivery scope of VC 6350; you will find the description of the same in "Special accessories, Pos.A")
Before Commissioning
Please find enclosed 2 batteries. Please insert them in the battery compartment below the handle before starting vacuum operations.
→ Slide and remove the battery compartment cover.
→ Insert the batteries, pay attention to the polarity (+ and - marking at the base of the battery compartment).
→ Replace the battery compartment cover and close it.
Start up
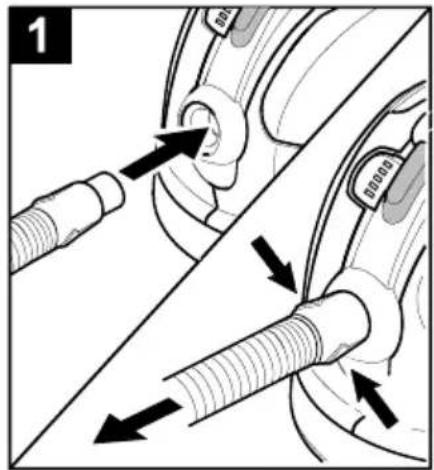
Illustration 1
→ Lock the suction hose neck in the suction opening.
→ To take off, push both lock devices together and pull the tube.
Illustration 2
→ Connect handle and suction tube and insert.
→ Connect the floor nozzle and telescopic suction pipe and insert.
Illustration 3
→ Use the adjustment in order to adjust the telescopic suction pipe to the length you wish.
Illustration 4
→ When you stop or you take a short break, hang the floor nozzle into the parking position on the back of the appliance, and push it into the resting position.
Illustration 5
→ To remove, press handle backwards in the direction of the appliance. The floor nozzle is thus unlocked from the parking holder and can be removed upwards.
Illustration 6
→ Hold the power cord at the plug and pull it out. Insert the mains plug into a socket.
→ Turn on/off the appliance.
Illustration 7
→ The power suction adjustment is at the power suction control: + push button (A), higher power suction - push button (B), lower suction power
Adjust the suction power to suit the suction requirement:
■ Low suction power – for laced curtains, textiles, upholstered furniture, cushions
■ Medium suction power – for slightly dirty carpets/ carpeted floors, precious carpets, bridges and runners
- Highest suction power – for hard floors, very dirty carpets and carpeted floors
→ It is advisable to use the Stand-by key (C) during short breaks in cleaning: Press the Standby key, the appliance switches off, the LED on the appliance glows to indicate the standby mode.
→ Press the Stand-by key again to resume work.
Note: After pressing the stand-by key, the vacuum cleaner runs at the vacuum setting that had been set earlier.
Important notice! The appliance will shutdown automatically, if there is danger of overheating. Turn the appliance off and pull the power plug. Make sure, that the nozzle, the suction pipe or the tube is not clogged, failing all the above the filter must be changed. After the elimination of the interference let the appliance cool down for a minimum of 1 hour, before using it again.
Suction using accessories
QuickClick attachment
QuickClick Using the attachments
■ Upholstery nozzle: for cleaning upholstered furniture, mattresses, laced curtains, etc.
■ Furniture brush: for cleaning furniture and delicate objects with care, dusting books, air vents in the car, etc.
■ Joint nozzle, detachable: for edges, joints and heaters
Changing the attachments in the Quick-Click attachment housing
→ Hang in the floor nozzle in the park holder on the rear side of the machine and press it into locking position (see illustration 4)
Illustration 8
→ Push the dead button at the handle and remove the telescopic suction pipe.
Illustration 9
→ Open the attachment housing cover.
Illustration 10
→ Insert the handle in the desired accessory until the stop. It then gets locked. Then tilt it downwards and pull it out.
Illustration 11
→ To store, put the attachment using the handle into the attachment housing and click it up into place. Remove the handle.
→ Notice: You also can remove the attachment manually and put it on top of the handle. In order to release the attachment, push the dead button on the handle.
→ Notice: All steps stated above can also be done when the telescopic suction pipe is connected. Hang the floor nozzle on the backside of the appliance into the parking holder, and push into the pause position. Pull the telescopic suction pipe straight up.
ComfoGlide nozzle
Illustration 12
→ Carpets and carpeted floors: Select the following switch setting:

Illustration 13
→ Hard surfaces: Select the following switch setting:

Finish operation
→ Turn off the appliance and disconnect the mains plug.
Illustration 14
→ Push the take-up cable button. The cable will pull itself automatically into the appliance.
→ Hang the floor nozzle on the backside of the appliance into the parking holder, and push into the pause position.
Transport, storage
→ Hold the appliance at the carrying handle when you want to transport it and store it in dry rooms.
Note: It is recommended that you first completely push in the telescopic suction pipe.
Maintenance and care
⚠️Risk of injury
Always switch off the appliance and pull out the mains plug before care and maintenance work.
Cleaning the device
Caution
Do not use abrasives, glass or universal cleaners! Never immerse the appliance in water.
→ Clean the appliance and accessory parts made of plastic with a commercial plastic cleaner.
→ Clean the dust chamber with a dry wipe cloth/ dust brush.
Replacing the filter bag
Order no. 6.904-329
Contents: 5 filter bags with cap and 1 engine protection filter.
Note: Separate the telescopic suction pipe from the handle to see the filter change indicator.
Illustration 15
→ If the filter change indicator in the cover glows red, then please change the filter bag.
→ Use the closing lever and open the lid.
Illustration 16
→ Unlock the holder of the filter bags and pull towards the outside.
Illustration 17
→ Close the filter bag using the closing flap, remove the filter bag and dispose it off.
Illustration 18
→ Push the new filter bag into the support until the stop. First press the flap downwards; then push the holder into the casing and lock it at the appliance casing.
Caution
Close the lid only, if there is a filter bag inserted. After picking up small dust particle (as for example plaster, cement etc) clean the motor protection filter, change if necessary.
Change the motor protection filter
Motor protection filter: change before the last filter bag is removed from the filter bag package.
→ The motor protection filter is behind the inserted filter bag. Change the motor protection filter before you insert the filter bag.
Illustration 19
→ Unlock the frame and remove.
→ Remove the lower part of the frame, take out old engine protection filter and dispose it off. Insert the new engine protection filter in the frame and replace the lower part of the frame.
Illustration 20
→ Insert and click the frame into its place.
Change the EPA-filter
Order no. 6.414-805
Filter for pure blower air.
EPA filter: Change once a year.
Illustration 21
→ Open cover.
→ Unlock the EPA filter and remove.
Illustration 22
→ Insert the new EPA filter and click it into place.
→ Close the lid.
Cleaning of the ComfoGlide nozzle
The ComfoGlide nozzle must be cleaned regularly!
→ Remove the nozzle from the suction pipe.
Illustration 23
→ Clean the back steering roller:
The easiest way to do this, is to remove the roller. Unscrew the axle and pull out. Dust fluff, hair etc. can now be removed easily. Fit the steering roller back into place.
Cleaning the accessories
Illustration 24
→ Handle and suction tube can be disconnected in order to clean or if clogged. Push the 2 interlocks and pull apart.
→ Connect handle and suction tube and insert.
Changing the battery
Note: The battery should not be empty if you want to ensure cable-free transmission. Please replace the battery if you see no reaction or just inadequate reaction when you press the keys.
→ Slide and remove the battery compartment cover.
→ Remove old batteries and dispose them off properly.
→ Insert new batteries; pay attention to correct polarity.
→ Replace the battery compartment cover and close it.
General notes
Warranty
The terms of the guarantee applicable in each country have been published by our respective national distributors. We will repair possible faults on your unit free of charge within the warranty period, insofar as the faults are caused by material defects or defective workmanship. Guarantee claims should be addressed to your dealer
or the nearest authorized customer service centre, and supported by documentary evidence of purchase.
(See address on the reverse)
Customer Service
Our KÄRCHER branch will be pleased to help you further in the case of questions or faults. See address on the reverse.
Ordering spare parts and special attachments
At the end of the operating instructions you will find a selected list of spare parts that are often required.
You can procure the spare parts and the attachments from your dealer or your KÄRCHER branch office.
(See address on the reverse)
Technical specifications
| Voltage 220 - | 240 | V |
| Current type 50/60 Hz | ||
| Mains fuse (slow-blow) 16 A | ||
| Protective class II | ||
| Output P_nom | 1800 W | |
| Output P_max | 2000 W | |
| Weight (without accessories) | 7,0 kg | |
| Action radius 10 m | ||
| Dimensions ø 380 x | 380 | mm |
| Nominal width, accessories | 35 mm | |
| Sound pressure level L_pA | 66 dB(A) |
Subject to technical modifications!
Special accessories
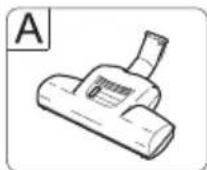


A Turbo nozzle for floors
(Order no. 4.130-177)
brush and vacuum in one work cycle.
Especially suitable in order to pick up animal hair and to vacuum high floor carpets. The brush roller is driven by air steam.
There is not electrical outlet necessary.
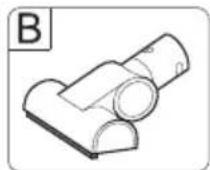
B Turbo nozzle for upholstery
(Order no. 2.903-001)
Brushing and vacuum cleaning upholstered furniture, mattresses, car seats, etc. in one single step.
Especially suitable for absorbing animal hair. The brush rollers are driven by the air current.
No electrical connection required.
C Parquet nozzle
(Order no. 4.130-172)
Used to vacuum sensitive and smooth floors (parquet, marble, terracotta etc.).
D Mattress nozzle
(Order no. 6.906-755)
For absorbing dust from mattresses and upholstery.
E Filter bag
(Order no. 6.904-329)
Content: 5 filter bags with cover and 1 motor protection filter
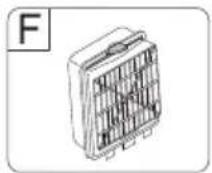
F EPA-filter
(Order no. 6.414-805)
Additional filters for cleaner exhausting air. Recommended for allergy sufferers
Table des matières
www.kaercher.com/REACH
flowchart
graph TD
    A["Grid Structure"] --> B["Open Book Structure"]
    B --> C["Arrow to Top Right"]
    B --> D["Arrow to Bottom Left"]
Transport, conservation
www.kaercher.com/REACH
text_image
Diagram showing three panels of an open book with grid patterns and arrows indicating rotation or transformation.www.kaercher.com/REACH
text_image
Diagram showing three panels of an open book with grid patterns and arrows indicating rotation or transformation.www.kaercher.com/REACH
text_image
Diagram showing three panels of an open book with grid patterns and arrows indicating rotation or transformation.www.kaercher.com/REACH
text_image
Diagram showing three panels of an open book with grid patterns and arrows indicating rotation or transformation.www.kaercher.com/REACH
text_image
Diagram showing three panels of an open book with grid patterns and arrows indicating rotation or transformation.www.kaercher.com/REACH
text_image
Diagram illustrating the concept of an open book with grid patterns and text blocks, showing transformation arrows.www.kaercher.com/REACH
text_image
Diagram showing three panels of an open book with grid patterns and arrows indicating rotation or transformation.1 Nettkabel med plugg
2 Bryter for kabeloppvikling
3 På-/av bryter
4 LED effektindikator
5 Sugeslange
6 Håndtak
(A) Batterirom
7 Sugekraftregulator
Rengjøre ComfoGlide dyse
text_image
Diagram showing three panels of an open book with grid patterns and arrows indicating rotation or transformation.www.kaercher.com/REACH
text_image
Diagram showing three panels of an open book with grid patterns and arrows indicating rotation or transformation.www.kaercher.com/REACH
text_image
Diagram showing three panels of an open book with grid patterns and arrows indicating rotation or transformation.www.kaercher.com/REACH
text_image
Diagram showing three panels of an open book with grid patterns and arrows indicating rotation or transformation.www.kaercher.com/REACH
text_image
Diagram illustrating the transformation of a grid-based document into an open book, with arrows indicating the process.www.kaercher.com/REACH
text_image
Diagram showing three panels of an open book with grid patterns and arrows indicating rotation or transformation.Mult stimate client,

www.kaercher.com/REACH
text_image
Diagram showing three panels of an open book with grid patterns and arrows indicating rotation or transformation.www.kaercher.com/REACH
text_image
Diagram showing three panels of an open book with grid patterns and arrows indicating rotation or transformation.www.kaercher.com/REACH
text_image
Diagram showing three rectangular panels with grid patterns and arrows indicating rotation or transformation around each panel.www.kaercher.com/REACH
text_image
Diagram showing three panels of an open book with grid patterns and arrows indicating rotation or transformation.www.kaercher.com/REACH
Zbrinjavanje filtra i filtarske vrećice
Filtar i filtarska vrećica su izrađeni od materijala koji ne štete okolišu.
Ako ne sadrže nikakve usisane tvari, koje se ne smiju odlagati u kućanski otpad, može ih se zbrinuti kao običan kućanski otpad.
Sigurnosni napuci
text_image
Diagram showing three panels of an open book with grid patterns and arrows indicating rotation or transformation.1 Strujni kabel s utikačem
2 Tipka za namatanje kabela
3 Uključno/isključna tipka
4 LED pokazivač snage
5 Usisno crijevo
6 Rukohvat (A) Pretinac za baterije
7 Regulator usisne sile
(A) + tipka
(B) - tipka
(C) funkcija standby
www.kaercher.com/REACH
Otklanjanje filtera i filterske vrećice u otpad
Filter i filterska vrećica su izrađeni od materijala koji ne štete čovekovoj okolini.
Ako ne sadrže nikakve usisane supstance koje se ne smeju bacati u kućni otpad, mogu se tretirati kao običan kućni otpad.
Sigurnosne napomene
- Ovaj uređaj nije predviđen da njime rukuju osobe (uključujući i decu) sa smanjenim fizičkim, senzornim ili mentalnim mogućnostima opažanja ili s ograničenim iskustvom i znanjem, osim ukoliko ih lice koje je za njih odgovorno ne nadgleda ili upućuje u rad sa uređajem. Deca se moraju naggledati kako bi se sprečilo da se igraju s uređajem.
– Ambalažne folije čuvajte van dohvata dece, jer postoji opasnost od gušenja!
- Isključite uređaj posle svake upotrebe i pre svakog čišćenja/održavanja.
– Opasnost od požara. Ne usisavajte zapaljene ili užarene predmete.
– Zabranjen je rad u područjima ugroženim eksplozijom.
– Prilikom dužih pauza u radu isključite uređaj putem glavnog prekidača odnosno prekidača uređaja ili izvucite strujni utikač iz utičnice.
text_image
Diagram illustrating the concept of an open book with grid patterns and text blocks, showing transformation arrows.1 Mrežni priključni kabl sa utikačem
2 Tipka za namotavanje kabla
3 Uključno/isključna tipka
4 LED pokazivač snage
5 Usisno crevo
6 Drška
(A) Kućište za baterije
7 Regulator usisne sile
(A) + tipka
(B) - tipka
(C) funkcija standby
8 Teleskopska usisna cev
9 Podešivač teleskopske usisne cevi
10 Podna mlaznica
11 Poklopac odeljka za odlaganje pribora
12 Odeljak za odlaganje pribora
QuickClick:
sadrži sisaljku za tekstilni nameštaj,
usisni nastavak za fuge na izvlačenje i
četku za nameštaj
13 Pokazivač za zamenu filtera
14 Bravica, poklopac filterske vrećice / filtera za zaštitu motora
15 Filter za zaštitu motora
16 Držač filterske vrećice
17 Poklopac EPA filtera
18 EPA filter
19 Ručka za nošenje
20 Turbo sisaljka za podove
(samo u obimu isporuke VC 6350,
odgovarajući opis naći ćete u poglavlju
"Poseban pribor A")
Pre upotrebe
U prilogu se nalaze 2 baterije. Pre početla usisivanja molimo vas da ih postavite u kućištu za baterije ispod rukohvata.
→ Poklopac kućišta za baterije otvoriti guranjem i skloniti.
→ Postavite baterije, pri tome obratite pažnju na polaritet (oznaka + i - u kućištu za baterije).
→ Ponovo nametnuti poklopac kućišta za baterije i zatvoriti.
Stavljanje u pogon
Slika 1
→ Nastavak usisnog creva uglavite u usisni otvor.
→ Za skidanje pritisnite obe izbočine i skinite crevo.
Slika 2
www.kaercher.com/REACH
text_image
Diagram showing three panels of an open book with grid patterns and arrows indicating rotation or transformation.www.kaercher.com/REACH
Filtri ja filtrikoti utiliseerimine
text_image
Diagram showing three panels of an open book with grid patterns and arrows indicating rotation or transformation.www.kaercher.com/REACH
text_image
Diagram showing three panels of an open book with grid patterns and arrows indicating rotation or transformation.1 Elektros laidas su kištuku
2 Kabelio susukimo mygtukas
3 Tinklo jungiklis
4 LED galios indikatorius
5 Siurbimo žarna
6 Rankena
(A) Bateriju déklas
7 Siurbimo galios reguliatorius
(A) + mygtukas
(B) – mygtukas
(C) parengties režimas
8 Teleskopinis siurblio vamzdis
9 Teleskopinio vamzdžio ilgio reguliato-
rius
www.kaercher.com/REACH
text_image
Diagram showing three panels of an open book with grid patterns and arrows indicating rotation or transformation.www.kaercher.com/REACH
text_image
Diagram showing three panels of an open book with grid patterns and arrows indicating rotation or transformation.natural_image
Illustration of a mop handle on a tiled floor, with a close-up view of the handle (no text or symbols)
text_image
14 1. 2.
text_image
15
text_image
16 1. 2.
natural_image
Diagram of a mechanical device showing internal components and a hand interacting with a surface (no text or symbols)
text_image
18 1. 2.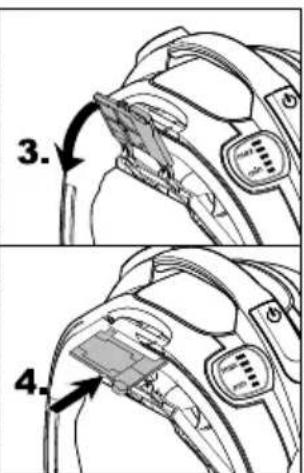
text_image
3. 4.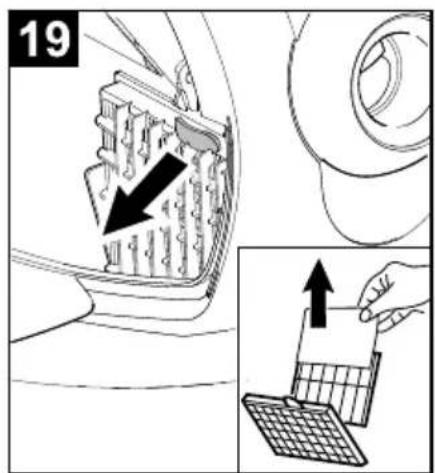
text_image
19
text_image
20 "click"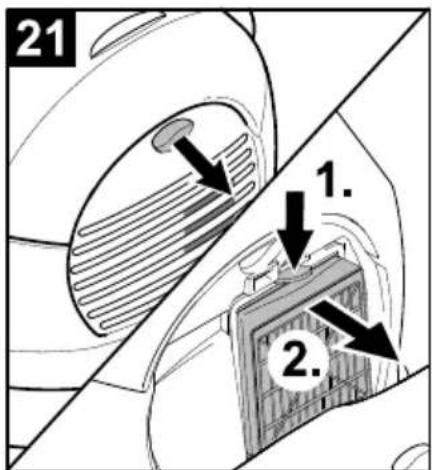
text_image
21 1. 2.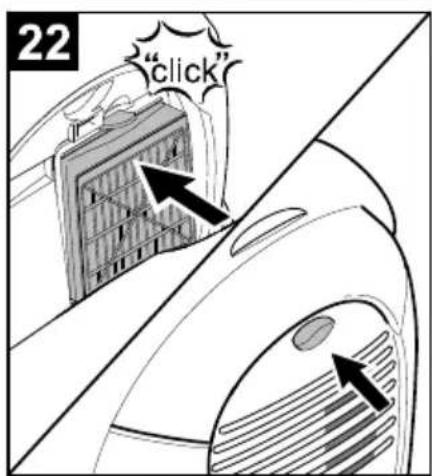
text_image
22 "click"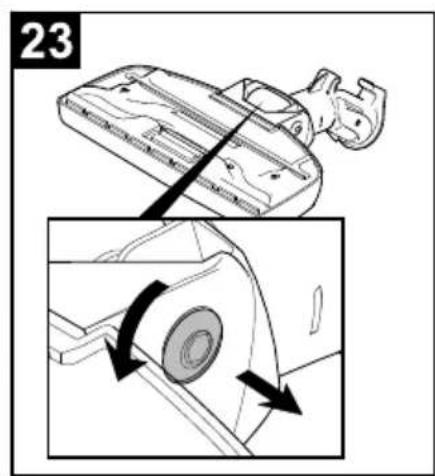
text_image
23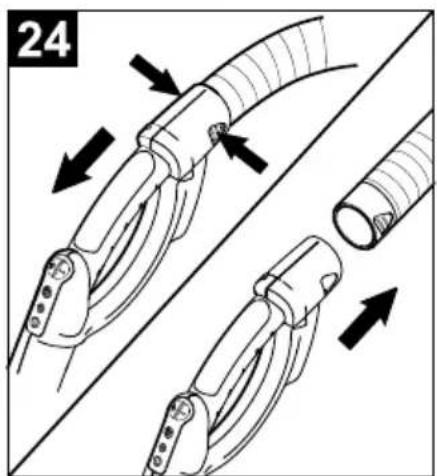
natural_image
Diagram of a robotic arm with directional arrows indicating movement or force (no text or symbols present)
flowchart
graph TD
    A["Open Book"] --> B["Grid Blocks"]
    B --> C["Arrow Right"]
    C --> D["Arrow Left"]
    D --> E["Arrow Up"]
    E --> F["Arrow Down"]
AE Karcher FZE, P.O. Box 17416, Jebel Ali Free Zone, Dubai, United Arab Emirates,
4 8861177 • www.karcher.ae
AT Alfred Kärcher Ges.m.b.H., Lichtblaustraße 7, 1220 Wien,
01 250 600 • www.kaercher.at
AU Karcher Pty. Ltd., 40 Koornang Road, Scoresby 3179, Victoria, Australia,
1800 675 714 • www.karcher.com.au
BE Kärcher N.V., Industrieweg 12, 2320 Hoogstraten,
0900 10027 • www.karcher.be
CH Kärcher AG, Industriestrasse 16, 8108 Dällikon, Kärcher SA, Croix-du-Péage, 1029 Villars-Ste-Croix,
0844 850 863 • www.kaercher.ch
CN Kärcher (Shanghai) Cleaning Systems Co. Ltd., East Part, Building 20, No. 1000, Jinhai Road, Pudong, Shanghai, 201206
021 5076 8018 • www.karcher.cn
CZ Kärcher spol. s r.o., Modletice 141, 251 01 Ricany,
0323 606 014 • www.kaercher.cz
DE Alfred Kärcher GmbH & Co. KG, Service-Center Gissigheim, Im Gewerbegebiet 2, 97953 Königheim-Gissigheim,
07195 903 2065 • www.kaercher.de
DK Kärcher A/S, Slotsherrensvej 411 C, 2610 Rødovre,
70 206 667 • www.karcher.dk
EE Kärcher OÜ, Pirita tee 102, 12011 Tallinn,
600 5831 • www.karcher.com
ES Kärcher, S.A., Pol. Industrial Font del Radium, Josep Trueta, 6-7, 08403 Granollers (Barcelona),
902 170 068 • www.karcher.es
FI Kärcher OY, Yrittäjäntie 17, 01800 Klaukkala,
0207 413 600 • www.karcher.fi
FR Kärcher S.A.S., Z.A. des Petits Carreaux, 5, avenue des Coquelicots, 94865 Bonneuil-sur-Marne,
01 43 99 67 70 • www.karcher.fr
GB Kärcher (U.K.) Ltd., Kärcher House, Beaumont Road, Banbury, Oxon OX16 1TB,
01295 752 000 • www.karcher.co.uk
GR Kärcher Cleaning Systems A.E., 31-33, Nikitara str. & Konstantinoupoleos str., 13671 Aharnes,
210 2316 153 • www.karcher.gr
HK Kärcher Limited, Unit 10, 17/F., Apec Plaza, 49 Hoi Yuen Road, Kwun Tong, Kowloon,
2357 5863 • www.karcher.hk
HU Kärcher Hungaria KFT, Tormásrét ut 2. (Vendelpark), 2051 Biatorbagy,
23 530 640 • www.kaercher.hu
IE Kärcher Limited (Ireland), C1 Centrepoint Business Park, Oak Road, Dublin 12.
01 409 7777 • www.kaercher.ie
IN Karcher Cleaning Systems Pvt. Ltd., Plot No. D-120, Sector-63, Noida 201307, Uttar Pradesh,
0120 466 1800 • www.karcher.in
IT Kärcher S.p.A., Via A. Vespucci 19, 21013 Gallarate (VA),
848 99 88 77 • www.karcher.it
JP Kärcher (Japan) Co., Ltd., Irene Kärcher Building, No. 2, Matsusaka-Daira 3-chome, Taiwa-cho, Kurokawa-gun, Miyagi 981-3408,
022 344 3140 • www.karcher.co.jp
KR Karcher Co. Ltd. (South Korea), 872-2 Sinjeong-Dong, Yangcheon-Gu, Seoul, Korea Zip code 158-856
02-322 6588, A/S. 1544-6577 • www.karcher.co.kr
NZ Karcher Limited, 12 Ron Driver Place, East Tamaki, Auckland, New Zealand,
09 274 4603 • www.karcher.co.nz
PL Kärcher Sp. z o.o., Ul. Stawowa 140, 31-346 Kraków,
012 6397 222 • www.karcher.pl
PT Neoparts S.A., Av. Infante D. Henrique, Lote 35, 1800-218 Lisboa,
218 558 300 • www.karcher.pt
RO Karcher Romania s.r.l., Sos. Odaii 439 Sector 1, RO-013606 Bucureşti,
0372 709 001, www.kaercher.ro
SG Karcher South East Asia Pte. Ltd., 5 Toh Guan Road East, #01-00 Freight Links Express Distripark, Singapore 608831.
6897-1811 • www.karcher.com.sg
SK Kärcher Slovakia, s.r.o., Bratislavská 25, 94901 Nitra,
037 6555 798 • www.kaercher.sk
TR Kärcher Servis Ticaret A.S., Mahmutbey Mahallesi İstoç, Petrol Plaza C-Blok Kat: 2-3, Bağcılar, 34218 Istanbul
0212 659 43 69 • www.karcher.com.tr
TWKarcher Limited, 7/F, No. 66, Jhongijheng Rd., Sinjhuang City, Taipei County 24243,
2 2991 5533 • www.karcher.tw
UA Kärcher Ltd., Petropavlivska Str., 4, Petropavlivska Borschagivka, Kyiv region, 08130,
0800 500 48 90 • www.karcher.ua
ZA Kärcher (Pty) Ltd., 144 Kuschke Street, Meadowdale, Edenvale, 1614,
011 574 5360 • www.karcher.co.za