212700 Food Processor Pro - Blender PRINCESS - Free user manual and instructions
Find the device manual for free 212700 Food Processor Pro PRINCESS in PDF.

User questions about 212700 Food Processor Pro PRINCESS
0 question about this device. Answer the ones you know or ask your own.
Ask a new question about this device
Download the instructions for your Blender in PDF format for free! Find your manual 212700 Food Processor Pro - PRINCESS and take your electronic device back in hand. On this page are published all the documents necessary for the use of your device. 212700 Food Processor Pro by PRINCESS.
USER MANUAL 212700 Food Processor Pro PRINCESS
Food Processor and Blender Article 212700
natural_image
Line drawing of a kitchen blender with a water heater and a side dish, no text or symbols present- Gebruiksaanwijzing • User's instructions • Mode d'emploi
- Bedienungsanleitung • Instrucciones de uso • Istruzioni per l'uso
- Bruksanvisning • Brugsanvisning • Bruksanvisning • Käyttöohje
- Instruções de uso • Ođηγίες χρήσης دليل المستخدم
Nederlands 1
English 8
Français 15
Deutsch 23
Español 31
Italiano 39
Svenska 47
Dansk 54
Norsk 61
Suomi 68
Português 75
Ελληνικά 83
عربي 91
natural_image
Line drawing of a kitchen blender with a side view showing the lid and base, plus a close-up of its internal structure (no text or symbols)2
natural_image
Line drawing of a kitchen blender with internal components and a side view showing the lid and handle (no text or symbols)3
text_image
Diagram illustrating the step-by-step assembly of a kitchen blender, showing the front panel, side panels, and internal components.
Algemeen
Blenden in blenderkan:
With the Princess Food Processor and Blender, you can prepare food in no time.
You can use it to cut, chop, grate, shred, and cut slices.
You have all the accessories you need to prepare food exactly as you wish. The accessories can easily be stored in the integrated storage tray.
The appliance is equipped with a two speed electric drive unit and a pulse function.
The anti-slip feet ensure that the appliance is always stable during use.
The mixing bowl has a volume of 0.75 litres.
The blender function can be used to chop vegetables and fruit, and to prepare delicious shakes and juices.
The sharp stainless-steel knives enable you to finely chop or puree both small and large pieces of fruit and vegetables with the greatest of ease.
A special function makes it possible to grind ice cubes in the blender jug. This function lets the blender run with short intervals to give the ice the time to drop back to the bottom of the jug.
This function can also be applied using the mixing bowl with non liquid food.
The blender jug has a closable lid; during blending the filling opening in the lid can be used to add ingredients without spillage.
The blender jug has a volume of 1.2 litres.

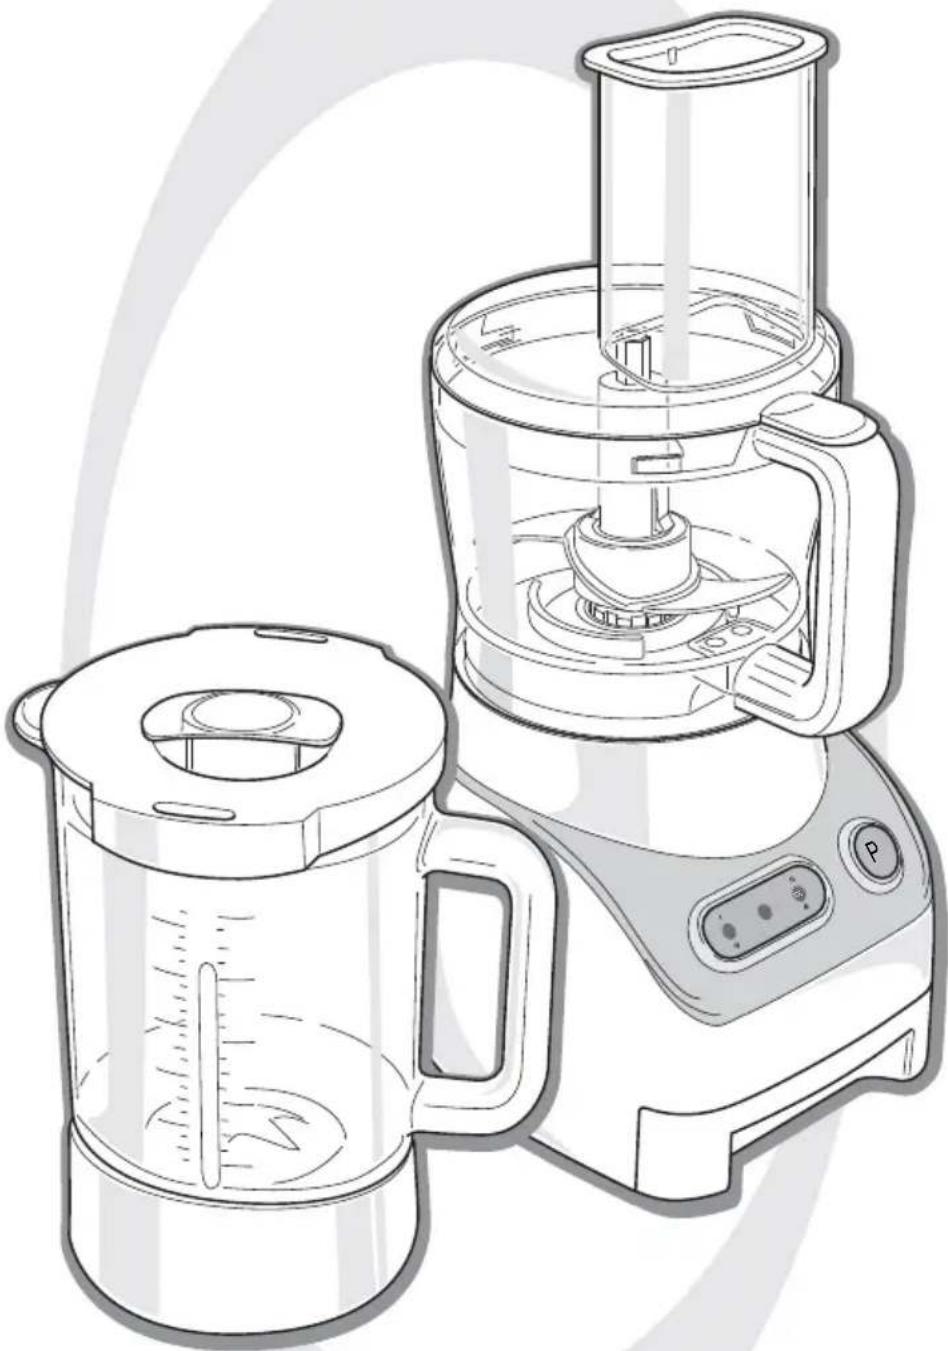
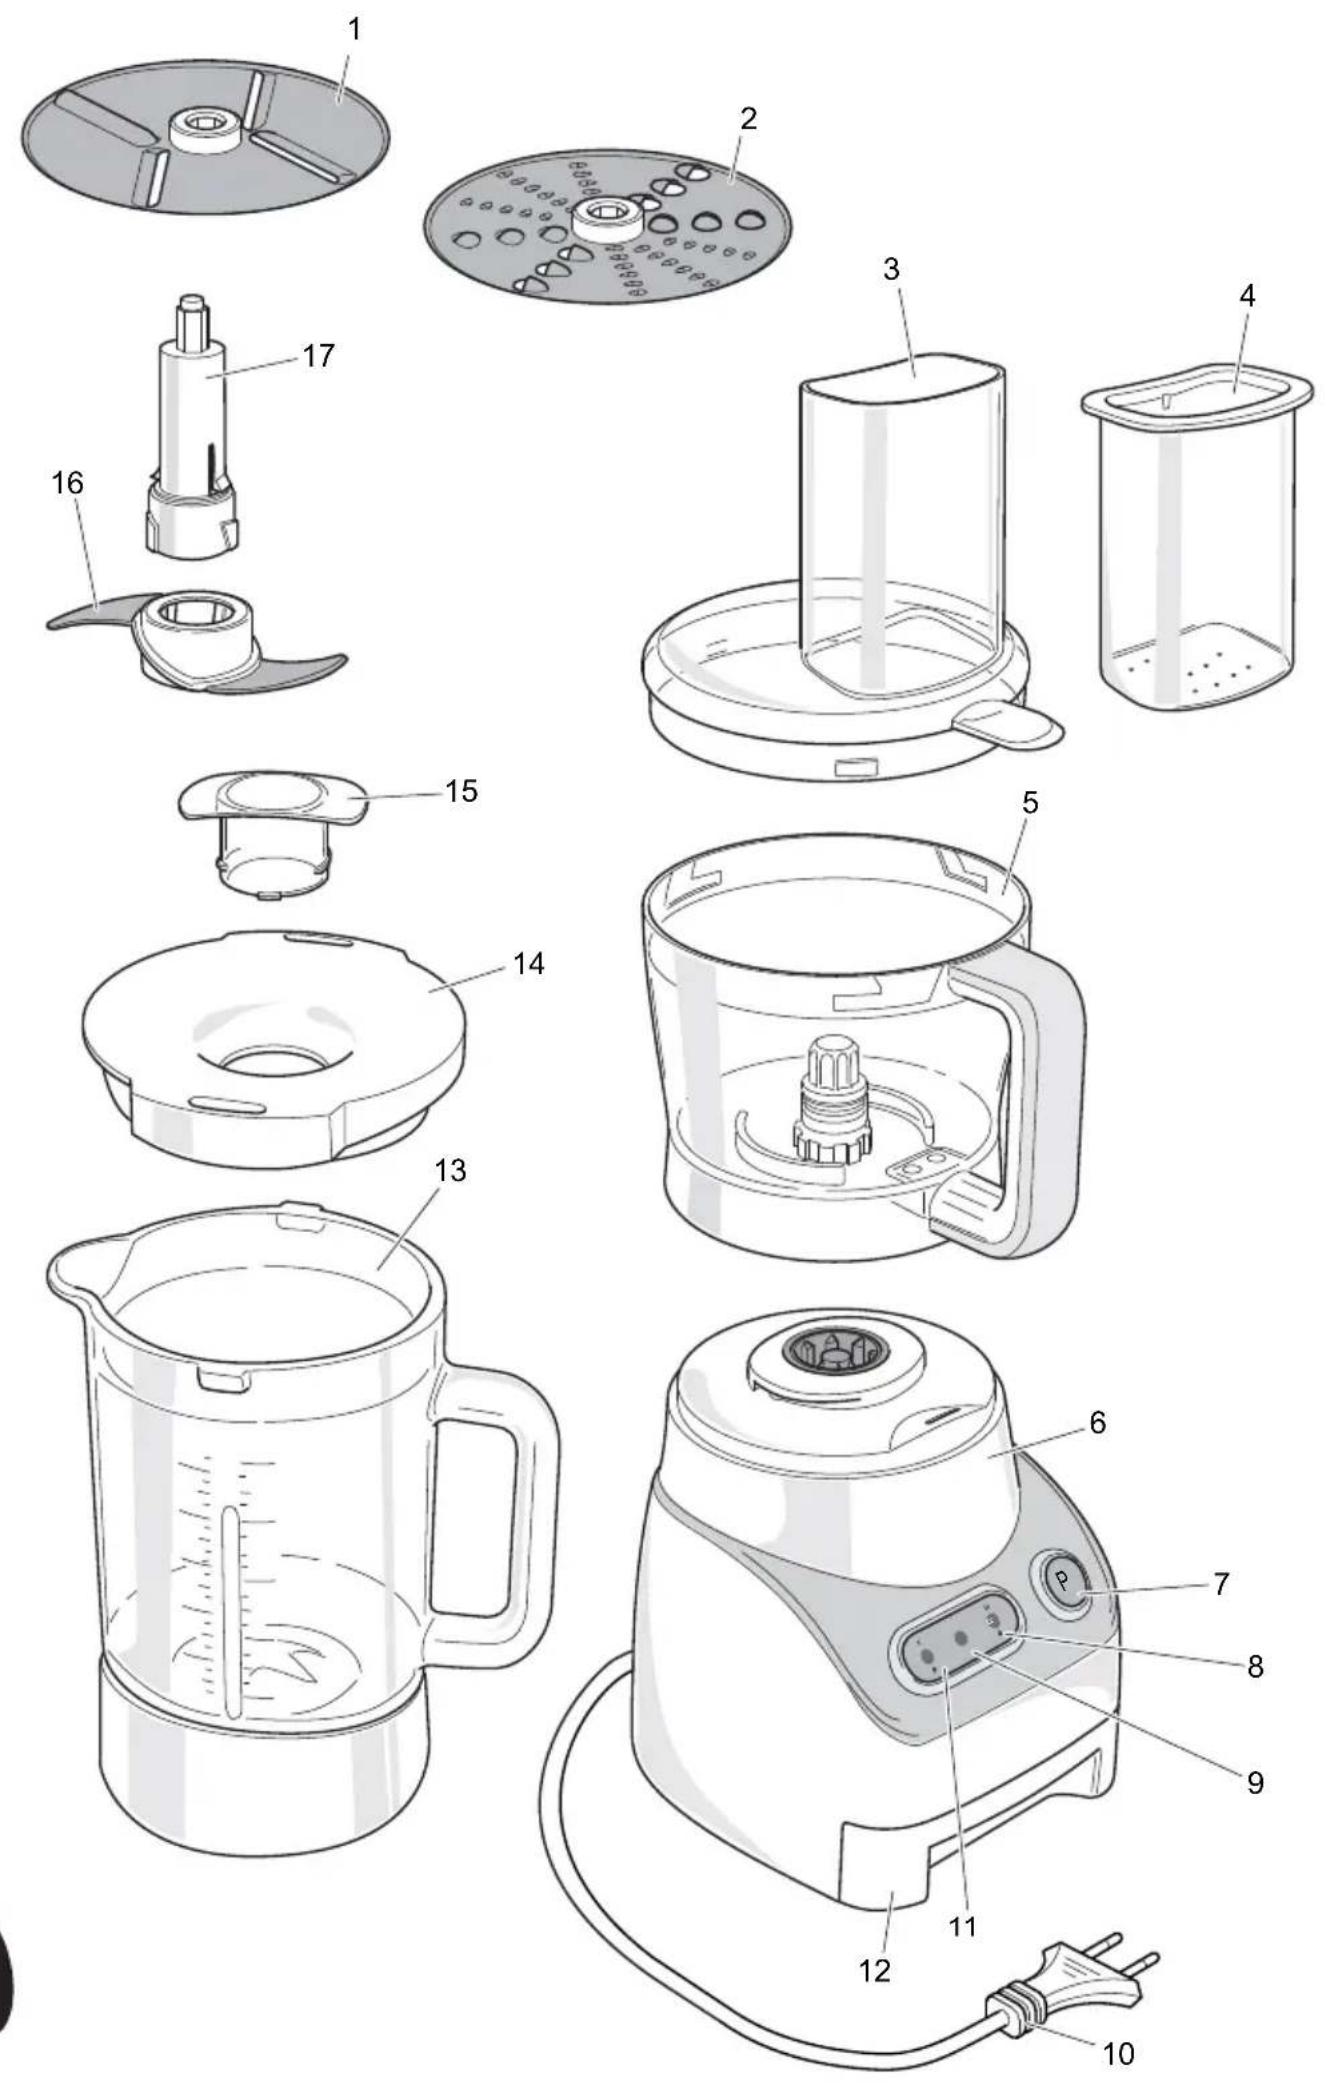
Operation and Controls
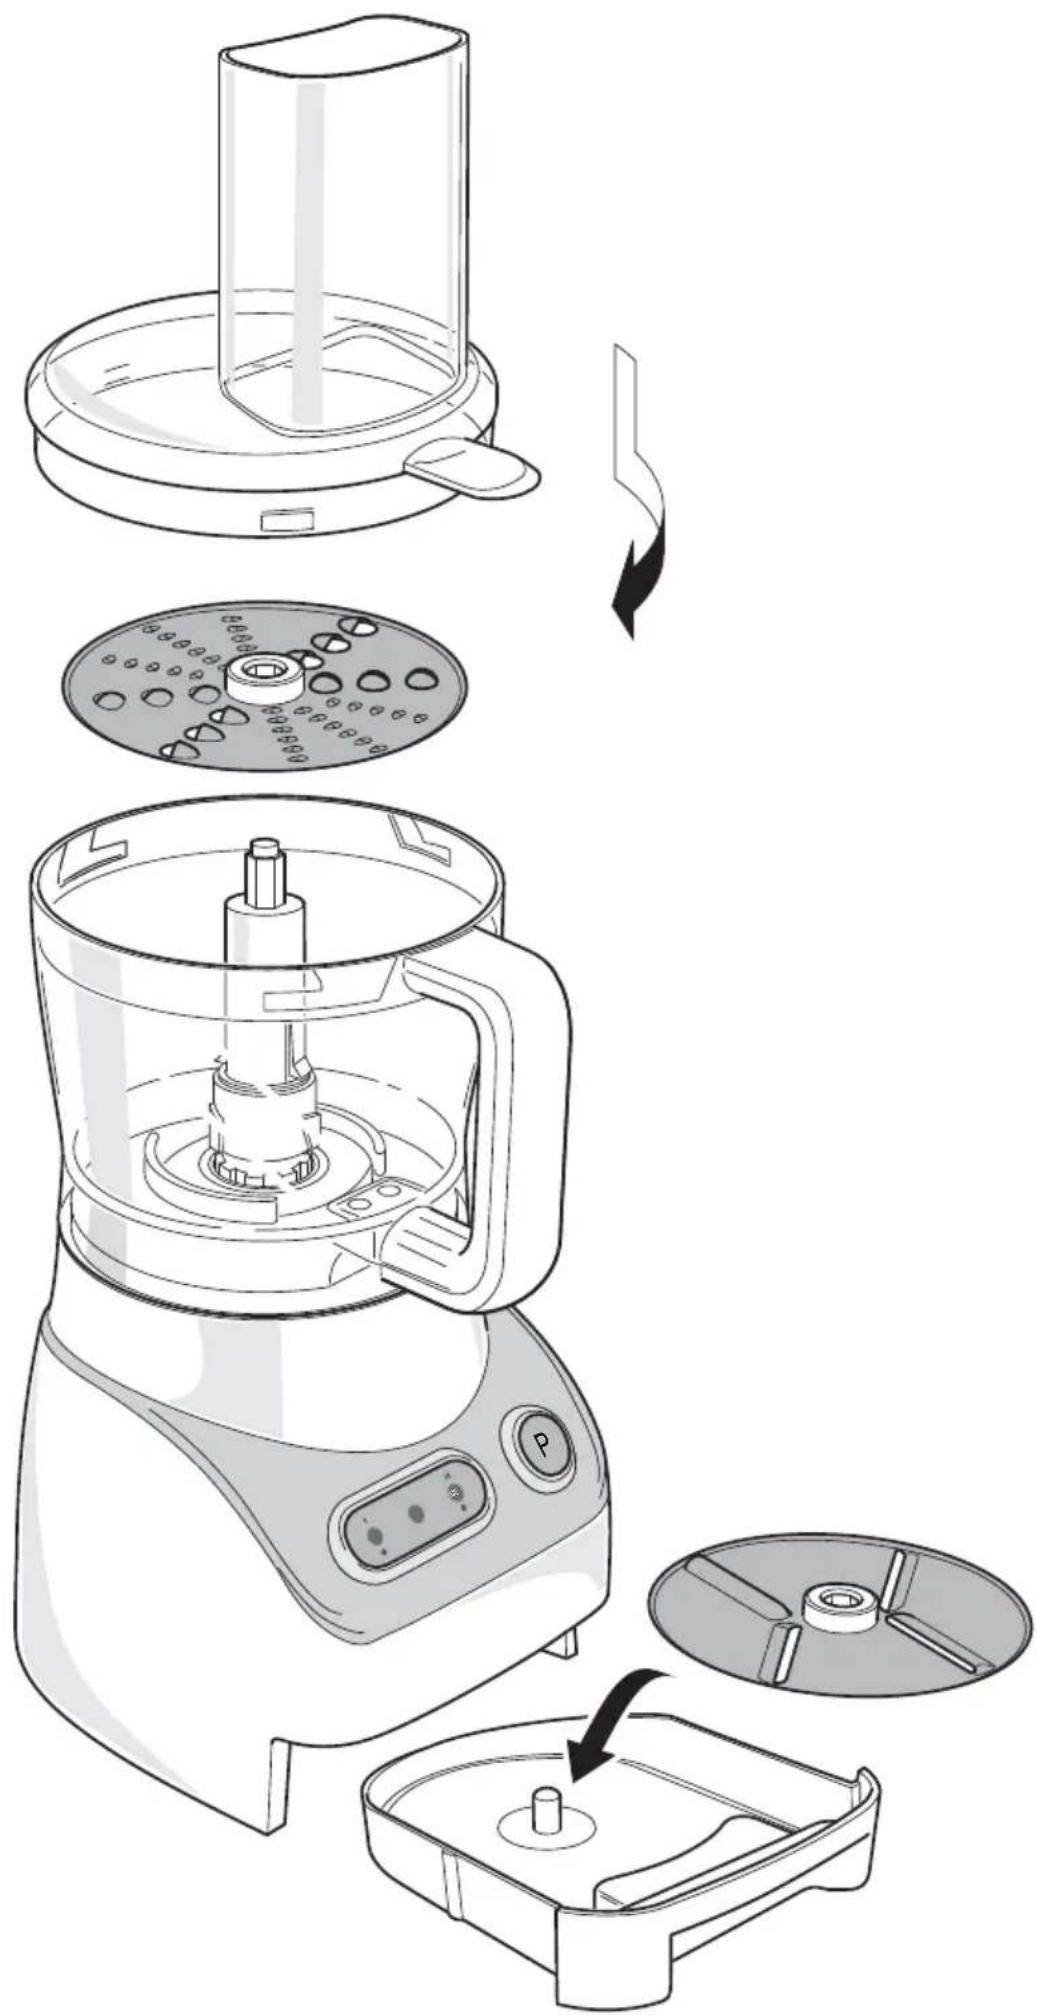
See Figure 1.
The appliance is equipped with the following features:
1 S l i c e r
2 Grater/shredder
3 Mixing bowl lid
4 Stopper
5 Mixing bowl
6 Drive unit
7 P(ulse) button with indicator light
8 II/ICE - Continuous high speed button with indicator light / interval function
9 Stand-by indicator light
10 Power cord with plug
11 I - Continuous low speed button with indicator light
12 Accessory storage tray
13 Blender jug
14 Blender lid
15 Blender lid insert
16 Knife
17 Accessory shaft
Before first use
1 Take the appliance out of the packaging.
2 Make sure that the mains voltage is the same as indicated on the type plate on the appliance.
3 Clean the appliance. See 'Maintenance and cleaning'.
Use
Cutting and chopping
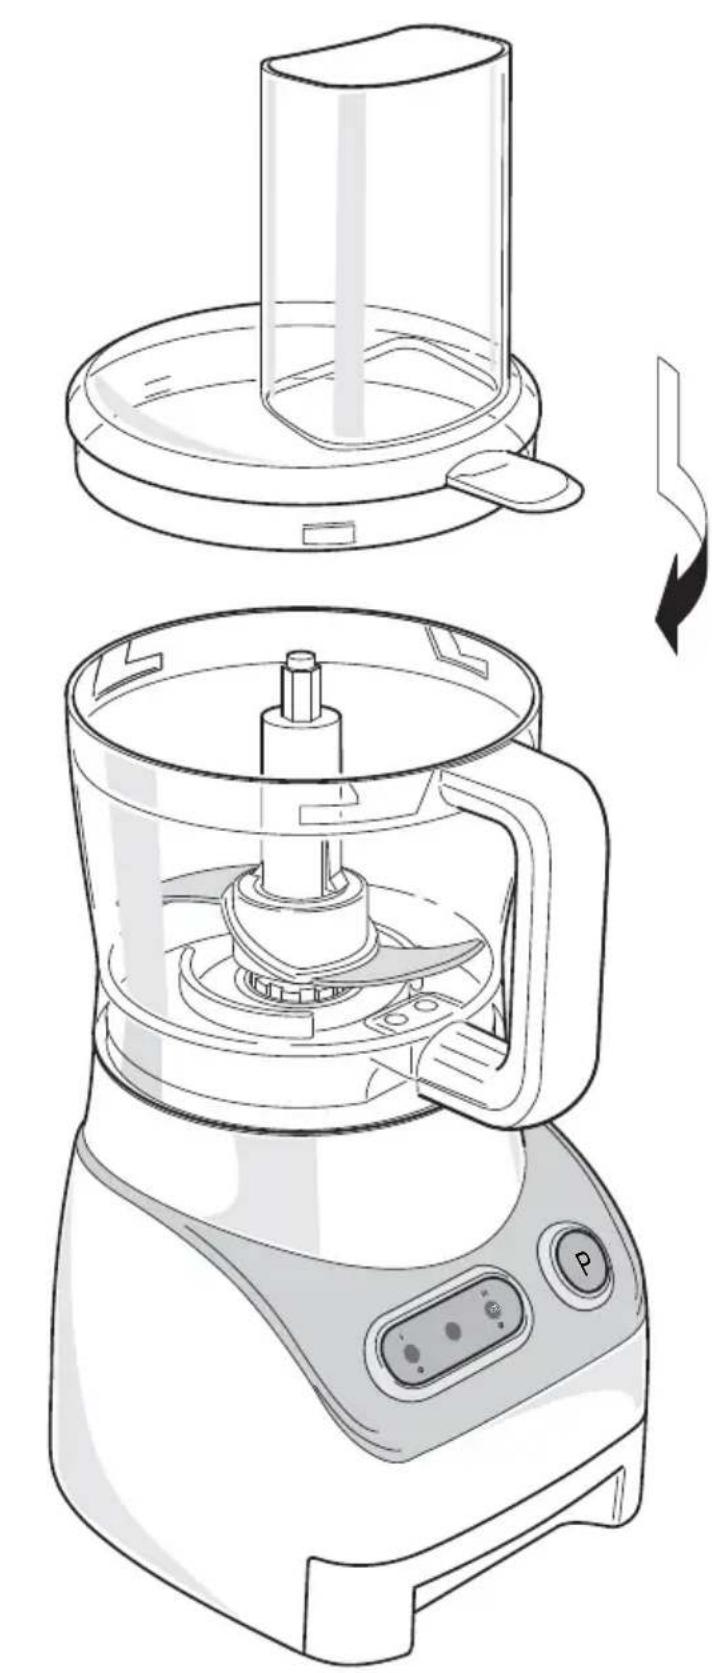
1 Place the appliance on a flat, stable surface where it cannot fall.
See figure 2.
2 Place the mixing bowl on the drive unit. Rotate the mixing bowl clockwise as far as possible.
3 Slide the knife over the accessory shaft and push it downwards till the locks click the knife in a fixed position.

Be careful when attaching and removing accessories. The knife is sharp.
4 Place the knife with the accessory shaft over the drive shaft in the mixing bowl.
5 Put the ingredients in the mixing bowl.
6 Place the lid on the mixing bowl and rotate the lid clockwise as far as possible. The lid's protruding lip must be slid over the mixing bowl's handle.
7 Place the stopper in the filling opening.
8 Pull the power cord out of the storage space at the rear of the drive unit.
9 Insert the plug into the wall socket.

When all indicator lights are flashing, the mixing bowl and/or the lid is not fitted correctly. For safety reasons it is not possible to switch on the appliance. Check the position of the bowl and the lid.
When the mixing bowl and the lid are fitted correctly, only the stand-by indicator light flashes. Only then the appliance can be operated.
10 Press the P(ulse) button to have the drive unit run for a short period at high speed (pulse function) or press the I button for continuous low speed or the II/ICE button for continuous high speed. The stand-by indicator light will dim and the blue indicator light in applied button will be lit.
11 Add ingredients during use via the filling opening in the lid. Use the stopper to push solid ingredients downwards through the filling opening. Do not push too hard.

- The maximum operating time in continuous high or low speed is 2 minutes. Then the drive unit will be switched off automatically for 2 minutes. 15 seconds before switching off the stand-by indicator light starts flashing. The blue indicator light stays on.
• To avoid personal injury or damage to the appliance, never insert a hand or
another object into the mixing bowl whilst the appliance is being used.
• Always use the stopper to push ingredients. Never use your fingers, a fork or another object to push ingredients.
12 Use the stopper to close the filling opening during use so that nothing can fall into or splash out of the mixing bowl.
13 Switch the appliance off after use (press the button with the lit indicator light or release the Pulse button).
14 Unscrew the mixing bowl and remove it from the drive unit.
Remove the knife with the accessory shaft from the bowl before emptying.

Do not remove the lid from the mixing bowl before the knife has stopped moving.
Tips
- In the P(ulse) mode, the knife rotates at its maximum speed as long as the button is pressed.
- If the ingredients stick to the knife or to the inside of the mixing bowl, switch the appliance off and remove the lid and the knife. The ingredients can then be scraped off using a spatula.
- Cut the ingredients into small pieces before placing them in the mixing bowl.
- The machine chops very quickly. Make sure the machine does not chop for too long! It is better to chop briefly a number of times using the P(ulse) mode.
- Use the interval function (press the II/ICE button for more than 3 seconds) in case you want to process non liquid food.
- Do not chop hard ingredients in the mixing bowl, such as coffee beans, nutmeg or ice cubes.
Grating, shredding or cutting slices
1 Place the appliance on a flat, stable surface where it cannot fall.
See figure 4.
2 Place the mixing bowl on the drive unit. Rotate the mixing bowl clockwise as far as possible.
3 Place the accessory shaft (without the knife) over the drive shaft in the mixing bowl.
4 Place the slicer or the grater/shredder on the accessory shaft, making sure the side to be used is facing upwards.

Be careful when attaching and removing accessories. The grater/shredder is sharp.
5 Place the lid on the mixing bowl and rotate the lid clockwise as far as possible. The lid's protruding lip must be slid over the mixing bowl's handle.
6 Pull the power cord out of the storage space at the rear of the drive unit.
7 Insert the plug into the wall socket.

When all indicator lights are flashing, the mixing bowl and/or the lid is not fitted correctly. For safety reasons it is not possible to switch on the appliance. Check the position of the bowl and the lid.
When the mixing bowl and the lid are fitted correctly, only the stand-by indicator light flashes. Only then the appliance can be operated.
8 Press the I button for continuous low speed. The stand-by indicator light will dim and the blue indicator light in the I button will be lit.
9 Add ingredients during use via the filling opening in the lid. Use the stopper to push solid ingredients downwards through the filling opening. Do not push too hard.

- The maximum operating time in continuous high or low speed is 2 minutes. Then the drive unit will be switched off automatically for 2 minutes. 15 seconds before switching off the stand-by indicator
light starts flashing. The blue indicator light stays on.
- To avoid personal injury or damage to the appliance, never insert a hand or another object into the mixing bowl whilst the appliance is being used.
• Always use the stopper to push ingredients. Never use your fingers, a fork or another object to push ingredients.
10 Switch the appliance off after use (press the I button with the lit indicator light).
11 Unscrew the mixing bowl and remove it from the drive unit. Remove the accessories from the bowl before emptying.
Blending
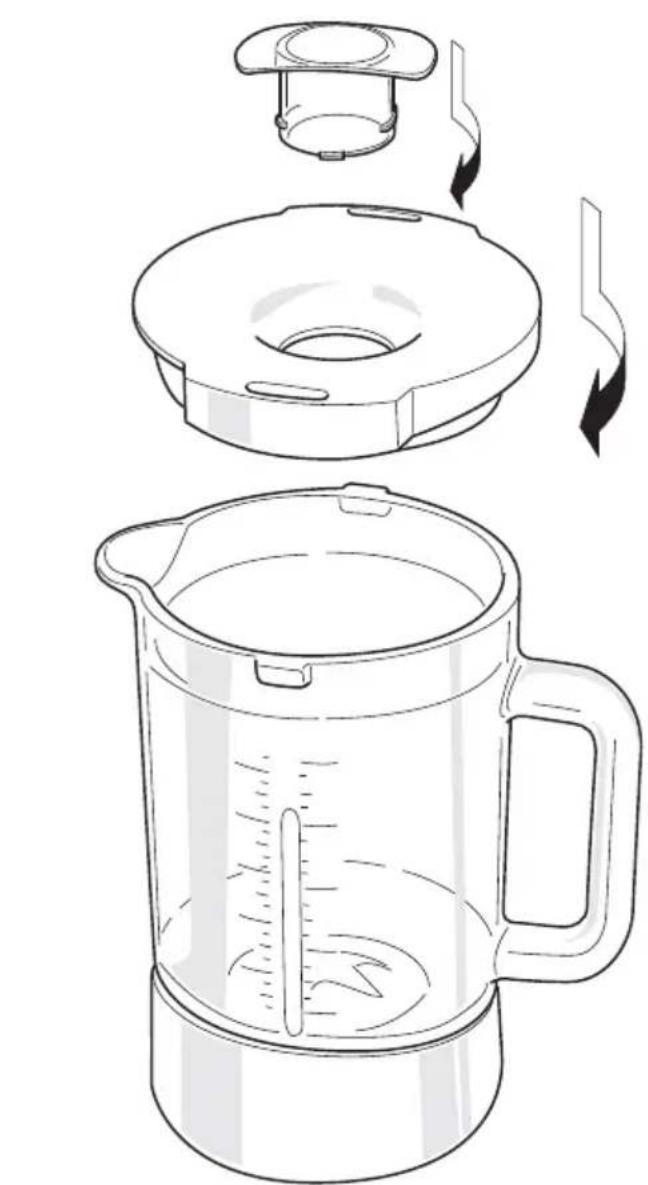
1 Place the appliance on a flat, stable surface where it cannot fall.
2 Place the blender jug on the drive unit. Rotate the blender jug clockwise as far as possible.
3 Cut the fruit and/or vegetables into pieces that fit in the jug. Do not cut into pieces that are too large, since they will need to be small enough to fall to the base of the jug.
4 Open the lid by turning it anti-clockwise, and put the pieces in the jug.
See figure 3.
5 Fit the lid back onto the jug to prevent splashing.
6 Insert the plug into the wall socket.

When all indicator lights are flashing, the jug is not fitted correctly. For safety reasons it is not possible to switch on the appliance. Check the position of the jug.
When the jug is fitted correctly, only the stand-by indicator light flashes. Only then the appliance can be operated.
7 Press the P(ulse) button to have the drive unit run for a short period at high speed (pulse function) or press the I button for continuous low speed or the II/ICE button for continuous high speed. The stand-by indicator light will dim and the blue indicator light in applied button will be lit.
Note: the blender works very fast. In a few seconds the product will be chopped. The smoothness of the blend increases with longer blending times.
8 If necessary, top up the contents by opening the lid insert: turn the lid insert anti-clockwise and remove it from the lid. If the pieces are too large for the filling opening then switch off the blender, remove the lid, and add the product. Put the lid back on the jug before switching the blender on again.
9 Once you have processed the required quantity of fruit and/or vegetables, you can switch the appliance off (press the button with the lit indicator light).
10 Unscrew the jug and remove it from the drive unit.
Grinding ice
- The appliance is equipped with a special procedure to grind ice cubes in the blender jug. Press the II/ICE button for more than 3 seconds to start up this procedure. The appliance will start running for 1,5 seconds and stop 0,7-0,8 seconds. This is repeated 10 times, taking about 22 seconds.
Safety during use
- To avoid personal injury or damage to the appliance, never insert a hand or another object into the jug whilst the appliance is being used.
- Never allow the power cord to hang over the edge of the draining board, worktop or table.
• Always make sure the power cord has been fully unwound.
- Never use the appliance outdoors.
- Never use the appliance in a humid room.
- Always remove the plug from the wall socket after use.
- Make sure your hands are dry when you touch the appliance, the power cord or the plug.
- Switch off the appliance and remove the plug from the wall socket in the event of a malfunction during use, before cleaning the appliance, before fitting or removing an accessory and before storing the appliance after use.
- Never leave the appliance unattended when in use.
• Always close the lid before switching on the appliance.
- Hot liquids in the blender may result in the lid flying off due to the steam and pressure caused by the hot liquid. Prevent this from happening by holding the lid down with a cloth whilst the blender is in use.
- The blender works very quickly. The ingredients are ground within just a few seconds. The longer the blender is switched on, the finer the products will be ground.

Maintenance and Cleaning
1 Remove the plug from the plug socket.
2 Remove the knife from the accessory shaft after pressing the two locks above the knife and shift the knife up.
3 Clean the mixing bowl, the lid, the blending jug with lid and all the accessories, except the drive unit, with

warm water and a small amount of washing-up liquid. You can also clean these items in a dishwasher. Rinse all the items well to remove any soap and dry them thoroughly.

Be careful when attaching and removing accessories. The knife, the slicer and the grater/shredder are sharp.
4 Clean the drive unit and the power cord with a damp cloth and a small amount of washing-up liquid. Thoroughly dry the appliance and the power cord.

- Make sure no moisture comes into contact with the appliance's electrical parts.
- Never immerse the appliance, the power cord or the plug in water or other liquids.
- Never use aggressive or abrasive cleaning products or sharp objects (such as a knife or a hard brush) to clean the appliance.
- Only the loose parts (mixing bowl with the lid, the blending jug with lid and all the accessories) may be cleaned in a dishwasher. The appliance itself may not be cleaned in the dishwasher.
- Make sure all parts are completely dry before use.
- This appliance uses sharp knives. Avoid cutting yourself on the knives.
Storage
1 Place the accessories in the storage tray at the bottom of the appliance.
2 Push the power cord into the storage space at the back of the appliance.
3 Store the appliance in a frost free and dry location.
- Store the appliance out of reach of children.

Safety
- Read and follow these instructions carefully. Keep this manual for future reference.
- Use this appliance only in accordance with these instructions.
- This appliance is intended solely for domestic use.
- The use of this appliance by children or persons with a physical, sensory, mental or motor disability or who lack the necessary knowledge and experience may cause a hazard. Persons responsible for the safety of such people must give explicit instructions or supervise the use of the appliance.
- Keep the appliance out of the reach of children, and of persons who may not be able to operate it safely.
- Have the appliance repaired only by a qualified electrician. Never try to repair the appliance yourself.
- Only use accessories recommended by the supplier. The use of other accessories may result in damage to the appliance, thereby creating hazards for the user.
Electricity
-
The appliance is not intended to be operated by means of an external timer or separate remote control system.
• Always remove the plug from the wall socket when the appliance is not in use. -
Always remove the plug from the wall socket by pulling on the plug not the power cord.
- Never pull the power cord to move the appliance.
- Do not use the appliance if the appliance or the power cord is damaged. Have a damaged power cord replaced by a qualified electrician.
- Make sure that the appliance, the power cord and the plug do not come into contact with sources of heat such as a hot hob or naked flame.
- Make sure that the appliance, the power cord and plug do not come into contact with water, other fluids or chemicals.
- Do not pick up the appliance if it falls into water. Immediately remove the plug from the wall socket. Do not use the appliance anymore.
U.K. Wiring Instructions
The wires in the mains lead are coloured in accordance with the following code:
As the colours of the wires in the mains lead of this appliance may not correspond with the colour markings identifying the terminals on your plug, proceed as follows:
- The BLUE wire must be connected to the terminal marked with the letter N or coloured black.
- The BROWN wire must be connected to the terminal marked with the letter L or coloured red.
If a 13A plug (BS1363) is used a 5A fuse (BS1362) should be fitted. If any other type of plug is used, a 13A fuse must be fitted either in the plug or adapter, or on the distribution board.
This is a double insulated appliance and does not deed an earth connection.
WARNING: ON NO ACCOUNT SHOULD EITHER THE LIVE OR NEUTRAL WIRES BE CONNECTED TO THE EARTH TERMINAL

The Environment
Dispose of packaging material, such as plastic and boxes, in the appropriate waste containers.

If you wish to dispose of the appliance whilst it still works properly or can be easily repaired, then ensure that the appliance is recycled.

When the appliance reaches the end of its useful life, it should be disposed of in a responsible manner, thereby ensuring the reuse of the appliance or its parts. Do not dispose of the appliance with unsorted refuse; hand it in at the store, or take it to a recognized collection point. Contact your municipality for information about the reception and collection systems in your area.
CE Conformity
Applicable European guideline:
2002/95/EC
2002/96/EC
Recipes:
Mixing and cutting with mixing bowl and knife:
| Food Max. quantity | Operating time | Preparation | |
| Carrot 250 g 15-20 sec. | Peel and cut into 2 cm blocks | ||
| Apple 250 g 15-20 sec. | Peel and remove core, cut into | 2 cm blocks | |
| Cheese 150 g 15-20 sec. | Cut into 2 cm blocks | ||
| Egg 6 pcs 5-10 sec. | Boil the eggs, peel the eggs and | cut into several pieces | |
| Meat (fresh or cooked) | 200 g 15-20 sec. | Cut into 2 cm blocks | Fresh meat requires more time than cooked meat |
| Nuts 150 g 10-15 sec. | Divide evenly in bowl | ||
| Onion 200 g 10-15 sec. | Peel and cut into several pieces | ||
| Celery | little | 10 sec. Remove the stems | |
| Potatoes | 200 g 15-25 sec. | Peel and boil and cut into 3 cm blocks | |
| Flour | 250 g flour + 150 g water | 20 sec. ON 2 min. OFF | Add egg (approx. 60 g) |
| Flour+icing sugar | 360 g flour + 45 g icing sugar + 1 egg + 230 ml water | 15 sec. ON 2 min. OFF | Add egg (approx. 60 g) |
Blend in blender jug:
| Food Max. quantity | Operating time | Preparation | |
| Carrot 480 g carrots | 720 ml water | 15-20 sec. Peel carrots and cut into 2 cm blocks | |
| Ice cubes | 6 pcs 1,5 sec. ON | 0,7 sec. OFF10 cycles (Interval procedure) | Max. size blocks: 20*25*35 mm |
