
213201 2 Mills Let’s - Blender PRINCESS - Free user manual and instructions
Find the device manual for free 213201 2 Mills Let’s PRINCESS in PDF.


| Product Type | Blender |
| Brand | Princess |
| Model | 213201 2 Mills Let’s |
| Bowl Capacity | 1.5 liters |
| Bowl Material | Glass |
| Power | 800 W |
| Number of Speeds | 2 speeds + Pulse function |
| Ice Crushing Function | Yes |
| Blade Type | Stainless steel blades |
| Dimensions (L × W × H) | 20 × 18 × 40 cm |
| Weight | 2 kg |
| Power Supply | 220–240 V, 50/60 Hz |
| Cable Length | 1 m |
| Color | White / Silver |
| Care and Cleaning | Bowl and lid dishwasher safe |
| Safety | Safety lock if bowl is not properly positioned |
| Replacement Parts Available | Replacement bowl sold separately |
| Warranty | 2 years |
| Included Accessories | Recipe book |
| Use | Domestic |
Frequently Asked Questions - 213201 2 Mills Let’s PRINCESS
User questions about 213201 2 Mills Let’s PRINCESS
0 question about this device. Answer the ones you know or ask your own.
Ask a new question about this device
Download the instructions for your Blender in PDF format for free! Find your manual 213201 2 Mills Let’s - PRINCESS and take your electronic device back in hand. On this page are published all the documents necessary for the use of your device. 213201 2 Mills Let’s by PRINCESS.
USER MANUAL 213201 2 Mills Let’s PRINCESS
ART 213201
BLENDER & 2 MILLS (LET'S BLENDER)

Gebruiksaanwijzing
Nederlands 1
User's instructions
English 5
Mode d'emploi
Français 10
Bedienungsanleitung
Deutsch 14
2

3
5
Algemeen
JdB Blenders_213201 book Page 2 Friday, May 16, 2008 2:03 PM
Producten malen
Zie figuur 4.
JdB_Blenders_213201 book Page 5 Friday, May 16, 2008 2:03 PM

General information
This attractive blender has been designed by Jan des Bouvrie. The appliance can be used to finely chop fruit and vegetables or to make delicious shakes and juices. It can also be used to grind nuts, pepper and herbs. Both the housing and the jugs are of a modem and luxurious design.
The Jan des Bouvrie Blender has a powerful motor with two speed settings and a pulse setting.
The jug has a lid with an opening through which it can be filled. Products can be added through this opening whilst blending without making a mess. The jug has a volume of 1.5 liters. Steel knives are integrated in the jug, so that the blender can easily chop and puree both large and small pieces of fruit and vegetables.
This model comes with two extra mills, a universal mill for grinding for example walnuts and herbs, and a pepper mill. These mills have a removable blade stand with integrated knives.
The device must be connected to the mains power supply.
Operation and controls
See figure 1.
1 Housing
2 Power cord and plug
3 Operation indicator light (orange)
4 On/Off indicator light (red)
5 Rotary button
6 Jug (volume 1.5 liters)
- Filler Cap
9 Universal mill
10 Mill blade stand I (removable)
11 Pepper mill
12 Mill blade stand II (removable)
Before using for the first time
1 Remove all the packaging materials and stickers from the appliance.
2 Clean the appliance and all the accessories (see 'Cleaning and maintenance') and dry them thoroughly.
Blending products
See figure 2.
1 Place the housing on a stable surface.
2 Fit the jug to the housing. The three catches on the housing must fit precisely into the slots in the base of the jug.
3 Place the lid on the jug.
4 Place the filler cap in the lid and tighten the filler cap by
rotating it a quarter of a turn.
5 Cut the fruit and/or vegetables into pieces. Do not make the pieces too large. They must be small enough to fit into the bottom of the jug.
6 Open the lid and put the pieces in the jug.
7 Place the lid back onto the jug to prevent splashing.
8 If the rotary button is in 0-position and pushed in, the button is locked. Push the rotary button to unlock it (see figure 2).
9 Switch the blender a few seconds to setting 1 or 2 or the pulse setting (P).
The blender works very fast. In a few seconds the product will be chopped. The longer the blender is turned on, the finer the products will be chopped.
Note: Do not operate the blender more then 3 minutes to avoid overheating. Let the blender cool down for a few minutes before starting again.
10 If necessary, you can top up the jug by opening the filler cap. Unscrew it a quarter of a turn and remove it from the lid. If the pieces to be added do not fit through the filler opening, turn off the blender, remove the lid and place the pieces in the jug. Place the lid back on the jug before turning the blender back on.
11 Switch off the blender (position 0) once the required quantity of fruit and/or vegetables have been chopped.
12 Push the rotary button to lock it (see figure 2).
13 Remove the plug from the plug socket.
BLENDER & 2 MILLS (LET'S BLENDER) ART 213201
5


JdB Blenders_213201.book Page 6 Friday, May 16, 2008 2:03 PM
Grinding
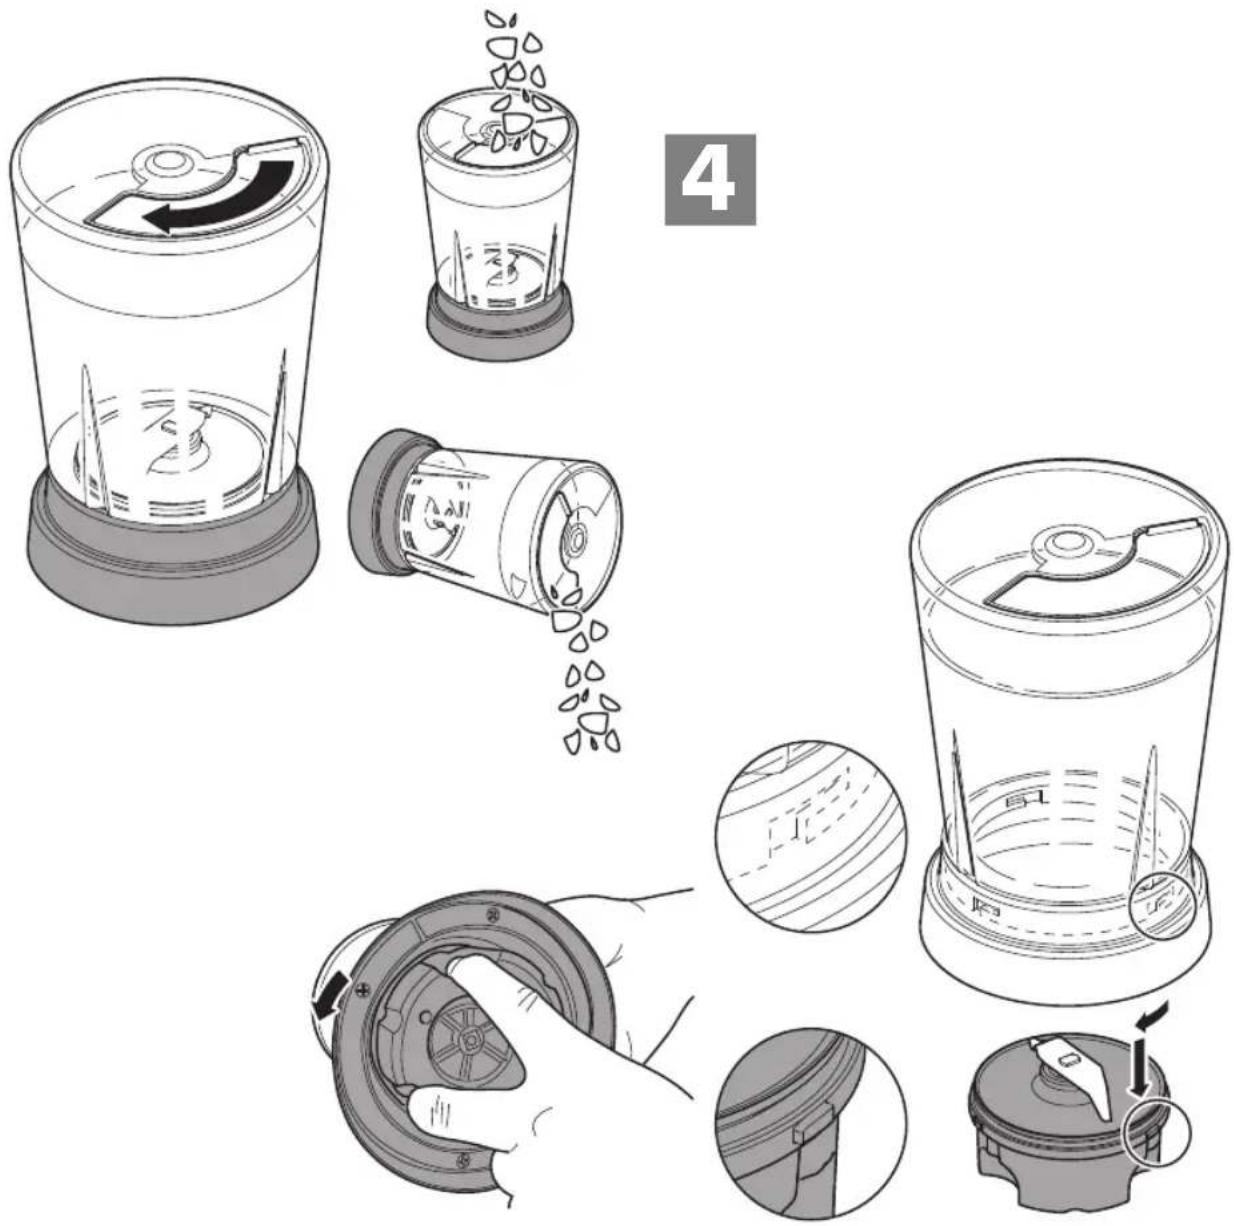
See figure 4
1 Place the housing on a stable surface.
2 Fit the mill to the housing. The three catches on the housing must fit precisely into the slots in the base of the mill.
3 Rotate the top plate of the mill clockwise to open the mill-jug.
4 Fill the mill jug with the product that you wish to grind.
5 Rotate the top plate of the mill anti-clockwise to close the mill-jug.
6 If the rotary button is in 0-position and pushed in, the button is locked. Push the rotary button to unlock it (see figure 2).
7 Switch the mill a few seconds to setting 1 or 2 or the pulse setting (P).
This mill works very fast. In seconds the product will be ground. The longer the mill is turned on, the finer the products will be ground.
Note: Do not operate the mill more than 50 seconds with max. 150 g ingredients. Let the mill cool down for around 7 minutes before stating again.
8 Switch off the mill (position 0) once the required quantity has been ground.
9 Push the rotary button to lock it (see figure 2).
10 Remove the plug from the plug socket.
11 Wait until the blades stand still and remove the ground product.

Cleaning and maintenance
- Make sure the plug has been removed from the plug socket before cleaning the appliance.
• Make sure no moisture gets into the interior of the housing. - Do not immerse the appliance in water or in other liquids. If this does happen, do not use the appliance again. For safety reasons, dispose of the appliance.
-
Only the separate components may be cleaned in a dishwasher.
-
Never use corrosive or scouring cleaning products.
- This blender uses sharp knives, which are located in the bottom of the container. Therefore, be very careful when emptying and cleaning the blender. Avoid cutting yourself on the knives.
1 Clean the exterior of the housing with a soft, damp cloth.
2 Clean the jugs and the components with warm soapy water.
3 Thoroughly clean the rotating knives at the bottom of the jug, in particular, and make sure you remove all the food from them (see 'Removing and fixing the base with the rotating knives').
4 Dry the components thoroughly after they have been cleaned.
Removing and fixing the base with the rotating knives
See figure 3.
1 Fit the jug to the housing.
2 Hold the housing.
3 Rotate the jug anti-clockwise.
4 Remove the jug from the base with the rotating knives.
5 Remove the base with the rotating knives from the housing.
6 Reassemble the base with the rotating knives and the jug in the opposite order.
Removing the mill base from mill
See figure 5.
1 Hold the mill and rotate the mill base and clockwise.
2 Remove the base from the mill-jug.
3 Reassemble the mill in the opposite order.
BLENDER & 2 MILLS (LET'S BLENDER) ART 213201


JdB Blenders_213201 book Page 7 Friday, May 16, 2008 2:03 PM

Safety
General information
- Please read these instructions carefully and keep them for future reference.
- Only use this appliance in accordance with these instructions.
- Only use this appliance for domestic purposes.
• The use of this appliance by children or persons with a physical, sensory, mental or motor limitation or persons who lack the necessary knowledge and experience may result in a dangerous situation. Persons responsible for their safety must give explicit instructions or supervise the use of the appliance.
• Make sure children do not play with the appliance.
• Repairs may only be carried out by a qualified service technician. Never try to repair the appliance yourself.
Heat and electricity
- Verify that the mains voltage is the same as that indicated on the appliance's type plate before use.
- Plug the appliance into an earthed plug socket.
- Always remove the plug from the plug socket when the appliance is not in use.
- Always remove the plug from the plug socket by pulling the plug, not the power cord.
- Do not use the appliance if the power cord or the appliance is damaged. For your own safety, return the appliance to our service department. A damaged power cord may only be replaced by our service department using the special tools required for the repair.
- Make sure the appliance and the power cord do not come in contact with heat sources, such as a hot hob or a naked flame.
• Make sure the appliance, the power cord and the plug do not come into contact with water.
- Do not pick up the appliance if it falls into water. Remove the plug from the plug socket immediately. Do not use the appliance anymore.
During use
- When using the blender continuously during a longer period, the electric motor will warm up. In this case, let the motor cool down before further use of the appliance.
- Never use the appliance outdoors.
- Never use the appliance in a humid room.
- Place the appliance on a flat, stable surface where it cannot fall.
- Never allow the power cord to hang over the edge of the draining board, worktop or table.
• Make sure your hands are dry when you touch the appliance, the power cord or the plug. - Only turn on the appliance if a jug has been placed on the housing and a lid has been placed on the jug.
- Switch off the appliance and remove the plug from the plug socket in the event of a malfunction during use and before cleaning the appliance, fitting or removing an accessory, or storing the appliance after use.
- Never leave the appliance unattended when in use.
- After use, clean the appliance thoroughly (see 'Cleaning and maintenance').
• The blender works very quickly. The ingredients are ground within just a few seconds. The longer the blender is turned on, the finer the products will be ground. - Hot liquids in the blender may result in the lid flying off due to the steam and pressure caused by the hot liquid. Prevent this from happening by holding the lid down with a cloth whilst the blender is in use.


BLENDER & 2 MILLS (LET'S BLENDER) ART 213201
7


JdB_Blenders_213201 book Page 8 Friday, May 16, 2008 2:03 PM
U.K. WIRING INSTRUCTIONS
The wires in the mains lead are coloured in accordance with the following code:
• BLUE NEUTRAL
• BROWN LIVE
As the colours of the wire in the mains lead of this appliance may not correspond with the colour markings identifying the terminals on your plug, proceed as follows:
- The wire which is coloured BLUE must be connected to the terminal which is marked with the letter N or coloured black.
- The wire which is coloured BROWN must be connected to the terminal which is marked with the letter L or coloured red.
• The wire which is coloured GREEN/YELLOW must be connected to the terminal which is marked with the letter E or (earth symbol) and is coloured GREEN or GREEN/YELLOW
WARNING: THIS APPLIANCE MUST BE EARTHED

The environment
Dispose of packaging materials, such as plastic and boxes, in the appropriate containers.
If you wish to dispose of the appliance whilst it still works properly or can be easily repaired, ensure that the appliance is recycled.

When the appliance reaches the end of its useful life, it must be disposed of in a responsible manner, thereby ensuring the reuse of the appliance or its parts. Do not dispose of the appliance with normal household waste, but hand it over to a recycling collection point. Contact your local authority for
information about available disposal and collection systems in your area.
Applicable European guidelines:
·2002/95/EC
• 2002/96/EC

Recipes
Browse the internet for delicious recipes to make with a blender. Below you'll find three of the recipes we have found for you.
Banana milkshake
Ingredients:
1 Banana
vanilla ice-cream
1918
Cut the banana into slices and put these in the jug of the blender. Add some vanilla ice-cream and some cold milk. Switch on the blender and let it blend for a few seconds. The result is a delicious banana milkshake!
Strawberry breakfast
Ingredients:
2 cups unsweetened whole strawberries
1 1/2 cup milk
1/2 cup plain yoghurt
2 env. vanilla flavoured instant breakfast mix
2 tablespoons honey


BLENDER & 2 MILLS (LET'S BLENDER) ART 213201


JdB Blenders_213201.book Page 10 Friday, May 16, 2008 2:03 PM
Généralités
JdB Blenders_213201.book Page 11 Friday, May 16, 2008 2:03 PM


JdB Blenders_213201.book Page 12 Friday, May 16, 2008 2:03 PM
JdB Blenders_213201.book Page 14 Friday, May 16, 2008 2:03 PM
Allgemein
JdB Blenders_213201.book Page 15 Friday, May 16, 2008 2:03 PM

JdB Blenders_213201 book Page 16 Friday, May 16, 2008 2:03 PM
JdB_Blenders_213201.book Page 17 Friday, May 16, 2008 2:03 PM

Bei der Benutzung
JdB_Blenders_213201.book Page 19 Friday, May 16, 2008 2:03 PM

Generalidades
JdB Blenders_213201 book Page 20 Friday, May 16, 2008 2:03 PM


JdB Blenders_213201 book Page 21 Friday, May 16, 2008 2:03 PM

JdB Blenders_213201 book Page 22 Friday, May 16, 2008 2:03 PM
JdB Blenders_213201 book Page 23 Friday, May 16, 2008 2:03 PM

Introduzione
JdB Blenders_213201.book Page 24 Friday, May 16, 2008 2:03 PM

JdB_Blenders_213201.book Page 25 Friday, May 16, 2008 2:03 PM

JdB_Blenders_213201.book Page 26 Friday, May 16, 2008 2:03 PM

JdB Blenders_213201 book Page 28 Friday, May 16, 2008 2:03 PM
Allmänt
JdB Blenders_213201.book Page 29 Friday, May 16, 2008 2:03 PM


Denataren Tomvand Brüning.
JdB Blenders_213201 book Page 30 Friday, May 16, 2008 2:03 PM


JdB Blenders_213201.book Page 32 Friday, May 16, 2008 2:03 PM
Generelt
10 Kværnens bund I (los)
11 Peberkvæm 12 Kupereans h
12 Kvaemens bund II (Ios)
32
JdB Blenders_213201.book Page 33 Friday, May 16, 2008 2:03 PM

Maling af madvarer
Se fig. 4.
JdB Blenders_213201 book Page 34 Friday, May 16, 2008 2:03 PM

JdB Blenders_213201 book Page 35 Friday, May 16, 2008 2:03 PM


JdB Blenders_213201 book Page 36 Friday, May 16, 2008 2:03 PM
Generelt
JdB Blenders_213201 book Page 38 Friday, May 16, 2008 2:03 PM


JdB Blenders_213201.book Page 40 Friday, May 16, 2008 2:03 PM

Yleistä
JdB Blenders_213201.book Page 41 Friday, May 16, 2008 2:03 PM

Jauhaminen
Katso kuva 4.
JdB Blenders_213201 book Page 42 Friday, May 16, 2008 2:03 PM
JdB Blenders_213201.book Page 44 Friday, May 16, 2008 2:03 PM
Geral
JdB Blenders_213201.book Page 45 Friday, May 16, 2008 2:03 PM

JdB Blenders_213201 book Page 46 Friday, May 16, 2008 2:03 PM
Segurança
Geral
JdB Blenders_213201.book Page 47 Friday, May 16, 2008 2:03 PM

Ambiente
JdB Blenders_213201 book Page 48 Friday, May 16, 2008 2:03 PM
Γενικές πληροφορίες
JdB Blenders_213201.book Page 49 Friday, May 16, 2008 2:03 PM

JdB Blenders_213201 book Page 50 Friday, May 16, 2008 2:03 PM
JdB Blenders_213201 book Page 51 Friday, May 16, 2008 2:03 PM



JdB Blenders_213201 book Page 52 Friday, May 16, 2008 2:03 PM
Συνταγές
JdB Blenders_213201 book Page 53 Friday, May 16, 2008 2:03 PM

[Non-Text]
[Non-Text]
[Non-Text]
[Non-Text]
[Non-Text]
JdB Blenders_213201 book Page 54 Friday, May 16, 2008 2:03 PM
التنظيف والصيانة
JdB Blenders_213201 book Page 55 Friday, May 16, 2008 2:03 PM


- ALGEMEEN
- PRODUCTEN MALEN
- GENERAL INFORMATION
- OPERATION AND CONTROLS
- BEFORE USING FOR THE FIRST TIME
- BLENDING PRODUCTS
- GRINDING
- CLEANING AND MAINTENANCE
- REMOVING AND FIXING THE BASE WITH THE ROTATING KNIVES
- REMOVING THE MILL BASE FROM MILL
- SAFETY
- HEAT AND ELECTRICITY
- DURING USE
- U.K. WIRING INSTRUCTIONS
- THE ENVIRONMENT
- RECIPES
- BANANA MILKSHAKE
- STRAWBERRY BREAKFAST
- GÉNÉRALITÉS
- ALLGEMEIN
- BEI DER BENUTZUNG
- GENERALIDADES
- INTRODUZIONE
- ALLMÄNT
- GENERELT
- MALING AF MADVARER
- YLEISTÄ
- JAUHAMINEN
- GERAL
- SEGURANÇA
- AMBIENTE
- ΓΕΝΙΚΈΣ ΠΛΗΡΟΦΟΡΊΕΣ
- ΣΥΝΤΑΓΈΣ
Brand : PRINCESS
Model : 213201 2 Mills Let’s
Category : Blender