
RC-ST3 - Bluetooth speaker JVC - Free user manual and instructions
Find the device manual for free RC-ST3 JVC in PDF.
| Product Type | Portable Bluetooth speaker with CD player, cassette deck and FM/AM tuner |
| Brand | JVC |
| Model | RC-ST3 |
| Dimensions (W x H x D) | 440 mm x 168 mm x 241 mm |
| Weight | Approximately 3.1 kg (without batteries) |
| Power supply | Mains 230 V ~ 50 Hz or 12 V DC (8 R20/D batteries) |
| Power consumption | 19 W operation, 3.2 W standby |
| Output power | 2 W per channel into 8 Ω (RMS) |
| Speakers | 2 x 10 cm |
| Bluetooth connectivity | Yes (version not specified, typical range 10 m) |
| CD player | Audio CD 8 cm and 12 cm, compatible with finalized CD-R/RW |
| Cassette deck | Stereo 4-track, 2-channel, type I (normal) |
| Tuner | FM (87.5 - 108 MHz) and AM (522 - 1629 kHz) |
| CD playback functions | Repeat, random, intro, programming (up to 16 tracks) |
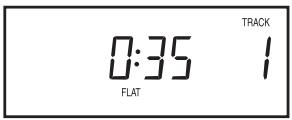
| Equalizer | Presets: ROCK, JAZZ, POP, CLASSIC, FLAT |
| Sound effect | Hyper-Bass Sound (bass enhancement) |
| Headphone output | PHONES jack 3.5 mm (16-32 Ω) |
| Remote control | Yes, with R03/AAA batteries |
| Display | Display window with indicators |
| Maintenance | Clean with a soft, dry cloth; clean cassette heads every 10 hours; demagnetize every 20-30 hours |
| Safety | Unplug during storms; avoid humidity and extreme temperatures (5°C to 35°C); do not block ventilation openings |
| Supplied accessories | Power cord, remote control, batteries for remote control |
Frequently Asked Questions - RC-ST3 JVC
User questions about RC-ST3 JVC
0 question about this device. Answer the ones you know or ask your own.
Ask a new question about this device
Download the instructions for your Bluetooth speaker in PDF format for free! Find your manual RC-ST3 - JVC and take your electronic device back in hand. On this page are published all the documents necessary for the use of your device. RC-ST3 by JVC.
USER MANUAL RC-ST3 JVC
MANUEL D'INSTRUCTIONS
GEBRUIKSAANWIJZING
Disconnect the mains plug to shut the power off completely. The STANDBY/ON ⏻/1 button in any position does not disconnect the mains line. The power can be remote controlled.
To reduce the risk of electrical shocks, fire, etc.:
- Do not remove screws, covers or cabinet.
- Do not expose this appliance to rain or moisture.
ACHTUNG
- Do not block the ventilation openings or holes. (If the ventilation openings or holes are blocked by a newspaper or cloth, etc., the heat may not be able to get out.)
- Do not place any naked flame sources, such as lighted candles, on the apparatus.
- When discarding batteries, environmental problems must be considered and local rules or laws governing the disposal of these batteries must be followed strictly.
- Do not expose this apparatus to rain, moisture, dripping or splashing and that no objects filled with liquids, such as vases, shall be placed on the apparatus.
ACHTUNG
HANDLING PRECAUTIONS
- When not in use
When not using the unit for an extended period of time, disconnect the AC power cord from the AC outlet.
- AC power cord
- Do not handle the power cord with wet hands.
- When unplugging the power cord from the wall outlet, always grasp and pull the plug, not the cord.
- Do not modify the power cord in any manner. Do not bend it sharply or twist it.
- Consult your dealer when damage, disconnection or contact failure is found with the power cord.
- In case of lightning, unplug the AC power cord.
- Do not disassemble the unit.
• Foreign objects and liquid
- Do not insert any metallic objects into the unit.
- If water or some liquid gets inside the unit, unplug the power cord from the outlet and consult your dealer.
- Avoid installing the unit in the following places:
- Where the temperature may become excessively high or low; the recommended temperature range is between 5^ and 35^ .
– Where subject to vibrations. - Where it is excessively humid, such as in a bathroom.
– In a badly ventilated place. - Near strong magnetic fields.
- Do not use the unit in direct sunlight or leave it in a closed automobile, etc.
The unit might be exposed to high temperatures above 40^ C.
- Ventilation
Do not block the ventilation holes of the unit; otherwise heat cannot escape from the unit.
- CD pickup lens
Do not leave the disc compartment cover open; otherwise the CD pickup lens might be contaminated with dust. Do not touch the lens with fingers.
- Condensation
Moisture may form on the CD pickup lens when:
- A heater has just been switched on in the room where the unit is used.
- The unit is in a place with smoke or high humidity.
- The unit has just moved from a cold place to a warm room.
If the unit has condensation inside, it may not function correctly. Should this occur, turn on the unit and wait one or two hours before use.
- Do not place magnetic objects near the speakers.
Since the speakers contain magnets inside, do not place cassette tapes or magnetic cards nearby as recorded data could be erased.
- Keep the unit away from a TV.
Do not place the unit near a TV or avoid using the unit when the TV is turned on; otherwise the TV picture could be distorted.
- Carrying handle
- Do not raise or lower the carrying handle with the telescopic antenna extended, to avoid damage to the antenna.
- Position the carrying handle so that it does not interfere with operation.
Operation on household AC
1 Connect the supplied AC power cord to the AC IN \~ jack on the rear panel of the unit.
2 Plug the AC power cord into an AC power outlet.
Cautions
- Use only the JVC power cord provided with this unit to avoid malfunction or damage to the unit.
- Even when you turn off the unit by pressing the STANDBY/ON ⏻/I button, a very small current continues to flow. To save power and for safety when not using the unit for an extended period of time, disconnect the power cord from the household AC outlet.
Operation on batteries Installing batteries
1 Open the battery compartment cover by pressing down the two tabs.
natural_image
Technical line drawing of a mechanical bracket or mounting plate (no text or symbols)2 Install eight R20P (SUM-1)/D (13F) batteries.
Insert the batteries with and positioned correctly referring to the drawing above the battery compartment.
3 Replace the cover.
Battery replacement
When the tape speed or output sound level decreases, or CD playback becomes intermittent, replace all batteries with fresh ones.
For better battery usage
- When making an important recording, use of new batteries (preferably alkaline batteries with a longer service life) is recommended to avoid any possible failure.
- To prevent the power from being accidentally turned on, remove the batteries when carrying the unit by hand or in the trunk of a car, thus avoiding wasteful battery consumption.
- Continuous operation of the unit causes the battery power to be consumed quicker than non-continuous operation.
- Operation of the unit in a cold place causes the battery power to be consumed more quickly than in a warm place.
Cautions
If batteries are used incorrectly, it may result in electrolyte leakage or they may explode.
- Make sure that the batteries are installed with the positive and negative terminals positioned correctly.
- Do not mix new and old batteries together, or mix different types of batteries.
- Do not try to recharge non-rechargeable batteries.
- Remove the batteries when the unit is not to be used for an extended period of time.
- Remove the batteries when operating the unit on the household AC; though the power supply is automatically switched from the batteries to the household AC when the AC power cord is connected.
- If chemicals leaking from batteries come in contact with your skin, wash them off immediately with water. If chemicals leak on the surface of the unit, clean the unit completely.
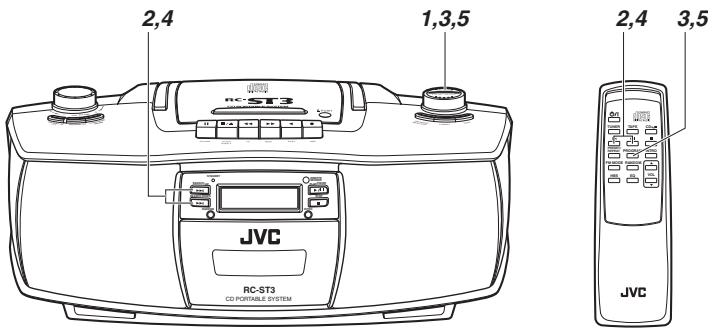
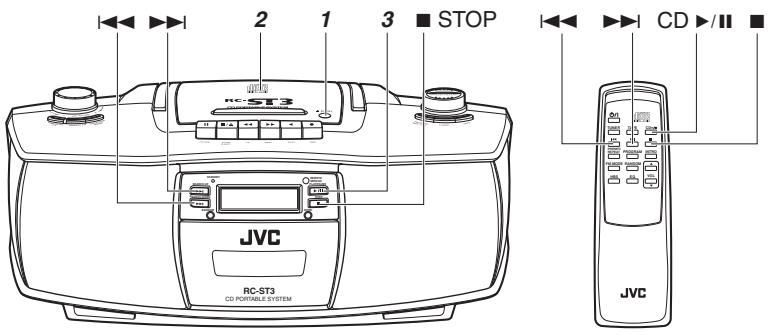
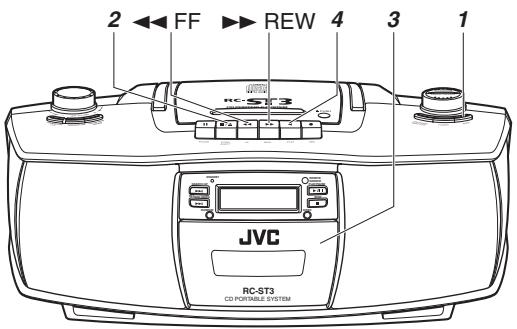
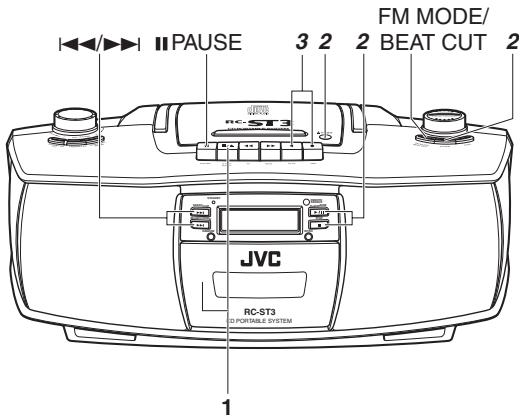
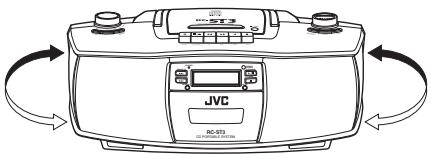
Top
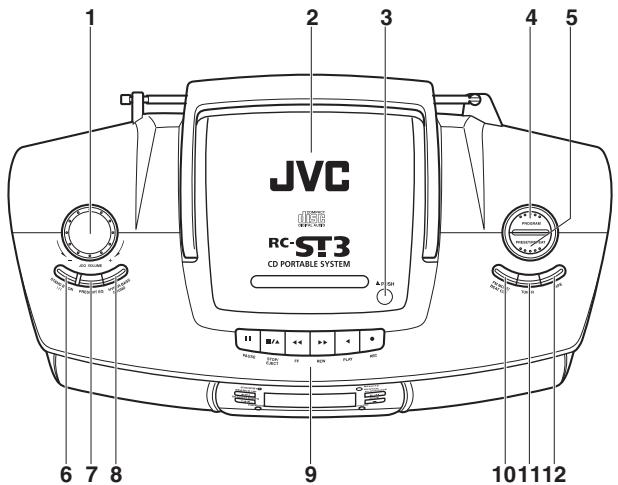
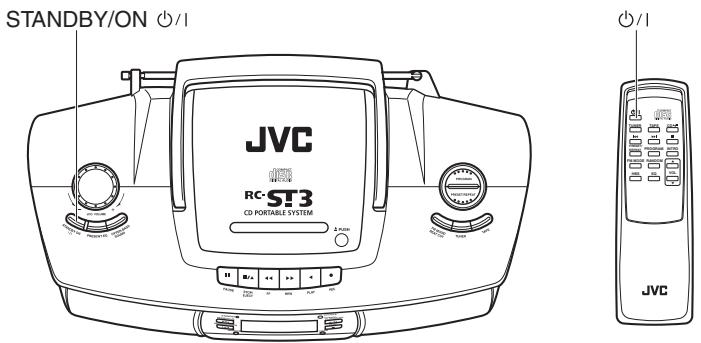
1 JOG VOLUME control
2 Disc compartment
3 ▲ PUSH
4 PROGRAM button
5 PRESET/REPEAT button
6 STANDBY/ON ⏻/I button
7 PRESET EQ button
8 HYPER-BASS SOUND button
9 Cassette operation buttons
II PAUSE button
■/▲ STOP/EJECT button
FF button
▶▶ REW button
◀ PLAY button
- REC button
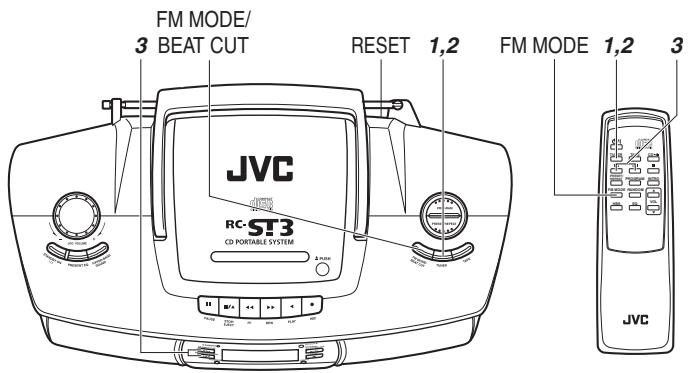
10 FM MODE/BEAT CUT button
11 TUNER button
12 TAPE button
Front
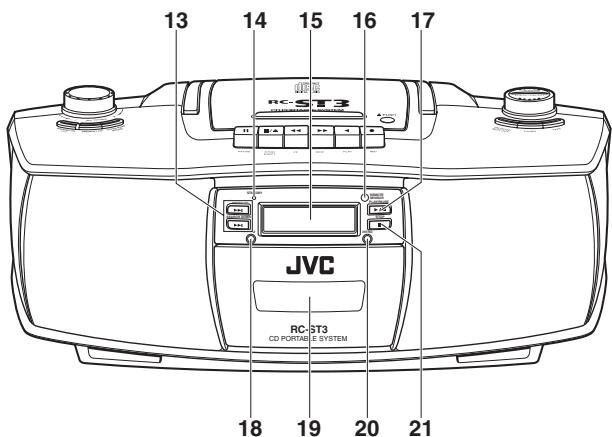
13 ▶▶| SEARCH UP and ◀◀ | SEARCH DOWN buttons
14 STANDBY indicator
15 Display window
16 REMOTE SENSOR
17 ▶/II PLAY/PAUSE button
18 RANDOM button
19 Cassette holder
20 INTRO button
21 ■ STOP button
Rear
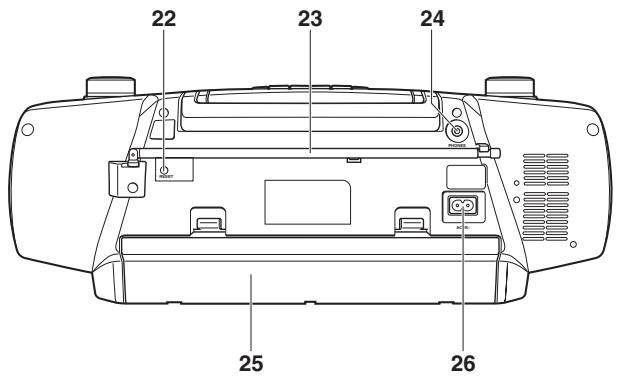
22 RESET key
23 FM telescopic antenna
24 PHONES jack
25 Battery compartment
26 AC IN ∼ jack
REMOTE CONTROL UNIT

1 ⏻/l button
2 TUNER button
3 ◀◀◀ and ▶▶▶ buttons
4 PRESET/REPEAT button
5 RANDOM button
6 FM MODE button
7 Sound control buttons
HBS button
EQ button
8 TAPE button
9 CD ▶/II button
10 ■ button
11 PROGRAM button
12 INTRO button
13 VOL ▲ and VOL ▼ buttons
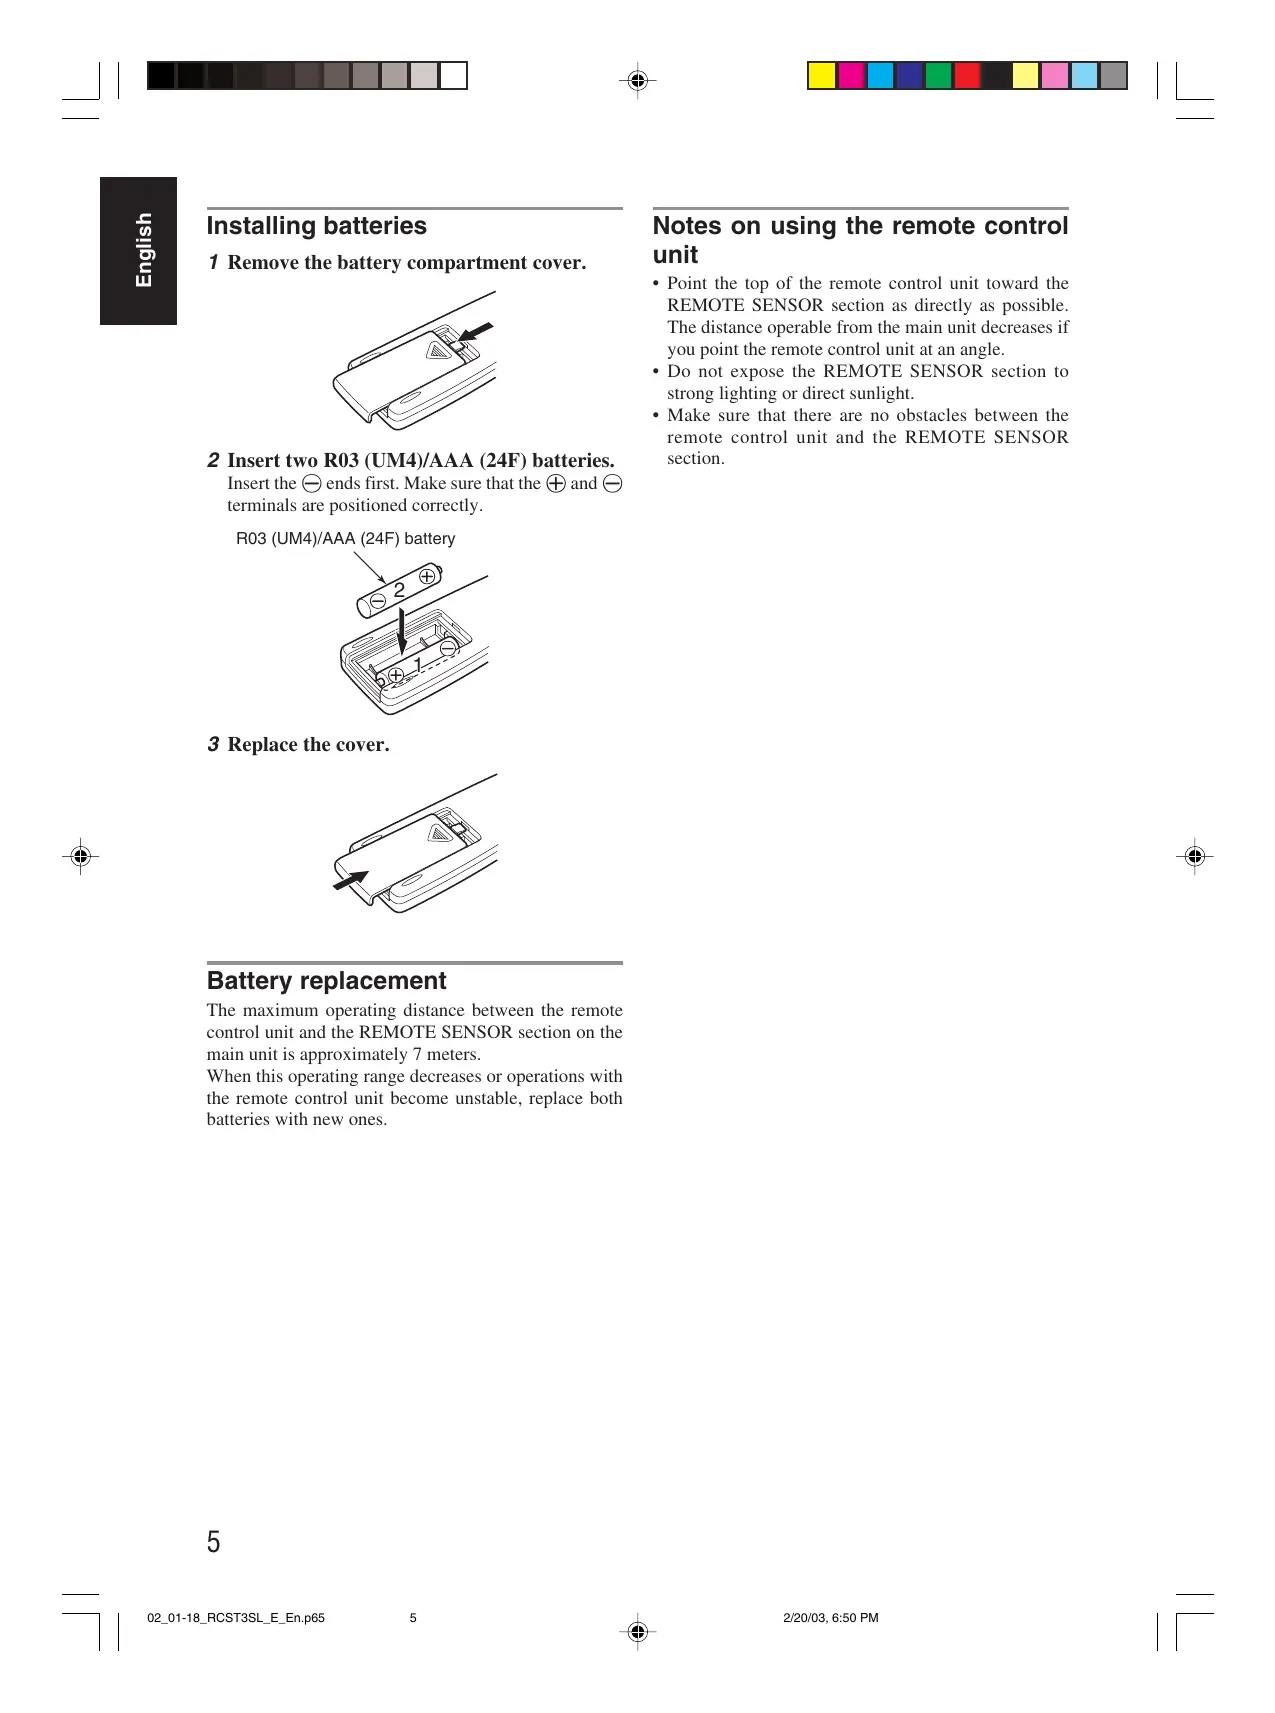
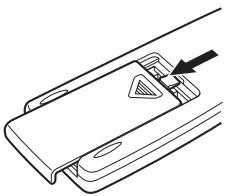
Installing batteries
1 Remove the battery compartment cover.
natural_image
Diagram of a door handle with a clip and arrow indicating direction (no text or symbols)2 Insert two R03 (UM4)/AAA (24F) batteries.
Insert the ends first. Make sure that the and terminals are positioned correctly.
R03 (UM4)/AAA (24F) battery

3 Replace the cover.
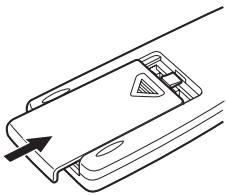
natural_image
Diagram of a device handle with an arrow pointing to a component (no text or symbols present)Battery replacement
The maximum operating distance between the remote control unit and the REMOTE SENSOR section on the main unit is approximately 7 meters.
When this operating range decreases or operations with the remote control unit become unstable, replace both batteries with new ones.
Notes on using the remote control unit
- Point the top of the remote control unit toward the REMOTE SENSOR section as directly as possible. The distance operable from the main unit decreases if you point the remote control unit at an angle.
- Do not expose the REMOTE SENSOR section to strong lighting or direct sunlight.
- Make sure that there are no obstacles between the remote control unit and the REMOTE SENSOR section.
To turn on the unit
Press STANDBY/ON ⏻/| (or ⏻/| on the remote control unit).
The STANDBY indicator goes off. The unit turns on ready to play the source selected when the unit was last turned off.
To turn off the unit
Press STANDBY/ON ⏻/| (or ⏻/| on the remote control unit) again.
The STANDBY indicator lights up in red and the unit enters the standby mode.
SETTING THE CLOCK
The clock is displayed when the unit is in the standby mode.
When the unit is turned off
1 Press and hold PROGRAM on the main unit until the hour indication starts flashing.
2 Press |◀◀ or ▶▶| to set the hour.
3 Press and hold PROGRAM until the minute indication starts flashing.
4 Press |◀◀ or ▶▶| to set the minute.
5 Press and hold PROGRAM until the clock starts functioning.
Notes
- In step 1, you can press the PROGRAM button only on the main unit, not on the remote control unit.
- If the unit is disconnected from the power source for a certain period of time, the clock setting will be lost. In this case, reset the clock again.
- The clock may gain or lose one to two minutes per month.
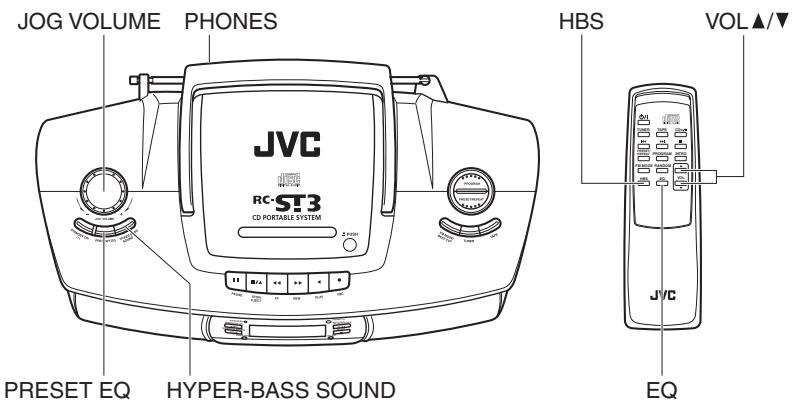
Volume adjustment
To increase the volume
Turn JOG VOLUME clockwise (or press VOL ▲ on the remote control unit).
To decrease the volume
Turn JOG VOLUME counterclockwise (or press VOL ▼ on the remote control unit).
Caution
Do not turn off the unit with the volume set to an extremely high level; otherwise a sudden blast of sound might be produced damaging your hearing and/or the speakers, when you turn on the unit next time or start playing another source.
Listening through headphones
Connect a pair of headphones to the PHONES jack.
Use commercially available 3.5-mm stereo mini headphones (16 Ω to 32 Ω).
No sound comes out of the speakers when headphones are connected.
Cautions
- Turn down the volume before connecting headphones and keep the volume level low; as listening at high volumes could damage your hearing.
- Do not drive while listening through headphones.
Changing the EQ (equalizer) setting
The unit has several preset EQ (equalizer) settings so that you can select one that most matches the type of music being played.
Press PRESET EQ (or EQ on the remote control unit) repeatedly.
Each time you press the button, the EQ setting changes as shown below.
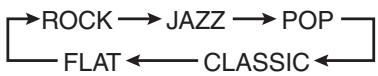
flowchart
graph LR
    A["ROCK"] --> B["JAZZ"]
    B --> C["POP"]
    C --> D["CLASSIC"]
    D --> E["FLAT"]
    E --> A
Reinforcing the bass sound
You can enjoy powerful bass sound by turning on the Hyper-Bass Sound effect.
Press HYPER-BASS SOUND (or HBS on the remote control unit).
When the Hyper-Bass Sound effect is turned on, the HBS indicator lights up in the display window.
To turn off the effect
Press the same button again so that the HBS indicator goes off.
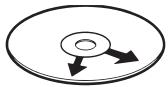
playable discs
The unit can play audio CDs (8 cm and 12 cm) with the following mark.

The unit can also play CD-R and CD-RW discs recorded in music CD format.
Notes on CD-R and CD-RW discs
- User-edited CD-R (Recordable) and CD-RW (Rewritable) discs can be played only if they are already finalized.
- Some CD-R and CD-RW discs may not be played on the unit depending on the disc characteristics or recording conditions.
- Before playing CD-R or CD-RW discs, read their instructions and cautions carefully.
- Some CD-R and CD-RW discs may not be played on the unit because of damage or stain on them, or if the CD pickup lens is dirty.
- CD-RW discs may require a longer readout time (due to the fact that the reflectance of CD-RW discs is lower than that of regular CDs).
Notes on handling discs
The following care should be taken to keep discs in good condition, since dirty, damaged or warped discs could lead to sound deterioration and damage the unit.
- Do not touch the reflective recorded surface.
- Do not stick or write anything on both surfaces.
- Do not bend discs.
- Do not expose discs to direct sunlight, high temperatures from a heater, etc., high humidity, or dust.
• After using a disc be sure to put it back in its case. - To remove a disc from its storage case, press the center and lift the disc out.
natural_image
Line drawing of hands operating a circular device with a pointer (no text or symbols)- When replacing a disc in its case, press the center part to secure the disc.
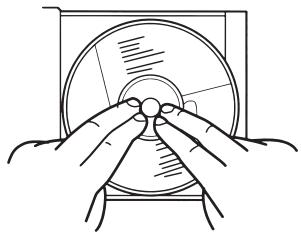
natural_image
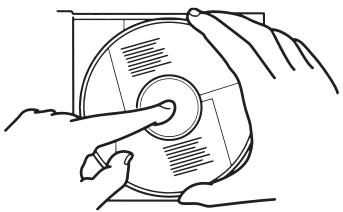
Line drawing of two hands operating a circular device with a pointer (no text or symbols)- Clean off any dust, dirt or fingerprints on discs with a soft, dry cloth, wiping from the center to edge. Never use thinner, benzene, record cleaner or antistatic spray.
Correct
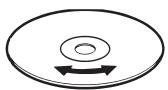
Incorrect
Basic operations
1 Press ▲ PUSH to open the disc compartment cover.
2 Load a disc with the label side facing up and close the cover.
3 Press ▶/Ⅱ PLAY/PAUSE (or CD ▶/Ⅱ on the remote control unit) to start playback.
During playback, the current track number and the elapsed playing time of the track are displayed.
Notes
- The following indication is displayed when the unit cannot read the disc information. Check if the disc is dirty or scratched, or the disc is loaded upside down.
$$ \boxed {n o d 1 S C} $$
- Skipping of sound may occur if a strong shock is applied to the unit or the unit is subject to vibrations. If this happens, stop playback (or at least lower the volume), and replace the unit in a secure place.
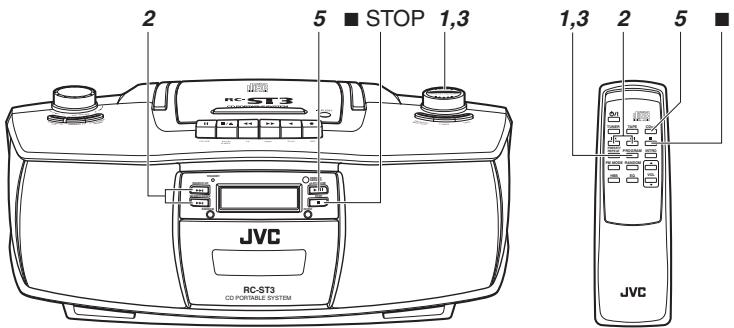
To stop playback
Press ■ STOP (or ■ on the remote control unit).
The total playing time and total number of tracks of the disc are displayed in the CD stop mode.
Caution
Never open the disc compartment unless the unit is in the stop mode. When removing a disc from the disc compartment, make sure that the disc has completely stopped rotating.
To pause playback
Press ▶/Ⅱ PLAY/PAUSE (or CD ▶/Ⅱ on the remote control unit).
To resume playback, press the button again.
Selecting a desired track before playback
1 In the CD stop mode, press ◀◀◀ or ▶▶◀ repeatedly until the desired track number is displayed.
2 Press ▶/Ⅱ PLAY/PAUSE (or CD ▶/Ⅱ on the remote control unit) to start playback.
Skipping tracks
Press |◀◀ or ▶▶| during playback.
- To skip to the beginning of the next track: press ▶▶l.
- To skip back to the beginning of the track currently being played: press ◀◀◀.
- To skip back to the beginning of the previous track: press ◀◀ twice in rapid succession.
Search
You can locate a desired position on the disc quickly by fast-forward or reverse search.
Press and hold |◀◀ or ▶▶| during playback.
- To search in the forward direction: ▶▶
- To search in the reverse direction:
Release the button when you find the desired position. Playback continues from the selected position.
Various playback operations
Repeat playback
Press PRESET/REPEAT before or during playback.
Each time you press the button, the repeat mode changes as shown below.
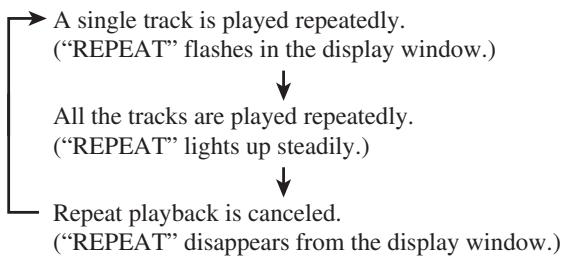
flowchart
graph TD
    A["A single track is played repeatedly. ("REPEAT" flashes in the display window.)"] --> B["All the tracks are played repeatedly. ("REPEAT" lights up steadily.)"]
    B --> C["Repeat playback is canceled. ("REPEAT" disappears from the display window.)"]
Random playback
Press RANDOM before or during playback.
The RANDOM indicator lights up in the display window, and the tracks are played in random order.
Random playback ends when all the tracks are played once.
To cancel random playback
Press RANDOM again so that the RANDOM indicator goes off.
Introductory playback
You can play the introductory portion (10 seconds) of each track successively.
Press INTRO before or during playback.
The INTRO indicator lights up in the display window, and introductory playback starts.
To cancel introductory playback
Press INTRO again so that the INTRO indicator goes off.
Programmed playback
You can program up to 16 tracks to be played in your desired order.
1 Press PROGRAM in the CD stop mode.
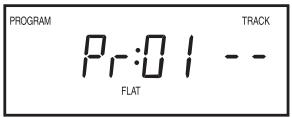
2 Press |◀◀ or ▶▶| to select a desired track to be programmed.
3 Press PROGRAM.
The selected track is registered on the program.
4 Repeat steps 2 and 3 to program other tracks.
5 Press ▶/Ⅱ PLAY/PAUSE (or CD ▶/Ⅱ on the remote control unit).
Programmed playback starts.
Note
The unit does not store more than 16 programmed tracks in its memory. If you select more than 16 tracks, programmed tracks are overwritten from the first track.
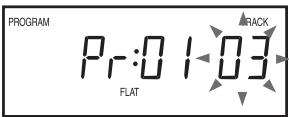
To check the order of tracks on the program
Press PROGRAM repeatedly in the CD stop mode.
To clear the program
Press ■ STOP (or ■ on the remote control unit) in the CD stop mode.
The program is also canceled when you open the disc compartment cover.
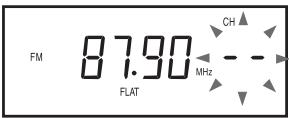
Tuning to a station
1 Press TUNER to set to the tuner mode.
2 Press TUNER to select the band, FM or AM (MW).
3 Press and hold |◀◀ or ▶▶| for about one second.
The unit starts searching and stops when a station of sufficient signal strength is tuned in.
If you press ◀◀◀ or ▶▶◀ briefly and repeatedly, the frequency changes step by step.
Changing the FM reception mode
When an FM stereo broadcast is hard to receive or noisy, reception may improve by changing to monaural reception mode.
Press FM MODE/BEAT CUT (or FM MODE on the remote control unit).
The MONO indicator lights up in the display window.
To restore stereo reception
Press the button again so that the MONO indicator goes off.
Presetting stations
You can preset 20 FM and 12 AM stations.
1 Press TUNER to select the band, FM or AM (MW).
2 Tune to a station you want to preset using |◀◀ or ▶▶.
3 Press PROGRAM.
4 Press PRESET/REPEAT repeatedly to select a preset number.
The selected preset number flashes.
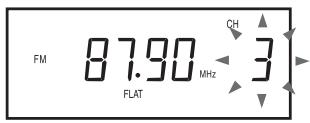
5 Press PROGRAM.
The station with the preset number is stored in the memory.
6 Repeat steps 2 to 5 to preset other stations, allocating a different preset number to each of them.
Note
If the unit is unplugged or a power failure occurs, the preset stations will be erased from the memory. If this happens, you need to preset the stations again.
Tuning to a preset station
After selecting the band, FM or AM (MW), press PRESET/REPEAT repeatedly until the desired preset number appears.
Adjusting the antennas
FM
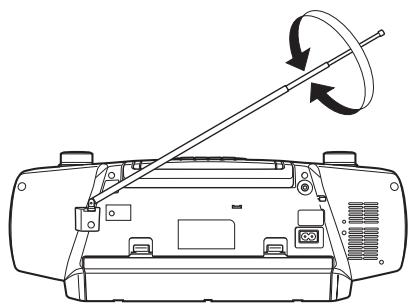
natural_image
Diagram of a device rear panel with a rotating lever and cable, showing no text or symbolsAM

Note
Place the unit away from the TV or turn off the TV, when listening to an AM station, to prevent the built-in ferrite core antenna picking up interference from the TV.
Playing back a cassette
1 Press TAPE to set to the tape mode.
2 Press ■/▲ STOP/EJECT to open the cassette holder.
3 Load a cassette with the open side up and the playback side facing out, then close the cassette holder.
4 Press ◀ PLAY to start playback.
To stop playback
Press ■/▲ STOP/EJECT.
Playback automatically stops when the tape reaches the end.
To fast-wind a tape
Press ◀◀FF or ▶▶REW.
- To fast-wind in the forward direction: ◀FF
- To fast-wind in the reverse direction: ▶▶ REW
When the tape reaches the end, press ■/▲ STOP/EJECT to release the ◀◀ FF or ▶▶ REW button.
Notes on cassette tapes
- It may be unlawful to record or play back copyrighted material without the consent of the copyright owner.
- Use only normal tapes of type I for playback and recording.
- Use of tapes longer than 120 minutes is not recommended, since characteristic deterioration may occur and these tapes easily jam in the pinch roller and capstan.
- Loose tape can cause trouble. If you notice some slack in the tape, tighten it up using a pencil.
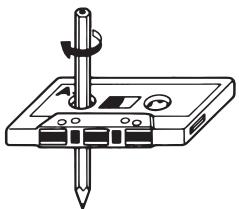
natural_image
Diagram of a cassette tape with a screwdriver inserted, showing internal components (no text or symbols)To prevent accidental erasure
Remove the tab(s) with a screwdriver. When you want to erase the recording or re-record on the tape, reseal the slot(s) with adhesive tape.
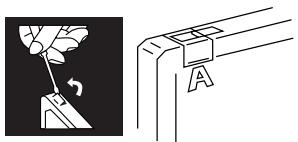
natural_image
Diagram showing a hand using a tool to lift a component, with a separate schematic view of a bracket labeled A (no text or symbols present)Recording on a cassette
The following marks are used to distinguish the two recording sources in the procedure below.
TUNER: When recording from the radio
CD: When recording from a CD
1 Load a cassette.
2 Prepare the recording source.
TUNER: Set to the tuner mode and tune to a desired station (see pages 12 and 13).
CD: Load a CD and set to the CD stop mode (see page 9). You can specify a desired track to start recording by pressing ◀◀◀ or ▶▶◀.
3 Press ● REC to start recording.
The ◀ PLAY button is also depressed with the ● REC button.
CD: The CD player starts playback when the cassette deck enters the recording mode (synchronized recording).
To stop recording
Press ■/▲ STOP/EJECT.
Recording also stops when the tape reaches the end.
CD: The CD player stops playback when the tape stops running at its end or by your pressing ■/▲ STOP/EJECT.
When the CD player reaches the end of the disc and stops playback earlier, the tape continues running. In this case, press ■/▲ STOP/EJECT to stop the tape.
To start recording at the exact moment
1 In step 3 above, press II PAUSE before pressing ● REC.
2 Press II PAUSE again to release the tape at the exact moment you want to start recording.
To remove beats during AM broadcast recording
Press FM MODE/BEAT CUT repeatedly to select the better beat-cut reception mode.
To erase the recording
You can erase the recording on a tape without overwriting the tape with a new recording.
1 Set to the CD stop mode with no disc loaded in the unit.
2 Press ● REC to start erasing.
The ◀ PLAY button is also depressed with the ● REC button.
Cleaning the cabinet
Wipe it with a soft, dry cloth. Never use benzene or thinner as these could damage the surface finish.
Cleaning the heads, capstan and pinch roller
When the tape is running, magnetic powder and dust naturally accumulate on the heads, capstan and pinch roller.
When they become too dirty:
• Sound quality deteriorates.
- The sound output level drops.
- The previous recording is not completely erased.
- Recording is not performed correctly.
To avoid these, clean the heads, capstan and pinch roller every 10 hours of use.
For effective cleaning, use a cleaning kit available at audio stores. Make sure that the cleaning fluid has dried completely before loading a cassette.
Pinch roller
Note
Do not use thinner or benzene, as these will damage the rubber pinch roller (use of alcohol is permitted).
Demagnetizing the recording/playback head
If the head becomes magnetized, noise will increase and the sound will deteriorate.
Demagnetize the recording/playback head every 20 to 30 hours of use with a head demagnetizer available at audio stores. When demagnetizing the head, turn off the unit to the standby mode by pressing the STANDBY/ON ⏻/I button.
Caution
As the erasure head of the unit is of magnetic type, do not demagnetize it.
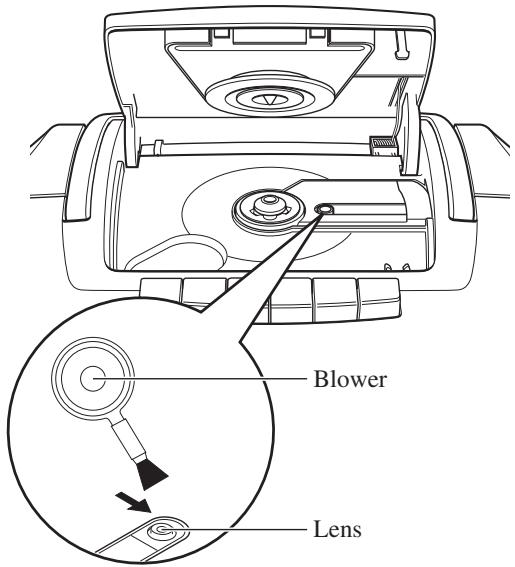
Cleaning the CD pickup lens
If the CD pickup lens is dirty, clean the lens to prevent sound deterioration.
Gently wipe off fingerprints, etc. on the lens using a cotton swab.
To blow off dust on the lens, use a blower available at camera shops, etc., as shown below.
TROUBLESHOOTING
What appears to be trouble is not always serious. Referring to the following, check whether your problem can be solved with a simple operation.
Power cannot be turned on.
→ Is the AC power cord unplugged?
Remote control does not function.
→ Are the batteries in the remote control unit exhausted?
→ Is the REMOTE SENSOR section exposed to bright light (direct sunlight, etc.)?
No sound is heard from the speakers.
→ Are headphones connected?
Playback sound is at a very low level.
→ Are the batteries exhausted?
→ Is the head of the cassette deck dirty?
The disc is loaded but does not play.
→ Is the disc upside down?
→ Is the disc dirty, damaged or warped?
→ Is the CD pickup lens dirty?
→ Is there moisture condensation on the CD pickup lens? If so, turn on the unit and wait one or two hours until moisture evaporates before use.
Radio reception is poor and there is much static.
→ Is the antenna properly adjusted?
When the ◀ PLAY button is pressed, the tape does not run.
→ Is the Ⅱ PAUSE button pressed?
The ● REC button does not function.
→ Is a cassette loaded?
→ Are the erasure-prevention tabs of the cassette broken off?
The tape speed is irregular and there are wow and flutter.
→ Is the pinch roller or capstan dirty?
→ Are the batteries exhausted?
How to reset the unit
If normal operations are disabled, reset the unit as follows:
- Turn off the unit.
- Press the RESET key with the tip of a small screwdriver or similar tool.
- Turn on the unit.
The clock setting and preset AM/FM stations will be lost when the RESET key is pressed. You need to set the clock and preset AM/FM stations again.
Compact disc player
| Signal detection system : Non-contact optical pickup (semiconductor laser) | |
| Number of channels : 2 channels (stereo) | |
| Frequency response : 20 Hz - 20 000 Hz | |
| Signal-to-noise ratio : 90 dB | |
| Wow and flutter : Less than measurable level |
Tuner
| FM frequency range | : 87.50 MHz - 108.00 MHz |
| AM frequency range | : 522 kHz - 1 629 kHz |
| Antennas | : Telescopic antenna for FM Ferrite core antenna for AM |
Cassette deck
| Track system | : 4-track 2-channel stereo |
| Motor | : Electronic governor DC motor for capstan |
| Heads | : Hard Permalloy head for recording/playback Magnetic head for erasure |
| Frequency response | : 80 Hz - 12 500 Hz |
| Wow and flutter | : 0.15% (WRMS) |
| Fast-winding time | : Approx. 120 sec.(C-60 cassette) |
General
| Speakers | : 10 cm × 2 |
| Power output | : 2 W per channel, min. RMS, driven into 8 Ω at 1 kHz, with no more than 10% total harmonic distortion (IEC 268-3) |
| Output terminal | : PHONES × 1, output level 0 mW - 20 mW/32 Ω, matching impedance: 16 Ω - 32 Ω |
| Power supply | : AC 230 V ∼, 50 Hz DC 12 V (batteries R20P (SUM-1)/D (13F) × 8) |
| Power consumption | : 19 W (operation mode) 3.2 W (standby mode) |
| Dimensions | : 440 mm (W) × 168 mm (H) × 241 mm (D) |
| Mass | : Approx. 3.1 kg (without batteries) |
Accessories
AC power cord × 1
Remote control unit × 1
Batteries for the remote control unit, R03 (UM-4)/AAA (24F) × 2
Design and specifications are subject to change without notice.
INHALT
VORSICHTSMASSREGELN ZUM GEBRAUCH ... 1
STROMVERSORGUNG 2
NAMEN DER KOMPONENTEN UND BEDIENELEMENTE .... 3
FERNBEDIENUNG 4
EIN- UND AUSSCHALTEN DES GERÄTS ...... 6
natural_image
Technical line drawing of a mechanical bracket assembly (no text or symbols)1 JOG VOLUME Regler
2 Disc-Fach
3 ▲ PUSH
4 PROGRAM Taste
5 PRESET/REPEAT Taste
6 STANDBY/ON ⏻/I Taste
7 PRESET EQ Taste
8 HYPER-BASS SOUND Taste
9 Kassettendeck-Bedienungstasten
II PAUSE Taste
■/▲ STOP/EJECT Taste
FF Taste
▶▶ REW Taste
PLAY Taste
- REC Taste
10 FM MODE/BEAT CUT Taste
11 TUNER Taste
12 TAPE Taste
Vorne

natural_image
Diagram of a door handle with a clip and arrow indicating direction (no text or symbols)natural_image
Line drawing of a door handle with an arrow indicating direction (no text or symbols)natural_image
Line drawing of hands operating a CD or DVD disc (no text or symbols)natural_image
Line drawing of hands holding a circular object with measurement markings (no text or symbols)natural_image
Diagram of a device rear view with a rotating cable and sensor array (no text or symbols)AM
Hinweis
natural_image
Line drawing of a cassette tape with a screwdriver inserted, showing internal components (no text or symbols)natural_image
Diagram showing a hand using a tool to adjust a component, with no visible text or symbolsR03 (UM-4)/AAA (24F) × 2
natural_image
Technical line drawing of a mechanical bracket assembly (no text or symbols)2 Installez huit piles R20P (SUM-1)/D (13F).
17 Touche ▶/II PLAY/PAUSE (lecture/pause)
natural_image
Diagram of a door handle with a clip and arrow indicating direction (no text or symbols)2 Insérez deux piles R03 (UM4)/AAA (24F).
natural_image
Line drawing of a door handle with an arrow pointing to the interior panel (no text or symbols)natural_image
Line drawing of hands operating a circular mechanical component (no text or symbols)natural_image
Line drawing of hands holding a circular object with internal components (no text or symbols)natural_image
Diagram of a device rear panel with a rotating lever and sensor array (no text or symbols)AM
Remarque
natural_image
Diagram of a device with a screwdriver inserted into a slot, showing internal components (no text or symbols)natural_image
Diagram showing a hand using a tool to press or install a mechanical component, with no visible text or symbols.R03 (UM-4)/AAA (24F) × 2
natural_image
Technical line drawing of a mechanical bracket or mounting plate assembly (no text or symbols)2 Leg acht stuks R20P (SUM-1)/D (13F)-formaat batterijen in het vak.
natural_image
Diagram of a car door handle with a clip and arrow indicating direction (no text or symbols)natural_image
Line drawing of a door handle with an arrow indicating direction (no text or symbols)Batterijen in de afstandsbediening vervangen
natural_image
Line drawing of hands operating a CD or DVD disc (no text or symbols)natural_image
Line drawing of hands holding a circular object with a pointer, no text or symbols presentnatural_image
Diagram of a device rear panel with a rotating lever and cable, showing no text or symbolsAM
Opmerking
natural_image
Diagram of a device with a screwdriver inserted into a slot, showing internal components (no text or symbols)natural_image
Technical illustration showing a hand using a tool to press or install a component, with no visible text or symbols.natural_image
Technical line drawing of a mechanical bracket or support structure (no text or symbols)2 Instale ocho pilas R20P (SUM-1)/D (13F).
natural_image
Diagram of a door handle with an arrow pointing to a clip (no text or symbols)2 Coloque dos pilas R03 (UM4)/AAA (24F).
natural_image
Diagram of a device with an arrow pointing to a component, no text or symbols presentCambio de las pilas
natural_image
Line drawing of hands operating a circular disc with a pointer (no text or symbols)natural_image
Line drawing of hands holding a circular object with internal components (no text or symbols)natural_image
Diagram of a device rear panel with a rotating lever and sensor array (no text or symbols)AM
Nota
natural_image
Diagram of a device with a screwdriver inserted into a slot, showing internal components (no text or symbols)natural_image
Technical illustration showing a hand using a tool to press or adjust a component, with no visible text or symbols.natural_image
Technical line drawing of a mechanical bracket or support structure (no text or symbols)2 Inserire otto pile R20P (SUM-1)/D (13F).
natural_image
Diagram of a door handle with a clip and arrow indicating direction (no text or symbols)natural_image
Line drawing of a door handle with an arrow pointing to the interior panel (no text or symbols)natural_image
Line drawing of hands operating a circular mechanical component (no text or symbols)natural_image
Line drawing of hands holding a circular object with internal components (no text or symbols)natural_image
Diagram of a device rear panel with a rotating lever and cable, showing no text or symbolsAM

Nota
natural_image
Line drawing of a cassette tape with a screwdriver inserted, showing internal components (no text or symbols)natural_image
Diagram showing a hand using a tool to lift a component, with a separate view of a bracket labeled A (no text or symbols present)- ACHTUNG
- HANDLING PRECAUTIONS
- - When not in use
- - AC power cord
- - Do not disassemble the unit.
- • Foreign objects and liquid
- - Avoid installing the unit in the following places:
- - Do not use the unit in direct sunlight or leave it in a closed automobile, etc.
- - Ventilation
- - CD pickup lens
- - Condensation
- - Do not place magnetic objects near the speakers.
- - Keep the unit away from a TV.
- - Carrying handle
- Operation on household AC
- Cautions
- Operation on batteries Installing batteries
- Battery replacement
- For better battery usage
- Top
- Front
- Rear
- REMOTE CONTROL UNIT
- Installing batteries
- Remove the battery compartment cover.
- Insert two R03 (UM4)/AAA (24F) batteries.
- Replace the cover.
- Notes on using the remote control unit
- To turn on the unit
- To turn off the unit
- SETTING THE CLOCK
- When the unit is turned off
- Notes
- Volume adjustment
- To increase the volume
- To decrease the volume
- Caution
- Listening through headphones
- Connect a pair of headphones to the PHONES jack.
- Changing the EQ (equalizer) setting
- Press PRESET EQ (or EQ on the remote control unit) repeatedly.
- Reinforcing the bass sound
- Press HYPER-BASS SOUND (or HBS on the remote control unit).
- To turn off the effect
- playable discs
- Notes on CD-R and CD-RW discs
- Notes on handling discs
- Basic operations
- To stop playback
- To pause playback
- Selecting a desired track before playback
- Skipping tracks
- Search
- Various playback operations
- Repeat playback
- Press PRESET/REPEAT before or during playback.
- Random playback
- Press RANDOM before or during playback.
- To cancel random playback
- Introductory playback
- Press INTRO before or during playback.
- To cancel introductory playback
- Programmed playback
- Press PROGRAM in the CD stop mode.
- Press |◀◀ or ▶▶| to select a desired track to be programmed.
- Press PROGRAM.
- Repeat steps 2 and 3 to program other tracks.
- Press ▶/Ⅱ PLAY/PAUSE (or CD ▶/Ⅱ on the remote control unit).
- Note
- To check the order of tracks on the program
- To clear the program
- Tuning to a station
- Changing the FM reception mode
- Press FM MODE/BEAT CUT (or FM MODE on the remote control unit).
- To restore stereo reception
- Presetting stations
- Tuning to a preset station
- Adjusting the antennas
- Playing back a cassette
- To fast-wind a tape
- Notes on cassette tapes
- To prevent accidental erasure
- Recording on a cassette
- Load a cassette.
- Prepare the recording source.
- Press ● REC to start recording.
- To stop recording
- Press ■/▲ STOP/EJECT.
- To start recording at the exact moment
- To remove beats during AM broadcast recording
- To erase the recording
- Cleaning the cabinet
- Cleaning the heads, capstan and pinch roller
- Demagnetizing the recording/playback head
- Cleaning the CD pickup lens
- TROUBLESHOOTING
- Power cannot be turned on.
- Remote control does not function.
- No sound is heard from the speakers.
- Playback sound is at a very low level.
- The disc is loaded but does not play.
- Radio reception is poor and there is much static.
- When the ◀ PLAY button is pressed, the tape does not run.
- The ● REC button does not function.
- The tape speed is irregular and there are wow and flutter.
- How to reset the unit
- Accessories
- INHALT
- Vorne
- Hinweis
- Insérez deux piles R03 (UM4)/AAA (24F).
- Remarque
- Batterijen in de afstandsbediening vervangen
- Opmerking
- Coloque dos pilas R03 (UM4)/AAA (24F).
- Cambio de las pilas
- Nota
Brand : JVC
Model : RC-ST3
Category : Bluetooth speaker