
CD-576 - Radio AudioSonic - Free user manual and instructions
Find the device manual for free CD-576 AudioSonic in PDF.

| Product Type | Portable Radio with CD Player |
| Brand | AudioSonic |
| Model | CD-576 |
| Power Supply | 230 V AC or 8 C batteries (UM2) |
| Radio | FM stereo/mono, AM |
| CD Player | CD audio, CD-R, CD-RW, MP3, WMA |
| Connections | USB 1.1/2.0, SD/MMC, AUX (line input), stereo headphones |
| Playback Functions | Play, pause, skip, search, repeat (1 track, all, folder), shuffle, intro, program (20 tracks CD, 99 tracks MP3) |
| Equalizer | POP, ROCK, CLASSIC, JAZZ, BASS, NORMAL |
| Display | LCD screen with mode, time, track, album, source indicators |
| Speakers | Integrated |
| Antenna | Telescopic FM, internal directional AM |
| Power | Adjustable via wheel |
| Safety | Invisible laser beam, do not expose to moisture, do not open the casing |
| Maintenance and Cleaning | Clean discs with a soft cloth from center to edge; remove batteries if not used for a long time |
| Batteries | 8 C (UM2) batteries, remove if prolonged non-use |
| Consumption | Not specified |
Frequently Asked Questions - CD-576 AudioSonic
User questions about CD-576 AudioSonic
0 question about this device. Answer the ones you know or ask your own.
Ask a new question about this device
Download the instructions for your Radio in PDF format for free! Find your manual CD-576 - AudioSonic and take your electronic device back in hand. On this page are published all the documents necessary for the use of your device. CD-576 by AudioSonic.
USER MANUAL CD-576 AudioSonic
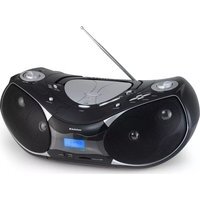
natural_image
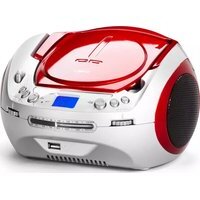
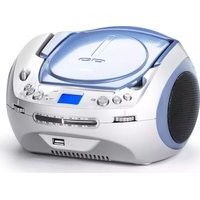
Black and silver portable electronic device with a digital display showing the audio output (no visible text or symbols on the device body)Stereo Radio
CD / MP3 / USB
CD-576

AudioSonic
WARNINGS

CAUTION: TO REDUCE THE RISK OF ELECTRIC SHOCK, DO NOT REMOVE COVER (OR BACK). NO USER-SERVICEABLE PARTS INSIDE. REFER SERVICING TO QUALIFIED SERVICE PERSONNEL.
|  | THE LIGHTNING FLASH WITH ARROWHEAD SYMBOL, WITHIN AN EQUILATERAL TRIANGLE, IS INTENDED TO ALERT THE USER TO THE PRESENCE OF UNINSULATED "DANGEROUS VOLTAGE" WITHIN THE PRODUCT'S ENCLOSURE THAT MAY BE OF SUFFICIENT MAGNITUDE TO CONSTITUTE A RISK OF ELECTRIC SHOCK TO PERSONS. |
|  | THE EXCLAMATION MARK SYMBOL INSIDE AN EQUILATERAL TRIANGLE WARNS THE USER THAT IMPORTANT OPERA TING AND SERVICING (TROUBLESHOOTING) INSTRUCTIONS ARE CONTAINED IN THE DOCUMENTATION ACCOMPANYING THE PRODUCT. |
DANGER
Invisible laser radiation when open and interlock failed or defeated. Avoid direct exposure to beam.
WARNING
To prevent fire or shock hazard, do not expose this appliance to rain or moisture. To avoid electrical shock, do not open the cabinet, refer servicing to qualified personnel only.
CAUTION
Use of controls or adjustments or performance of procedures other than those specified herein may result in hazardous radiation exposure.
PRECAUTIONS
Please read these precautions before operating this player.
Power Cord Protection
To avoid any malfunctions of the player, and to protect against electric shock, fire or personal injury, please observe the following.
- Hold the plug firmly when connecting or disconnecting the AC power cord.
- Do not connect or disconnect the AC power cord when your hands are wet.
- Keep the AC power cord away from heating appliances.
- Never put any heavy object on the AC power cord.
- Do not attempt to repair or reconstruct the AC power cord in any way.
- Remove dust, dirt, etc. on the plug at regular intervals.
Placement
Avoid placing the player in areas of:
- direct sunlight or heating radiators, or closed automobiles
• high temperature (over 35°C) or high humidity (over 90%) - excessive dust
- vibration, impact or where the surface is tilted as the internal parts may be seriously damaged.
Non-use periods
When left unused for a long period of time, the player should be unplugged from the household AC outlet.
No fingers or other objects inside
- Touching internal parts of this player is dangerous, and may cause serious damage to the player. Do not attempt to disassemble the player.
- Do not put any foreign object on the disc tray.
Keep away from water and magnetic object
- Keep the player away from flower vases, tubs, sinks, etc. If liquids are spilled into the player, serious damage could occur.
- Keep magnetic objects such as speakers, at a distance from the player.

AudioSonic
Instruction Manual
Stacking
- Place the player in a horizontal position, and do not place anything heavy on it.
- Do not place the player on amplifiers or other equipment which may become hot.
Condensation
moisture may form on the lens in the following conditions:
- immediately after a heater has been turned on.
• in a steamy or very humid room.
- when the player is moved from a cold environment to a warm one.
If moisture forms inside this player, it may not operate properly. In this case, turn off the power and wait about one hour for the moisture to evaporate.
Caution:
• To avoid electric shock, this unit must not be exposed to dripping water or water splash.
• Minimum distances around the apparatus for sufficient ventilation.
- The ventilation should not be impeded by covering the ventilation openings with items, such as newspapers, table-cloths, curtains, etc.
- No naked flame sources, such as lighted candles, should be placed on the apparatus.
• The use of apparatus in tropical and/or moderate climates.
- Before scrapping the appliance, remove the batteries and place them in the appropriate battery collection container.
CD/MP3/WMA PLAYER WITH RADIO AND USB&SD/MMC CARD READER
Please read and follow these instructions before using your unit.
Dripping Warning: The product shall not be exposed to dripping or splashing and no items filled with liquid like a filled glass or vase or cup, shall be placed on the product.
Ventilation Warning: The ventilation openings of the product shall not be intentionally covered.
The mains plug is used as disconnect device, the disconnect device shall remain readily operable.
LOCATION OF CONTROLS
- VOLUME CONTROL
- SKIP/SEARCH DOWN BUTTON
- SKIP/SEARCH UP BUTTON
- PLAY/PAUSE BUTTON
- POWER INDICATOR
- USB/CARD BUTTON
- CD DOOR
- MODE BUTTON
- FM ST. INDICATOR
- CD DOOR OPEN AREA
- STOP BUTTON
- PROGRAM/EQ BUTTON
-
+10/ALBUM BUTTON
-
TUNING CONTROL
- SPEAKERS
- USB PORT
- LCD DISPLAY
- SD/MMC CARD SLOT
- PHONES JACK
- FUNCTION SWITCH
- BAND SWITCH
- AUX JACK
- FOLDING HANDLE
- BATTERY COMPARTMENT
- FM TELESCOPIC ANTENNA
- AC SOCKET

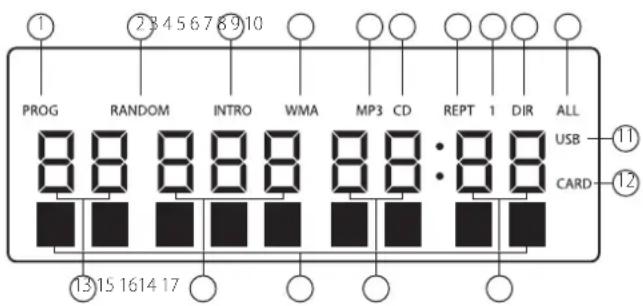
FAMILIARIZE WITH THE DISPLAYED CONTENTS IN THE LCD
- "PROG" shows during Programming and in programmed play.
- "RANDOM" shows when in RANDOM playback.
- "INTRO" shows when in INTRO playback.
- "WMA" shows when the file played is in WMA format.
- "MP3" shows when the disc played is an MP3-CD.
- "CD" shows when the disc played is a CD-DA.
- "REPT" shows when in various repeat modes.
- "1" shows together with "REPT" when in single track repeat mode.
- "DIR" shows together with "REPT" when in album repeat mode.
- "ALL" shows together with "REPT" when in all tracks repeat mode.
- This shows when the player reads data from USB data traveller.
- This shows when player reads data from SD/MMC card.
- This figure is the album number.
- This figure is track number of the current album on a MP3 disc or the current track number on a CD disc.
- This figure is the elapsed minutes of the track played.
- This figure is the elapsed seconds of the track played.
- English Text display. The information of the current track is displayed scrolling forward in MP3 playback.
POWER SUPPLY
BATTERY OPERATION
- Remove the battery compartment cover gently.
- Install 8 x 'C' size batteries (UM-2 or equivalent) while observing the correct polarities. (not supplied)
- Replace the battery compartment cover.
NOTE:
- The AC cord must be detached from the AC socket of the player. (battery use)
- Leaking batteries may damage the battery cabinet and the player as a whole, so they should be removed from the cabinet when becoming flat or when the player is not to be played on batteries for some time.
AC OPERATION
Insert the AC cord to the AC socket of the player, and plug the other end to an applicable wall outlet.
TO PLAY THE RADIO
- Set the FUNCTION switch to the RADIO position, the POWER Indicator will light up.
- Select the desired band with the BAND switch.
- Tune to the desired station by rotating the TUNING control (rotate that control back and forth until you get the strongest and clearest reception).
- The built-in AM antenna and external FM TELESCOPICANTENNA are directional.
- When you are receiving an FM broadcast, fully extend the TELESCOPIC ANTENNA and rotate it for the best reception.
- For AM broadcast, rotate the whole set until the best reception is heard.
- Adjust the volume level to a comfortable listening level.
- To turn off the radio, set the FUNCTION switch to the OFF, USB/CARD, CD/MP3/AUX position.
NOTES:
- If a particular FM (STEREO) station is weak, or you hear too much background noise, try moving the band selector switch to the FM (MONO) position. This can often result in a much clearer reception.
- When the band selector switch is set to FM STEREO and a stereo broadcast is on the air. The FM ST. indicator will light up.
STEREO PHONES JACK
A stereo phones jack has been provided on the side of the player so that you can listen without disturbing others. To use this jack, plug in the headphones/ carphones (NOT INCLUDED) and adjust the VOLUME control to a preferred level.
NOTE:
When external headphones/earphones are connected, the speakers will be muted.
HANDLING AND MAINTENANCE OF ADISC
Follow the instructions below to handle and maintain your disc in order that long time and trouble free performance can possibly be obtained:
- Ensure not to caress the rain bow side of the disc; handle the disc by the edge.
- Long time exposure to sunshine, high temperatures and humidity will damage the disc. And keep storage area clean.
- Avoid sticking labels on both sides of a disc. Writing with pointed articles on the disc should be strictly avoided.
- Clean the disc wiping the centre and then working out to the edge with a dry & soft cloth or a disc brush. Avoid any cleansing lotion or chemical eradicator.
- Store them in their cases when they are not to be used.
CLEAN FROM CENTER TO EDGE DO NOT STORE NEAR HEAT
LOAD A DISC
- Open the CD door by the Door open area.
- Load a disc on the disc tray with the label side facing up.
- Close the CD door.
PLAY A DISC
- Slide the Function switch to CD/MP3/AUX position.
- Follow the steps above to load a disc.
- The player begins reading disc immediately the CD door is closed, "READING" shows in the LCD.
- When the disc is successfully read, TOC (total of contents) shows in the LCD and playback follows with the first track.
- Press Play/Pause button once to halt music playback, the elapsed time of the current track flashes and "PAUSE" appears on the bottom of the LCD to indicate the player in Pause mode; press Stop button to cease music playback. The LCD shows the TOC again with "STOP" on the bottom.
SKIP TRACKS AND SEARCH FOR A SPECIFIC POINT TO PLAY
- Press once the SKIP/SEARCH up button in music play to skip to the next track. To skip to a specific track ahead, press this button several times.
- Press once the SKIP/SEARCH down button in music play to skip to the previous track. To skip to a specific track at back, press this button several times.
- Press +10/ALBUM button once in play to skip to the track 10 tracks ahead, twice to skip to the track 20 tracks ahead. You can reach the last track of the disc using this button.
- Hold the SKIP/SEARCH up button in music play to search at quick rate for a specific point to play.
- Hold the SKIP/SEARCH down button in music play to search at quick rate for a specific point to play.
REPEAT A SINGLE TRACK
To repeat a preferred track in playback, press MODE button once, "REPT 1" shows in the LCD. Then select the preferred track using SKIP/SERCH buttons or +10/ALBUM button. The player will repeat the chosen track until you press STOP button.
REPEAT ALL TRACKS
To repeat all tracks, press MODE button twice in play mode, "REPT ALL" shows in the LCD. The player will repeat all tracks until you press STOP button.
RANDOM PLAY
Random play is that tracks on the disc are played by the player at random. Press MODE button three times to enter this mode during play, "RANDOM" shows in the LCD. Tracks on the disc will be selected at random for playback and the player stops automatically after all tracks are played. You may press STOP button to exit random play mode and press PLAY/PAUSE button to resume normal playback.
INTRODUCTION PLAY
Introduction play is that the first ten seconds of each track are played in a sequential order. Press MODE button four times to enter this mode during play, "INTRO" shows in the LCD. Press MODE button to exit Introduction play mode and normal music play resumes. Press SKIP/SEARCH up button in Introduction mode to begin Introduction play from the next track immediately after the current track. Press SKIP/SEARCH down button in Introduction mode to begin Introduction play from the current track.
PROGRAMMED PLAY
- Programmed play is that tracks on the disc can be edited for playback in a preferred order with the use of PROGRAM button.
- In CD stop mode, press PROGRAM/FQ button once, "PROG" shows in the LCD with a flickering track number and the program sequence indication "P-01", select the first track to be programmed using SKIP/SEARCH buttons or +10/ALBUM button, and press PROGRAM button again to store and advance to the next programming step. The program sequence indication changes to "P-02" waiting for your next input.
-
Repeat the steps above to program more tracks. A maximum of 20 tracks can be programmed in memory in a preferred order.
-
Press PLAY/PAUSE button to begin programmed play in the preferred order after you are done with programming. The player stops automatically after all programmed tracks are played.
- You may press STOP button to terminate programmed playback. In program stop mode, press STOP button again to clear the programming; press PLAY/PAUSE button to begin the programmed playback with the programming order identical with the previous one done.
MP3-CD (WMA) PLAYBACK
This player is capable of MP3-CDs. It takes longer time for this player to read an MP3-CD than it does CD-DA. Wait patiently while it is reading.
After an MP3-CD is successfully read, the total number of albums and tracks shows in the LCD together. And a second later, playback begins from the first track of the first album with the icon of "Mp3" showing on the screen.
SKIP TRACKS AND SEARCH FOR A SPECIFIC POINT TO PLAY
- Press once the SKIP/SEARCH up button in music play to skip to the next track. To skip to a specific track ahead, press this button several times.
- Press once the SKIP/SEARCH down button in music play to skip to the previous track. To skip to a specific track at back, press this button several times.
- Press +10/ALBUM button once in play to skip to the track 10 tracks ahead, twice to skip to the track 20 tracks ahead. You can reach the last track of the disc using this button.
- Hold the SKIP/SEARCH up button in music play to search at quick rate for a specific point to play.
- Hold the SKIP/SEARCH down button in music play to search at quick rate for a specific point to play.
- Hold the +10/ALBUM button once during play, the album number flashes; select the desired album using the SKIP/SEARCH buttons or the +10/ALBUM button; confirm this album selection by holding +10/ALBUM button again, the track number "000" flickers for your input; select the desired track of the chosen album using the SKIP/SEARCH button or +10/ALBUM button. Finally, press PLAY/PAUSE button again to begin playing this chosen track.
REPEAT A SINGLE TRACK
To repeat a preferred track in playback, press MODE button once, "REPT 1" shows in the LCD. Then select the preferred track using SKIP/SERCH buttons or +10/ALBUM button. The player will repeat the chosen track until you press STOP button.
REPEAT ALL TRACKS
To repeat all tracks, press MODE button twice in play mode, "REPT ALL" shows in the LCD. The player will repeat all tracks until you press STOP button.
REPEAT AN ALBUM
To repeat a preferred album in playback, press MODE button thrice, "REPT DIR" shows in the LCD. Then select the preferred album using +10/ALBUM button and SKIP/SERCH buttons. The player will repeat the chosen album until you press STOP button.
RANDOM PLAY
Random play is that tracks on the disc are played by the player at random. Press MODE button four times to enter this mode during play, "RANDOM" shows in the LCD. Tracks on the disc will be selected at random for playback and the player stops automatically after all tracks are played. You may press STOP button to exit random play mode and press PLAY/PAUSE button to resume normal playback.
INTRODUCTION PLAY
Introduction play is that the first ten seconds of each track are played in a sequential order. Press MODE button five times to enter this mode during play, "INTRO" shows in the LCD. Press SKIP/SEARCH up button in Introduction mode to begin Introduction play from the next track immediately after the current track. Press SKIP/SEARCH down button in Introduction mode to begin Introduction play from the current track. Press MODE button once more to exit introduction and return to normal playback from the track the unit plays.
PROGRAMMED PLAY
- Programmed play is that tracks on the disc can be edited for playback in a preferred order with the use of PROGRAM button.
- In MP3 stop mode, press PROGRAM button once, "PROG" shows in the LCD with a flickering album number and the program sequence indication "P-01"; select the album number to be programmed using SKIP/SEARCH buttons or +10/ALBUM button, and press PROGRAM button again to store; the track number flickers waiting for your selection. Choose the desired track with SKIP/SEARCH buttons or +10/ALBUM button. Press PROGRAM button again to confirm the first programming and advance to the next programming step. The program sequence indication changes to "P-02" waiting for your next input.
- Repeat the steps above to program more tracks. A maximum of 99 tracks can be programmed in memory in a preferred order.
- Press PLAY/PAUSE button to begin programmed play in the preferred order after you are done with programming. The player stops automatically after all programmed tracks are played.
- You may press STOP button to terminate programmed playback. In program stop mode, press STOP button again to clear the programming; press PLAY/PAUSE button to begin the programmed playback with the programming order identical with the previous one done.
EXTERNAL MEMORY MEDIA OPERATION (USB,MMC/SD)
• Prepare the player for external memory media operation
- Insert a USB data traveller into the USB port OR insert a MMC/SD card into the card slot; slide the FUNCTION switch to the USB/CARD position and playback will start from the first track.
NOTE:
The player reads data from the USB by default if both USB data traveller and MMC/SD cards are inserted. You may press the USB/CARD button to switch between these modes in stop mode.
VARIOUS PLAY MODES
SKIPPING TRACKS AND SEARCHING BETWEEN TRACKS
- Press SKIP UP button once to skip the current track and play the next track, press this button continuously to go to corresponding tracks ahead;
- Press SKIP DOWN button once to skip the current track and go back to the previous track, press this button continuously to go back to corresponding tracks at back. Press and hold SKIP buttons to initiate high-rate scanning between tracks; release one of them to begin playback of music at normal speed.
REPEAT MODES
- Press MODE button once in play mode to repeat the current track; the LCD shows the icon for single track repeat.
- Press MODE button twice in play mode to repeat tracks on stored on this storage media (USB/MMC card) as a whole; the LCD shows the icon for all tracks repeat. Press MODE button thrice to repeat tracks in the current folder as a whole; the LCD shows the icon for DIR repeat.
RANDOM PLAY
Press MODE button for the fourth time in play to activate random playback immediately; the player will pick up tracks in a random sequence for playback after PLAY/PAUSE button is pressed. You may press STOP button to exit random play mode and press PLAY/PAUSE button to resume normal playback.
INTROSCAN PLAY
Press MODE button for the fifth time in play mode to activate introscan playback immediately; the player will pick up tracks for playback of the first 10 seconds of each track in a sequential order after PLAY/PAUSE button is pressed. You may press MODE button once again to exit introscan play mode and return to normal playback from the track it's arrived at.
AUXILIARYIN
Your player can be used as a power amplifier to playback the programs from portable radio, TV set or MP3 player or whatever provided this appliance is so designed that audio signal may be produced through a LINE-OUT jack or the like. Observe the following steps to connect the player to another appliance:
- Power the player on using the supplied AC Power Cord.
- Slide Function Switch to CD/MP3/Aux position.
- Connect the appliance into the player's AUX in socket with the supplied LINE OUT cable of the appliance.
- Power on the appliance and begin play. Easy job, right? At this time you will be able to hear the sound produced from the programs the connected appliance is broadcasting.
EQ SELECTION
Press Program/EQ button continuously during disc playback mode to select EQ sound effects among POP, ROCK, CLASS, JAZZ, BASS and NORMAL.
IMPORTANT
Note: Although this CD player can read CD-R, CD-RW and MP3 discs - in addition to normal CD's - the playability of CD-R, CD-RW and MP3 discs may be affected by the type of software that was used to create the discs, as well as the quality and condition of the blank media you are using. 100% playability cannot be guaranteed. This is not an indication of a problem with the player.
IMPORTANT
- The USB port of this product is fully compatible with the USB 1.1 and 2.0 standard. If MP3 players connected to this port are not written in compliance with the official USB 1.1 or 2.0 standard it may occur that those MP3 players do not work on this port. This is not a defective of this product.
- The MP3 player does not comply with the official USB 1.1 or 2.0 standard.
INSTRUCTIONS IN ENVIRONMENT PROTECTION
Do not dispose of this product in the usual household garbage at the end of its life cycle; hand it over at a collection point for the recycling of electrical and electronic appliances. The symbol on the product, the
instructions for use or the packing will inform about the methods for disposal.
The materials are recyclable as mentioned in its marking. By recycling, material recycling or other forms of re-utilization of old appliances, you are making an important contribution to protect our environment.
Please inquire at the community administration for the authorized disposal location.
WARNINGS

OPGEPAST
RISICO OP ELEKTRISCHE SCHOKKEN. NIET OPENEN

OPGEPAST: OM HET RISICO VAN ELEKTRISCHE SCHOK TE VERMINDEREN, NOOIT DE AFDEKKING (OF ACHTERKANT) VERWUDEREN. ER ZUN GEEN DELEN DIE DOOR DE CONSUMENT GESERVICED MOETEN WORDEN. VOOR SERVICEWERKEN, CONTACT OPNEMEN MET BEVOEGD SERVICEPERSONEEL.

HET FLIKKERLICHT MET EEN SYMBOOL VAN EEN PUL, BINNEN EEN DRIEHOEK, IS BEDOELD OM DE CONSUMENT TE WAARSCHUWEN VOOR HET BESTAAN VAN NIET GEïSOLEERDE "GEVAARLIJKE SPANNING" IN DE BEHUIZING VAN HET PRODUCT DIE VOLDOENDE KAN ZUN OM EEN RISICO VOOR ELEKTRISCHE SCHOK TE VEROORZAKEN.

HET UITROEPINGSTEKEN IN EEN DRIEHOEK IS BESTEMD OM DE CONSUMENT TE WAARSCHUWEN VOOR DE AANWEZIGHEID VAN BELANGRUKE BEDIENINGS- EN ONDERHOUDS(SERVICE) AANWUZINGEN IN DE DOCUMENTATIE DIE MET DE UITRUSTING GELEVERD WORDT.
GEVAAR
WEERGAVEN IN HET LCD VENSTER
RISQUES D'ÉLECTROCUTION NE PAS OUVRIR.

MISE EN GARDE : AFIN DE RÉDUIRE LES RISQUES D'ÉLECTROCUTION, NE RETIREZ PAS LE BOITIER (OU L'ARRIÈRE DE L'APPAREIL). IL NE SE TROUVE AUCUNE PIÈCE POUVANT ÊTRE RÉPARÉE PAR L'UTILISATEUR. CONFIEZ L'ENTRETIEN DE CET APPAREIL À UN TECHNICIEN QUALIFIÉ.

LES SYMBOLES DE L'ÉCLAIR ET DE LA POINTE DE FLÈCHE DANS UN TRIANGLE PERMETTENT D'ALERTER L'UTILISATEUR DE LA PRÉSENCE DE TENSION DANGEREUSE' NON ISOLÉE À L'INTÉRIEUR DE L'APPAREIL, D'UNE FORCE TELLE QU'ELLE CONSTITUE UN RISQUE SÉRIEUX D'ÉLECTROCUTION.

LE POINT D'EXCLAMATION À L'INTÉRIEUR DU TRIANGLE PERMET D'ALERTER L'UTILISATEUR DE LA PRÉSENCE D'INSTRUCTIONS D'OPÉRATION ET D'ENTRETIEN IMPORTANTES ACCOMPAGNANT LE PRODUIT.
DANGER
LECTURE DES INDICATIONS FOURNIES PAR L'ÉCRAN LCD
LCD-ANZEIGE
FAMILIARÍCESE CON LOS CONTENIDOS DE LA PANTALLA LCD
IGNORAR FAIXAS E PESQUISAR ENTRE FAIXAS
ELEMENTY POJAWIAJĄCE SIĘ NA WYŚWIETLACZU LCD
FAMILIARIZZARE CON I CONTENUTI VISUALIZZATI SULL'LCD
VAD SOM VISAS PÅ LCD-DISPLAYEN
ANVÄNDNING AV EXTERNT MINNESMEDIA (USB, MMC/SD)
- Stereo Radio
- AudioSonic
- WARNINGS
- DANGER
- WARNING
- CAUTION
- PRECAUTIONS
- Power Cord Protection
- Placement
- Non-use periods
- No fingers or other objects inside
- Keep away from water and magnetic object
- Stacking
- Condensation
- Caution:
- CD/MP3/WMA PLAYER WITH RADIO AND USB&SD/MMC CARD READER
- LOCATION OF CONTROLS
- FAMILIARIZE WITH THE DISPLAYED CONTENTS IN THE LCD
- POWER SUPPLY
- BATTERY OPERATION
- NOTE:
- AC OPERATION
- TO PLAY THE RADIO
- NOTES:
- STEREO PHONES JACK
- HANDLING AND MAINTENANCE OF ADISC
- CLEAN FROM CENTER TO EDGE DO NOT STORE NEAR HEAT
- LOAD A DISC
- PLAY A DISC
- SKIP TRACKS AND SEARCH FOR A SPECIFIC POINT TO PLAY
- REPEAT A SINGLE TRACK
- REPEAT ALL TRACKS
- RANDOM PLAY
- INTRODUCTION PLAY
- PROGRAMMED PLAY
- MP3-CD (WMA) PLAYBACK
- REPEAT AN ALBUM
- EXTERNAL MEMORY MEDIA OPERATION (USB,MMC/SD)
- VARIOUS PLAY MODES
- SKIPPING TRACKS AND SEARCHING BETWEEN TRACKS
- REPEAT MODES
- INTROSCAN PLAY
- AUXILIARYIN
- EQ SELECTION
- IMPORTANT
- INSTRUCTIONS IN ENVIRONMENT PROTECTION
- OPGEPAST
- GEVAAR
- WEERGAVEN IN HET LCD VENSTER
- LECTURE DES INDICATIONS FOURNIES PAR L'ÉCRAN LCD
- LCD-ANZEIGE
- FAMILIARÍCESE CON LOS CONTENIDOS DE LA PANTALLA LCD
- IGNORAR FAIXAS E PESQUISAR ENTRE FAIXAS
- FAMILIARIZZARE CON I CONTENUTI VISUALIZZATI SULL'LCD
- VAD SOM VISAS PÅ LCD-DISPLAYEN
- ANVÄNDNING AV EXTERNT MINNESMEDIA (USB, MMC/SD)
Brand : AudioSonic
Model : CD-576
Category : Radio