SAB 160 A1 - Car stereo SILVERCREST - Free user manual and instructions
Find the device manual for free SAB 160 A1 SILVERCREST in PDF.
User questions about SAB 160 A1 SILVERCREST
0 question about this device. Answer the ones you know or ask your own.
Ask a new question about this device
Download the instructions for your Car stereo in PDF format for free! Find your manual SAB 160 A1 - SILVERCREST and take your electronic device back in hand. On this page are published all the documents necessary for the use of your device. SAB 160 A1 by SILVERCREST.
USER MANUAL SAB 160 A1 SILVERCREST
Operating instructions
Bluetooth-robotradio
Käyttoohje
SE Bluetooth-bilradio
Bruksanvising
DK Bluetooth-bilradio
Beteningsvejledning
KOMPERNASS GMBH
BURGSTRASSE 21 · D-44867 BOCHUM
www.kompernass.com
Information for these operating
instructions 2
Copyright 2
Limited liability 3
Warnings 3
Proper use. 4
Safety. 4
Basic Safety Instructions 4
Package contents and transport
inspection 6
Disposal of the packaging 6
Operating components . . . .7
Installation 9
Connection 9
Installation 11
Uninstalling the device 13
Initial use. 14
Face plate. 14
Handling and operation . . .15
Switching On and Off 15
Settings. 15
Radio reset (RESET) 19
Radio functions. 19
General CD functions. 23
MP3 CDs functions. 25
USB port. 26
Card reader (SD/MMC) 27
Record function. 27
Connecting an external audio
device to the device 29
Bluetooth operation 29
Cleaning 33
Safety instructions. 33
Display cleaning. 33
Disposal. 33
Disposal of the device 33
Troubleshooting 34
Safety instructions. 34
Malfunction causes and remedies .34
Appendix 36
Technical data 36
Information regarding the EG
conformity declaration 37
Warranty 37
Importer 37
Introduction
Preface
Dear customer,
by purchasing the Bluetooth car radio SAB 160 A1 you have decided on a quality product from SilverCrest, which, in terms of technology and functionality, meets the most up-to-date development standards.
Read the information included here so that you can quickly familiarize yourself with your device and thus make full use of its functions.
We wish you a great deal of enjoyable use.
Information for these operating instructions
These operating instructions are a component of the Bluetooth car radio SAB 160 A1 (hereafter referred to as the device) and supplies you with important information regarding proper use, safety, installation and connection as well as how to operate the device.
The operating instructions must be constantly kept available close to the device. They are to be read and used by anyone assigned to install, service and repair faults in the device.
Keep these operating instructions and hand them over with the device to any future owners.
Copyright
This documentation is copyright protected.
All rights including those of photographic reproduction, duplication and distribution by means of particular methods (for example data processing, data carriers and data networks), wholly or partially as well as substantive and technical changes are reserved.
Limited liability
All technical information, data and information for installation, connection and operation contained in these operating instructions correspond to the latest at time of printing and, to the best of our knowledge, take into account our previous experience and know-how.
No claims can be derived from the details, illustrations and descriptions in these instructions.
The manufacturer assumes no responsibility for damage caused by failure to observe the instructions, improper use, inappropriate repairs, making unauthorized changes or for using unapproved replacement parts.
Warnings
In the current operating instructions the following warnings are used:
WARNING
A warning of this danger level signifies a possible dangerous situation.
If the dangerous situation is not avoided it can lead to injuries.
The directives in this warning are there to avoid personal injuries.
IMPORTANT
A warning of this danger level signifies possible property damage.
If the situation is not avoided it can lead to property damage.
The directives in this warning are there to avoid property damage.
NOTICE
A notice signifies additional information that assists in the handling of the device.
Proper use
This device is intended only for reception of FM/AM radio stations as well as for the playback of audio and MP3 CDs, MP3 files from USB data carriers and SD/MMC memory cards as well as audio signals of external audio devices. In addition you can couple the device with a Bluetooth mobile phone and with the microphone unit use the device as a hands free facility. The device is intended for installation into a vehicle.
This device is not intended for any other use or for uses beyond those mentioned.
WARNING
Danger from unintended use!
Danger can come from the device if used for unintended purposes and/or other types of use.
Use the device exclusively for intended purposes.
Observe the procedures described in these operating instructions.
Claims of any kind for damage resulting from unintended use will not be excepted.
The operator alone bears liability.
Safety
In this chapter you receive important safety information regarding handling of the device.
This device complies with the statutory safety regulations. Incorrect usage can, however, lead to personal injury and property damage.
Basic Safety Instructions
For safe handling of the device observe the following safety information:
Before use check the device for visible external damage. Do not put into operation a device that is damaged or has been dropped.
- Damaged cables or connections should be replaced by authorized qualified persons or by the customer service department.
- Persons who, due to their physical, intellectual or motor abilities, are incapable of operating the device safely may only use the device under supervision or direction from a responsible person.
Only permit children to use the device under supervision.
Repairs should only be carried out by authorized specialist companies or by the customer service department. Incorrect repairs can result in significant dangers for the user. In addition, warranty claims become void.
A repair to the device during the warranty period may only be carried out by a customer service department authorized by the manufacturer otherwise no additional warranty claims can be considered for subsequent damages.
Defective components may only be replaced with original replacement parts. Only by using original replacement parts can you guarantee that the safety requirements are complied with.
Protect the device from moisture and liquid penetration.
Danger from laser radiation

WARNING

The device is equipped with a class 1 laser. Laser radiation is dangerous to the eyesight!
Observe the following safety instructions to avoid exposure of yourself or others to laser radiation:
Never open the device.
Have the device repaired only by a specialist.
Do not make any modifications to the device.
Traffic safety

WARNING
Safety in traffic has the highest priority!
Observe the following safety instructions so that you do not put yourself or others in danger:
Before travel commencement familiarize yourself with the operation of the device.
- Only operate the device when the traffic situation allows. Stop in a suitable place to carry out comprehensive operations.
- Only remove or insert the face plate when the vehicle is parked.
- Set the volume to a moderate level so that acoustical signals from police vehicles, fire trucks and other emergency services can be perceived in good time.
Package contents and transport inspection
WARNING
Risk of suffocation!
- Packaging material should not be used as a play thing. There is a risk of suffocation!
The device is delivered with the following components as standard:
Car radio (incl. face plate)
- Installation bracket (Attached)
- Bezel frame (Attached)
- Fixture plate (incl. securing material)
- Keys for installation frame (2x)
Case for face plate
- Microphone unit with adhesive strip
- Operating instructions
NOTICE
Check the contents to make sure everything is there and for visible damage.
If the contents are not complete or are damaged due to defective packaging or through transportation contact the service hotline (see warranty card).
Disposal of the packaging
The packaging protects the device from transport damage. The packaging materials are selected from the point of view of their environmental friendliness and disposal technology and are therefore recyclable.

The recirculation of packaging into the material circuit saves on raw material and reduces generated waste. Dispos of packaging material that is no longer needed according to the regionally established regulations.
NOTICE
If possible preserve the device's original packaging during the warranty period so that in the case of a warranty claim you can package the device properly for return.
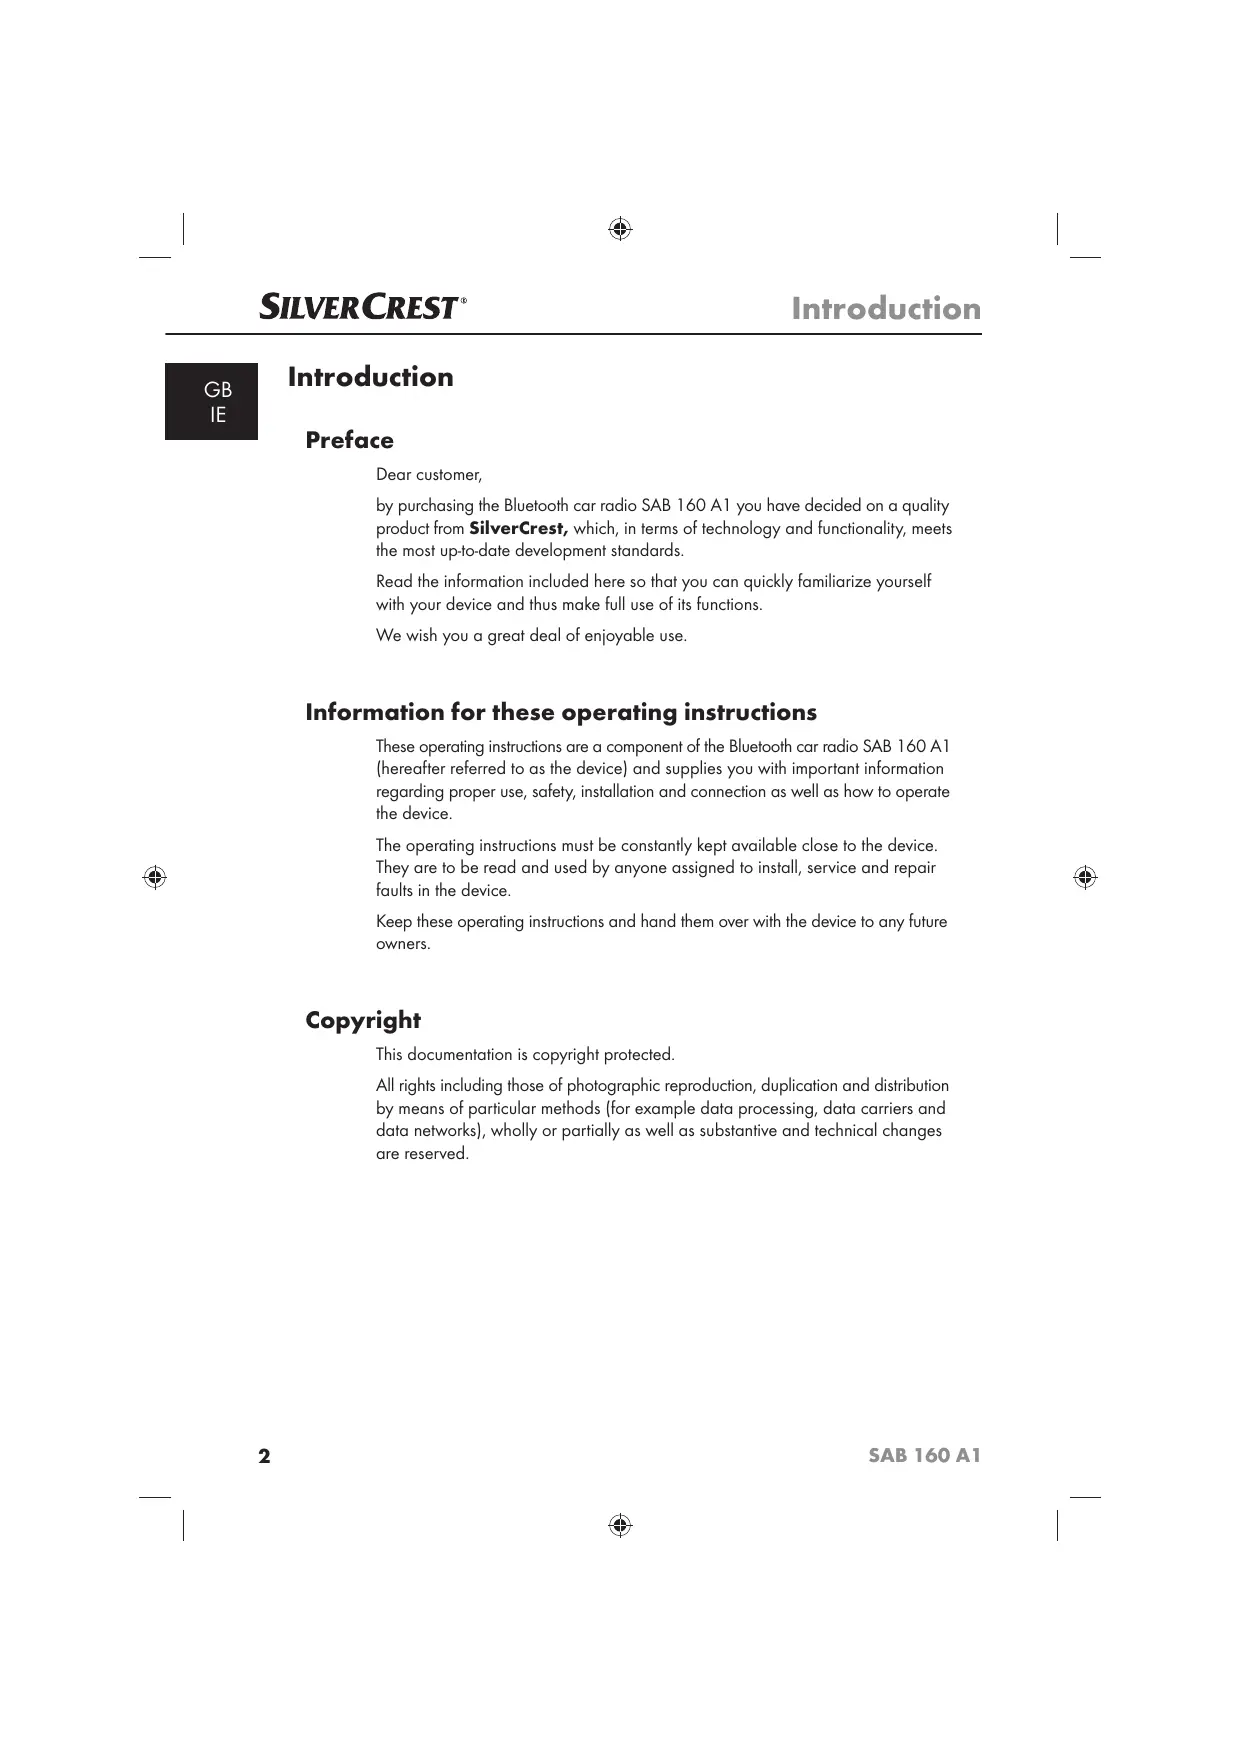
Operating components
Car radio (see front fold out flap)
1: Number button 1
RPT/2: Repeat function in the CD/MP3 operation mode, number button 2
INT/3: Intro function in the CD/MP3 operation mode, number button 3
4 Multi controller: Turn to set value/volume
5 button:Accept call
6 Display
7 Unlocking the face plate
8 Card slot for SD/MMC cards
USB port
10 AUX: 3.5 mm stereo input socket for the connection of an external audio device
11 I: Title / Station search forwards
12 I: Title / Station search backwards
13 SCAN/REC: Automatic station search/Record to a data carrier at the USB port or the SD/MMC card slot
14 AS/PS: Automatic station saving
15 BD/ENT: Select band range/confirm selection
16 PHONE: Access telephone function
17 button: End call
DISP/#: Show display information, # button
19 MODE/0: Set operational mode, number button 0
20 *:Button*
TA/9: Activate traffic radio station, number button 9
22 AF/8: Alternative Frequency search/regional programme activation, number button 8
23 PTY/7: Station search by PTY group, number button 7
24 ( )/DIM: Switch device on and off/dim display illumination
25 6: Number button 6
26 button: Switching off the sound
27 RDM/4: Random playback in the CD/MP3 operation mode, number button 4
28 5: Number button 5
29 button:Eject disc
CD compartment
31 Theft protection LED/ CD compartment position LED
32 Holder for the face plate
RESET: Resetting the device
ISO-Block connection B
35 Automotive blade type fuse 10 A
ISO block connection A
37 Bluetooth antenna
SUBWOOFER: Connection cable with cinch connector for subwoofer
39 Socket for microphone unit
40 LINE OUT: Audio cinch output L/R for amplifier
41 Antenna connection for DIN antenna plug
Accessories (see rear fold out flap)
42 Microphone unit plug
43 Microphone
44 TALK button
45 green LED for connection status
46 Case for face plate
47 Bezel frame
48 Installation bracket
Key for installation bracket
Fixture plate (incl. securing material)
Installation
WARNING
With the installation of the device damage can occur!
If possible have the device installed by a qualified technician.
If you want to install the device yourself, for safe and flawless operation of the device follow the instructions for connection and installation.
Connection
IMPORTANT
The use of incorrect connections can lead to damage to the device.
For installation use the device's ISO connections. The vehicle specific ISO adapter that you may possibly require can be obtained from a specialist establishment, from a local dealer or from the store's technical department. When using other connection types the warranty becomes void!
Configuration of the ISO connections
The view of the plug connector is from behind.
| ISO A (power supply configuration) | Configuration | |
| 1 | unconfigured | |
| 2 | unconfigured | |
| 3 | unconfigured | |
| 4 | Permanent positive 12 V (Tc. 30) | |
| 5 | Antenna power | |
| 6 | unconfigured | |
| 7 | Ignition circuit positive 12 V (Tc. 15) | |
| 8 | Negtative (-) chassis (Tc. 31) | |
| ISO B (spea-ker connection configuration) | Configuration | |
| 1 | Rear right + | |
| 2 | Rear right - | |
| 3 | Front right + | |
| 4 | Front right - | |
| 5 | Front left + | |
| 6 | Front left - | |
| 7 | Rear left + | |
| 8 | Rear left - | |
To connect the device to two speakers use only the cables for the front speakers.
NOTICE
Make sure that a permanent positive connection is applied to the station memory of connection 4 in the ISO block A.
In some automobile models the standard configuration of the connections [4] and [7] in ISO block A are interchanged at the factory. If this is the case the station memory can be lost. To correct this, the connections 7 (Ignition positive) and 4 (Permanent positive) in the ISO Block A must be swapped.
- You can connect an external amplifier to the audio cinch output. For this follow the operating instructions for the external amplifier.
Antenna power connection
IMPORTANT
Possible damage to the device!
- Never attach the antenna power connection with the antenna's motor power cable.
The connection for the antenna power is available for a relay controlled antenna. The relay then automatically extends the antenna when the device is switched on. When switched off the antenna retracts. This connection can also be used to control an external amplifier. For exact connection information please consult the amplifier's operating instructions.
Connection of an external amplifier
For the connection of an external amplifier use the audio cinch output LINE OUT 40. For this follow the operating instructions for the external amplifier.
Connection of an external subwoofer
For the connection of an external subwoofer use the yellow cinch connector SUBWOOFER 38. For this follow the operating instructions for the external subwoofer.
Connecting the microphone unit
For connection of the microphone unit use the microphone unit socket 39.
Connection schematic
Installation
The device can be installed into any standard ISO mounting duct. In the event that your vehicle does not have an ISO mounting duct contact your local specialist establishment, local dealer or the technical department of the store.
NOTICE
Before installation remove, without fail, the two transport securing screws on the top of the housing (marked with a red sticker)!
- Connect the cable before finally installing the device. Make sure that it is plugged in properly and that the system functions correctly.
Installation instructions
Install the device in the duct provided for it or select the installation location so that all buttons can be comfortably reached and the driver is not impeded.
Only connect the device to a properly installed 12 V automotive battery.
Only connect the device in the vehicle via an ISO plug.
Install the device in such a way as to avoid the development of heat accumulation and so that the device is sufficiently ventilated.
To avoid function disturbances the installation angle should be less than 30^
- Do not install the device in a location where it will be subjected to high temperatures (i. e. direct sunlight or heating vents), heavy contamination and strong vibrations.
In the event that changes to the vehicle are necessary contact your vehicle dealer/qualified radio installation facility.
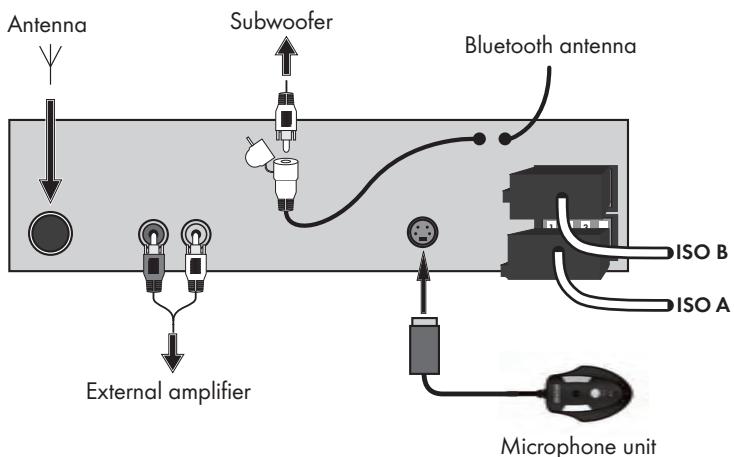
Installing the device into the ISO duct
Pull the installation bracket 43 and the bezel frame 47 from the device's housing.
Place the installation bracket into the ISO mounting duct.
Bend the tabs on the installation bracket with a screw driver so that the bracket is fixed firmly into the mounting duct (see diagram).
Check to make sure that the bracket is securely fixed.
Connect the ISO socket block of the device with the two ISO plugs on your vehicle.
Connect the antenna cable from the vehicle antenna to the antenna socket on the device.
Feed the microphone unit cable into the aperture and connect it to the microphone unit socket. Run the cable in such a way that the microphone unit can be secured in the vehicle interior later, see also the section "Using the microphone".
Contingently connect the audio cinch cable of an external amplifier to the LINE OUT socket 40 on the device.
Contingently connect the audio cinch cable of an external subwoofer to the yellow cinch socket SUBWOOFER 38 on the device.
If necessary secure your device against theft with additional measures. Attach the securing screw with the anchoring plate 50 and the securing material to the engine firewall of the vehicle.
Carefully push the device into the mounting duct until it locks into place.
After all connections have been made activate the RESET button with a ball point pen or other pointed object.
Attach the face plate as described under "Installing the face plate".
IMPORTANT
Possible damage to the cable!
Observe the position of the cable when sliding the device into the duct so as to avoid damaging it.
Finally put on the bezel frame.
Uninstalling the device
To remove the installed device proceed as follows:
Remove the bezel frame 47.
Insert the right and left keys 49 into their respective slots on the sides of the device. (The tabs are now bent back.)
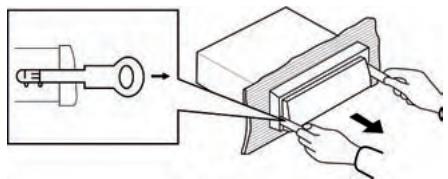
Pull the device out.
Initial use
Face plate
To protect against theft you can remove the face plate from your device. Do not store the removed face plate in your vehicle.
NOTICE
When the face plate is not inserted into the frame the theft protection LED 31 on the device blinks.
To safeguard the face plate always keep it stored in its case.
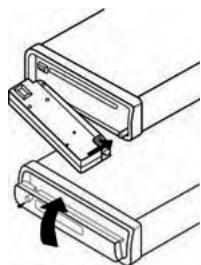
Installing the face plate
Place the face plate with the left side in the frame first.
Then firmly press the right side until it locks into place.
Subsequently flip the face plate upwards until it locks into place.
Check to make sure that the face plate is firmly and correctly installed in the frame. If the face plate is incorrectly installed it can result in malfunctions when operating the device.
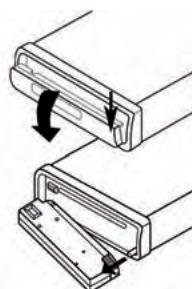
Removing the face plate
Press the button to unlock the face plate. The face plate tilts automatically forward.
Slide the face plate to the left and then pull first the right and then the left side away.
Handling and operation
In this chapter you receive important information for the handling and operation of the device.
NOTICE
If no setting is made and/or no button pushed within approx. 5 seconds the device returns to its previous operating mode. Changed settings are saved.
Switching On and Off
Press briefly the / DIM button to switch the device on. In the display the notice WELCOME appears.
Briefly tap the / DIM button. In the display appears AUTO DIM.
Briefly tap the (1)/DIM button again. In the display appears MAN DIM.
AUTO DIM: The display illumination will, depending on the lighting conditions, set automatically.
MAN DIM: The display illumination can be set in two stages (H = High and L = Low) by turning the multi controller.
To switch off hold down the / DIM button longer.
Settings
WARNING
Hearing damage as a result of too high a volume!
If the volume is set too high it can lead to permanent hearing damage.
Set the volume to moderate levels only.
Volume
Turn the multi controller to set the volume.
Switching mute on and off
Press the button to switch the sound off. "MUTE" blinks in the display.
To switch the sound on again press the button once more. The mute switching is rescinded when receiving a PTY or TA station.
Bass/Treble/Balance/Fader
Press the multi controller on the device. The current volume level is shown. Each additional press of the multi controller accesses the next setting point.
The following settings are possible:
VOL - Volume (from 0 to 50),
BAS-Bass(from-10to10),
TRB - Treble (from -10 to 10)
BAL - Balance (sound distribution between the right and left speakers) (from 10L to 10R)
FAD - Fader (sound distribution between the rear and front speakers) (from 10F to 10R)
Turn the multi controller to change the settings of the displayed menu items.
further settings via the multi controller
Hold down the multi controller for approx. 2 seconds and then press the multi controller repeatedly until the desired function appears in the display.
INVOL - switch on volume
Turn the multi controller to set the volume level, with which the device is to be set when turned on.
REC - Recording format
Turn the multi controller to set the record format for recording on SD/MMC and/or USB data carriers, MP3 (MP3 data) or WMA (Windows Media Audio).
SUBW - Subwoofer
You can connect an active external subwoofer to produce a more powerful bass effect.
Turn the multi controller to turn the bass effect on (SUBW ON) or off (SUBW OFF).
ADJ - Time of day
NOTICE
The device is equipped with an RDS controlled clock. The clock sets itself automatically when the EON function is switched on and also continues to run when the radio is switched off. If you do not receive any RDS signal you can also set the time of day manually.
Turn the multi controller to the right to set the hours and to the left to set the minutes.
TAVOL - Volume for traffic radio
Turn the multi controller to set the volume level, with which traffic reports are to be played back.
EON - Information from other stations
When the EON function is switched on the radio switches to traffic radio or PTY groups if the TA or PTY function has been activated.
Turn the multi controller in order to switch the EON function on (EON ON) or off (EON OFF).
DSP - Equalizer (Digital Sound Processing)
Turn the multi controller to select one of the settings CLASSICS, ROCK M, POP M, FLAT or DSP NONE. In the setting DSP NONE no DSP is switched on. The DSP equalizer setting is shown to the right in the display.
TA - Traffic Announcement (traffic radio)
Turn the multi controller to perform the following settings:
TA SEEK: As soon as the reception signal for traffic announcements becomes weaker or you leave the reception area the search function starts and will look for the strongest TA station.
TA ALARM: As soon as the reception signal for traffic announcements becomes weaker or you leave the reception area an alarm tone sounds.
PI - Program Identification (Sound with the station search)
The programme identification code (PI) is a built-in transmission identification code, which is used for, among other things, the search of alternative frequencies. It consists of a 16 bit rate which allows for a positive identification of the station.
Turn the multi controller to perform the following settings:
PI SOUND: Station search with sound.
PI MUTE: Station search without sound.
RETUNE (Search times of stations with PI recognition)
Turn the multi controller to perform the following settings:
RETUNE L: The search process for a station with the correct PI recognition runs for 90 seconds.
RETUNE S: The search process for a station with the correct PI recognition runs for 30 seconds.
MASK (Conceal specific stations)
Turn the multi controller to perform the following settings:
MASK DPI: Conceals the AF stations which have another PI recognition.
MASK ALL: Conceals the AF stations which have another PI recognition and all annoying non-PI stations that have the same station frequency.
Loudness
Hold down the MODE button to switch the loudness function on or off. In the display appears LOUD ON and/or LOUD OFF.
Operating mode
Press the MODE button to switch between radio reception (frequency indicator), CD/MP3 operation (CD), memory card slot (SD/MMC), USB port (USB), audio streaming (BT MUSIC or A2DP) and audio input (AUX).
NOTICE
The operational modes CD, SD/MMC, USB and BT MUSIC can only be accessed when the corresponding medium is inserted and/or a mobile telephone is connected.
Display
Press repeatedly the DISP button to display successively the following information:
Radio station, time of day (automatically set with RDS reception), frequency and PTY settings (these RDS functions are sent by the broadcasting services in various volumes; see also the section "Radio functions").
NOTICE
- When you are not receiving any RDS or PTY information, "PS NONE" or "PTY NONE" is shown in the display.
Radio reset (RESET)
To reset the device to its factory default settings, press the RESET button with a pointed object, such as a pen.
NOTICE
To access the RESET button the face plate must be completely detached, see also the section "Removing the face plate".
Reset the device:
- when operating for the first time,
after the cable connection, - if not all function buttons are working
- when an error message appears in the display.
Radio functions
Select frequency range
Press the BD/ENT button to switch between VHF (F1, F2, F3) and medium wave (M1, M2).
Automatic station search
Press briefly the buttons I or to start a station search. The search will stop when a station is found.
Manual station selection
Hold down one of the buttons or for two seconds, in the display appears MANUAL.
Now press the buttons I or to change the frequency in steps of 0.05 MHz (VHF) and/or 9 kHz (MW) until the desired frequency is set.
If no button is pressed for approx. two seconds the automatic station search is set again. AUTO appears in the display.
Saving radio stations
For each frequency range 6 stations can be saved.
Hold down for approx. 3 seconds one of the station buttons 1 to 6 to save the currently set station. The successful saving is signalised by the showing of the numbers 1 to 6 in the display.
Search for stations with alternative frequencies
Press the SCAN/REC button to search for stations with an AF signal in the VHF band range.
The search stops with each found station for 5 seconds and then continues searching.
If you want to listen to and save the station press the SCAN/REC button to stop the search.
Hold down for approx. 3 seconds one of the station buttons 1 to 6 to save the currently set station. The successful saving is signalised by the showing of the numbers 1-6 in the display.
Accessing saved stations
Select with BD/ENT the frequency range.
Press one of the station buttons 1 to 6, to access the saved station.
Automatic saving
Hold down the AS/PS button for 3 seconds. A search immediately starts whereby each found station remains for approx. five seconds. The station indicator and/or the station frequency blinks and the memory slot is displayed. With weak stations the search will automatically continue.
Running through saved stations
Press briefly the AS/PS button. All stations will be briefly selected.
When you hear the desired station press the AS/PS button. The chosen station remains selected.
Switching alternative frequencies (AF) on / off
You can search for alternative frequencies of a station so that it will always have optimal reception.
Press the AF button. In the display appears the indicator AF. The device now constantly searches for the optimal frequency of the currently set station.
Press the AF button again to switch the function off. In the display the indicator AF disappears.
Regional programmes
A few stations broadcast regional programmes.
In order to playback only the station's regional programme hold down the AF button until the notice REG ON appears in the display.
To again playback the national programme hold down the AF button until the notice REG OFF appears in the display.
Programme mode (PTY)
With the help of this function you can search for stations in a designated genre. The following settings are possible:
| POP M | SPORT | VARIED | OLDIES |
| ROCK M | EDUCATE | JAZZ | SOCIAL |
| NEWS | DRAMA | COUNTRY | RELIGION |
| AFFAIRS | CLASSICS | WEATHER | PHONE IN |
| INFO | OTHER M | FINANCE | FOLK M |
| EASY M | CULTURE | CHILDREN | TRAVEL |
| LIGHT M | SCIENCE | NATION M | LEISURE |
| DOCUMENT |
NOTICE
- Please note that this information is dependent on the region, the broadcasting corporation and the station.
For this function the EON function must be switched on.
Setting the PTY identification
Press the PTY button and subsequently press repeatedly one of the number buttons 1 to 6 to select the desired PTY input.
To switch between the PTY inputs "Musical genre" and "Talk contributions" by the indicator of the first PTY input press the PTY button again.
The number buttons are reserved as follows:
| Button | Musical genre | Talk contributions |
| 1 | POP M, ROCK M | NEWS, AFFAIRS, INFO |
| 2 | EASY M, LIGHT M | SPORT, EDUCATE, DRAMA |
| 3 | CLASSICS, OTHER M | CULTURE, SCIENCE, VARIORED |
| 4 | JAZZ, COUNTRY | WEATHER, FINANCE, CHILDREN |
| 5 | NATION M, OLDIES | SOCIAL, RELIGION, PHONE IN |
| 6 | FOLK M | TRAVEL, LEISURE, DOCUMENT |
If no further input occurs for 2 seconds an automatic search for stations that correspond to the PTY input starts The search stops with the first found station.
Switching the PTY function on/off
To activate the PTY search press the PTY button. In the display the notice PTY appears.
With the station search only stations of the currently selected PTY identification will be considered.
To deactivate the PTY search press the PTY button again.
Station search by PTY identification
During the display of a PTY identification if you press briefly the PTY button or the buttons I and/or a search immediately starts for stations, which correspond to this PTY identification.
If no station is found that corresponds with this PTY identification the indicator PTY NONE appears briefly and subsequently the search ends with the last preset station.
Traffic radio (TA - "Traffic Announcement")
For this function the EON function must be switched on.
Press the TA button to switch this mode on or off.
In the TA mode the device will immediately switch from other stations or operation modes to the radio station, which is currently broadcasting traffic information. With this the volume level entered under TAVOL will be set.
During the playback of traffic radio press the TA button to stop the TA function without switching off this function.
General CD functions
NOTICE
- Dampness and high humidity can cause the CD player to malfunction. In this case switch on the vehicle heating to dissipate the dampness before using the device. Do not subject the device to any extremely high or low temperatures.
Anti-Shock function (ESP - "Electronic Shock Protection")
The device is equipped with an anti shock function. This function serves to compensate for vibrations, for example on uneven streets, and to provide an uninterrupted playback even with device movement. When the device is switched on the memory automatically fills with data:
with audio CDs for 12 seconds;
with MP3 CDs for 75 seconds.
Inserting and removing CDs
Press the button to unlock the face plate. The face plate tilts automatically forward.
Push the CD into the CD slot with the inscribed side facing up.
Lock the face plate back into place by folding it upwards. Playback of the CD begins. In the display appears CD PLAY.
To remove the CD open the face plate again. Press the button. The CD will be ejected. The device switches to radio mode.
Immediately remove the CD from the CD slot. If an ejected CD is not removed within approx. 5 seconds the device will draw it back in, however playback of the CD will not start.
Title skip
Press the buttons or I to select the next and/or previous title. The title number will be shown in the display.
Fast forward/backward
Hold down the buttons or longer to start fast forward or backward.
Stop playback
Press the button 1, to pause playback. S-PAUSE blinks in the display.
To continue playback press the 1 button once more.
Repeat function (RPT - Repeat)
Press several times the RPT button to switch between the repeat functions. The following settings are possible:
RPT ONE: The current title is repeated.
- RPT ALL: The entire CD will be repeated. RPT will not be displayed.
Additionally with MP3 CDs:
RPT DIR: All titles in the current directory will be repeated.
If the functions RPT ONE or RPT DIR are activated RPT will appear in the display.
Title sampling
Press the INT button. In the display INT is shown. Approx. 10 seconds from all titles will playback one after the other.
Press the INT button once more to activate normal playback.
Random playback of all titles (RDM - Random)
Press the RDM button. The display shows RDM. A random controlled playback is started. A repeat pressing launches the normal playback.
MP3 CDs functions
Playback
The device can playback files in the MP3 and WMA formats.
A mixture of titles and directories on the same level can result in problems when playing back.
During playback the information from the ID3 tag of the MP3 files are read and are shown successively in the display.
Skip directory
Press the number button 6 to playback the next directory and/or the number button 5 to playback the previous directory. The name of the directory will appear briefly in the display after which playback begins automatically.
NOTICE
If files are located in the CD's main directory the directory name ROOT will be shown in the display.
Search functions
Title number search
Press the AS/PS button. The notice MP3* appears in the display.
Turn the multi controller or press the numbers on the device to set the desired title number.
Press the multi controller or wait 3 seconds to start playback of the set title.
NOTICE
If a title number is selected that does not exist the title with the largest title number will playback.
Title name search
Press the AS/PS button twice. In the display the notice* appears.
Turn the multi controller until the desired letter appears.
Press the multi controller to confirm the letter and to switch to the second letter of the title name. In this way up to 16 letters/characters can be entered.
When you have set the desired character press the BD/ENT button to show all titles that begin with the sought after character.
NOTICE
If no titles are found that begin with the set character NO MEDIA will be shown briefly and you can carry out the setting again.
Turn the multi controller to select a title and start playback with BD/ENT.
Search for directories
Press the AS/PS button three times. The directory that is currently playing back appears.
Turn the multi controller to switch between the available directories.
Press the BD/ENT button to select the currently shown directory. Playback of the first title from the selected directory starts immediately.
USB port
The device can process USB data carriers up to 16 GB. With this the directory structure may contain a maximum of 1024 folders, 4096 files and a directory depth of 8 levels.
Connecting data carriers
Open the protective cap from the USB port.
Connect your USB device to the port. The device searches for MP3 or WMA files on the data carrier and the notice USB PLAY appears in the display.
Place the protective cap back on the USB port when no USB device is connected to avoid contamination.
Playback and search functions
The operations for playing files on the external data carrier as well as the search function are exactly the same as with MP3 CDs.
If the device is in a different mode (CD, Radio, AUX or MMC) you can select the USB data carrier with the MODE button.
Card reader (SD/MMC)
The device can process SD/MMC memory cards up to 2 GB and SDHC memory cards up to 32 GB. With this the directory structure may contain a maximum of 1024 folders, 4096 files and a directory depth of 8 levels.
Connecting data carriers
Slide a memory card into the memory card slot with the marking pointing to the right. Playback of the MP3 or WMA title on the memory card begins automatically.
Playback and search functions
The operations for playing files on the external data carrier as well as the search function are exactly the same as with MP3 CDs.
If the device is in a different mode (CD, Radio, AUX or USB) you can select the card reader with the MODE button.
Record function
NOTICE
- Please observe the legal regulations valid in your place of residence regarding the duplication of copyrighted works. In case of doubt please consult a specialist in your area.
With your device you can record data from audio CDs, radio or external audio devices onto USB or SD/MMC data carriers and copy MP3 and/or WMA data from an MP3 CD onto USB or SD/MMC data carriers.
The data will be saved with the following notations:
Title of audio CDs: Track_001, Track_002, ...
Data from MP3 CDs: Copy_001, Copy_002, ...
Radio recordings: Tuner_001, Tuner_002, ...
Recordings have a bitrate of 128 kbps and a sampling frequency of 44kHz
Recording
Place a memory medium into the card slot or connect a data carrier to the USB port.
Insert the CD, if necessary, and/or switch on the external audio device.
With the MODE button set the desired operation mode (CD, Radio, AUX).
If necessary start playback of the external audio device.
Hold down the SCAN/REC button until REC MMC or REC USB is displayed. In the operation mode CD, MMC ALL or USB ALL will be displayed. If no data carrier is connected, on which recordings can be made NO MEDIA will be displayed.
Press the SCAN/REC button repeatedly until the desired recording option is displayed. When recording an audio CD you can make an additional setting depending on whether you want to record all titles from the CD (USB/MMC ALL) or only the current title (USB/MMC ONE).
Start the recording by pressing the BD/ENT button.
The audio data is now saved on the data carrier in the format that was set (MP3 or WMA). The preceding blinking "R" signals the recording.
NOTICE
- When the selected data carrier is full recording automatically moves to the other data carrier as long as a corresponding data carrier is connected.
To end the recording press briefly the BD/ENT button once more. After which WAIT is shown briefly in the display, the recording is saved.
Copying data from an MP3 CD
You can copy individual titles from an MP3 CD to an external USB data carrier or an SD/MMC memory card.
Place a memory medium into the card slot or connect a data carrier to the USB port.
Hold down, during playback of a title from an MP3 CD, the SCAN/REC button. The notice COPY MMC and/or COPY USB appears. If no data carrier is connected, on which recordings can be made NO MEDIA will be displayed.
Press the SCAN/REC button several times to select either the copying option COPY USB (copying on USB data carriers) or COPY MMC (copying on SD/MMC cards).
Start the copy process by pressing the BD/ENT button.
During the copy process COPY appears in the display and a percentage indicator from 01 - 100 shows the copying progress. After the notice COPY 100 the copying process is ended and playback of the MP3 title continues.
Connecting an external audio device to the device
Connect the audio output of an external audio device (i.e. an MP3 player) via a 3.5 mm stereo jackplug to the socket AUX IN on the front panel of the device.
Select playback of the audio input by pressing, several times, the MODE button until AUX is shown in the display.
Bluetooth operation
The microphone unit must be connected to the device in order to use the Bluetooth functions. In addition a mobile phone is required that supports the Bluetooth data transmission.
Connecting the telephone to the device
Activate the Bluetooth function on your mobile phone and conduct a search for Bluetooth devices.
After a successful search the entry CarBT appears for the device in the display of the mobile phone.
Select this entry for the connection and for the subsequent password request enter the password 1234 for the device. You may possibly have to confirm the connection structure once more.
After a successful coupling CONN OK appears briefly in the device's display and the green LED on the microphone unit lights up.
Using the microphone
During the telephone call you will hear the caller via the speaker connected to the device.
For optimal transmitting of your voice place the microphone unit close to you.
Attach the microphone unit, for example, to the dashboard. For this purpose you can use the supplied sticky tape. In this case clean beforehand dust and grease from the surface. The sticky tape can be used for securing on almost all smooth surfaces.
NOTICE
Do not mount the microphone in the vicinity of speakers otherwise the voice quality may deteriorate.
Call accept/end
With an incoming call you will hear the call signal via the speakers attached to the device and via your mobile telephone. The call number is shown in the device's display.
You accept an incoming call by pressing the TALK button on the microphone unit or the button on the device.
You end the call by pressing the TALK button on the microphone unit again or by pressing the button on the device.
Rejecting a call
With an incoming call press the button to reject that call.
To call
Press the button. DIAL appears in the display.
With the number buttons on the device enter the phone number that you want to call.
Press the button again. The number is dialled and CALLING appears in the display.
NOTICE
If you make a mistake when entering the phone number press the button to delete the last number entered. Each additional press of the button deletes the last number respectively.
Redial
Hold down the TALK button on the microphone unit or the button on the device for approx. 2 seconds.
- If previously no call number was selected via the number buttons on the device the last selected mobile phone call number is dialled.
- If previously a call number was selected via the number buttons on the device this call number is dialled.
Caller lists
Press the PHONE button on the device. CALL LIST appears in the display
Press the PHONE button again. IN CALL appears in the display.
Turn the multi controller to select between the following displays:
- IN CALL: Shows the last 20 incoming calls.
- OUT CALL: Shows the last 20 outgoing calls.
Press the PHONE button again. READING appears in the display and subsequently shows the last incoming (IN CALL) and/or dialled (OUT CALL) call number.
Turn the multi controller to show the last 20 received and/or dialled call numbers one after the other.
Press the button to dial the selected call number.
Press the button to end redialling and exit the caller list.
Telephone book function
You can transfer up to 20 contacts (Telephone book entries) from the connected mobile phone to the device and thus dial and call the contact from the device.
NOTICE
Details for the transference of the contact via Bluetooth can be obtained from the operating instructions of your mobile phone.
Each transferred contact is filed in the memory slot PB01. The contacts that have already been transferred are automatically filed one memory slot further (PB02, etc).
Press the PHONE button on the device. CALL LIST appears in the display
Turn the multi controller to select the display PH BOOK.
Press the PHONE button again. READING appears in the display. Subsequently PB01 appears and the name and call number of the first memory slot is shown.
Turn the muti controller to select additional telephone book entries.
Press the button to dial the selected call number.
Press the button to end the call and exit the directory function.
Deleting the caller lists and telephone book entries
Press and hold the button until RESET appears in the display. The Bluetooth connection to the mobile phone is disconnected and all directory entries and caller lists on the device are deleted.
Audio streaming (A2DP)
The device uses the A2DP profile (Advanced Audio Distribution Profile) and therefore can playback your mobile phone's audio data.
Select an audio file from your mobile phone and start the playback.
In the device's display appears the entry A2DP and the audio data will be played back via the speakers connected to the device.
NOTICE
On the mobile phone it may possibly be necessary to switch playback via the Bluetooth stereo headset. Consult the operating manual of your mobile phone for more information.
- With a few mobile phones the device does not automatically switch to the A2DP mode. In this case you switch to the A2DP mode by pressing the MODE button several times until the notice BT MUSIC or A2DP appears in the display.
AVRCP (Audio Video Remote Control Profile)
The device uses the AVRCP profile thus facilitating the control of audio devices.
With the 1 button on the device you can pause and/or re-start playback of the audio files on the mobile phone.
With the I or I buttons on the device you can access the previous or next audio file on the mobile phone.
Cleaning
Safety instructions
IMPORTANT
Possible damage to the device
Make sure when you are cleaning the device that no moisture gets inside in order to avoid irreparable damage to it.
Display cleaning
Clean the front panel of the device / the display exclusively with a soft, moist, lint-free cloth and a mild dish washing liquid.
Disposal
Disposal of the device

Do not dispose of the device in your normal domestic waste. This product is subject to the European directive 2002/96/EC-WEEE (Waste Electrical and Electronic Equipment).
Dispose of the device through an approved disposal centre or at your community waste facility. Observe the currently applicable regulations. In case of doubt, please contact your waste disposal centre.
Troubleshooting
In this chapter you will receive important information for malfunction localization and remedies. Observe the instructions in order to avoid danger and damage.
Safety instructions
WARNING
Observe the following safety information to avoid danger and property damage:
Repairs to electronic devices may only be carried out by specialists who have been trained by the manufacturer. Considerable danger to the consumer and damage to the device can occur as a result of incorrect repairs.
Malfunction causes and remedies
The following table will help with localizing and remedying minor malfunctions:
| Defect | Possible cause | Solution |
| The device will not switch on | The ignition is not switched on. | Switch the ignition on by turning the key. |
| The fuse is defective. | Replace the fuse. | |
| No sound | The volume is set to minimum. | Increase the volume. |
| The cables are not connected correctly. | Check the cable connections. | |
| The sound is switched off. | Press the button to switch the sound back on. | |
| The CD will not load or eject | A CD is already inserted into the device. | Remove the CD. |
| The CD has been inserted the wrong way up. | Insert the CD with the inscribed side up. | |
| The CD is dirty or defective. | Clean the CD or insert a different CD. | |
| The temperature in the vehicle is too high. | Allow the vehicle to air out until the temperature has again dropped to the operational temperature. | |
| Condensation on the laser lens | Switch the device off for a few hours and then try it again. | |
| Function but-tons are not functioning | There is a malfunction with the device. | Press the RESET button. |
| The face plate is not correctly installed. | Check to see that the face plate is installed correctly. | |
| The CD jumps | The mounting angle exceeds 30°. | Correct the mounting angle. |
| The CD is very dirty or defective. | Clean the CD or insert a different CD. | |
| Failure with burnt CDs | Check the burnt CD in another playback device. | |
| The radio and/or the automatic station saving is not functioning | The antenna cable is not connected correctly. | Check the antenna cable for correct connection. |
| The station signals are too weak. | Set the station manually. | |
| Station memory is not functioning | The connection 4 in the ISO block A (Permanent positive) is not connected correctly. | Check the cable connections. For this consult the chapter "Connections". |
| The device's USB port does not function | The USB port is intended for devices that function according to the USB standard. Not all market available devices conform to this standard. It is possible that a device is connected that does not function according to the USB standard. | Connect a device that functions according to the USB standard. Make sure that the data carrier is formatted for the FAT32 file system. |
| The card reading device does not read the cards | The card is possibly defective, dirty or not properly inserted. | Check the card. Slide it in with the inscribed side facing to the right. Make sure that the data carrier has been formatted to the FAT32 file system. |
| The Bluetooth connection does not function | The mobile phone does not support Bluetooth transmissions. | Reconnect the mobile phone and the device. For this also read, without fail, your mobile phone's instructions. |
| The mobile phone is not coupled with the device. |
NOTICE
If you cannot solve the problem with the aforementioned methods, please contact Customer Service.
Appendix
Technical data
General
| Input voltage | 12 | VDC |
| Input current | max. 10 | A |
| Max. Impulse output | 4 x 40 | W |
| Power rating (with 1% distortion factor) | 4 x 13.5 | W |
| Operating temperature | +5 - +40 | °C |
| Humidity (no condensation) | 5 - 90 | % |
| Dimensions (L x D x H): | 18.6 x 20.6 x 5.7 | cm |
| Weight incl. accessories | approx. 1550 | g |
| Device fuse Automotive blade type fuse | 10 | A |
Radio frequency range
| Frequency FM (VHF) | 87.5 - 108 | MHz |
| Frequency AM (MW) | 522 - 1620 | kHz |
| Station memory slots FM (VHF) | 18 | Slots |
| Station memory slots AM (MW) | 12 | Slots |
Audio input (AUX)
| Stereo jackplug | 3.5 | mm |
USB port
USB 1.1 and 2.0 compatible data carrier (up to 16 GB)
Card slot
SD/MMC memory card slot (SD up to 2 GB, SDHC up to 32 GB)
Information regarding the EG conformity declaration
This device complies in regard to conformity with the basic requirements and other relevant regulations of the vehicle directive 2004/104/EC and the R&TTE directive 1999/5/EC.
CE
The complete original declaration of conformity can be obtained from the importer.
Warranty
You receive a 3-year warranty for this device as of the purchase date. This device has been manufactured with care and meticulously examined before delivery. Please retain your receipt as proof of purchase. In the case of a warranty claim, please get in touch by telephone with our service department. Only in this way can a post-free dispatch for your goods be assured.
NOTICE
The warranty adjustment is valid only for material or manufacturing defects not, however, for transport damage, wear and tear or for damage to breakable parts, i.e. switches or rechargeable batteries.
The product is intended merely for private use and not for commercial purposes.
In the event of misuse and improper handling, use of force and interference not carried out by our authorized service branch, the warranty will become void. This warranty does not affect your statutory rights.
The warranty period is not extended by repairs effected under warranty. This applies also to replaced and repaired parts. Damages or defects discovered after purchase are to be reported directly after unpacking, at the latest two days after the purchase date. After expiry of the warranty period incidental repairs are subject to payment.
Importer
KOMPERNASS GMBH
BURGSTRASSE 21
44867 BOCHUM, GERMANY
www.kompernass.com
GB
IE
SILVERCREST®
Warranty
Bluetooth Car Radio SAB 160 A1
In order to guarantee a cost free repair procedure please get in touch with the service hotline. Ensure you have your sales slip handy.
Sender, please write clearly:
Last name
First name
Street
City/Town
Country
Telephone
Date/Signature
GB Service Great Britain
Tel.: 0871 5000 720 (£ 0.10/Min.)
E-Mail: kompernass@lidl.co.uk
IAN 66837
IE Service Ireland
Tel.: 1890 930 034
(0,08 EUR/Min., (peak))
(0,06 EUR/Min., (off peak))
E-Mail: kompernass@idl.ie
IAN 66837
Description of the defect:
Sisällysluettelo
Johdanto. 42
Esipuhe. 42
AVRCP (Audio Video Remote Control Profile)

m = 311 ;
AVRCP (Audio Video Remote Control Profile)
Sogning after station after PTY-kode
Nár du trykker kort på knappen PTY eller knapperne I< × ller I, mens PTY-koden vises, starter du straks en søgning after stationer, som svarer tilijke PTY-kode.
Trafikradio (TA - "Traffic Announcement")
For atijke Funktion kan fungere skal EON-funktionen slas til.
Tryk pa knappen TA for at sla indstillingen til aller fra.
Sogning after mapper
AVRCP (Audio Video Remote Control Profile)
Bilradioen anvender AVRCP-profilen og giver dermed mulighed for at styre audioapparater.