
SAR 28 A1 - Car stereo SILVERCREST - Free user manual and instructions
Find the device manual for free SAR 28 A1 SILVERCREST in PDF.

User questions about SAR 28 A1 SILVERCREST
0 question about this device. Answer the ones you know or ask your own.
Ask a new question about this device
Download the instructions for your Car stereo in PDF format for free! Find your manual SAR 28 A1 - SILVERCREST and take your electronic device back in hand. On this page are published all the documents necessary for the use of your device. SAR 28 A1 by SILVERCREST.
USER MANUAL SAR 28 A1 SILVERCREST
Operating instructions
FR BE
AUTORADIO
Mode d'emploi
DE AT CH
AUTORADIO
Bedienungsanleitung
DK
BILRADIO
Before reading, unfold both pages containing illustrations and familiarise yourself with all functions of the device.
DK
GB/IE Operating instructions Page 1
| DK | Betjeningsvejledning | Side | 29 |
| FR/BE Mode d'emploi Page 57 | |||
| NL/BE Gebruiksaanwijzing Pagina 85 | |||
| DE/AT/CH Bedienungsanleitung Seite 113 | |||
D
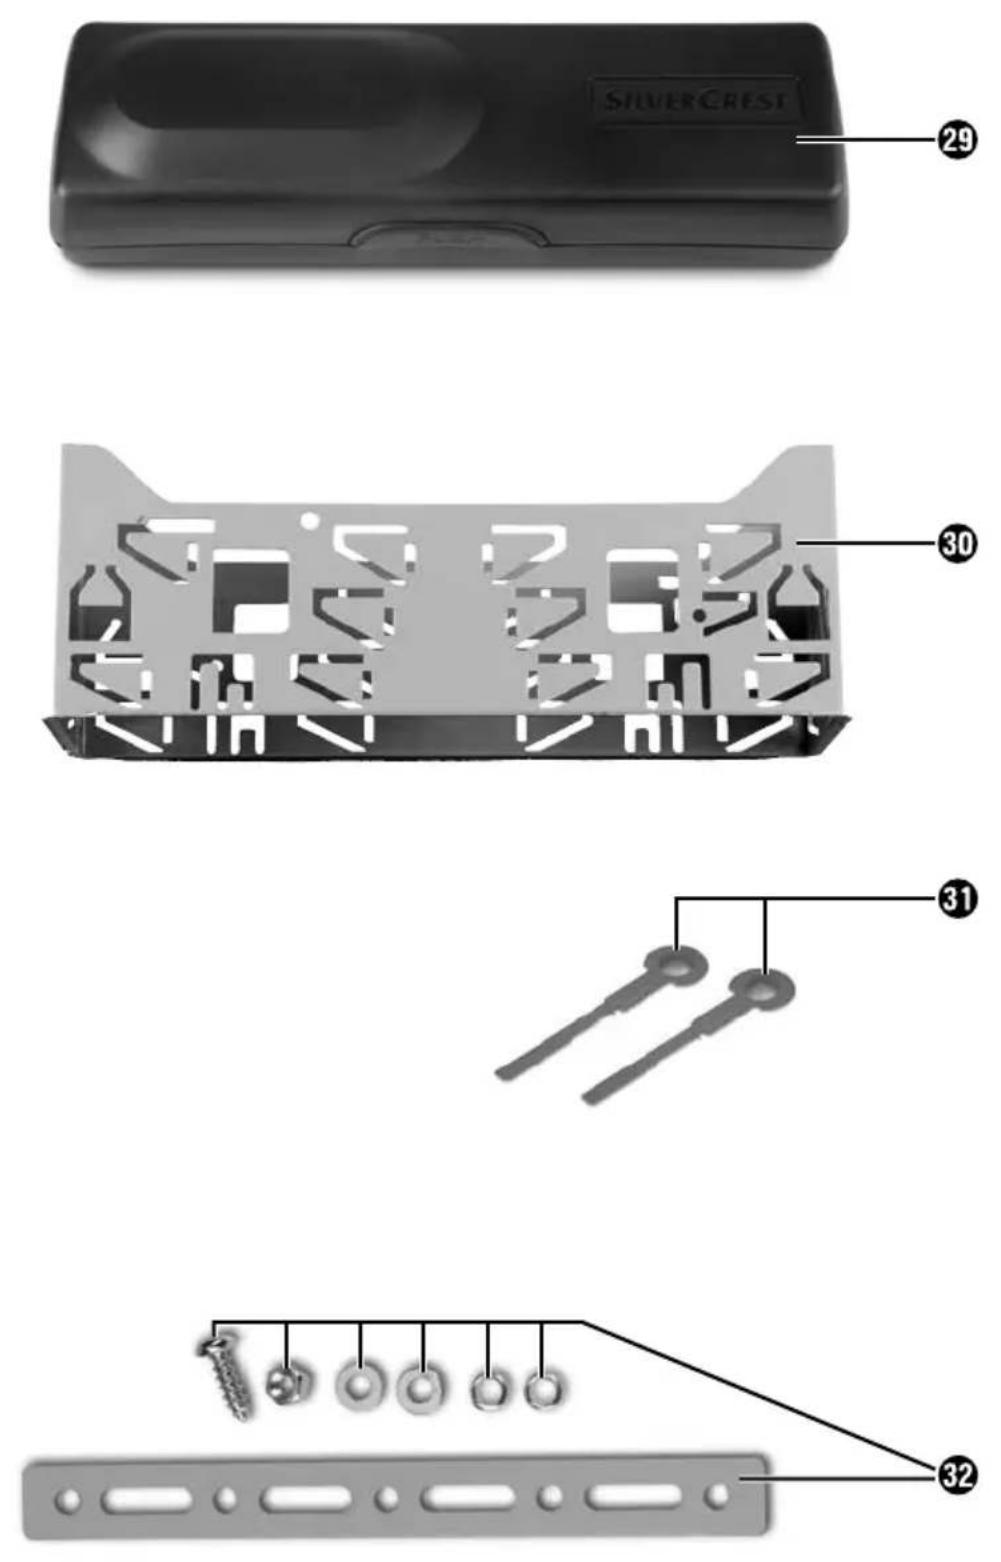
Table of contents
Introduction 2
Preface 2
Copyright 2
Limitation of liability 2
Warnings 3
Intended use....3
Safety 4
Basic safety instructions 4
Package contents (see fold-out pages) 5
Disposal of packaging 5
Controls....6
Installation 7
Connection....7
Installation 9
Removing the device....11
Using the device 12
Face plate....12
Handling and use.... 13
Switching on and off 13
Settings....13
Radio reset (RESET) 14
Radio functions....17
USB port....19
Card reader....19
MP3 / WMA playback functions 20
Connecting an external audio device to the device 22
Cleaning 22
Safety instructions....22
Cleaning the display....22
Disposal 22
Disposal of the device 22
Fault rectification 23
Safety instructions....23
Fault causes and rectification....23
Appendix 24
Technical details 24
EC Declaration of Conformity information 25
Warranty 26
Importer 26

Introduction
Preface
Congratulations on the purchase of your new device.
You have decided to purchase a high-quality product. These operating instructions are part of the SAR 28 A1 car radio (hereafter referred to as the device) and provide you with important instructions pertaining to the intended use, safety, installation, connection and operation of the device.
The operating instructions must be kept near to the device at all times. They are to be read and applied by all those working on installation, servicing and fault rectification of the device.
Keep these operating instructions in a safe place and pass them on to any future owner together with the device.
Copyright
This documentation is subject to copyright protection.
All rights, including those of photographic reproduction, duplication and distribution by means of particular methods (such as data processing, data carriers and data networks), in whole or in part, as well as substantive and technical changes, are reserved.
Limitation of liability
All technical information, data and information in these operating instructions pertaining to installation, connection and operation correspond to the latest versions at the time of printing and to the best of our knowledge take into due consideration our previous experience and expertise.
No claims can be derived from the details, illustrations and descriptions in these instructions.
The manufacturer assumes no liability for damage caused by failure to observe these instructions, non-intended use, improper repairs, making unauthorised modifications or using non-approved replacement parts.
Warnings
The following warnings are used in these operating instructions:

WARNING
A warning of this risk level indicates a potentially hazardous situation.
Failure to avoid this hazardous situation could result in physical injury or death.
▶ Follow the instructions in this warning to prevent physical injury.
CAUTION
A warning of this risk level indicates potential material damage.
Not averting this situation could result in material damage
▶ Follow the instructions in this warning to prevent material damage.
NOTE
▶ A notice indicates additional information that will assist you in handling the device.
Intended use
This device is intended solely for the reception of FM radio stations, for the play-back of MP3/WMA fi les from USB data carriers and SD/MMC memory cards, as well as audio signals from external audio devices. The device is intended for installation into a vehicle. The device is not intended for any other use or for uses extending beyond those stated.

WARNING
Risks from non-intended use!
Risks can arise if the device is used for non-intended purposes and/or other types of usage.
▶ Only use the device for its intended purpose.
▶ Observe the procedures described in these operating instructions.
Claims of any kind for damage arising as a result of non-intended use are excluded. The user is the sole bearer of the risk.
GB IE
Safety
This section provides you with important safety information regarding the handling of the device.
The device complies with statutory safety regulations. However, incorrect use can result in injury and material damage.
Basic safety instructions
For safe handling of the device, follow the safety information below:
■ Before use, check the device for visible external damage. Do not use a damaged device or one that has been dropped.
If the cables or connections are damaged, arrange for them to be exchanged by an authorised specialist or customer service.
■ Those who, due to their physical, intellectual or motor abilities, are incapable of using the device safely, may only use it whilst under the supervision or direction of a person responsible.
■ Only permit children to use the device when under supervision.
■ Only have repairs carried out by authorised specialist companies or customer service. Improper repairs can pose significant risks to the user. Warranty claims also become void.
■ Repairs to the device during the warranty period may only be carried out by a customer service department authorised by the manufacturer. Otherwise no additional warranty claims can be considered for subsequent damage.
■ Defective components may only be replaced with original replacement parts. Only by using original replacement parts can it be guaranteed that safety requirements are being complied with.
■ Protect the device from moisture and liquid penetration.
Traffi c safety

WARNING
Road traffic safety has the highest priority!
Observe the following safety instructions so as not to endanger yourself or others:
▶ Before starting your journey, familiarise yourself with how to use the device.
▶ Only use the device when the traffic situation allows it! Stop at a suitable place if you wish to perform major configurations.
▶ Only remove or insert the face plate when the vehicle is parked.
▶ Set the volume to a moderate level so that the acoustic sirens of police vehicles, fi re trucks and other emergency service vehicles can be heard in good time.
Package contents (see fold-out pages)

WARNING
Risk of suff ocation!
▶ Packaging material must not be used as a play thing since it poses a risk of suffocation.
The following components are included in delivery:
● Car Radio (including face plate)
● Installation bracket (attached)
● Fixture plate (including securing material)
- Keys for installation frame (2x)
- Case for face plate
● This operating manual
NOTE
▶ Check the contents for completeness and for signs of visible damage.
▶ If the contents are not complete or are damaged due to defective packaging or transportation, contact the service hotline (see warranty card).
Disposal of packaging
The packaging protects the device from damage caused during transit. The packaging materials are selected according to their environmental friendliness and disposal attributes - and are therefore recyclable.

Recirculation of packaging into the material flow saves on raw material and reduces the amount of waste generated. Dispose of packaging material no longer needed in line with applicable local regulations.
NOTE
If possible, keep the device's original packaging during the warranty period so that, in the event of a warranty claim, you can package the device properly for its return.
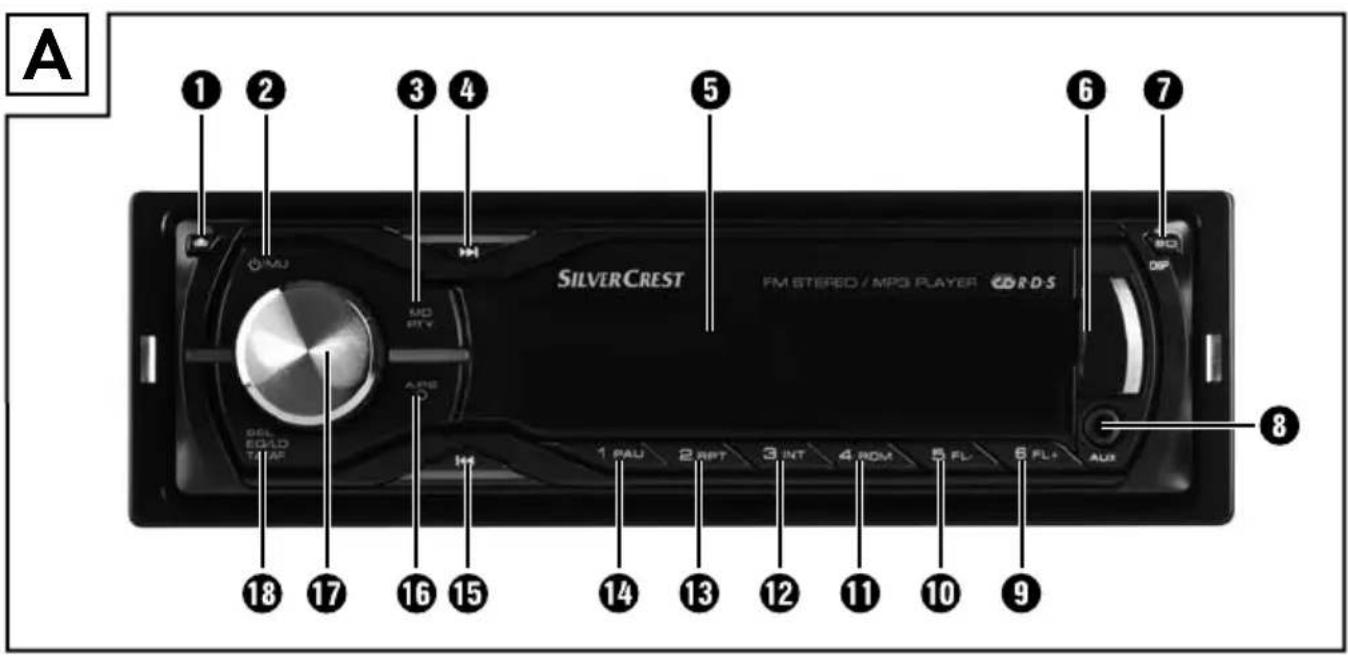
Controls
Car radio (see front fold out fl ap)
Figure A:
1 Button ↑: Unlocking the face plate
2 Button ⏻/MU: Switching the device on and off / turning the sound off (MUTE)
3 MD/PTY button: Setting the operating mode / setting the PTY function
4 Button ▶▶I: Title / Station search forwards
⑤ Display
6 USB port
7 BD/DISP: Select memory level FM 1-3 / showing display information
8 AUX: 3.5 mm stereo input socket for the connection of an external audio device
9 6/FL+ button: Station memory location 6 / directory forwards during MP3/WMA playback
10 5/FL-button: Station memory location 5 / directory backwards during MP3/WMA playback
11 4/RDM button: Station memory location 4 / random play during MP3/WMA playback
12 3/INT button: Station memory location 3 / intro function during MP3/WMA playback
13 2/RPT button: Station memory location 2 / repeat function during MP3/WMA playback
14 1/PAU button: Station memory location 1 / pause playback (Pause)
15 |◀◀: Title / Station search backwards
16 A/PS ☐: Automatic station memory / search function during MP3/WMA playback
17 Multi-controller: Turn to set values/volume
18 SEL (EQ/LD TA/AF) button: Call up Settings menu
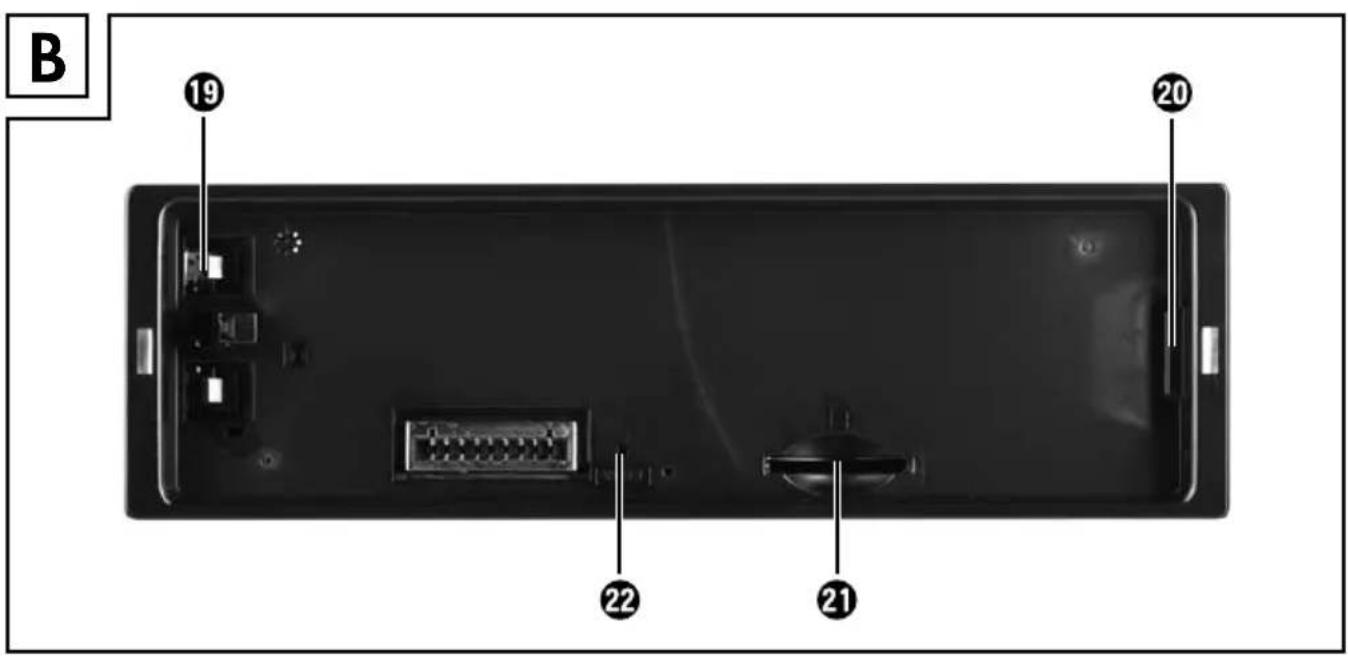
Figure B:
19 Locking the face plate
20 Holder for face plate
21 Card reader for SD/MMC cards
22 RESET: Resetting the device
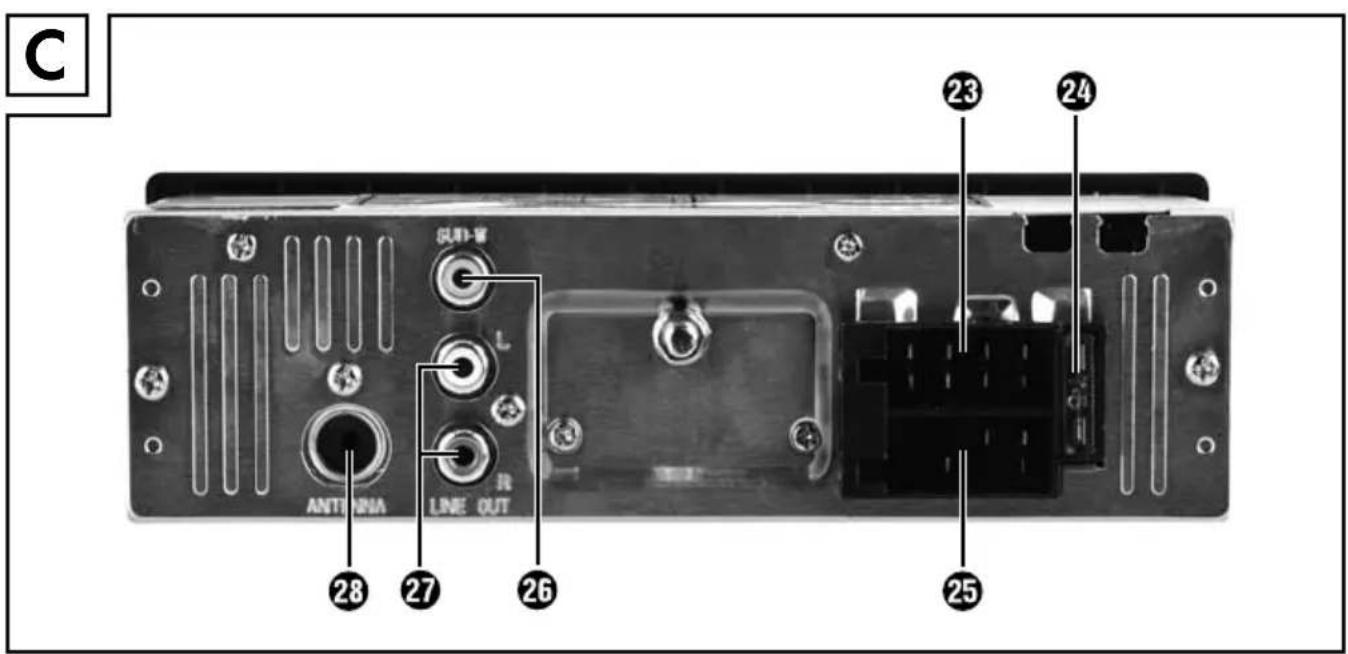
Figure C:
23 ISO block connection B
24 Automotive blade type fuse 7.5 A
25 ISO block connection A
26 SUBW: Audio cinch output for subwoofer
27 LINE OUT: Audio cinch output L/R for amplifi er
28 Antenna socket for DIN antenna plug
Accessories (see rear fold out fl ap)
Figure D:
29 Case for face plate
30 Installation bracket
31 Key for installation bracket
32 Anchoring plate (including securing material)
Installation

WARNING
Damage can be caused when installing the device!
▶ If possible, have the device installed by a qualified technician.
▶ If you wish to install the device yourself, follow the instructions for connection and installation for safe, fault-free use of the device. Incorrect installation can cause a fi re hazard!
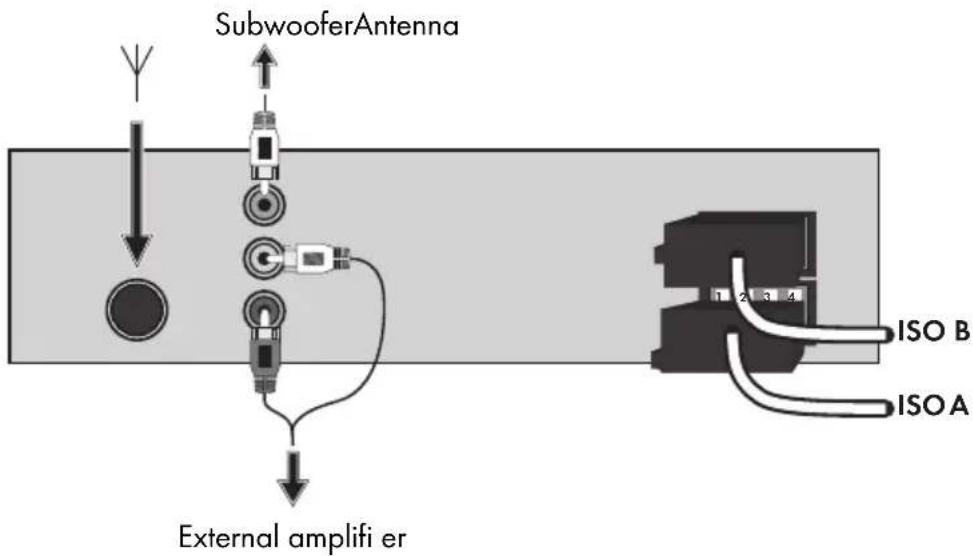
Connection
CAUTION
Using incorrect connections can cause damage to the device.
For installation, use the device's ISO connections. The vehicle-specific ISO adapters you may require can be sourced from a specialist workshop, from a local dealer or from a general store's technical department. Using other connector types voids the warranty.
Assignment of the ISO connections
The view of the plug connector is from behind.
| ISO A(power supplyassignment) | Assignment | ||
| 1 | Not used | ||
| 2 Not used | |||
| 3 Not used | |||
| 4 | Steady plus 12 V(terminal 30) | ||
| 5 Antenna power | |||
| 6 Not used | |||
| 7 | Ignition circuit positive 12 V(terminal 15) | ||
| 8 | Negative (-)ground (terminal 31) | ||
GB IE
 | ISO B (speaker connec-tion assignment) | Assignment |
| 1 Rear right + | ||
| 2 Rear right - | ||
| 3 Front right + | ||
| 4 Front right - | ||
| 5 Front left + | ||
| 6 Front left - | ||
| 7 Rear left + | ||
| 8 Rear left - |
To connect the device to two speakers, only use the cables for the front speakers.
NOTE
▶ Ensure that a steady plus connection is applied to the station memory of connector 4 in ISO Block A.
In some vehicle models, the default assignment of connectors [4] and [7] in ISO Block A are interchanged at the factory. If this is the case, the station memory can be lost. To remedy this, connectors 7 (Ignition positive) and 4 (Steady plus) in ISO Block A must be swapped.
Antenna control voltage connection
CAUTION
Possible damage to the device
▶ Never load the antenna control voltage with the motor power cable or other power consumers.
The connector for the antenna control voltage is available for a relay-controlled antenna. The relay then automatically extends the antenna out when the device is switched on. When switched off, the antenna retracts back in. This connector can also be used to control an external amplifier. For exact connector information, please consult the operating instructions for the amplifier.
Connection of an external amplifier
Use the LINE OUT 27 audio cinch output to connect an external amplifier. To do this, following the operating instructions for the external amplifier.
Connection of an external subwoofer
Use the orange SUBW 26 cinch output to connect an external subwoofer. To do this, follow the operating instructions for the external subwoofer.
Connection diagram
Installation
The device can be installed into any standard ISO mounting bay. In the event that your vehicle does not have an ISO mounting bay, contact your local specialist workshop, local dealer or the technical department of a general store.
NOTE
- Connect up the cables before finally installing the device. Ensure that it is plugged in properly and that the system works correctly.
Installation instructions
■ Install the device in the bay provided or select the installation location so that all buttons can be reached easily without the driver being impeded.
■ Only connect the device to a 12 V car battery that is installed properly.
■ Only connect up the device within the vehicle via the ISO plugs.
■ Install the device in such a way as to prevent heat build-up and so that the device is adequately ventilated.
GB IE
■ Do not install the device where it is subjected to high temperatures (i.e. direct sunlight or heating vents), heavy contamination or strong vibrations.
■ Should modifications to the vehicle be necessary, contact your vehicle dealer or specialist workshop.
Installing the device into the ISO bay
◆ Remove the installation bracket30 from the device housing. Use the 31 spanner supplied (see also chapter "Removing the device").
◆ Place the installation bracket into the ISO mounting bay.
Bend the tabs on the installation bracket with a screwdriver so that the bracket is fixed firmly into the mounting bay (see diagram).
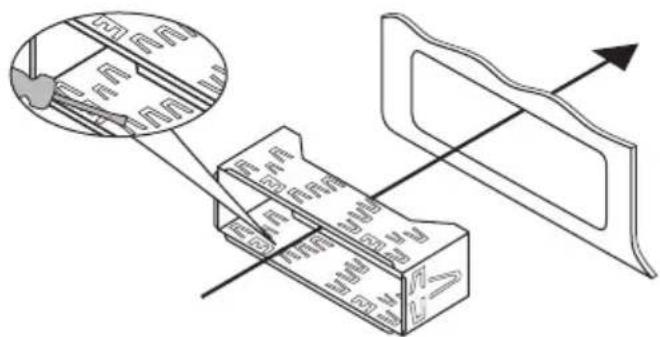
◆ Check to ensure the bracket is securely fixed.
◆ Connect the ISO socket block of the device to the two ISO plugs on your vehicle.
Connect the cable from the vehicle antenna to the antenna socket28 on the device. The vehicle-specific ISO adapters you may require can be sourced from a specialist workshop, from a local dealer or from a general store's technical department.
If required, connect the audio cinch cable of an external amplifier to the LINE OUT 27 socket on the device.
If required, connect the audio cinch cable of an external subwoofer to the orange SUBW 26 cinch socket on the device.
Protect your device against theft with additional measures as required. Attach the securing screw with the anchoring plate 32 and the securing material to the engine fi rewall of the vehicle.
CAUTION
Possible damage to the cable!
▶ To avoid damage, observe the position of the cables when sliding the device into the bay. There is a fi re hazard if cables are damaged!
◆ Carefully push the device into the installation bracket30 until it locks into place.
◆ After all the connections have been established, press the RESET22 button for about 6 seconds with a ballpoint pen or other sharp object.
◆ Attach the face plate as described under "Installing the face plate".
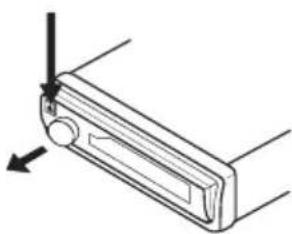
Removing the device
To remove the installed device, proceed as follows:
Insert the right and left keys31 into their respective slots on the sides of the device. Ensure that the elevations on the spanners are facing outwards (The tabs are now bent back).
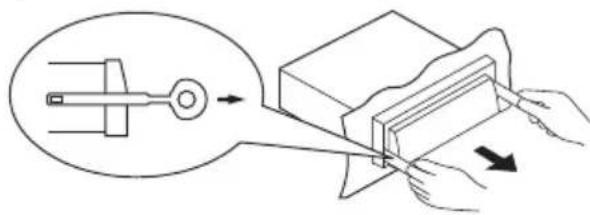
◆ Pull the device out.
Using the device
Face plate
You are able to remove the face plate from your device as an anti-theft measure. Do not keep the face plate in your vehicle after removal.
NOTE
▶ Always keep the face plate in its case 29 to protect it.
Inserting the face plate
- First, place the face plate with its right-hand side against the holder 20.
- Then press the left-hand side into the frame until the locking mechanism 19 engages.
Check to ensure that the face plate is fitted correctly and is securely connected to the main device. Not installing the face plate correctly can result in malfunctions when using the device.
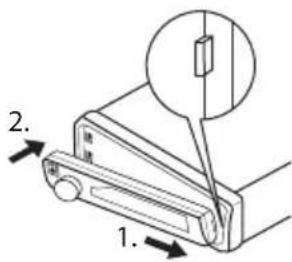
Removing the face plate
Press the ▲b1 on to unlock the face plate. The left-hand side of the face plate jumps forwards slightly.
◆ Remove the face plate by its left-hand side first, then by its right-hand side.
natural_image
Technical line drawing of a mechanical component with directional arrows (no text or symbols)Handling and use
This section provides you with important information on handling and using the device.
NOTE
If no setting is configured and/or no button pushed within about 5 seconds, the device returns to its previous operating mode. Settings changed are saved.
Switching on and off
◆ Press the ⏻MU ② button to switch the device on. The WELCOME display is shown.
To switch off, keep the ⏻/MU button pressed. The GOODBYE display is shown.
Settings
WARNING
Hearing damage as a result of too high a volume!
Setting the volume too high can result in permanent hearing damage.
▶ Set the volume to moderate levels only.
Volume
♦ Turn the multi-controller17 to set the volume.
Switching mute on / off
Press the ⏻/MU button briefly to turn the sound off. The MUTE ON message appears in the display.
Press the ⏻/MU button again to turn the sound on again. Muting is cancelled when receiving a PTY or TA station or if you change station or source.
Operating mode
◆ Press the MD/PTY 3 button to switch between radio reception (TUNER), card reader (CARD), USB port (USB) and audio input (AUX).
NOTE
The CARD and USB operating modes can only be enabled once the appropriate medium has been inserted.
Display
◆ Press and hold the BD/DISP⑦ button until the time (CT) is shown on the display ⑤. Now keep pressing the BD/DISP button to have the following information displayed in turn:
Radio station, time (automatically set with RDS reception), frequency and PTY settings (these RDS functions are sent by broadcasting services in various volumes; also refer to Section "Radio functions").
NOTE
▶ If you are not receiving any RDS or PTY information, PTY NONE is shown on the display.
▶ The radio switches back to standard operation after around 5 seconds without user input.
Radio reset (RESET)
To reset the device to its default factory settings, keep the RESET 22 button pressed for about 6 seconds with a sharp object, such as a pen.
NOTE
To access the RESET button, the face plate must be completely removed, see also Section "Removing the face plate".
Reset the device:
- when using for the first time,
• after connecting the cables, - when not all function buttons are working,
- when an error message is shown on the display,
- if there is an obvious malfunction in the device.
Settings using the SEL button (EQ/LD/TA/AF)
◆ Press the SEL18 button on the device. The current bass setting is shown. Each further press of the SEL button accesses the next setting.
The following settings are possible:
BAS - Bass (from -7 to +7)
TRE - Treble (from -7 to +7)
BAL - Balance (sound distribution between the right and left speakers), from OL to 9L and OR to 9R
FAD - Fader (sound distribution between the front and rear speakers), from 0F to 9F and 0R to 9R
VOL - Volume (from 0 to 20)
- Turn the multi-controller ^17 to change the settings of the menu item displayed.
Further settings using the SEL button (EQ/LD/TA/AF)
Hold down the SEL button for about 2 seconds and then keep pressing the SEL button until the required function is shown on the display.
◆ Turn the multi-controller to change the settings of the menu item displayed.
TA - Enabling / disabling Traffi c Announcement (traffi c information)
TA ON: If TA mode is enabled, the device immediately switches from other stations or operating modes to the radio station that is currently transmitting traffic information.
NOTE
When the TA function is enabled, you can only search for or save stations that are transmitting traffic information. Stations that are transmitting traffic information signals are denoted in the display by TP.
TA OFF: The TA function is disabled.
AF - Enabling / disabling Alternative Frequencies
AF ON: When the AF function is enabled, the device searches for the current station's optimum frequency.
AF OFF: The AF function is disabled.
EQ - Equaliser
Turn the multi-controller to select one of the FLAT, CLASSIC, ROCK, POP or EQ OFF settings. No equaliser is enabled if EQ OFF is set. The equaliser setting is shown at the bottom of the display.
SUBW - Subwoofer
You can connect an active external subwoofer to produce a more powerful bass effect.
- Turn the multi-controller ^17 to enable the bass effect (SUBW ON) or disable it (SUBW OFF).
AVOL - Set the volume when radio is switched on
◆ Turn the multi-controller to set the volume level used when the radio is turned on.
STEREO / MONO - Set the audio output
Turn the multi-controller to set the audio output in radio mode to stereo (STE-REO) or mono (MONO). If you are receiving a stereo station, the stereo symbol ① appears on the display.
LOUD - Enable / disable the loudness function
Turn the multi-controller to increase base or treble levels (LOUD ON) or to disable the function (LOUD OFF). When the loudness function is enabled, LOUD is shown on the right of the display.
Dx / LOCAL - Set reception sensitivity
- Turn the multi-controller to align the reception sensitivity to national stations (OX) or regional stations (LOCAL).
Please note that only stations with good reception quality will be played under the LOCAL setting.
CT - Set the time
NOTE
The device has an RDS-controlled clock. The clock sets itself automatically when the RDS function is enabled and continues to run when the radio is switched off. If you do not receive any RDS signal, you can set the time of day manually.
- Turn the multi-controller to the right to set the minutes and to the left to set the hours.
Adjust volume level for traffic c announcement transmission
HINWEIS
If a radio station with traffic announcements is being received, the volume level for traffic announcement transmission can be set by rotating the multi-controller.
The radio cannot be operated while you receive traffic announcements (display TRAFFIC). Only the „Volume“, „Mute“ and „Switch on/off“ functions can be selected.
Whilst you are receiving traffic announcements (TA + TP appear at bottom left of the display 5), rotate the multi-controller 17 clockwise or anticlockwise. TRVOL appears on the display, together with the current volume level setting.
Use the multi-controller to set the desired volume level. The setting is saved automatically after approx. 5 seconds.
Radio functions
Select memory level
◆ Press the BD/DISP7 button to switch between station memory bands (FM1, FM2, FM3).
Each station memory band covers the same frequency range (87.5 - 108 MHz) and has 6 memory locations. The memory level is not displayed if the station name is being displayed.
Automatic station search
◆ Keep the ▶▶14 or 1◀◀ 15 button pressed to start automatic station search. The search stops when a station is found.
Manual station selection
◆ Press the ▶▶I or I◀◀ button briefly to change the frequency in 0.05 MHz (FM) increments until the required frequency is set.
Storing radio stations
- Keep one of the 1 to 6 buttons pressed for about 2 seconds to store the station currently selected. The showing of numbers 1 to 6 on the display indicates a successful store.
Selecting stations stored
Use the BD/DISP button to select the memory level (FM1, FM2, FM3).
◆ Press one of the 1 to 6 buttons to select the station stored.
Automatic storing
◆ Keep the A/PS 16 button pressed for 3 seconds. After the channel search, the 6 saved stations are played successively for around 5 seconds, and at the same time the memory slot number blinks. The search continues automatically when weak stations are found.
Run through the stations stored
◆ Press the A/PS 16 button briefl y. All saved stations for the current memory level are played briefl y.
When you hear the required station, press the A/PS button. The station chosen remains selected.
Programme type (PTY)
You can use this function to search for a particular type of station. The following settings are available:
| POP M | SPORT | VARIED | OLDIES |
| ROCK M | EDUCATE | JAZZ | SOCIAL |
| NEWS | DRAMA | COUNTRY | PHONE IN |
| AFFAIRS | CLASSICS | WEATHER | FOLK M |
| INFO | OTHER M | FINANCE | TRAVEL |
| EASY M | CULTURE | CHILDREN | LEISURE |
| LIGHT M | SCIENCE | NATION M | DOCUMENT |
NOTE
▶ Please note that this information is dependent on region, broadcasting corporation and station.
Setting the PTY ID
♦ Keep pressing the MD/PTY3 button until the PTY message is shown at the bottom of the display.
Then press one of the 1 to 6 buttons to select the required PTY entry.
To change between the "Musical style" and "Vocal style" PTY entries, press the MD/PTY button briefly again when the first PTY entry is displayed.
Buttons 1 to 6 are assigned as follows:
| Button Musical genre Vocal style | |
| 1 POP M, ROCK M NEWS, AFFAIRS, INFO | |
| 2 EASY M, LIGHT M SPORT, EDUCATE, DRAMA | |
| 3 CLASSICS, OTHER M CULTURE, SCIENCE, VARIED | |
| 4 JAZZ, COUNTRY WEATHER, FINANCE, CHILDREN | |
| 5 NATION M, OLDIES SOCIAL, PHONE IN | |
| 6 FOLK M TRAVEL, LEISURE, DOCUMENT |
If there is no further input for 2 seconds, an automatic search for stations matching the PTY entry starts. The search stops when the first station is found. The selected PTY entry blinks in the display ⑤ during the channel search.
Disabling / enabling the PTY function
◆ Press the MD/PTY3 button to activate the PTY search.
The PTY symbol is shown on the display with the last PTY entry selected (e.g. POP N).
Only stations with the PTY ID currently selected are included in the station search.
Press the MD/PTY button again to disable the PTY search. PTY is no longer shown on the display.
Station search by PTY ID
If you do not input anything for 2 seconds whilst a PTY ID is being displayed, an automatic search for stations matching this PTY ID is started.
If no stations matching this PTY ID are found, PTY NONE is shown briefly and the search then ends at the station last set.
USB port
The device can process USB data carriers up to 16 GB.
Connecting data carriers
◆ Push the USB port protective cap to the right.
◆ Connect your USB device to the port.
◆ To protect against dirt, replace the protective cap on the USB port when no USB device is connected.
Card reader
The device can process SD/MMC memory cards up to 2 GB, and SDHC memory cards up to 32 GB.
Connecting data carriers
Press the ⬆ button to unlock the face plate and remove it from the device (see also Section "Removing the face plate").
◆ Push a memory card into the memory card slot with the lettering pointing upwards until it engages.
MP3 / WMA playback functions
Playback
■ The device can play back files in the MP3 and WMA formats.
■ A mixture of titles and directories on the same level can cause problems when playing back.
■ During playback, the information from the MP3 file ID3 tag is read and shown in turn on the display.
◆ Playback of the MP3 or WMA title on the USB device or memory card begins automatically.
Stop playback
◆ Press the 1/PAU14 button to stop playback. The current title play time blinks in the display 5.
◆ Press the 1/PAU button again to continue playback.
NOTE
- Keep the 1/PAU button pressed to play the first title on the storage medium.
Skip title
◆ Press the ▶▶1④ or 1◀◀ 15 button to select the next or previous title. The title number is shown on the display.
Fast forward/backward
◆ Hold down the ▶▶1 or 1◀◀ button for longer to start fast forward or backward.
Repeat function (RPT - Repeat)
◆ Press the RPT/213 button several times to switch between the repeat functions. The following settings are available:
- RPT ONE: The current title is repeated.
- RPT DIR: All titles in the current directory are repeated.
- RPT ALL: All titles on the storage medium are repeated.
If the RPT ONE or RPT DIR function is enabled, RPT is shown on the display.
Title sampling
◆ Press the 3/INT12 button. INT ON appears briefly on the display. All titles are played back one after the other for approximately 10 seconds.
Press the 3/INT button again to commence playback of the title currently selected. INT OFF appears briefly on the display.
Random playback of all titles (RDM - Random)
◆ Press the 4/RDM1 button. RDN ON appears briefly on the display. A randomly controlled playback is started.
◆ Press the 4/RDM button to commence normal playback again. ROR OFF appears briefly on the display.
Skip directory
◆ Press the 6/FL+9 button to skip to the next directory or the 5/FL-10 button to skip to the previous directory. Playback starts automatically.
Search functions
Title number search
◆ Press the A/PS 16 button.
◆ Turn the multi-controller ^17 to set the first digit of the title number required.
◆ Press the SEL18 button to confirm the entry and to skip to entry of the second, third or fourth digit.
◆ Press the 1/PAU14 button to commence playback of the selected title.
Title name search
Press the A/PS 📋 button twice. A-SEARCH is shown on the display. The search for title names starts immediately. If no title starting with the digit set is found, NONE is displayed.
◆ Turn the multi-controller until the desired character or digit appears.
◆ Press the ▶▶1④ or 1◀◀ 15 button to confirm the character set and to display all titles beginning with the required character.
◆ Press the 1/PAU button to commence playback of the title displayed.
Search for directories
◆ Press the A/PS 16 button three times. The directory currently being played back is shown.
◆ Turn the multi-controller17 to switch between the available directories.
◆ Press the 1/PAU14 button to select the directory currently being displayed. Playback of the first title from the selected directory starts immediately.
Connecting an external audio device to the device
Connect the audio output of an external audio device (e.g. an MP3 player) via a 3.5 mm stereo jack plug to the AUX 8 socket on the front panel of the device.
Select audio input playback by repeatedly pressing the MD/PTY 3 button until RUX is shown on the display.
Cleaning
Safety instructions
CAUTION
Possible damage to the device
▶ To avoid irreparable damage, ensure that no moisture penetrates into the device whilst it is being cleaned.
Cleaning the display
■ Only clean the front panel of the device / the display with a soft, moist, lint-free cloth and mild dish washing liquid.
Disposal
Disposal of the device

Never dispose of the device in your normal domestic waste. This product is subject to the provisions of European Directive 2012/19/EU-WEEE (Waste Electrical and Electronic Equipment).
Dispose of the device through an approved disposal centre or at your community waste facility. Please observe currently applicable regulations. Please contact your waste disposal centre should you be in any doubt.
This section contains important information on fault localisation and rectification.
Follow the instructions to avert hazards and damage.
Safety instructions
WARNING
Observe the following safety instructions to avert hazards and material damage:
▶ Repairs to electrical devices may only be carried out by specialists trained by the manufacturer. Improper repairs can represent considerable risk to users and can cause damage to the device.
Fault causes and rectifi cation
The following table can help with localising and rectifying minor faults:
Defect Possible cause Rectification
| The device will not switch on | The ignition is not switched on. Switch the ignition on by turning the key. | |
| The fuse is defective. Replace the fuse. | ||
| The volume is set to minimum. Increase the playback volume. | ||
| No sound | The cables are not connected correctly. | Check the cable connections. |
| The sound is turned off. | Press the /MU button to turn the sound back on. | |
| The Function buttons are not working | There is a fault with the device. | Press the RESET button. |
| The faceplate has not been mounted. | Check that the face plate is installed correctly. | |
| The radio and/or automatic station store function are/is not working | The antenna cable is not connected correctly. | Check the antenna cable for correct connection. |
| The station signals are too weak. | Set the station manually. | |
| The station memory is not working | Connector 4 in ISO Block A (steady plus) is not connected correctly. | Check the cable connections. Please refer to the "Connections" section. |
GB IE
| Defect Possible cause Rectifi cation | ||
| The device on the USB port is not working | The USB port is intended for devices working in accordance with the USB standard. Not all devices available on the marketplace conform to this standard. It is a possibility that a device not working in accordance with the USB standard is connected. | Connect a device that works in accordance with the USB standard. Check that the data carrier is formatted with the FAT32 fi le system. |
| The card reader cannot read the card | The card may be defective, dirty or not properly inserted. | Check the card. Slide it in with the lettered side pointing upwards. Check that the data carrier is formatted with the FAT32 fi le system. |
NOTE
▶ Please contact Customer Service (see warranty card) if you are unable to resolve the problem with any of the above actions.
Appendix
* The technical features of this device enable an adjustable frequency range of FM 87.5 - 108 MHz. In some countries, different national regulations may apply to the assigned radio frequency ranges. Please note that information received outside of the assigned radio frequency ranges may not be exploited, passed on to third parties or otherwise misused.
Technical details
| General | ||
| Input voltage 12 V DC | ||
| Input current max. 7.5 A | ||
| Rated power 4 x 7 W | ||
| Operating temperature +5 - +40 °C | ||
| Storage temperature | 0 - +50 | °C |
| Humidity (no condensation) | ≤75 | % |
| Dimensions (L x W x H): | 18.6 x 12.7 x 5.7 | cm |
| Weight including accessories | approx. 650 | g |
| Device fuseAutomotive blade type fuse | 7.5 | A |
| Radio frequency range* | ||
| Frequency FM (VHF) 87.5 - 108 MHz | ||
| Station memory locations FM (VHF) 18 locations | ||
| Audio input (AUX) | ||
| Stereo jack plug 3.5 mm | ||
| Audio output | ||
| 2 x cinch socket for external amplifi er (L/R)1 x cinch socket for external subwoofer | ||
| USB port | ||
| USB 1.1 and 2.0 compatible data carrier (to 16 GB) | ||
| Card slot | ||
| SD/MMC memory card connector (SD/MMC to 2 GB, SDHC to 32 GB) | ||
EC Declaration of Conformity information
This device satisfies the fundamental requirements and other relevant regulations of Vehicle Directive 2004/104/EC.
The full original Declaration of Conformity is available from the importer.
CE
Warranty
The warranty for this appliance is for 3 years from the date of purchase. The appliance has been manufactured with care and meticulously examined before delivery.
Please retain your receipt as proof of purchase. In the case of a warranty claim, please make contact by telephone with our Customer Service Department. Only in this way can a post-free despatch for your goods be assured.
NOTICE
The warranty covers only claims for material and manufacturing defects, but not for transport damage, wearing parts or for damage to fragile components, e.g. buttons or batteries.
This product is for domestic use only and is not intended for commercial use. The warranty is void in the case of abusive and improper handling, use of force and internal tampering not carried out by our authorised service branch.
Your statutory rights are not restricted in any way by this warranty. The warranty period is not extended by repairs made under the warranty. This applies also to replaced and repaired parts.
Damages and defects extant at the time of purchase must be reported immediately after unpacking, resp. no later than two days after the date of purchase.
Repairs made after the lapse of the warranty period are subject to charge.
Importer
KOMPERNASS HANDELS GMBH
BURGSTRASSE 21
44867 BOCHUM
GERMANY
www.kompernass.com
SILVER CREST®
Warranty
Car Radio
SAR 28 A1
Please contact the Service hotline to guarantee free repair. Ensure you have your sales receipt handy.
Sender, please write clearly:
Last name
First name
Street
Post code/Town
Country
Telephone
Date/Signature
Fault description:
GB Service Great Britain
Tel.: 0871 5000 720 (£ 0.10/Min.)
E-Mail: kompernass@lidl.co.uk
IAN 42775
IE Service Ireland
Tel.: 1890 930 034
(0,08 EUR/Min., (peak))
(0,06 EUR/Min., (off peak))
E-Mail: kompernass@lidl.ie
IAN 42775
Hotline availability:
Monday to Friday 08:00 - 20:00 (CET)
Indholdsfortegnelse
Introduktion 30
Forord....30
Ophavsret. 30
natural_image
Technical line drawing of a mechanical component with directional arrows indicating movement (no text or symbols)KOMPERNASS HANDELS GMBH
BURGSTRASSE 21
44867 BOCHUM
GERMANY
www.kompernass.com
SILVER CREST®
Garanti
Bilradio
SAR 28 A1
natural_image
Technical line drawing of a mechanical component with directional arrows indicating movement (no text or symbols)KOMPERNASS HANDELS GMBH
BURGSTRASSE 21
44867 BOCHUM
GERMANY
www.kompernass.com
SILVER CREST®
Autoradio
SAR 28 A1
natural_image
Technical line drawing of a mechanical component with directional arrows indicating movement (no text or symbols)KOMPERNASS HANDELS GMBH
BURGSTRASSE 21
44867 BOCHUM
GERMANY
www.kompernass.com
SILVER CREST®
Garantie
Autoradio
SAR 28 A1
natural_image
Technical line drawing of a mechanical component with directional arrows indicating movement (no text or symbols)KOMPERNASS HANDELS GMBH
BURGSTRASSE 21
44867 BOCHUM
GERMANY
www.kompernass.com
SILVERCREST®
Autoradio
SAR 28 A1
KOMPERNASS HANDELS GMBH
BURGSTRASSE 21
44867 BOCHUM
DEUTSCHLAND / GERMANY
www.kompernass.com
Last Information Update · Tilstand af information
Version des informations - Stand van de informatie
