
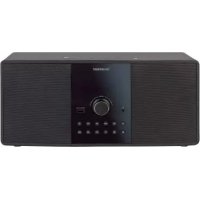
KH 2307 - Hi-Fi System SILVERCREST - Free user manual and instructions
Find the device manual for free KH 2307 SILVERCREST in PDF.

| Product type | Hi-Fi system |
| Brand | SILVERCREST |
| Model | KH 2307 |
| Rated voltage | 230 V~, 50 Hz |
| Power consumption | Standby: 3 W; Operation: 14 W |
| Radio frequency ranges | FM: 87.5 - 108 MHz; AM: 526.5 - 1606.5 kHz |
| Main unit dimensions | 25 x 18 x 6.2 cm (W x D x H) |
| Each speaker dimensions | 11 x 18 x 6.2 cm (W x D x H) |
| Main unit weight | Approx. 1008 g |
| Each speaker weight | Approx. 280 g |
| Output power | 2 x 1.2 W RMS |
| AUX input | 3.5 mm jack |
| Headphone output | 3.5 mm jack |
| CD laser | Class 1 |
| Operating temperature | 5 °C to 40 °C |
| Storage temperature | -20 °C to 60 °C |
| Protection class | II |
| Remote control batteries | 2 x 1.5 V (AAA, LR03) |
| Memory batteries | 2 x 1.5 V (AA, LR6) - not included |
| Main functions | FM/AM radio, CD audio and MP3 player, AUX input, timer (wake/sleep), repeat and shuffle playback, track programming |
| Cleaning | Unplug, wipe with a slightly damp cloth. Do not use solvents. |
| Important safety instructions | Do not open the housing, avoid moisture, unplug before cleaning, keep batteries out of reach of children. |
Frequently Asked Questions - KH 2307 SILVERCREST
User questions about KH 2307 SILVERCREST
0 question about this device. Answer the ones you know or ask your own.
Ask a new question about this device
Download the instructions for your Hi-Fi System in PDF format for free! Find your manual KH 2307 - SILVERCREST and take your electronic device back in hand. On this page are published all the documents necessary for the use of your device. KH 2307 by SILVERCREST.
USER MANUAL KH 2307 SILVERCREST
GB MINI SOUND SYSTEM
MT Operating instruction manual
| INDEX | PAGE |
| Intended Use | 26 |
| Items supplied | 26 |
| Technical data | 26 |
| Safety instructions | 26 |
| Positioning the device | 27 |
| The operating elements | 27 |
| Inserting the batteries | 28 |
| Becoming acquainted with the remote control | 28 |
| Connecting the components | 28 |
| Switching the device on and off | 28 |
| Setting the time | 28 |
| Selecting the programme source | 28 |
| Setting the sound volume levels | 28 |
| Using headphones | 28 |
| Operating the radio | 28 |
| Operating the CD player | 29 |
| MP3 functions | 30 |
| AUX operation | 31 |
| Timer operation | 31 |
| Cleaning and care | 31 |
| Troubleshooting | 31 |
| Disposal | 32 |
| CE Conformity | 32 |
| Importer | 32 |
| Important warranty information | 32 |
Read the operating instructions carefully before using the device for the first time and preserve this booklet for later reference. Pass this manual on to whoever might acquire the device at a future date.
Intended Use
This micro system is intended exclusively for the playback of audio CDs, MP3-CDs, CD-R, CD-RW, and for the playback of radio programmes. The micro system is not intended for use in commercial or industrial environments. No warranty claims will be granted for damage resulting from improper use!
Items supplied
1 Micro-system
2 Loudspeakers
1 Remote control (Inc. 2 batteries)
1 Operating instruction booklet
Technical data
| Rated voltage: | 230 V~, 50 Hz |
| Power consumption: | |
| in Standby: | 3 Watts |
| in Operation: | 14 Watts |
| Frequency range radio: | AM: 526.5 - 1606.5 kHzVHF (FM): 87.5 - 108 MHz |
| Measurements (W x H x D): | |
| Main device: | 25 x 18 x 6,2 cm |
| Each speaker: | 11 x 18 x 6,2 cm |
| Weight | |
| Main device: | 1008 g approx. |
| Each speaker: | 280 g approx. |
| Output power.: | 2 x 1.2 Watt RMS |
| AUX - Input | 3,5 mm Jackplug |
| Headphones output: | 3,5 mm Jackplug |
| Max. output voltageat the headphone socket: | 60 mV |
| CD Laser: | Laser class 1 |
| Operating temperature: | 5° - 40°C |
| Storage temperature : | -20° - 60°C |
| Protection class: | II ☑ |
| Batteries: | |
| Remote control: | 2 x 1,5 V, (AAA, LRO3) Micro |
| Battery backup: | 2 x 1,5 V, (AA, LR6) Mignon |
The technical details of the device allow for an adjustable frequency range of MW (AM) 525-1635 kHz, and/or FM (USW) 87,2-108,6 MHz. In some countries, different national regulations may apply to the assigned radio frequency ranges. Please note that information received outside of the assigned radio frequency ranges may not be used, passed on to third parties or otherwise misused.
Safety instructions
- Do not permit children to handle electrical devices without supervision, they cannot correctly assess the possible risks of injury.
- Unplug the power cord after every use and before cleaning, so as to prevent the device from switching on inadvertently.
- Check the device and all parts for visible damages. The safety concept can work only if the device is in a faultless condition.

Risk of explosion!
- Do not throw batteries into a fire.
- Do not recharge batteries.
- Never open batteries, never solder or weld batteries. The risk of explosions and injuries exists!
- Regularly check the condition of the batteries. Leaking batteries can cause damage to the remote control or to the device.
- If you do not intend to use the device for an extended period, remove the batteries.
- If the batteries have leaked put on protective gloves and clean the battery compartment and the battery contacts with a dry cloth.

Risk of electrical shocks.
- Connect the device to an electrical wall socket with a mains voltage of 230V / 50Hz .
- Do not operate the device if the connection cord or the power plug is damaged.
- The connection cord or device should be immediately repaired or exchanged by the customer service department if they fail to function faultlessly.
- Never submerge the device in water. Wipe it only with a slightly damp cloth.
- Do not expose the device to rain and never use it in a humid or wet environment.
- Make sure that the power cord does not become wet during operation.
- You must not open the device housing or attempt to repair the device yourself. There is invisible radiation inside the device (Class 1 Laser) Furthermore should you do so, the safety concept of the device may be compromised and the warranty becomes void.
- Do not place objects containing fluids, e.g. flower vases, on or near the device.
- Notice regarding power disconnection
- To completely disconnect the device from mains power, the plug MUST be removed from the power socket.
- For this reason the device should be placed in a position where unhindered access to the power socket is assured at all times, so that in an emergency the plug can be quickly removed. To eliminate the risk of fire you should completely disconnect the plug from the wall socket if the device is not going to be used for an extended period, for example, during holidays.
- Always take hold of the power cord by the plug. Do not pull on the cord itself and never touch the power cord with wet hands, this could result in either a short circuit or you receiving an electric shock. Do not place the device, furniture or anything else on the power cord and ensure that it does not become clamped. NEVER tie knots in the power cord and do not bind it with other cables. Place the power cord in a position where it cannot be trod on. A damaged power cord can cause a fire or an electrical shock. Check the power cord from time to time. Should it become damaged contact your nearest authorized customer service centre or dealer to have it replaced.

Risk of fire!
- Do not use the device near hot surfaces.
- Do not place the device in locations that are subject to direct sunlight or strong artificial light. Otherwise, it may overheat and become irreparably damaged.
- Never leave the device unattended while it is being used.
- Never cover the ventilation slots of the device while it is on.
- Do not place open fire sources, such as candles, on the device.
- When a storm and/or thunderstorm with the risk of lightening threatens please disconnect the device from the mains power.

Risk of personal injury!
- Keep the power cord and device away from children. Children frequently underestimate the dangers of electrical appliances.
- Provide a stable location for the device.
- Do not operate the device if it has sustained a fall or is damaged. Arrange for the device to be checked and, if necessary, repaired by qualified technicians.
- Keep batteries well away from children. Children can put batteries into their mouths and swallow them. If a battery is swallowed medical assistance must be sought immediately.
- This device is not intended for use by individuals (including children) with restricted physical, physiological or intellectual abilities or deficiencies in experience and/or knowledge unless they are supervised by a person responsible for their safety or receive from this person instruction in how the device is to be used. Children should be supervised to ensure that they do not play with the device.

Danger of eye injuries!
- The device is fitted with a "Class 1 Laser". Never open or attempt to repair the device yourself. The invisible laser beam could damage your eyes.

CAUTION!
Information on surge voltage (EFT / rapid electrical transition process) and Electrostatic discharge:
In the case of a malfunction due to rapid electrical transition (surge voltage) or electrostatic discharge the product must be reset (it may be necessary to disconnect the power source and then reconnect it) to restore normal operation.
Note: A case of electrostatic discharge occurs if one walks with plastic-soled shoes over a carpet that also contains elements of plastic. Through the friction of the shoe soles on the carpet a charge is created in the body which discharges itself as soon as one touches an electricity conducting object, such as for example a door knob or the bodywork of a motor vehicle. Thereby it is sufficient to approach the conductor to within only a few cm. Direct contact is not required to effect a discharge. The charge can also unload itself over an electrical arc. A discharge is thus also possible through plastic housing components.
Positioning the device
Remove the micro system and accessories from the packing.
Remove all transportation fasteners and tapes/foils.
Place the micro system on an even, level surface. Pull out the supports on the rear panel of the main device and on the speakers. Place the Micro system in a position that will allow the CD compartment cover to open completely.
Place the speakers to the right and left of the micro system.
You can also fasten the speakers to the device. For this pull the speaker holders on the right and left of the main device fully out (approx. 3.5mm ) and slide the right and left speakers with the guide rails onto the respective holder, until the underside of the speakers and main device lock together.
Alternatively you can secure the main device and/or the speakers to a wall by using the hangers ⑧ on the rear panel of the device and speakers. The spacers ④ on the rear panel of the speakers will provide the necessary stability.
The operating elements
On the device
1 Function switch
FM ST - FM MO - AM - Radio band switch
3 TUNING controller - tuning in of radio stations
Speaker fasteners
CD Compartment
6 PROG
7 REPEAT
8 REW
F.FWD
STOP
11
12 FOLDER UP
B REMOTE SENSOR
14 FM.ST
15 POWER
16 Display
VOL+
13 VOL-
19 AL. SET
20 POWER
2 HOUR / MIN
AL. ON/OFF
23 TIME SET
24 AUX

SPR
7 SPL
Suspension eyes for wall mounting
29 FM (USW) dipole antenna
Power cord
31 Battery compartment (Battery backup)
Device supports
Speaker
4 Spacer for wall mounting
Speaker cable
36 Guide rails for speaker fastening
On the remote control:
⑦ PLAY/PAUSE -CD playback start/stop
F.FWD -CD title skip forwards
PROG - for the storage of CD programmes
40 FOLDER UP - for folder selection in MP3-CD operation
REP./RAND -activates the repeat function and random playback
STOP -End CD playback
REW -CD title skip backwards
4 Battery compartment (rear panel)
Inserting the batteries
You can equip the micro system with 2 × 1,5V Type AA batteries so that in the event of a power failure the saved time and timer information will not be lost. The remote control requires 2 × 1,5V Type AAA batteries.
Batteries for the retention of data during a power failure are not supplied.
Open the battery compartment on the rear panel of the device 31 and on the underside of the remote control 46.
Insert the batteries, ensuring that you observe the polarity markings as indicated in the battery compartment.
Carefully close the corresponding battery compartment lid until it locks into place.
If the device no longer reacts reliably to the remote control signal, then the batteries are depleted. Change the batteries with fresh ones of the same type.
Becoming acquainted with the remote control
Point the remote control towards the device when you activate its buttons. The remote control functions at a distance of approx. 5m from the device and at an angle of at least 60^ . For transmission of the signal there must be no objects placed between the device and the remote control.
Connecting the components
Loudspeakers
Connect the speaker cable of the right speaker to the right speaker connection "SP R" 26 on the device.
Connect the speaker cable of the left speaker to the left speaker connection "SP L" ⑦ on the device.
Power supply
Connect the power plug of the power cord 30 to a properly connected 230V /50Hz power socket.
Switching the device on and off
To switch the device on move the function switch ① to the CD/MP3-, RADIO- or AUX position and press the POWER button ②. The Micro system is now operational and the red POWER indicator ⑤ as well as the blue background illumination of the display ⑥ light up.
To switch the device off either move the function switch ① to the BUZZ position or press the POWER button ②.
To disconnect the device from the mains power pull the power cord plug ⑤ 0 out of the mains socket.
Setting the time
Hold down the TIME SET 23 button while you enter, with the HOUR/MIN buttons 4, the current time in hours and minutes. For this you can either repeatedly press the HOUR/MIN button 4 or hold it down.
Ssequently release the TIME SET 23 button. The time of day is now saved and appears in the display even when the device is switched off.
Selecting the programme source
You can select between the following programme sources:
- CD/MP3 -Playback of audio CDs or MP3-CDs
- RADIO -Playback of radio stations
- AUX -Playback of a device connected to the AUX input 24
For this move the FUNCTION switch 1 to the desired position.
Setting the sound volume levels
To increase the volume, repeatedly press the VOL + button or hold the button down until the device has reached the desired volume level.
To decrease the volume, repeatedly press the VOL- 18 button or hold the button down until the device has reached the desired volume level.
Using headphones
You can connect headphones to the micro system with a 3.5mm jackplug (not supplied). The headphones socket is located on the left side of the micro system. When the headphones are connected, the loudspeakers are switched off and you will only hear sound via the headphones.
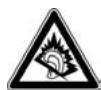
IMPORTANT! Listening to music with headphones over a long period of time and with full volume can result in loss of hearing!
Operating the radio
This device receives radio stations on the frequency bands, Ultra short wave (USW or engl. FM) and Medium wave (MW or engl. AM).
In order to receive a good USW reception with the micro system unwind the dipole antenna 29 on the rear panel of the device completely.
If the reception is insufficient change the position of the dipole antenna ②. Secure the dipole antenna ②, if necessary, with sticky tape.
The device has a built in ferrite antenna for reception of MW stations. When the MW reception is insufficient please turn the device in a more favourable direction.
To activate the radio function move the function switch ① to the "RADIO" position.
Now select with the Radio band switch ② the desired frequency band FM or AM depending on which band the station that you want to listen to is located. When the switch is in the FM ST. position the device only plays USW stations that transmit their programmes in stereo.
With the help of the TUNING controller 3 you can now select the station. For this turn the controller in a clockwise direction to select stations with a lower broadcast frequency than the one currently shown in the display 16.
Turn the TUNING controller 3 in a counter clockwise direction to select stations with a higher broadcast frequency than the one currently shown in the display 16.
If the device receives USW broadcasts in stereo the "FM. ST" indicator lights up.
If the stereo reception becomes noisy move the Radio band switch 2 to the FM MO position and thus switch to mono.
Operating the CD player
The device plays audio CDs (CD-A) and MP3-CDs. Both pressed and blank discs burnt on the computer of the format CD-R and CD-RW are supported. Because of the many different kinds of blank discs, computer types, operating systems, burning software and burning processes we are not able to guarantee that every "burnt" disc will playback faultlessly.
Inserting a CD
Move the function switch 1 to the CD/MP3 position.
To open the CD compartment carefully raise the cover at the location to the left of the OPEN/CLOSE indicator.
Place the CD with the marked side up pointing towards the arbor of the CD disc, into the CD compartment ⑤.
Press the CD lightly onto the arbor until it locks firmly into place.
To close the CD compartment ⑤ carefully lower the cover by hand.
The device will now read the CD. After which playback of the first title begins. The display 16 shows you, on the right next to the time of day, the number of the currently playing title as well as the playback symbol .
Playback stop/resume
During playback press the button II 1 on the device and/or the button PLAY/PAUSE 37 on the remote control to stop playback. When CD playback is stopped the playback symbol blinks in the display 16.
To resume playback press the button II 1 and/or PLAY/PAUSE again.
Starting playback
When the disc has been paused or stopped press the button II 1 on the device and/or the button PLAY/PAUSE on the remote control.
Next/previous title
To playback the next title from a CD press the button F.FWD 9 on the device and/or the F.FWD button 串 on the remote control.
To once more start playback of a CD title that has just played press once the button REW 1 on the device and/ or the REW button 3 on the remote control.
To playback the previous title of a CD briefly press twice successively the button REW 1 on the device and/or the REW button 3 on the remote control.
Search forward and backward
You can activate a search to find specific passages within a title.
For this, during playback, hold down the button F.FWD 9 and/or F.FWD (forwards) or the button REW and/ or REW (backwards) until the desired location in the title is reached.
Stopping the play function
Press the button STOP on the device and/or on the remote control.
The display now shows you, on the right next to the time of day, the total number of titles that are on the CD.
Removing the CD
To open the CD compartment ⑤ carefully raise the cover at the location to the left of the OPEN/CLOSE indicator.
Remove the CD.
To close the CD compartment ⑤ carefully lower the cover by hand.
To switch on the repeat and random functions.
With the repeat function you can repeat play individual titles or all the titles of a CD. The random function allows for playback of titles on the disc in random order.
To repeat an individual title, before or during playback, press the button REPEAT ⑦ on the device and/or REP./ RAND ④ on the remote control:
The display 16 shows "REP".
To repeat all the titles on a CD press twice the button REPEAT ① on the device and/or REP./RAND ④ on the remote control:
The display 16 shows "ALL REP".
To playback the titles on a CD in random order press three times the button REPEAT ⑦ on the device and/or REP./ RAND ④ on the remote control:
The display 16 shows "RAND".
To stop repeat and/or random playback press the button REPEAT ① on the device and/or REP./RAND ④ on the remote control repeatedly until the indicator REP / ALL / RAND disappears.
Programming the playing order
You can programme an order in which the titles of a CD are to be played. 20 program positions are available for this purpose. Programming is only possible when playback is stopped.
Press the button PROG 6 on the device and/or on the remote control 39.
In the display ⑥ blinks the programme position 1 (P0 1) of the title, which will be the first title played when programme playback begins. The PROG indicator also blinks in the display ⑥. If you do not make an entry within a minute the device again exits from the Programme-Mode.
Select with the REW F.FWD buttons on the device and/or REW/F.FWD on the remote control the desired title for the indicated programme position. In place of the programme position indicator the display now shows the CD titles available for selection.
To save the selected title press the button PROG 6 and/or 39.
To programme further titles, repeat the previously described steps.
Starting the programmed title list.
Once you have programmed all desired titles you can start playback by pressing the button on the device and/or PLAY/PAUSE on the remote control.
If you press the STOP button 10 on the device and/or or 42 on the remote control you will stop playback, however the device remains in the programme mode.
If you press the STOP button ⑩ on the device and/or ④ on the remote control twice you will clear the programme and the device exits the programme mode.
You will also clear the programme if you open the CD compartment ⑤, switch to another programme source or switch off the micro system. Then the PROG indicator goes out.
MP3 functions
"MP3" denotes a process and/or format developed by the Fraunhofer Institute for the compression of audio data. In the MP3 format compressed music pieces are only a fraction of their original size, which, for example, on CD-Rs/CD-RWs allows for storage of a considerably greater volume of music than on commercially available audio CDs, on which audio data is stored in the CDA format. Indeed the audio quality is scarcely reduced by the process.
Playing MP3 titles
Place a CD with MP3 files into the CD compartment 5.
Move the function switch 1 to the CD/MP3 position.
The device will now read the MP3-CD. After which playback of the first title begins. The display ⑥ shows you, on the right next to the time of day, the number of the currently playing title, the MP3 indicator as well as the playback symbol ▷.
Playback stop/resume
During playback press the button II 1 on the device and/or the button PLAY/PAUSE 7 on the remote control to stop playback. When MP3-CD playback is stopped the playback symbol blinks in the display 16.
To resume playback press the button II 1 and/or PLAY/PAUSE again.
Starting playback
When the MP3-CD has been paused or stopped press the button II 1 on the device and/or the button PLAY/PAUSE 37 on the remote control.
When the MP3-CD contains several folders proceed as follows:
To select a folder before the start of playback press, if necessary, several times the button FOLDER UP ⑫ on the device or on the remote control ⑩.
In the display is shown the folder number and to the left of it you will see the "ALB" indicator (= Album). The root directory will be treated by the device as folder "001".
Within aprox. 3 seconds press the button II on the device and/or PLAY/PAUSE on the remote control to begin playback of the files in this folder. If the time elapses the display returns to the indicator for the total title count. After the files from this folder have played back the device switches to the next alphabetical folder.
Press once the button FOLDER UP 12 on the device or on the remote control 40 and for approx. 3 seconds the indicator of the current folder number will blink.
Press during playback several times the button FOLDER UP ⑫ on the device or on the remote control ⑩ and playback will instantly switch to the first title of the selected folder.
Stopping the play function
Press the button STOP on the device and/or on the remote control.
The display now shows you, on the right next to the time of day, the total number of titles that are on the MP3-CD.
Next/previous title
To playback the next title from a MP3-CD press the button F.FWD 9 on the device and/or the F.FWD button ^出 on the remote control.
To start playback once more of a MP3-CD title that has just played press once the button REW on the device and/or the REW button on the remote control.
To playback the previous title of a CD briefly press twice successively the button REW on the device and/or the REW button on the remote control.
Search forward and backward
You can activate a search to find specific passages within an MP3 title.
For this, during playback, hold down the button F.FWD 9 and/or F.FWD (forwards) or the button REW and/or REW (backwards) until the desired location in the title is reached.
Programming the playing order
You can programme an order in which the titles of a CD are to be played. 20 program positions are available for this purpose. Programming is only possible when playback is stopped.
Press the button PROG 6 on the device and/or on the remote control 39.
In the display 16 blinks the programme position 1 (P0 1) of the title, which will be the first title played when programme playback begins. The PROG indicator also blinks in the display 16. If you do not make an entry within a minute the device again exits from the Programme-Mode.
Select with the REW F.FWD buttons 8/9 on the device and/or REW/F.FWD 13/33 on the remote control the desired title for the indicated programme position. In place of the programme position indicator the display 16 now shows the CD titles available for selection.
To access a title in another folder on the MP3-CD keep pressing the FOLDER UP button on the device 12 and/or on the remote control 40 until the display 16 shows the desired folder number.
Press the PROG button 6 and/or 9 to confirm the folder selection. Then select the desired title in the folder.
To save the selected title press the button PROG 6 and/or 9.
To programme further titles, repeat the previously described steps.
Starting the programmed title list.
Once you have programmed all desired titles you can start playback by pressing the button on the device and/or PLAY/PAUSE on the remote control.
If you press the STOP button ⑩ on the device and/or ④2 on the remote control you will stop playback, however the device remains in the programme mode.
If you press the STOP button 10 on the device and/or or 42 on the remote control twice you will clear the programme and the device exits the programme mode.
You will also clear the programme if you open the CD compartment 5, switch to another programme source or switch off the micro system. Then the PROG indicator goes out.
To switch on the MP3 repeat and random functions. With the repeat function you can repeat playback individual MP3 titles, the contents of a folder or all the titles on an MP3-CD. The random function allows for playback of titles on the disc in random order.
To repeat an individual title, before or during playback, press the button REPEAT ⑦ on the device and/or REP./ RAND ④ on the remote control: The display ⑥ shows "REP".
To repeat all titles in a folder on the MP3-CD press twice the button REPEAT 7 on the device and/or REP./RAND 41 on the remote control: The display 16 shows "REP" and the folder number blinks.
Select with the FOLDER UP button on the device 12 and/or on the remote control 40 the desired folder.
The display 16 shows, alternating with the title number, the number of the folder from which is currently being played back (i.e. F02 for folder 2 in alphabetical order).
To repeat all the titles on a CD press three times the button REPEAT ① on the device and/or REP./RAND ① on the remote control: The display ⑥ shows "ALL REP".
To playback the title of an MP3-CD folder accessed in random order press four times the button REPEAT ⑦ on the device and/or REP./RAND ④ on the remote control: The display ⑥ shows "RAND".
To stop repeat and/or random playback press the button REPEAT ⑦ on the device and/or REP./RAND ① on the remote control repeatedly until the indicator REP / ALL / RAND disappears.
AUX operation
With the device you can playback audio signals from another suitable device (MP3 player etc.).
For this connect the audio output of the other device via a cable with a 3.5mm jack plug (not supplied) to the AUX SOCKET of the micro system.
Move the function switch ① to the AUX setting.
Begin playback of the other device.
Timer operation
You can set the device to switch on or off automatically at a determined time of day. First make sure that the time of day has been correctly set.
Automatic switch on
Hold down the button AL. SET 19 while you enter, with the HOUR/MIN button 21, the hour and minutes of the desired switch on time. For this you can either repeatedly press the HOUR/MIN button 21 or hold it down.
Subsequently release the button AL. SET 9. The switch on time is now saved.
Press the AL. ON/OFF button ② to activate the automatic switch on. In the display ⑥ the bell symbol appears.
Select with the function switch ① the device function that
the device should operate on when switched on. If the device is to issue signal tones at the entered time select "BUZZ".
Set the desired volume.
Press the POWER button 20 to switch the device off. The device will switch itself on at the entered time.
If you have selected the signal tone function press the AL. ON/OFF button 2 to deactivate the device after the automatic switch on. If you had selected the radio or CD function press the POWER button 20 to deactivate the device after the automatic switch on. The switch on time remains, however saved and will again switch on the device on the following day.
To deactivate the automatic switch on press the AL. ON/OFF button ②. The bell symbol extinguishes.
Automatic switch off
Switch the device on and select the desired function.
Hold down the button AL. SET 19 while you enter, with the HOUR/MIN button 21, the hour and minutes of the desired switch off time. For this you can either repeatedly press the HOUR/MIN button 21 or hold it down.
Subsequently release the button AL. SET 19. The switch off time is now saved.
Press the AL. ON/OFF button 2 to activate the automatic switch off. In the display 16 the bell symbol appears. To again deactivate this function press the AL. ON/OFF button 2 once more. The bell symbol extinguishes.
The device will switch itself off at the entered time.
At any time hold down the AL. SET 19 to allow the display 16 to show the current switch on and off times.
Cleaning and care
Risk of potentially fatal electrical shock:
- Never open the device housing. There are no user-serviceable elements inside.
- Never submerge the device or its components in water or other fluids!
- Do not allow any liquids to penetrate the housing.
Cleaning the housing:
Remove the power plug from the power socket beforehand.
Clean the housing surface with a slightly damp cloth Never use petrol, solvents or detergents that can damage plastics!
Cleaning the CD-Laser
- Clean the laser at regular intervals.
- To clean the laser you should use a commercial cleaning CD.
Troubleshooting
No or poor radio reception
When the MW reception is insufficient check to see if the device is optimally aimed and/or with insufficient USW reception whether the USW dipole antenna 29 is unwound and optimally aimed.
With noisy USW stereo reception switch to the mono position (FM MO position) with the Radio band switch 2.
The device is not providing any sound
Is the plug of the power cord ⑥0 inserted firmly into the power socket?
Is there a plug inserted into the headphones output? This will switch off the speaker.
Disposal
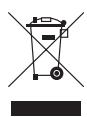
Do not dispose of the device in your normal domestic waste. This product is subject to the provisions of European Directive 2002/96/EC.
Micro system and speakers
- Have the micro-system or parts of it disposed of by a professional disposal company of by your communal disposal facility.
- Observe the currently applicable regulations. In case of doubt contact your disposal facility.
Batteries/rechargeable batteries
- Used batteries/rechargeable batteries may not be disposed of in household waste.
- Batteries can contain poisons which are damaging to the environment. Therefore, dispose of the batteries/rechargeable batteries in accordance with statutory regulations.
- Every consumer is legally obliged to surrender batteries/ rechargeable batteries to a community collection centre in their district or to a dealer. The purpose of this obligation is to ensure that batteries are disposed of in a non-polluting manner.
- Only dispose of batteries when they are fully discharged.

Dispose of packaging materials in an environmentally responsible manner.
CE Conformity
This device has been both examined and approved in regard to conformity with the fundamental requirements and other relevant regulations of the EMC Directive 2004/108/EC and the low voltage directive LVD 2006/95/EC.
Importer
KOMPERNASS GMBH
BURGSTRASSE 21
44867 BOCHUM, GERMANY
www.kompernass.com
Important warranty information
A 3-year warranty applies to this device, starting from the date of purchase. Should you, in spite of our high quality standards, have reasons for complaint please contact our Service Hotline.
In the event that processing of your complaint
is not possible by telephone here you will receive
- a processing number (RMA number) as well as
- an address to which you can send your device for repair under warranty.
In the case of a mail-in shipment please enclose a copy of the purchase receipt (sales slip). The device must be securely packed and the RMA number clearly visible. Products received without the RMA number cannot be processed.
Note: The warranty provisions cover only material or factory defects.
The warranty does not apply
to parts subject to wear and tear
- for damage to breakable parts, such as switches or rechargeable batteries.
This product is for private use only and is not intended for commercial applications. The warranty is void in the case of abusive and improper handling, use of force and internal tampering not carried out by our authorized service branch. Your statutory warranty claims are not restricted by this warranty.
GB DES Ltd
Tel.: 0870/787-6177
Fax: 0870/787-6168
e-mail: support.uk@kompernass.com
IE Kompernass Service Ireland
Tel: 1850 930 412 (0,082 EUR/Min.)
Standard call rates apply. Mobile operators may vary.
e-mail: support.ie@kompernass.com
- Intended Use
- Items supplied
- Technical data
- Safety instructions
- Risk of explosion!
- Risk of electrical shocks.
- Risk of fire!
- Risk of personal injury!
- Danger of eye injuries!
- CAUTION!
- Information on surge voltage (EFT / rapid electrical transition process) and Electrostatic discharge:
- Positioning the device
- The operating elements
- On the device
- On the remote control:
- Inserting the batteries
- Becoming acquainted with the remote control
- Connecting the components
- Loudspeakers
- Power supply
- Switching the device on and off
- Setting the time
- Selecting the programme source
- Setting the sound volume levels
- Using headphones
- Operating the radio
- Operating the CD player
- Inserting a CD
- Playback stop/resume
- Starting playback
- Next/previous title
- Search forward and backward
- Stopping the play function
- Removing the CD
- To switch on the repeat and random functions.
- Programming the playing order
- Starting the programmed title list.
- MP3 functions
- Playing MP3 titles
- AUX operation
- Timer operation
- Automatic switch on
- Automatic switch off
- Cleaning and care
- Risk of potentially fatal electrical shock:
- Cleaning the housing:
- Cleaning the CD-Laser
- Troubleshooting
- No or poor radio reception
- The device is not providing any sound
- Disposal
- Do not dispose of the device in your normal domestic waste. This product is subject to the provisions of European Directive 2002/96/EC.
- Micro system and speakers
- Batteries/rechargeable batteries
- CE Conformity
- Importer
- Important warranty information
- GB DES Ltd
- IE Kompernass Service Ireland
Brand : SILVERCREST
Model : KH 2307
Category : Hi-Fi System