
KC-930EU - Air purifier SHARP - Free user manual and instructions
Find the device manual for free KC-930EU SHARP in PDF.
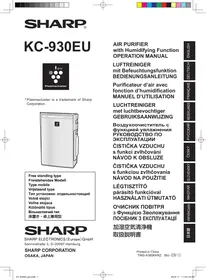



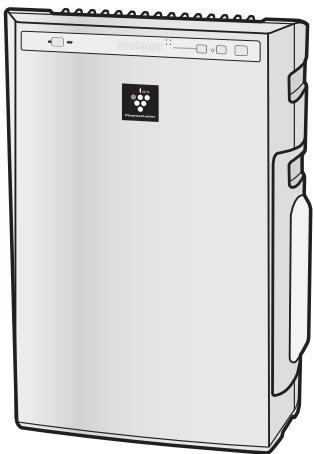
| Product type | Air purifier with humidification |
| Brand | SHARP |
| Model | KC-930EU |
| Dimensions (W x D x H) | 375 x 205 x 535 mm |
| Weight | 6.1 kg |
| Power supply | 220-240 V, 50/60 Hz |
| Power consumption (max/medium/low) | 27 W / 13 W / 4.5 W |
| Water tank capacity | 2.1 L |
| Airflow (max/medium/low) | 180 / 126 / 60 m³/h |
| Humidification (max/medium/low) | 350 / 250 / 140 ml/h |
| Purification technology | Plasmacluster Ion |
| Main filter type | HEPA filter (class H10) + deodorizing filter (activated carbon) |
| Humidification filter | Model FZ-Y30MFE |
| Sensors | Odor sensor |
| Operating modes | Auto, Low, Medium, Max |
| Cable length | 2.0 m |
| Recommended area (purification) | ~21 m² |
| Recommended area (Plasmacluster high density) | ~17 m² |
| Routine maintenance | Clean rear panel and sensors every 2 months; humidification tray every month |
| Filter replacement | HEPA/deodorizing filter: approximately 2 years; humidification filter: approximately 1 year |
| Spare parts | Collection/deodorizing filter FZ-Y30SFE; humidification filter FZ-Y30MFE |
Frequently Asked Questions - KC-930EU SHARP
User questions about KC-930EU SHARP
0 question about this device. Answer the ones you know or ask your own.
Ask a new question about this device
Download the instructions for your Air purifier in PDF format for free! Find your manual KC-930EU - SHARP and take your electronic device back in hand. On this page are published all the documents necessary for the use of your device. KC-930EU by SHARP.
USER MANUAL KC-930EU SHARP
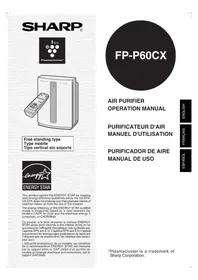
Plasmacluster is a trademark of Sharp Corporation.
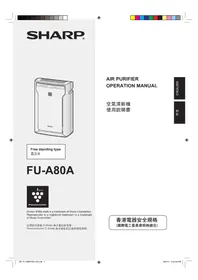
Free standing type
AIR PURIFIER with Humidifying Function OPERATION MANUAL
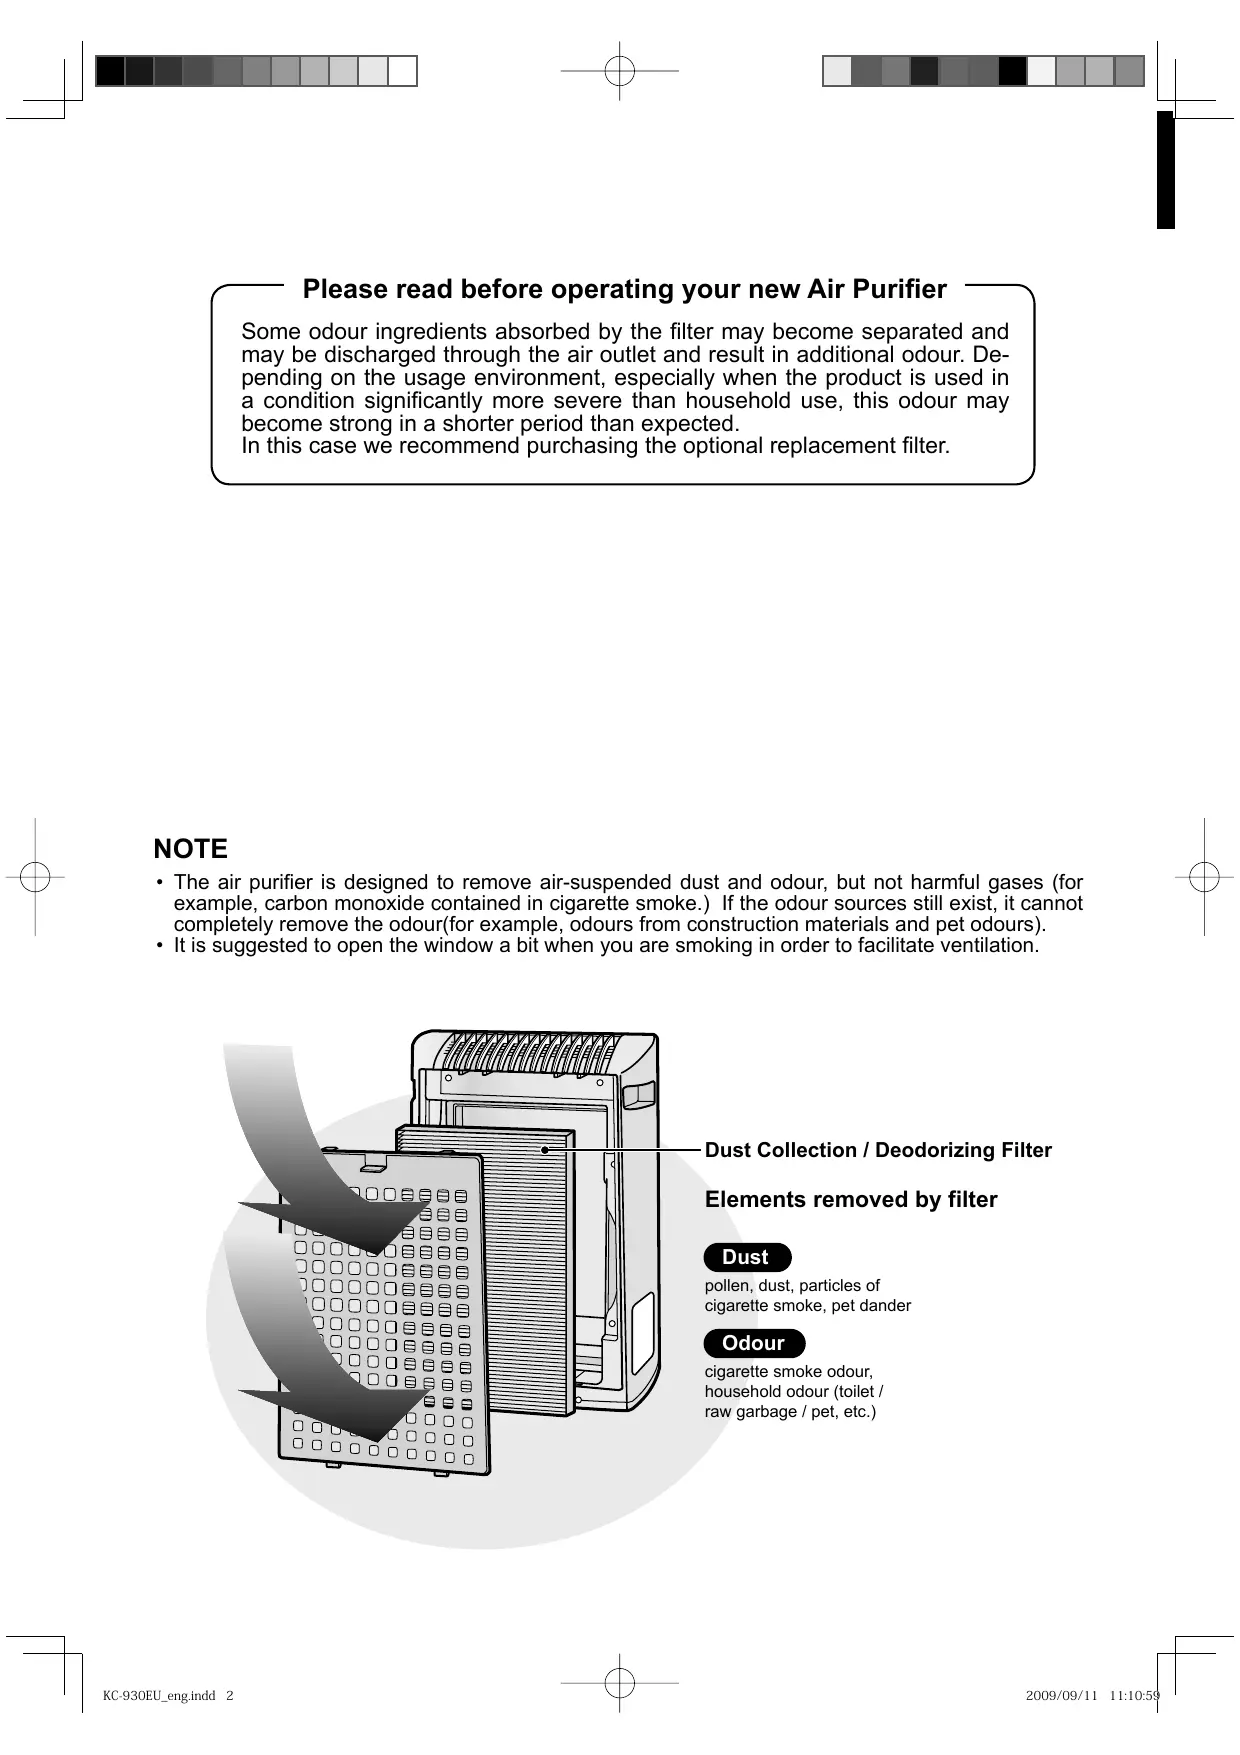
Please read before operating your new Air Purifier
Some odour ingredients absorbed by the filter may become separated and may be discharged through the air outlet and result in additional odour. Depending on the usage environment, especially when the product is used in a condition significantly more severe than household use, this odour may become strong in a shorter period than expected.
In this case we recommend purchasing the optional replacement filter.
NOTE
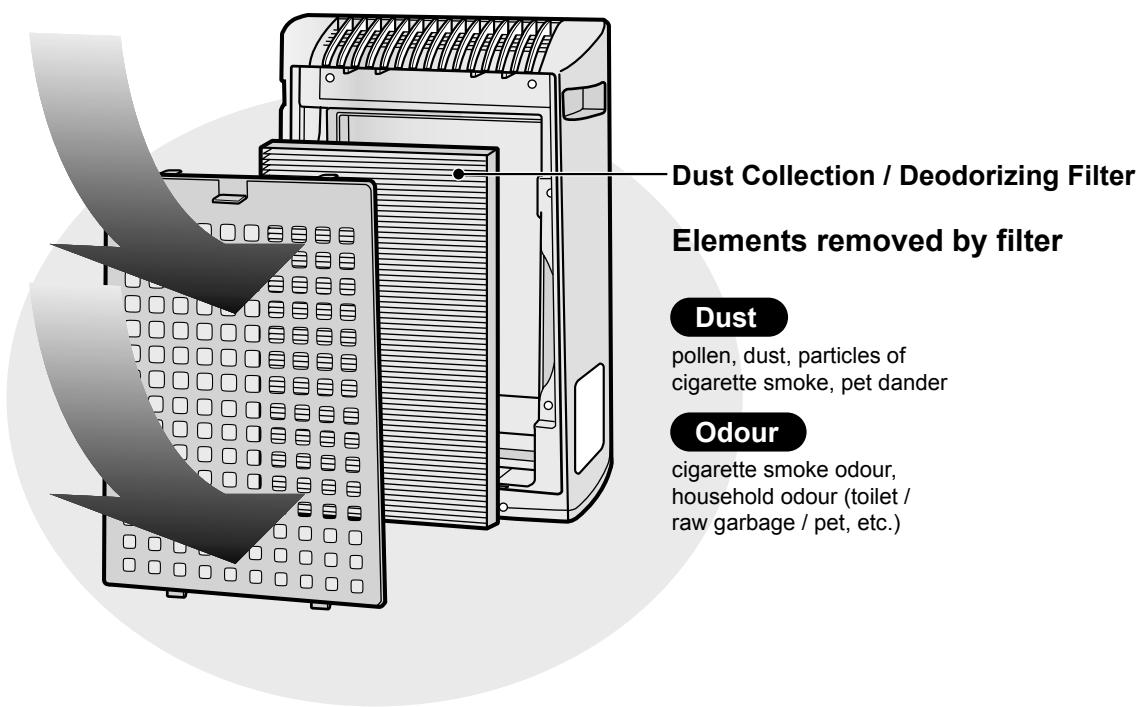
- The air purifier is designed to remove air-suspended dust and odour, but not harmful gases (for example, carbon monoxide contained in cigarette smoke.) If the odour sources still exist, it cannot completely remove the odour (for example, odours from construction materials and pet odours). It is suggested to open the window a bit when you are smoking in order to facilitate ventilation.
FEATURES
"Plasmacluster" technology
Plasmacluster technology uses plasma discharge to produce and release the same positive and negative ions as those found in nature ("Plasmacluster ions").
This is a unique air cleaning technology of the SHARP CORPORATION for breaking down and inactivating such potential allergens as the faecal matter or corpses of aerial mites, viruses, and mold and bacteria suspended in the air, and has been substantiated by third-party organizations both in Japan and overseas.
When there is a high density of Plasmacluster ions in the air, the smell of cigarette smoke trapped in curtains or sofas is removed in about 80 minutes, and when clothing is hung in a place exposed to the direct air expelled from the unit generating Plasmacluster ions, the smell of sweat is reduced to a virtually imperceptible level in one night (about 6 hours).
1 Graduate School of Advanced Sciences of Matter, Hiroshima University, Japan Measurement of action on the potential allergens of aerial mites in (13 m²) 2 Retroscreen Virology, Ltd., London, UK Measurement of ratio of viruses eliminated from the air in a 1 m³ box 3 Ishikawa Health Service Association, Japan Measurement of aerial mold and bacteria with an air sampler (13 m²) 4 Japan Spinners Inspecting Foundation, Japan Evaluation of deodorizing effect on odor-imbued fragments of cloth
CONTENTS
IMPORTANT SAFETY INSTRUCTIONS
- WARNING
- CAUTIONS CONCERNING OPERATION
- INSTALLATION GUIDELINES
- FILTER GUIDELINES
PART NAMES
- MAIN UNIT DISPLAY AND ILLUSTRATIVE DIAGRAM
- INCLUDED
- BACK
PREPARATION
- FILTER INSTALLATION
- REFILLING THE WATER TANK
OPERATION
Thank you for purchasing the SHARP Air Purifier. Please read this manual carefully for the correct usage information. Before using this product, be sure to read the section: "Important Safety Instructions."
After reading this manual, retain it in a convenient location for future reference.
When using electrical appliances, basic safety precautions should be followed, including the following:
WARNING - To reduce the risk of electrical shock, fire or injury to persons:
- Read all instructions before using the unit.
- Use only a 220-240 volt outlet.
- Do not use the unit if the power cord or plug is damaged or the connection to the wall outlet is loosened. Periodically remove dust from the power plug.
- Do not insert fingers or foreign objects into the intake or air outlet.
- When removing the power plug, always hold the plug and never pull the cord.
Electrical shock and/or fire from short circuit may occur as a result.
- Do not remove the plug when your hands are wet.
- Do not use this unit near gas appliances or fireplaces.
- Remove the power plug from the wall outlet before cleaning the unit and when not using the unit.
Electrical shock from bad insulation and/or fire from short circuit may occur as a result.
- When refilling the Water Tank, cleaning the unit, or when the unit is not in use, be sure to unplug the unit. Electrical shock and/or fire from a short circuit may result.
- If the power cord is damaged, it must be replaced by the manufacturer, its service agent, Sharp Authorised Service Centre or similarly qualified person in order to avoid a hazard.
- Do not operate when using aerosol insecticides or in rooms where there is oily residue, incense, sparks from lit cigarettes, chemical fumes in the air or in very high humidity conditions, such as a bathroom.
- Be cautious when cleaning the unit. Corrosive cleansers may damage the exterior.
- Only Sharp Authorised Service Centre should service this air purifier. Contact the nearest Service Centre for any problems, adjustments, or repairs.
- When carrying the unit, remove the Water Tank and Humidifying Tray first and hold the unit by handles on both sides.
- Do not drink the water in the Humidifying Tray or Water Tank.
- Change the water in the Water Tank daily with fresh tap water and regularly clean the Water Tank and Humidifying Tray. (See E-11 and E-12). When unit is not in use, dispose of the water in the Water Tank and Humidifying Tray. Leaving water in the Water Tank and/or Humidifying Tray may result in mold, bacteria, and bad odours.
In rare cases, this bacteria may cause harmful physical effects.
- This appliance is not intended for use by persons (including children) with reduced physical, sensory or mental capabilities, or lack of experience and knowledge, unless they have been given supervision or instruction concerning use of the appliance by a person responsible for their safety.
Children should be supervised to ensure they do not play with the appliance.
NOTE - Radio or TV Interference
If this air purifier should cause interference to radio or television reception, try to correct the interference by one or more of the following measures:
- Reorient or relocate the receiving antenna.
- Increase the separation between the unit and radio/TV receiver.
- Connect the equipment into an outlet on a circuit different from that to which the receiver is connected.
- Consult the dealer or an experienced radio/TV technician for help.
CAUTIONS CONCERNING OPERATION
- Do not block the intake and/or air outlet.
- Do not use the unit near or on hot objects, such as stoves or heaters, or where it may come into contact with steam.
- Always operate the unit in an upright position.
- Always hold the handle on both sides of the unit when moving it.
Holding the back panel when carrying may cause it to detach, thus dropping the unit and resulting in bodily injury.
- Do not operate the unit without the filters, Water Tank, and Humidifying Tray properly installed.
- Do not wash and reuse the filter.
Not only does it not improve filter performance, it may cause electrical shock or malfunction.
- Clean the exterior with a soft cloth only.
Do not use volatile fluids and/or detergents.
The unit surface may be damaged or cracked.
In addition, the sensors may malfunction as a result.
INSTALLATION GUIDELINES
- During the operation of the product, please place the unit at least 2 m away from equipment utilizing electrical waves such as televisions, radios, or wave clocks.
- Avoid use in locations where furniture, fabrics, or other items may come in contact with and restrict the air intake and/or air outlet.
- Avoid use in locations where the unit is exposed to condensation or rapid temperature changes. (Use under appropriate conditions between 0 and 35°C in the room.)
(If it is unavoidable, please allow the unit to stand for 1 hour before switching on.) - Place on a stable surface with sufficient air circulation.
When placing the unit on a heavily carpeted area, it may cause the unit to vibrate slightly. - Avoid use in locations where grease or oily smoke is generated (such as in a kitchen, etc.).
The unit surface may crack or the sensor may malfunction as a result.
- Place the unit about 30 cm to 60 cm (1 to 2 ft) away from the wall in order to ensure proper airflow.
The wall directly behind the air outlet may become dirty over time. When using the unit for an extended period of time in the same location, periodically clean the wall and protect the wall with a vinyl sheet, etc. to prevent the wall from becoming dirty.
FILTER GUIDELINES
- Follow the instructions in this manual for correct care and maintenance of the filters.
Use only filters designed for this product.
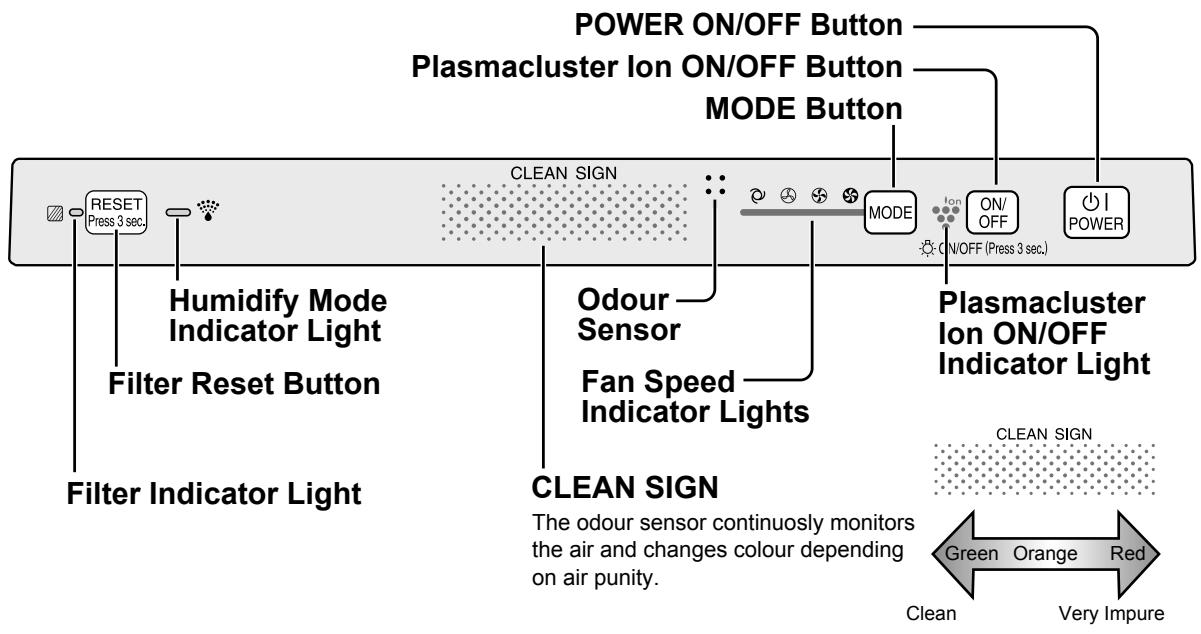
MAIN UNIT DISPLAY
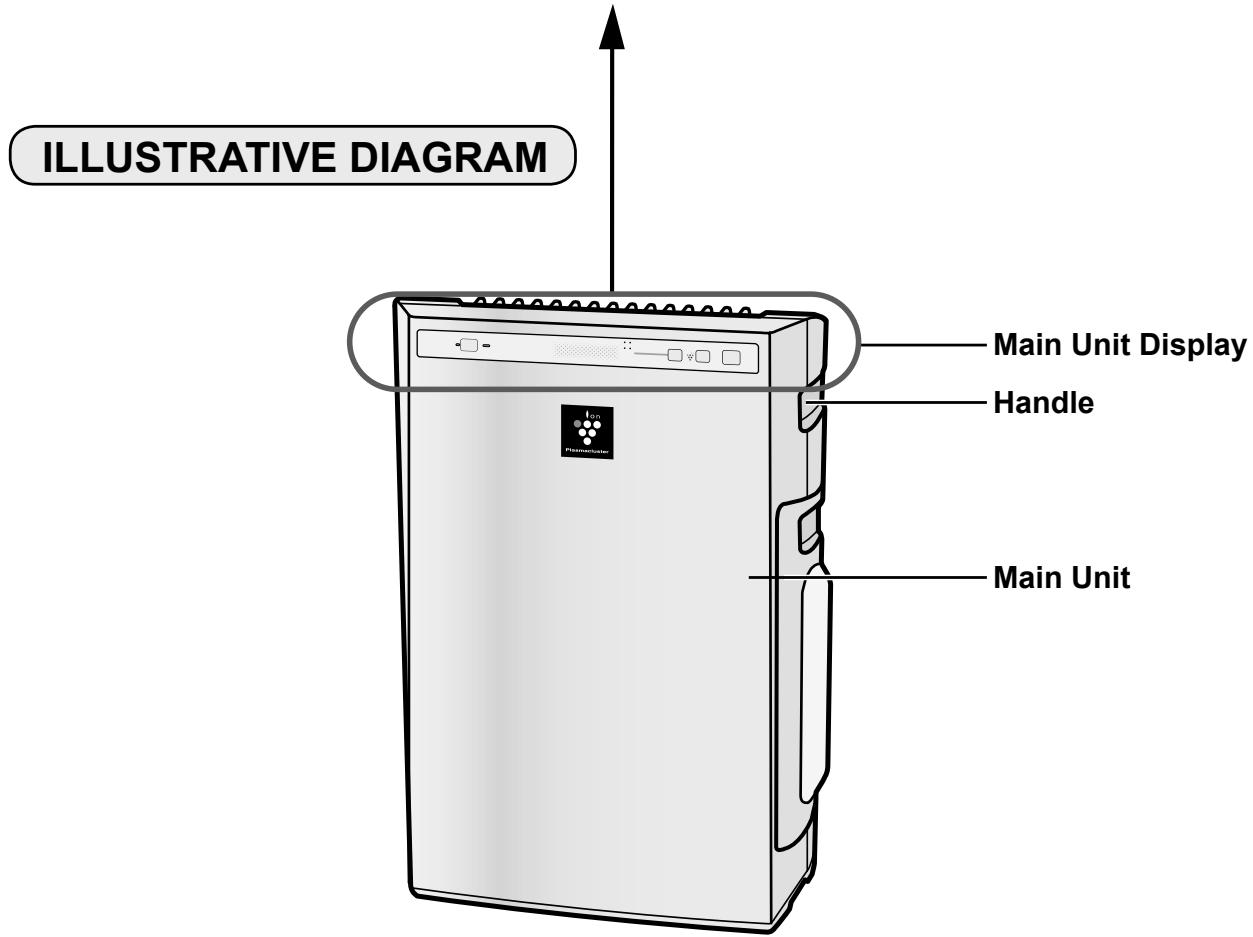
INCLUDED
Operation manual
BACK
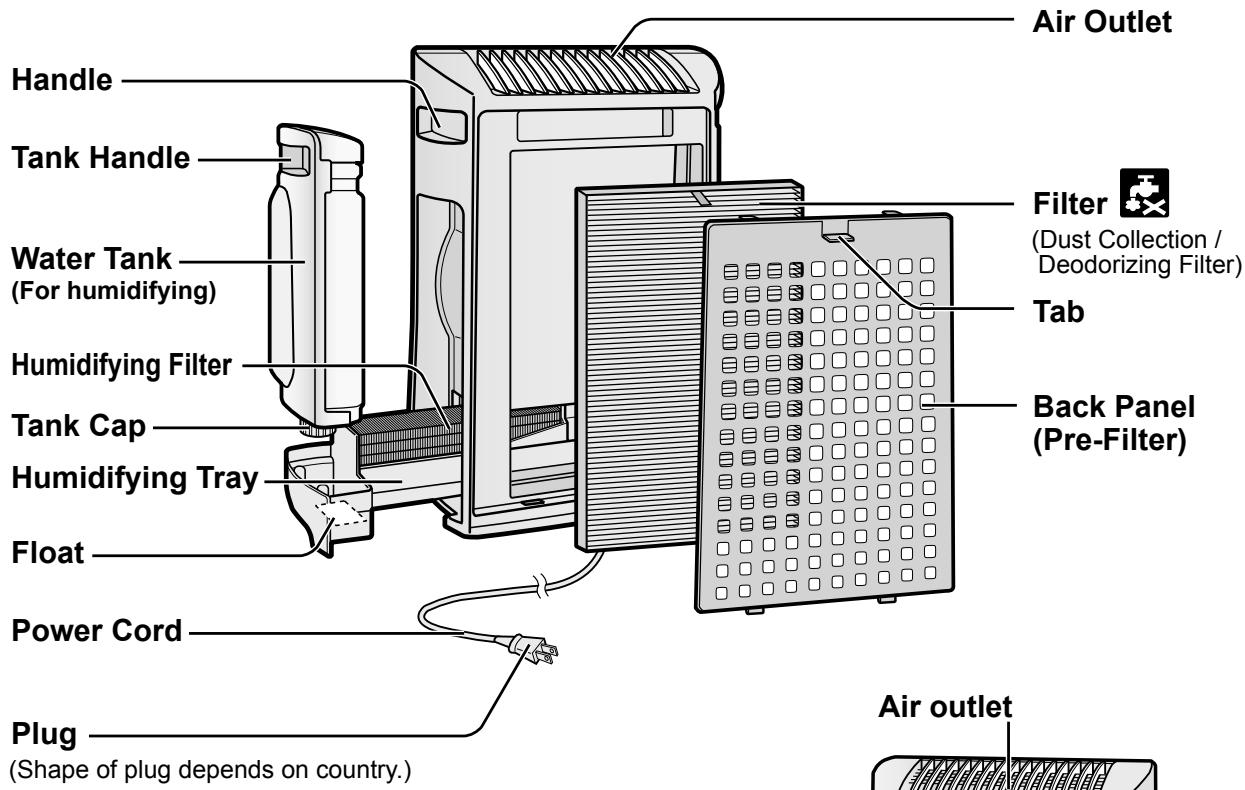
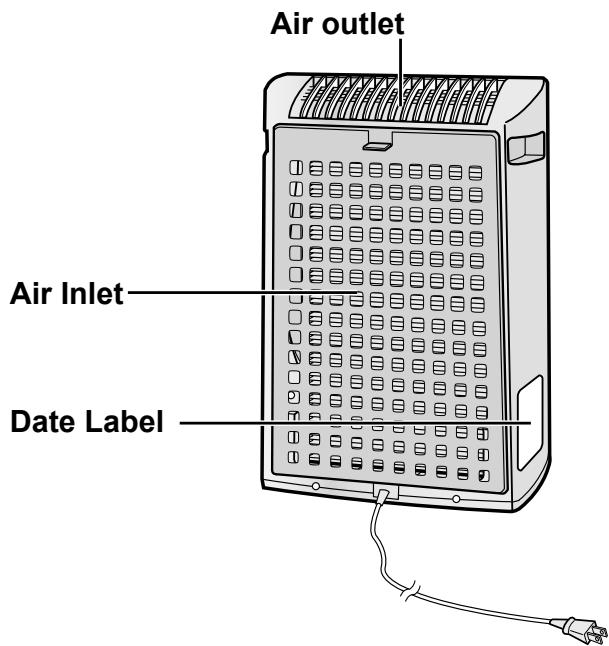
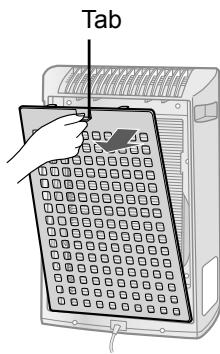
FILTER INSTALLATION
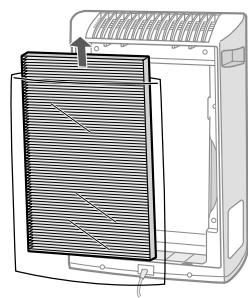
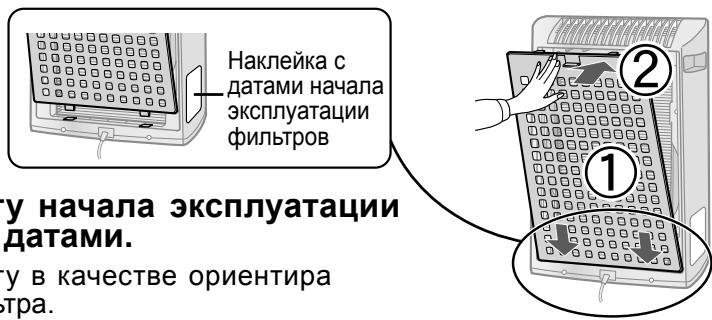
To maintain the quality of the filter, it is installed in the main unit and packed in a plastic bag. Be sure to remove the filter from the plastic bag before using the unit.

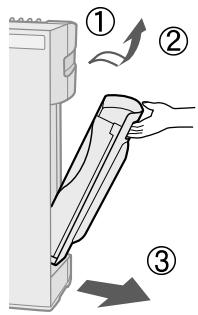
Remove the filter
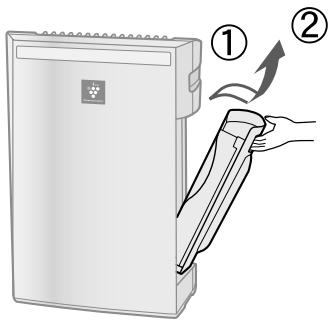
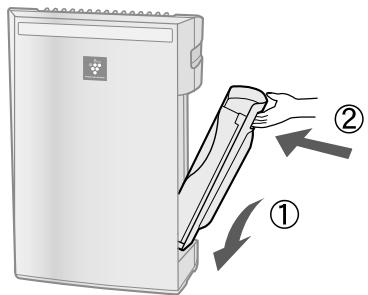
1 Remove the Back Panel.
Pull the tab at the top of the Back Panel.
2 Remove the Filter from the plastic bag.

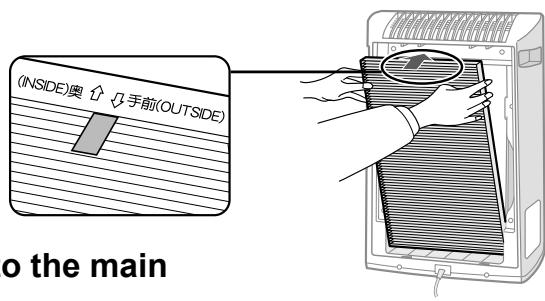
Install the filter
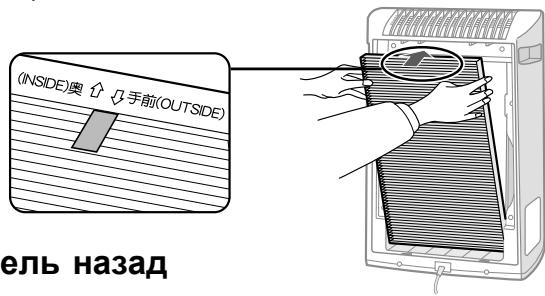
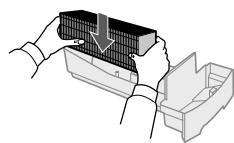
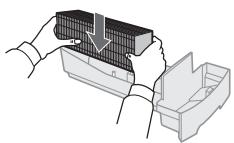
1 Place the Filter within the main unit.
Do not install the filter backwards or the unit will not operate properly.
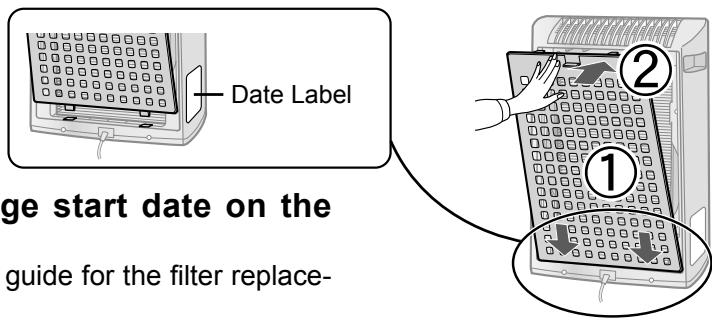
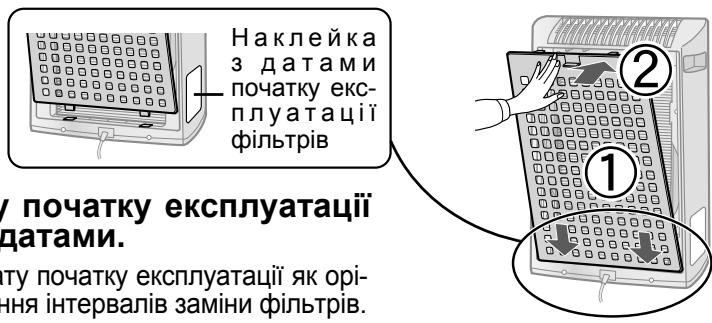
2 Replace the Back Panel to the main unit.
REFILLING THE WATER TANK
The unit can be used in the Clean Air Mode without putting water in the Water Tank. When using in the Humidify Mode, the Water Tank should be filled with water.
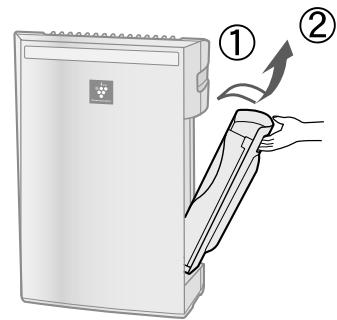
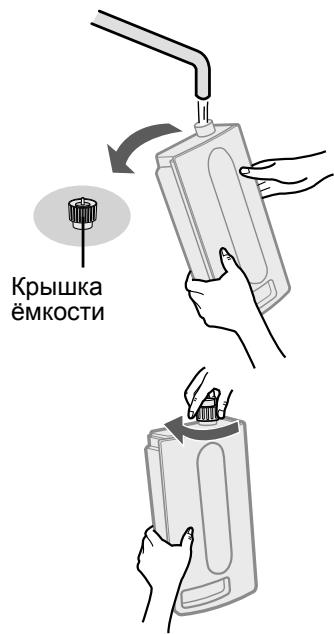
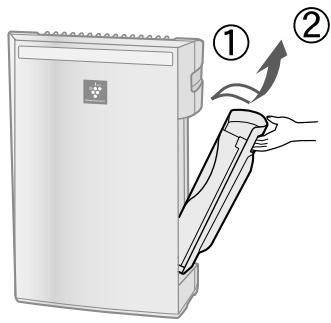
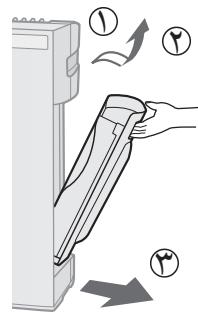
1 Remove the Water Tank by unlatching the top.
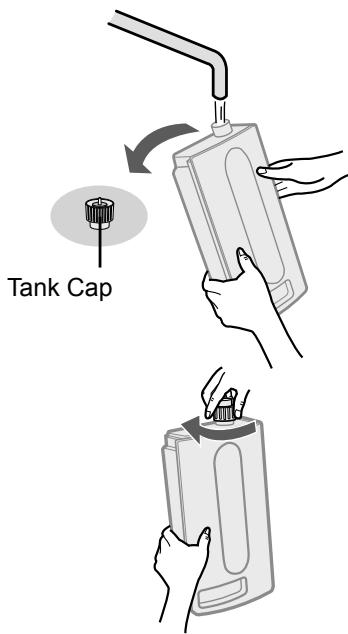
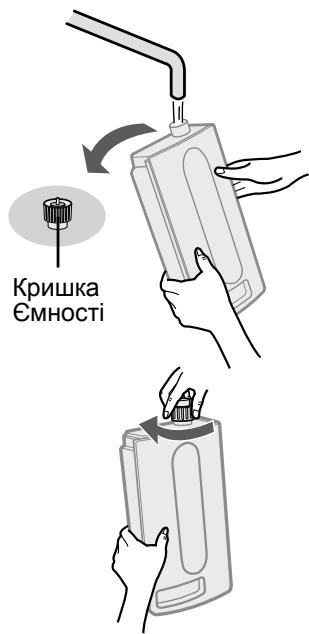
2 Remove the Water Tank Cap and carefully fill the Water Tank with tap water. Change the water in the Water Tank every day with fresh tap water.
3 After filling, securely tighten the Tank Cap. Check to see that there is no water leaking.
- Be sure to wipe off any excess water on the outside of the Water Tank.
- When carrying the Water Tank, hold it with both hands so that the Water Tank opening is facing up.
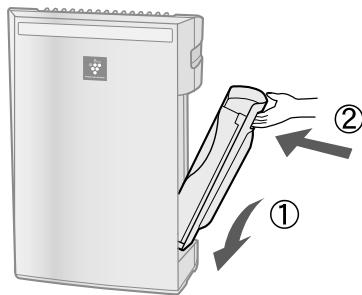
4 Replace the Water Tank in the unit.
The top latch will "click" in place when the Water Tank is properly installed.
CAUTION
- Do not expose the unit to water. Short circuit and/or electrical shock may occur as a result.
- Do not use hot water (40°C), chemical agents, aromatic substances, dirty water, or other damaging substances, deformation and/or malfunction may occur.
- Use only fresh tap water. Use of other water sources may promote the growth of mold, fungus and/or bacteria.
MAIN UNIT OPERATION
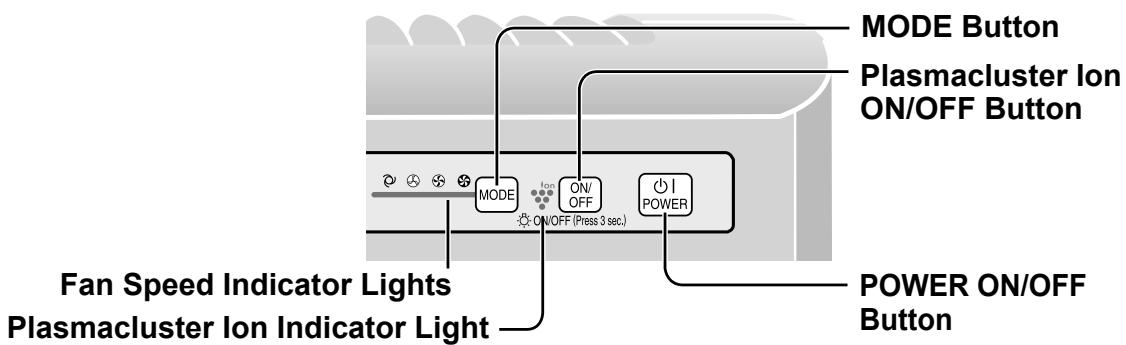
Please select either Humidify mode or Clean air mode operation when using.
Humidify mode: Fill Water Tank. (See E-7)
Clean Air mode: Drain Water Tank and Humidifying Tray.

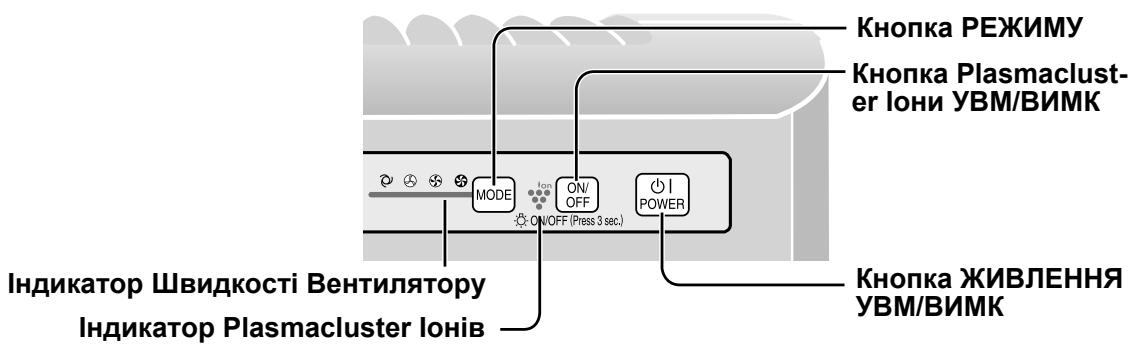
Power ON/OFF Button
- Press to start operation (short beep) and stop operation (long beep).
- Plasmacluster Indicator Light and Fan Speed Indicator Light turn on/off.
- Unless the power cord has been unplugged, the operations starts in the previous mode it was operated in.
MODE

MODE Button
- Press the MODE Button to select the desired fan speed. Indicator Lights will show the fan speed currently selected.
- The operation mode can be switched as below.
TO operation

The fan speed is automatically switched (between HIGH and LOW) depending on the amount of impurities in the air. The sensors detect impurities for efficient air purification.
LOW operation

The unit will operate quietly using minimal air intake.
MAX operation

The unit will operate at a fan speed of MAX.
MEDIUM operation

The unit will operate at a fan speed of MEDIUM.

Plasmacluster Ion ON/OFF Button
Press the Plasmacluster Ion ON/OFF Button to turn Plasmacluster Ion Mode ON and OFF.
When Plasmacluster Ion is ON, the Plasmacluster Ion Indicator Light will turn on. (blue)
To maintain optimum performance of this air purifier, please clean the unit including the sensor and filters periodically.
When cleaning the unit, be sure to first unplug the power cord, and never handle the plug with wet hands. Electrical shock and/or bodily injury may occur as a result.
FILTER INDICATOR LIGHT
Care Cycle
After 720 hours of use (30 days × 24 hours = 720)
The Filter Indicator Light will illuminate as a reminder to perform maintenance of the Back Panel, Sensors, and Humidifying Filter. The Indicator Light will turn on after approximately 720 hours of use.
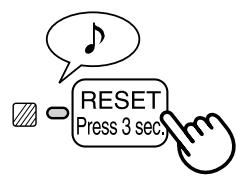
After performing maintenance, reset the Filter Indicator.
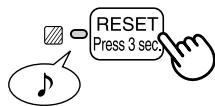
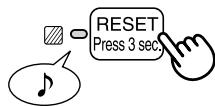
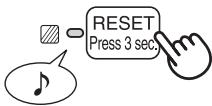
1 Plug the unit in, turn power ON. Press the RESET button for 3 seconds. The Filter Indicator Light will go off. - Even if the Filter Indicator Light is already off, the RESET button should be pressed to reset the maintenance timer.
BACK PANEL and SENSORS
Care Cycle
Whenever dust accumulates on the unit or every 2 months
Gently remove dust from the sensor opening and the back panel, using a vacuum cleaner attachment or similar tool.
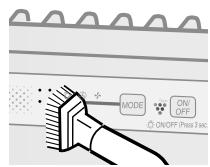
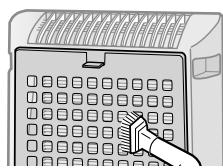
1 In case of heavy dirt, soak the back panel in water with a small amount of kitchen detergent.
(Approx. 10min.)
(Avoid scrubbing the back panel hard when washing.)
2 Rinse the back panel repeatedly with clean water to remove the solution residue. 3 Drip dry filter to remove excess water.
Back Panel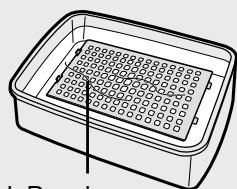
WATER TANK
Care Cycle: Every day when humidifying
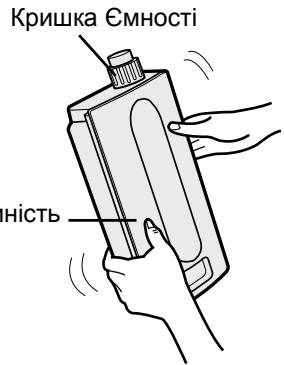
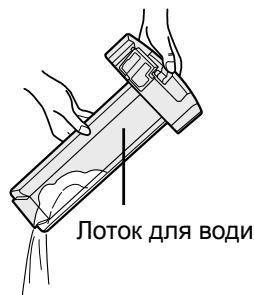
Rinse the inside of the tank by leaving a small amount of lukewarm water inside, closing the tank cap firmly, and shaking the tank. Mild household detergents may be used to clean the inside of the tank, but detergent should be diluted and the tank should be thoroughly rinsed to remove all detergent residue. (Note: The water tank is not dishwasher safe.)
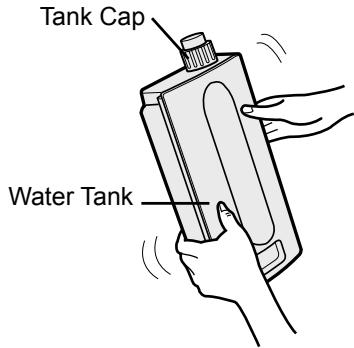
UNIT
Care Cycle: Whenever dust accumulates on the unit or every 2 months
To prevent dirt or stains on the unit, clean regularly. If stains are allowed to remain, they may become difficult to remove.
Wipe with a dry, soft cloth.
For stubborn stains or dirt, use a soft cloth dampened with warm water.
Do not use volatile fluids.
Benzene, paint thinner, polishing powder may damage the surface.
Do not use detergents.
Detergent ingredients may damage the unit.
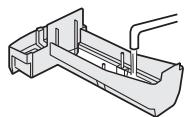
HUMIDIFYING TRAY
Care Cycle: 1 month
Frequency of maintenance cycle will depend on the hardness of the water. Avoid spilling water when removing or cleaning the tray.
1 Remove the Water Tank and Humidifying Tray.
Unlatch the Water Tank first, then remove the tray. Use both hands when pulling out the Humidifying Tray to avoid spilling water.
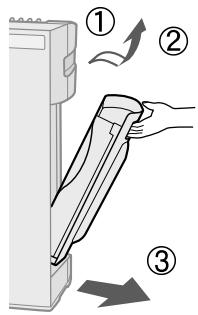
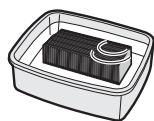
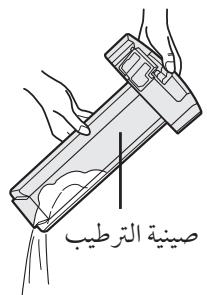
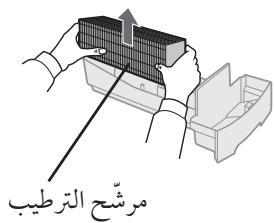
2 Remove the Humidifying Filter from the Humidifying Tray. Drain accumulated water by tilting the Humidifying Tray slowly.
Humidifying Filter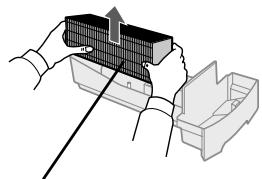
Humidifying Tray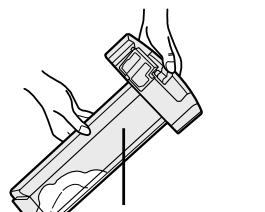
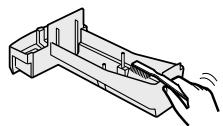
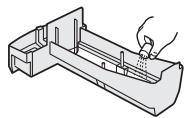
3 Rinse the inside of the Humidifying Tray with lukewarm water to remove impurities.
- Do not remove the Styrofoam float.
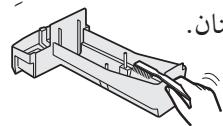
- Clean difficult-to-reach parts with a cotton-tipped swab or tooth brush.
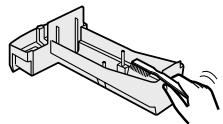
When Water Deposits are Difficult to Remove
1 Fill Humidifying Tray halfway with lukewarm water, add a small amount of mild kitchen detergent, and leave to soak for about 30 minutes.
Dilute detergent according to instructions on the container. Clean difficult-to-reach parts with a cotton swab or tooth brush.
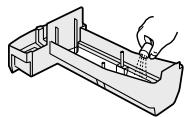
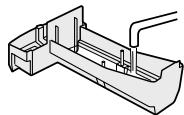
2 Rinse the Humidifying Tray with lukewarm water.
- Rinse until all detergent residue is removed.
- Inadequate rinsing may cause the detergent odour or changes in the shape/colour of the main unit.
CAUTION
- Use only mild kitchen detergents to clean the Humidifying Tray. Use of non-designated chemicals or detergents can cause deformation, tarnishing, cracking (water leakage).
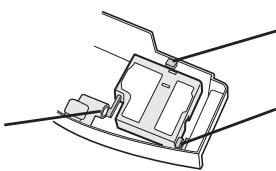
If the Styrofoam float comes off, replace by inserting the tabs of the Float into the holes in the Humidifying Tray as shown in the diagram.
② Insert the tab of the float into the hole.
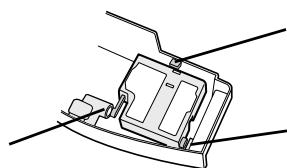
① Insert the float below this tab. ③ Insert the tab on the other side of the float into the hole.
When cleaning the unit, be sure to first unplug the power cord, and never handle the plug with wet hands. Electrical shock and/or bodily injury may occur as a result.
HUMIDIFYING FILTER
Care Cycle: Once a month or when the Filter Indicator Light is on.
Frequency of maintenance cycle will depend on the hardness or the impurities of the water that you use; the harder the water the more often descaling will be necessary.
Pay attention not to spill water when cleaning the filter.
1. Remove the Water Tank and Humidifying Tray. (See E-11) 2. Remove the Humidifying Filter from the Humidifying Tray.
Avoid spilling water from the Humidifying Tray.
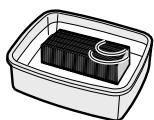
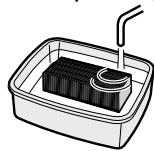
3. Preparing the descaling solution.
Citric acid, available at some drugstores, or 100% bottled lemon juice are used for descaling. Choose either one to use, and prepare the descaling solution.
Dissolve 3 teaspoons of citric acid and 2 1/2 cups of lukewarm water in a suitable container, and stir well.
100% bottled lemon juice can be used for descaling. Use only 100% bottled lemon juice with no pulp (strain juice if necessary). Combine 1/4 cup lemon juice and 3 cups of lukewarm water in a container large enough to hold the Humidifying Filter and stir well.
4 Pre-soak the Humidifying Filter in the solution for 30 minutes before cleaning.
When using lemon juice, it is recommended to pre-soak longer than citric acid.
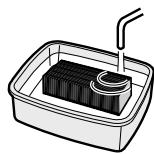
5 Rinse the Humidifying Filter repeatedly with lukewarm water to remove all the solution residue.
Inadequate rinsing may cause odour and affect the performance and/or appearance of the unit.
*Do not scrub the Humidifying Filter, rinse gently under lukewarm water only.
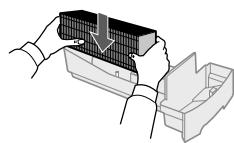
6 Attach the Humidifying Filter to the Humidifying Tray, and replace the Humidifying Tray in the unit.
- The Humidifying Filter does not need to be oriented in any particular position (forward/backward, up/down).
- When not using the unit for long periods of time, dry the Humidifying Filter completely before replacing.
7 Plug in the unit, turn power ON, and press the Filter Reset Button on the display for more than 3 seconds to reset.
You may notice reddish-brown or white deposits forming on the surface of the Humidifying Filter. These impurities (calcium, etc.) are due to the impurities contained in tap water; this is not a defect. Replace the Humidifying Filter when it is covered completely in white deposits.
FILTER REPLACEMENT GUIDELINES
Filter life varies depending on the room environment, usage, and location of the unit.
If dust or odour persist, replace the filter.
(Refer to "Please read before operating your new Air Purifier")
Guide for filter replacement timing
- The following filter life and replacement period is based on the condition of smoking 5 cigarettes per day and the dust collection/deodorization power is reduced by half compared with that of new filter.
We recommend to replace the filter more frequently if the product is used in a condition significantly severer than normal household use.
- Dust Collection / Deodorizing Filter……About 2 years after opening
- Humidifying Filter - About 1 years after opening
REPLACING THE FILTER
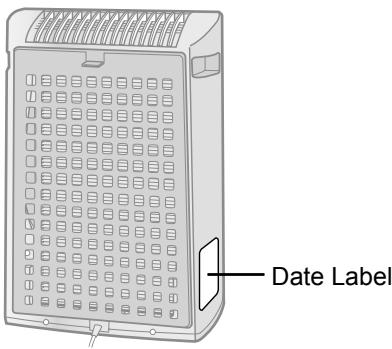
1 See page E-6 and E-11,12 for directions on how to install the filter when replacing. 2 Fill in the usage start date of the filter on the Date Label.
Replacement Filters
Model : FZ-Y30SFE
- Dust Collection / Deodorizing Filter : 1 unit

Model : FZ-Y30MFE
- Humidifying filter : 1 unit
Humidifying Filter
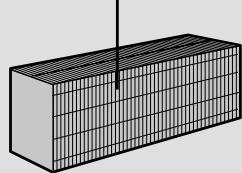
Please consult your dealer for purchase of replacement filter.
Disposal of Filter
Please dispose of the replaced filter according to the local disposal laws and regulations.
Dust Collection / Deodorizing Filter materials :
-Filter: Polypropylene - Frame : Polyester - Deodorizer: Activated charcoal Humidifying Filter materials : Rayon, Polyester
TROUBLESHOOTING
Before calling for service, please review the Troubleshooting chart below, since the problem may not be a unit malfunction.
| SYMPTOM | REMEDY (not a malfunction) | |
| Odours and smoke are not removed. | • Clean or replace the filters if they appear to be heavily soiled. (See E-13) | |
| The Clean Sign illuminates green even when the air is impure. | • The air could be impure at the time the unit was plugged in. Unplug the unit, wait one minute, and plug the unit in again. | |
| The Clean Sign illuminates orange or red even when the air is clean. | • Sensor operation is affected if the odour sensor openings are dirty or clogged. Gently clean the dust sensors. (See E-9) | |
| A clicking or ticking sound is heard from the unit. | • Clicking or ticking sounds may be audible when the unit is generating Plasumacluster ions. | |
| The discharged air has an odour. | • Check to see if the filter are heavily soiled. • Clean or replace the filter. • Plasmacluster Air Purifiers emit small traces of ozone which may produce an odour. | |
| The unit does not operate when cigarette smoke is in the air. | • Is the unit installed in a location that is difficult for the sensor to detect cigarette smoke? • Are the dust sensor openings blocked or clogged? (In this case, clean the openings.) (See E-9) | |
| Filter Indicator Light is illuminated. | • After replacing filters, connect the power cord to an outlet and press the Filter Reset Button. (See E-9) | |
| The Clean Sign are turned off. | • Check to see if the Lights OFF Mode selected. If so, then press the Lights Control Button to activate the indicator lights. (See E-8) | |
| The Humidify Mode Indicator Light does not illuminate when the tank is not empty. | • Check Styrofoam float for impurities. Clean the HumidifyingTray. Ensure unit is located on a level surface. | |
| Water level in the tank does not decrease or decreases slowly. | • Check to see if the Humidifying Tray and Water Tank are correctly installed. Check the Humidifying Filter. • Clean or replace the filter when it is heavily soiled. (See E-11, E-12, E-13) | |
| The Clean Sign lights change colour frequently. | • The Clean Sign lights automatically change colours as impurities are detected by the dust sensor and odour sensor. | |
| Flashing of the Fan Speed Indicator Light ‘⊗’. | • Abnormal fan motor | • Turn power OFF to cancel the error display, wait one minute, and then turn power ON. |
| Model | KC-930EU | |||
| Power supply | 220-240V 50/60Hz | |||
| Fan Speed operation | Fan Speed Adjustment | MAX | MED | LOW |
| Rated Power | 27W | 13W | 4.5W | |
| Fan Speed | 180m³/hour | 126m³/hour | 60m³/hour | |
| Humidification | 350ml/hour | 250ml/hour | 140ml/hour | |
| Recommended Room Size | ~21m²*1 | |||
| High density Plasmacluster ion recommended room size | ~17m²*2 | |||
| Water tank capacity | 2.1L | |||
| Sensor | odour sensor | |||
| Filter type | Dust Collection (HEPA Filter *3)/ Deodorizing Filter | |||
| Cord Length | 2.0m | |||
| Dimensions | 375mm(W)x205mm(D)x535mm(H) | |||
| Weight | 6.1kg | |||
1 Size of a room which is appropriate for operating the unit at maximum fan speed. - It indicates the space where a certain amount of dust particles can be removed in 30 minutes(JEM1467). 2 Size of a room in which approximately 7000 ions can be measured per cubic centimeter in the center of the room (at a height of approximately 1.2 meters from the floor) when the product is placed next to a wall and run at the MAX operation position.
Standby Power
In order to operate the electrical circuits while the power plug is inserted in the wall outlet, this product consumes about 0.9W of standby power.
For energy saving, unplug the power cord when the unit is not in use.
*3 The class of the HEPA filter by EN 1822 is H10.
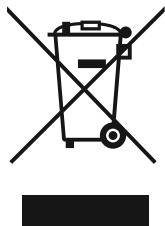
Attention: Your product is marked with this symbol. It means that used electrical and electronic products should not be mixed with general household waste. There is a separate collection system for these products.
A. Information on Disposal for Users (private households)
1. In the European Union
Attention: If you want to dispose of this equipment, please do not use the ordinary dust bin!
Used electrical and electronic equipment must be treated separately and in accordance with legislation that requires proper treatment, recovery and recycling of used electrical and electronic equipment.
Following the implementation by member states, private households within the EU states may return their used electrical and electronic equipment to designated collection facilities free of charge. In some countries your local retailer may also take back your old product free of charge if you purchase a similar new one.
*) Please contact your local authority for further details.
If your used electrical or electronic equipment has batteries or accumulators, please dispose of these separately beforehand according to local requirements.
By disposing of this product correctly you will help ensure that the waste undergoes the necessary treatment, recovery and recycling and thus prevent potential negative effects on the environment and human health which could otherwise arise due to inappropriate waste handling.
2. In other Countries outside the EU
If you wish to discard this product, please contact your local authorities and ask for the correct method of disposal.
For Switzerland: Used electrical or electronic equipment can be returned free of charge to the dealer, even if you don't purchase a new product. Further collection facilities are listed on the homepage of www.swico.ch or www.sens.ch.
B. Information on Disposal for Business Users.
1. In the European Union
If the product is used for business purposes and you want to discard it:
Please contact your SHARP dealer who will inform you about the take-back of the product. You might be charged for the costs arising from take-back and recycling. Small products (and small amounts) might be taken back by your local collection facilities.
For Spain: Please contact the established collection system or your local authority for take-back of your used products.
2. In other Countries outside the EU
If you wish to discard of this product, please contact your local authorities and ask for the correct method of disposal.
Please dispose of the replaced filter according to the local disposal laws and regulations.
Sharp "Plasmacluster"
Sharp Plasmacluster uses plasma discharge to produce and release positive and negative ions, just as they occur in nature ("Plasmacluster ions").
This unique cleaning technology of Sharp Corporation has been proven to deactivate potential allergens such as mite feces*1, viruses*2, mold spores*3, and bacteria*4 suspended in the air, and has been verified by independent organizations both in Japan and in other countries.
When a high concentration of Plasmacluster ions is created in the air, the smell of cigarette smoke that has permeated curtains and upholstered furniture is removed in about 80 minutes*5, and if you hang clothes in a place where the direct airflow from the device that emits Plasmacluster ions reaches, the smell of sweat will become practically unnoticeable in about one hour (approximately 6 hours).
TECHNICAL SPECIFICATIONS...R-15
Sharp Plasmacluster air purifier. Please read this manual carefully for correct operation of the air purifier. Before using this device, be sure to read the section: "Important Instructions and Safety Precautions." After reading, keep the manual in a convenient place for future reference.
When using electrical appliances, basic precautions should always be followed, including the following:
WARNING
To reduce the risk of electric shock, fire, or injury:
- Read all instructions before using this appliance. Use only the voltage specified on the rating label (220-240 V AC). Do not use the appliance if the power cord or plug is damaged, or if the plug does not fit firmly into the wall outlet. Periodically clean the power plug.
- Do not insert fingers or foreign objects into the air inlet or outlet openings.
- When unplugging the appliance, always hold the plug, never pull on the cord. This may result in electric shock or fire due to a short circuit. Do not unplug with wet hands.
- Do not operate this appliance near gas stoves or fireplaces.
- When the appliance is not in use, and also when the air purifier is not in operation, remove the plug from the outlet.
Otherwise, there is a risk of electric shock or fire due to a short circuit.
- When filling the water tank, cleaning the appliance, or if the appliance is not in use, remove the plug from the outlet. Otherwise, there is a risk of electric shock or fire due to a short circuit.
- If the power cord is damaged, it must be replaced by the manufacturer, its service agent, or a similarly qualified person in order to avoid a hazard.
- Do not operate the appliance in the presence of insect repellents or in rooms with residual oil, air fresheners, sparks from lit cigarettes, chemical gases, or high humidity, for example in a bathroom. Be careful when cleaning the appliance. Aggressive cleaning agents may damage the housing. Only an authorized Sharp service center should perform maintenance on this air purifier. Contact your nearest service center if problems arise, if adjustment is needed, or for repair.
- When transporting the appliance, first empty the water tank, then lift the appliance by the handles on both sides. Do not spill water from the tank or the water tank.
- Change the water in the tank daily, filling it with fresh tap water, and regularly clean the tank and the water tank. (See R-11 and R-12). If the appliance is not used, empty the water from the tank and the water tank. If water is left in the tank or the water tank, it may lead to the formation of mold, bacteria, or unpleasant odors.
In rare cases, bacteria may have a temporary adverse effect on health.
- This appliance is not intended for use by persons (including children) with reduced physical, sensory, or mental capabilities, or lack of experience and knowledge, unless they have been given supervision or instruction concerning use of the appliance by a person responsible for their safety.
Children should be supervised to ensure that they do not play with the appliance.
NOTE: TV and radio interference
If the air purifier causes interference with TV or radio reception, try to correct the situation by taking the following measures:
PRECAUTIONS FOR USE
- Do not block the air intake or outlet openings.
- Do not operate this appliance near or on heat sources, such as stoves or heaters, or in places where steam may affect the appliance.
- Use the device only in a vertical position.
- When moving, always hold the device by both handles located on the sides.
Do not hold the device by the back panel; it may detach, causing the device to fall and be damaged.
- Do not operate the device without properly installed filters, water tank, and water tray. Do not wash or reuse the filter.
This not only worsens the filter's performance but can also cause electric shock or damage to the equipment.
- Wipe the housing exclusively with a soft cloth.
Do not use aggressive liquids or cleaning agents.
Otherwise, the surface of the device may be damaged or crack.
In addition, the sensors may be damaged as a result.
INSTALLATION INSTRUCTIONS
- When using the device, place it at a distance of at least 2 m from devices that generate electromagnetic waves, such as televisions, radios, or radio clocks. Do not use the device where furniture, fabrics, or other objects may block the air intake/exhaust openings.
- Do not use the device in humid places or in places with sharp temperature changes. (Use the device in conditions suitable for its operation, at an air temperature in the room from 5 to 35°C.)
(If this is unavoidable, let the device stand for 1 hour before turning it on.)
- Install on a stable surface in rooms with sufficient air circulation. When installing the device on carpeted coverings, it may vibrate slightly. Do not place it in places with oil fume emissions (such as kitchens, etc.). As a result, the surface of the device may crack or the sensor may be damaged.
- Install the device at a distance of about 30–60 cm (1–2 feet) from the wall to ensure sufficient air movement.
The wall directly behind the air outlet may become dirty over time. If the device is used for a long time in the same place, periodically clean the wall and cover it with a vinyl sheet, etc., to prevent it from getting dirty.
Do not install the filter backwards, otherwise the device will not work properly.
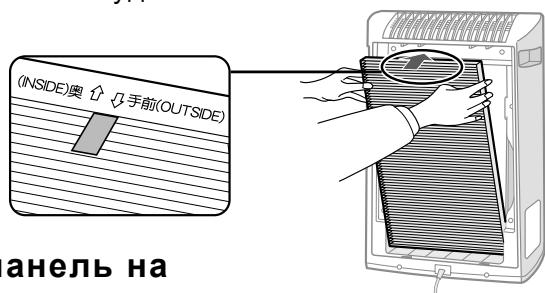
2 Install the front panel back in place.
FILLING THE WATER TANK
This device can be used in air purification mode without water in the tank. When using the humidification mode, the tank must be filled with water.
1 Remove the tank by pulling the tank handle upward. 2 Remove the tank cap and carefully fill the tank with tap water.
Change the water in the tank every day, filling it with fresh tap water.
Plasmacluster ON/OFF button
Press the Plasmacluster Ion ON/OFF button to turn the Plasmacluster Ion mode on or off. The blue indicator shows that the Plasmacluster Ion mode is on.
To maintain the optimal performance of this air purifier, please periodically clean the device, including the sensors and filters. When cleaning the device, do not forget to first unplug the power plug from the outlet, and never touch the plug with wet hands. Otherwise, electric shock or injury may occur.
FILTER INDICATOR
Maintenance period.
After 720 hours of operation (30 days x 24 hours = 720)
The filter indicator lights up, indicating that the front panel, sensors, and humidifying filter need maintenance. This indicator lights up after approximately 720 hours of operation.
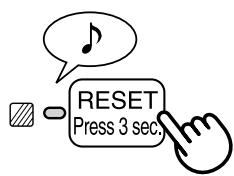
After performing maintenance, reset the filter indicator.
1 Plug the device into the outlet, turn on the power. 2 Press the reset button for 3 seconds. -The filter indicator turns off. Even if the filter indicator is off, the reset button must be held down to reset the service timer.
REAR PANEL AND SENSORS
Maintenance period
As dust accumulates on the device, or every 2 months
Carefully remove dust from the sensor and rear panel using a vacuum cleaner nozzle or similar attachment.
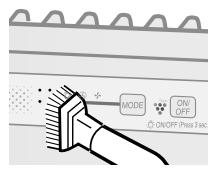
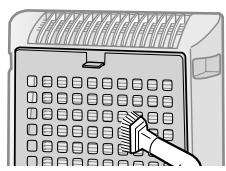
1 In case of heavy soiling, clean the rear panel with water and a little dishwashing liquid.
Do not use aggressive liquids
Gasoline, thinner, or abrasive cleaners can damage the surface.
Do not use cleaning agents
Components of cleaning agents can damage the device.
WATER TANK
Maintenance period.
1 month
The maintenance interval depends on water hardness. Do not allow water to spill while removing the tank for cleaning.
1 Remove the tank and the water tank.
Remove the water tank, then pour out the water. When removing the tank, hold it with both hands to avoid spilling water.
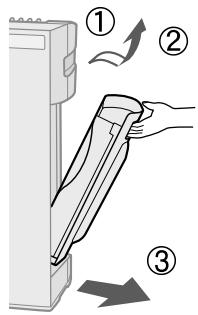
2 Remove the humidifying filter from the water tank. Slide it out slowly, gently tilting the tank.
Humidifying filter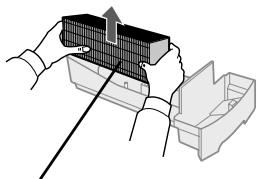
Water tank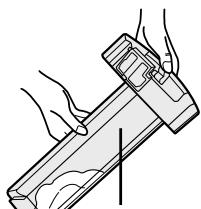
3 Rinse the tank with warm water to remove any residue.
- Do not remove the foam float.
- Clean hard-to-reach areas with a cotton swab or a toothbrush.

If mineral deposits are difficult to remove
1 Fill the water tank halfway with warm water, add a small amount of mild dish soap, and leave it for about 30 minutes.
Dilute the detergent according to the instructions on the packaging. Clean hard-to-reach areas with a cotton swab
on a stick or a toothbrush.
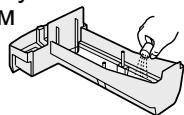
2 Rinse the water tank with warm water.
- Rinse until no traces of detergent remain. - Improper rinsing may cause the detergent to remain, leading to changes in the shape or color of the main
unit.
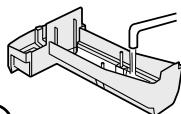
CAUTION
- Use only a mild detergent to clean the water tank. Using unsuitable chemical cleaning agents can cause deformation, cracks, or leaks.
If the float falls out, put it back in place by inserting the float's tabs into the holes in the water tank, as shown in the figure.
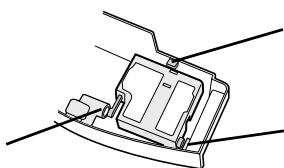
① Insert the float under this tab. ③ Insert the tab on the other side of the float into the hole.
② Insert the float's tab into the hole.
During cleaning, do not forget to first unplug the power plug from the outlet and never touch the plug with wet hands. Otherwise, electric shock or injury may occur.
Humidifier filter
Maintenance period
Every month or when the indicator lights up.
The maintenance interval will depend on the hardness of the water used; the harder the water, the more often cleaning is needed.
Be careful not to spill water during filter cleaning.
1 Remove the tank and water tray.
(See R-11)
2 Take out the humidifier filter from the water tray.
Be careful not to spill water from the tray.
If odors remain, replace the filters.
(CMOTPNTe «Почтnte, покалуntа, поед д ecрлуатациь Baшero hoCrtTeя bo3dyxa').)
Hnctpykunno cpokam 3aMeHbI cnJbTpoB
Cpok cnyk6bl n nepno3aMeHb fNJIbTPOB paccuHTan hCXoJn u3 ycIOBn, yTO B DeHb BbIKypNBaETc 5 cnIapeT, n CnocO6HOCTb yJaBnBaHnra Nbln/Je3OOpnpOBaHnrcKpaTaetc B 2 pa3a no CpabHeHIO C HOBbIM fNJIbTpOM.
Mbl pekomehnyem MeHrB fnilbtp qaue, ecn yctpoiCTBO 3KcnIyatnpyeTcB 6oJee JecTKnx ycNoBnX, Yem DomaunHe.
TEXHNUECKNE XAPAKTEPNUCTNKN
Ecnn B BaWeM CTapOM 3NeKtpnuecckom ININ 3NeKtpoHOM npInbopNe nCIOB3OBAJNCB 6batapeKn ININ akkymyTAp0bl, ppeDbapntelbHO yTNIN3npyTe INX OTDeJIbHO B COOTBeCTBIM C MeCTbIMN Tpe6OBaHnA M.
YtIN3npy DaHnHoE N3dEIne B yCTaHOBJIeHNOM IopRJaKe, Bbl NOMOgaTeObeCneHTb Heo6XoDmMyI nepepa6oTKy, BOCCTaHOBJIeHne NIOBTOPHOIENCNtB3OBAHNE OTOJOB IN TEM CaMbIM npeDTBpATNTB BO3MOXHbIEHe6IaNrOpnIaTHbIe NocJIeCTBnI dIg OKpyKaIoUeI cpeIbI N 3doPOBbBy CEIOBeKa, KOTOpBle B IpOTNBOM Clyuae MOrII bI Bo3HKnHyTb I3-3a HeHaJNeKaueroYdaJIeHnB B OTXoDbI.
2. In countries outside the EU
If you intend to dispose of this product, please contact your local authorities and ask them for advice on disposal.
TROUBLESHOOTING CZ-14
TECHNICAL DATA CZ-15
IMPORTANT SAFETY INSTRUCTIONS
In such a case, we recommend using an additional filter and replacing it.
NOTE
The device is designed to reduce odors in the air, but it cannot remove all gases (for example, carbon monoxide, which may be present in cigarette smoke). If the source of the odor is still present, the device may not completely eliminate the odor (for example, odors from building materials and odors from pet waste). It is recommended to open a window slightly while the device is operating to improve ventilation.
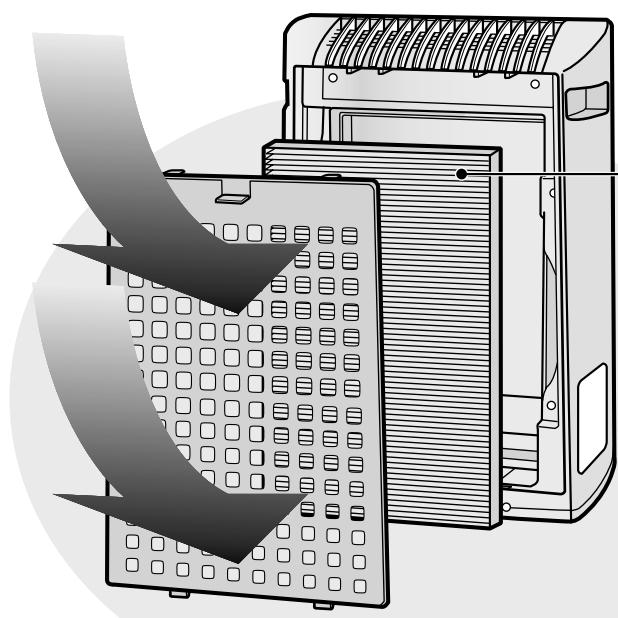
Replacement of the filter / Deodorizing filter
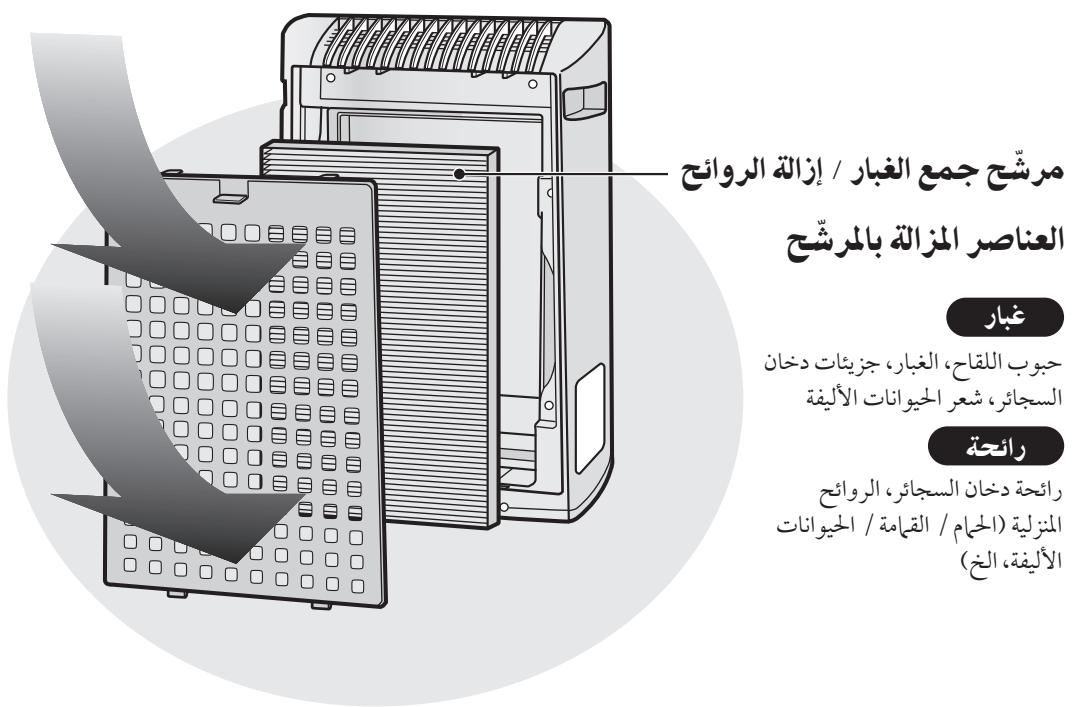
Removing the filter elements
Dust, pollen, parts of cigarette smoke, pet dander
Odor
Odor of cigarette smoke, household odors (toilet / pet / kitchen, etc.)
TECHNICAL SPECIFICATIONS
Plasmacluster Technology
Plasmacluster technology uses plasma discharge to generate and release the same positive and negative ions that are produced in nature (Plasmacluster ions). This is a unique air purification technology from SHARP, recognized for reducing and deactivating airborne allergens such as dust mites, mold, viruses, and bacteria, and for removing odors from the air. It has been verified by third-party organizations in Japan and other countries.
When the air has a high concentration of Plasmacluster ions, cigarette smoke that has entered a room or been breathed in will be removed in approximately 80 minutes*4, and when clothes are hung in a space that is exposed to the airflow from the device that emits Plasmacluster ions, the odor of the smoke will be reduced to almost zero within one night (approximately 6 hours).
*1 Tested by the University of Hiroshima, Japan, for the effect on airborne allergens in a 13 m² room. *2 Retroscreen Virology, Ltd., London, UK, measured the reduction of airborne viruses in a 1 m³ chamber. *3 Japan Spinners Inspecting Foundation, Japan, measured the removal of mold and bacteria from the air in a 13 m² room. *4 Japan Spinners Inspecting Foundation, Japan, measured the removal of smoke odor from fabric samples.
CONTENTS
IMPORTANT SAFETY INSTRUCTIONS...EN-2
CAUTIONS FOR OPERATION...EN-3 - INSTALLATION GUIDELINES...EN-3 - FILTER MAINTENANCE INSTRUCTIONS...EN-3
Display of the control unit .................................... UA-4 Control panel UA-4 · Installation UA-5 Inside page UA-5
Preparation.. UA-6
· Installation of filters UA-6 - Fill the water tank..UA-7
Operation.. UA-8
Operation of the control unit UA-8
Maintenance......UA-9
- Filter indicator.................................... UA-9 Battery replacement....................................UA-9
- Water tank.. UA-10 Unit UA-10 Water tray. UA-11 Drain filter UA-12
- Instructions for replacing the filter......UA-13
Troubleshooting UA-14
Specifications UA-15
- Do not use the appliance without correctly installed filters, water tank, and tray.
- Do not wash and reuse the filter.
This will not only worsen the filter's performance, but may also cause electric shock or damage to the appliance.
- Wipe the device body with a soft cloth.
Do not use strong solvents or abrasive agents.
The device surface may be damaged or scratched.
In addition to the above, the sensor may be damaged as a result.
INSTALLATION INSTRUCTIONS
During operation of the device, please install it at least 2 m away from appliances that emit electromagnetic waves, such as televisions, radios, or electric clocks. Avoid places where furniture, fabrics, or other objects may block the air intake or outlet. Avoid using the device where it may be exposed to condensation or sudden temperature changes. (Use in normal conditions at a temperature from 0 to 35°C in a room.)
(If this cannot be avoided, please keep the device at least 1 hour.)
Install on a flat surface in rooms with sufficient air circulation.
When installing the device on a carpeted surface, the device may vibrate slightly.
- Avoid places where there are oil fumes (such as kitchens, etc.).
As a result, the device surface may scratch, or the sensor may malfunction.
Install the device at a distance of approximately 30-60 cm from the wall to ensure sufficient air movement.
The wall located directly behind the air outlet may become dirty over time. When using the device for a long time in the same place, periodically clean the wall and cover it with a protective film, etc., to prevent wall contamination.
FILTER MAINTENANCE INSTRUCTIONS
Follow the instructions in this manual for proper care and maintenance of the filter.
Built-in filter for disposable models
Main unit display
The filter indicator shows the degree of filter contamination and changes the indicator color depending on the intensity of the odor.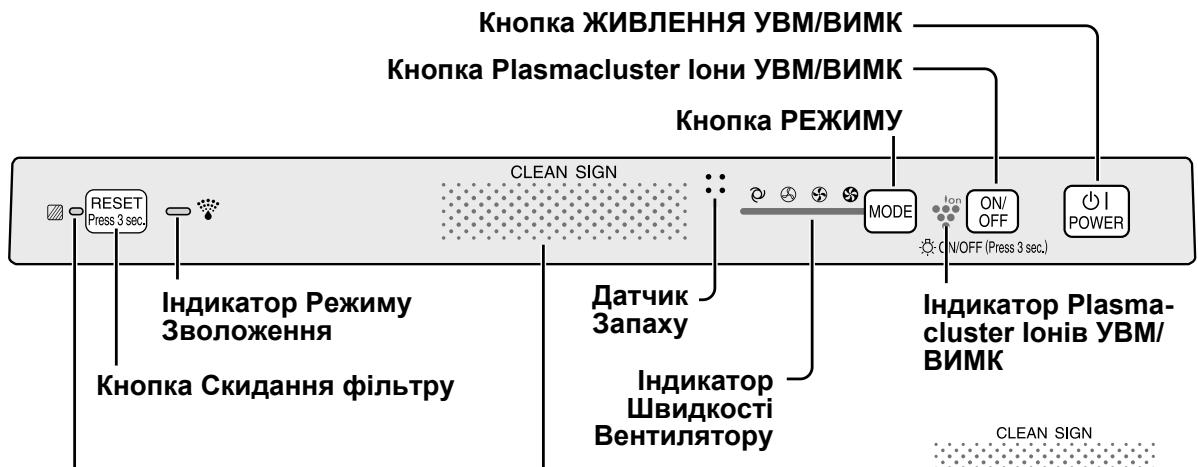
Filter clogging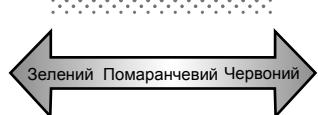
UA-4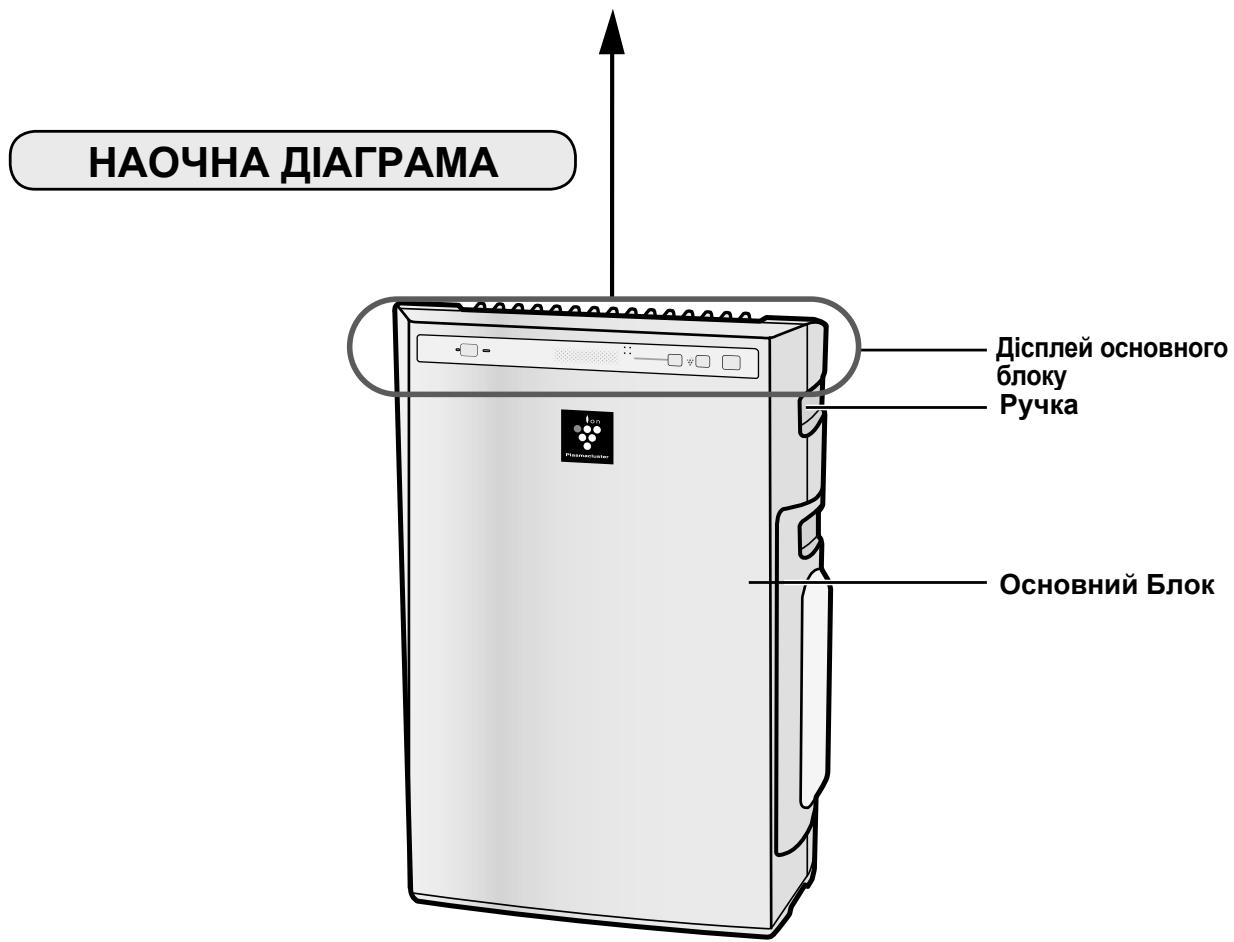
Removal
Do not install the filter in advance, otherwise the device will not operate correctly.
2. Press the water tank release button and pull the tank backwards.
FILL THE TANK WITH WATER
The appliance can be used without water in steam burst mode during ironing. When using the steam burst mode, the water tank must be filled with water.
1. Release the tank by lifting the tank handle up. 2. Open the tank cap and carefully fill the tank with tap water.
Fill the tank with water for each use with clean tap water.
3. After filling with water, close the tank cap tightly.
- Make sure that water does not leak. Wipe any water on the outside of the tank with a dry cloth. - When filling the tank, hold it upright with both hands, opening facing up.
4. Install the water tank into the appliance.
The device is installed in the correct position when properly installed.
Precautions
- Do not touch the power plug with wet hands. This may cause short circuit and/or electric shock.
- Do not use hot water (40°C), chemical reagents, aromatic reagents, hard water, or other liquids. This may cause deformation and/or damage to the device inlet. Use only clean tap water. Using other water may cause mold, fungi, and/or bacteria.
CONTROL PANEL
POWER button
- Press the power button (short beep) to start operation, and press again (long beep) to stop.
- The Plasmacluster indicator and fan speed indicator will turn on/off. If the power plug has not been disconnected, the unit will resume operation in the mode it was in before.
MODE button
- Press the MODE button to select the desired fan speed. The indicator will show the fan speed selected at that moment.
- The operation mode can be set as shown below.
AUTO operation

The fan speed will switch automatically (from high to low and in reverse order) depending on the amount of dust in the air. The sensor detects the level of dirt and ensures effective air purification.
LOW operation

Operates in a quiet mode with minimal air intake.
Work MAX

The appliance should be operated at MAXIMUM fan speed.
Work MEDIUM

The appliance should be operated at MEDIUM fan speed.

Plasmacluster Ion button ON/OFF
Press the Plasmacluster Ion button ON/OFF to turn on or turn off the ion mode. When the Plasmacluster Ion is turned on, the Plasmacluster Ion indicator lights up. (blue)
For optimal operation of your air purifier, please periodically clean the filter, including the pre-filter and the main filter.
When cleaning the appliance, first unplug the power cord from the electrical outlet, and never touch the appliance with wet hands. This may cause electric shock and/or personal injury.
FILTER INDICATOR
Replacement period
After performing maintenance, reset the filter indicator.
1 Plug the appliance into an electrical outlet and press the ON/OFF button. 2 Press the RESET button for 3 seconds. The filter indicator turns off. - If the filter indicator is already off, press and hold the RESET button until the maintenance timer is reset.
(Note: The contents cannot be washed in a dishwasher.
BLOCK
Maintenance period: when dust accumulates on the pre-filter or every 2 months
If you have never seen or used the device before, it will be difficult to forget it in the future.
Wipe with a dry, soft cloth.
For stubborn dirt and stains, use a soft cloth dampened with warm water.
Do not use strong solvents.
Benzene, thinner, alcohol, and other solvents may damage the surface.
Do not use cleaning agents that contain abrasives.
Components of cleaning agents may damage the device.
Water filter
Maintenance interval: 1 month
The maintenance interval depends on water hardness. Do not allow limescale to build up in the filter or device.
1. Remove the water tank and the water filter.
First remove the tank, then remove the filter. When removing the filter, hold it with both hands to avoid spilling water.
2. Remove the water filter from the water tank. Place it under running water.
Water filter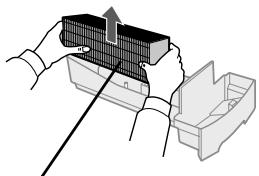
Run warm water through the filter to remove any buildup.
- Rinse the nozzle thoroughly with clean water or a toothbrush.
If you have difficulty swallowing
1 Fill the reservoir with warm water, add a mild cleaning agent, and leave it to soak for about 30 minutes.
Dilute the cleaning agent according to the instructions on the packaging.
Rinse the nozzle thoroughly with clean water or a toothbrush.
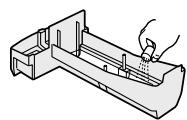
2 Rinse the reservoir with warm water.
Rinse until all traces of the cleaning agent are removed. - Incorrect rinsing may cause an unpleasant odor from the cleaning agent or alter the taste/color of the main component.
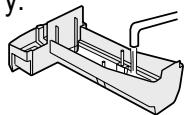
Warning
Use only cleaning agents suitable for the device. Using other chemicals or cleaning agents may cause deformation, damage, or malfunction.
If the nozzle falls out, place it back in position by inserting the nozzle opening into the reservoir with water, as shown in the figure.
Insert the nozzle opening downward.
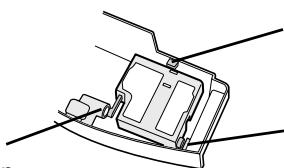
Insert the nozzle with the opening facing down.
Insert the opening on the other side of the nozzle.
After cleaning, first make sure the device is unplugged before checking the water level, and never touch it with wet hands. This can lead to electric shock or serious injury.
Maintenance period
One of the filters may need to be cleaned.
The maintenance interval (cleaning) will depend on the hardness of the water you use; the harder the water, the more often you need to clean.
Be careful not to run water through the filter without cleaning.
1 Disconnect the water supply and the hose for humidification. (See UA-11) 2 Remove the humidifying filter from the water hose.
Rinse the filter under running water. 3 Prepare a cleaning solution.
For cleaning, use citric acid, which can be purchased in stores, or 100% lemon juice in packages. Choose one of these products and prepare a cleaning solution.
Dissolve 2 tablespoons of citric acid in 2 1/2 cups of warm water in a container large enough for the filter and mix well.
<IF USING LEMON JUICE> 100% lemon juice can be used for cleaning. Use only 100% lemon juice without pulp (strain if necessary). Mix 1/4 cup of lemon juice with 3 cups of warm water in a container large enough to hold the humidifying filter, and mix well.
4 Soak the humidifying filter in the solution for 30 minutes before cleaning.
When using lemon juice, it is recommended to soak for a longer time. When using citric
acid.
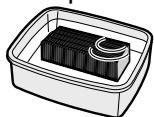
5 Rinse the humidifying filter several times to remove any remaining cleaning solution.
Improper cleaning may cause odors and affect the operation or appearance of the device.
Replace the water filter, carefully following the instructions.
Install the water filter into the water inlet, then install the water inlet back onto the appliance.
The water filter does not require a specific orientation in the housing (front/back, up/down).
If the appliance has not been used for a long time, dry the water filter before reinstalling it.
Plug the appliance into the outlet, turn on the power, and press the filter reset button on the display for 3 seconds to reset the filter indicator.
You may notice air bubbles or sediment on the surface of the water filter. These are caused by the presence of air in the water and are not defects. Replace
the water filter if it becomes clogged with sediment.
INSTRUCTIONS FOR FILTER REPLACEMENT
The filter's service life depends on the conditions of use, the operating period of the appliance, and the location of the appliance.
If the filter becomes clogged and odors appear, replace the filter.
(Read the instructions before using your new air filter.)
Instructions for filter replacement steps
TROUBLESHOOTING
Before contacting the service center, please review the troubleshooting table below, as the problem may not be due to a malfunction of the appliance.
1
JolSjLolzulwJl 1000

.
. 1
a 1111111111111111
∴ S = 4c + 3/2
1
J 1
Aaill Jiaedr. odJgldly
e 1
Jieiui iie aieidll jie yjoo
∴ 小小 √2
a 1 g i e j i die cll w s w . cll jw gl d al l o gdo j sai
A
1
2
Therefore, |x - 2| = |x - 4| = 1
KC-930EU


- Plasmacluster is a trademark of Sharp Corporation.

- PLEASE READ BEFORE OPERATING YOUR NEW AIR PURIFIER
- NOTE
- FEATURES
- PLASMACLUSTER" TECHNOLOGY
- CONTENTS
- IMPORTANT SAFETY INSTRUCTIONS
- PART NAMES
- PREPARATION
- OPERATION
- NOTE - RADIO OR TV INTERFERENCE
- CAUTIONS CONCERNING OPERATION
- INSTALLATION GUIDELINES
- FILTER GUIDELINES
- MAIN UNIT DISPLAY
- INCLUDED
- BACK
- FILTER INSTALLATION
- REMOVE THE FILTER
- INSTALL THE FILTER
- REFILLING THE WATER TANK
- CAUTION
- MAIN UNIT OPERATION
- POWER ON/OFF BUTTON
- MODE
- MODE BUTTON
- TO OPERATION
- LOW OPERATION
- MAX OPERATION
- MEDIUM OPERATION
- PLASMACLUSTER ION ON/OFF BUTTON
- FILTER INDICATOR LIGHT
- CARE CYCLE
- BACK PANEL AND SENSORS
- WATER TANK
- CARE CYCLE: EVERY DAY WHEN HUMIDIFYING
- UNIT
- CARE CYCLE: WHENEVER DUST ACCUMULATES ON THE UNIT OR EVERY 2 MONTHS
- HUMIDIFYING TRAY
- CARE CYCLE: 1 MONTH
- REMOVE THE WATER TANK AND HUMIDIFYING TRAY
- REMOVE THE HUMIDIFYING FILTER FROM THE HUMIDIFYING TRAY. DRAIN ACCUMULATED WATER BY TILTING THE HUMIDIFYING TRAY SLOWLY
- RINSE THE INSIDE OF THE HUMIDIFYING TRAY WITH LUKEWARM WATER TO REMOVE IMPURITIES
- WHEN WATER DEPOSITS ARE DIFFICULT TO REMOVE
- FILL HUMIDIFYING TRAY HALFWAY WITH LUKEWARM WATER, ADD A SMALL AMOUNT OF MILD KITCHEN DETERGENT, AND LEAVE TO SOAK FOR ABOUT 30 MINUTES
- RINSE THE HUMIDIFYING TRAY WITH LUKEWARM WATER
- HUMIDIFYING FILTER
- FILTER REPLACEMENT GUIDELINES
- GUIDE FOR FILTER REPLACEMENT TIMING
- REPLACING THE FILTER
- REPLACEMENT FILTERS
- DISPOSAL OF FILTER
- TROUBLESHOOTING
- STANDBY POWER
- INFORMATION ON DISPOSAL FOR USERS (PRIVATE HOUSEHOLDS)
- IN THE EUROPEAN UNION
- IN OTHER COUNTRIES OUTSIDE THE EU
- INFORMATION ON DISPOSAL FOR BUSINESS USERS
- SHARP "PLASMACLUSTER
- TECHNICAL SPECIFICATIONS...R
- WARNING
- NOTE: TV AND RADIO INTERFERENCE
- PRECAUTIONS FOR USE
- INSTALLATION INSTRUCTIONS
- FILLING THE WATER TANK
- PLASMACLUSTER ON/OFF BUTTON
- FILTER INDICATOR
- REAR PANEL AND SENSORS
- DO NOT USE AGGRESSIVE LIQUIDS
- DO NOT USE CLEANING AGENTS
- MAINTENANCE PERIOD
- REMOVE THE TANK AND THE WATER TANK
- REMOVE THE HUMIDIFYING FILTER FROM THE WATER TANK. SLIDE IT OUT SLOWLY, GENTLY TILTING THE TANK
- RINSE THE TANK WITH WARM WATER TO REMOVE ANY RESIDUE
- IF MINERAL DEPOSITS ARE DIFFICULT TO REMOVE
- FILL THE WATER TANK HALFWAY WITH WARM WATER, ADD A SMALL AMOUNT OF MILD DISH SOAP, AND LEAVE IT FOR ABOUT 30 MINUTES
- RINSE THE WATER TANK WITH WARM WATER
- HUMIDIFIER FILTER
- HNCTPYKUNNO CPOKAM 3AMEHBI CNJBTPOB
- TEXHNUECKNE XAPAKTEPNUCTNKN
- IN COUNTRIES OUTSIDE THE EU
- TROUBLESHOOTING CZ
- TECHNICAL DATA CZ
- ODOR
- TECHNICAL SPECIFICATIONS
- PLASMACLUSTER TECHNOLOGY
- IMPORTANT SAFETY INSTRUCTIONS...EN
- PREPARATION.. UA
- OPERATION.. UA
- MAINTENANCE......UA
- TROUBLESHOOTING UA
- SPECIFICATIONS UA
- FILTER MAINTENANCE INSTRUCTIONS
- REMOVAL
- FILL THE TANK WITH WATER
- PRECAUTIONS
- CONTROL PANEL
- POWER BUTTON
- AUTO OPERATION
- WORK MAX
- WORK MEDIUM
- PLASMACLUSTER ION BUTTON ON/OFF
- REPLACEMENT PERIOD
- BLOCK
- WATER FILTER
- REMOVE THE WATER TANK AND THE WATER FILTER
- REMOVE THE WATER FILTER FROM THE WATER TANK. PLACE IT UNDER RUNNING WATER
- RUN WARM WATER THROUGH THE FILTER TO REMOVE ANY BUILDUP
- IF YOU HAVE DIFFICULTY SWALLOWING
- FILL THE RESERVOIR WITH WARM WATER, ADD A MILD CLEANING AGENT, AND LEAVE IT TO SOAK FOR ABOUT 30 MINUTES
- RINSE THE RESERVOIR WITH WARM WATER
- ONE OF THE FILTERS MAY NEED TO BE CLEANED
- INSTRUCTIONS FOR FILTER REPLACEMENT
- INSTRUCTIONS FOR FILTER REPLACEMENT STEPS
- KC-930EU
Brand : SHARP
Model : KC-930EU
Category : Air purifier