
FP-P60CX - Air purifier SHARP - Free user manual and instructions
Find the device manual for free FP-P60CX SHARP in PDF.


| Product type | Air Purifier |
| Brand | Sharp |
| Model | FP-P60CX |
| Technology | Plasmacluster Ion |
| Recommended room size | Up to 30 m² |
| CADR (Clean Air Delivery Rate) | 120 m³/h |
| Fan speeds | 3 speed modes (Low, Medium, High) |
| Air quality sensor | Dust sensor |
| Noise level | 21 dB (silent) to 45 dB (high) |
| Power consumption | 30 W (max) |
| Power supply | AC 220-240 V, 50/60 Hz |
| Dimensions (W x D x H) | 390 x 245 x 570 mm |
| Weight | 4.5 kg |
| Filtration | Pre-filter, HEPA filter, activated carbon filter |
| Maintenance | Clean pre-filter every 2 weeks; replace HEPA filter every 2 years |
| Safety features | Child lock, automatic shut-off, safety circuit |
| Spare parts | HEPA and carbon filters are replaceable |
| Additional functions | Auto mode, sleep mode, timer (1-8 hours) |
Frequently Asked Questions - FP-P60CX SHARP
User questions about FP-P60CX SHARP
0 question about this device. Answer the ones you know or ask your own.
Ask a new question about this device
Download the instructions for your Air purifier in PDF format for free! Find your manual FP-P60CX - SHARP and take your electronic device back in hand. On this page are published all the documents necessary for the use of your device. FP-P60CX by SHARP.
USER MANUAL FP-P60CX SHARP
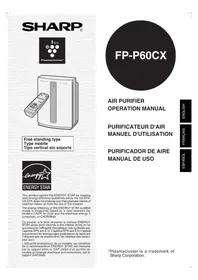
Free standing type Type mobile Tipo vertical sin soporte

This product earned the ENERGY STAR by meeting strict energy efficiency guidelines set by the US EPA. US EPA does not endorse any manufacturer claims of healthier indoor air from the use of this product.
The energy efficiency of this ENERGY STAR qualified model is measured based on a ratio between the model's CADR for Dust and the electrical energy it consumes, or CADR/Watt.
*Plasmacluster is a trademark of Sharp Corporation.
Please read before operating your new Air Purifier
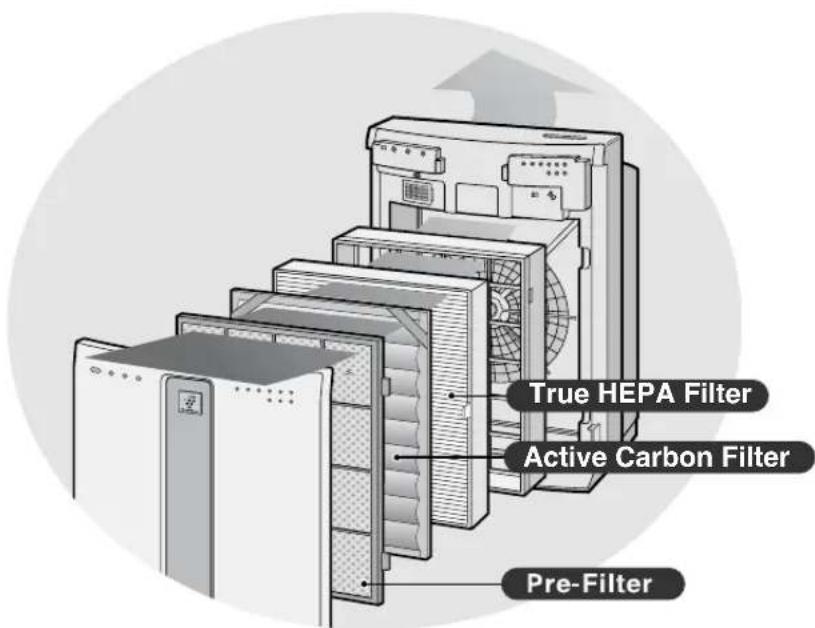
The air purifier draws in room air from its air intake, lets the air pass through a Pre-Filter, an Active Carbon Filter (deodorization filter) and a True HEPA Filter (dust collection filter) inside of the unit, then discharges the air from its air outlet. The air purifier unit repeats this process by moving its internal fan. As air passes through, a new True HEPA Filter can remove 99.97% of dust particles, of as small as 0.3 microns. The Active Carbon Filter gradually absorbs odor elements as they repeatedly pass through the filter. (Odor elements are absorbed by the True HEPA Filter as well.)
Some odor ingredients absorbed by the filters may become separated and may be discharged through the air outlet and result in additional odor. Depending on the usage environment, especially when the product is used in a condition significantly more severe than normal household use, this odor may become strong in a shorter period than expected.
If the odor persists, then the filters are fully expended and it is necessary to purchase the optional replacement Iter kit FZ-P65HFU.
NOTE
- The air purifier is designed to remove air-suspended dust and odor, but not harmful gases (for example, carbon monoxide contained in cigarette smoke). If the odor sources still exist, it cannot completely remove the odor. (for example, odors from construction materials and pet odors).
- It is suggested to open the window a bit when you are smoking in order to facilitate ventilation.
ENGLISH
FEATURES
Plasmacluster Ion Control
The unit controls the ratio of negative ions and positive ions depending on the condition of the room.
- Clean Mode
Approximately the same numbers of positive and negative ions are discharged.
- Ion Control Mode
Plenty of negative ions exist in natural surroundings such as waterfalls or forests. In this mode, negative ions will be released at an increased rate, in order to bring the room air close to this natural environment.
• AUTO Plasmacluster Ion Mode
The unit will switch between Clean Mode and Ion Control Mode automatically depending on the amount of impurities in the air detected by the odor sensor.
• NIGHT Mode
The fan speed is automatically switched between NORMAL and SILENT, depending on the amount of impurities in the air.
The Plasmacluster Indicator Light and Clean-Sign Light will turn off.
- Filters
1) Pre-Filter
It collects large particles.
2) Washable Active Carbon Filter
Absorbs odor elements.
Washable to maintain optimum deodrization performance.
3) True HEPA (High Efficiency
Particulate Air) Filter with Microbial Control Filter
High-efficiency particle collection including pollen and dust.
Declaration of Conformity
SHARP AIR PURIFIER FP-P60CX
This device complies with Part 18 of FCC rules.
Responsible Party:
SHARP ELECTRONICS CORPORATION
Sharp Plaza,
Mahwah, New Jersey 07430-2135
TEL: 1-800-BE-SHARP
Declaration of Conformity
SHARP AIR PURIFIER FP-P60CX
This ISM device complies with Canadian ICES-001
Responsible Party:
SHARP ELECTRONICS OF CANADA LTD.
335 Britannia Road East Mississauga, Ontario
L4Z 1W9 Canada
TEL: (905) 568-7140
CONTENTS
FOR CUSTOMER ASSISTANCE(U.S) .....E-2
CONSUMER LIMITED WARRANTY(U.S).... E-3
FOR CUSTOMER ASSISTANCE(CANADA) ... E-4
LIMITED WARRANTY(CANADA) ...... E-5
IMPORTANT SAFETY INSTRUCTIONS .. E-6
- WARNING E-6
- CAUTIONS CONCERNING OPERATION .E-7
- REMOTE CONTROL LIMITATIONS ......E-7
• INSTALLATION GUIDELINES ..... E-7
• FILTER GUIDELINES .....E-7
PART NAMES ...... E-8
- MAIN UNIT DISPLAY ....E-8
• INCLUDED.....E-8 - BACK E-8
PREPARATION...... E-9
- INSERTING BATTERIES IN THE REMOTE CONTROL ....E-9
- REMOTE CONTROL USE ......E-9
• FILTER INSTALLATION ...... E-10
OPERATION E-12
Thank you for purchasing the SHARP Air Purifier. Please read this manual carefully for the correct usage information. Before using this product, be sure to read the section: "Important Safety Instructions."
After reading this manual, retain it in a convenient location for future reference.
FOR CUSTOMER ASSISTANCE(the United States)
To aid in answering questions if you call for service or for reporting loss or theft, please use the space below to record the model and serial number located on the back side of the unit.
MODEL NUMBER
SERIAL NUMBER
DATE OF PURCHASE
Dealer Name
Address
City
State
Zip
Telephone
TO PHONE: Dial 1-800-BE-SHARP (237-4277) for:
SERVICE (for your nearest Sharp Authorized Servicer)
PARTS (for your Authorized Parts Distributor)
ACCESSORIES
ADDITIONAL CUSTOMER INFORMATION
TO WRITE: For service problems, warranty information, missing items and other assistance:
Sharp Electronics Corporation
Customer Assistance Center
1300 Naperville Drive
Romeoville, IL 60446-1091
TO ACCESS OUR WEB SITE: www.sharpusa.com
Please provide the following information when you write or call: model number, serial number, date of purchase, your complete mailing address (including zip code), your daytime telephone number (including area code) and description of the problem.
CONSUMER LIMITED WARRANTY
CONSUMER LIMITED WARRANTY FOR U.S. USERS
SHARP ELECTRONICS CORPORATION warrants to the first consumer purchaser that this Sharp brand product (the "Product"), when shipped in its original container, will be free from defective workmanship and materials, and agrees that it will, at its option, either repair the defect or replace the defective Product or part thereof with a new or remanufactured equivalent at no charge to the purchaser for parts or labor for the period(s) set forth below.
This warranty does not apply to any appearance items of the Product nor to the additional excluded item(s) set forth below nor to any Product the exterior of which has been damaged or defaced, which has been subjected to improper voltage or other misuse, abnormal service or handling, or which has been altered or modified in design or construction.
In order to enforce the rights under this limited warranty, the purchaser should follow the steps set forth below and provide proof of purchase to the servicer.
The limited warranty described herein is in addition to whatever implied warranties may be granted to purchasers by law. ALL IMPLIED WARRANTIES INCLUDING THE WARRANTIES OF MERCHANTABILITY AND FITNESS FOR USE ARE LIMITED TO THE PERIOD(S) FROM THE DATE OF PURCHASE SET FORTH BELOW. Some states do not allow limitations on how long an implied warranty lasts, so the above limitation may not apply to you.
Neither the sales personnel of the seller nor any other person is authorized to make any warranties other than those described herein, or to extend the duration of any warranties beyond the time period described herein on behalf of Sharp.
The warranties described herein shall be the sole and exclusive warranties granted by Sharp and shall be the sole and exclusive remedy available to the purchaser. Correction of defects, in the manner and for the period of time described herein, shall constitute complete fulfillment of all liabilities and responsibilities of Sharp to the purchaser with respect to the Product, and shall constitute full satisfaction of all claims, whether based on contract, negligence, strict liability or otherwise. In no event shall Sharp be liable, or in any way responsible, for any damages or defects in the Product which were caused by repairs or attempted repairs performed by anyone other than an authorized servicer. Nor shall Sharp be liable or in any way responsible for any incidental or consequential economic or property damage. Some states do not allow the exclusion of incidental or consequential damages, so the above exclusion may not apply to you.
THIS WARRANTY GIVES YOU SPECIFIC LEGAL RIGHTS. YOU MAY ALSO HAVE OTHER RIGHTS WHICH VARY FROM STATE TO STATE.
Your Product Model Number & Description:
FP-P60CX Air Purifier. Be sure to have this information available when you need service for your Product.
Warranty Period for this Product:
One (1) year parts and labor from date of purchase.
Additional Item(s) Excluded From Warranty Coverage:
Appearance items of the Product, filters, accessories, or any printed materials. Product which has been used for rental and/or commercial purposes.
Where to Obtain Service:
From a Sharp Authorized Servicer located in the United States. To find the location of the nearest Sharp Authorized Servicer, call Sharp Toll Free at 1-800-BE-SHARP.
What to Do to Obtain Service:
Ship prepaid or carry in your Product to a Sharp Authorized Servicer. Be sure to have Proof of Purchase available. If you ship the Product, be sure it is insured and packaged securely.
TO OBTAIN SUPPLY, ACCESSORY OR PRODUCT INFORMATION, CALL 1-800-BE-SHARP, OR VISIT OUR WEBSITE AT www.sharpusa.com
SHARP®
SHARP ELECTRONICS CORPORATION
Sharp Plaza, Mahwah, New Jersey 07430-2135
FOR CUSTOMER ASSISTANCE (Canada)
To aid in answering questions if you call for service or for reporting loss or theft, please use the space below to record the model and serial number located on the back side of the unit.
| MODEL NUMBER |
| SERIAL NUMBER |
| DATE OF PURCHASE |
| Dealer Name |
| Address |
| City |
| Province |
| Postal Code |
| Telephone |
TO PHONE: Dial 1-905-568-7140 for:
SERVICE (for your nearest Sharp Authorized Servicer)
PARTS (for your Authorized Parts Distributor)
ACCESSORIES
ADDITIONAL CUSTOMER INFORMATION
TO WRITE: For service problems, warranty information, missing items and other assistance:
Sharp Electronics of Canada Ltd.
Customer Care
335 Britannia Road East
Mississauga, Ontario L4Z 1W9
TO ACCESS OUR WEB SITE: www.sharp.ca
Please provide the following information when you write or call: model number, serial number, date of purchase, your complete mailing address (including Postal Code), your daytime telephone number (including area code) and description of the problem.
SHARP®
LIMITED WARRANTY (VALID IN CANADA ONLY)
Consumer Electronics Products
Congratulations on your purchase!
Sharp Electronics of Canada Ltd. (hereinafter called "Sharp") gives the following express warranty to the first consumer purchaser for this Sharp brand product, when shipped in its original container and sold or distributed in Canada by Sharp or by an Authorized Sharp Dealer:
Sharp warrants that this product is free, under normal use and maintenance, from any defects in material and workmanship. If any such defects should be found in this product within the applicable warranty period, Sharp shall, at its option, repair or replace the product as specified herein.
This warranty shall not apply to:
(a) Any defects caused or repairs required as a result of abusive operation, negligence, accident, improper installation or inappropriate use as outlined in the owner's manual.
(b) Any Sharp product tampered with modi ed, adjusted or repaired by any party other than Sharp, Sharp's Authorized Service Centres or Sharp's Authorized Servicing Dealers.
(c) Damage caused or repairs required as a result of the use with items not specified or approved by Sharp, including but not limited to head cleaning tapes and chemical cleaning agents.
(d) Any replacement of accessories, glassware, consumable or peripheral items required through normal use of the product including but not limited to earphones, remote controls, AC adapters, batteries, temperature probe, stylus, trays, Iters, belts, ribbons, cables and paper.
(e) Any cosmetic damage to the surface or exterior that has been defaced or caused by normal wear and tear.
(f) Any damage caused by external or environmental conditions, including but not limited to transmission line/power line voltage or liquid spillage.
(g) Any product received without appropriate model, serial number and CSA and/or cUL markings.
(h) Any products used for rental or commercial purposes.
(i) Any installation, setup and/or programming charges.
Should this Sharp product fail to operate during the warranty period, warranty service may be obtained upon delivery of the Sharp product together with proof of purchase and a copy of this LIMITED WARRANTY statement to an Authorized Sharp Service Centre or an Authorized Sharp Servicing Dealer. In home warranty service may be provided at Sharp's discretion on any Sharp television with the screen size of 27" or larger and on any Sharp Over-the-Range Microwave Oven.
This warranty constitutes the entire express warranty granted by Sharp and no other dealer, service centre or their agent or employee is authorized to extend, enlarge or transfer this warranty on behalf of Sharp. To the extent the law permits, Sharp disclaims any and all liability for direct or indirect damages or losses or for any incidental, special or consequential damages or loss of profits resulting from a defect in material or workmanship relating to the product, including damages for the loss of time or use of this Sharp product or the loss of information. The purchaser will be responsible for any removal, reinstallation, transportation and insurance costs incurred. Correction of defects, in the manner and period of time described herein, constitute complete fulfillment of all obligations and responsibilities of Sharp to the purchaser with respect to the product and shall constitute full satisfaction of all claims, whether based on contract, negligence, strict liability or otherwise.
WARRANTY PERIODS: Parts & Labour (exceptions noted)
Audio Products 1 year
Camcorder 1 year
DVD Products 1 year
LCD Projector 1 year (lamp 90 days)
LCD TV 1 year
Microwave Oven 1 years (magnetron component-4 additional years)
Television Products 1 year (picture tube component-1 additional year)
VCR Products 1 year
Vacuum Cleaner
1 year
Air Puri er & Air Conditioners
1 year (except Iters)
To obtain the name and address of the nearest Authorized Sharp Service Centre or Dealer, please contact: SHARP ELECTRONICS OF CANADA LTD. 335 Britannia Road, East Mississauga, Ontario L4Z 1W9
For more information on this Warranty, Sharp Canada Products,
Accessory Sales, Dealer or Service Locations, please call
(905)568-7140
Visit our Web site: www.sharp.ca


IMPORTANT SAFETY INSTRUCTIONS
When using electrical appliances, basic safety precautions should be followed, including the following:
WARNING - To reduce the risk of electrical shock, re or injury to persons:
- Read all instructions before using the air puri er.
- Use only a 120 volt outlet.
- The air purifier has a polarized plug (one blade is wider than the other is). This plug will fit in a polarized outlet only one way. Initially, if the plug does not fit into the outlet, reverse it. If it still does not t, contact a quali ed electrician or service person.
- Do not use the air purifier if the power cord or plug is damaged or the connection to the wall outlet is loose.
• Periodically remove dust from the power plug. - Do not insert ngers or foreign objects into the intake or air outlet.
- When removing the power plug, always hold the plug and never pull the cord. Electrical shock and/or re from short circuit may occur as a result.
- Do not remove the power plug when your hands are wet.
- Do not use this air puri er near gas appliances or replaces.
- Remove the power plug from the wall outlet before cleaning the unit and when not using the unit.
Electrical shock from bad insulation and/or re from short circuit may occur as a result. - If the power cord is damaged, it must be replaced by the manufacturer, its service agent, Sharp authorized Service Center or similarly qualified person in order to avoid a hazard.
- Do not operate when using aerosol insecticides or in rooms where there is oily residue, incense, sparks from lit cigarettes, chemical fumes in the air or under a humid condition.
- Be cautions when cleaning the air puri er. Strong corrosive cleansers may damage the exterior.
- Only Sharp Authorized Service Centre should service this air purifier. Contact the nearest Service Centre for any problems, adjustments, or repairs.
- The batteries must be removed from the remote control before disposal, and the batteries must be disposed of safely.
NOTE - Radio or TV Interference
If this air purifier should cause interference to radio or television reception, try to correct the interference by one or more of the following measures:
- Reorient or relocate the receiving antenna.
- Increase the separation between the air puri er and radio/TV receiver.
- Connect the equipment into an outlet on a circuit different from that to which the receiver is connected.
- Consult the dealer or an experienced radio/TV technician for help.
This product ful Is the requirement of the International standard CISPR 11.
In conformity with this standard, this product is classi ed as group 2 class B equipment.
Group 2 means that the equipment intentionally generates radio-frequency in the form of electromagnetic radiation for electro-discharge machining equipment.
Class B equipment means that the equipment suitable to be used in domestic establishments.
CAUTIONS CONCERNING OPERATION
- Do not block the intake and air outlet.
- Do not use the unit near or on hot objects, such as stoves or heaters or where it may come into contact with steam.
- Do not lay the unit down when using.
• Always hold the handle on the back of the main unit when moving it.
Holding the front panel when carrying may cause it to detach, thus dropping the unit and resulting in bodily injury.
- Do not operate the unit without the Iter.
- Do not wash and reuse HEPA Iter.
Not only does it not improve Iter performance, it may cause electric shock or malfunction.
- Clean the exterior with a soft cloth only.
The unit surface may be damaged or cracked.
In addition, the sensor may malfunction as a result.
REMOTE CONTROL LIMITATIONS
DO NOT USE THE REMOTE CONTROL IN THE FOLLOWING LOCATIONS:
- Any location where there is inverter lighting equipment or electronic spontaneous lighting equipment
The remote control may become inoperative. In this case, move away from such lighting equipment or change direction.
- Location exposed to direct sunlight or fluorescent.
The unit may not receive signals from the remote control.
INSTALLATION GUIDELINES
- During the operation of the product, please place the unit at least 7 feet(2m) away from equipment which involve electric wave such as televisions, radios or wave clocks, in case electrical interference occurs to such equipment.
- Avoid a location where the sensor is exposed to direct wind.
The unit may not operate properly.
- Avoid locations where curtains, etc., come into contact with the intake or air outlet.
Curtains, etc., may become dirty or a malfunction may occur.
- Avoid locations where the unit is exposed to condensation, due to drastic temperature changes.
(Use under appropriate conditions between 0 and 35°C in the room.)
- Place on a stable surface with sufficient air circulation.
When placing the unit on a heavily carpeted area, it may cause the unit to vibrate slightly.
- Do not install when there is generation of lampblack, such as in a kitchen, etc.
The unit surface may crack or the sensor may malfunction as a result.
- Leave about 2 feet (60cm) of space from the wall.
The wall behind the air outlet may become dirty as time passes. When using the unit for extended period of time in the same location, use a vinyl sheet, etc., to prevent the wall from becoming dirty. In addition, periodically clean the wall.
FILTER GUIDELINES
- Follow the instructions in this manual for correct care and maintenance of the Iters.
PART NAMES
MAIN UNIT DISPLAY
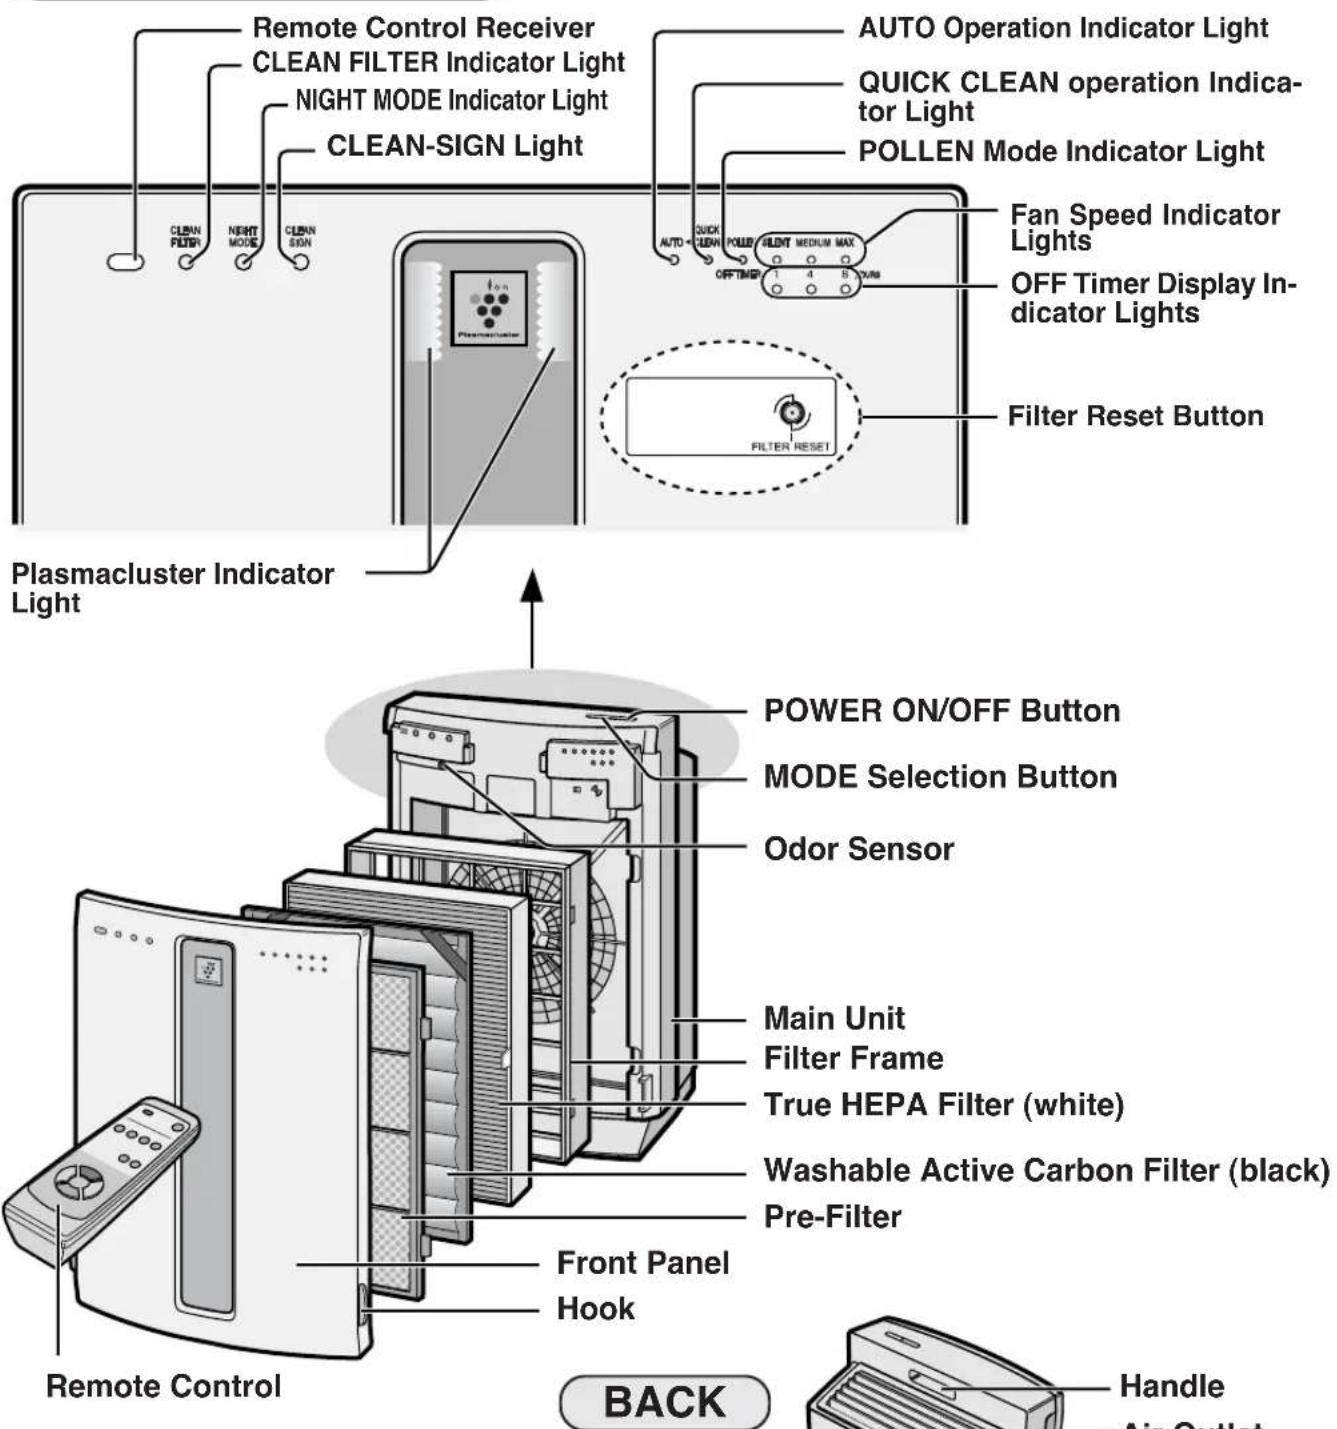
INCLUDED
Remote Control (1 unit)
Battery (AA battery x 2)
• Operation manual

(Shape of plug depends on country.)
INSERTING BATTERIES IN THE REMOTE CONTROL

1 Remove the back cover
Press and slide the back cover to remove.
Insert batteries
Insert batteries with ⊕ and ⊖ as shown below.
3 Close the back cover
Battery Information
• The battery life is about 1 year.
- The batteries for this remote control are for initial use only. Change the batteries when necessary.
- Incorrect usage of the batteries may cause battery uid leakage and/or damage. Take care of the following when handling:
- When replacing the batteries, replace both batteries with new ones of the same type. (Use 2 AA manganese batteries.)
- When not using the unit or remote control for an extended period, remove the batteries.
REMOTE CONTROL USE
- Operate the remote control facing the main unit receiver.
• The signal range is about 23 feet (7m). - Make sure there are no objects blocking the path of the signal.
- A beep sound will be heard from the main unit when a signal is received.
NOTE
- Avoid dropping or damaging the remote control, using in a high humidity condition, in direct sunlight or near a heat source.

FILTER INSTALLATION
To maintain the quality of the filters, they are installed in the main unit and packed in plastic bags. Be sure to remove the iters from the plastic bags before using the unit.
1 Remove the Iters
1 Remove the Front Panel.
Pull the bottom of the Front Panel.

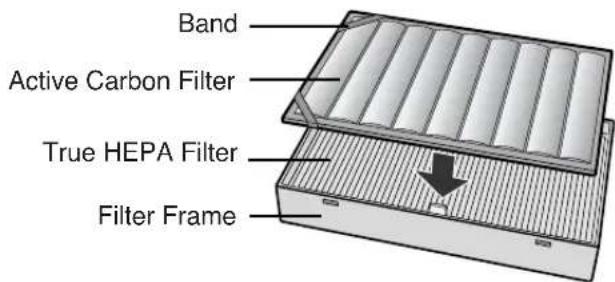
2 Pull out the Filter Frame and remove the Pre-Filter, Active Carbon Filter and True HEPA Filter.
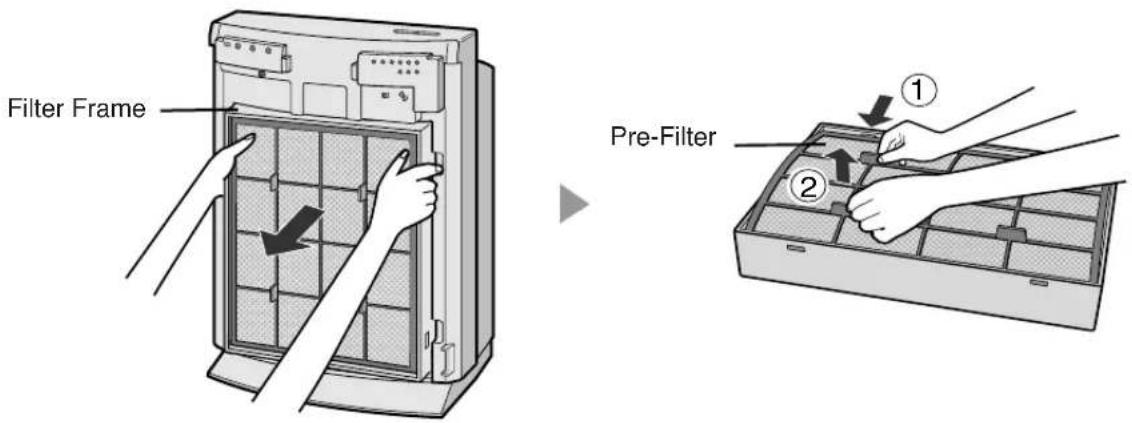
3 Remove the Active Carbon Filter (black) and True HEPA Filter (white) from the plastic bags.
Active Carbon Filter True HEPA Filter


Install the Iters
1 Place the True HEPA Filter within the Filter Frame with the tabs facing up.
Do not install the filter backwards or the unit will not operate properly.
2 Place the Active Carbon Filter on top of the True HEPA Filter with the bands (2 places) facing up.
3 Place the Pre-filter through the bands (2 places) located at the corners of the Active Carbon Filter.
Insert the tabs of the pre-filter into the associated holes of the Filter Frame.
4 Mount the Filter Frame to the main unit.
5 Fix the Front Panel to the main unit.
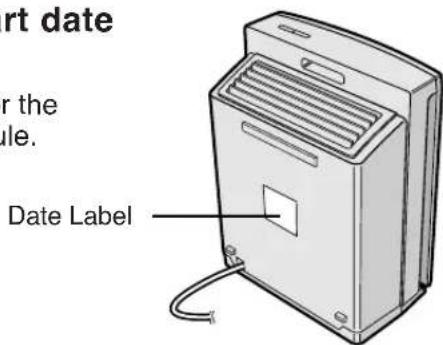
6 Fill in the usage start date on the Date Label.
Use the date as a guide for the Filter Replacement schedule.



Main Unit Controls
• AUTO
- QUICK CLEAN
• POLLEN
• SILENT
• MEDIUM
• MAX
• NIGHT MODE
MAIN UNIT OPERATION
CLEAN FILTER Indicator Light
NIGHT MODE Indicator Light
CLEAN SIGN Light
Plasmacluster Indicator Light
MODE Selection Button
Power ON/OFF Button

Power ON/OFF Button
• Used to start operation (short beep) and stop operation (long beep)
- Plasmacluster Indicator Light and Fan Speed Indicator Light turn on/off.
- Unless unplug the power cord, is unplugged the operation starts in the previous mode the unit was operated in.
MODE Selection Button
- The operation mode can be switched, and the Indicator Light will turn on.
AUTO operation
The fan speed is automatically switched (HIGH*, MEDIUM, SILENT) depending on the amount of impurities in the air. The sensors detect the impurities for efficient air purification.
QUICK CLEAN operation
The unit will operate at HIGH* fan speed for 15 minutes, then will operate at Auto operation.
The operation mode is effective when quick removal of impurities in the air is desired.
POLLEN mode operation
The unit will operate at HIGH* fan speed for 10 minutes, then will alternate between NORMAL and HIGH for 20 minutes.
10 minutes: HIGH fan speed
20 minutes: MEDIUM fan speed
20 minutes: HIGH fan speed
NIGHT MODE Operation
The fan speed is automatically switched between MEDIUM and SILENT, depending on the amount of impurities in the air. The Plasmacluster Indicator Light and Clean-Sign Light will turn off.
MAX operation
The unit will operate at a fan speed of MAX.
MEDIUM operation
The unit will operate at a fan speed of MEDIUM.
SILENT operation
The unit will operate quietly using minimal air intake.
* HIGH fan speed is an intermediate speed between MEDIUM and MAX.
PLASMACLUSTER INDICATOR LIGHT
Plasmacluster ion operation is selected using the remote control.
Blue light
When the Plasmacluster ion operation is in Clean Mode, or in AUTO Plasmacluster Ion Mode and the air in the room is impure, the Plasmacluster ions will be released continuously.
Green light
When the Plasmacluster ion operation is in the Ion Control Mode, or in AUTO Plasmacluster Ion Mode and the air in the room is clean, this light will be activated and the unit will operate in Ion Control Mode.
Light off
There are no Plasmacluster ions being generated.
- The light can be turned off by using the 'LIGHTS ON/OFF Button' on the Remote Control. In this case, Plasmacluster ions are generated.
(Please turn off the light if desired.)
CLEAN-SIGN LIGHT
The color changes according to the air condition.

Clean (Green) Slightly Impure (Orange) Very Impure (Red)


ABOUT THE CLEAN-SIGN
- The condition of the CLEAN-SIGN depends on the room air condition detected by the Odor Sensor when the plug is inserted into the wall outlet.
- It is possible to have a green CLEAN-SIGN with impurities in the air at the time that the air purifier was just introduced to the room environment. After a while, however, the base impurity rate will be adjusted to detect room air condition correctly.
- Use the Lights ON/OFF Button on the remote control to turn off the Indicator lights if desired.
DETERMINING THE BASE IMPURITY RATE
For the first 30 seconds after the power plug is inserted into the wall outlet, the unit will check the conditions of the air. If operation is set to ON during this time, the CLEAN-SIGN LIGHT will alternately flash in green, orange and red.
CLEAN FILTER INDICATOR LIGHT
CLEAN FLTER
O
Clean the Pre-Filter and the Active Carbon Filter when the CLEAN FILTER Indicator Light is on. (The indicator light will be activated in about 2 months, when using the unit for 24 hours a day.) (See Page E-16)
OPERATION
Operations available with the Remote Control
• AUTO
- MANUAL
• POLLEN
- OFF TIMER
• NIGHT MODE
- Quick CLEAN
• LIGHTS ON/OFF
Plasmacluster Ion mode selections
• AUTO
- CLEAN
- ION CONTROL
· OFF
POWER ON/OFF Button
- When you press the POWER ON/OFF Button, a short beep will sound and operation will start in AUTO Mode.
- Unless the power cord has been unplugged the operation starts from the previous mode the unit was operated in.
- To stop, press the POWER ON/OFF Button again. A long beep will sound and operation will stop.
Auto (Fan Speed) Button
The fan speed switches automatically depending on the amount of impurities in the air.
Manual (Fan Speed) Button
The fan speed can be switched among SILENT, MEDIUM and MAX settings.
NIGHT MODE Button
See page E-12
QUICK CLEAN Button
See page E-12
LIGHTS ON/OFF Button
Switches the Plasmacluster Indicator Light and CLEAN-SIGN Light either ON or OFF.

Transmitter
Filter Reset Button
When the Washable Active Carbon Filter is cleaned and reinserted into the main unit, press the Filter Reset Button.
Pollen Mode Operation Button
See Page E-12
Off Timer Button
The set time switches every time the button is pressed as shown below.
![graph LR A["1 hour"] --> B["4hours"] B --> C["8 hours"] C --> D["Cancel"] D --> A](/content/2026/08/1623644/images/d8c42c9ae45526a66ac208ac521c4496efe243ddb513a6097fb5ba143792e27f.jpg)
• The indicator light shows the remaining time.
- The unit will stop operation when the time is up.
Plasmacluster Ion Mode Selections
AUTO
When pressed, the unit will switch between Clean Mode and the Ion Control Mode automatically depending on the amount of impurities in the air as detected by the odor sensor. Clean Mode will operate for 1 minute when the Auto function is selected.
ION CONTROL
When pressed, the unit will constantly operate in Ion Control Mode.
The Plasmacluster Ion Indicator Light is green.
CLEAN
When pressed, the unit will constantly operate in the Clean Mode, in which the same numbers of positive and negative ions are discharged. The Plasmacluster Indicator Light is blue.
OFF
The generation of ions will be ceased and the Plasmacluster Indicator Light will go out.
CARE AND MAINTENANCE
To maintain optimum performance of this air purifier, please clean the unit including the sensor and Iters periodically.
When cleaning the unit, be sure to unplug the power cord, and never handle the plug with wet hands. Electrical shock and/or bodily injury may occur as a result.
MAIN UNIT
Care Cycle 1 month
To prevent dirt or stains on the main unit, clean as often as necessary. If stains are allowed to remain, they may become hard to clean.
Wipe with a dry, soft cloth
For stubborn stains or dirt, use a soft cloth dampened with warm water.
Do not use volatile uids
Benzene, paint thinner, polishing powder, etc., may damage the surface.
Do not use detergents
Detergent ingredients may damage the unit.
Keep the unit away from water
ODOR SENSOR
Care Cycle 2 months
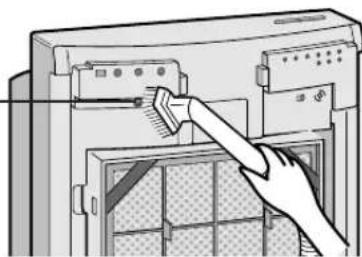
The sensitivity of the sensor will become unstable if the odor sensor is dirty or blocked. Remove dust from the surfaces of the sensor openings using a vacuum cleaner.
Opening of odor sensor
FILTER CLEANING
Care Cycle 2 months
Remove the Front Panel, Clean the surface of the Pre-Filter lightly with a vacuum cleaner. If it is very dirty remove it from the Filter Frame and wash it.
NOTE
• In case of washing, use a soft brush etc. and cold/warm water.
- Metal brushes or scrub brushes may cause damage.
• After washing, leave it in the shade until it is dry. Then place it back to the frame.
- Never wash or clean the True HEPA Filter using the nozzle of a vacuum cleaner directly.
This will greatly decrease the performance of the Iters.

CARE AND MAINTENANCE
WASHABLE ACTIVE CARBON FILTER CARE
HAND WASH ONLY! DO NOT TUMBLE DRY!
Care Cycle
When the CLEAN FILTER Indicator Light illuminates, this indicates that the filter needs to be cleaned. If the unit is kept on 24 hours a day then the CLEAN Filter Indicator Light will be activated in about 2 months.
The CLEAN FILTER Indicator Light is for reference. Clean the filter as often as necessary when odor persists.
1 Remove visible dirt with a vacuum cleaner.

2 Fill a large container up with warm water, add a mild kitchen detergent and stir.
Dilute as indicated on the detergent container.

3 Allow the filter to soak approximately 30 minutes before washing.
If the filter surface is very dirty, scrub with an old tooth-brush.

CAUTION
Handle with care to prevent damage to the activated carbon particles.

4 Rinse thoroughly with clean water
CAUTION
If rinsing in a container, be sure to rinse 3 to 4 times so that the odor is rinsed thoroughly from the filter.

5 Remove excess water
The filter will be saturated with water after rinsing. To decrease drying time, wrap the filter in an old thick towel so that excess water can be removed.
CAUTION
• Some carbon may adhere to the towel, but it is harmless.
- Do not wring out the filter.


6 Dry the filter outdoors if possible in a well ventilated area.
CAUTION
- The wet filter is heavy. Fix it securely for drying to make sure it does not fall down.
• The filter takes longer to dry in winter, and on rainy days. Wash it on a day when the weather is good and dry it in the sun.
Move it indoors at night to prevent freezing.
- Dry the filter outdoors in a well ventilated area. If dried indoors, the water dripping off the filter may soil your floor.
- Make sure that the activated carbon has not shifted to one side inside the filter. If it has, distribute it evenly with your ngers.
- Let the Iter dry thoroughly. If used while the filter is still moist, then the air that is exhausted from the main unit will have an odor. It may take 1 or 2 days to dry.
7 Reinstalling the Filter.
Reinstall the filter as shown on Page E-10,11
8 Once the Active Carbon Filter has been cleaned, connect the power cord to the outlet and press the Filter Reset Button on either the Remote Control or Main Unit.
- Once the Filter Reset Button has been activated, you will hear a beep sound that means the unit has been reset.
• The Filter indicator light will then go out automatically.

Filter Reset Button
FILTER REPLACEMENT GUIDELINES
Depending on the usage environment, air outlet odor may become strong after several months.
If dust or odors cannot be removed easily, replace the Iters.
(Refer to please read before operating new Air puri er E-0)
Guide for Iter replacement timing
- Filter life can be greatly reduced in poor environments. The presence of cigarette smoke, pet dander and other concentrations of airborne particles will cause Iters to become clogged in less time. Please check Iters regularly and replace as needed.
- True HEPA Filter
- Active Carbon Filter
Up to 5 years after opening Up to 5 years after opening
REPLACING THE FILTERS
1 See page E-10,11 for directions on how to install the Iters when replacing.
2 After replacing the Iters:
Be sure to press the Filter Reset Button on either the Remote Control or Main Unit with the power cord connected to the outlet.
A short beep will be heard and the operation hours stored in the memory will be reset.
The CLEAN FILTER Indicator Light will then go out automatically.
3 Fill in the usage start date of the filters on the Date Label.

Replacement Filters
Model: FZ-P65HFU
• True HEPA Filter : 1 unit
• Active Carbon Filter: 1 unit
Please consult your dealer for purchase of replacement filters.
Date Label

Disposal of Filters
Please dispose of replaced Iters according to the local disposal laws and regulations.
True HEPA Filter materials:
- Filter: Polypropylene
- Frame: Polyester
- Microbial Control Filter: Polypropylene, Polyethylene
Active Carbon Filter Materials: - Deodorizer: Activated charcoal
• Net: Polypropylene 60%, Polyester 40%
TROUBLESHOOTING
Before calling for repair, please review the list below, since the problem may not be a unit malfunction.
| SYMPTOM | REMEDY (not a malfunction) |
| The Remote Control does not work | Have the batteries been depleted?Are the batteries inserted correctly?Is a fluorescent light in the room flickering due to service life? |
| Odors and smoke are not removed | Clean or Replace the filters if they appear to be heavily soiled.(Refer to E-16,E-17) |
| The CLEAN-SIGN Light illuminates green even when the air is impure | The air could be impure at the time the unit was plugged in.(Refer to E-13) Pull out the plug from the electrical outlet, and insert the plug one minute later. |
| The CLEAN-SIGN Light illuminates orange or red even when the air is clean | The sensitivity of the sensor becomes unstable when the opening of the odor sensor is dirty or is clogged.Clean the dust around the sensor opening using a vacuum cleaner. (Refer to E-15) |
| The Plasmacluster Indicator Light remains green (or blue) and does not change | When in Ion Control Mode ( or Clean Mode), the Plasmacluster Indicator Light color will not change. |
| A clicking or ticking sound is heard from the unit | Clicking sound or ticking sound is emitted when the unit is generating ions. |
| The discharged air has an aroma or odor. | Check to see if the Iters are heavily soiled.Clean or Replace the Iters.Plasmacluster Air Purifiers emit small traces of ozone which may produce an odor. These ozone emissions are well below safety levels . |
| The unit does not operate when cigarette smoke is in the air. | Is the unit installed in a location that is difficult for the sensor to detect cigarette smoke?Is the odor sensor opening blocked or clogged?(In this case, clean the openings.) (Refer to E-15) |
| The CLEAN FILTER Indicator Light remains activated even after replacing Iter. | After replacing filters, connect the power cord to an outlet and press the Filter Reset Button on the remote control. (Refer to E-16) |
| The Plasmacluster Indicator Light or the CLEAN-SIGN Light will not activate. | Check to see if the Display OFF Mode on the Remote Control is selected. If so, press the Display ON/OFF Button on the Remote Control to activate the indicator light.(Refer to E-14) |
ERROR DISPLAY
| LAMP INDICATION | REMEDY |
| The “Silent” Fan Speed Indicator Light blinks. | Fan motor disconnected or abnormal.Operation stops.Pressing the ON/OFF button will reset the error display, but if error occurs again, contact the Sharp Service Center. |
SPECIFICATIONS
| Model | FP-P60CX | |||
| Power supply | 120V 60Hz | |||
| Fan Speed Operation | Fan Speed Adjustment | MAX | MED | SILENT |
| Rated Power | 72W | 13 W | 4.0 W | |
| Fan Speed CFM (m3/min) | 233(6.6) | 109(3.1) | 31(0.9) | |
| Noise Level | 52 dBA | 35 dBA | 14 dBA | |
| Applicable Floor Surface | 330sq.ft(31m2)*1 | |||
| CADR(Dust/Smoke/Pollen) | 209 / 213 / 205 | |||
| Cord Length | 5.3ft(2.5m) | |||
| Dimensions | 16-11/32in(W)x9-1/2in(D)x22-17/32in(H)415mm(W)x241(D)x572(H) | |||
| Weight | 19.2lbs(8.7kg) | |||
| Filter type | Dust collection | Pre- Iter & True HEPA with Microbial control | ||
| Deodorization | Washable Active Carbon | |||
| Sensors | Odor | |||
| OFF timer | 1 / 4 / 8 hours | |||
| Special Program Mode | Pollen / Quick CLEAN / Night Mode operation | |||
| Optional accessories | Replacement Iter [Model : FZ-R65HFU] | |||
*1 •The applicable oor surface area is appropriate for operating the unit of maximum fan speed.
Standby Power
In order to operate the electrical circuits while the power plug is inserted in the wall outlet, this product consumes about 0.3W of standby power.
For energy conservation, unplug the power cord when the unit is not in use.

- PLEASE READ BEFORE OPERATING YOUR NEW AIR PURIFIER
- NOTE
- ENGLISH
- FEATURES
- PLASMACLUSTER ION CONTROL
- CLEAN MODE
- ION CONTROL MODE
- AUTO PLASMACLUSTER ION MODE
- NIGHT MODE
- FILTERS
- PRE-FILTER
- WASHABLE ACTIVE CARBON FILTER
- TRUE HEPA (HIGH EFFICIENCY
- DECLARATION OF CONFORMITY
- SHARP AIR PURIFIER FP-P60CX
- RESPONSIBLE PARTY
- CONTENTS
- IMPORTANT SAFETY INSTRUCTIONS .. E
- PART NAMES ...... E
- PREPARATION...... E
- OPERATION E
- FOR CUSTOMER ASSISTANCE(THE UNITED STATES)
- MODEL NUMBER
- SERIAL NUMBER
- DATE OF PURCHASE
- DEALER NAME
- ADDRESS
- CITY
- STATE
- ZIP
- TELEPHONE
- TO ACCESS OUR WEB SITE: WWW.SHARPUSA.COM
- CONSUMER LIMITED WARRANTY
- CONSUMER LIMITED WARRANTY FOR U.S. USERS
- YOUR PRODUCT MODEL NUMBER & DESCRIPTION
- WARRANTY PERIOD FOR THIS PRODUCT
- ADDITIONAL ITEM(S) EXCLUDED FROM WARRANTY COVERAGE
- WHERE TO OBTAIN SERVICE
- WHAT TO DO TO OBTAIN SERVICE
- SHARP®
- SHARP ELECTRONICS CORPORATION
- FOR CUSTOMER ASSISTANCE (CANADA)
- TO ACCESS OUR WEB SITE: WWW.SHARP.CA
- LIMITED WARRANTY (VALID IN CANADA ONLY)
- CONSUMER ELECTRONICS PRODUCTS
- CONGRATULATIONS ON YOUR PURCHASE
- IMPORTANT SAFETY INSTRUCTIONS
- NOTE - RADIO OR TV INTERFERENCE
- CAUTIONS CONCERNING OPERATION
- REMOTE CONTROL LIMITATIONS
- DO NOT USE THE REMOTE CONTROL IN THE FOLLOWING LOCATIONS
- INSTALLATION GUIDELINES
- FILTER GUIDELINES
- PART NAMES
- INCLUDED
- INSERTING BATTERIES IN THE REMOTE CONTROL
- REMOVE THE BACK COVER
- INSERT BATTERIES
- CLOSE THE BACK COVER
- BATTERY INFORMATION
- REMOTE CONTROL USE
- FILTER INSTALLATION
- REMOVE THE ITERS
- REMOVE THE FRONT PANEL
- PULL OUT THE FILTER FRAME AND REMOVE THE PRE-FILTER, ACTIVE CARBON FILTER AND TRUE HEPA FILTER
- REMOVE THE ACTIVE CARBON FILTER (BLACK) AND TRUE HEPA FILTER (WHITE) FROM THE PLASTIC BAGS
- INSTALL THE ITERS
- MAIN UNIT CONTROLS
- MAIN UNIT OPERATION
- POWER ON/OFF BUTTON
- MODE SELECTION BUTTON
- AUTO OPERATION
- QUICK CLEAN OPERATION
- POLLEN MODE OPERATION
- NIGHT MODE OPERATION
- MAX OPERATION
- MEDIUM OPERATION
- SILENT OPERATION
- PLASMACLUSTER INDICATOR LIGHT
- BLUE LIGHT
- GREEN LIGHT
- LIGHT OFF
- CLEAN-SIGN LIGHT
- ABOUT THE CLEAN-SIGN
- DETERMINING THE BASE IMPURITY RATE
- CLEAN FILTER INDICATOR LIGHT
- OPERATION
- OPERATIONS AVAILABLE WITH THE REMOTE CONTROL
- PLASMACLUSTER ION MODE SELECTIONS
- AUTO (FAN SPEED) BUTTON
- MANUAL (FAN SPEED) BUTTON
- NIGHT MODE BUTTON
- QUICK CLEAN BUTTON
- LIGHTS ON/OFF BUTTON
- TRANSMITTER
- FILTER RESET BUTTON
- POLLEN MODE OPERATION BUTTON
- OFF TIMER BUTTON
- AUTO
- ION CONTROL
- CLEAN
- OFF
- CARE AND MAINTENANCE
- MAIN UNIT
- CARE CYCLE 1 MONTH
- WIPE WITH A DRY, SOFT CLOTH
- DO NOT USE VOLATILE UIDS
- DO NOT USE DETERGENTS
- ODOR SENSOR
- CARE CYCLE 2 MONTHS
- FILTER CLEANING
- WASHABLE ACTIVE CARBON FILTER CARE
- HAND WASH ONLY! DO NOT TUMBLE DRY
- CARE CYCLE
- CAUTION
- FILTER REPLACEMENT GUIDELINES
- GUIDE FOR ITER REPLACEMENT TIMING
- REPLACING THE FILTERS
- REPLACEMENT FILTERS
- DISPOSAL OF FILTERS
- TROUBLESHOOTING
- SPECIFICATIONS
- STANDBY POWER
Brand : SHARP
Model : FP-P60CX
Category : Air purifier