
EL1611P - Calculator SHARP - Free user manual and instructions
Find the device manual for free EL1611P SHARP in PDF.
User questions about EL1611P SHARP
0 question about this device. Answer the ones you know or ask your own.
Ask a new question about this device
Download the instructions for your Calculator in PDF format for free! Find your manual EL1611P - SHARP and take your electronic device back in hand. On this page are published all the documents necessary for the use of your device. EL1611P by SHARP.
USER MANUAL EL1611P SHARP
This equipment complies with the requirements of Directive 89/336/EEC as amended by 93/68/EEC.
Thank you for your purchase of the SHARP electronic printing calculator, model EL-1611P.
To insure trouble-free operation of your SHARP calculator, we recommend the following:
- The calculator should be kept in areas free from extreme temperature changes, moisture, and dust.
- A soft, dry cloth should be used to clean the calculator. Do not use solvents or a wet cloth.
- Since this product is not waterproof, do not use it or store it where fluids, for example water, can splash onto it. Raindrops, water spray, juice, coffee, steam, perspiration, etc. will also cause malfunction.
- If service should be required, use only a SHARP servicing dealer, a SHARP approved service facility or SHARP repair service.
- If you pull out the power cord to cut electricity completely or replace the batteries, the presently stored tax rate will be cleared.
CONTENTS
Page
OPERATING CONTROLS 2
INK ROLLER REPLACEMENT 3
PAPER ROLL REPLACEMENT 5
POWER SUPPLY 7
ERRORS 9
SPECIFICATIONS 10
RESETTING THE UNIT 11
CALCULATION EXAMPLES 89
TAX RATE CALCULATIONS 98
OPERATING CONTROLS

POWER ON KEY / CLEAR / CLEAR ENTRY KEY:
Clear - This key also serves as a clear key for the calculation register and resets an error condition.
Clear entry - When pressed after a number and before a function, clear the number.

POWER OFF KEY:
When this key is pressed, the power is turned off.

PRINT KEY:
To save paper you can only print what is displayed, even in non-print mode.
Pressing P after the entry of a number will print the entry with the symbol * even in non-print mode.
Pressing · will insert a separator into a number entry such as a code, date, etc. Separators are displayed as a period and dashes but printed as periods.

MEMORY + KEY / PRINT ON / OFF KEY:
Pressing 2nd P/NP selects print mode or non-print mode.
Cause the calculator to operate in a display / print or display only mode, depending upon the calculator's


present state.
"P" on the display: Print mode.
"NP" on the display: Non-print mode.
MEMORY - KEY / DECIMAL SELECTION KEY:
Pressing 2nd DEC sets the number of decimal places in the result.

"F" on the display:
The answer is displayed in the floating decimal system.
"3, 2, 1, 0" on the display:
Presents the number of decimal places in the answer.
"A" on the display (Add mode):
The decimal point in addition and subtraction entries is automatically positioned to the 2nd digit from the lowest digit of entry number. Use of the add mode permits addition and subtraction of numbers without entry of the decimal point. Use of + , × and ÷ will automatically override the add mode and decimal correct answers will be printed.
PRE-TAX KEY
RATE SET
TAX+
TAX-INCLUDING KEY / TAX RATE SET KEY:
You can set the tax rate by pressing [2nd] [RATE SET]. (A maximum of 4 digits excluding the decimal point can be stored as the tax rate.)
2nd
2nd FUNCTION KEY:
To use the functions shown above the keys, such as "DEC", press the 2nd key first. (When the 2nd key is pressed, "2nd" will appear at the top of the display.)
Example: To change decimal place setting from F to 2
2nd DEC, 2nd DEC

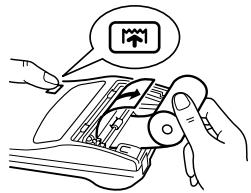
PAPER FEED KEY:
When pressed, the paper tape advances.
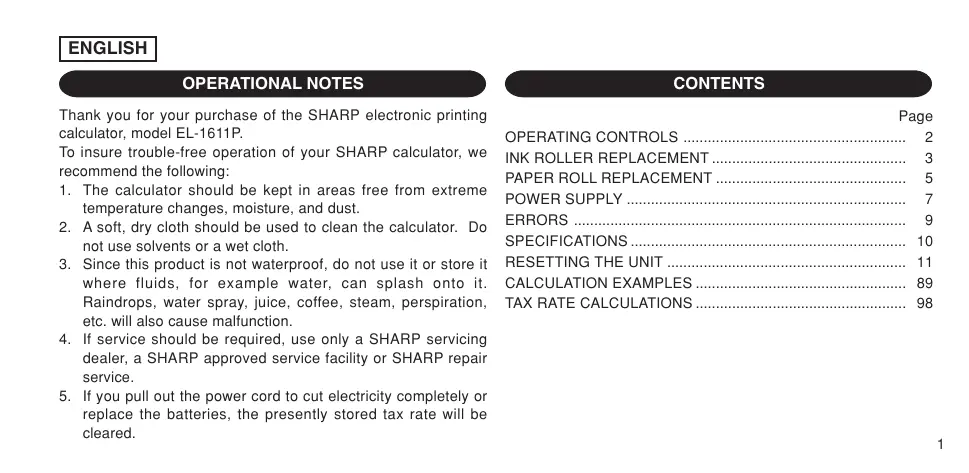
DISPLAY:
F: Floating decimal mode
TAX+: Incl. tax
3,2,1,0: Preset decimal mode
TAX-: Pre-tax
A:Add mode
TAX : Tax rate
P: Print mode
M:Memory
NP: Non-print mode
-:Minus
2nd: 2nd functions are available
E: Error
- For illustration purposes, all the relevant symbols are visible in the display above. However, in actual use, this would never happen.
INK ROLLER REPLACEMENT
If printing is blurry even when the ink roller is in the proper position, replace the roller.
Ink roller: Type EA-732R
WARNING
APPLYING INK TO WORN INK ROLLER OR USE OF UNAPPROVED INK ROLLER MAY CAUSE SERIOUS DAMAGE TO PRINTER.
1) Turn the power off.
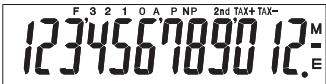
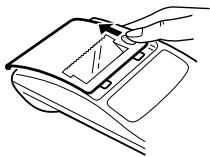
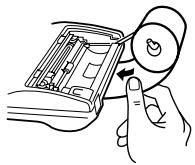
2) Remove the printer cover. (Fig. 1)
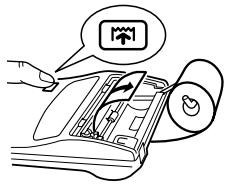
3) Remove the ink roller by turning it counterclockwise and pulling it upward. (Fig. 2)
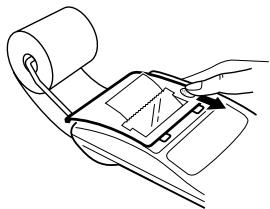
4) Install the new ink roller and press it in the correct position. Make sure that the ink roller is securely in place. (Fig. 3)
5) Put back the printer cover.

Fig. 1
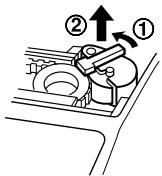
Fig. 2
Fig. 3
Cleaning the printing mechanism
If the print becomes dull after long time usage, clean the printing wheel according to the following procedures:
1) Remove the printer cover and the ink roller.
2) Install the paper roll and feed it until it comes out of the front of the printing mechanism.
3) Put a small brush (like a tooth brush) lightly to the printing wheel and clean it by pressing [n].
4) Put back the ink roller and the printer cover.
Notes: Never attempt to turn the printing belt or restrict its movement while printing. This may cause incorrect printing.
- Do not rotate the printing mechanism manually, this may damage the printer.
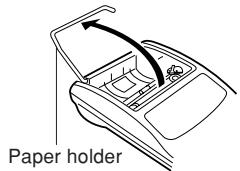
PAPER ROLL REPLACEMENT
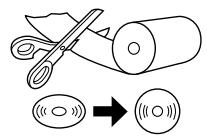
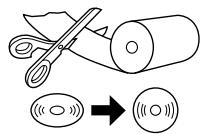
Never insert paper roll if torn. Doing so will cause paper to jam. Always cut leading edge with scissors first.
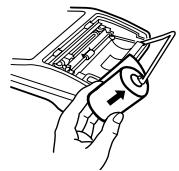
When using the paper roll that is less than or equals to 25~mm (31/32") in outside diameter:
Paper roll : Type EA-7100P

STEP1
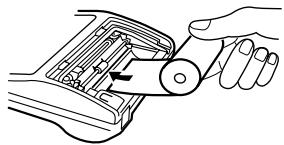
STEP2
STEP3
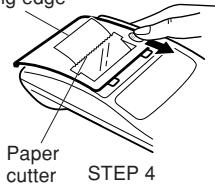
leading edge
Note: Paper tape replacement rolls are available where the EL-1611P calculator is sold.
When using the paper roll that is 12mm (15/32") in inside diameter and up to 80mm (3-5/32") in outside diameter:
STEP1
STEP2
STEP3
STEP4
STEP5
STEP6
Caution: • Never use the supplied paper (25 mm (31/32") in outside diameter) in the holder.
- When replacing the paper, touching the inside of the printer may damage it.
- The calculator has a free-paper mechanism. When drawing out the paper tape, pull it straight forward on the paper cutter side.
POWER SUPPLY
This calculator operates on dry batteries.
The calculator can also be operated on AC power through use of an AC adaptor.
BATTERY OPERATION
If the display becomes dim or the printer stops before or during printing, the batteries should be replaced.
Battery: Heavy-duty manganese battery, size AA (or R6) × 4
- Turn off power by pressing OFF
- Remove the battery cover by sliding it in the direction of the arrow on the cover.
- Replace the batteries. Be sure that the "+" and "-" marks on the battery correspond to the "+" and -" marks in the calculator. Always put back the 4 batteries at the same time.
-
Put back the battery cover.
-
After the replacement, press OFF and ON in this order to clear the calculator.
When the batteries are correctly installed "0." will be displayed. (If the display is blank, displays any other symbol or the keys become inoperative, remove the batteries and install them again. Press OFF and ON in this order and check the display again.)
Note: Due to solvent leakage of the battery, keeping a used battery in the battery compartment may result in damage to the calculator. Remove a used battery promptly.
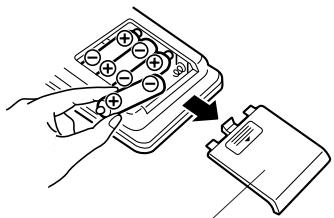
Battery cover
AC adaptor: Model EA-28A
When the AC adaptor is connected to the calculator, the power source is automatically switched over from dry batteries to AC power source.
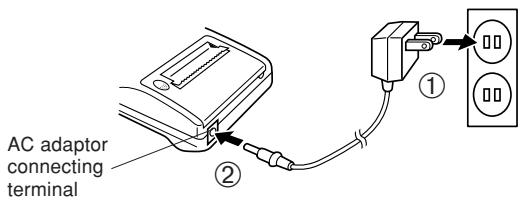
HOW TO CONNECT THE AC ADAPTOR
Make sure that you turn the calculator's power off when connecting or disconnecting the AC adaptor.
To connect the AC adaptor, follow steps ① and ②.
To disconnect the AC adaptor, simply reverse the procedure.
Notes: When the calculator is not in use, be sure to remove the adaptor from the calculator and the wall outlet.
- Never use any other AC adaptor except EA-28A.
CAUTION
Use of other than the AC adaptor EA-28A may apply improper voltage to your SHARP calculator and will cause damage.
ERRORS
There are several situations which will cause an overflow or an error condition.
When this occurs, an error symbol “E” will be displayed and “- - - - - ” will be printed, and all keys will electronically lock except C-CE, [ ] and OFF.
C-CE must be depressed to restart the calculation.
The contents of the memory at the time of the error are retained.
- When the integer portion of an answer exceeds 12 digits and does not exceed 24 digits.
OVERFLOW CALCULATION
$$ \left[\begin{array}{l}\text {E x . S e l e c t d e c i m a l p o s i t i o n " F "}.\8 8 8 8 8 8 8 8 8 8 8 \boxed {+} 3 4 5 6 7 8 9 2 3 4 5 6 \boxed {=} \rightarrow 1. 2 3 4 5 6 7 8 1 2 3 4 E\(1. 2 3 4 5 6 7 8 1 2 3 4 \times 1, 0 0 0, 0 0 0, 0 0 0, 0 0 0 = 1, 2 3 4, 5 6 7, 8 1 2, 3 4 0)\end{array}\right] $$
- When any number is divided by zero (Ex. 5 03 ).
- When the contents of the memory exceed 12 integers. (Ex. CM 999999999999 M+ 1 M+)
-
When the integer portion of a quotient in percentage calculation is 25 digits. (Ex. 100000000000 ÷ 0.00000000001 % )
-
When the paper jams, the printer stops and the error symbol "P.E" appears. Turn off the calculator. Tear off the paper tape and then pull the remaining part of the paper forward and completely out of the printer.
SPECIFICATIONS
Operating capacity:
Power source:
Operation:
12 digits
6V · (DC):Heavy-duty manganese battery,size AA (or R6) x4
AC: Local voltage with AC adaptor EA28A (Option)
Heavy-duty manganese battery, size AA (or R6)
Approx. 5,000 hours (in non-print mode, displaying 555'555 at 25^ (77^) ambient temperature)
Operating time depends on the type of battery and type of use.
Automatic Power-Off Function (APO):
Calculations:
To save your batteries, this function automatically turns off the machine approximately 12 minutes after the last key operation.
Four arithmetic, constant, square, chain, power, percentage, reciprocal, add-on, discount, memory, tax, etc.
PRINTING SECTION
Printing speed:
Approx. 1.4 lines/sec. (Printing speed changes slightly depending upon the printing digits per line.)
Printing paper:
57 mm (2-1/4") - 58 mm (2-9/32") wide 80 mm (3-5/32") in diameter (max.)
Operating temperature:
0^ - 40^ (32°F-104°F)
Power consumption:
6V ... (DC): 1.7 W
Dimensions:
Approx. 315 g (0.69 lb.) (with batteries)
Accessories:
Ink roller × 1 (installed), Paper roll × 1 ,
Dry battery (R6) × 4 and Operation manual
RESETTING THE UNIT
Strong impacts, exposure to electrical fields, or other unusual conditions may render the unit inoperative, and pressing the keys will have no effect. If this occurs, you will have to press the RESET switch on the bottom of the unit. The RESET switch should be pressed only when:
- an abnormal event occurs and all keys are disabled.
- you install or replace the batteries.
Notes:
- Pressing the RESET switch will clear the stored tax rate and other data stored in the memory.
- Use only a ballpoint pen to press the RESET switch. Do not use anything breakable or anything with a sharp tip, such as a needle.
After pressing the RESET switch, press ON to make sure that "0." is indicated.
DEUTSCH
BEDIENUNGSHINWEISE
6V (CC):1,7W
96 (L) × 191 (P) × 40 (H) mm
Premendo Anything to do, I'm sure you can find a calcolatrice.

TASTO DI STAMPA:
6V (CC):1,7 W
96 (larg) × 191 (prof) × 40 (alt) mm Ca. 315g (con batterie)
TANGENT FÖR MINNESMINUS / DECIMALVÄLJARE:
rabatt, minneskalkylering, skatt, etc.
SKRIVARDEL
Hastighet:
Pappersrulle:
Arbetstemperatur:
Effektforbrukning:
Matt:
Vikt:
Tillbehör:
Ca 1,4 rader/sek. (Hastigheten varierar beroende pà antal siftror/ rad.)
57 - 58 mm bred, 80 mm i diameter max.
0^ C - 40^ C
WERKING VIA AC-VOEDING (OPTIONEEL)
AC-adapter: Modet EA-28A
2. TOIMINNON NAPPAIN:
F 3 2 1 O A P NP 2nd TAX+TAX-

- To insure that each calculation is performed correctly, press C-CE C-CE firmly before starting the calculation.
- Press 2nd P/NP to select print mode or non-print mode. "P" appears in print mode and "NP" appears in non-print mode. Unless otherwise stated, it is assumed the calculator is in print mode.
- Example procedures are listed in following manner unless otherwise specified.
- The symbols on the display, such as "F", "P", and "TAX+", etc., are abbreviated here — only "M" is indicated.
| Decimal position (F, 3, 2, 1, 0, A) | Operation | Display | |
RECHNUNGSBEISPIELE
Note: was not used in the entries.
EXAMPLE 1: Set a 5% tax rate.
Calculate the total amount for adding a (5\%) tax to \(800.
EXAMPLE 2: Perform two calculations using 840 and 525, both of which already include tax. Calculate the tax on the total and the total without tax. (tax rate: 5%)